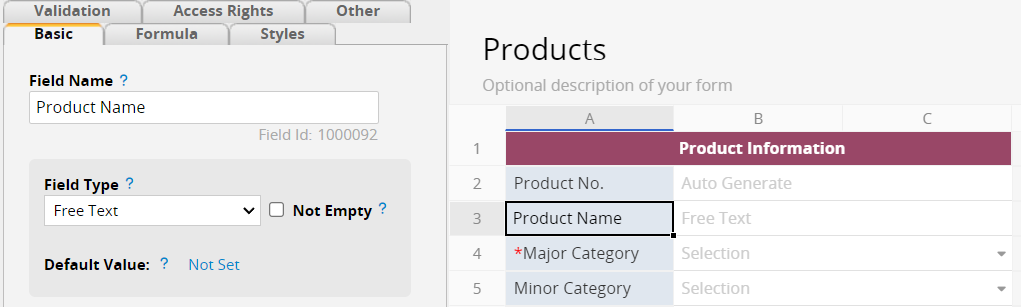
When designing sheets, Ragic supports various Field Types, determining the format in which users input data, such as Free Text, Selection, Numeric, or File Upload, etc. By default, fields are set to Free Text, allowing users to enter any kind of data without restrictions. However, selecting the appropriate Field Type can effectively manage data and prevent errors. For example, setting a field to accept only numeric values can reduce errors from accidental text entries. The Field Type can be set from the left sidebar under the Basic tab in Design Mode.
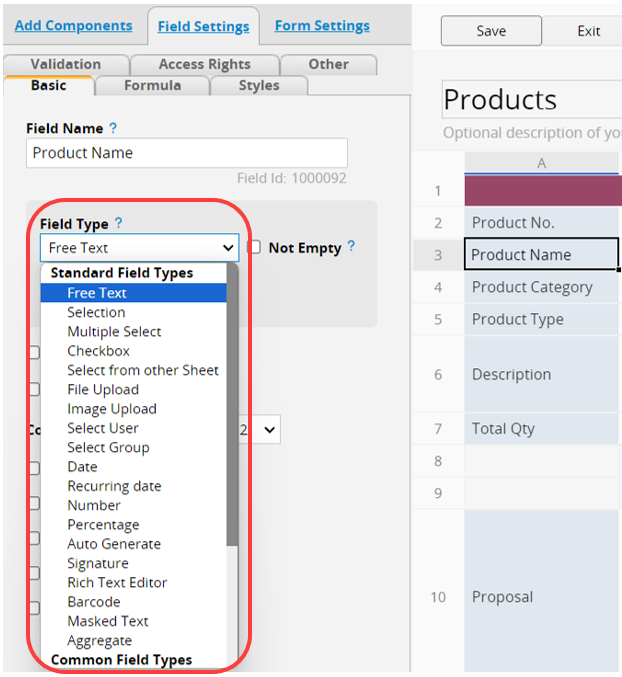
We will introduce all the Field Types in Ragic below:
The default Field Type allows users to input any text they want without length restrictions. The input text is regarded as "strings".
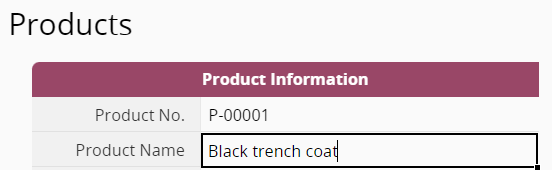
It is commonly used for fields like product names, names, etc.
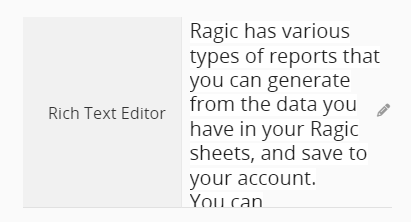
This Field Type gives users text formatting options, as well as the ability to insert images, tables, and links with a pop-out menu. There is also space for content editing and style notes.
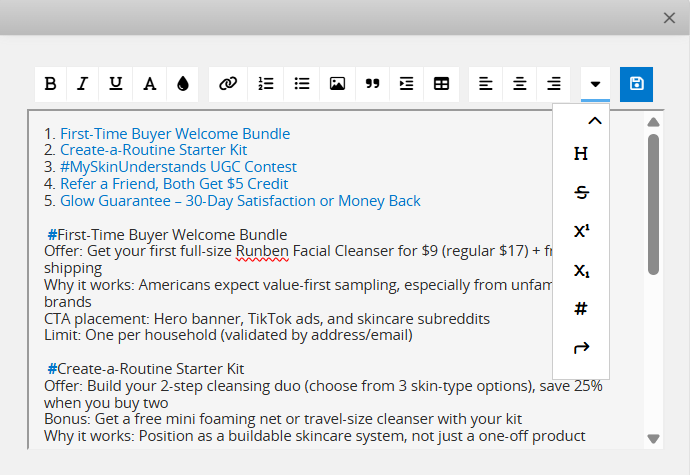
The configurable options are as follows:
| Settings | Description |
|---|---|
| Text Formatting | You can set text formatting options, including Bold, Italic, Underline, Font, and Text/Background Color. Clicking the arrow on the far right also lets you apply Strikethrough and Superscript/Subscript. |
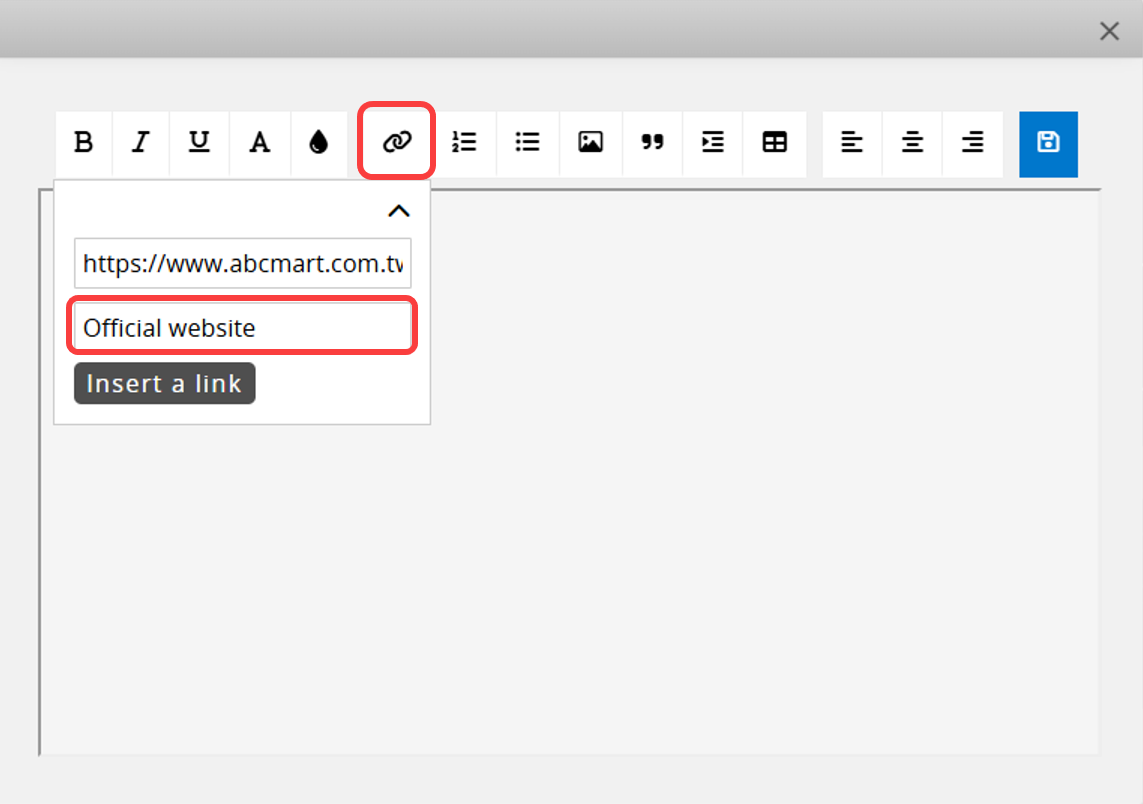
| Insert a link | When inserting a link, you can also specify its display text. See here for details. |
| Add list | You can add an Ordered list or an Unordered list and choose different styles. |
| Insert an image | Paste an image URL to insert an image, or paste a screenshot directly into the editor. |
| Insert a quote | Insert a quote for the content you want to reference. |
| Text alignment | Adjust indentation and set text alignment to left, center, or right. |
| Insert a table | Enter the number of rows and columns to insert a table. |
| Text heading | Click the arrow on the far right to select headings of different sizes: H1, H2, or H3. |
| Define Anchors | When a field contains a lot of content or you want to create an index, you can insert an anchor. This lets you click a link to quickly jump to the anchor within the field. See here for more details. |
By default, the height of the field adjusts automatically based on its content. If you prefer a fixed height, you can specify a "Max Height". Any content exceeding this height will not be fully displayed, and you will need to open the editor to view the entire content.
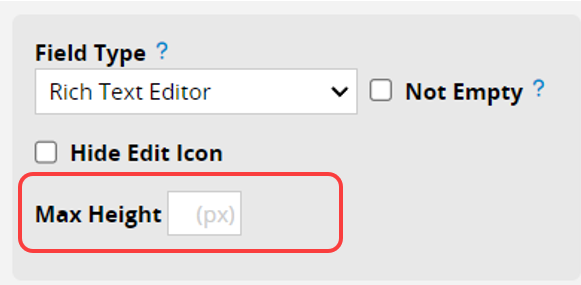
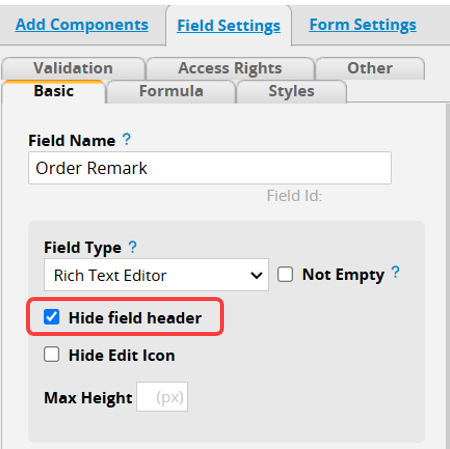
You can check Hide Field Header to display text like a Description Field while allowing users to adjust content freely for different sheets.

When inserting a link in the Rich Text Editor, you can specify its display text.
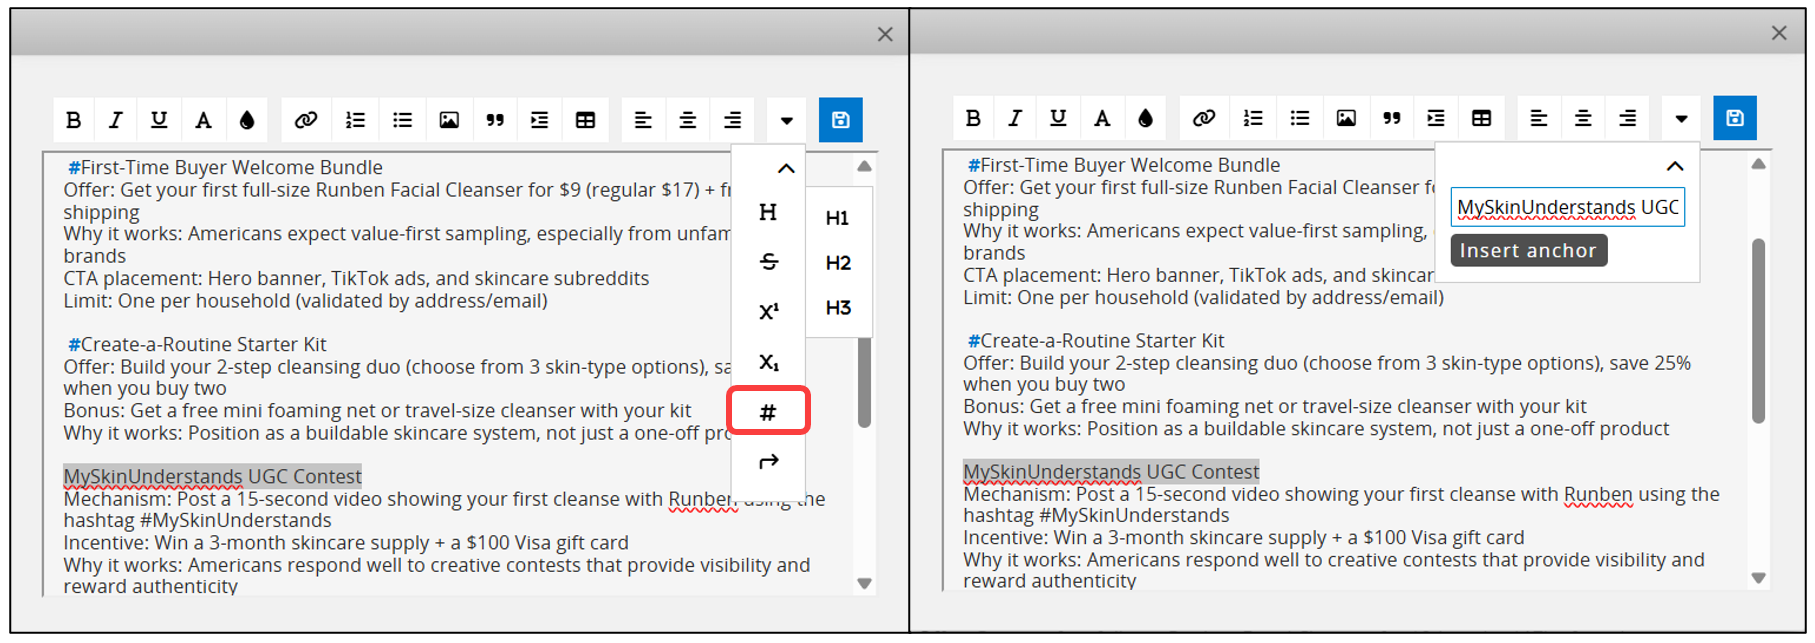
Insert Anchor
Select the text where you want to insert an anchor, open the dropdown arrow on the far right, and then click the ![]() icon to insert the anchor. Alternatively, you can click the icon first and enter the text to insert the anchor.
icon to insert the anchor. Alternatively, you can click the icon first and enter the text to insert the anchor.
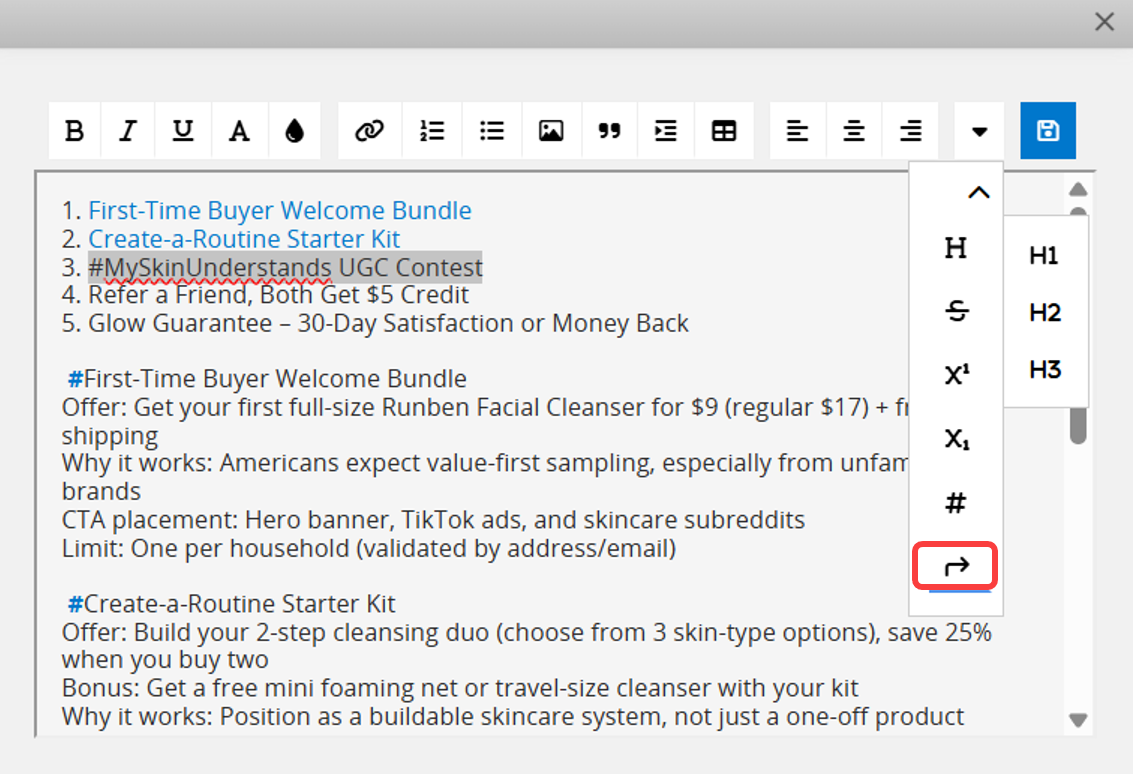
Insert Anchor Link
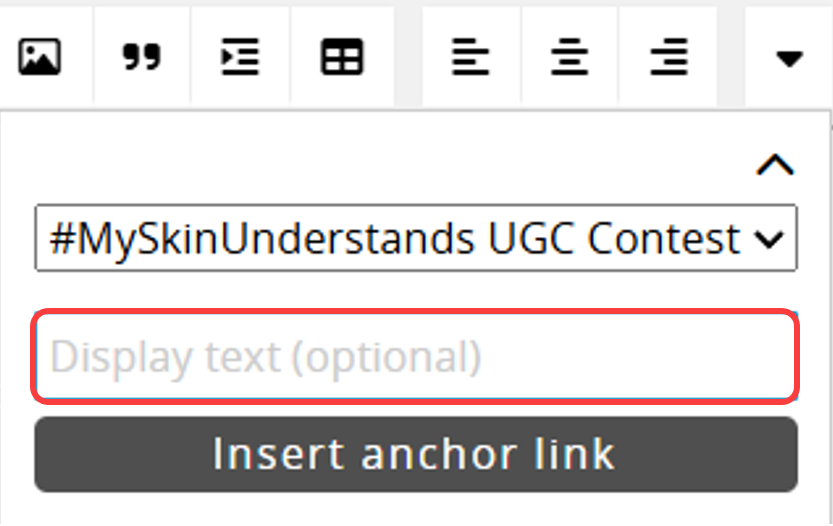
Select the text to be set as the anchor link or the location where you want to insert it. Open the dropdown arrow on the far right, click the ![]() icon, and choose the destination anchor to insert the anchor link.
icon, and choose the destination anchor to insert the anchor link.
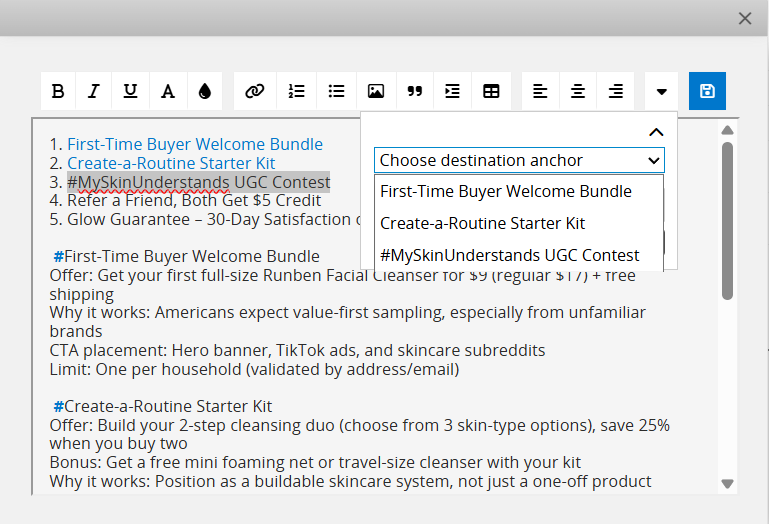
The display text is optional. If left blank, the system will show the destination anchor name by default, but you can customize it. If you selected the text, it will be used as the display text.
Once set, you can click the link to jump directly to the anchor.
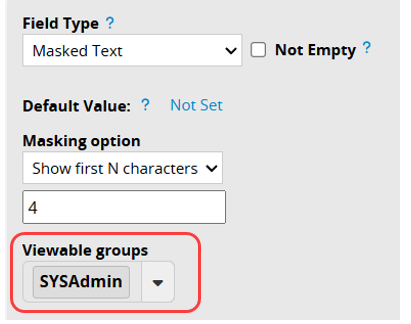
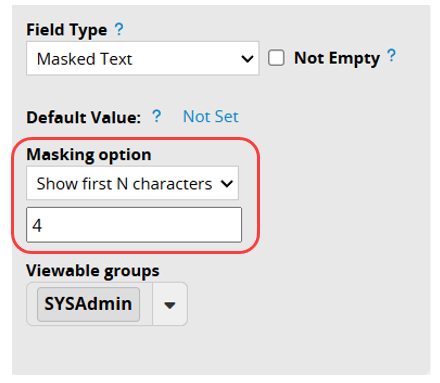
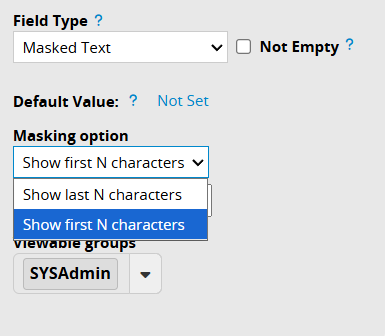
This Field Type is similar to the Free Text Field Type, but can additionally be configured to display only the last N digits of text, as well as full details for select users.
It is useful when typing sensitive information, such as customer ID numbers or phone numbers.

Set the Viewable groups (default is the SYSAdmin group). Users in those groups can click the Preview icon ![]() to see the full information.
to see the full information.

Note: The masked text field cannot be edited. For data security purposes, the field value will be cleared when you try to edit content in a Masked Text field.
You can choose to Show last N characters or first N characters, and customize how many characters to mask.
In the Markdown field, you can use simple Markdown syntax to add headings, lists, basic tables, and text formatting, making content clearer and easier to read. For supported syntax, please refer to this page.
1. This field does not support inserting links or images using Markdown syntax. You can paste URLs or images directly into the field, and they will be displayed automatically.
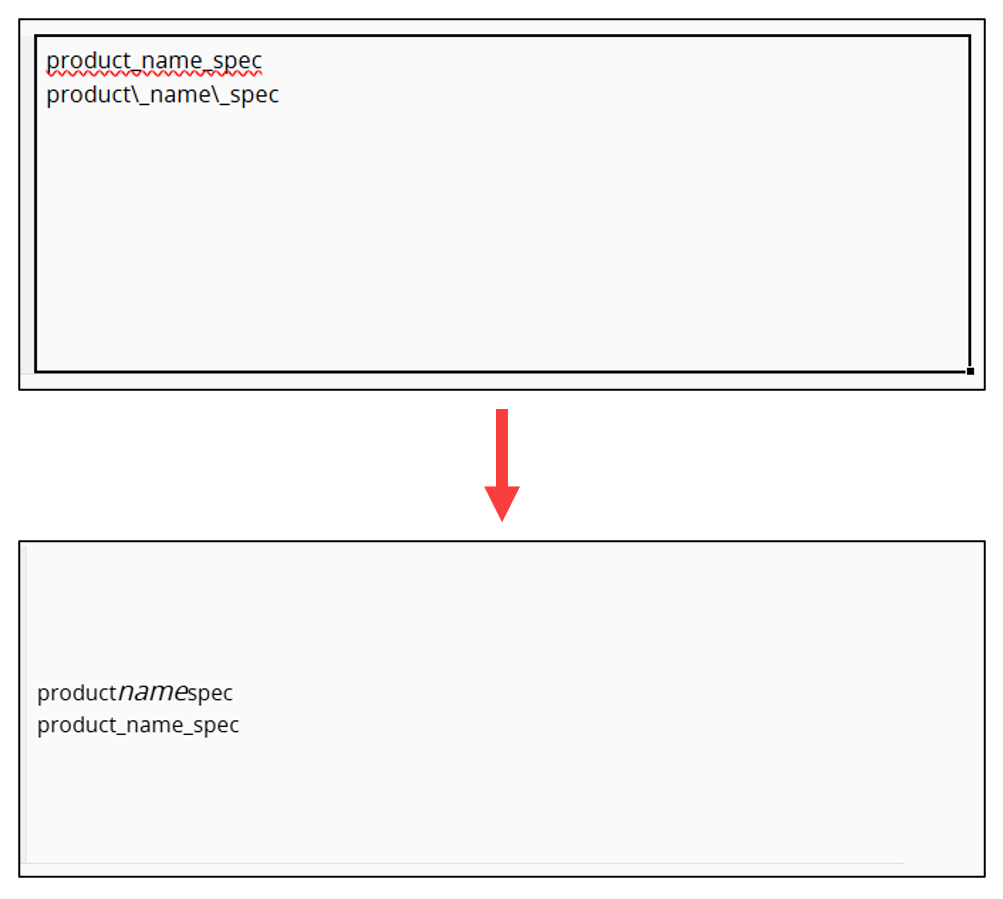
2. If the field content includes Markdown syntax characters, you need to escape them with a \ to display them correctly. For example, product_name_spec will be displayed as productnamespec. To display it as intended, write it as: product\_name\_spec.
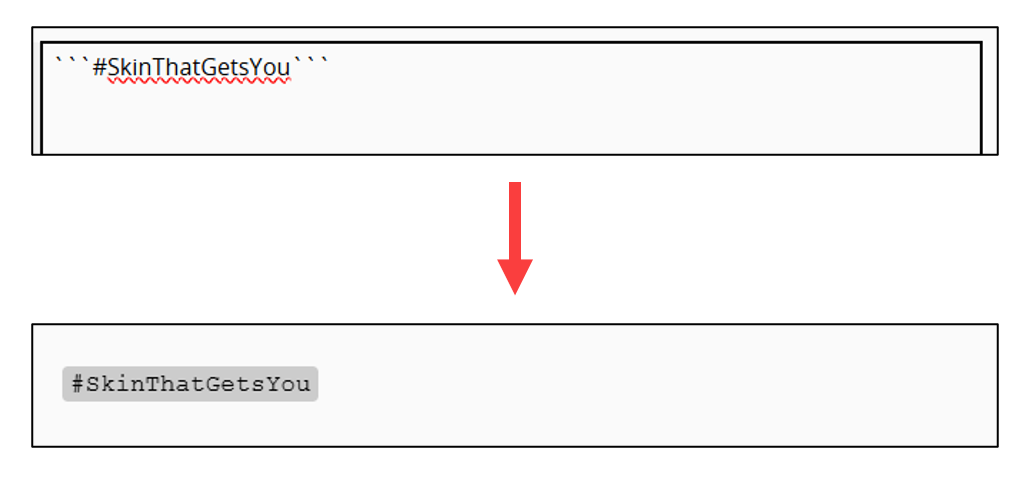
3. For Inline syntax, please use three `, for example: ```#SkinThatGetsYou```.
4. Ragic Markdown tables support text layout only and do not display grid lines.
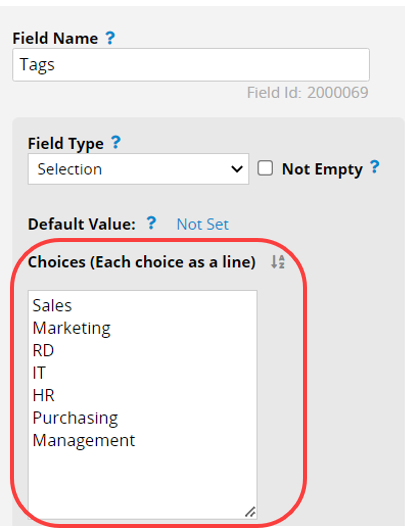
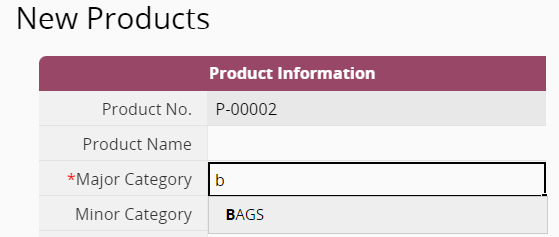
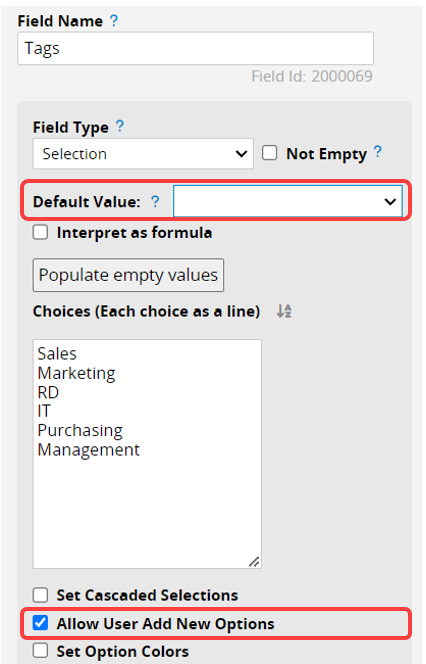
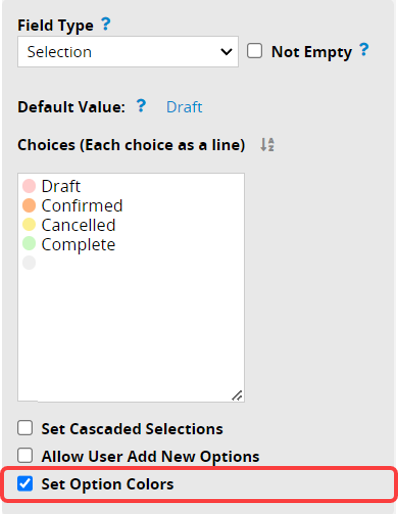
Users can select previously defined field values from a dropdown menu, typically used for categorization, grouping, or departments, etc.
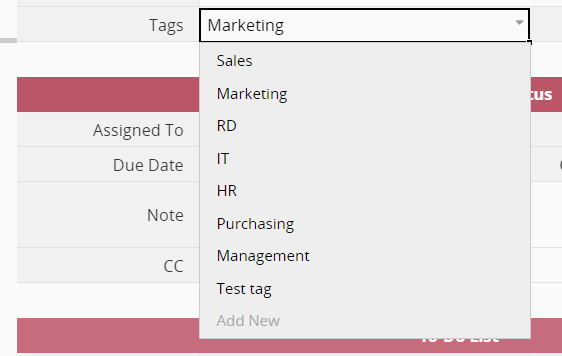
These field values can be added in the Choices box while in Design Mode.
When there are many choices to choose from, this field can also work as a "text filter", displaying available options as the user types.
You can also set a Default Value or "allow users to add options" when entering data.
If you need to create subcategories or display results connected to a previous selection field, you can set Cascaded Selections.
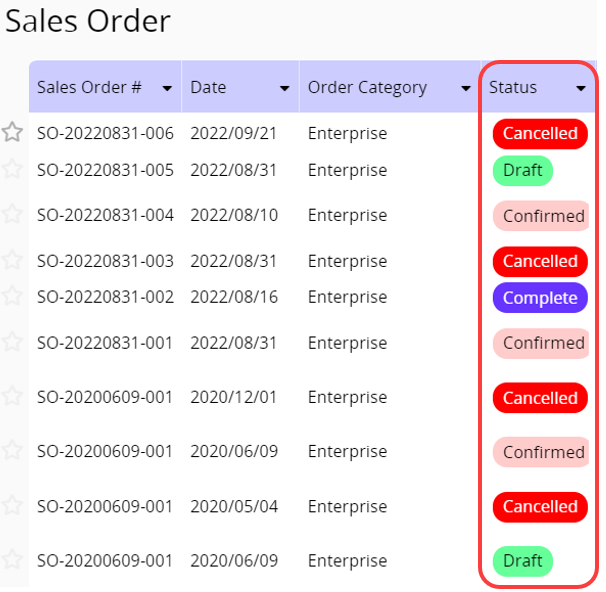
For data identification, you can also set option colors. After selecting the Set Option Colors option below, there will be a default color icon next to each option. You can click on the icon to change the display color.
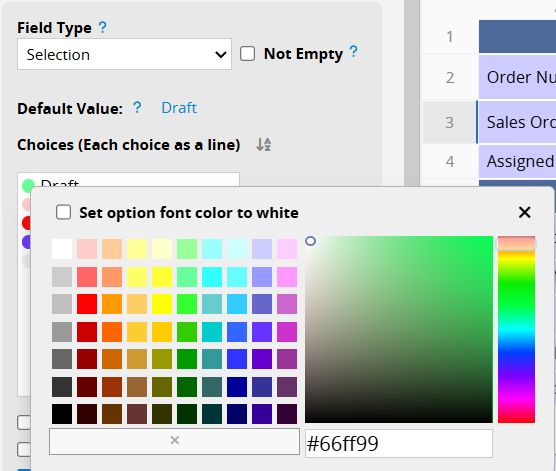
You can select Set option font color to white to switch the option text from black to white.

Then, each option will be displayed according to the set color.
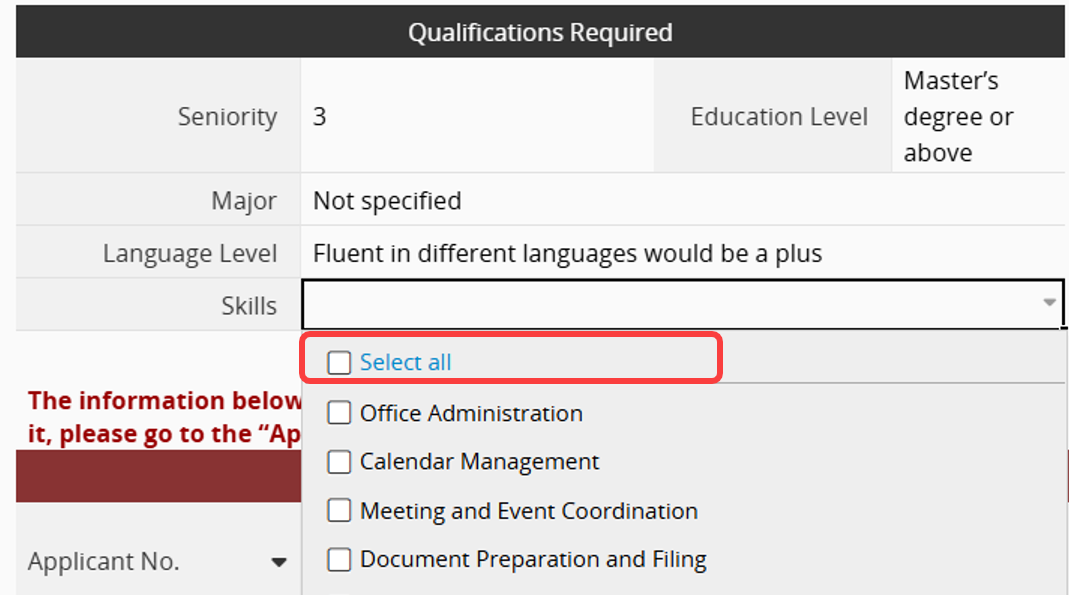
Users can select multiple values from the dropdown menu of previously defined field values in the Choices box in Design Mode.

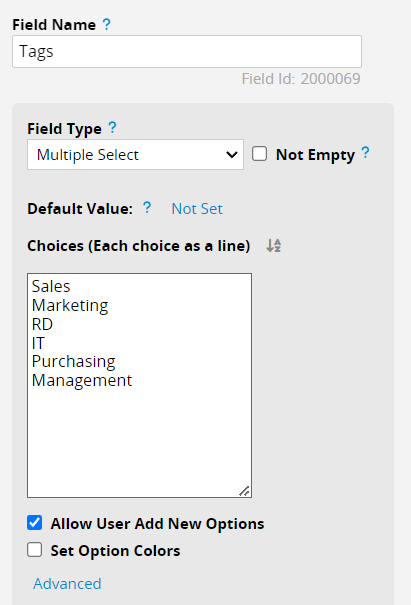
For easier identification of each option, you can refer to the Set Option Colors section of the Selection field.
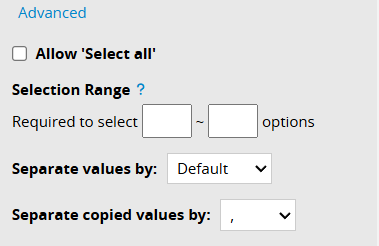
1. Allow "Select all": When enabled, a "Select all" button appears in the options list, allowing you to select all options at once.
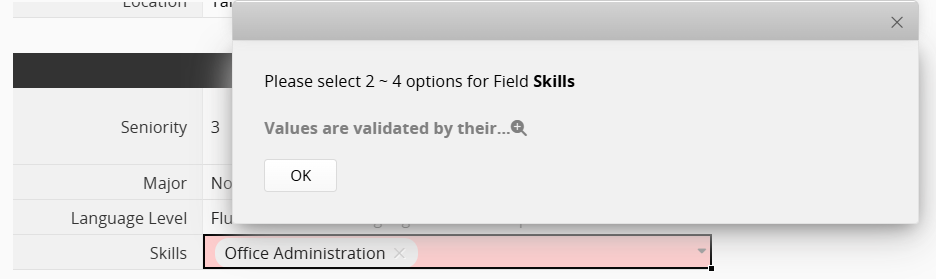
2. Selection Range: You can set the minimum and maximum number of selections allowed. Each can be configured individually or together. Leave a field blank if you do not want to apply that limit.

3. Separate values by: You can adjust the separators between items. Selecting "Default" applies the Default Separator of Multiple Fields set in the Company Settings. If none is set in the Company Settings, the separator defaults to "bubble". Option Colors appear only when the separator is set to "bubble". Other separators do not display Option Colors.
4. Separate copied values by: Specifies the separator used between options when copying a field value and pasting it elsewhere.

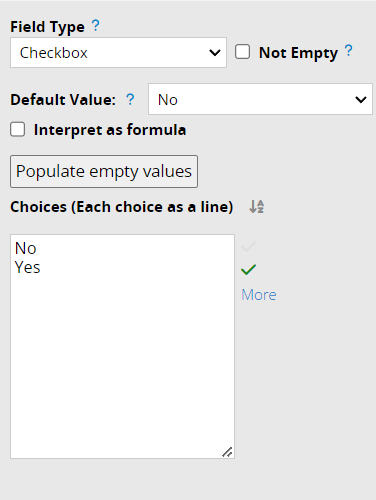
This Field Type works similarly to the Selection field but displays options with icons. Users can quickly switch between options by clicking on the icon.
By default, there will be two options: Yes and No.
You can include their sorting order within parentheses ( ). This will number the icons as a prefix next to the icon name. The text in ( ) will not be displayed.
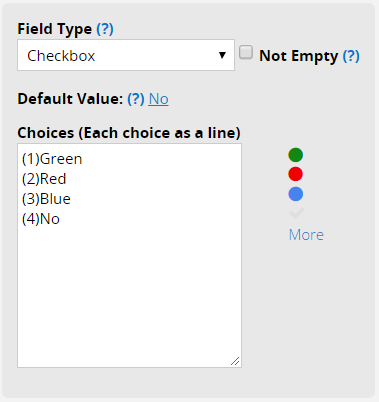
Note: The values of checkbox fields are treated as "text". Therefore, when applying formulas or setting default values, you need to specify the text corresponding to the checkbox option.
For more supported icons, please refer to the table below:
| Options | Icon |
|---|---|
| Yes | |
| No | |
| X | |
| Important | |
| Star | |
| Green | |
| Yellow | |
| Red | |
| Blue | |
| Black | |
| White | |
| Orange | |
| Purple | |
| Lightgreen | |
| Darkblue | |
| Toggle-On | |
| Toggle-Off | |
| Thumbs-Up | |
| Thumbs-Down | |
| Lock | |
| Unlock | |
| Plus | |
| Minus | |
| Smile | |
| Meh | |
| Frown | |
| Circle | |
| Dot-Circle | |
| True | |
| False |
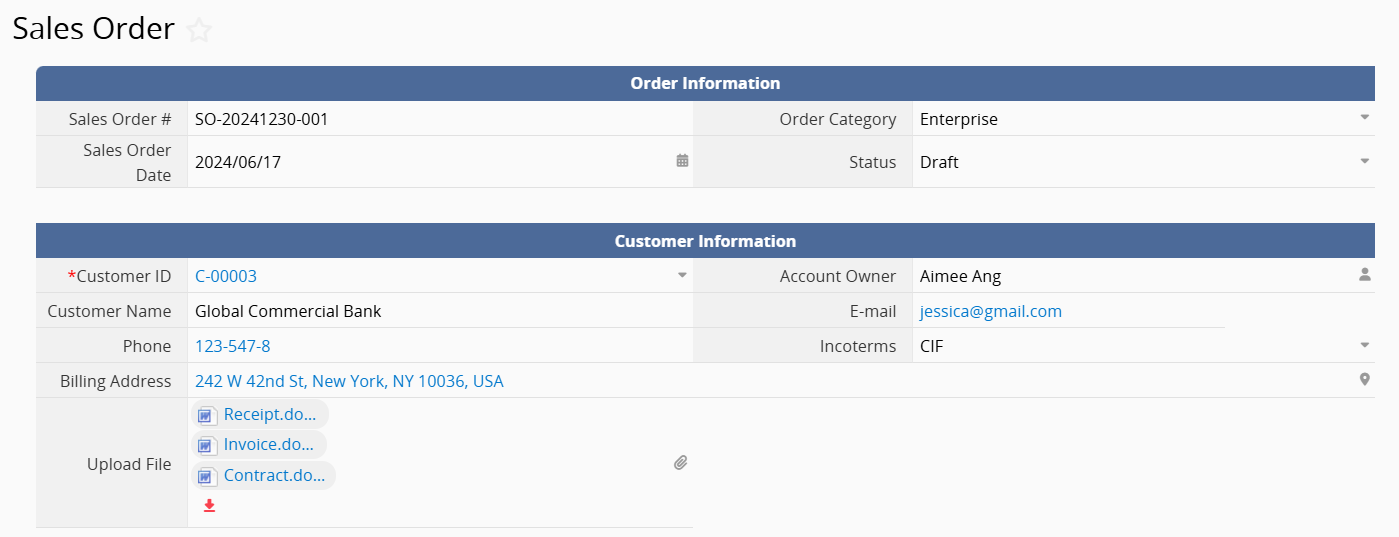
Users can select values that are referenced from another sheet when entering data into this field. For example, in the "Customer ID" field of the "Sales Order," select data that is already saved in another "Accounts" sheet.
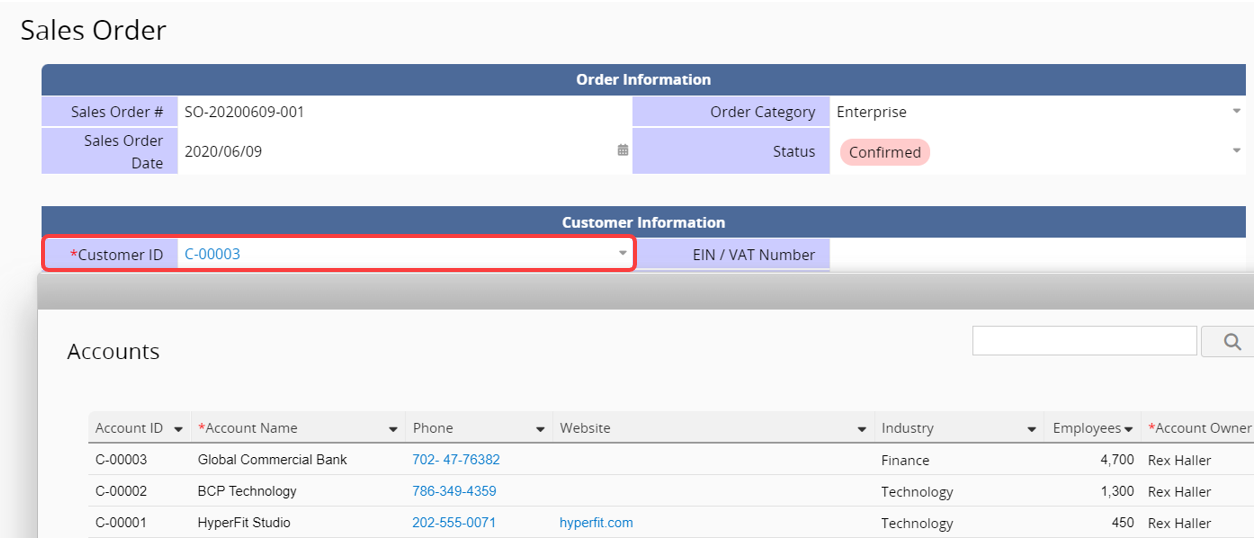
You can select the sheet and the field to be linked from Design Mode, but please note that the values in the linked source field must be the Unique Value.
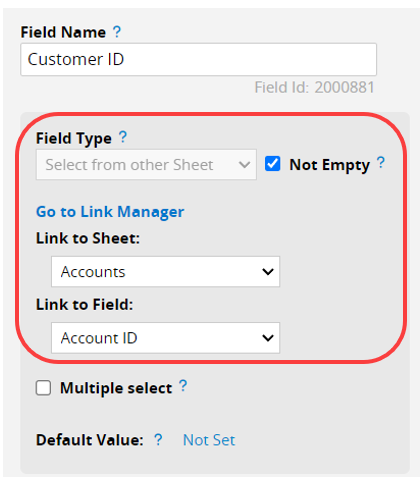
The following Field Types are blocked from being selected as a link source:
User type fields: Select user, Select group, Reviewer fields.
Selection type fields: Selection, Multiple select, Checkbox, Linked fields.
Numeric type fields: Numeric, Money, Percentage, Exchange rate, Statistics fields.
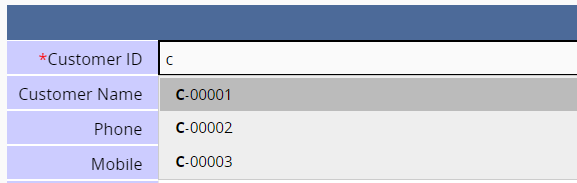
The Select from other Sheet field can also work like a "text filter", displaying available options from the source sheet as you type values into it.
If you need to load other values when selecting a value from another sheet, you can use Linking and Loading Fields.
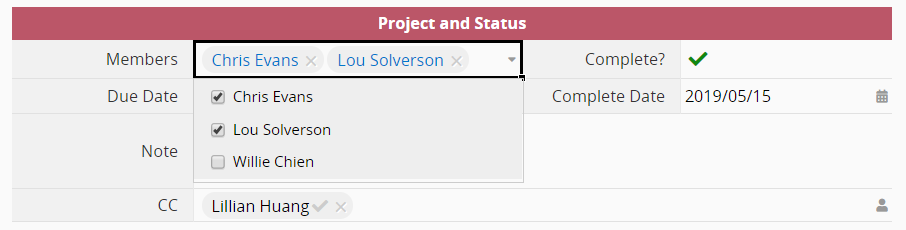
You can also configure Select from other sheet field as Multiple select.
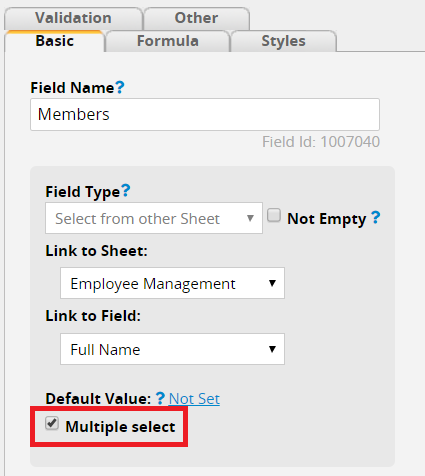
For example, the Members field (a Select from other sheet field) in the Project Report sheet is linked to the Employee Management sheet and is set as multiple select. With this configuration, the Members field will display a drop-down menu that enables multiple selections.
Note: If the multiple select option is checked, the linked field will no longer support loaded field configuration.
If the corresponding loaded fields are already set for the linked field, the setting will be automatically canceled once the multiple select option is checked, but the original field values will not be affected.
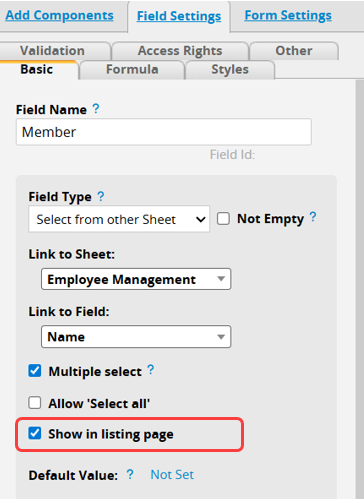
We currently limit the number of selections to 20000. If the number of records to select from the source sheet exceeds 20000, only the first 20000 records will be displayed in the selection list. If you need to include over 20000 selections, please contact support@ragic.com and briefly describe your requirement so we’ll be able to evaluate the plausibility of adjusting the limit.
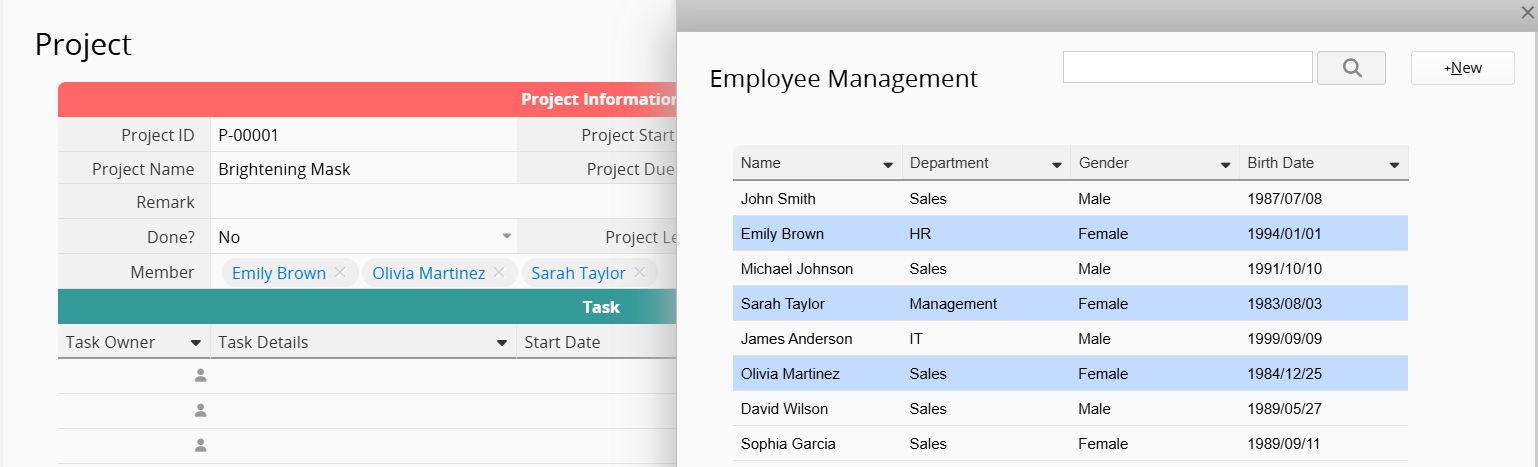
After enabling Multiple Selection, you can check Show in listing page. When selecting options, a window showing additional listing page fields will open, allowing you to view more information.
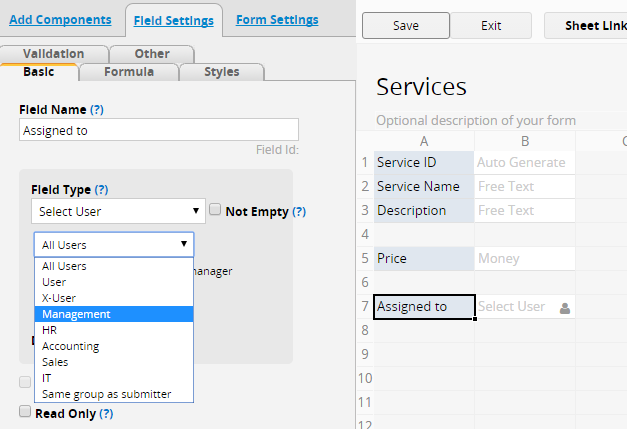
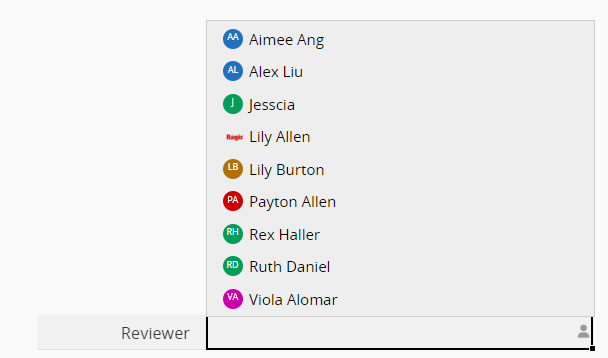
Choose from a preset list of account users.
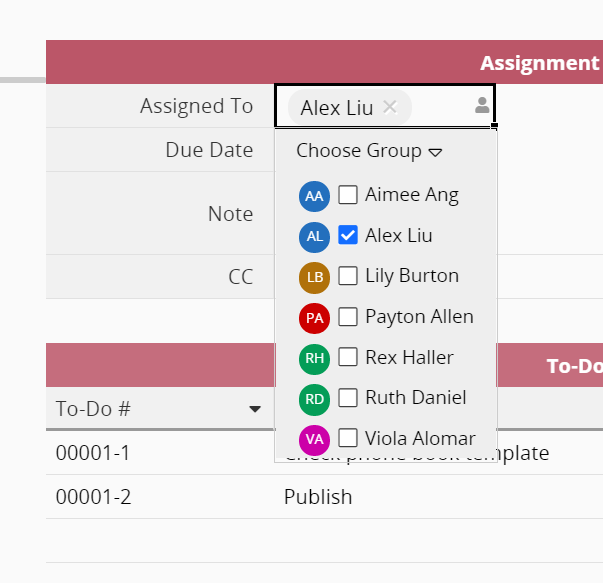
It's also possible to specify a certain user group that this user can be selected from.(or limit the "Group Menu" shown when selecting multiple users to specified groups).
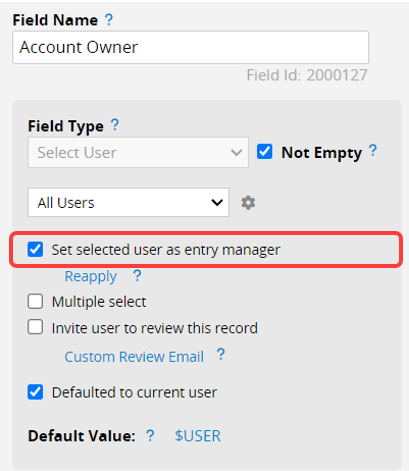
If you choose Set selected user as entry owner, the person that is chosen as the value for this entry will have the same Access rights as the person who created the entry.
Please view this document on Assigning an entry to a user for more information.
When importing data into a Select User field, the imported values must exactly match the emails or usernames in your database for the system to automatically match them to the respective users.
Select User Field is linked to the system's users sheet, so you can apply Dynamic Filtering and Link & Load sync to it.
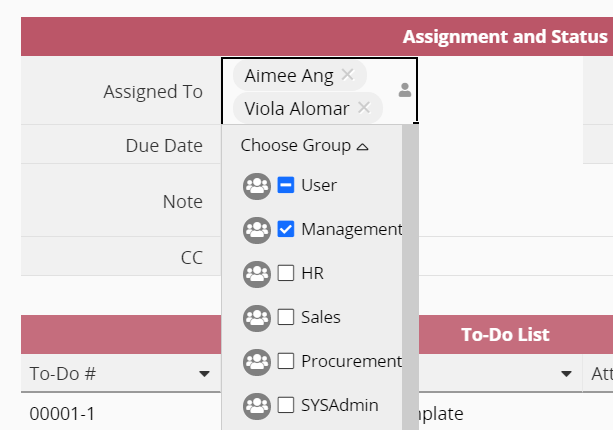
If you enable Multiple select in Design Mode
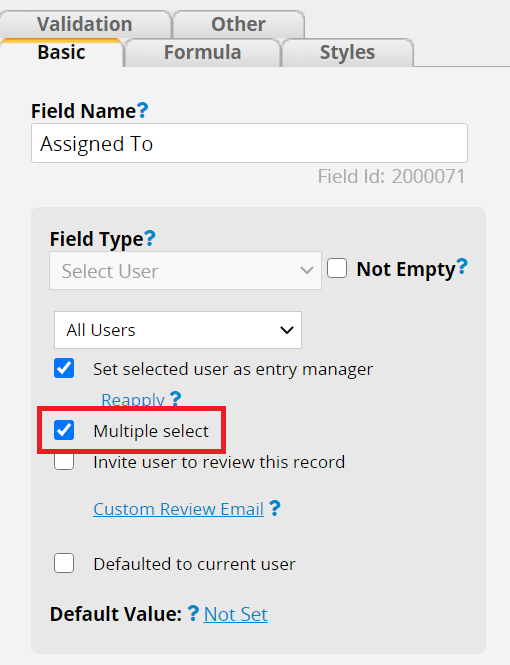
Users can then select multiple users. The "Group Menu" will be displayed, allowing them to select or deselect a group to add or remove all users in that group.
If you want to set multiple default values, please refer to this document.
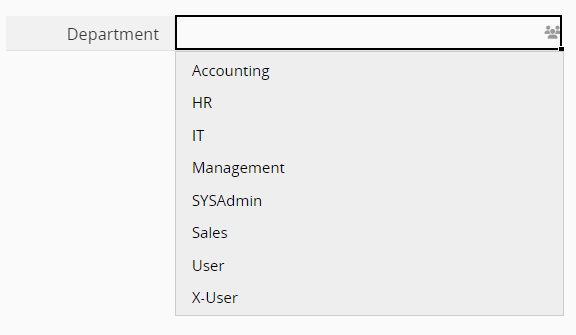
Lists the groups from this account to choose from. If you choose Set selected group as entry owner, all users in the selected group will have the same Access rights as the person who created this entry.
Please view this document on Assigning an entry to a user for more information.
It can also allow multiple selections. If you want to set multiple default values, please refer to this document.
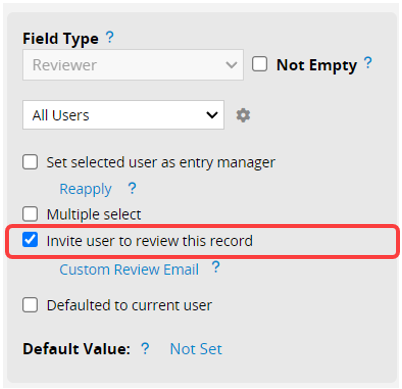
You can assign specific users the right to review entries by sending them a link to their email through this Field Type.
This field is the same as a Select User field where you select users and check to invite them to review this entry.
For detailed instructions, please refer to this article.
To upload a file, you can select it from your computer or drag and drop it into the field. The field values will appear as links for downloading.

Note: The maximum size limit for a single file is 1GB.
If you upload an audio or video file, Ragic will automatically display a media player for streaming supported files.
Audio streaming supports .mp3 and .ogg files.

Video streaming supports .mp4, .ogv, and .webm files.
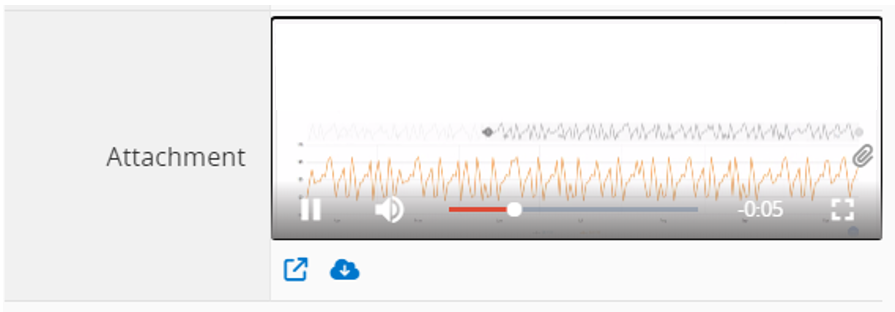
While integrated media streaming is provided, the uploaded files can still be downloaded by clicking on the ![]() icon.
icon.
If you'd like to upload files to multiple existing records, you can use the Mass File Upload feature.
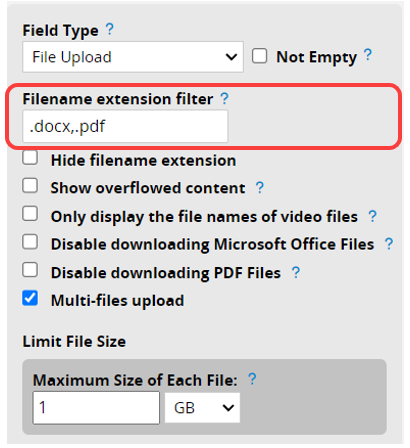
If you want to restrict file types for user uploads, you can enter file extensions into the Filename Extension Filter.
Allowed file formats: Enter .extension. For example, to restrict users to upload only Word files, enter ".docx. "
Disallowed file formats: Enter !.extension. For example, to block users from uploading Word files, enter "!.docx".
Use commas "," to separate multiple file extensions. If this field is left empty, there will be no restrictions on the file formats that can be uploaded.
You can choose "Disable downloading Microsoft Office files or PDF files". In this case, users will only be able to preview Microsoft Office or PDF files from the right panel.

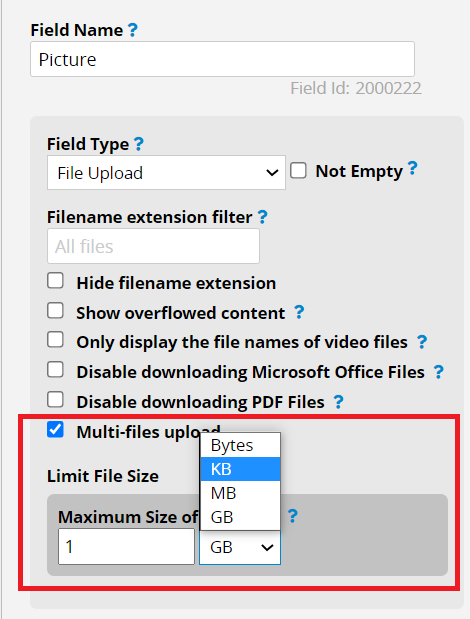
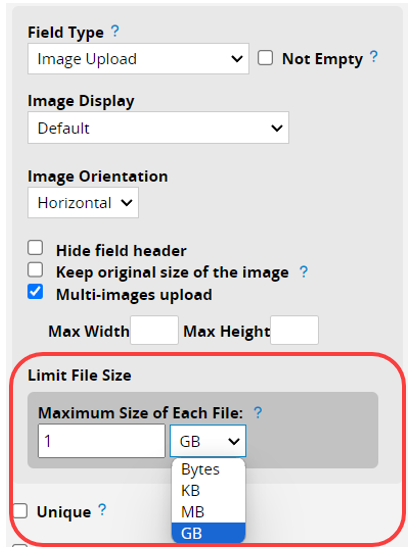
To upload multiple files to one field, you can check this option.
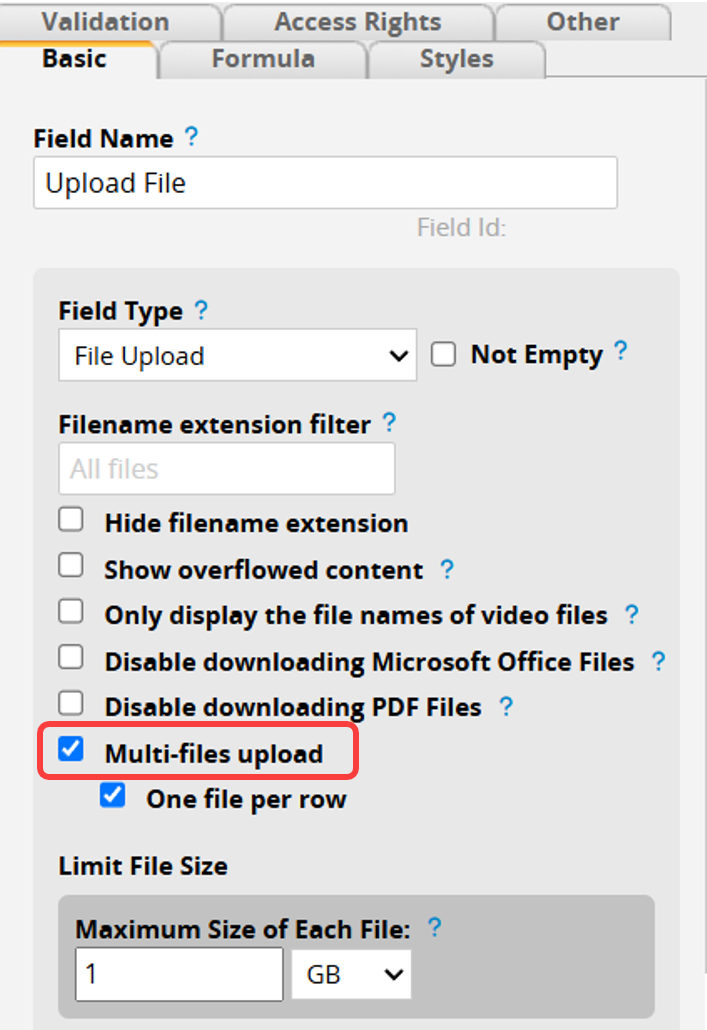
You can select the files from your computer or drag and drop them into the field. To download all the uploaded files, please click on the download icon.

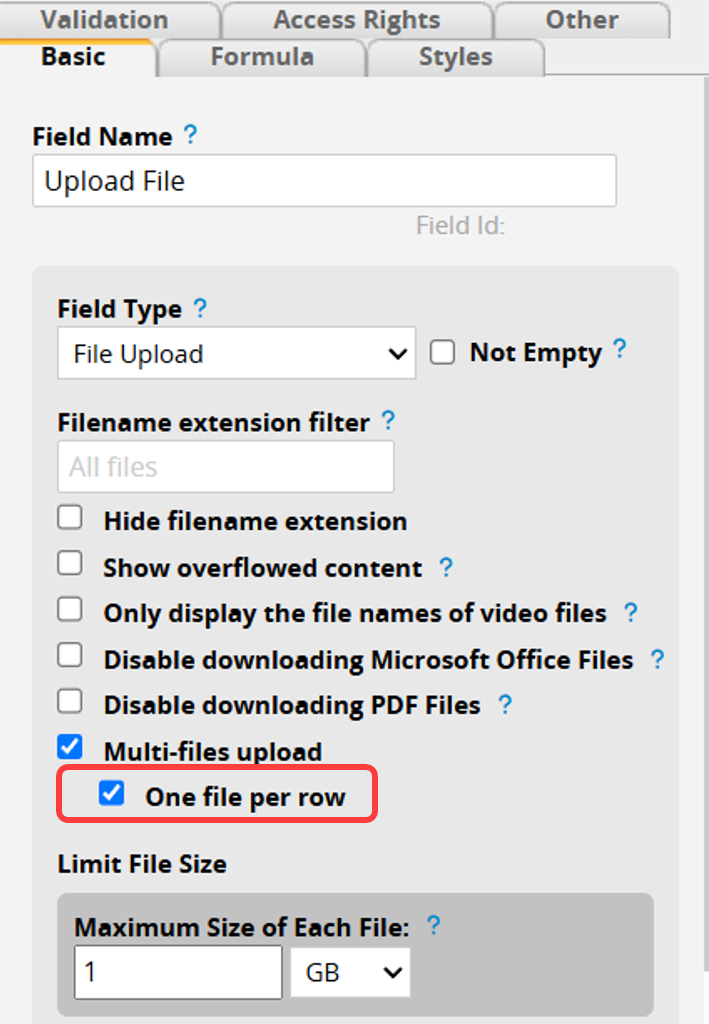
You can select the file arrangement option as "One file per row".
You can set the maximum size of each file, the maximum size limit currently supported is 1 GB.
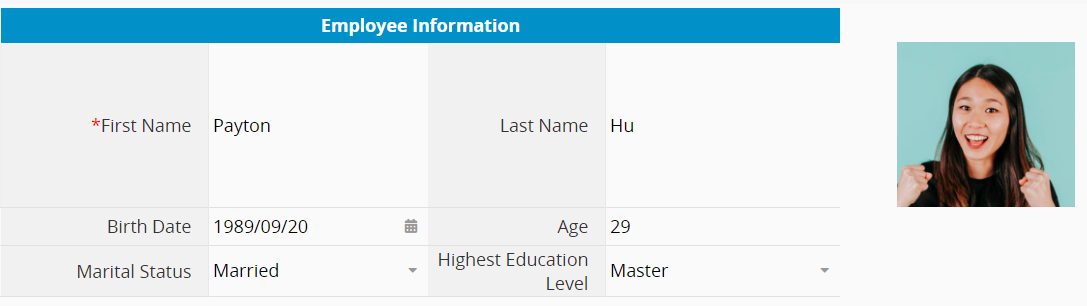
To upload an image, you can select it from your computer or drag and drop it into the field. It will then be displayed as a thumbnail, and users can view and download the image in a lightbox image gallery by clicking on the thumbnail.
If you'd like to upload images to multiple existing records, you can use the Mass File Upload feature.

When you upload an image to an Image Upload field, by default, the system will maintain the original field width but will slightly expand the field height to avoid distorting the image. This will also cause the height of other fields on the same row to expand.
If you don't want the height of other fields on the same row to be affected, you can configure advanced settings under Design Mode. There are two options: "Stretch/shrink to fit cell" and "Image can overflow beyond cell".
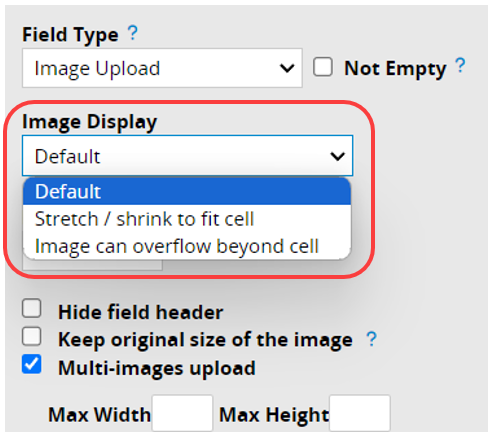
(1) Stretch / Shrink To Fit Cell
The image will be automatically resized to fit the cell, therefore the height of other fields on the same row will not expand.

(2) Image can overflow beyond cell
The image will be displayed in its actual aspect ratio regardless of the cell borders. If you do not set the "max width" or "max height", the image height will be 120 px.
In this mode, the field height in the same row will not expand, but the cells below the field may be covered by the image. Therefore, you will need to adjust the layout to avoid this.

Please note that "Stretch/shrink to fit cell" and "Image can overflow beyond cell" work in different mechanisms and that errors might occur if you check both options in the same image upload field.
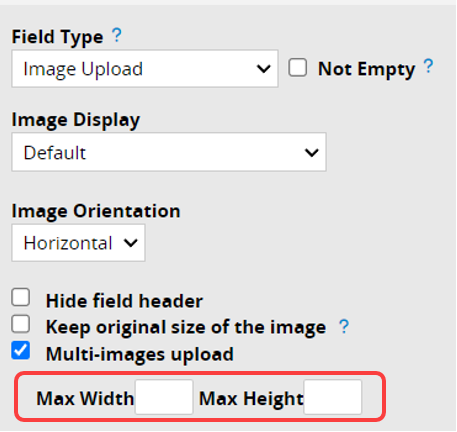
If you do not choose to "stretch/shrink to fit cell", the max height of the thumbnail will be 120 px, and you can fill in the "Max Height" and "Max Width" to resize the thumbnail.
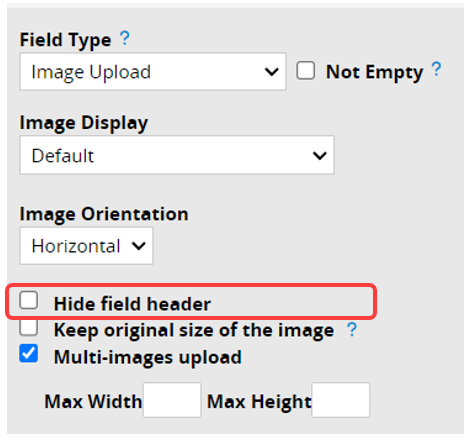
If you check the "Hide Field Header" box, the field header will be hidden, and the image will align to the upper-left corner of the header's original position.
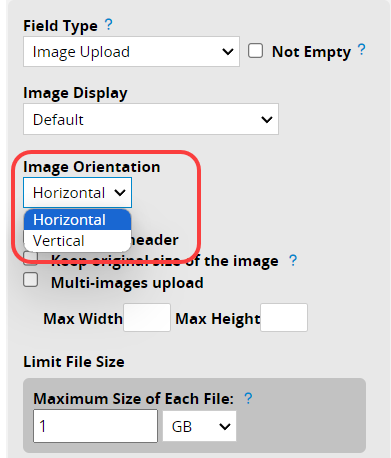
To upload multiple images to one field, you can check this option.
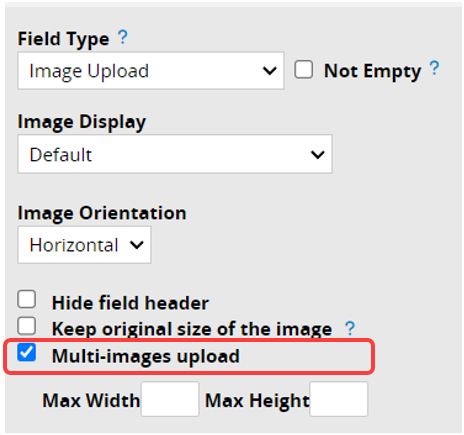
You can select the images from your computer or drag and drop them into the field as well.
You can set the maximum size of each file, the maximum size limit currently supported is 1 GB.
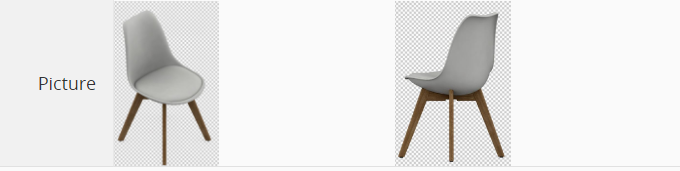
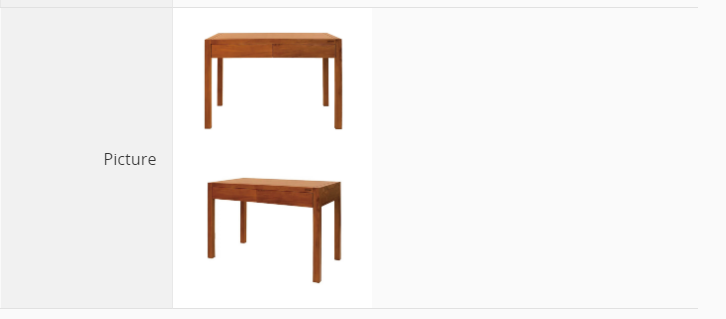
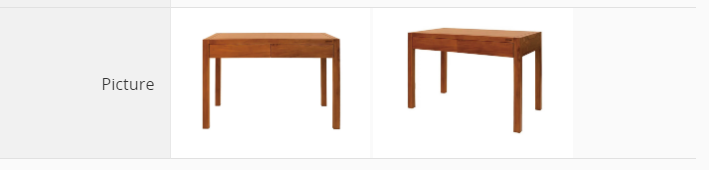
When uploading multiple images, you can set their orientation in the Listing Page and Form Page to be "Vertical" or "Horizontal".
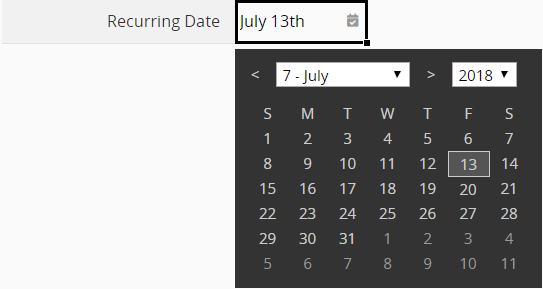
Specifies that the selected field is a Date or Time field. A Date Picker will appear automatically when the field is clicked, or you can enter the value manually.
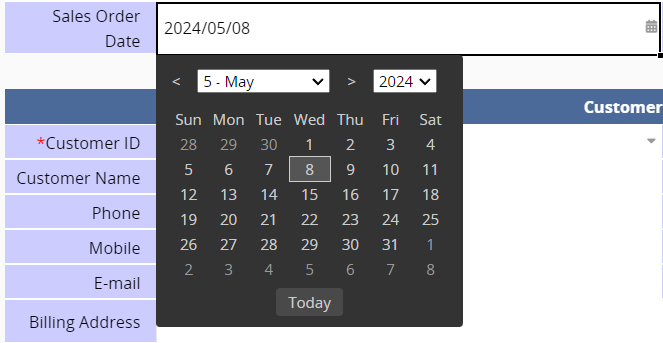
You can also choose a date format from the formatting options listed under Format Type in Design Mode.
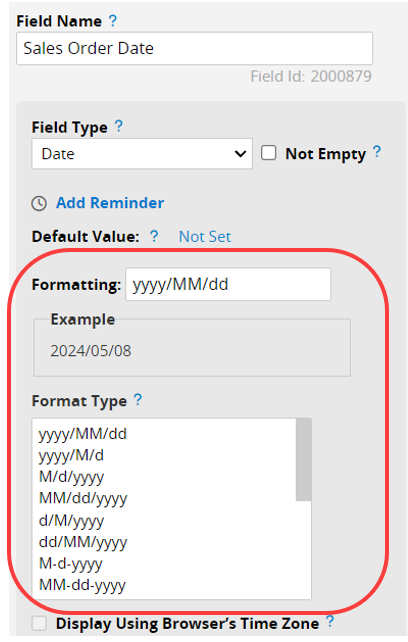
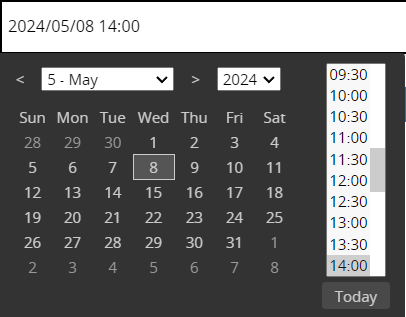
Note: If you also have time formatting applied, the Date Picker will allow you to set both options.
Ragic's default date field is a fixed time. If the field value is 9/15 00:00, the field value would be the same no matter which time zone you are in.
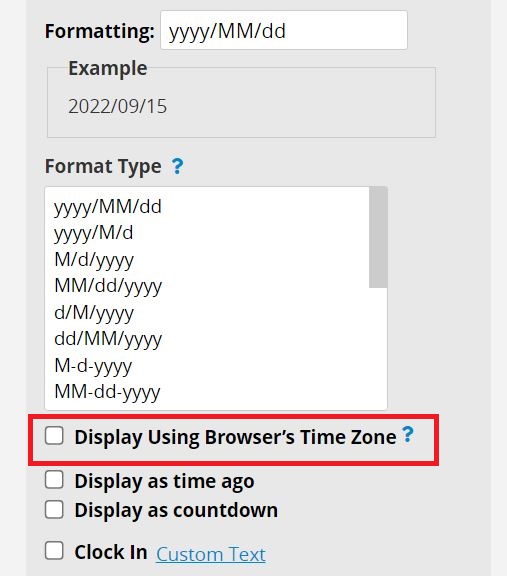
When selecting "Display Using Browser’s Time Zone", the field value will be different depending on the users' browser time zone. If the user located in the UTC time zone enters "9/15 00:00", this field value will display as "9/15 08:00" for the user in the UTC+8 time zone or "9/14 20:00" for users in the UTC-4 time zone.
With this option checked, users located in different time zones won't need to calculate the time differences and will present a more accurate time sorting.
Note:
1. Without enabling "Display Using Browser’s Time Zone", the time saved in the database won't belong to any time zone. If you enable this setting afterward, the field value will be regarded as UTC+0 time. For instance, if you are in the UTC+8 time zone and entered the field value 2022/06/10 00:00 when "Display Using Browser's Time Zone" is not enabled, the field value will become 2022/06/10 08:00 if you enable this setting afterward.
2. When enabling "Display Using Browser’s Time Zone", the field value will be saved as UTC time and display different values depending on the users' browser time zone. If this setting is disabled afterward, the field value will be displayed in the UTC time zone.
3. "Display Using Browser’s Time Zone" is not supported on reports yet, so the date and time values will still display using the database's UTC time.
When selecting "Display as countdown", the filed value will be displayed using countdown.
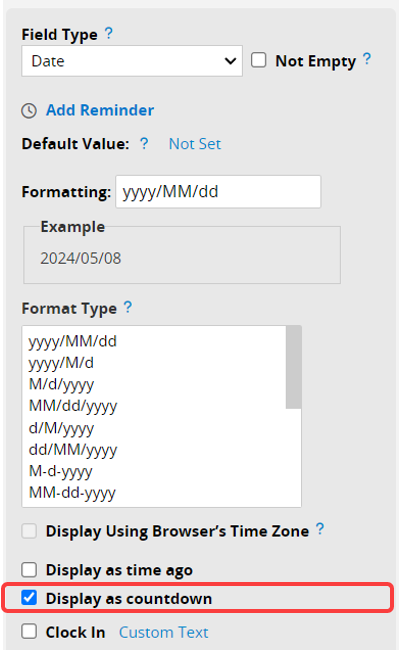

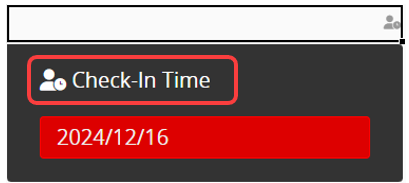
Check the box "Clock In" will give users the option to clock in the present time when editing the field value.
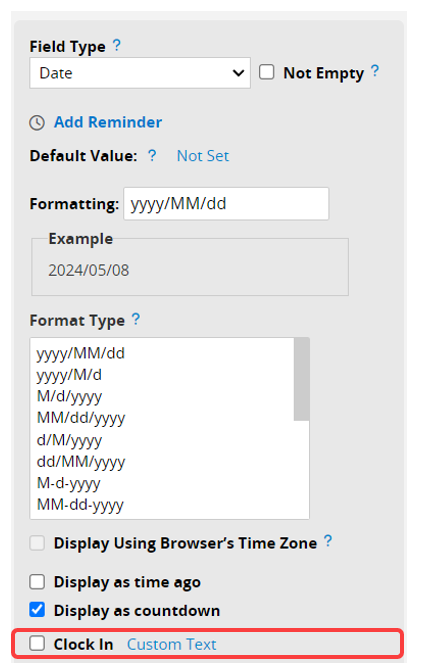
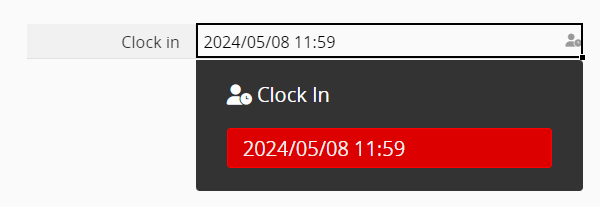
You can also customize the text of the "Clock In" button.

Formulas can be applied to the date field to calculate dates.
Another common usage for the date field is to create a timestamp. This can be done by assigning a Default Value to the date field.
Date fields can also help you remember dates by setting a Reminder or syncing with your favorite calendar application.
You can use this Field Type to set a cyclic Reminder to automatically send birthday e-mails to customers on a specific day every year, or payment requests to clients every month.
The recurring Cycle includes Yearly, Monthly, and Weekly.
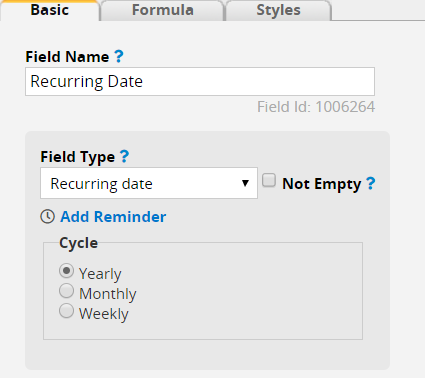
If you choose the Yearly cycle, the recurring value will be the specific month and day of each year (e. g. May the 4th of every year). For the Monthly cycle, the value will be the specific date in every month (e. g. the date 13 in every month). As for the Weekly cycle, the value will be the specific day of the week (e. g. every Monday).
Note:
1. If you set a Reminder with a Recurring Date on the 31st of every month, the Reminder will not be executed on the months that do not have a 31st.
2. To prevent format errors, the Recurring Date "Field Type" cannot be modified after saving the design.
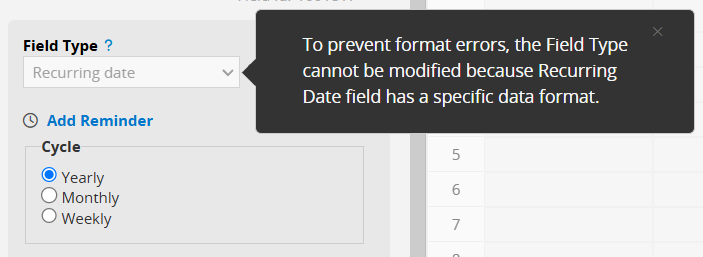
3. Existing fields of other Field Types cannot be changed to a Recurring Date field. You need to add a new field to select the Recurring Date Field Type.
4. About the Recurring Date fields in the event calendar, please refer to this page.
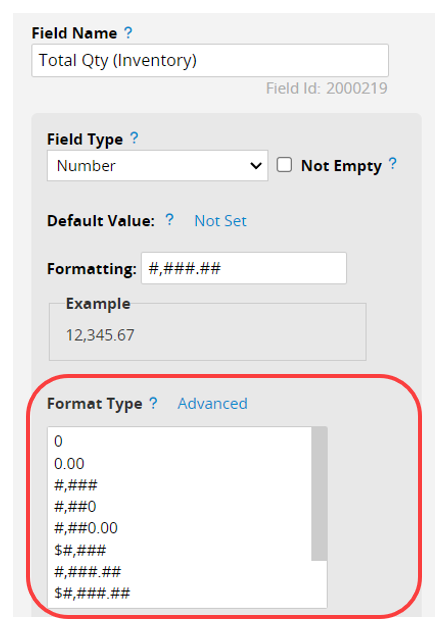
Specifies that the selected field is a numeric value.
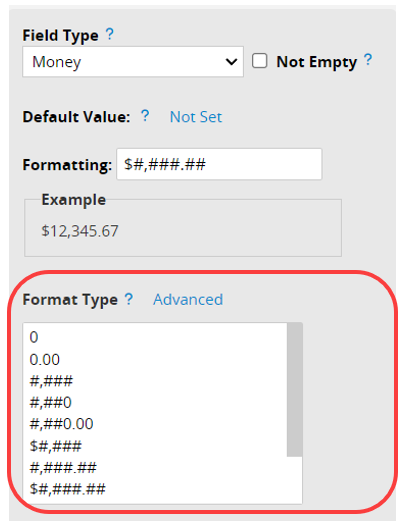
You can also choose a format from the formatting options listed under Format Type in Design Mode.
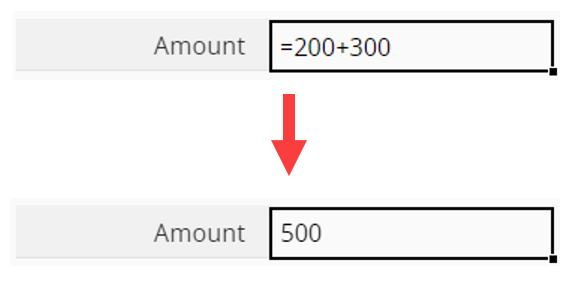
You can enter = in the field to perform basic arithmetic and obtain a value. For example, if you enter "=200+300", the field value will automatically be filled with "500".
Note: The formula will not be recorded after the value is calculated.
You can also combine numeric fields with Formulas!
When dealing with large numerical values, you can select the option below for Large Number Abbreviation. If the input value exceeds the selected threshold, it will be abbreviated.
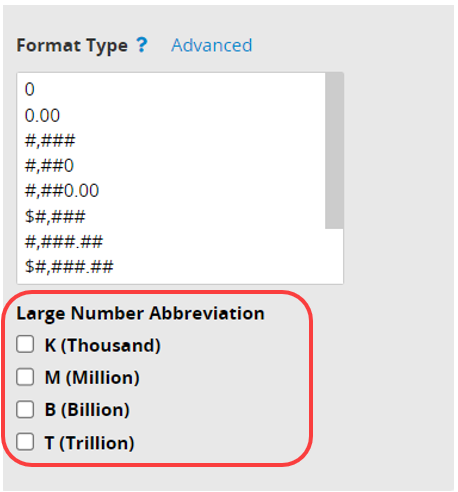
For example, when the "K" option is selected for the "Qty field", the field will display "2K" when the quantity is "2000".

Specifies that the selected field is a percentage value.
![]()
Percentage fields are most used with Formulas.
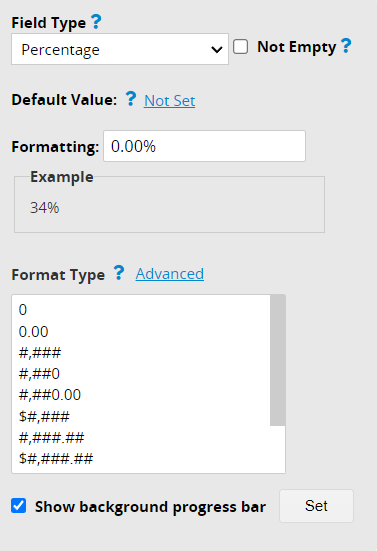
Checking the “Show background progress bar” option below the percentage field will turn the field into a progress bar.
![]()
After clicking the Set button next to the "Show background progress bar" option, a window will appear where you can adjust the progress bar settings by dragging separators to define percentage ranges. For example, if you want to highlight percentages above 70% in scarlet red, you can drag the separator from 75% to 70%.
When clicking on different percentage ranges on the progress bar, you can add separators, and set the text color and background color for the ranges.
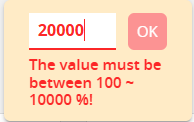
Click the "pencil" icon to modify the upper limit, which can go up to 10000%.
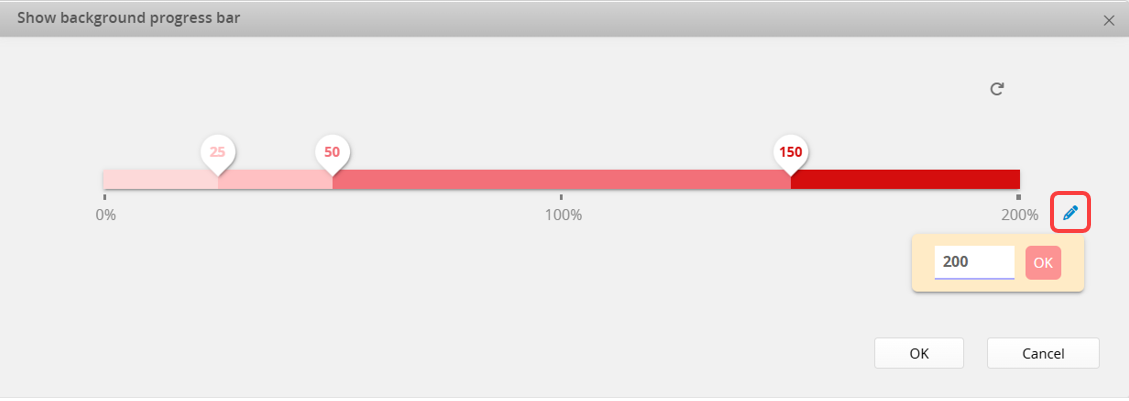
If you want to reset the progress bar, simply click on the "Reset button" ![]() and the progress bar will be reset to default settings.
and the progress bar will be reset to default settings.
Similar to the Numeric Field Type, you can use basic arithmetic to enter values in the fields, as well as apply formulas for calculations.
You can edit the currency format from the formatting options listed under Format Type in Design Mode.
When dealing with larger amounts, you can refer to the Large Number Abbreviation section in the Numeric Field for setting it up.
This field retrieves real-time exchange rates from Open Exchange Rates when adding or editing a record. You can use Formulas along with it to convert the original currency into other currencies. You can also Populate Empty Values if needed.
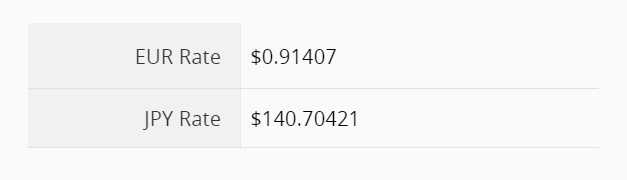
The Exchange Rate field will default to fetching the latest rate and allow you to specify the conversion from one currency to another. For example, if you set it to convert from USD to EUR, the field value will display the fixed exchange rate of US Dollars to Euros.
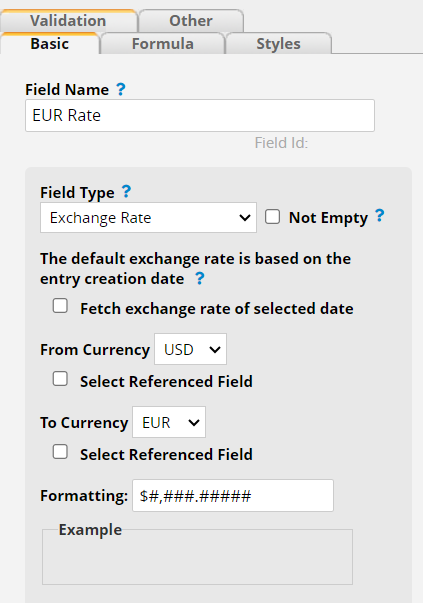
Sometimes, we don't want to use the latest rate for calculations. For instance, quotations are often based on the exchange rate of the day the quote was issued, rather than the current rate. In such cases, you can use a Referenced date field to specify the exchange rate date based on the "Sales Order Date" field in the sheet.
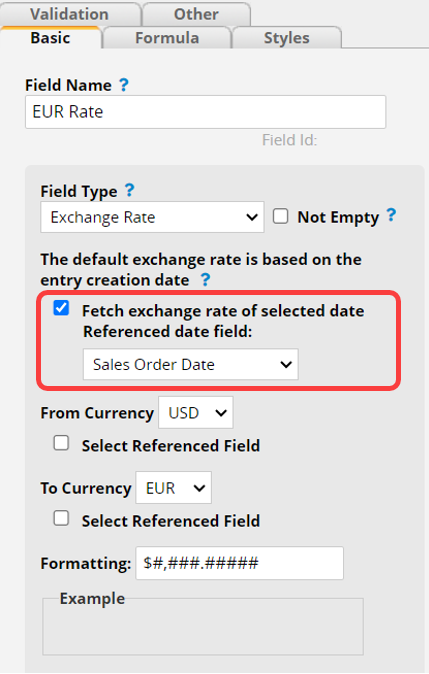
If the original currency or target currency is not fixed, you can set the conversion from one currency to another based on a currency reference field. For example, if your company deals with customers from Europe and Japan and needs to convert USD pricing to EUR and JPY, you can set the conversion from USD and select a "Currency" field as a reference. Conversely, if you receive various foreign currencies and need to convert them back to USD for accounting purposes, you can set the conversion from the currency reference field to USD. If both currencies are not fixed, you can refer to different currency fields accordingly.

Please note that the referenced fields can only be either Free Text or Selection fields. The field value must be three uppercase letters, such as USD, JPY, EUR, etc. If you are unsure of the currency abbreviation, you can refer to the options in the menu.
When editing, selecting "EUR" for the "Currency" field will automatically retrieve the corresponding exchange rate.

The exchange rate field will only retrieve the exchange rate when adding or editing a record. If you want to update the exchange rate for that field in all records at once, you can execute the Update Rate in Design Mode.
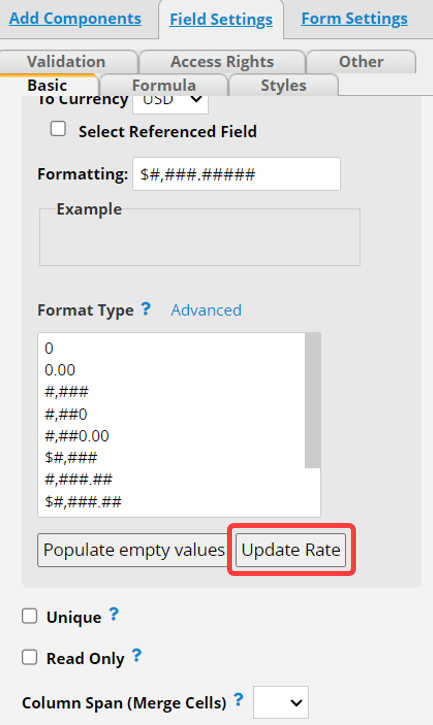
Please note that executing this button will update all the values of this field, overwriting the existing values. If there is no referenced date field to refer to, the system will update the field value with the latest exchange rate; otherwise, the system will update the field value with the exchange rate on the specified date.
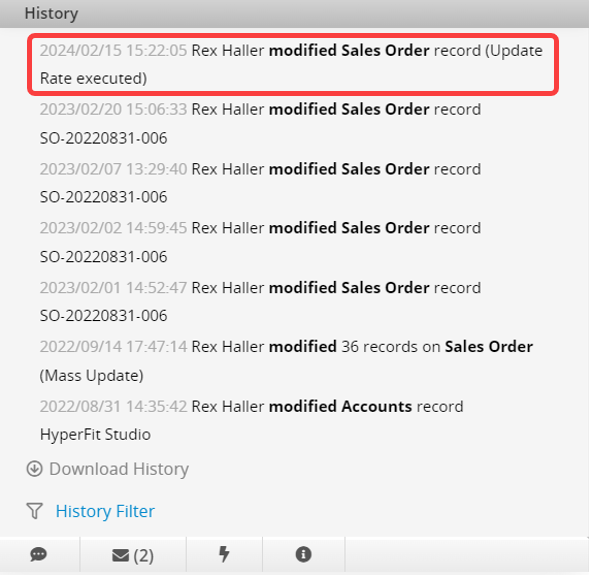
Updating rate will also be recorded in the Entry Information.
This field can aggregate all records on the source sheet (linked sheet) that has a linked field linked to this record. There are five aggregate methods: count, total, minimum, maximum, and average.
For example, if you have "Sales Order" and "Customers" sheets, and in "Sales Order", you have already established a Link and Load relationship to "Customers".
You can add an Aggregate Field in the "Customers" to calculate the total amount spent by each customer from the records in "Sales Order". Based on your requirements, you can select the desired aggregate method, source sheet, and field to be aggregated.
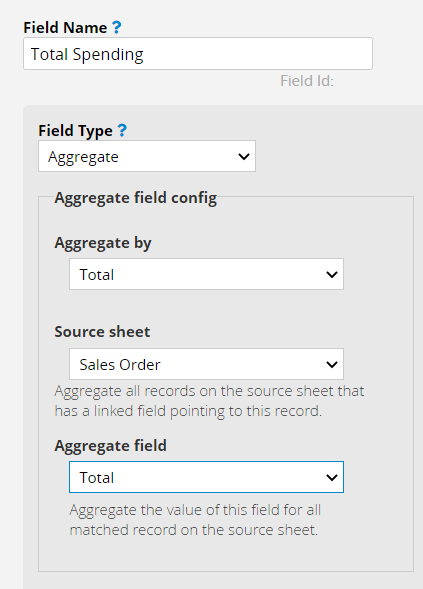
In "Customer", you will be able to display the total amount spent, highest spending, and average spending for each customer.

The value of this field will be automatically generated. This is a great help for generating system IDs and serial numbers.
When clicking on a field to enter data, users will see the Auto Generate option.

Ragic will generate a number or string according to your formatting.

You can choose from a list of formatting options provided in the Design Mode or customize the values by writing your filing codes.
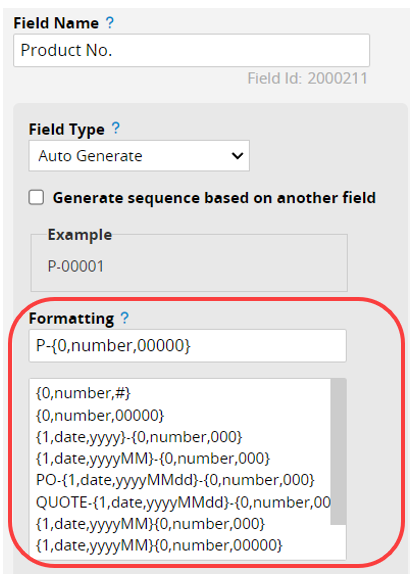
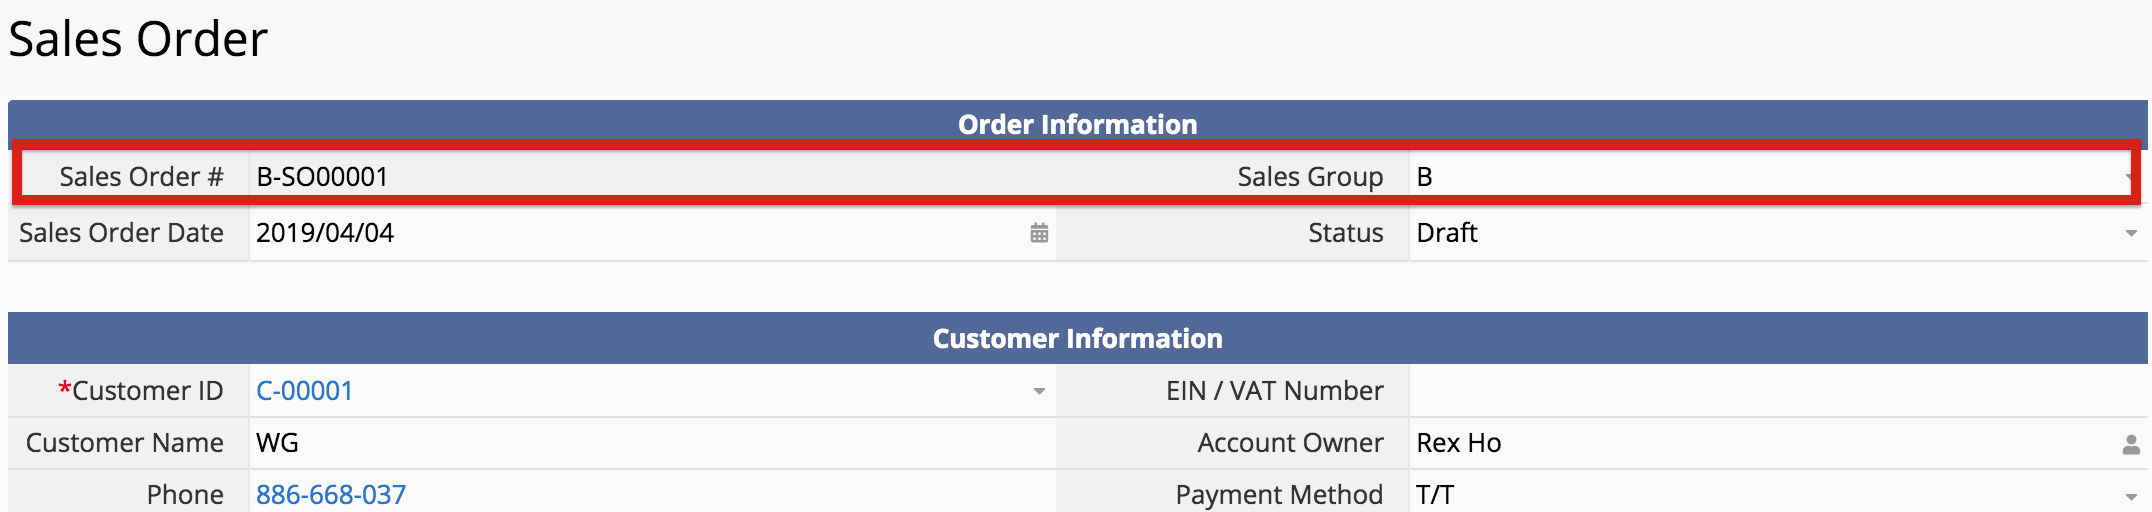
You can also set Auto Generate Field to generate sequence numbers based on the specified Selection field or Date field value.
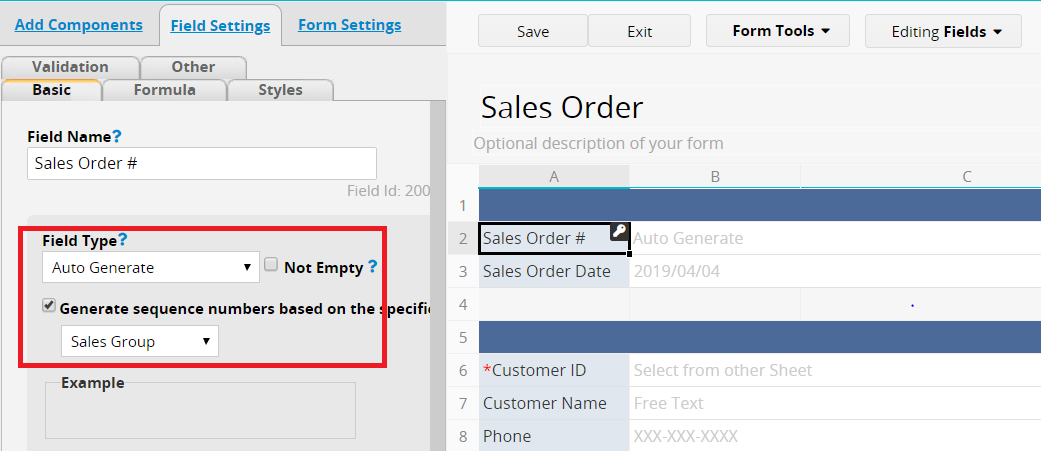
For example, you would like to generate sequence numbers for sales orders based on sales groups to categorize.

When editing a record, automatically generated values appear as a preview and are only created when the record is saved.
Note: Formulas referencing auto-generated fields will not recalculate automatically after saving. To trigger formula recalculation, use a post workflow. For details, please refer here.
For more information about this field, please see the Auto Generated Field Values section.
You can use this Field Type to generate a Barcode. There is a selection of Barcode types you can generate, such as Code 128 and QR Codes.
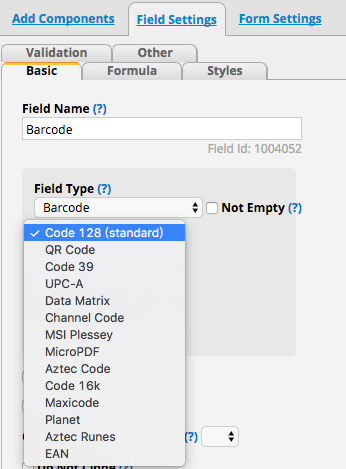

Alternatively, you can configure Additional field settings to display values as Code 128 Barcodes.
For more use cases of barcodes, please refer to Ragic Learning Center.
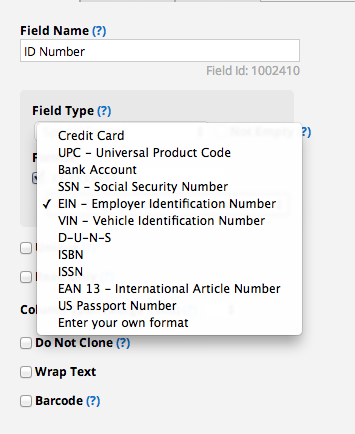
The value of this field will be formatted according to universal standards that you can specify.
![]()
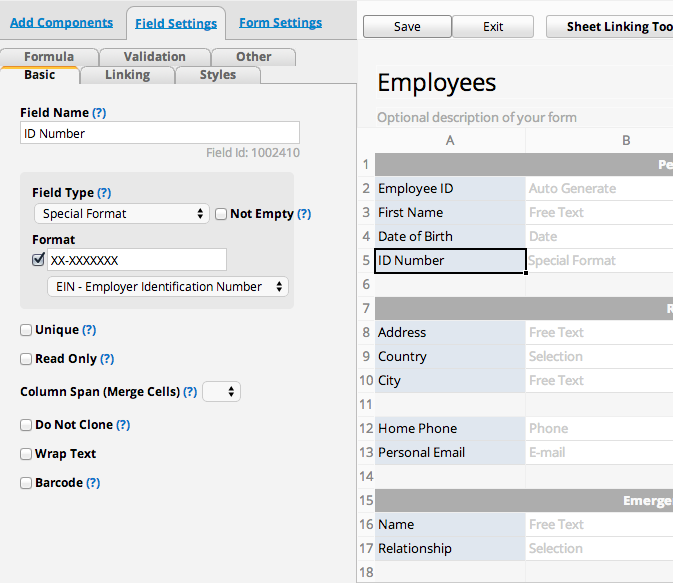
There are preprogrammed options available such as "SSN (Social Security Number)" and "VIN (Vehicle Identification Number)", but you can enter custom formats here as well.
The value of this field will be formatted as a link to the e-mail. Clicking on the link will prompt your web browser to respond according to its settings, such as by launching an e-mail application. Supports inputting multiple email addresses, separated by “,” and half-width spaces.

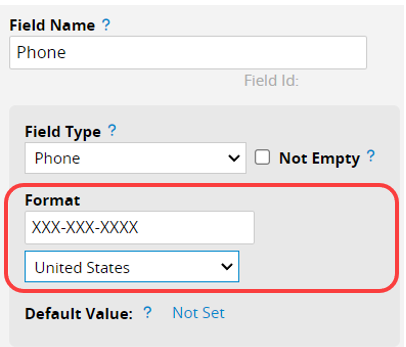
The value of this field will appear in the format type you selected in Design Mode. Clicking on the value of a phone field will prompt your web browser to respond according to its settings.

You can further select the desired format for the country's phone/mobile number in Formatting.
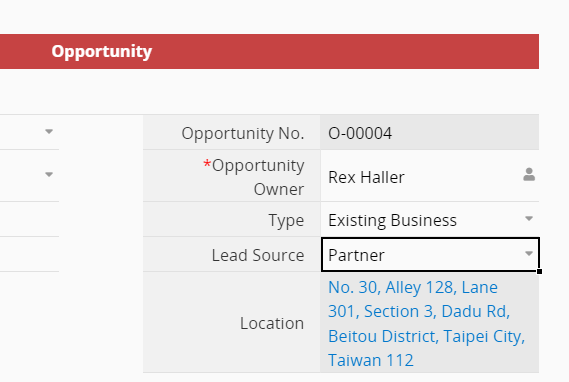
This field allows you to enter your address or longitude and latitude so that when you click on it, you can see its location on Google Maps.
![]()
For the longitude and latitude, we also support multiple formats:
Degrees, minutes, and seconds (DMS): 41°24'12.2"N 2°10'26.5"E
Degrees and decimal minutes (DMM): 41 24.2028, 2 10.4418
Decimal degrees (DD): 41.40338, 2.17403
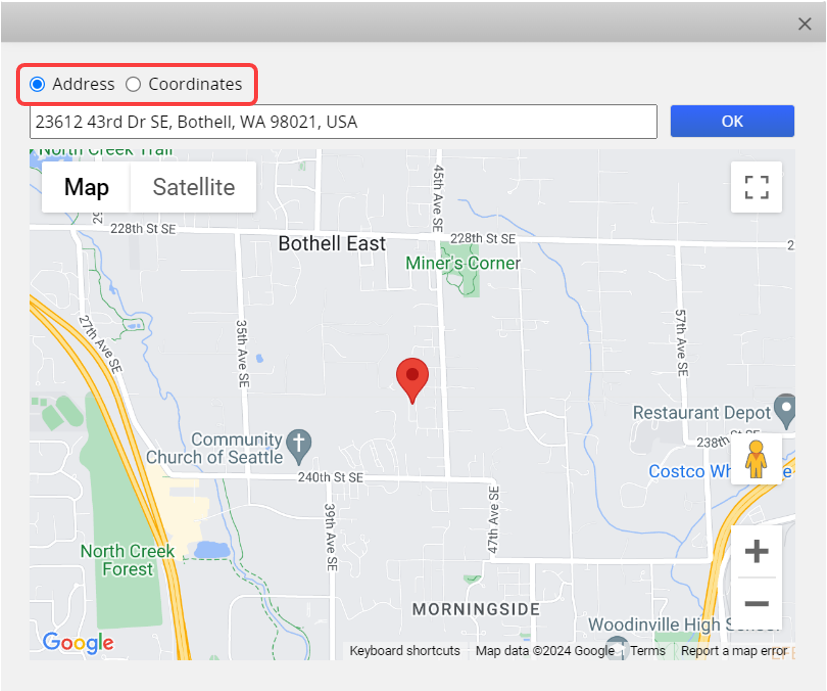
Another way to enter such values into this field is by clicking the Pin Icon.

A Google Maps window will pop up to let you pin the target location on the map.
Directly click on a location on the map and click OK to save that location. You can also choose to display it as "Address" or "Coordinates" from the options above.
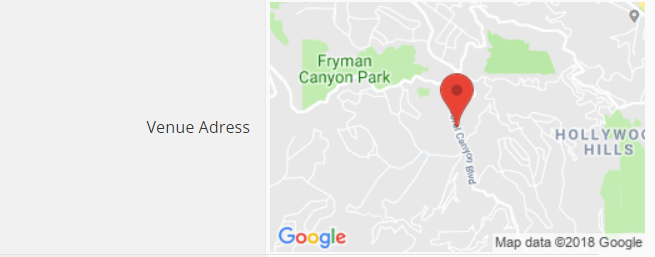
You can also set this field to display the address as a map.
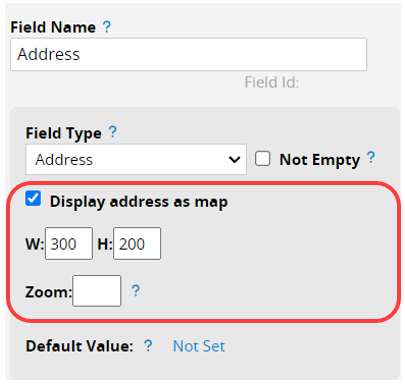
Enter and save the address in the field. It will be automatically displayed as a map.
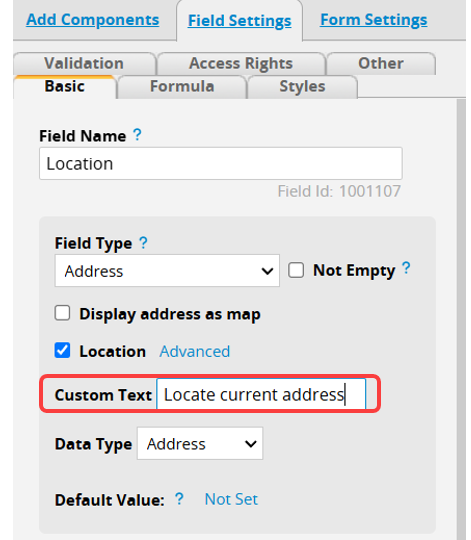
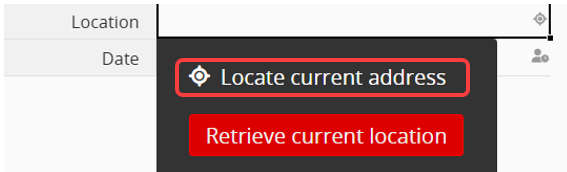
Sometimes, you may need users to report their current location, such as for field visit location reporting. You can utilize the Location feature in the Address Field and choose the desired format based on your needs.
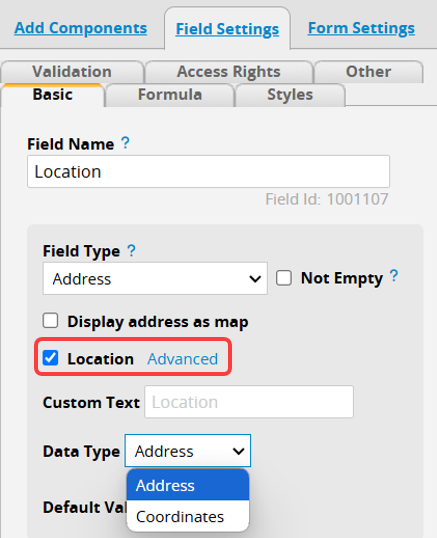
Once set up, users can input their current location by clicking the "Location" button while filling out the record. (Location data must be provided to the browser to obtain the current location.)
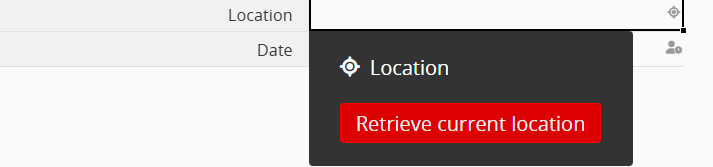
Additionally, you can customize the text on the "Location" button.
The value of this field will be recognized as a link, and clicking on the value will take you to the linked website.

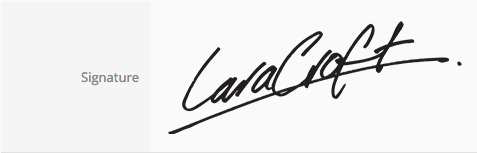
In this field, a signature can be added via mouse or trackpad.
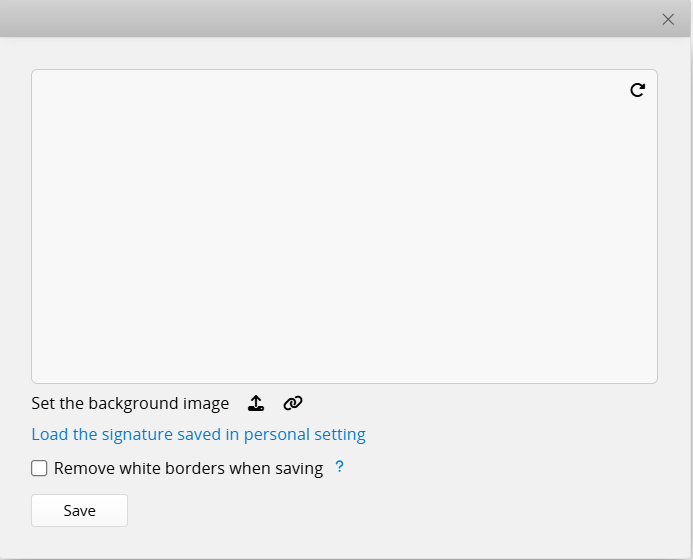
You can also upload the image file of a signature or insert a link to the URL of the image or load a saved signature in Personal Settings.
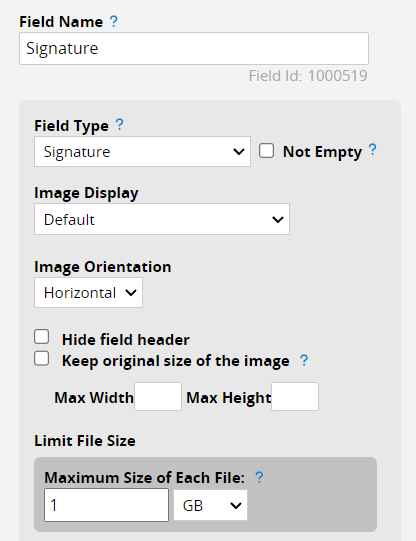
In Design Mode, the Signature Field has the same advanced settings as the Image Upload Field.
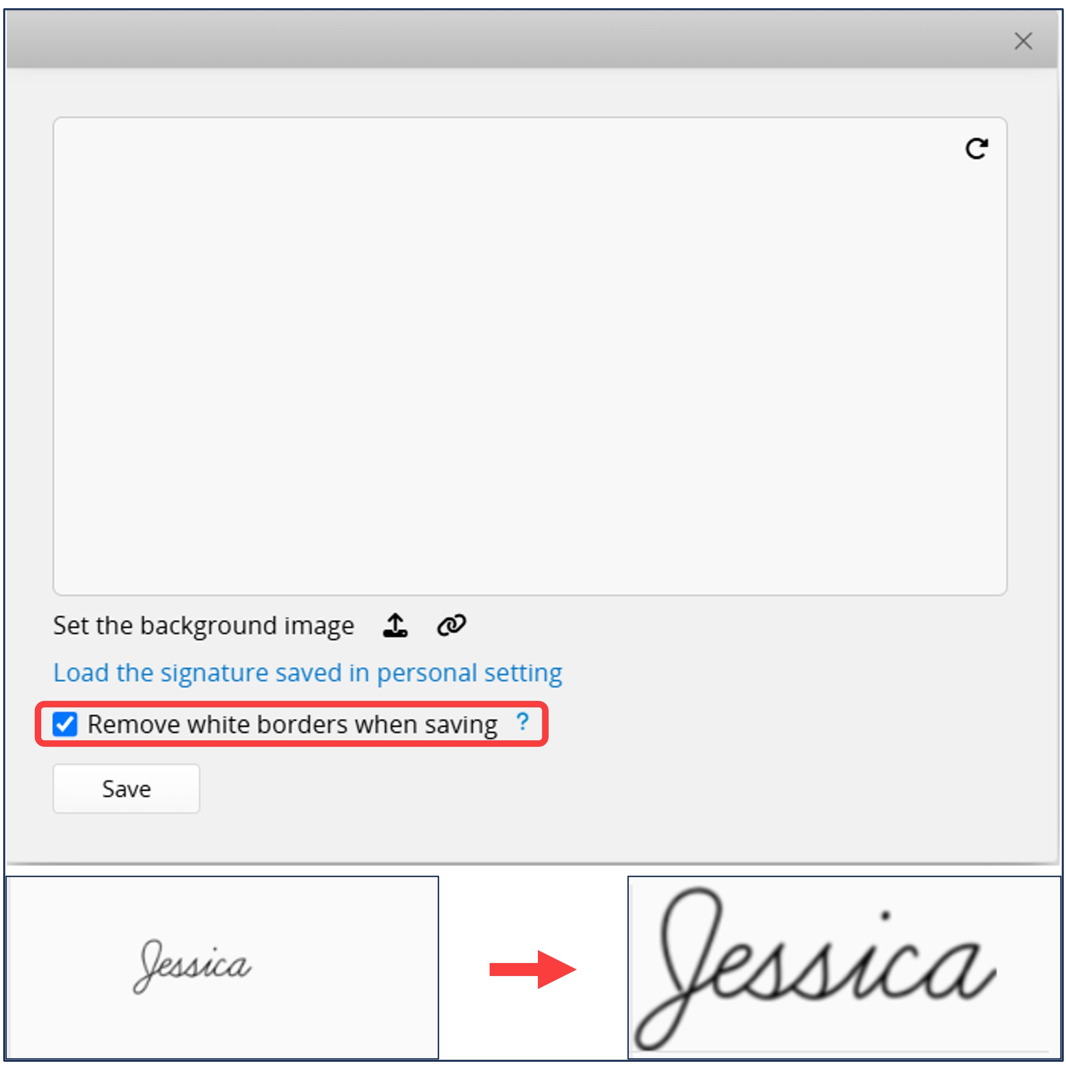
After users complete their signatures, they can check Remove white borders when saving. The system will remove the white borders and save the image in its original ratio.
The Action Barcode field is presented as a QR code, allowing users to scan the QR code and perform one of the following two actions:
1. View this record: For example, viewing event information.
2. Execute the Action Button: After scanning the QR code, a page will appear where the user can click to execute the Action Button, such as signing in to an event or adding payment records.
The following explains these two functions in detail:
Select View this record under Scan QR Code to execute to allow users to view the record by scanning the barcode.
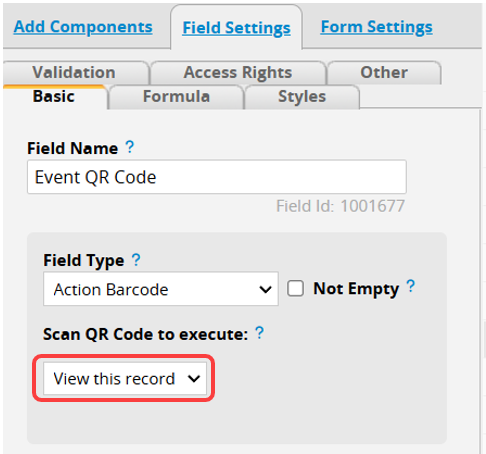
For example, you can print the event barcode and let participants scan it to view event-related information.
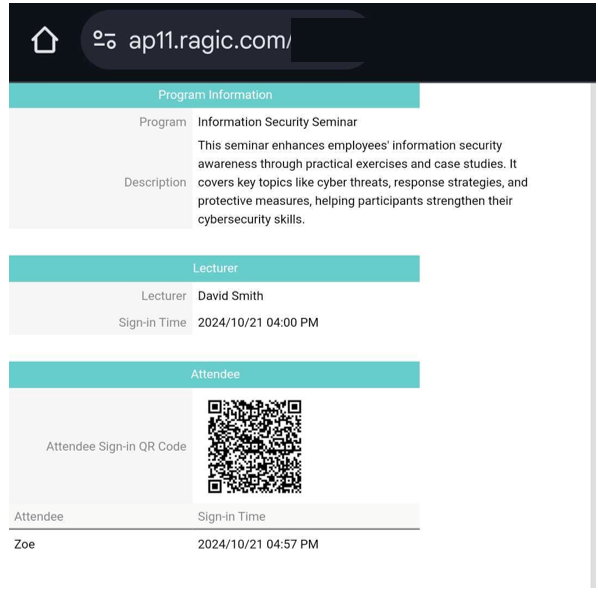
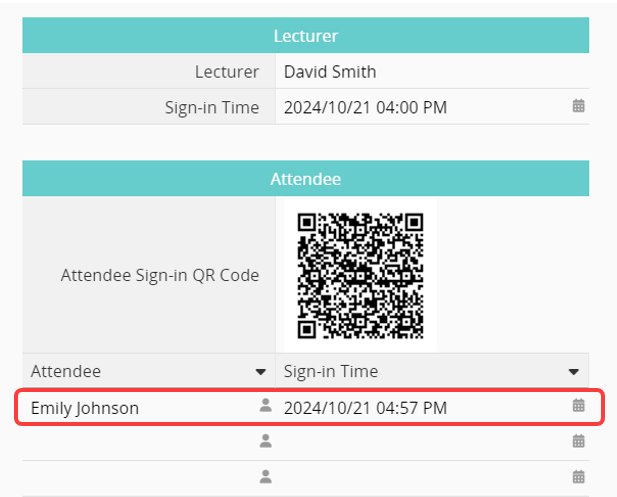
For example, there is a "Corporate Training" sheet with an Action Button labeled "Attendee Sign-in," which fills in the username and current time for sign-in.
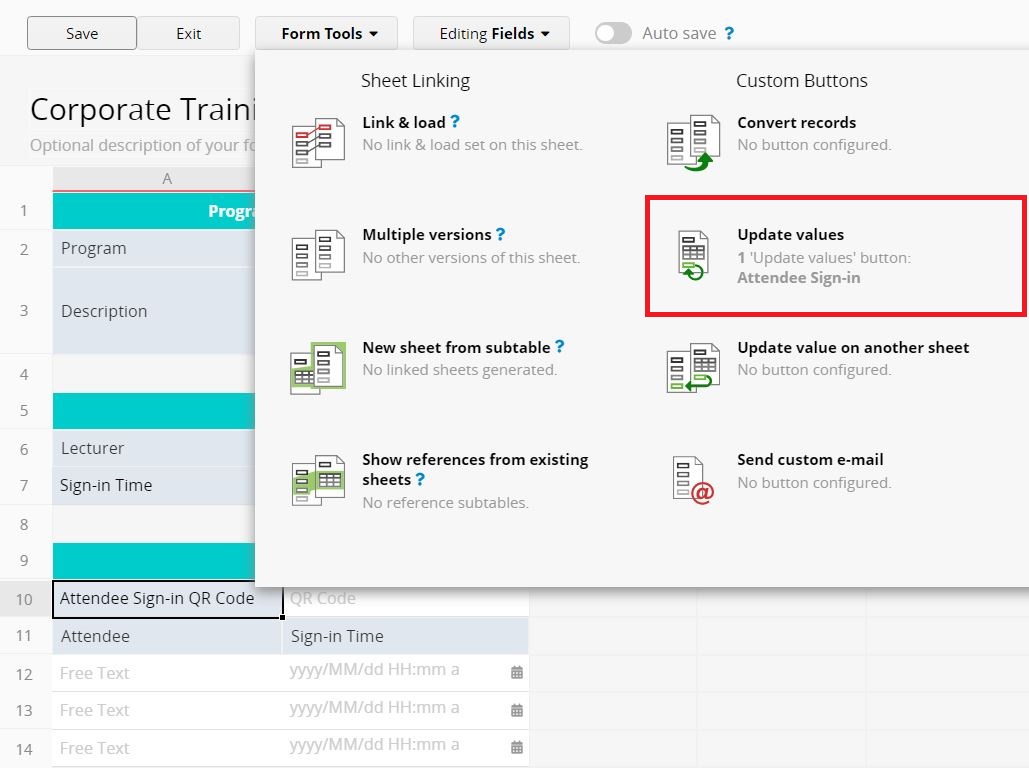
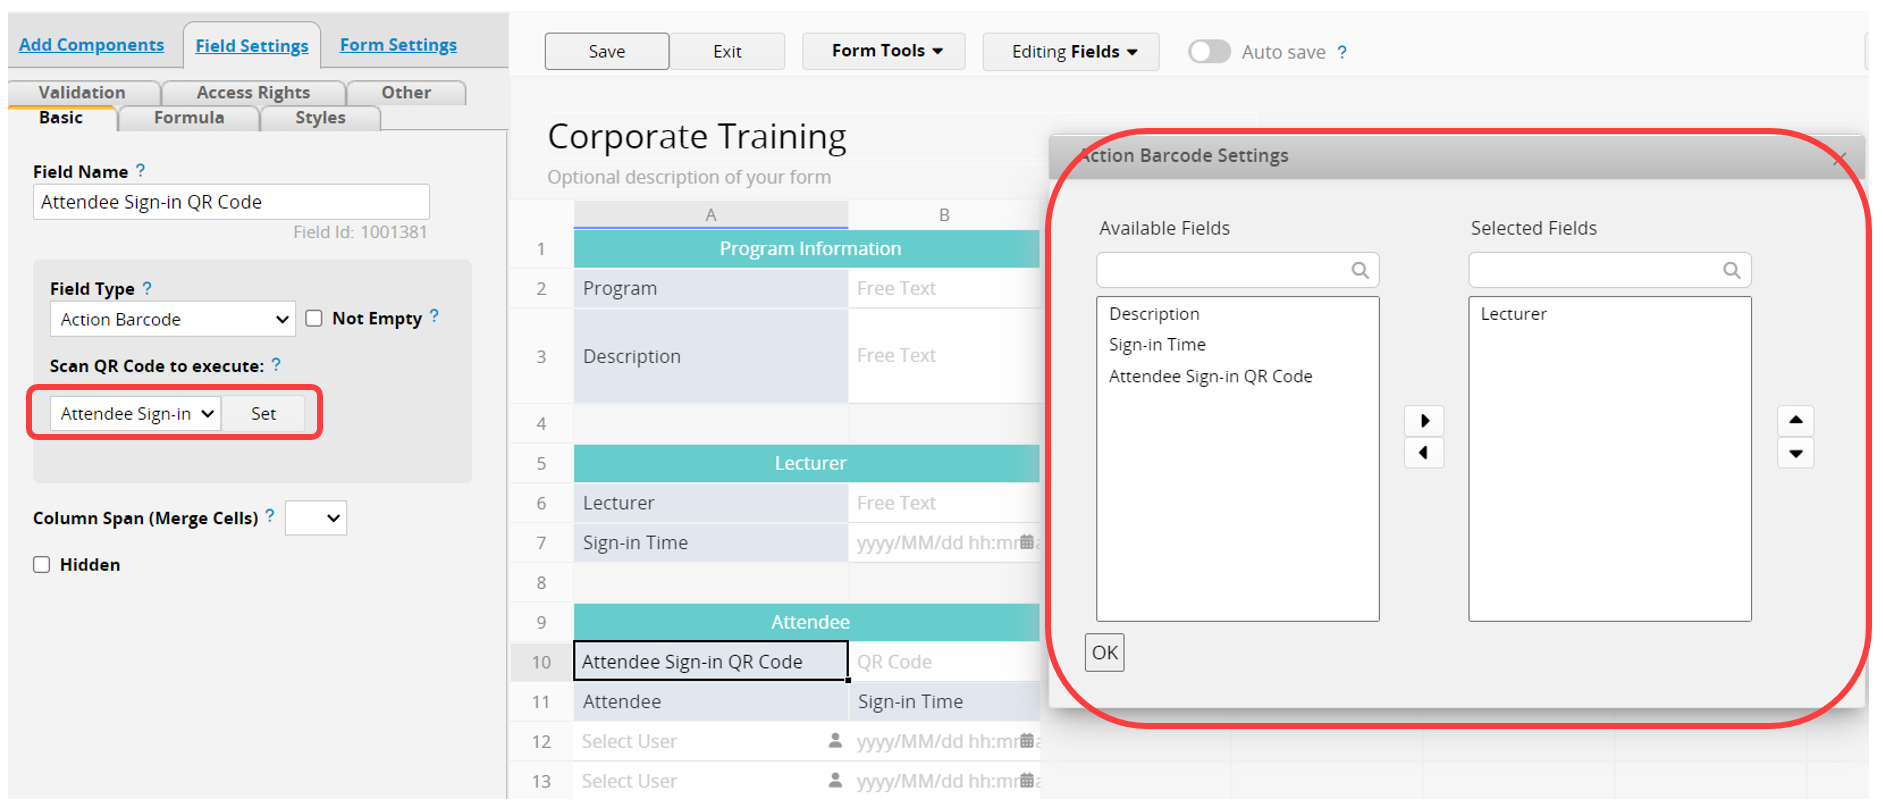
Add an Action Barcode field in the sheet and select the "Attendee Sign-in" Action Button under Field Settings. When you select the Action Button, a "Set" button will appear on the right, allowing you to customize the content displayed after scanning the barcode. You can also use the Action Button's advanced settings to customize the success message.
With that, attendees can sign in by simply scanning the QR code. You can also print out the QR code or display it on a screen for attendees to scan, so the sign-in process can be completed without accessing the sheet.
Note: Don’t forget to adjust the Access Rights of the sheet. For example, in the "Corporate Training" sheet, all participants should be assigned Admin rights.
Every time the Action Button is executed, SYSAdmin will see a sign-in record in the sheet.
 Thank you for your valuable feedback!
