Linking two fields in different sheets consists of creating a Linked Field and the corresponding Loaded Field(s).
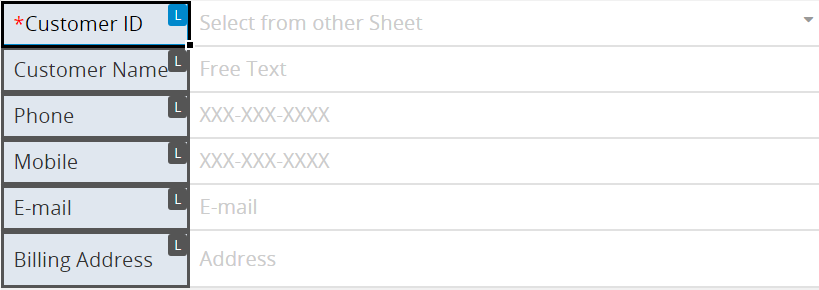
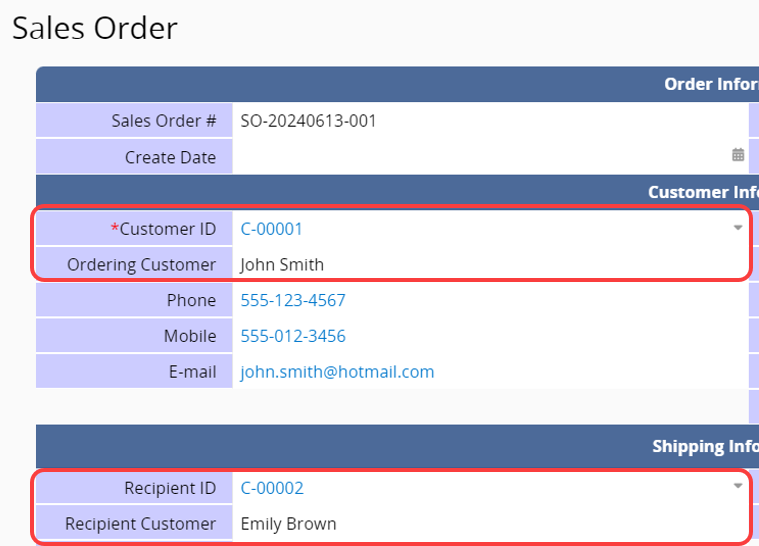
For example, when you enter information in a "Sales Order", data from another "Customer" sheet can automatically pop up. In this case, the "Customer ID" in the "Sales Order" is the Linked Field, which is configured to select values from the "Customer ID" field in the "Customer" sheet.
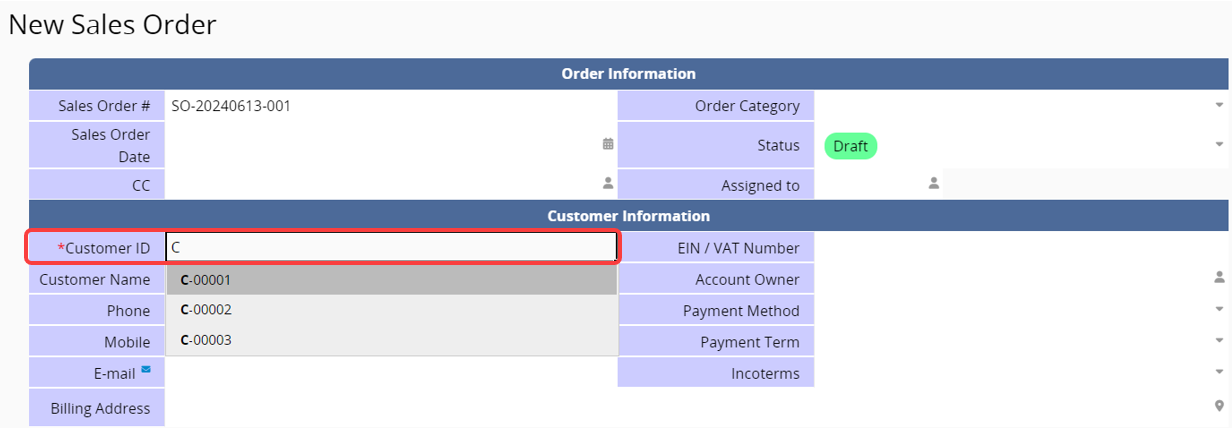
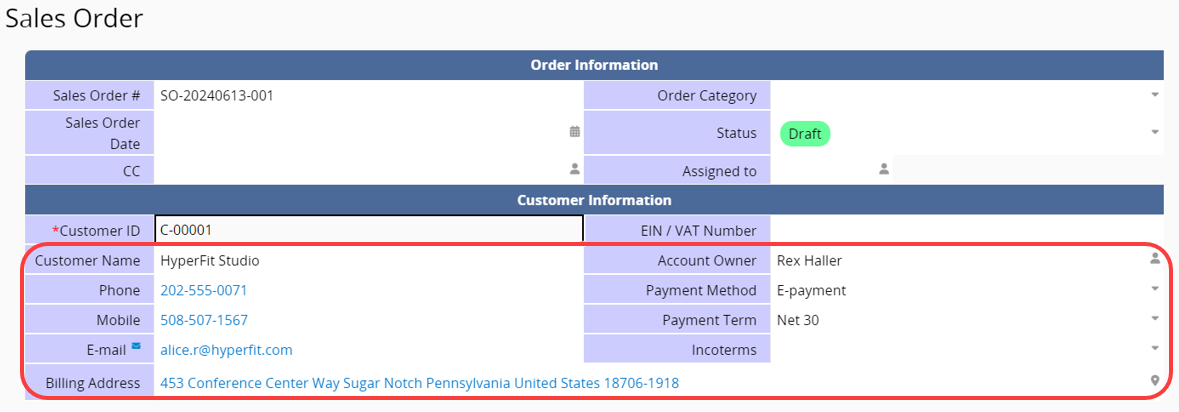
After selecting the "Customer ID", other corresponding information such as the "phone number", "address", and "email" will automatically populate. These fields are called Loaded Fields.
Using Linked and Loaded fields can significantly reduce data entry time and prevent manual input errors.
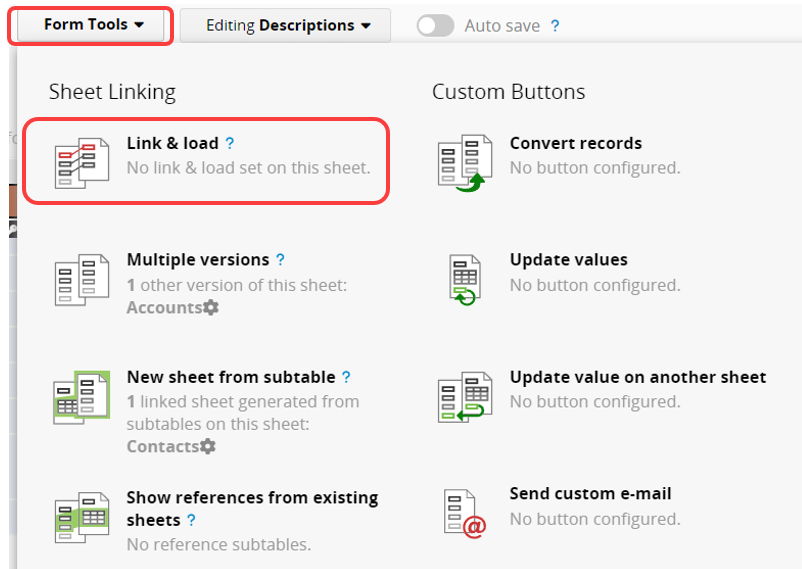
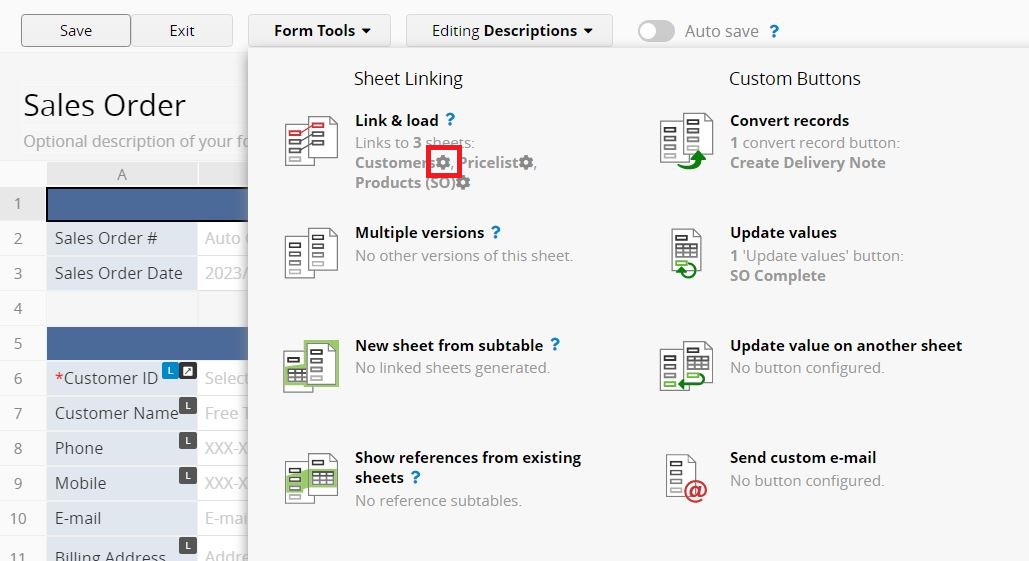
The Linked Field and Loaded Fields can both be configured in the Link Manager. In the Design Mode of the Form page, click on Form Tools and choose Link & Load under the Sheet Linking options.
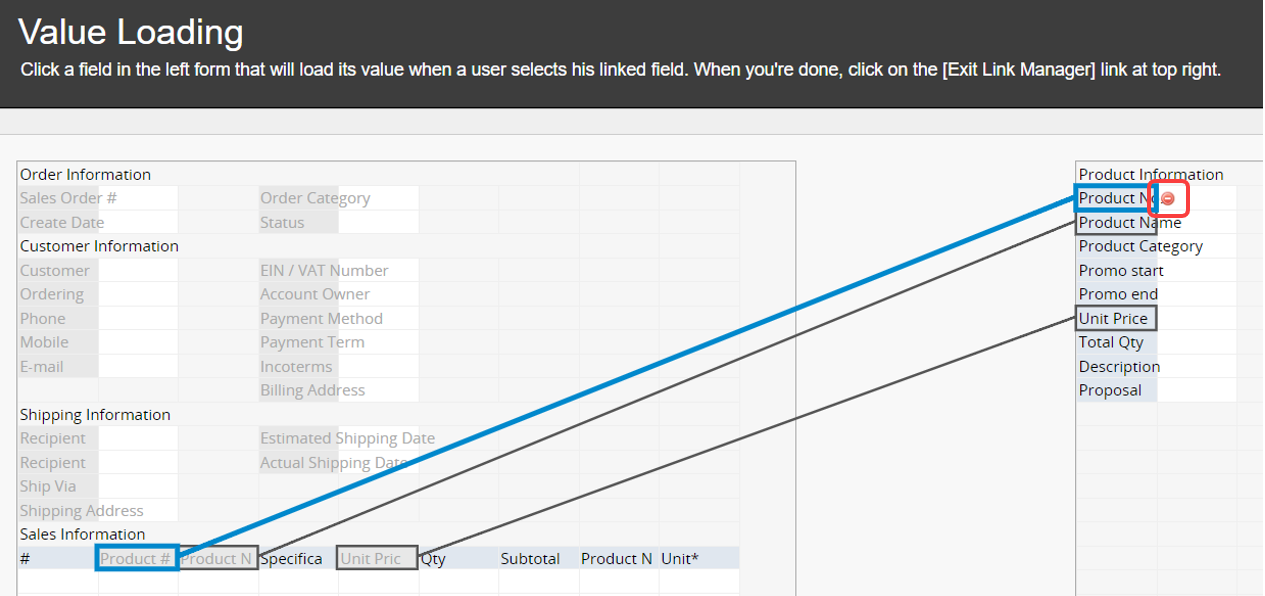
In the bottom right corner of the Link Manager page, you can choose the tab and sheet you want to link or select different fields within the same sheet to link.
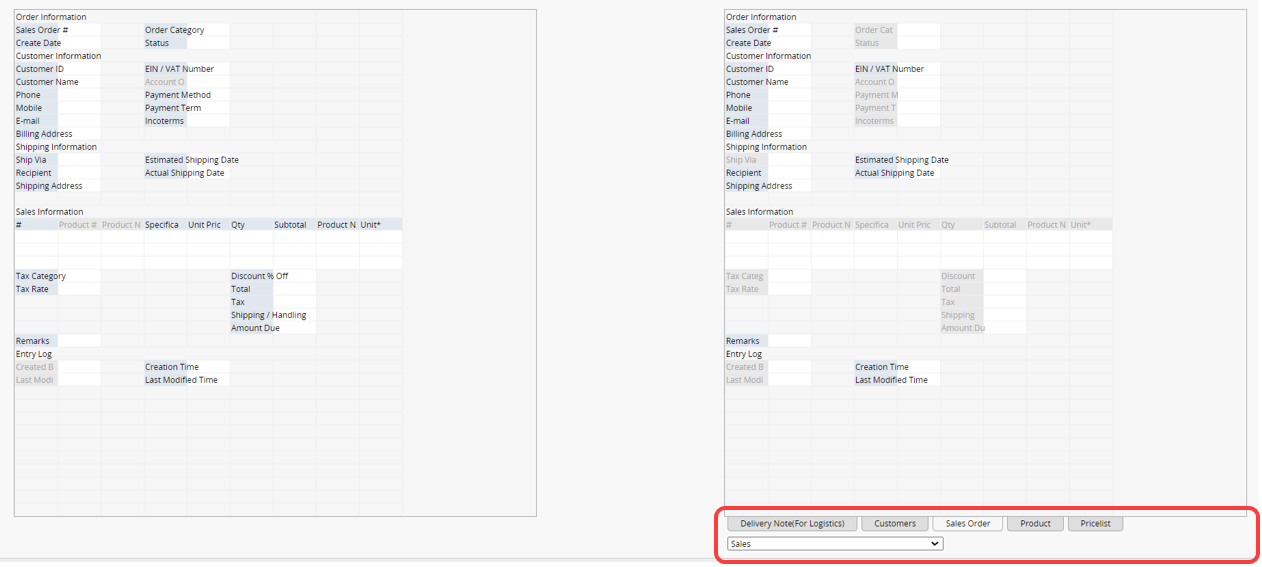
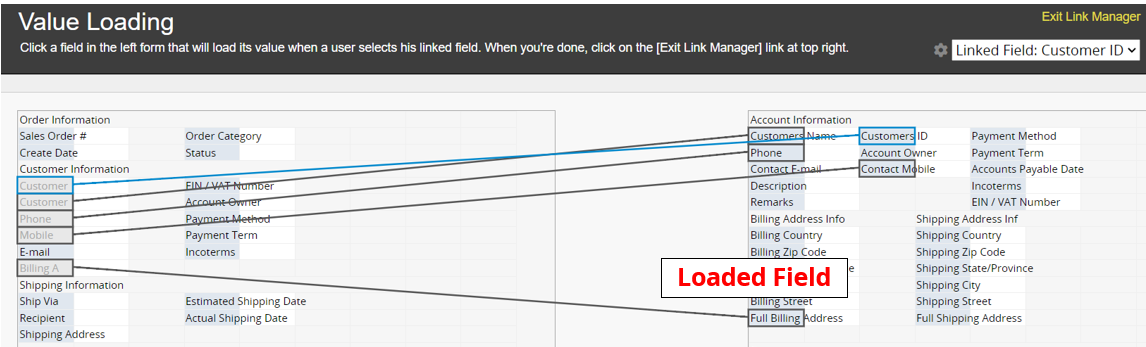
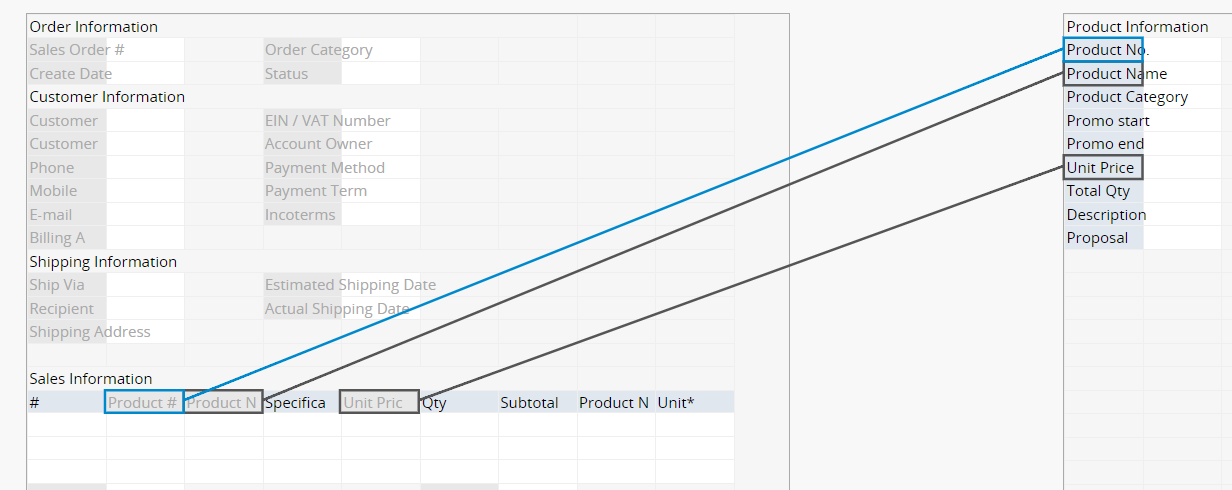
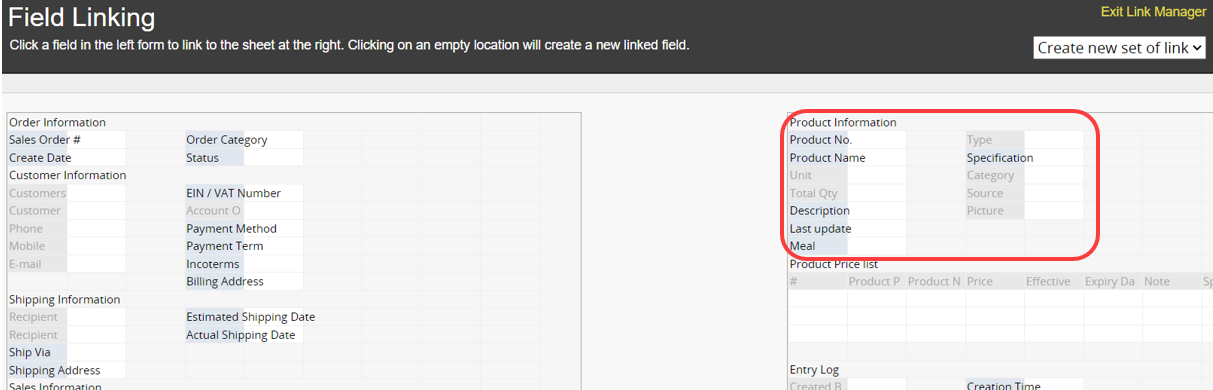
First, select a Field Header on the right side of the page. It will become the Linked Field, displayed in "blue". The Linked Field must have the Unique Value so that the system can correctly identify each record.
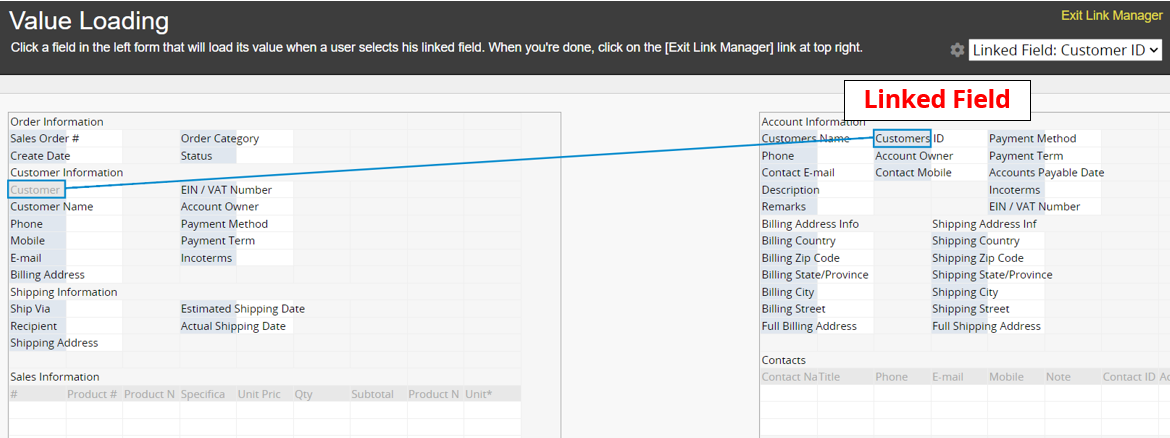
After configuring the Linked Fields, link the corresponding Loaded Fields on both the left and right pages. Loaded Fields will be displayed with gray borders and there can be multiple instances. You can drag a Loaded Field onto an existing field or simply select an empty space on the left page, and the corresponding field will be automatically added.
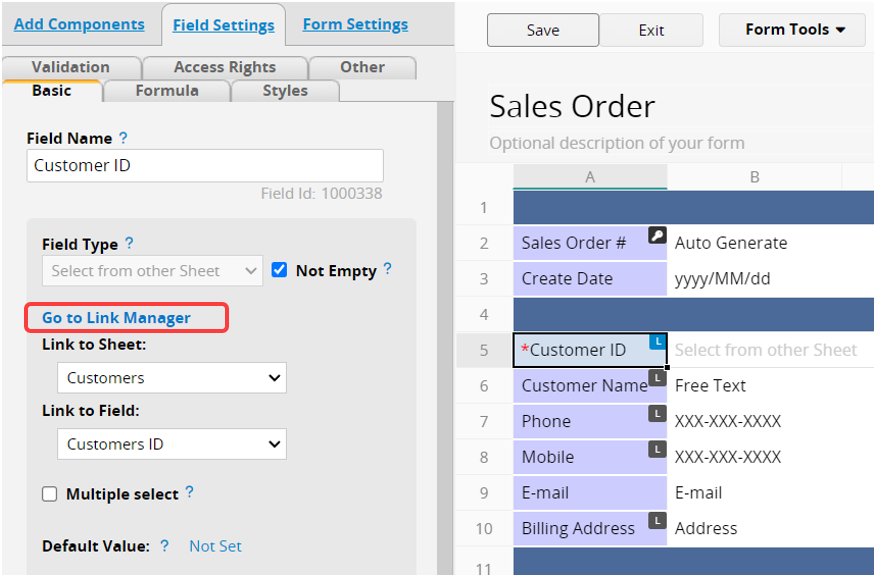
If there are Linked and Loaded Fields already set up in the sheet, you can directly select the field and click "Go to Link Manager" from the left sidebar.
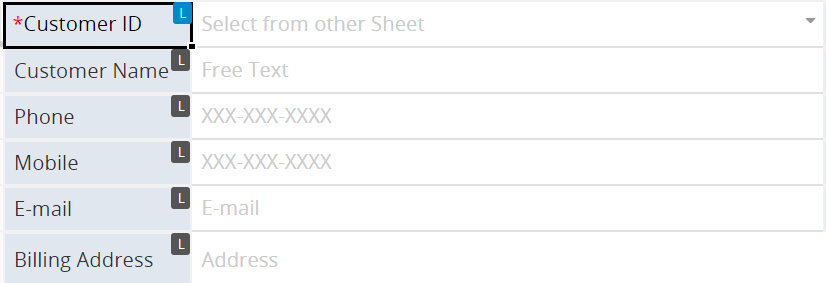
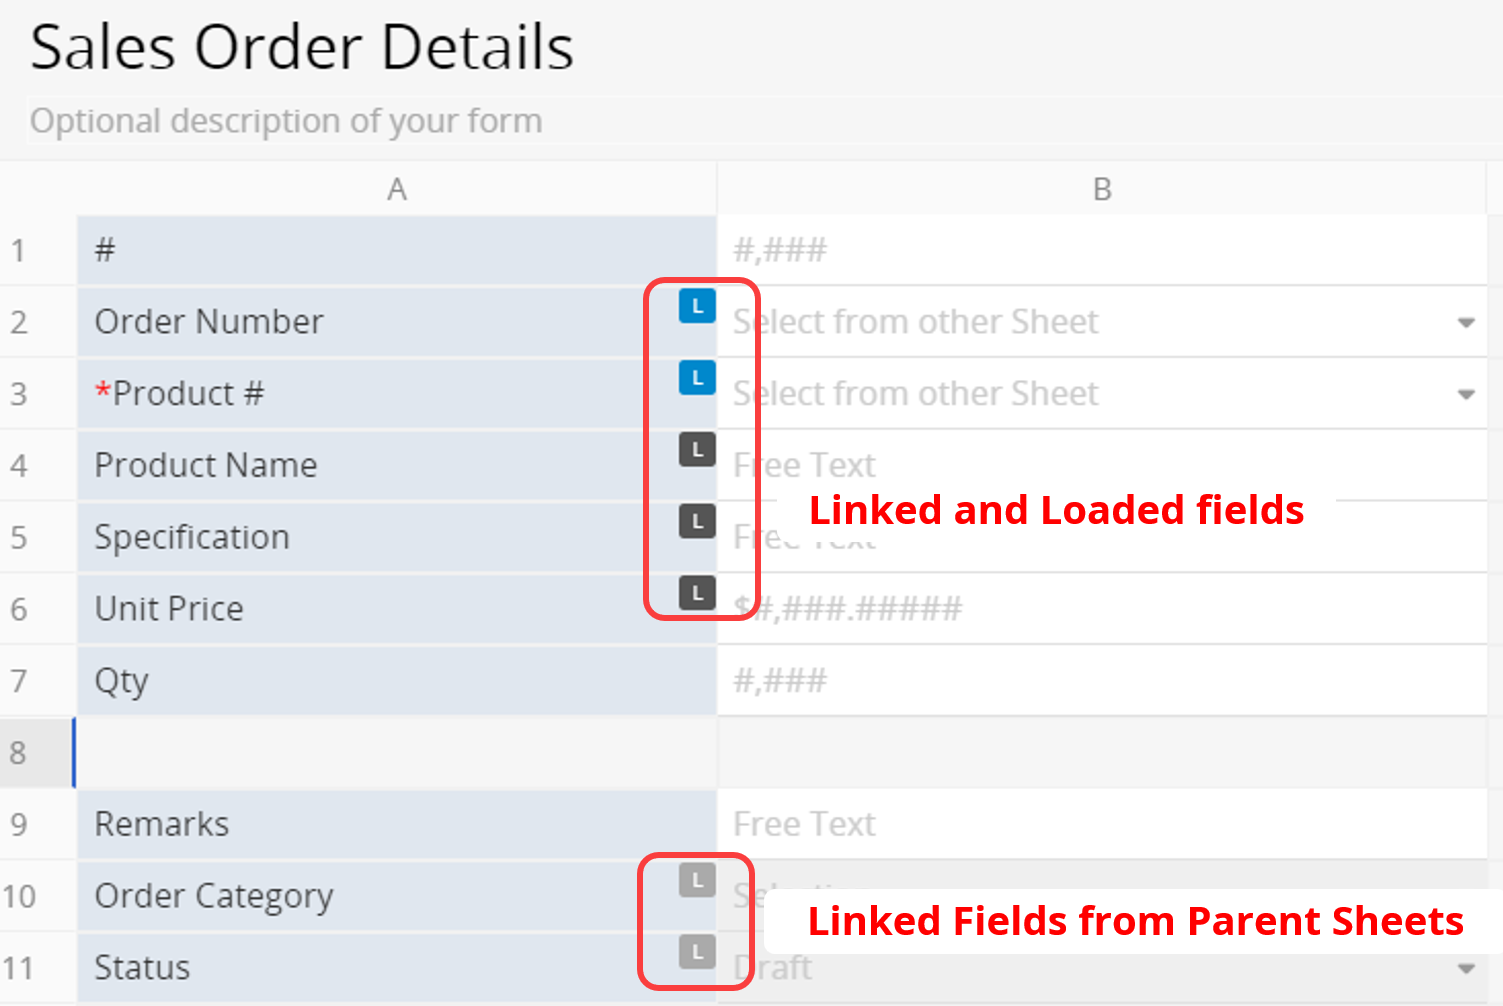
There will be a blue L icon in the Linked Field and a grey L icon in the Loaded Field.
Clicking on the icon will automatically highlight all the fields in the same set of Link & Load.
Note: If a light gray "L" icon is displayed at the top right of the loaded field, it indicates that the field is Linked From Parent Sheets. For more details, please refer to this chapter.
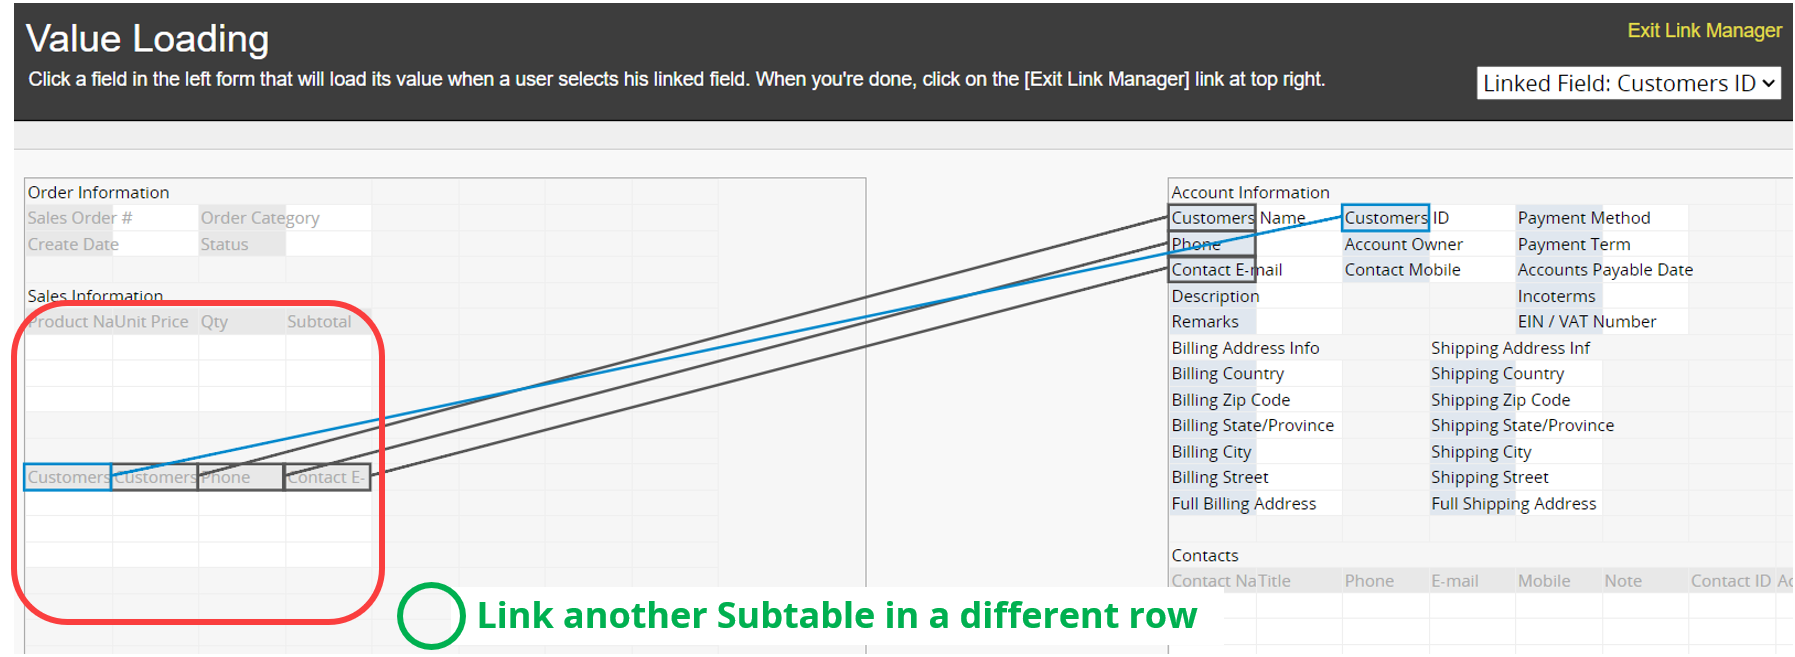
You can link and load data from other sheets into a Subtable. For instance, when entering data into a Subtable, you may want to automatically load related information into other fields after selecting a specific field, such as a "Product No.", which could then fill in the corresponding name, price, and so on.
For additional linking options related to Subtables, please refer to instructions on Generating a New Sheet From a Subtable and Adding a Reference Subtable.
When there is a Linked Field in the Subtable, you can enable the Multiple subtable rows at once option. However, you can only enable either Multiple subtable rows at once or Multiple select for a Linked Field.
Note: If the Multiple select option is checked, the linked field will no longer support Loaded Field configuration. If the corresponding Loaded Fields are already set for the Linked Field, the setting will be automatically canceled once the Multiple select option is checked, but the original field values will not be affected.

You can select multiple entries at once and populate them into the Subtable.
Note: You will need to close the window manually after entering the data. (If the Multiple subtable rows at once configuration is not checked, the window will close after selecting one entry.)
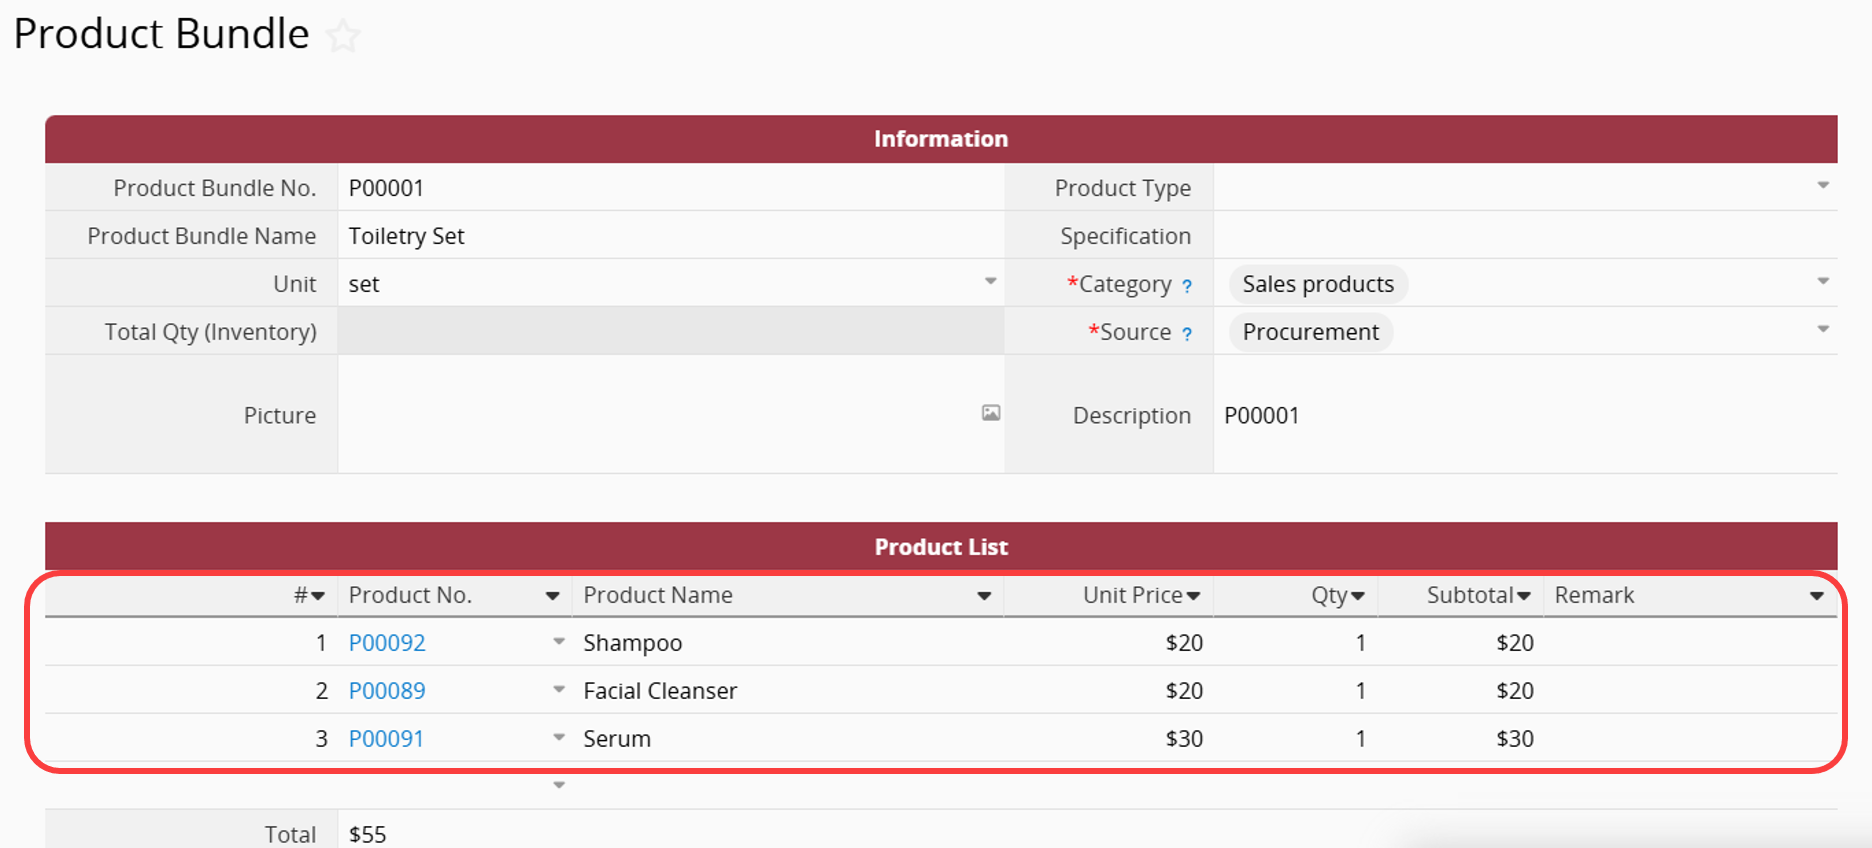
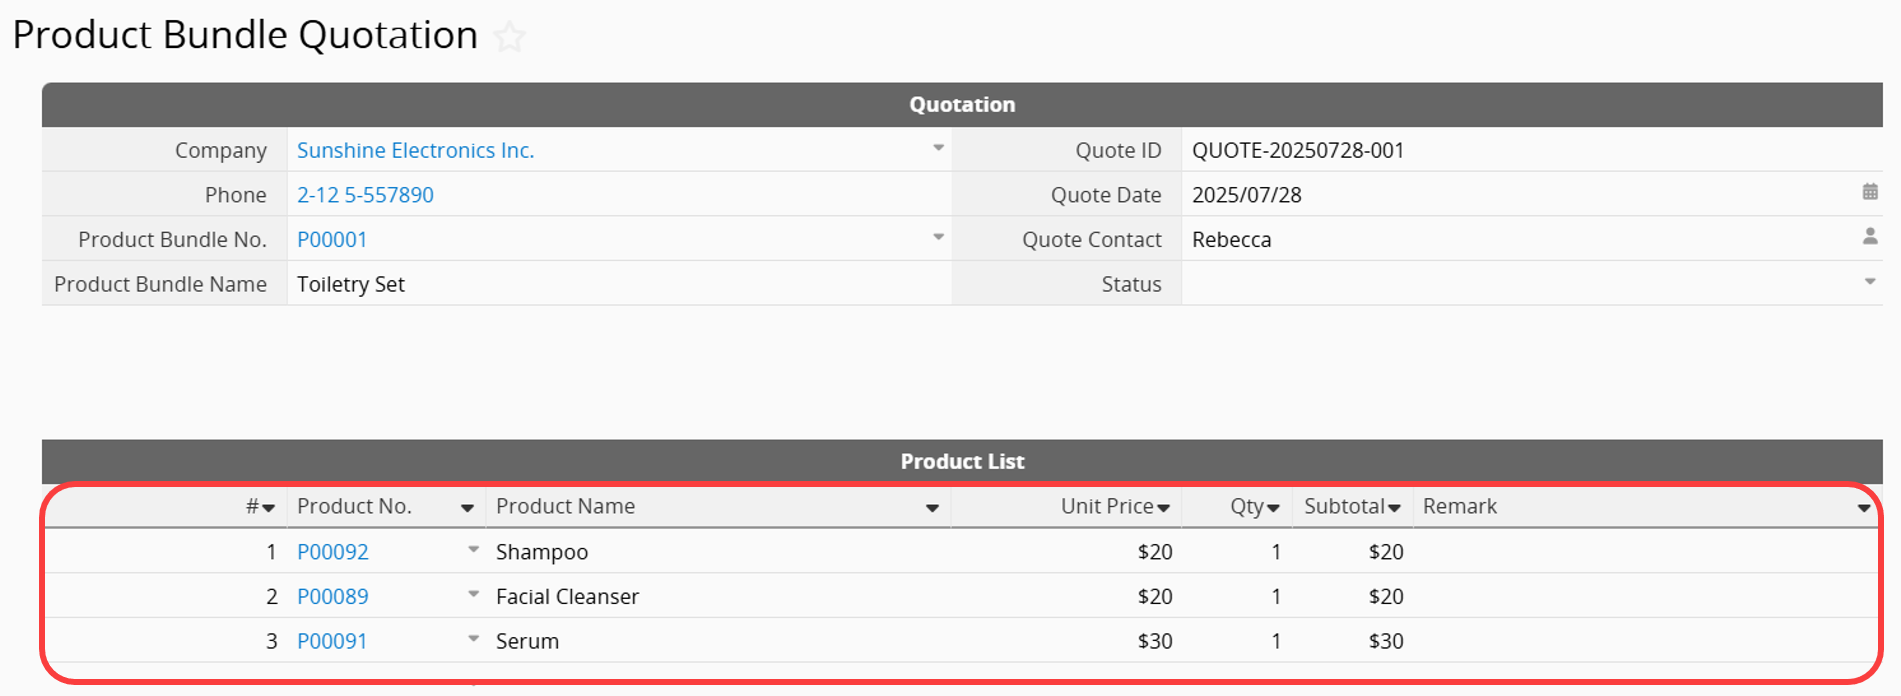
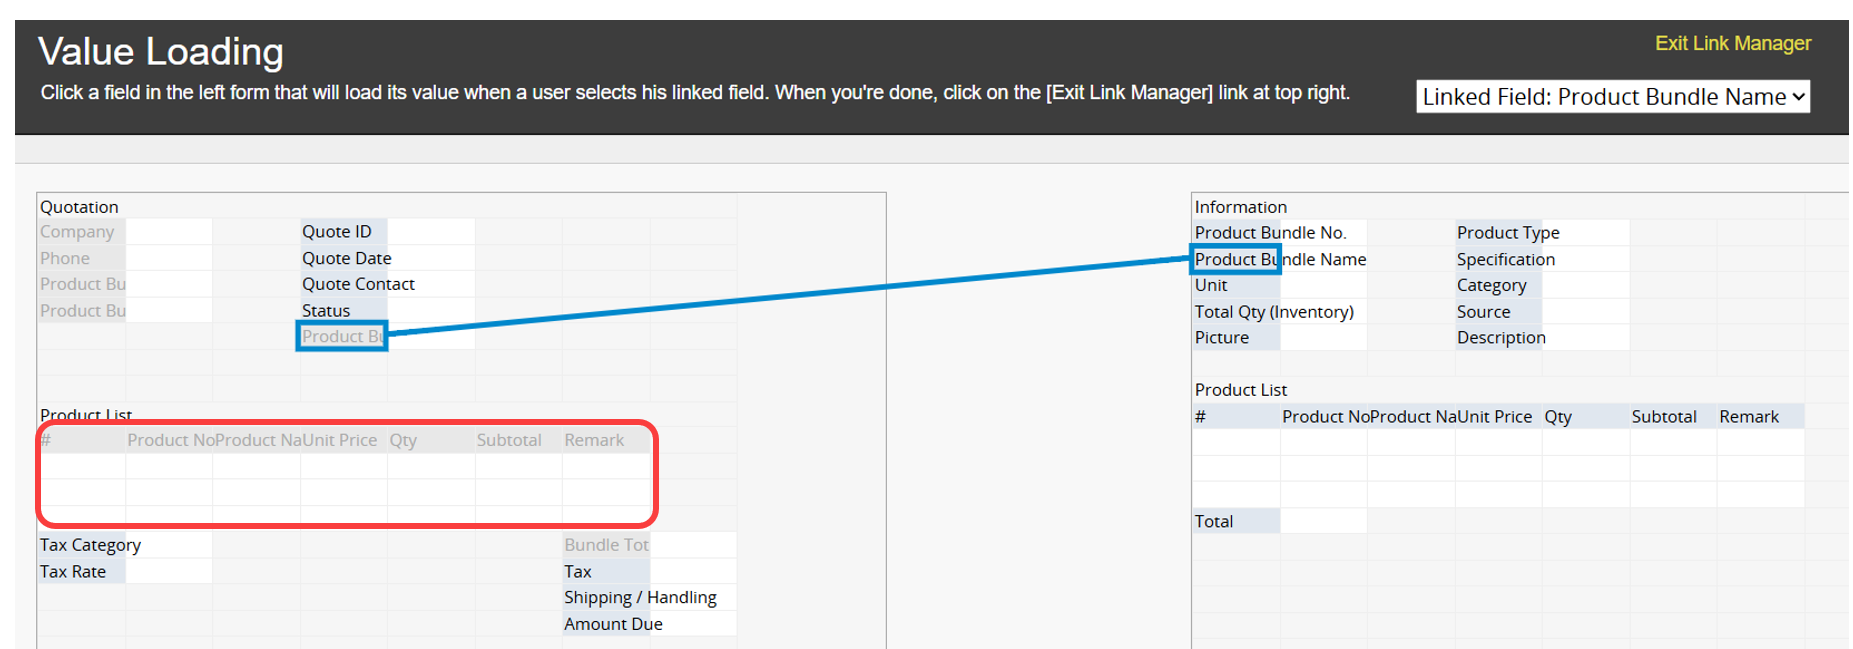
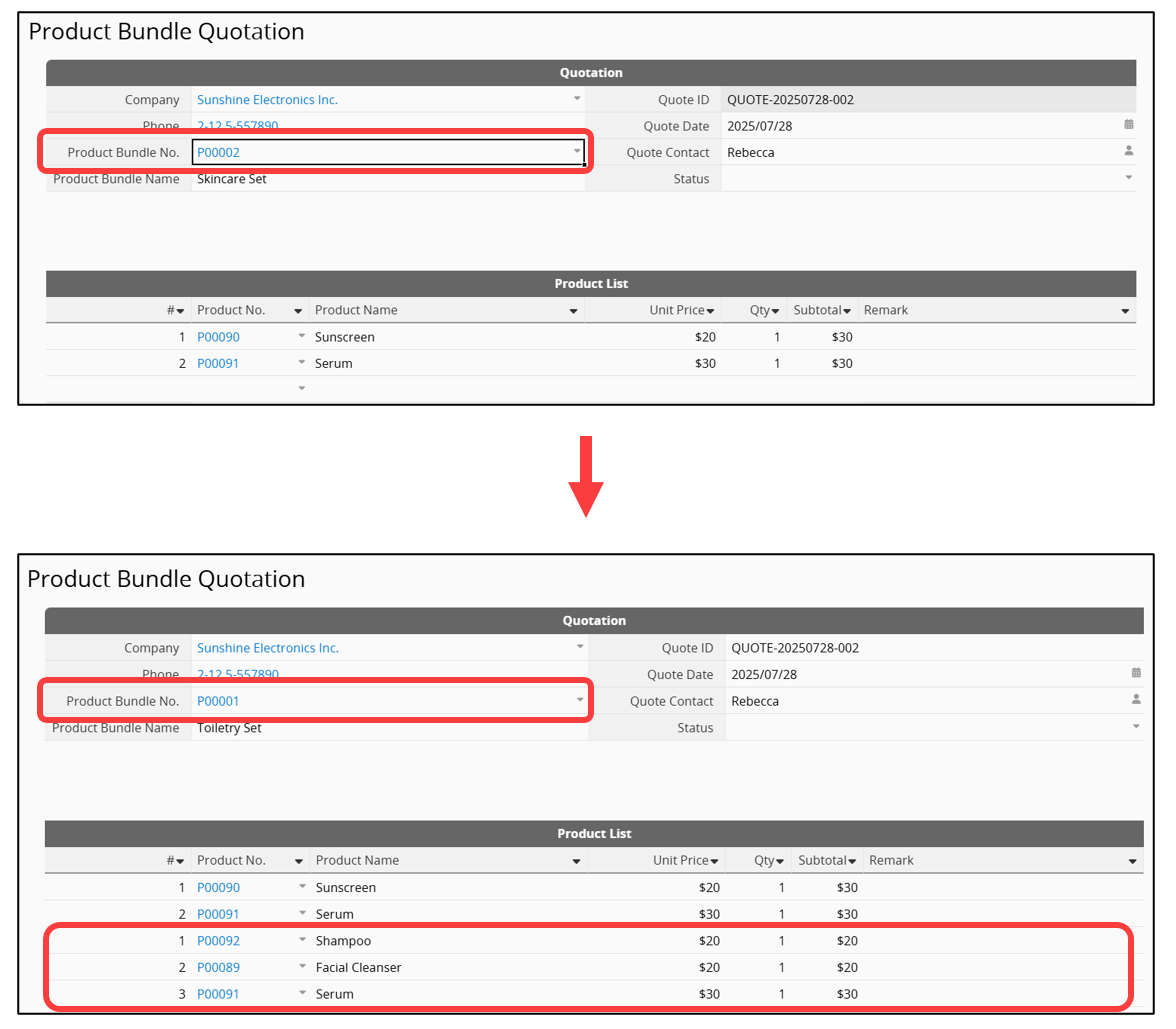
After linking to an independent field, you can choose to load all Subtable data from the source sheet. For example, in a "Product Bundle" sheet where the subtable lists individual products included in the bundle, when adding a product bundle to a "Quotation" sheet, you can use a Linked Field to load all product details from the subtable without manually selecting each product.
Since loading Subtable data is a unique feature, there are several configuration and operation limitations. Please refer to the sections below.
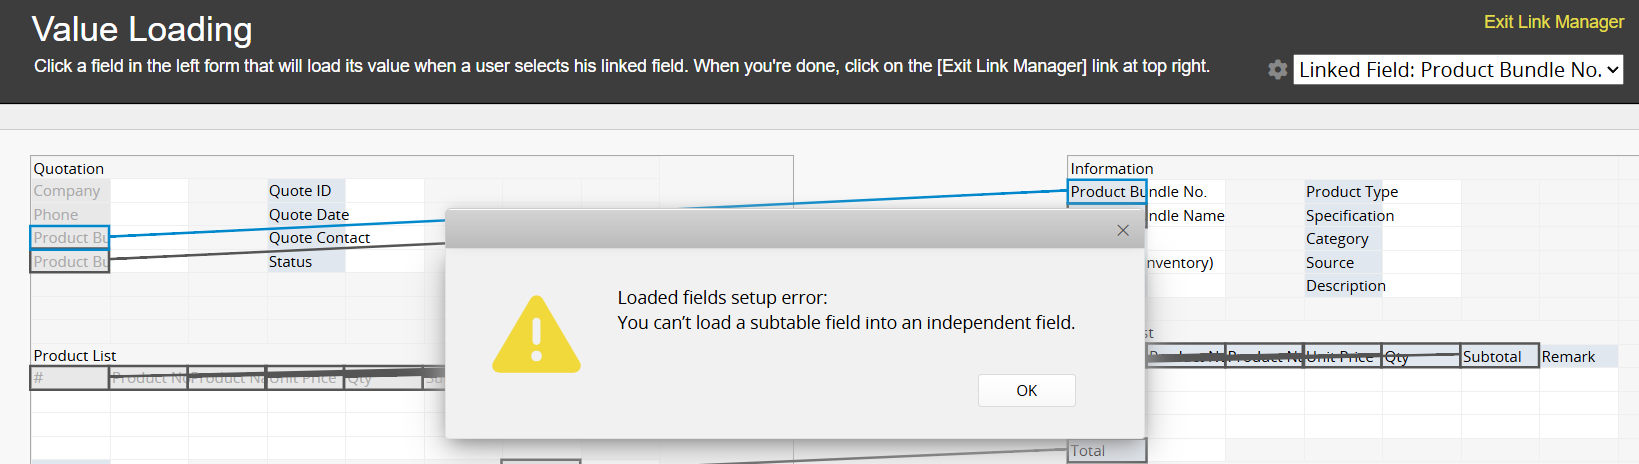
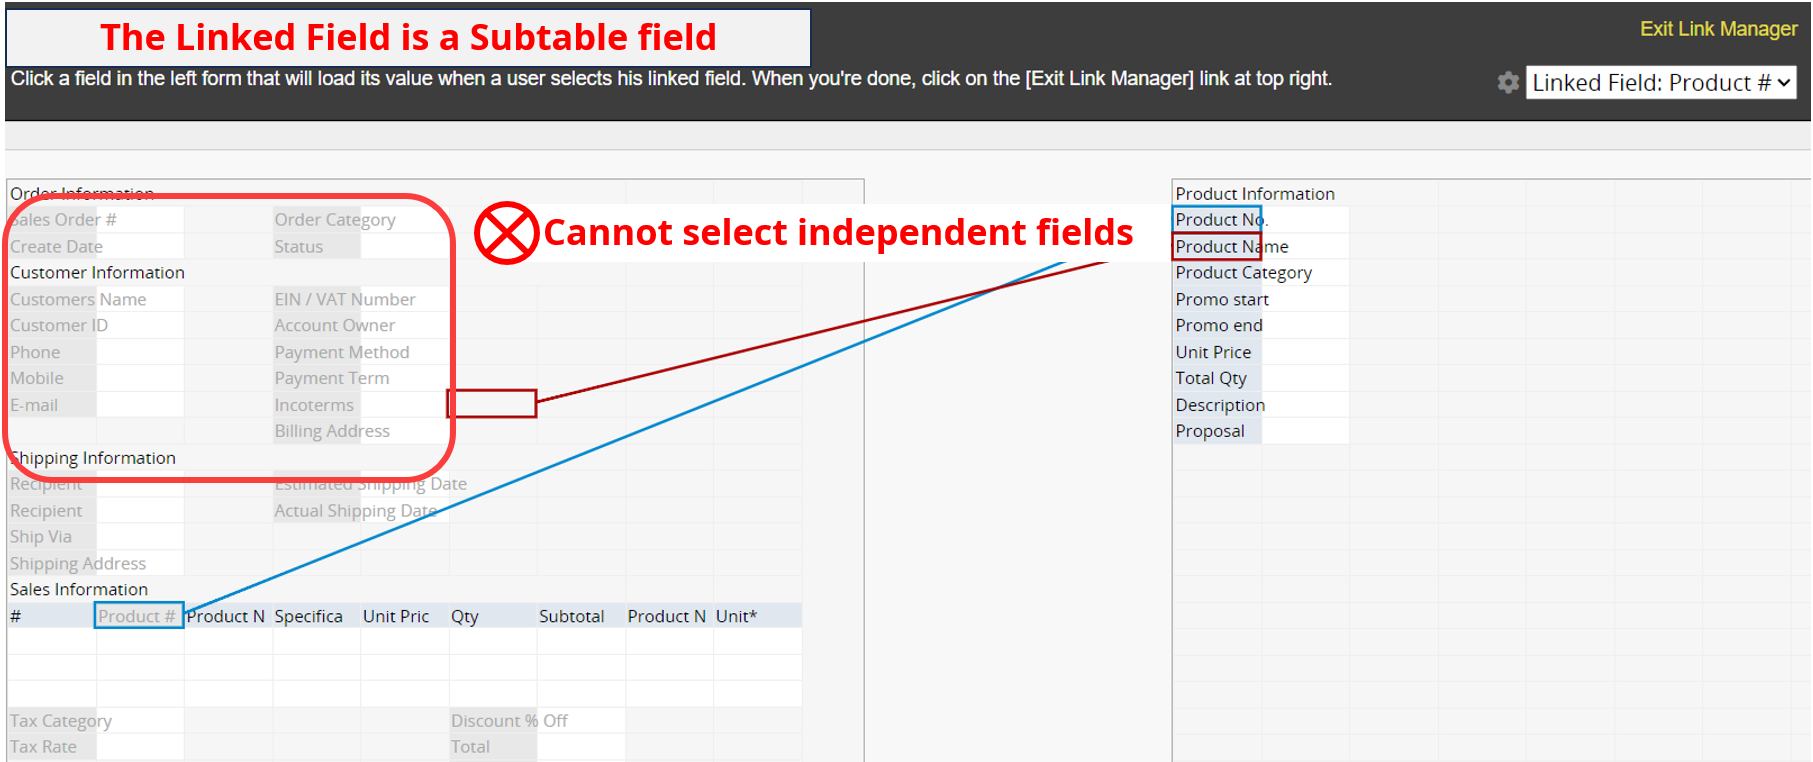
1. In the Link Manager, Subtable fields can only be mapped to existing Subtable fields on the target sheet. You cannot drag a source Subtable field to a blank area to create a new one. Please create the Subtable in Design Mode first, then set the loaded fields.
2. Field Type Restrictions
Linked Fields: Must be independent fields mapped to other independent fields.
Loaded Fields: Subtable fields can only be mapped to Subtable fields; they cannot be loaded into independent fields.
3. Subtable Mapping Rules
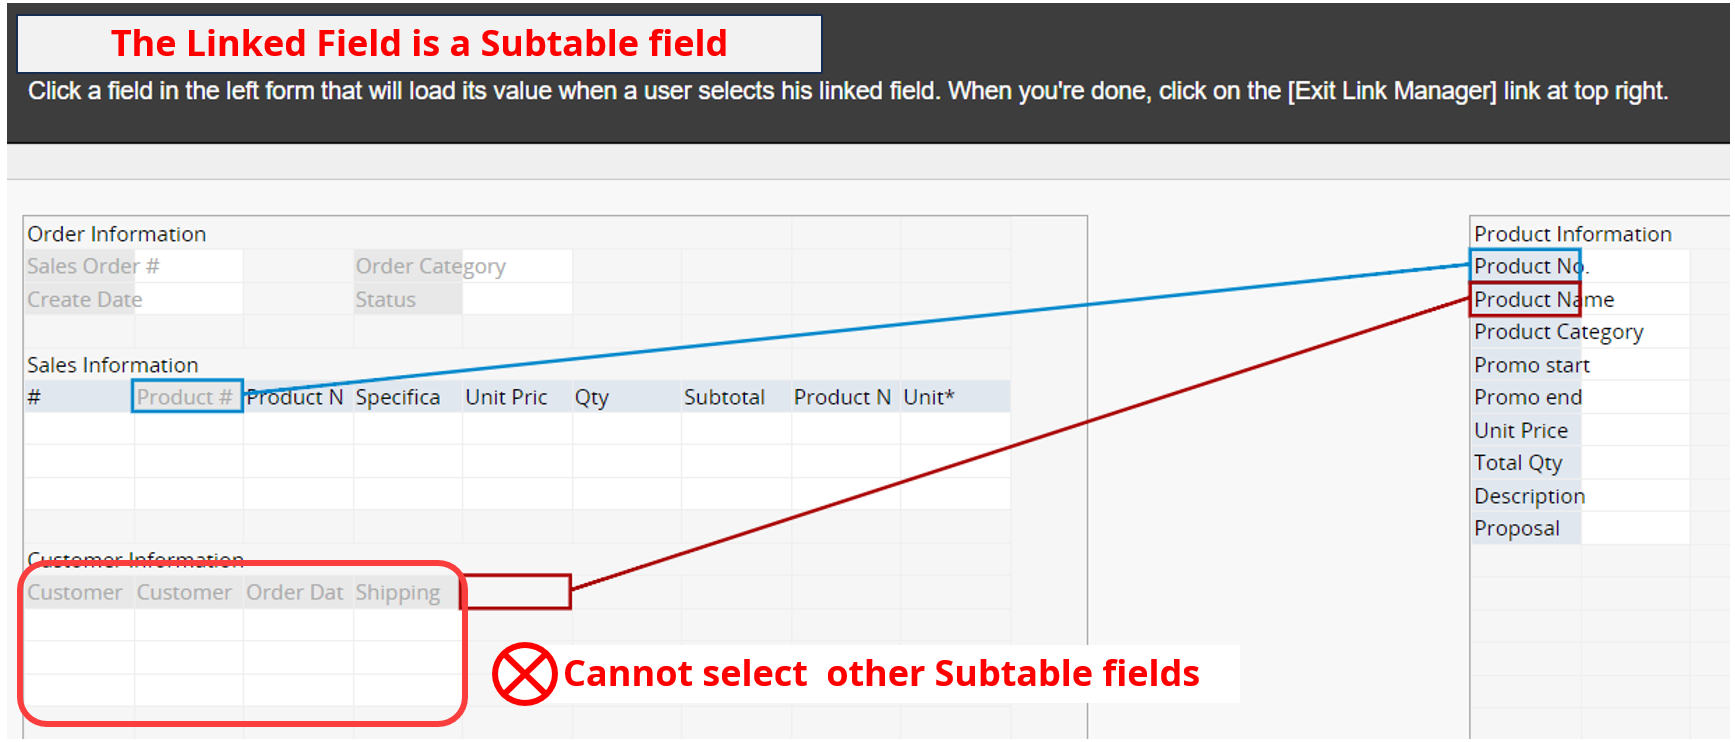
(1) A single linked field cannot load multiple Subtables.
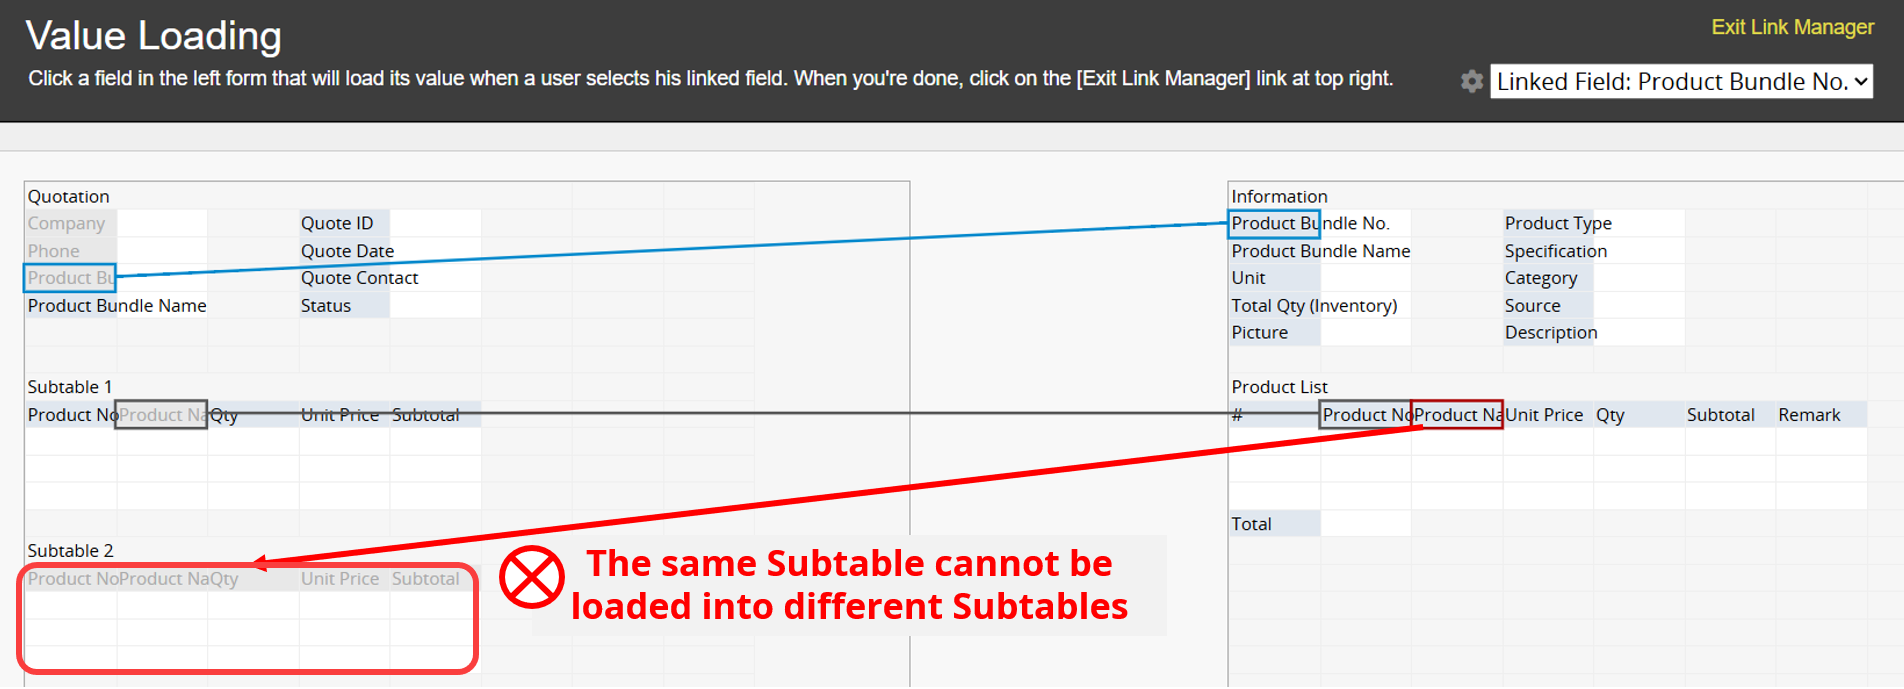
(2) The same Subtable from the source sheet cannot be loaded into multiple Subtables on the target sheet using the same link.
(3) Two different Subtables from the source sheet cannot be loaded into the same Subtable on the target sheet using the same link.

(4) Once a Subtable is configured with this type of Link and Load, it cannot be assigned to another link set. If you switch to a different link set, the Subtable will appear grayed out and cannot be selected.
4. Changes to Subtable loading in the Link Manager are not recorded in the Previous Versions in the Design Mode.
5. Syncing Linked and Loaded Fields does not apply to fields loaded from Subtables.
1. Unsupported Scenarios:
(1) Subtable loading is not triggered when using Convert Records.
(2) Subtable loading is not triggered during Importing.
2. Data Loading and Retention Rules
(1) Once Subtable data is loaded and saved, changing the Linked Field will append new data without automatically clearing or overwriting the existing data. It is recommended to clear the Subtable before modifying the Linked Field.
(2) If the Subtable already contains manually entered data, clear it before loading to avoid errors.
(3) If you change or clear a Linked Field before saving, any unsaved loaded Subtable data will also be cleared.
3. If the source sheet has a Fixed Filter and the Subtable Field Type is Select From Other Sheet, loading may cause an error.
1. Subtable loading is not supported when filling out sheets in the Ragic App.
2. Subtable loading is not supported when filling out embedded forms.
If you need to link and load different data from the same sheet multiple times, such as when the "Orderer" and "Recipient" in a "Sales Order" sheet are different but both come from the "Customer" sheet, this situation is not suitable for using Link and Load for a Subtable
For example:
Open Link Manager, and you will see the first set of Link and Load from "Customer" on the "Sales Order" sheet. In the menu at the top right, you can select to create a new set of links.
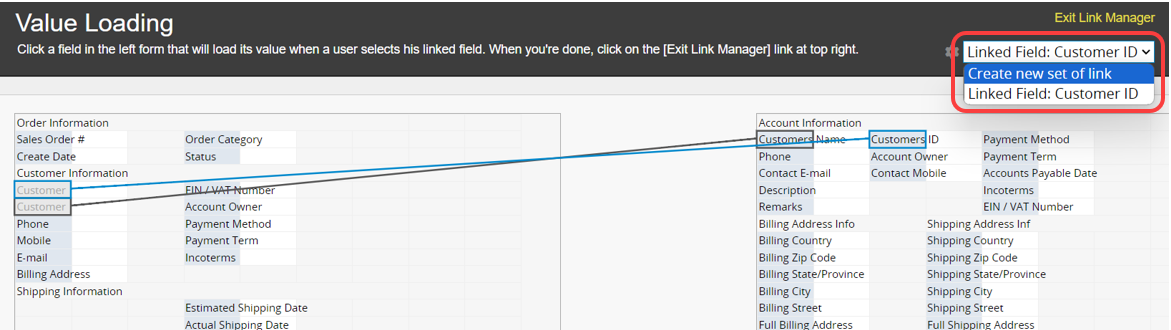
Then, you can create a second set of Link and Load from the same sheet.
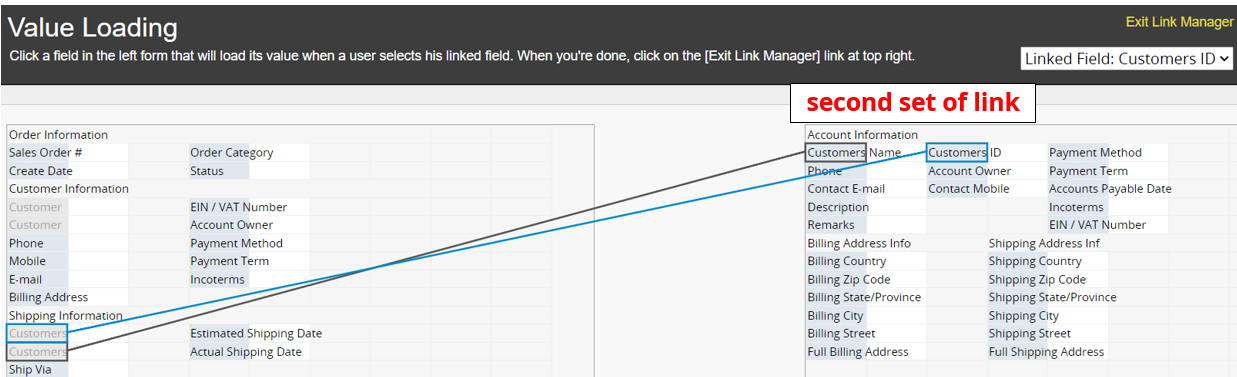
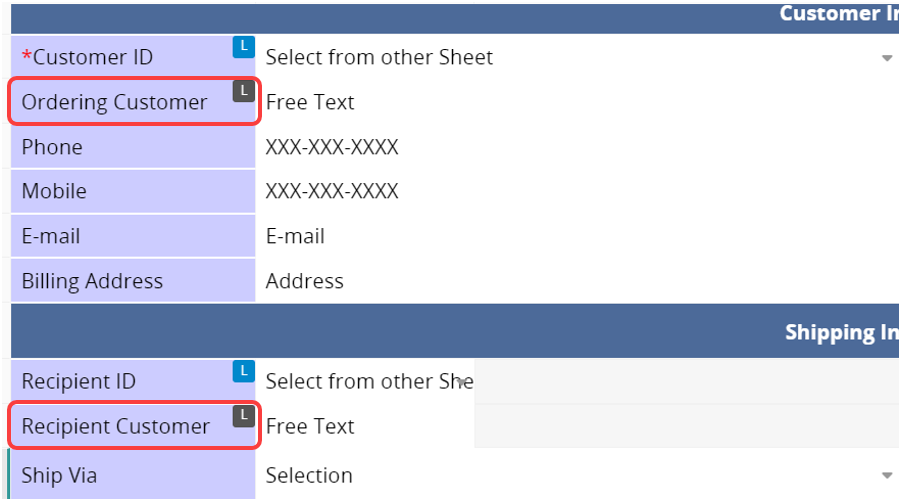
It is recommended to edit the field names to ensure that the information is clearly defined. For example, on the "Sales Order" sheet, the two sets of Links and Loads from the same source can be labeled as "Ordering Customer" and "Recipient Customer".
After saving, you can link and load the customer data twice.
To remove an existing link, go to the Link Manager, and click the red cancel icon next to the link you want to delete. If you remove the link for the Linked Field with the blue outline, all corresponding Loaded Fields will also be removed.
If you need to change the Linked Field, you can simply drag it to the desired field without unlinking all fields and resetting the Link and Load.
Example:
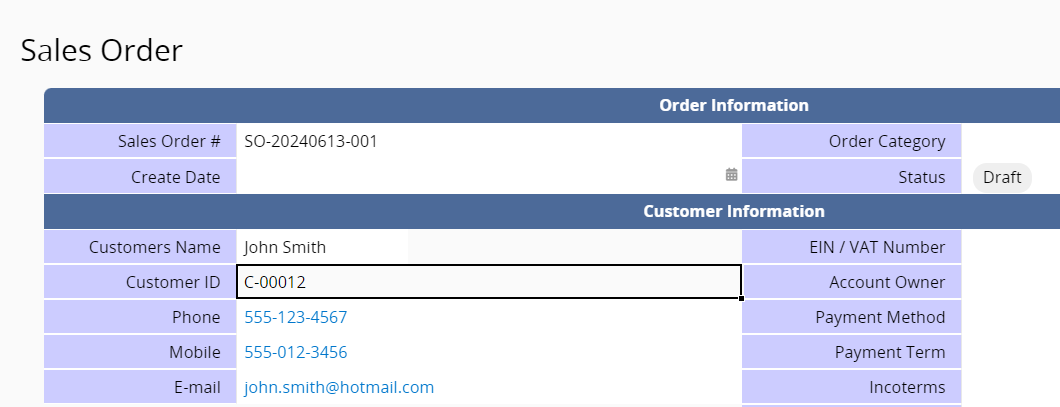
On the sheet "Sales Order," the Customer Name is linked from the Customer sheet. However, since there may be different customers who share the same name, it's better to change the Linked Field to "Customer ID" instead, which can identify customers more effectively.
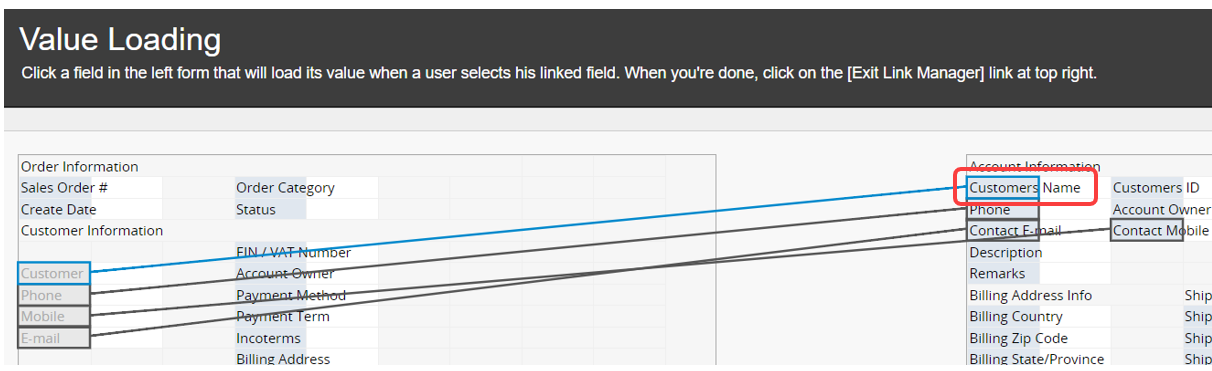
To change the Linked Field, simply click and hold the left mouse button on the "Customer Name" field, drag it to the "Customer ID" field, and release the left mouse button to complete the change.
Then you can adjust the field names, and users will now select values from the "Customer" sheet based on the "Customer ID". Previously saved records will also have the "Customer ID" as the link.
Note: You can also change the Loaded Field in the same way. Please note that once the Loaded Field is changed, existing loaded values will be updated accordingly. For more details, please refer to this article.
When setting up Link and Load, fields in the source sheet that cannot be linked will appear gray and cannot be selected to prevent incorrect links.
Below are some common linking mistakes:
The Linked Field is one type of Selection field (select from another sheet ).
To ensure each selection is uniquely identifiable, the Linked Field must come from a Unique Value field on the source sheet (e.g., ID number, serial number). If some fields on the right-hand side appear grayed out during setup, it's usually because they are Selection fields, Linked fields, or Numeric fields, which typically do not qualify as Unique Value fields and cannot be used as the Linked Field.
When the linked field is an independent field:
Loaded Fields must be independent fields mapped to independent fields, and Subtable fields must be mapped to Subtable fields only.
For restrictions on loading Subtable data via independent Linked Fields, please refer to this section.
When the linked field is a Subtable field:
Loaded Fields must be Subtable fields only.
Linking Different Subtables Simultaneously
You cannot link different Subtables simultaneously because each Subtable stores data independently. This prevents the transfer of data selected in Subtable A to Subtable B. Once linked to one Subtable, the others will appear grayed out and cannot be selected.
There won't be any technical issues, but having different Subtables on the same row could lead to confusion.
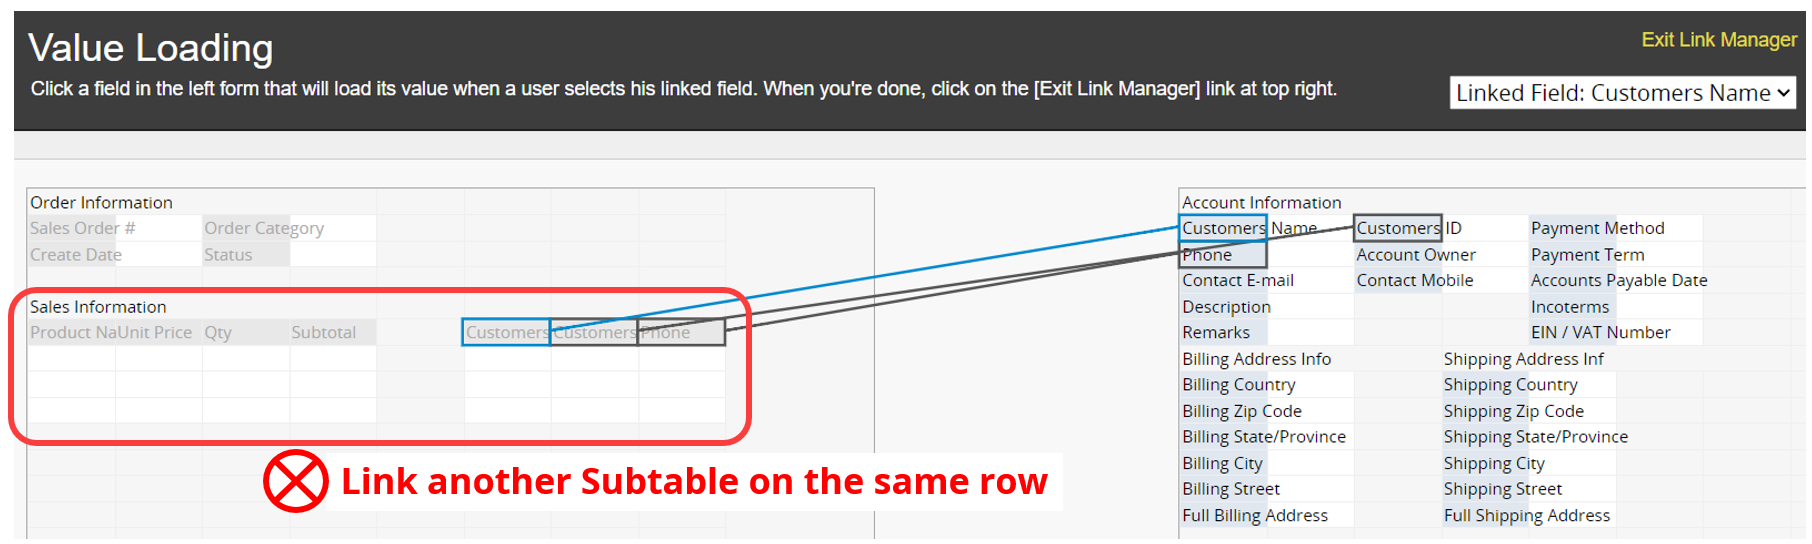
It's recommended to link to another row of Subtables instead.
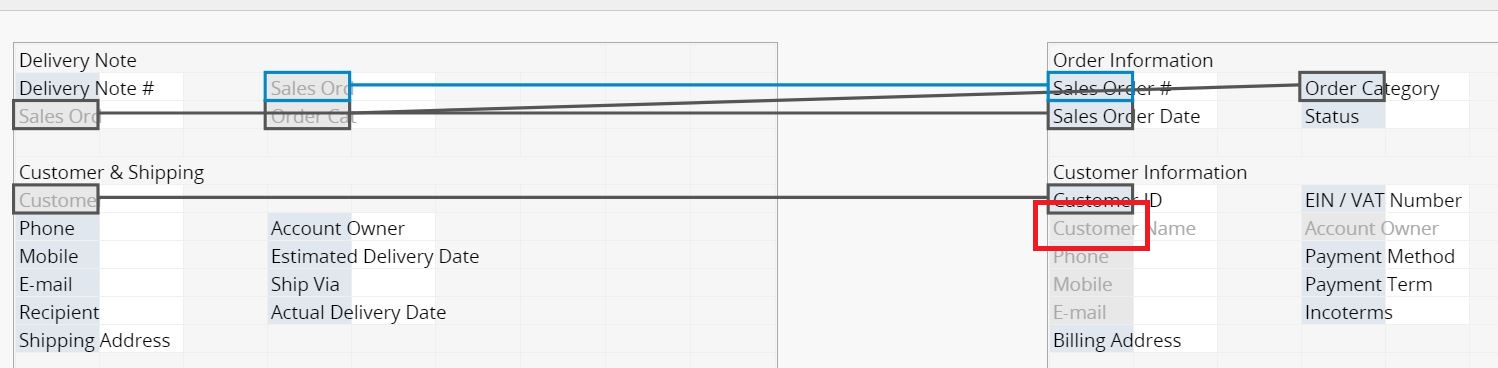
You cannot load a field again if it has already been loaded in another Multiple Versions sheet.
For instance, consider a "Delivery Note (For Sales)" and a Multiple Versions sheet named "Delivery Note (For Logistics)". In "Delivery Note (For Sales)", you have already loaded data from the "Customer Name" field.
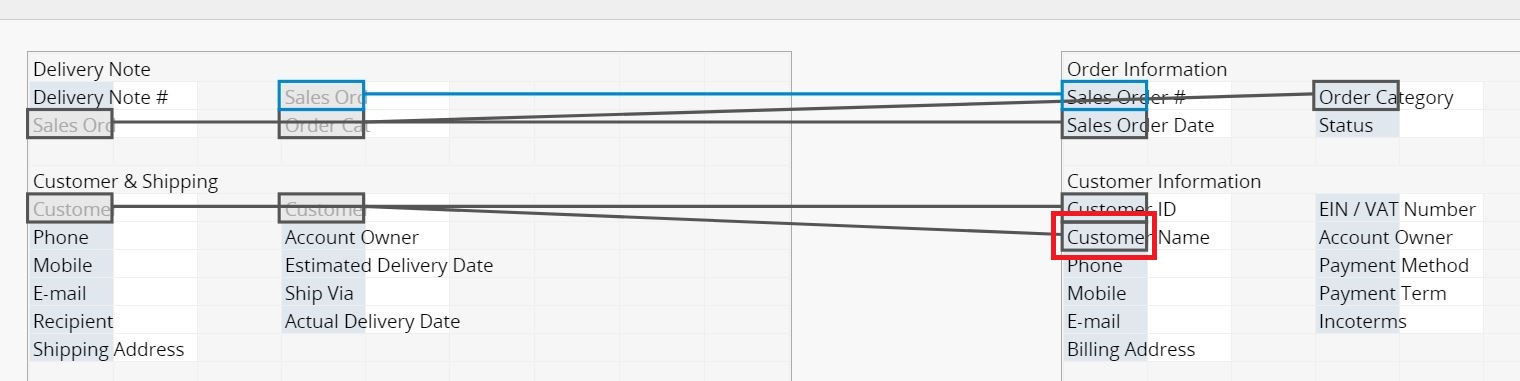
In the Multiple Versions sheet "Delivery Note (For Logistics)", even if you delete the "Customer Name" field, you cannot select it again for loading (it appears greyed out). If you wish to add the field back, please refer to this article.
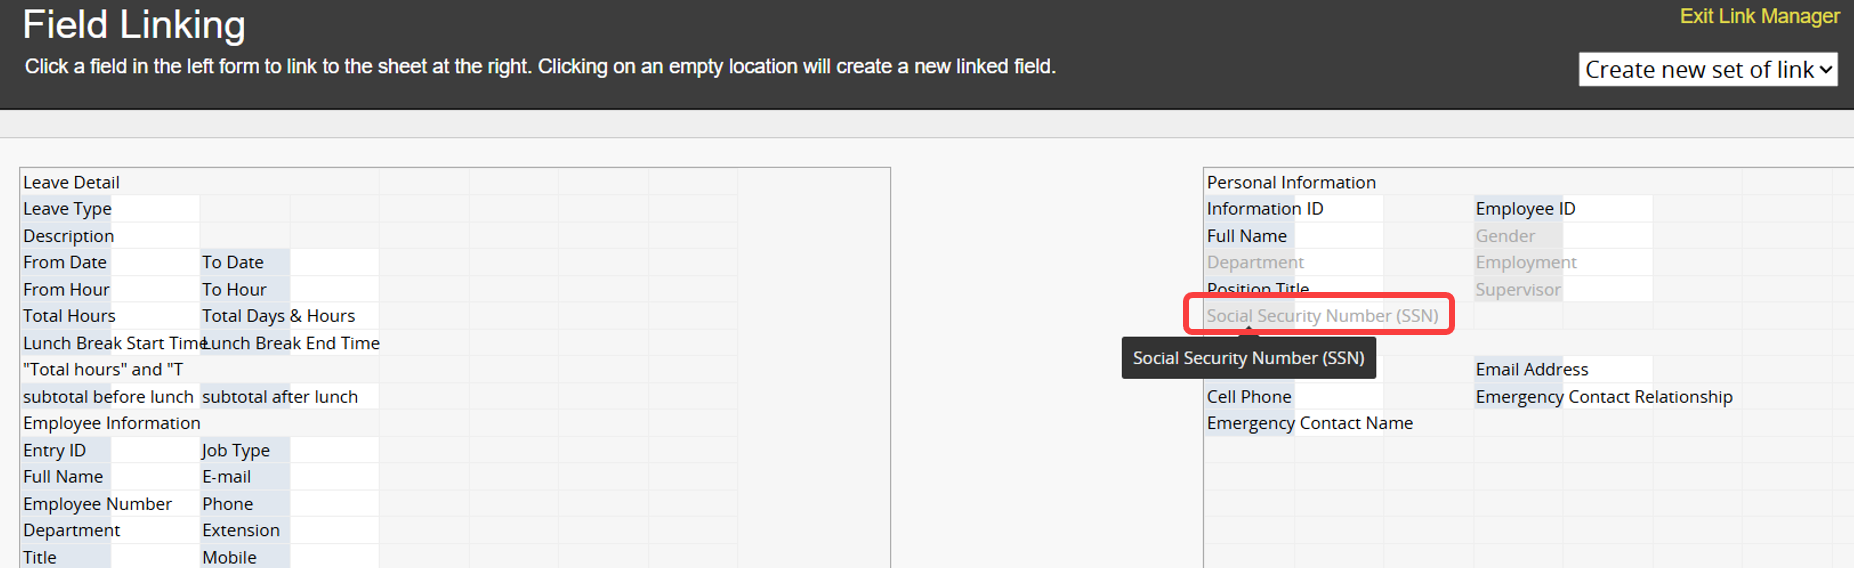
Fields with Field Level Access Rights cannot be set as Linked Fields. They will appear grayed out in the Link Manager and cannot be selected.
For example, if the "Social Security Number (SSN)" field in the "Employee" Sheet is configured with Field Level Access Rights, it cannot be selected as a Linked Field.
If a field on sheet A has its value loaded from sheet B, changes made to the value on sheet B will not be reflected in the previous entries on sheet A.
Assuming there is a sheet A called "Sales Orders" and sheet B called "Customer", when an order for Martha Stewart is finalized, her address information is populated using Link and Load from the "Customer" sheet. Suppose Martha changes her address in the "Customer" sheet. However, the previous orders should still display her original address at the time of the order, not the new address after moving.
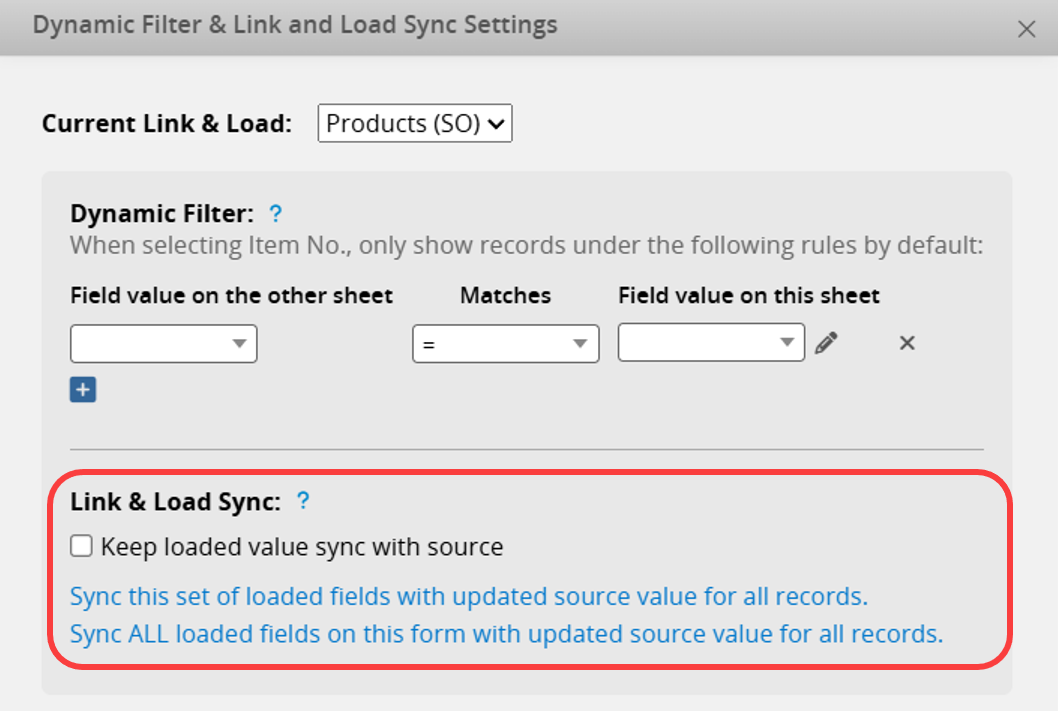
In some cases, after modifying values on sheet B, you may want the Loaded Fields on sheet A to update synchronously. In such situations, you can go to Design Mode under the Form page and select Form Tools to see a list of sheets that are linked with Link & Load. Then, click on the gear icon next to the appropriate sheet.
In the pop-up window, you can choose:
1. To sync this set of linked fields or ALL linked fields with updated source values for all records at once.
2. To keep the loaded values always updated when the source sheet is updated, check the option Keep loaded value sync with source. This will trigger a sync whenever a record in the source sheet changes.
Note:
1. The maximum limit for Keep loaded value sync with source in a single set of linked fields is 500 records. However, manually executing the link and load sync has no record limit.
2. The option to Keep loaded value sync with source is turned off for imports. Users will need to perform a manual Link and Load sync after importing.
3. When Linking and Loading from the same sheet, the Keep loaded value sync with source cannot be triggered.
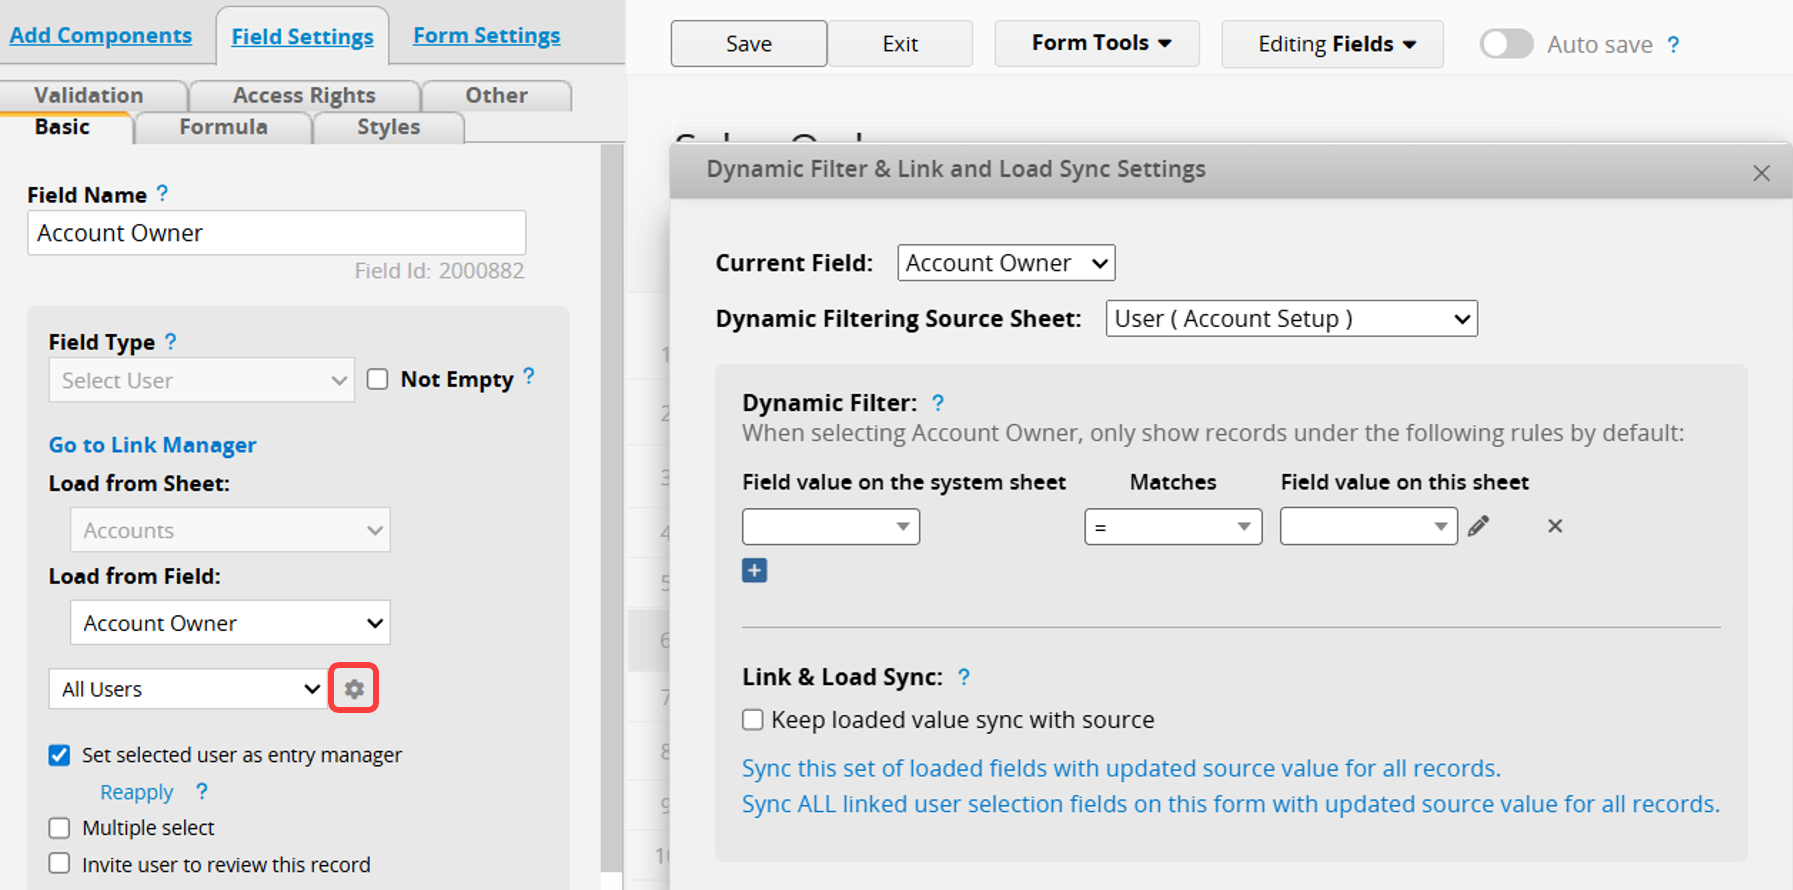
You can link and load field values from the system's User Sheet into your sheet using the Select User field. Please refer to this article for the instructions.
Since the Select User field is linked to the system's User Sheet, you can also click the gear icon in the "Field Settings" to open the "Dynamic Filter Setting".
For more detailed information about Link & Load, you can refer to the following tutorial video.
 Thank you for your valuable feedback!
