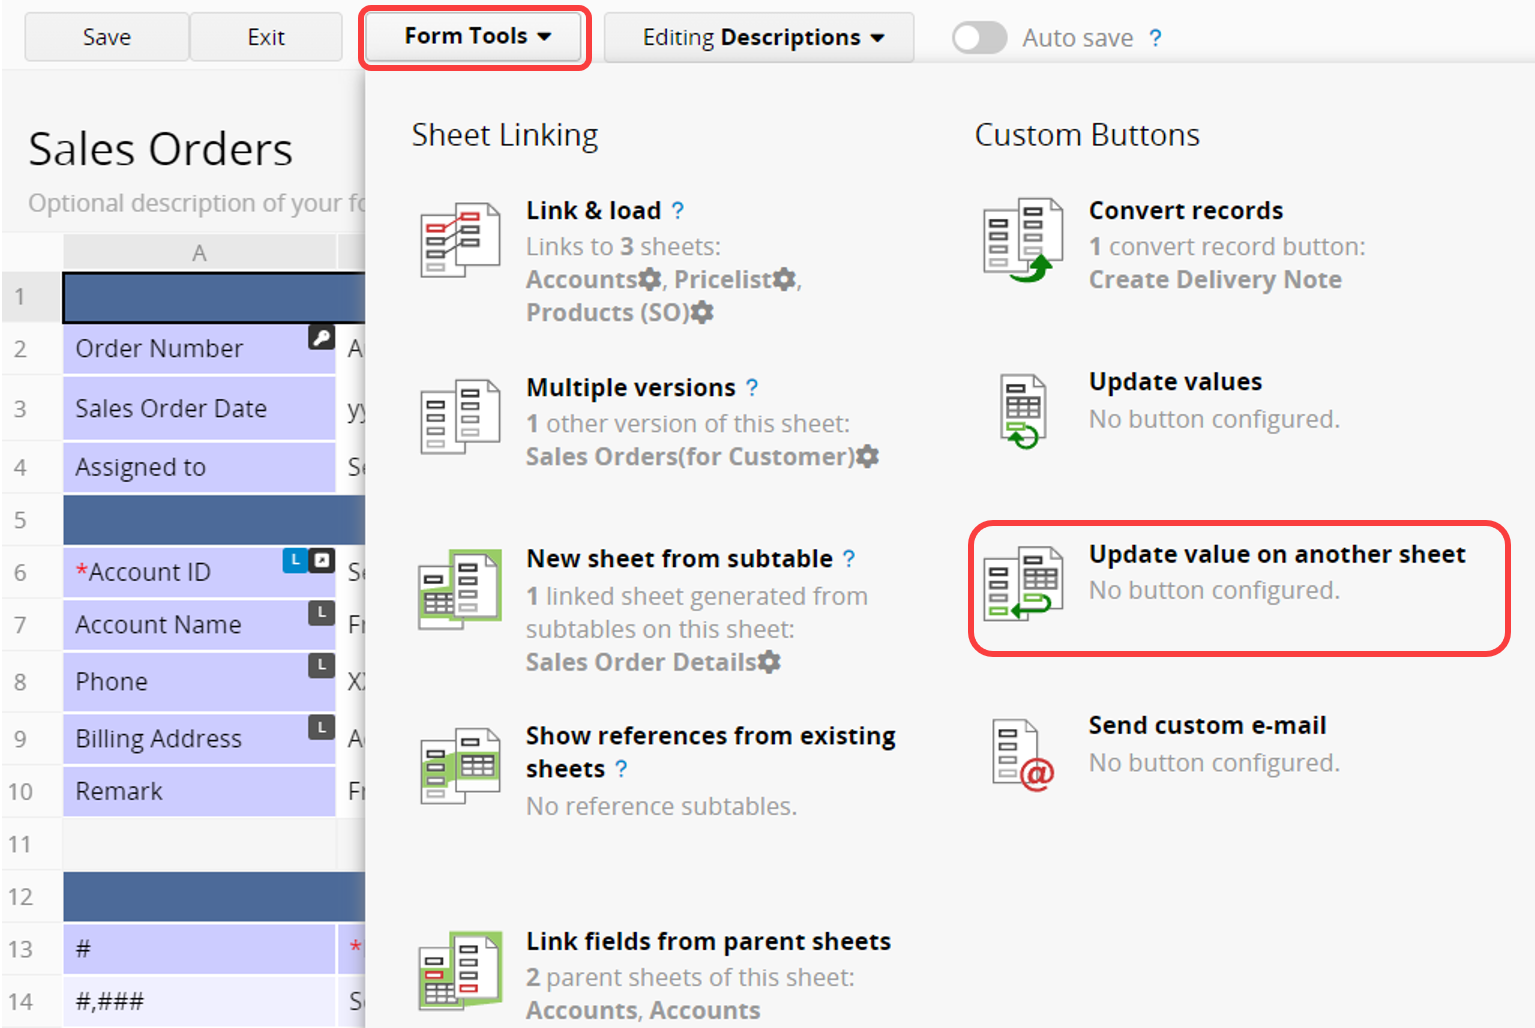
If you want to update field values in sheet A's record according to the values in a record from sheet B. For example, to deduct inventory after confirming a sales order, you can use the Update value on Another Sheet button. Here's an example using inventory deduction: Suppose there are two sheets, "Sales Orders" on the left and "Products" on the right.

To change the inventory in the "Products" sheet based on a record from "Sales Orders", you need to set up a button within the "Sales Orders" sheet. Enter the Design Mode of the Form Page, select Form Tools, and find Update Value on Another Sheet under the Custom Buttons category.
Choose the sheet to be updated from the pop-up window, then configure the following aspects: how to update values on another sheet and the conditions for updating values on another sheet.
Note: Updates can only be made to independent fields, not to Subtable fields.

Using "inventory deduction" as an example.
Use value from this field on data source sheet: Qty (this is a Subtable field)
To update: "-" (Select "subtract" since it's an inventory deduction; choose "add" if you need stock replenishment.)
Update this field on the update target sheet: Total Qty (Inventory)
To update multiple fields at once, click + to add them.
Note: The execution sequence is from top to bottom
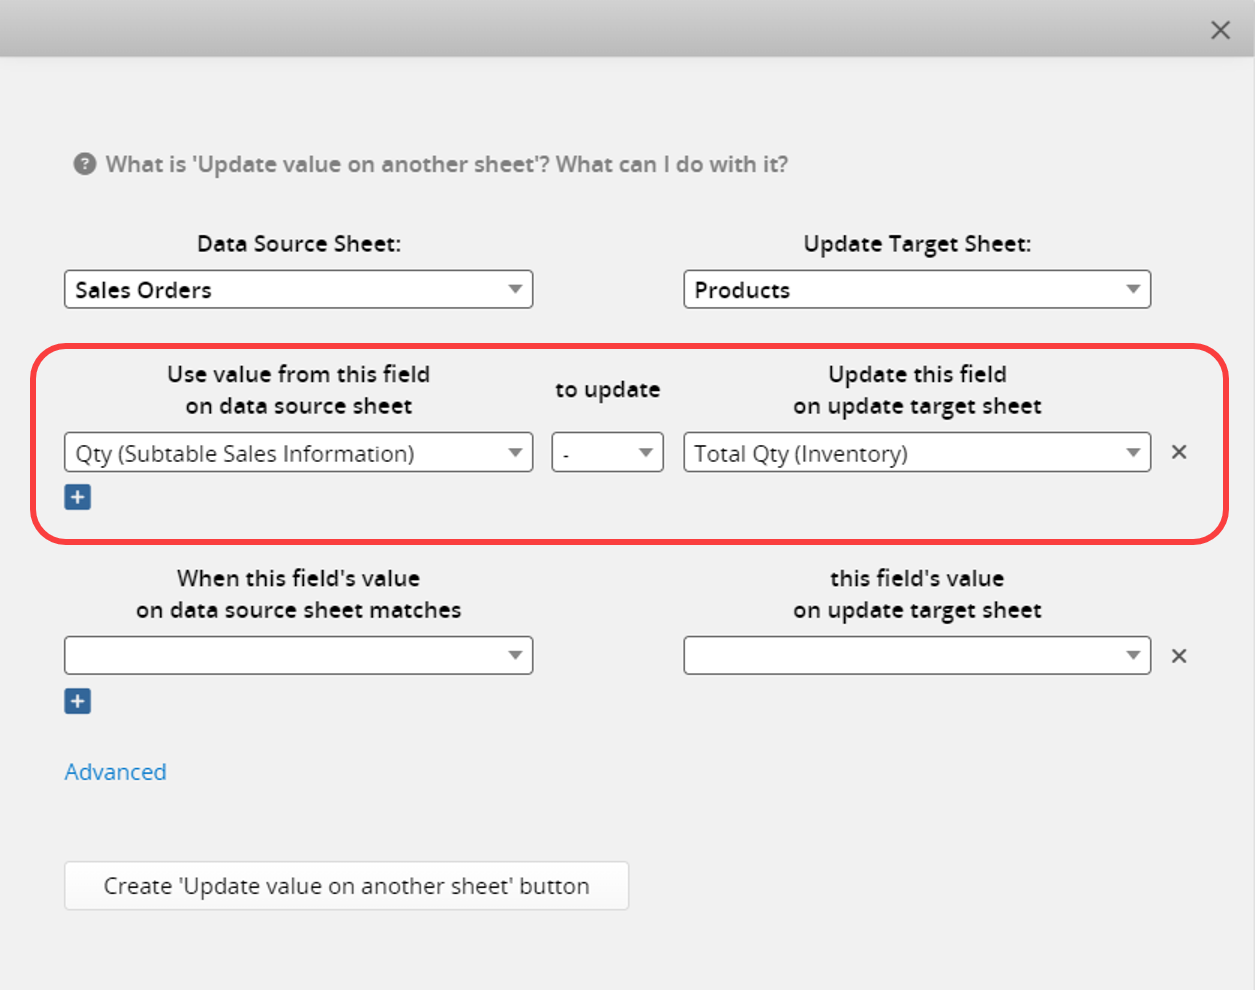
When this field's value on data source sheet: Item No.
Matches
This field's value on update target sheet: Product No.
If there are multiple conditions, click + to add them. The button will execute only when all conditions are met.

Note: If your conditions are not reasonable, you won't be able to save your configuration. Refer here to check common mistakes while setting conditions.
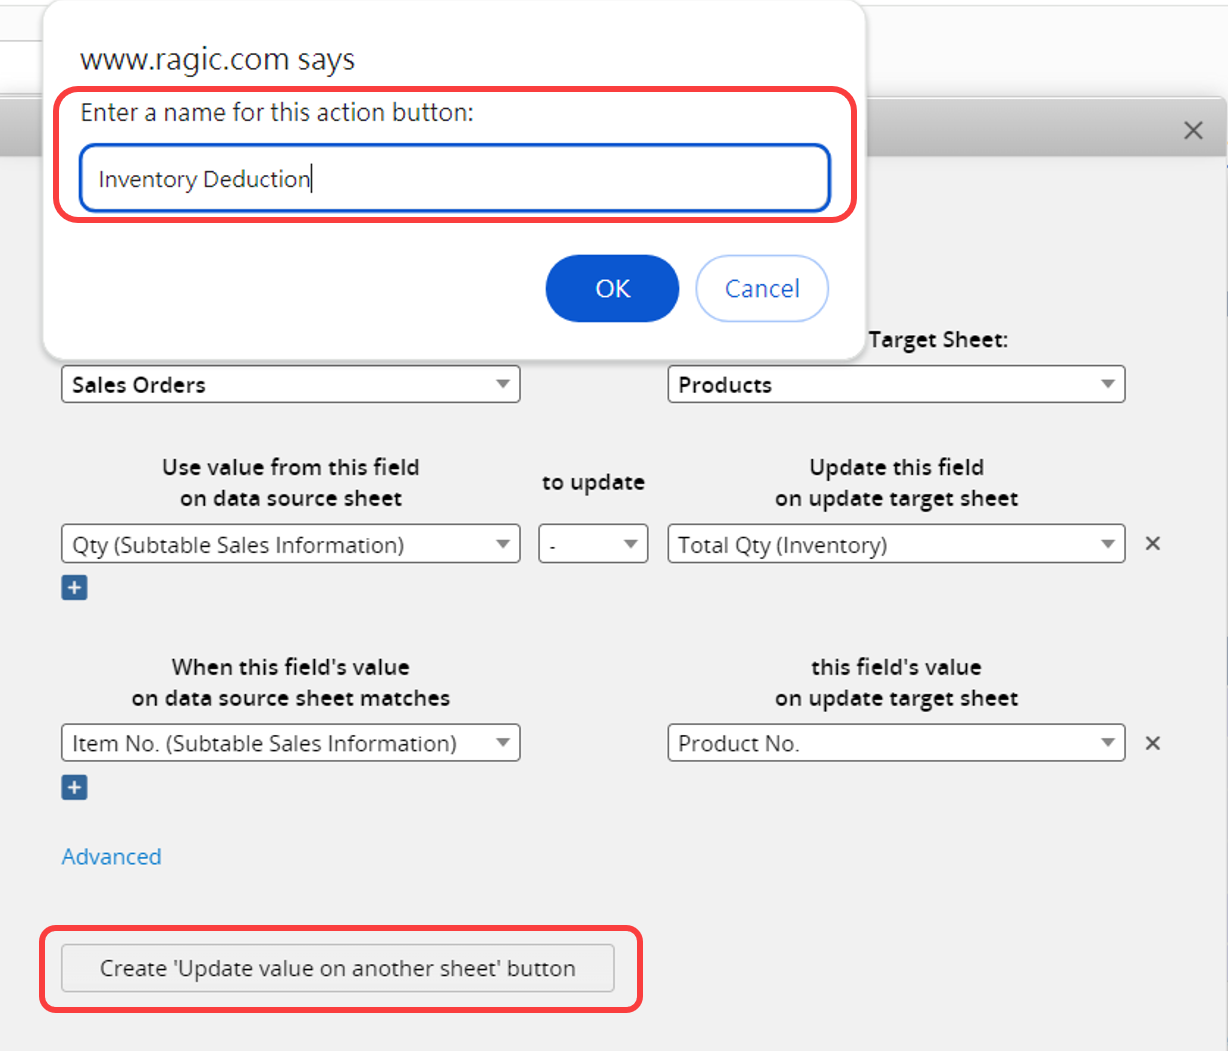
After configuring, click the Create 'Update value on another sheet' button and name it.
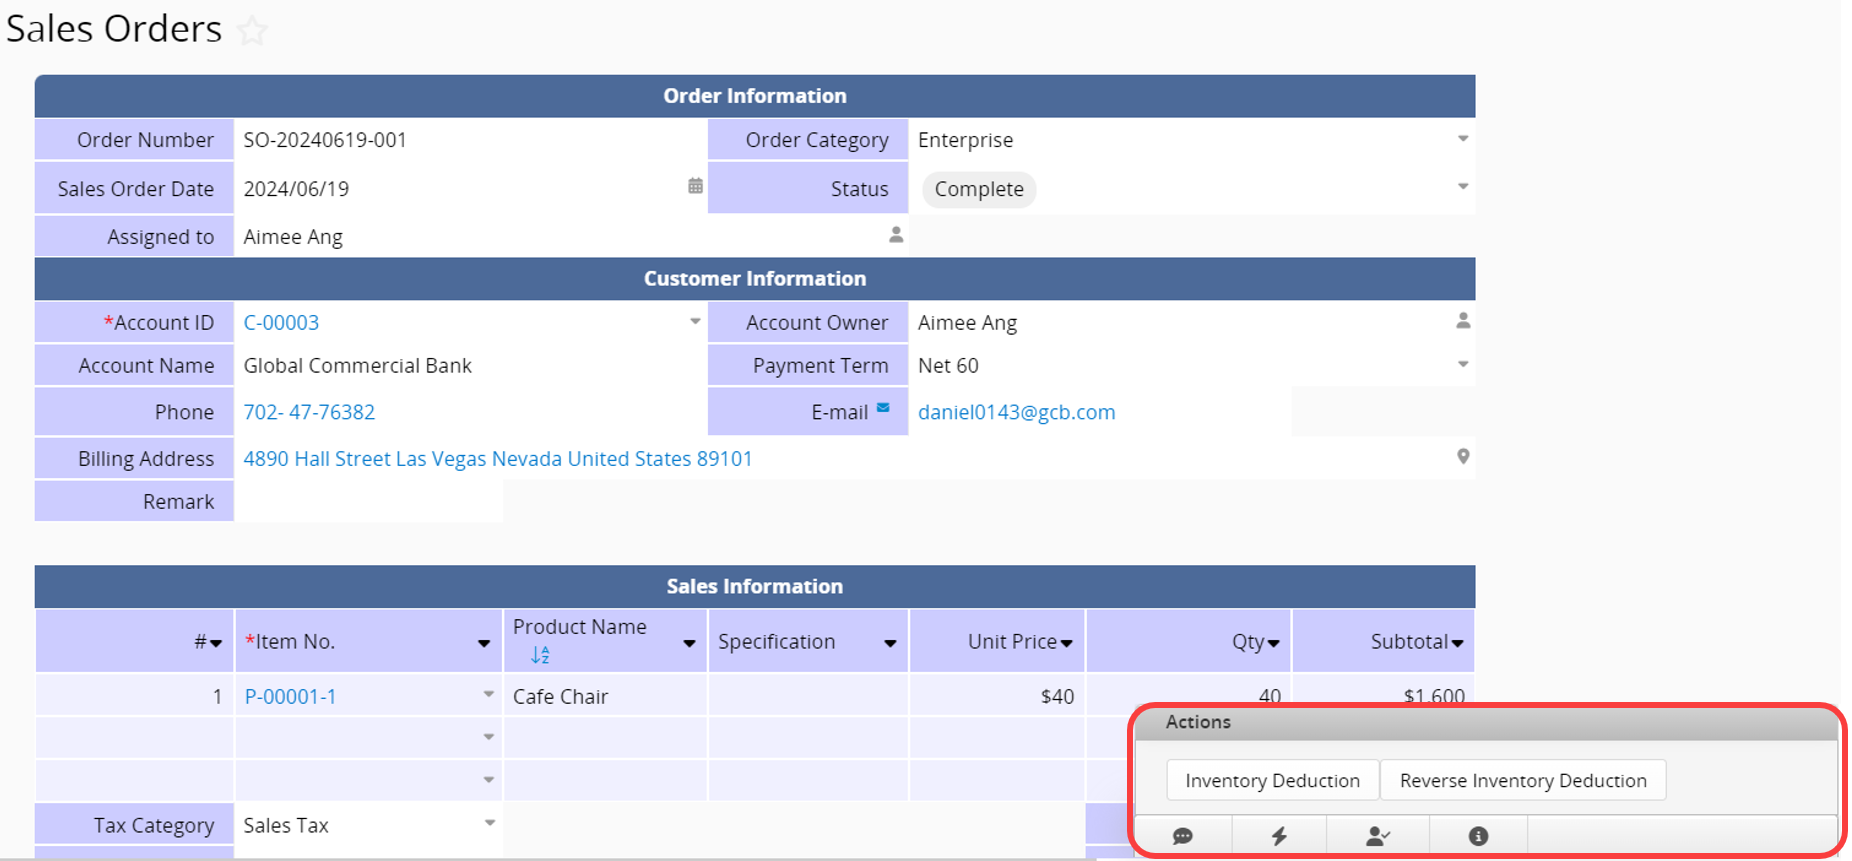
After saving and exiting Design Mode, you will see the added button in the lower-right corner of the Form Page.
When creating the button, the system automatically generates a date and time field to record when the Action Button is executed. This field is crucial for the proper functioning of this Action Button, so please do not delete it!
If you have created or modified this Action Button after 2017/06/01, it's recommended to set this field as Read Only to prevent users from manually modifying the field value.
If the Action Button was created after 2023/03/21, the Executed Time Field will have an undeletable attribute. You will need to delete this action button first before deleting this field.
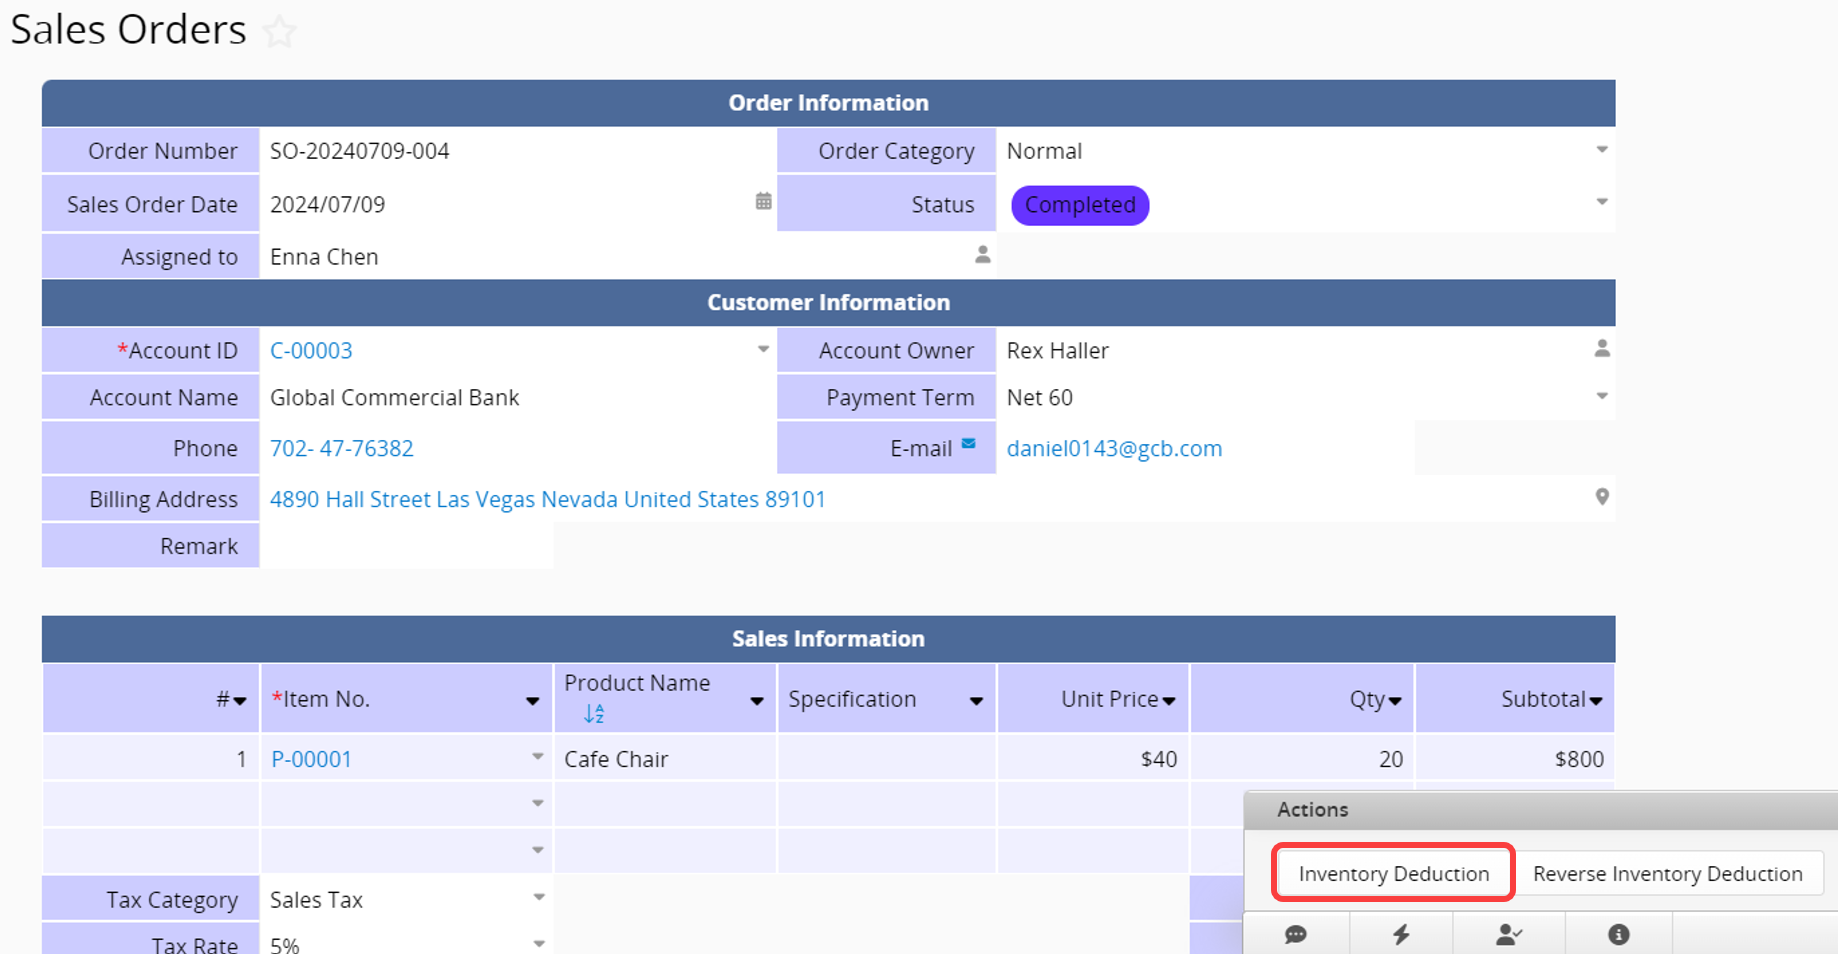
You can create a new "Sales Order" and try out the new Action Button to update values on the "Products" sheet.
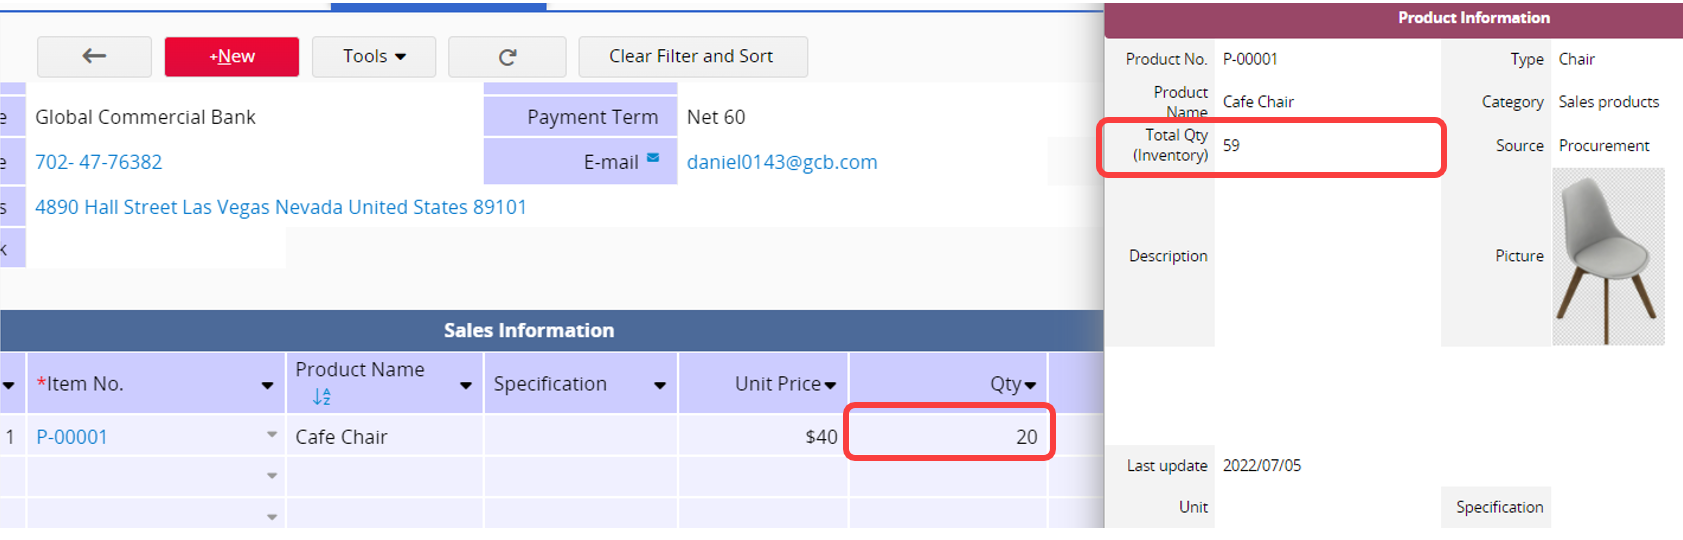
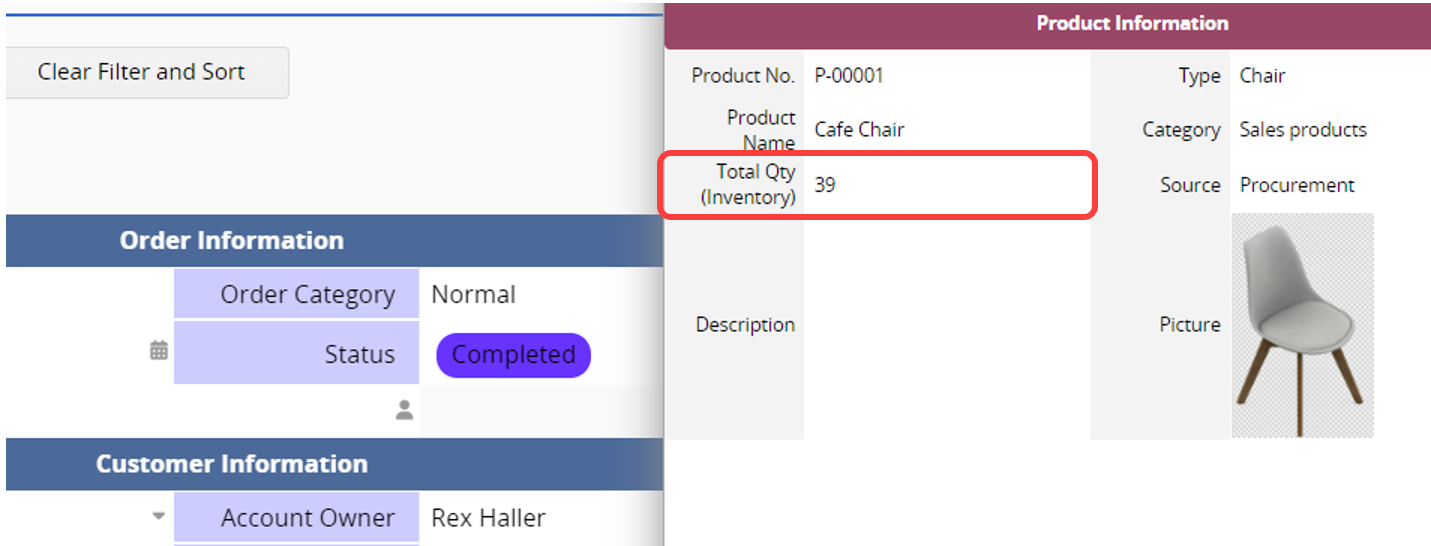
In the "Sales Orders", from the pop-out window, you can see that the inventory for the item "Cafe Chair" in the "Products" is 59, and the ordered "Qty" in this "Sales Order" is 20.
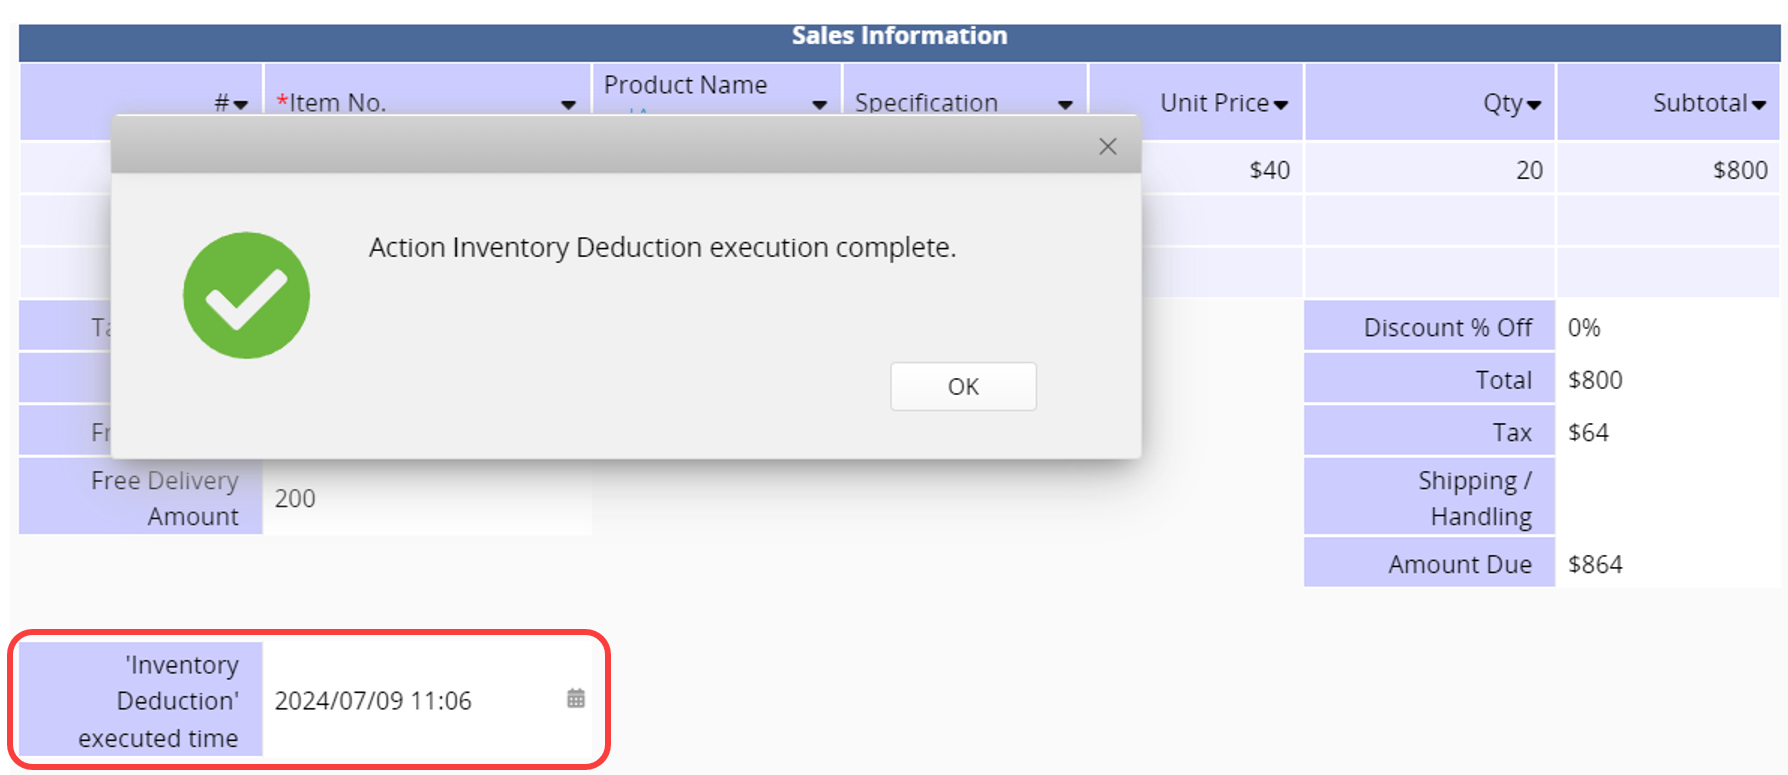
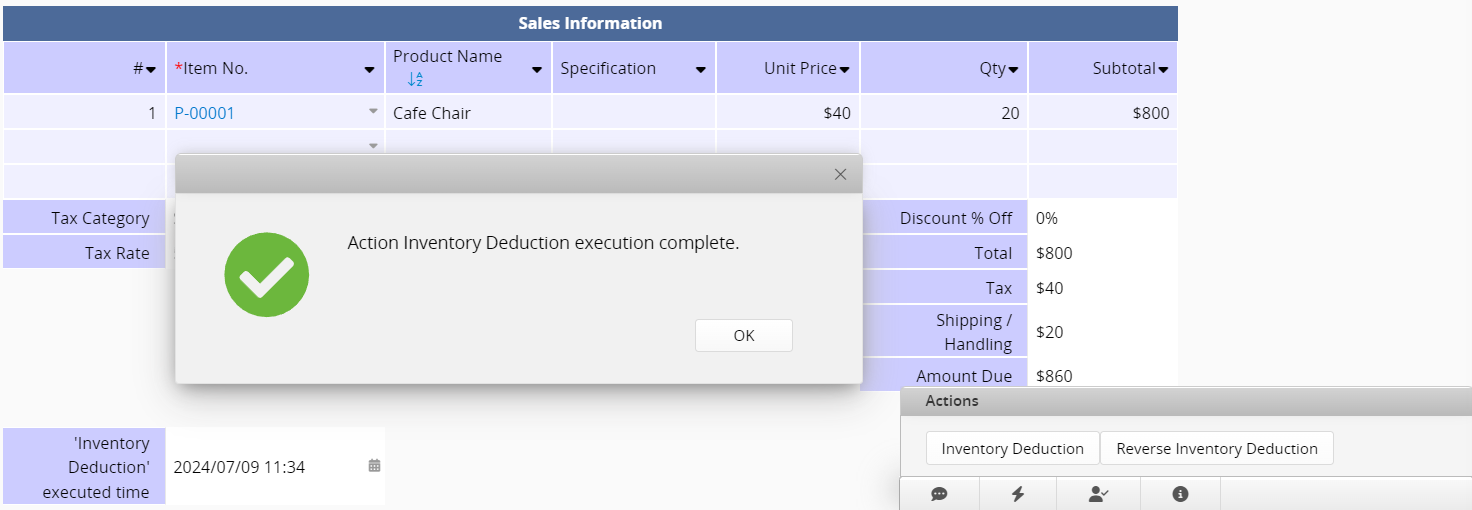
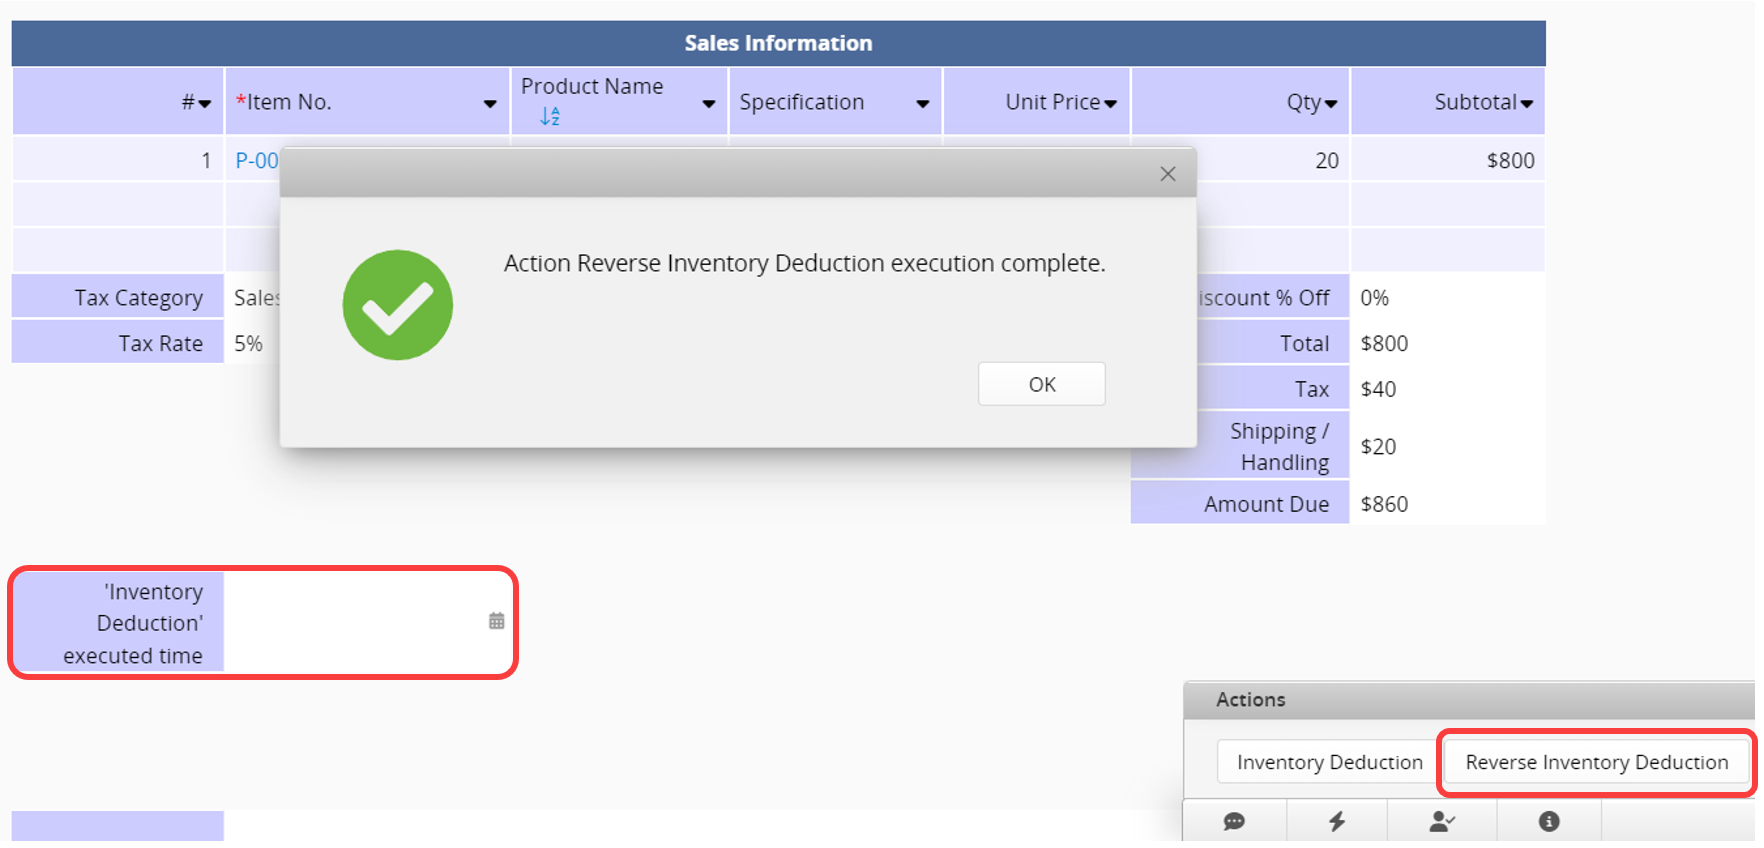
After saving this record, you can click on the Inventory Deduction button in the lower-right corner.
The system will prompt a message confirming that the value has been updated and automatically fill in the system-generated date & time field.
The quantity of the item "Cafe Chair" in "Products" has been reduced by 20, now totaling 39.
To reverse the "Inventory Deduction", you can click the Reverse Inventory Deduction Action Button (visible only if the Create reverse action button is enabled). After clicking, the system-generated date and time field value will be cleared, indicating that the "Inventory Deduction" has not been executed.
Note: The Create Reverse Action Button feature is only supported when adjusting quantities in Numeric fields. It does not support string updates, such as changing status or dates.
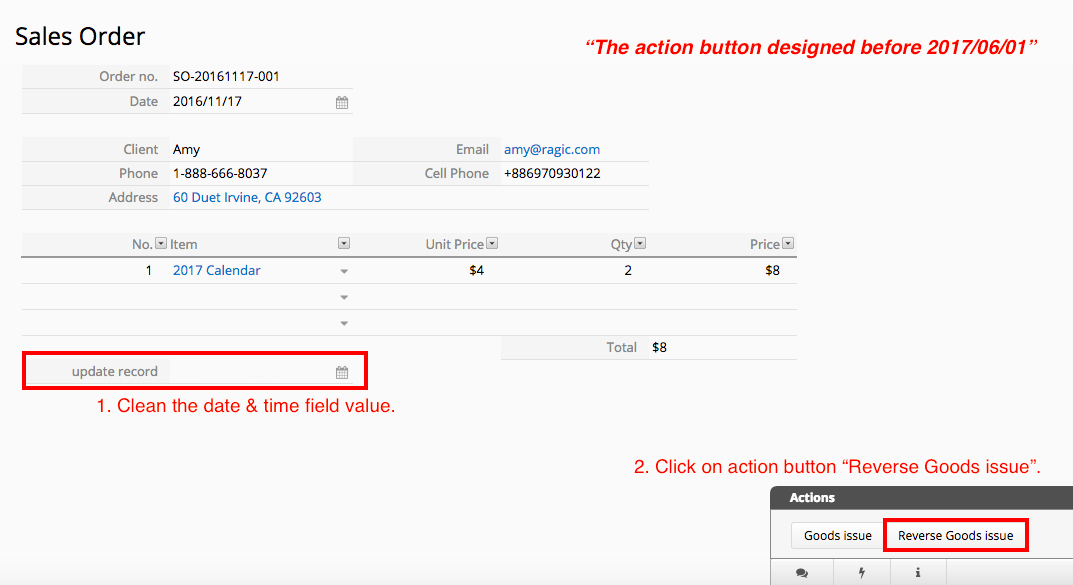
If this Action Button was created before 2017/06/01, and its settings haven't been modified since then, refer to this section for information on using the Reverse Action Button.
The Reverse Action Button was updated on 2017/06/01. If the Update Value on Another Sheet Action Button was created or edited before 2017/06/01, to reverse the action, you need to manually clear the system-generated date and time field value first, then click on the Reverse Action Button.
Note: The Create Reverse Action Button feature is only supported when adjusting quantities in Numeric fields. It does not support string updates, such as changing status or dates.
The following outlines the update of the "Reverse Action Button":
Old Version:
1. Checks if the last executed date & time field is empty; if it is, it executes and updates the last executed date & time.
2. There was no prevention mechanism for repetitively executing reverse actions. As long as the date and time field is empty, the Reverse Action Button can be clicked multiple times.
New Version:
1. Executes directly and automatically clears the last executed date and time.
2. If the last executed date & time field is empty, it does not execute the reverse action and returns a successful execution (interpreted as no update occurred), thus preventing consecutive reverse actions.
For advanced settings, please refer to the table below:
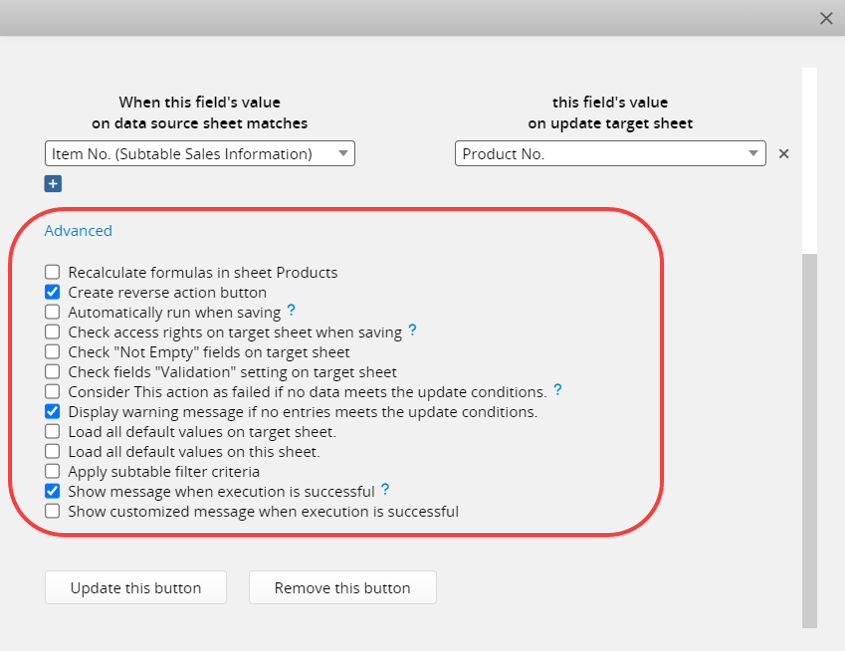
| Advanced Setting | Default Value | Description |
|---|---|---|
| Recalculate formulas in sheet | Off | Recalculate formulas on the target sheet when updating values. If there are fields with formulas referencing the updated fields, remember to check this option. |
| Create reverse action button | On | Enabled by default; it will create an additional button to reverse the update that was submitted with the Update Value on Another Sheet Action Button. For more information, refer to this section. |
| Automatically run when saving | Off | Automatically executes the Update Value on Another Sheet when records are created or updated. This ensures updates are based on the latest record. Only one set of "Update Value on Another Sheet" buttons can be configured to execute automatically on a sheet. |
| Check access rights on target sheet when saving | Off | Check if this user has Access Rights on the target sheet. |
| Check "Not Empty" fields on target sheet | Off | If the updated fields on the target sheet are Not Empty and attempt to update them to empty, an error message will be displayed, and the update will not proceed. |
| Check fields "Validation" setting on target sheet | Off | If the updated values do not meet the Validation settings, an error message will be displayed, and the update will not proceed. |
| Consider This action as failed if no data meets the update conditions | Off | If no fields meet the conditions for updating values, an error message will be displayed, and the update will not proceed. |
| Display warning message if no entries meets the update conditions | On | Enabled by default; if you don't want to display a warning message, remember to uncheck this option. |
| Load all default values on target sheet | Off | If you want to populate default values into the target sheet when executing this action button, you can check this option. |
| Load all default values on this sheet | Off | If you want to populate default values into this sheet when executing this action button, you can check this option. |
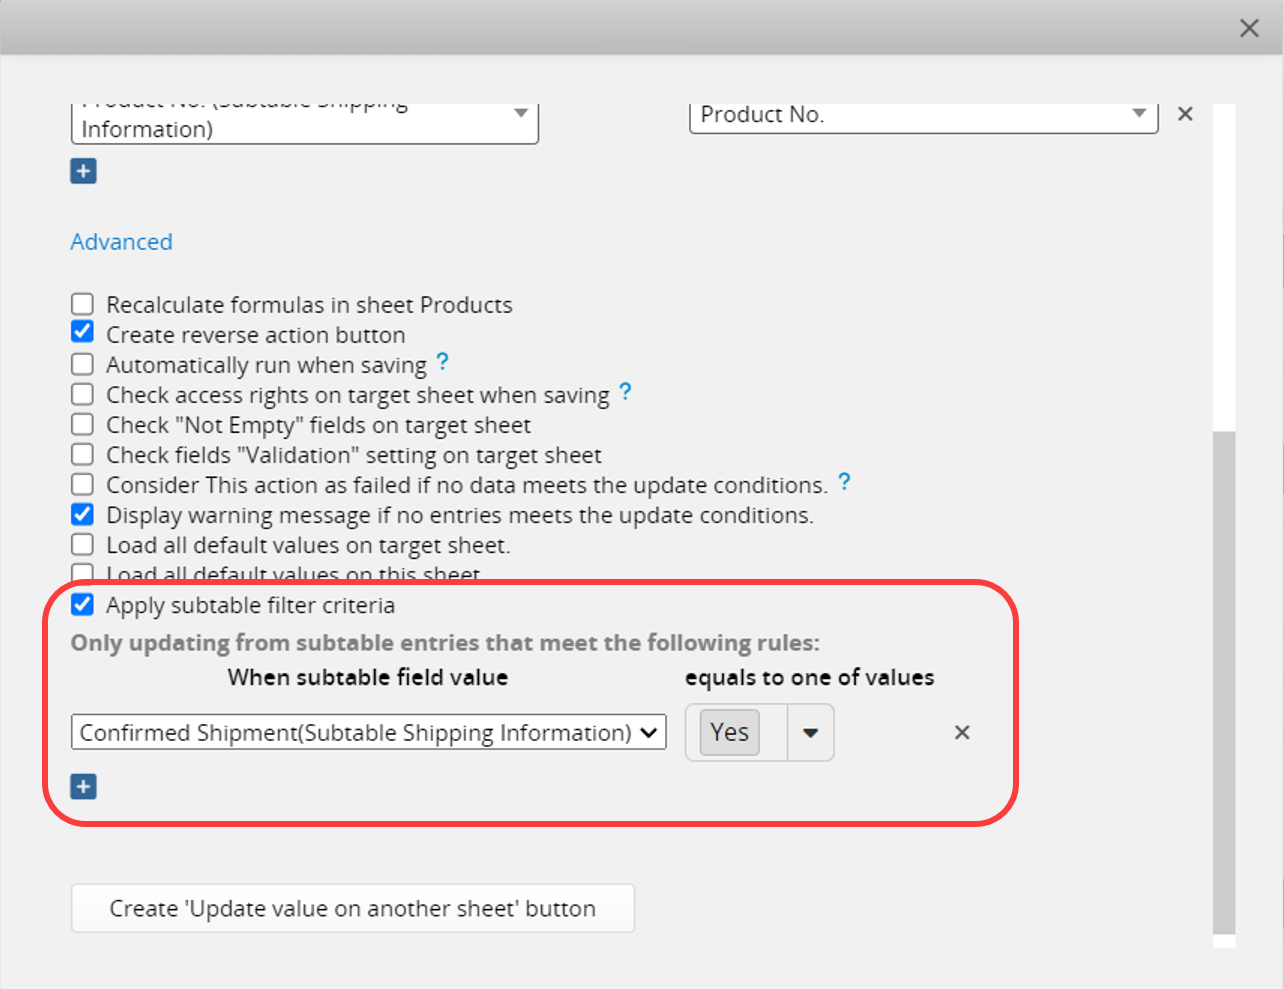
| Apply subtable filter criteria | Off | Refer to the following section on applying subtable filtering criteria. |
| Show message when execution is successful | On | It is recommended to keep this option checked. If unchecked, it may be difficult to confirm success during long execution times. |
| Show customized message when execution is successful | Off | After checking this option, you can enter a custom message in the field that appears below. Please note the character limit. |
If the record includes Subtable fields, you can apply a filter to update only Subtable values that match specific criteria.
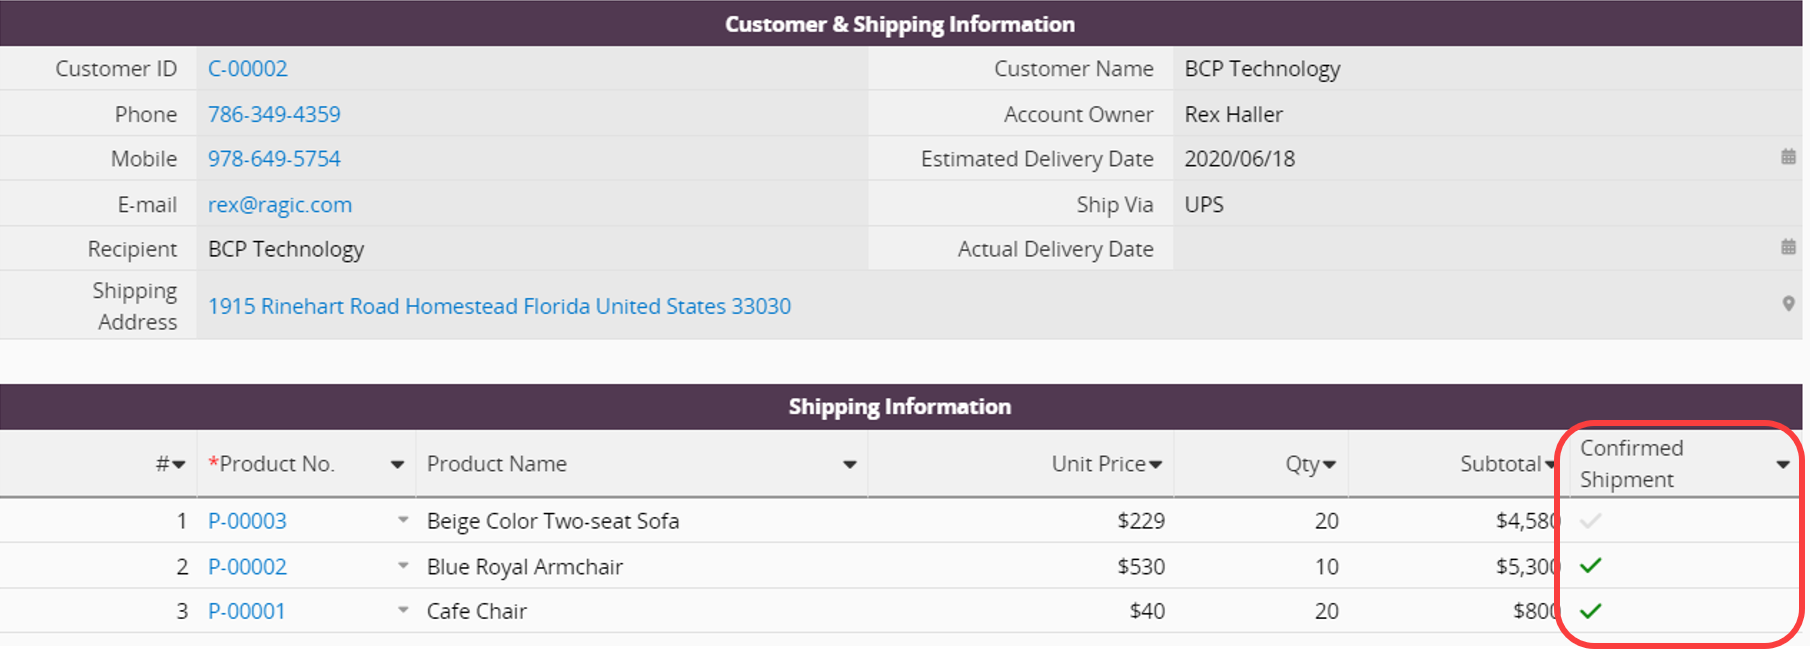
For example, in a "Shipment Order", if only two items were shipped, and your Subtable includes a "Confirmed Shipment" field, you can apply Subtable filter criteria in the Action Button configuration.
Using the example below, in the "Shipment Order," there were originally three items, but only two were eventually shipped out. The Subtable includes a field indicating which two items were shipped:
Check Apply subtable filter criteria in the advanced settings.
Based on the criteria set, executing the button will only deduct quantities from Subtable items marked as "Confirmed Shipment".
By default, each record can execute the Update Value on Another Sheet Action Button only once. The system will check the system-generated date & time field to prevent duplicate executions. However, there are scenarios that you may need to trigger the button again:
Usually, this happens when the button is configured with "+ to add" or "- to deduct". Re-executing these Action Buttons will lead to repeatedly repeatedly addition or deduction incorrectly. Therefore, please run the Reverse Action Button, update the record, and then re-trigger the Action Button. For example, if a "Shipment Order" Subtable initially contained two items and the inventory deduction action has already been executed, and you want to add an item, follow these steps:
Step 1: Execute the Reverse Action Button
To reverse the deduction of inventory for the existing two items and prevent duplicate deductions. When executing the Reverse Action Button, the system will reverse the operation based on the current values. For example, if 3 units were originally subtracted from inventory, the system will add back 3 units and clear the system-generated date & time field.
Step 2: Add the third item to the Subtable and then execute the "Inventory Deduction" Action Button again.
Usually, this happens when the button is configured with "= equal". For example, if there are two sheets without a direct linking relationship, but you want modifications in Sheet A to be updated on Sheet B each time, follow these steps:
Scenario 1: Automatically trigger the Action Button after each update.
When creating the Action Button, check the Automatically run when saving option in advanced settings.
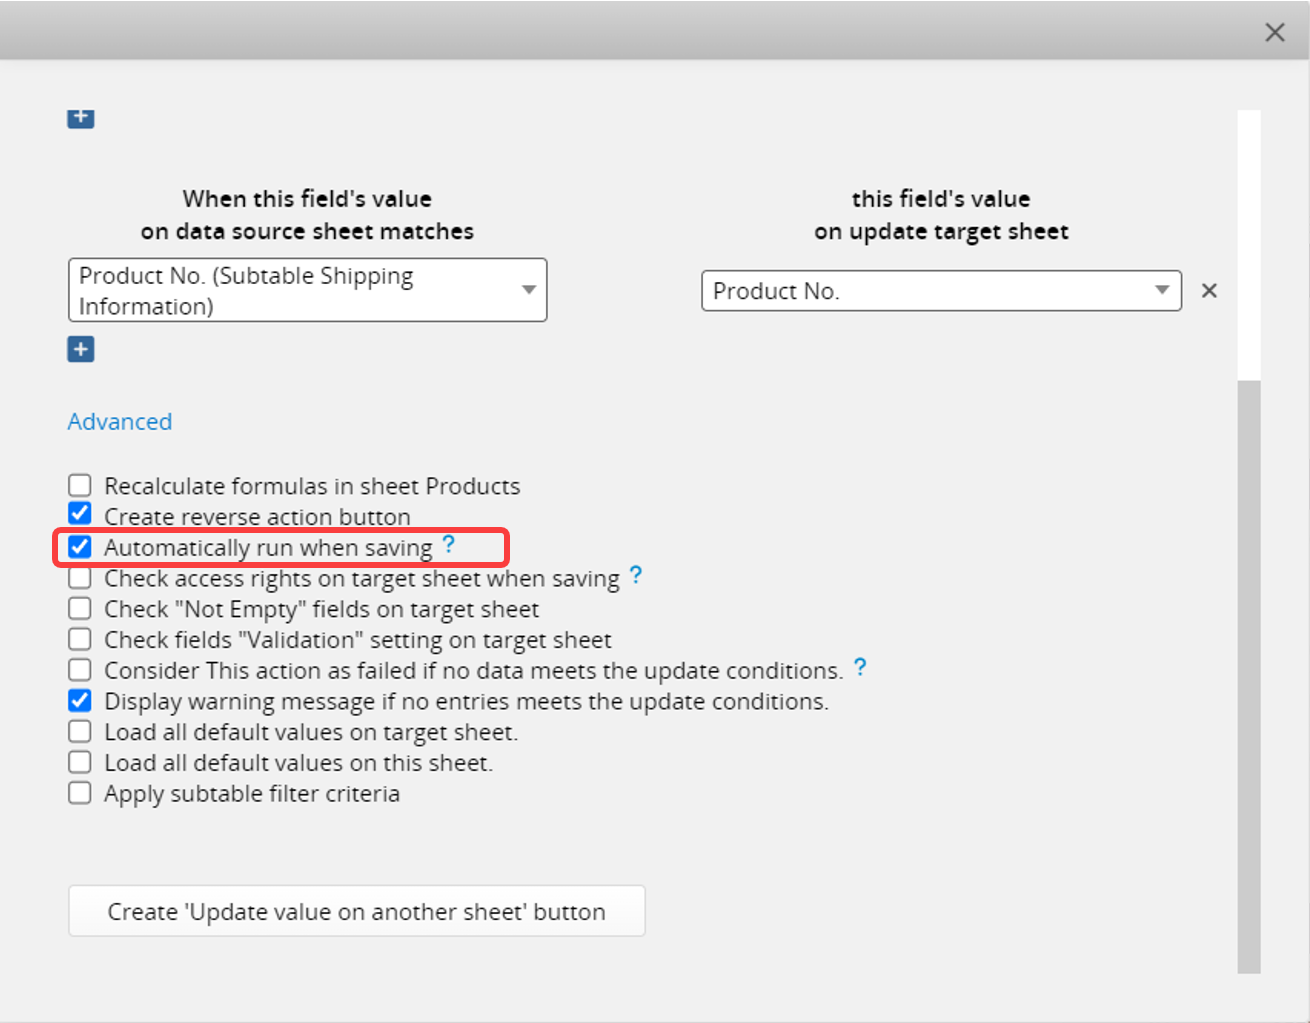
This way, every time the sheet is updated and saved, the Action Button will automatically execute and update the target sheet values.
Note: Only one set of Action Buttons can be configured to automatically execute on a sheet. If there are multiple update buttons, configure the others as described in Scenario 2.
Scenario 2: Manually trigger the Action Button after each update.
Apply the formula: " " to the system-generated execution time field, indicating automatic filling of empty values for subsequent executions.
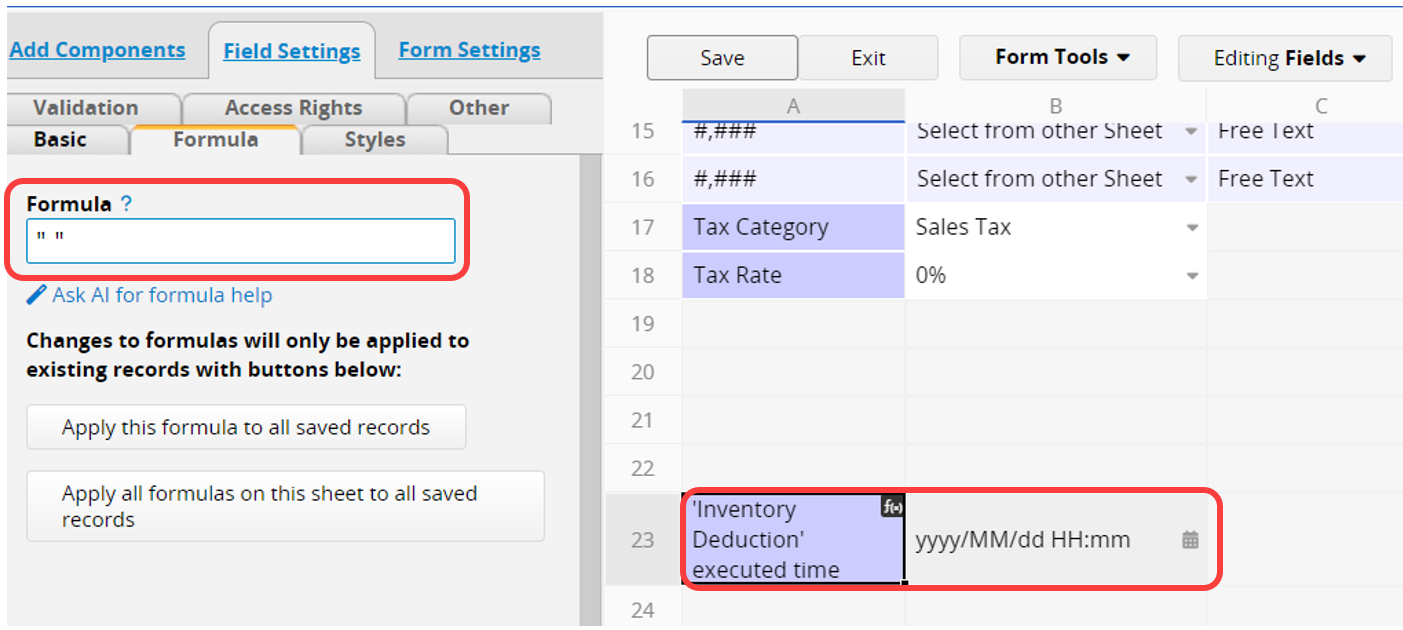
After updating the sheet, you can manually click the action button to update the values in the target sheet.
1. For arithmetic operations, both the source field and the target field in the Update Value on Another Sheet Action Button must be Numeric fields. For string inputs, please use "=".
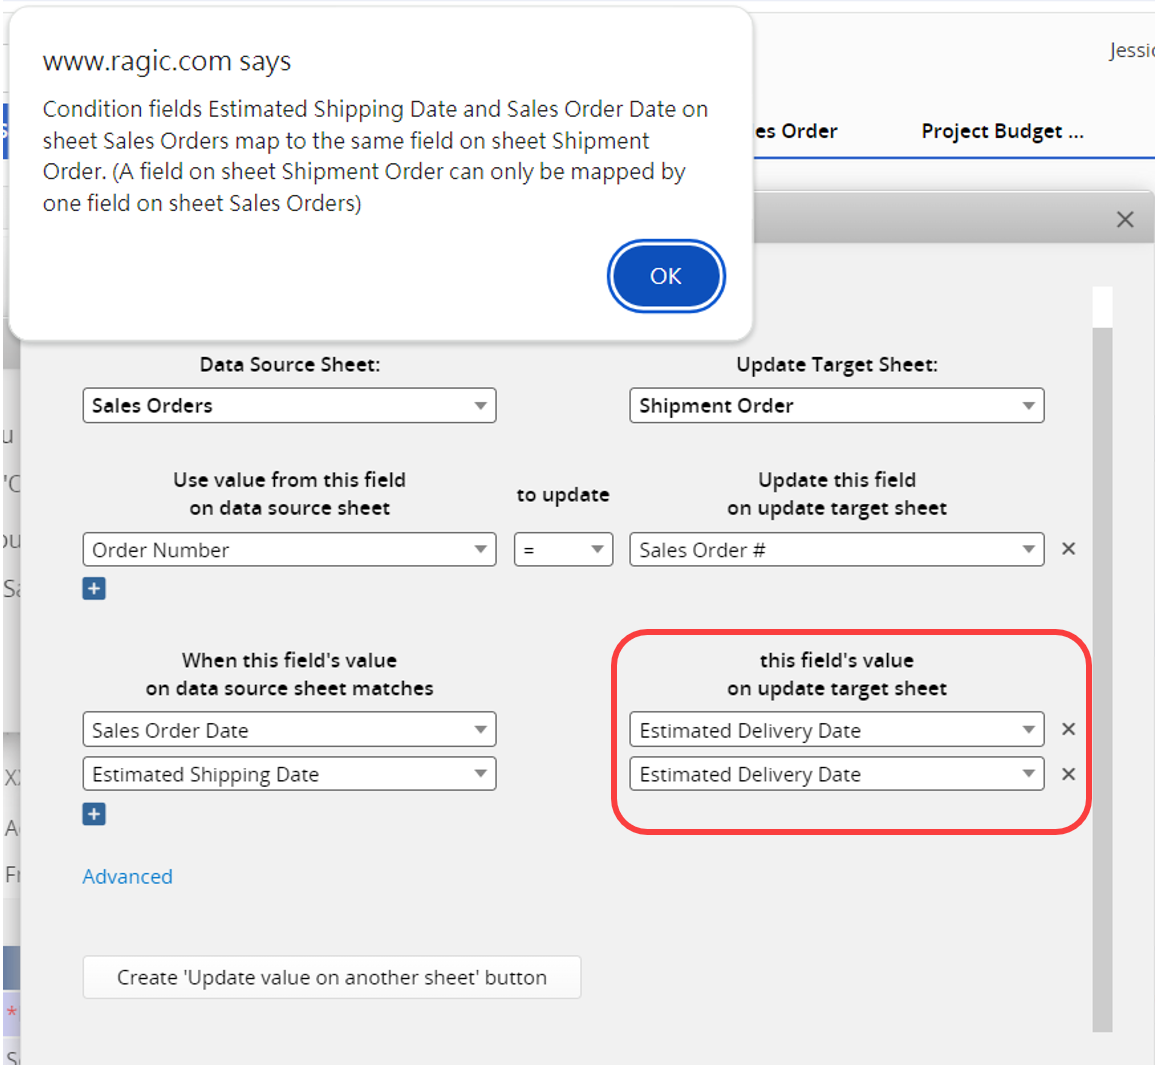
2. Configure at least one set of conditions.
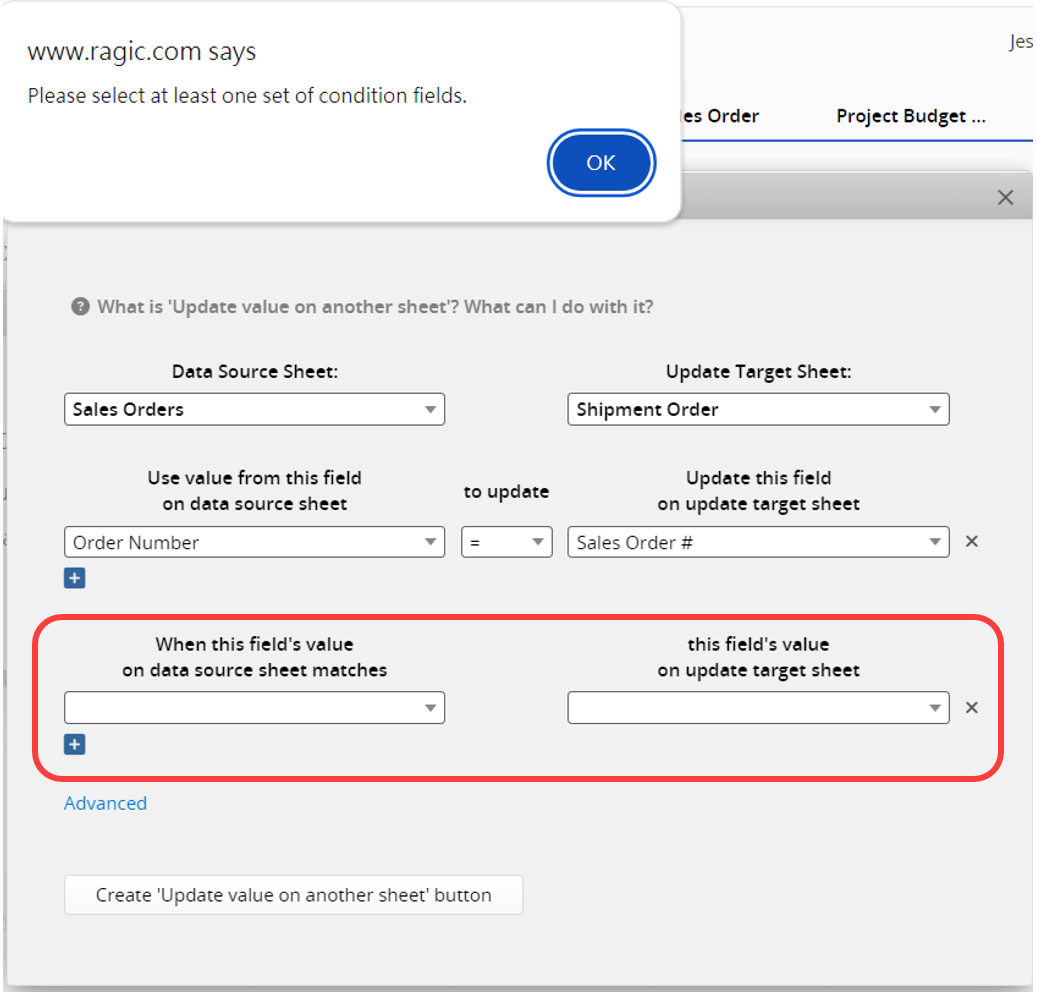
3. You cannot set different conditions on the same field of the target sheet.
4. The system-generated date and time field cannot be removed; otherwise, the Action Button will be ineffective. However, you can rename or hide this field.
5. In the old version, you cannot click the Update Value on Another Sheet Action Button twice or the Reverse Action Button without clearing the system-generated date & time field first. Please clear the value in the date and time field beforehand.
6. When there are multiple Update Value on Another Sheet actions, only one of them can be configured to Automatically run when saving.
If you want to delete the Action Button, you can refer to this article.
Alternatively, if you need additional settings for the Action Button, such as restricting user access rights to use the Action Button, you can refer to this article.
 Thank you for your valuable feedback!
