You can host Ragic on your own servers if necessary, provided that your organization has the ability to maintain your own servers. We strongly recommend companies only use on-premise servers if they have an experienced IT crew who understands how to maintain and keep a server safe and secure.
There is no additional cost for the on-premises option, but there is a 10 users minimum and your plan will need to be paid annually. For detailed information, please refer to pricing page.
Note: Some features on the on-premises server are either unsupported or require additional configuration. For details, please refer to this article.
JAVA_HOME: the path where JDK 8 is located
RAGIC_HOME: the path where Ragic is located
On the Windows taskbar, right-click the Windows icon and select System. In the Settings window, under Related Settings, click Advanced system settings and hit Environment Variables to create a new one.
If you don’t want to edit the environment variable, you can also just edit ragic.sh (Linux) or ragic.bat (Windows) to add lines like these:
JAVA_HOME= /usr/lib/jvm/java-8-openjdk-amd64
RAGIC_HOME= /home/ragic
You can also change the lines with JAVA_OPTS="-Xms5g -Xmx5g to tell your server how much memory Ragic can consume. 5g will mean that it takes up 5 GB of memory. If you set it to JAVA_OPTS="-Xms10g -Xmx10g it will give Ragic 10 GB of memory. You should not give Ragic more than 70% of physical memory available on the server, since there will be memory needed for the OS to function properly, and there is still some off-heap memory needed for Ragic to run.
For Windows, find the directory bin folder under your Ragic directory and type .\ragic_dbv7.bat run to start Ragic in the same window, or .\ragic_dbv7.bat start to start Ragic in a new window.
For Linux, type ./bin/ragic_dbv7.sh manual
On Linux, you can add nohup so that the process will not end as your user exits the session, or add it to the system services. Also notice that on Linux you will need to use root privilege or sudo to execute the service so that Ragic can be bound to port 80. On Windows, you will need sufficient privileges too to bound to port 80.
When starting or restarting Ragic, you should always make sure there’s only one instance of Ragic running. The easiest way to check is using your browser to connect to your Ragic URL and make sure it’s currently not running. On Linux, you can also use the command ps aux | grep java to check if there’s any java process running already. On Windows, you can go to the process monitor to see if there’s any Java process running. You will need to kill all Ragic Java processes before you start Ragic or running multiple instances of Ragic will result in an error (although sometimes not immediately noticeable).
This is the screen that you should see when you have successfully setup your Ragic Server:
Note: Some antivirus programs may cause problems in Ragic Server, so it is a recommended practice to configure any antivirus software running on Ragic server to exclude specific paths, processes, and file types.
Start: sudo nohup ./bin/ragic.sh manual
Stop: sudo pkill -f RagicJetty9Server
Please note that it's not recommended to force stop the service, unless it's necessary.
Make sure you make a backup of everything in your Ragic directory before you do any upgrading! You will need to log in to Ragic before you download any of the following patch or full version.
After the download is finished, you will need to upload the file to your server through the page below.
You can also update license through the page if you need.

When you finish setting up your server, please go to Private Server Config to make sure that the server IP or URL is entered correctly in the SERVER_NAME parameter. Next, please enter the mail server settings to prevent email features from malfunctioning. After changing those configurations in Private Server Config, please remember to restart your Ragic service to apply them.
Here are the mail server settings in Private Server Config:
SMTP_SERVER=The SMTP / SMTPS server domain name / IP
SMTP_SENDER_AUTH_USER=User name used to log in to SMTP
SMTP_SENDER_AUTH_PWD=Password used to log in to SMTP
SMTP_SSL_ENABLE=For SMTPS put true, SMTP put false
SMTP_PORT=Port to connect to your SMTP service
SMTP_SSL_PORT=Port to connect to your SMTPS service
SMTP_SENDER_PERSONAL=The name used when Ragic sends out an e-mail
SMTP_SENDER_EMAIL=The reply to address used when Ragic sends out an e-mail
Firewall settings contain inbound connections and outbound connections. If you would like Ragic to be accessible, you would need to open inbound port 80 / 443. On the other hand, if you would like Ragic to access PDF servers, you would need to open outbound port 80 and port 8888.
Add the parameter "DISABLE_MOBILE_APPLICATION_ACCESS" to the Private Server Config. When set to true, it will block App login. If not set or set to false, App login will be allowed as usual.
Add the parameter GEMINI_API_KEY=your Gemini API Key (click here to apply).
Once added, you will be able to use Ragic AI and the Formula Generator features.
Note:
1. You may also use OPEN_AI_KEY=your Open AI API Key (Click here to apply) to enable Ragic AI.
2. If you need to enable the AI Workflow Check feature, add the parameter CLAUDE_API_KEY=your Claude API key (click here to apply).
3. To switch to a Local AI model, please refer to this article for configuration.
Alternatively, you can use Gemini via Vertex AI as the Ragic AI model.
To do so, configure both of the following parameters (Please apply through your own GCP Project):
GEMINI_VERTEX_API_KEY=your Gemini Vertex API Key
GEMINI_VERTEX_PROJECT=your Gemini Vertex Project
Both parameters must be set and must correspond to an existing Project ID.
If the Vertex AI parameters are configured, GEMINI_API_KEY is not required.
However, you may still provide GEMINI_API_KEY as a fallback in case Vertex AI is temporarily unavailable.
If Custom Print Report fail to output images correctly, try adding the CARBONE_SEND_IMAGE_WITH_BASE64 parameter to the Private Server Config. When set to true, images will be successfully included in the output.
You can find this article to complete the setup.
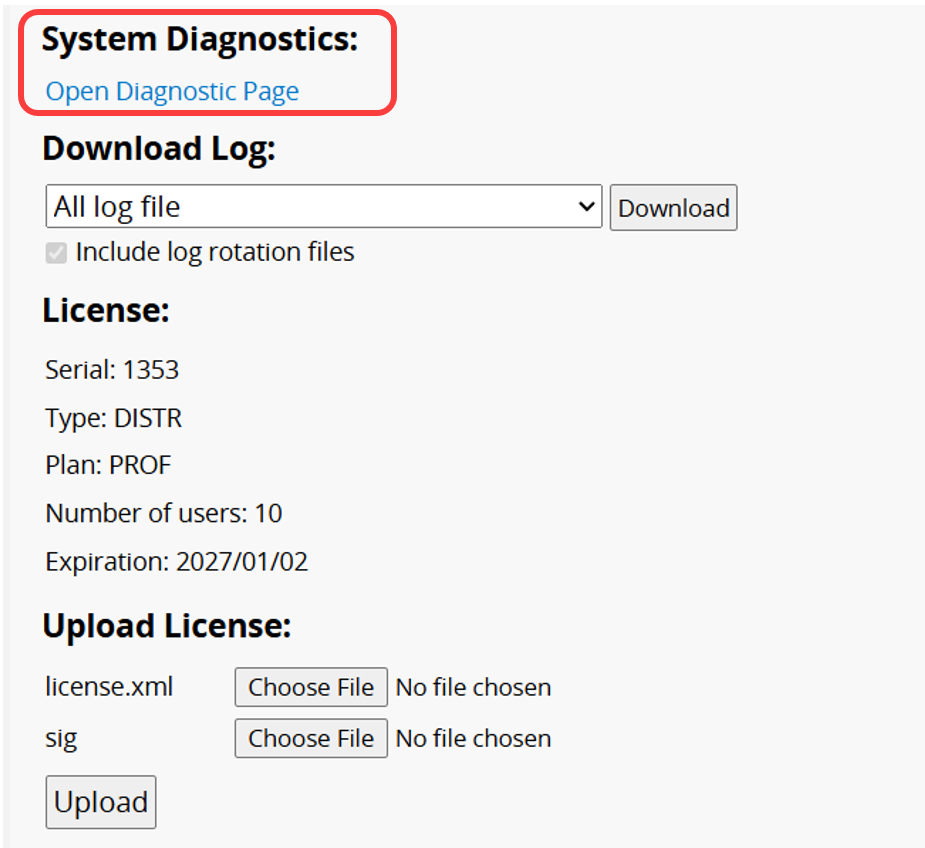
To update your license files, just go to the private server configuration page, upload your license file, and restart your Ragic service.
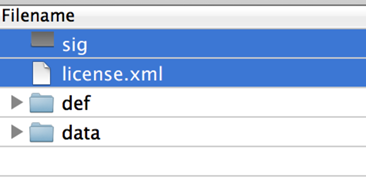
If the license has expired, you can still access the private server configuration page from the hamburger menu to update the license file. If you're unable to update through Private Server Management, copy your two license files (license.xml and sig) into the cust folder in your Ragic directory and restart your Ragic service.
Before updating, ensure that all data in the Ragic folder has been backed up.
Note: The following update methods are not supported on Windows servers. Please use manual update instead.
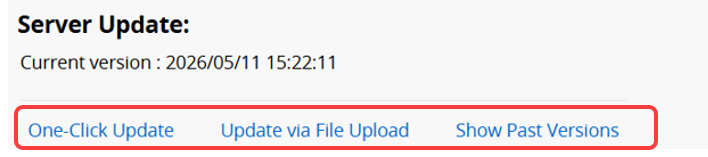
To upgrade your Ragic server, navigate to On-Premises Config and use the following three methods in the Server Update section at the bottom of the page:
One-Click Update: Update directly to the latest patch version.
Update via File Upload: Download patch files or the full installation package from this URL, then upload the files to update the system.
Show Past Versions: Display the latest 3 versions, allowing users to switch to a different version with one click.
A Ragic service restart is necessary after an update, and a restart link will appear for you to restart your Ragic service. On Linux servers (including QNAP and Synology servers, they are Linux based), you can use the restart link to restart your Ragic service, but on Windows servers, you will need to kill the Java process started by Ragic and manually restart it.
Note: "On-premises" here refers to any private server service, including self-built servers and NAS. This method is applicable for updating Ragic services. The main reason is that for products like NAS, the control over the update process is relatively limited for Ragic, and the version updates are likely to be slower than the official releases. Therefore, it is recommended to download the latest update files from the official website and use this method for updating, instead of relying on the Application Center update.
In some cases, we will suggest you do a full update. Then you will need to download a full version of Ragic.
You will need to make changes to the .sh or .bat files in the bin directory again if you have done any modifications to them. So make sure you have a backup of your old .sh or .bat file before you replace it.
You will also need to stop the server before the update and restart the server after the update.
When there are new features in the company settings and feature access settings, you'll need to update system sheets to have those features.
You can download "Ragic On-premises account setup forms patch" and unzip the file. In the "ragic-setup" folder, please copy those .nui files and paste them to the "ragic-setup" folder under your installation path. Then, access any of the system sheets and press the reload button to update.
Note: please do not rename the "ragic-setup" folder. Otherwise, the system may not work as expected.
You can have daily auto backup by adding the following configurations.
DISTR_DBBACKUP_PATH=The directory to store backup (ex : D:/MyBackUp/ )
DISTR_PRESERVED_NUM=The number of backup you want to preserve (ex: 5 )
DAILY_START_TIME=the start time of daily backup (ex: 18:00 )
Remember any changes to the private server configuration will require a Ragic service restart.
Or you can use your own backup software or script to create the backup, all you need to do is to copy the Ragic directory to another location, and it will contain all the necessary files and data to restore Ragic to a previous state.
For Linux servers, you can simply write a cron job and run rsync to periodically sync all your files to another backup server.
You can simply use the backup restore tool to restore a backup that you downloaded from your Ragic account online. But note that because the users in your backup are not actually registered on your on-premises version. After you restore your backup, you will need to edit and resave each user so that they are added to your server, and reset their password to a new default password.
Linux:
• Ubuntu Linux 22.04 or higher (64-bit) (Recommended)
• Red Hat Enterprise 9.x or higher (64-bit)
• Oracle Linux 8 or higher (64-bit)
• Suse Linux Enterprise Server 15 SP3 or higher (64-bit)
• CPU: 2 cores↑
• RAM: 8GB↑
• Disk space: 200GB↑
Windows:
• Windows Server 2019 or higher(Recommended)
• Windows 11 or higher
• CPU: 2 cores↑
• RAM: 8GB↑
• Disk space: 200GB↑
Mac OS X:
• Mac OS X 14 (Sonoma) or higher. (64-bit)
• Administrator privileges for installation
• RAM: 8GB↑
• Disk space: 200GB↑
If you’re would like to run Ragic on AWS EC2 or Google Compute Engine. We recommend starting with the following VM configurations:
AWS EC2:
Start with m7g.xlarge, and upgrade to m7g.2xlarge when you need more memory or CPU processing power. For storage, we recommend using the EBS gp3 storage type for data disk, and sc1 storage type for backups. You can consider starting with around 500GB of disk space. The amount of backup space will depend on how many backups that you configured to have.
GCP:
Start with e2-standard-4, and upgrade to e2-standard-8 when you need more memory or CPU processing power. For storage, we recommend using the balanced persistent disk for data disk, and standard persistent disk for backups. You can consider starting with around 500 GB of disk space. The amount of backup space will depend on how many backups that you configured to have.
Platforms Other Than AWS EC2 or GCP:
You can look for similar level of hardware for your VM. Which is to generally start with 4 vCPUs and 16 GB of RAM, double it when the load increases. For disk space, unless IO is critical, you can generally start with a hybrid of SSD and traditional disk. If such hybrid is not available, we would recommend using a SSD disk for the data disk, since the IO speed difference between a non-SSD disk and SSD disk is quite noticeable.
You can go to Account Setup > On-Premises Config. In the System Diagnostics section, click Open Diagnostic Page. On this page, you can quickly review the status of each feature, identify which are operating normally and which may have issues, and provide the diagnostic information to Ragic support for further troubleshooting.
If you encounter issues during the installation of Ragic and are unable to successfully install it, please check the following items to ensure your settings are correct:
When using on-premise servers, if issues arise with sending emails or attaching files (excluding SMTP), first check if you have installed a purchased certificate for your server. If not, please refer to the following methods:
1. Purchase and install your own certificate. Please refer to this article for installation instructions.
2. If you do not wish to purchase the certificate, you can set the parameter in conf/ragic.properties: IGNORE_SSL_EXCEPTION=true.
If you are unable to use the PDF download feature, please review your network settings and adjust them as needed:
1. Servers with internet access should be able to use the feature without additional configuration.
2. For internal networks without internet access, configure the firewall to allow connections to node1.ragic.com through ports 80 or 443. Once configured, the PDF download feature should function properly.
3. In fully isolated environments where the server cannot connect to the internet or open any outbound HTTP/HTTPS connections, refer to this article for instructions on enabling the PDF download feature.
 Thank you for your valuable feedback!
