The basic operational workflows in manufacturing are intricately linked to the BOM (bill of materials), from defining the materials list and process flows required to build a product, to exploding the BOM from the work order to generate all the required materials and production flows for manufacturing. A comprehensive production management system is required to support such activities to facilitate product manufacture, conversion to inventory, and eventual sale to clients.
Ragic’s "Production Management" template gives you access to detailed materials information, helping you to cut down on man-hours spent on production, management, and even overtime, all the while staying on top of material supply and demand.
If you don’t have a Ragic account, click here to sign up and install the "Production Management" template. This entire process is free, and we will not charge you without your consent.
If you are already a Ragic user, you can find the "Production Management" template under the "Manufacturing" category in Install Templates and click "Install" to download it.
Now, let's get into Ragic's "Production Management" template to see what the significance of each sheet is, how to add new data, and how to use the template.
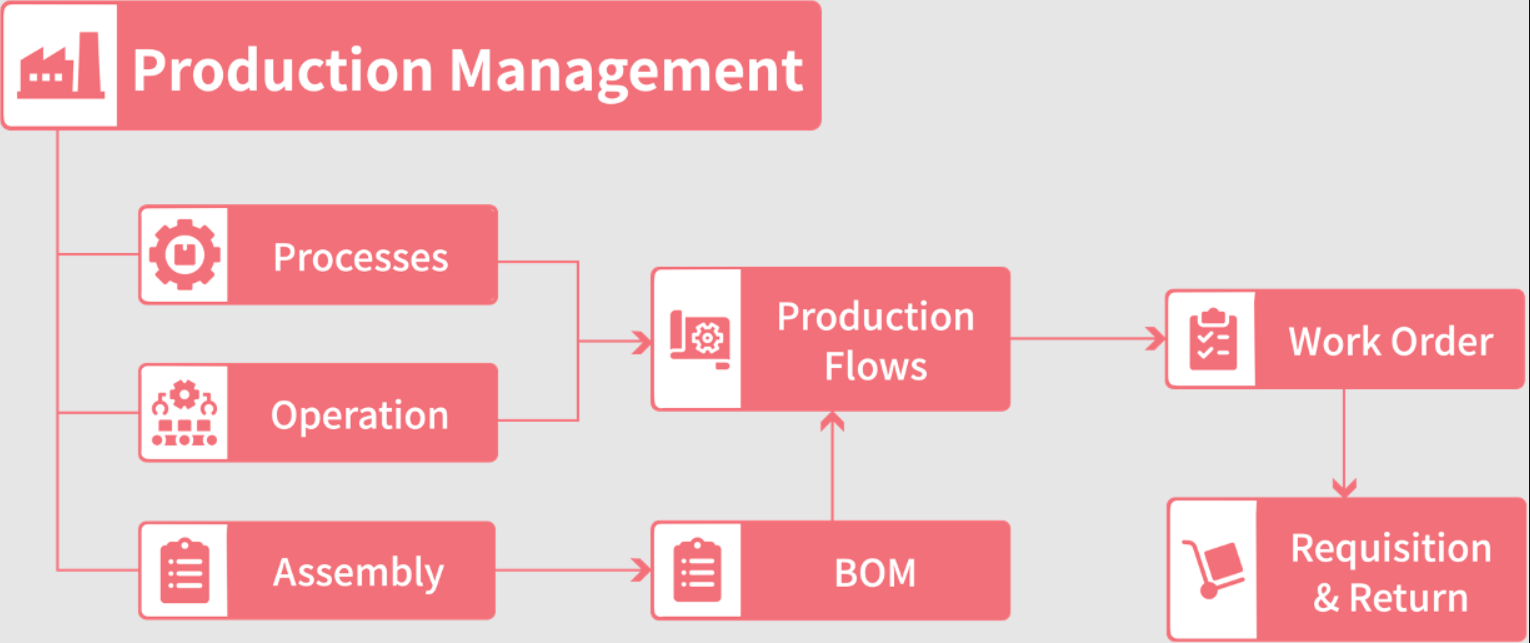
The "Production Management" template is used to manage manufactured products and required materials, the bill of materials and production flow of each product, and work orders. The template also allows BOM explosion from the work order and includes sheets for requisition during the production process and stock-in after production is completed.
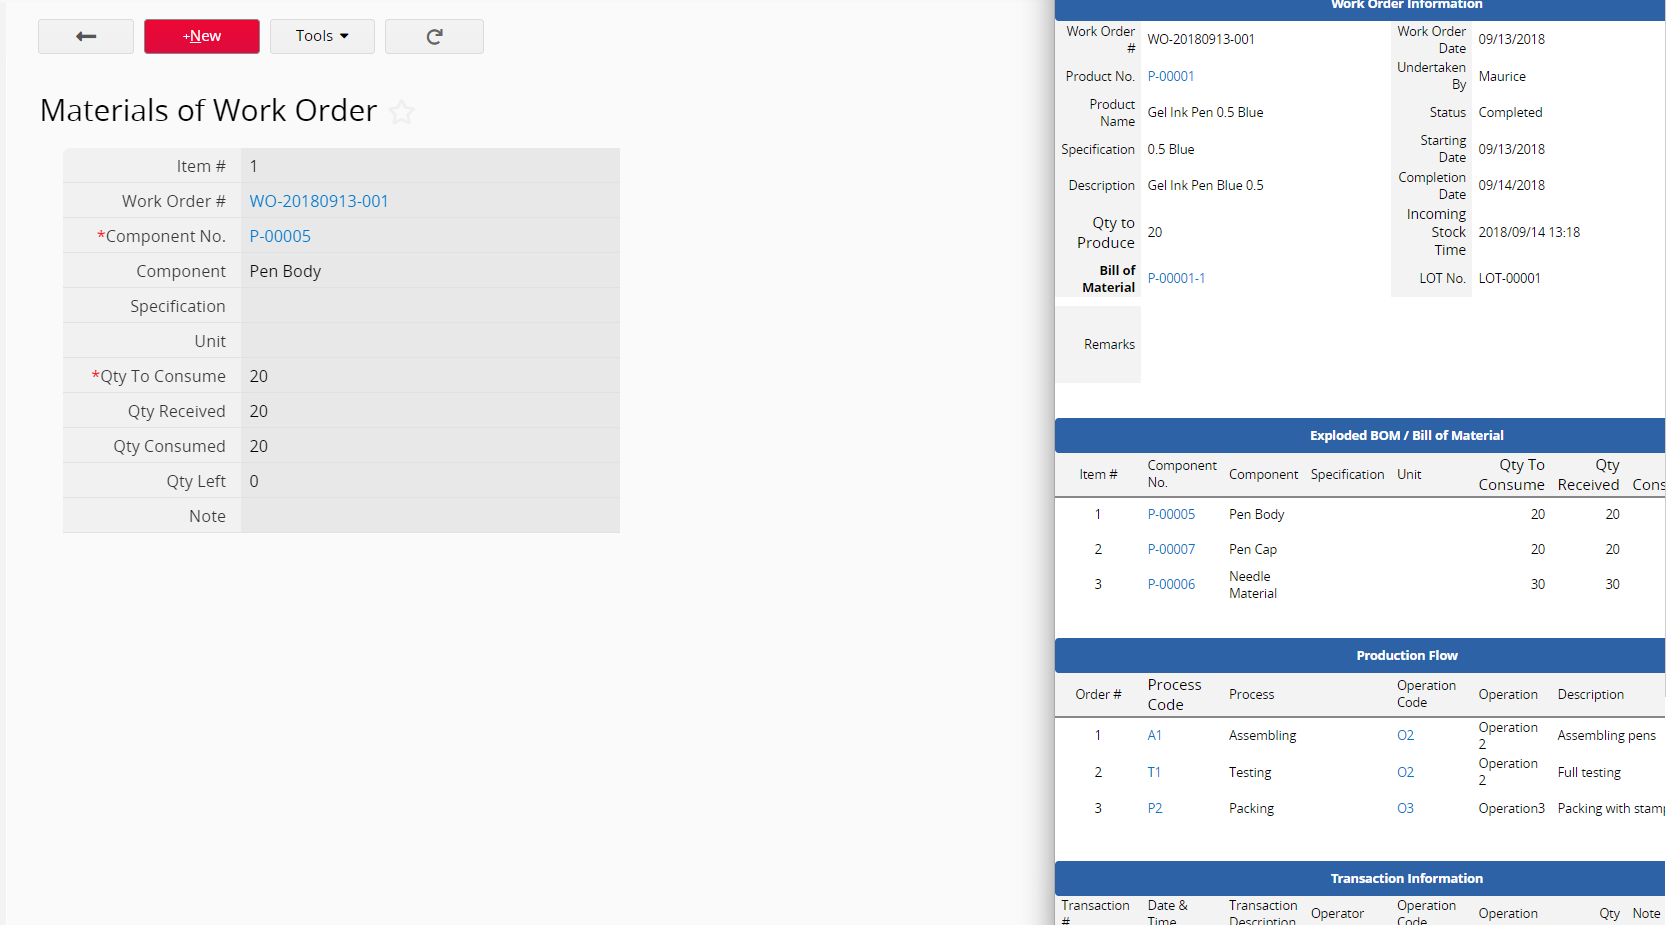
This template consists of 9 sheets, of which the "Materials of Work Order" sheet is read-only and used only to establish sheet relationships. No data entry is required in this sheet.
Please refer to the flowchart below for the corresponding data input workflow.
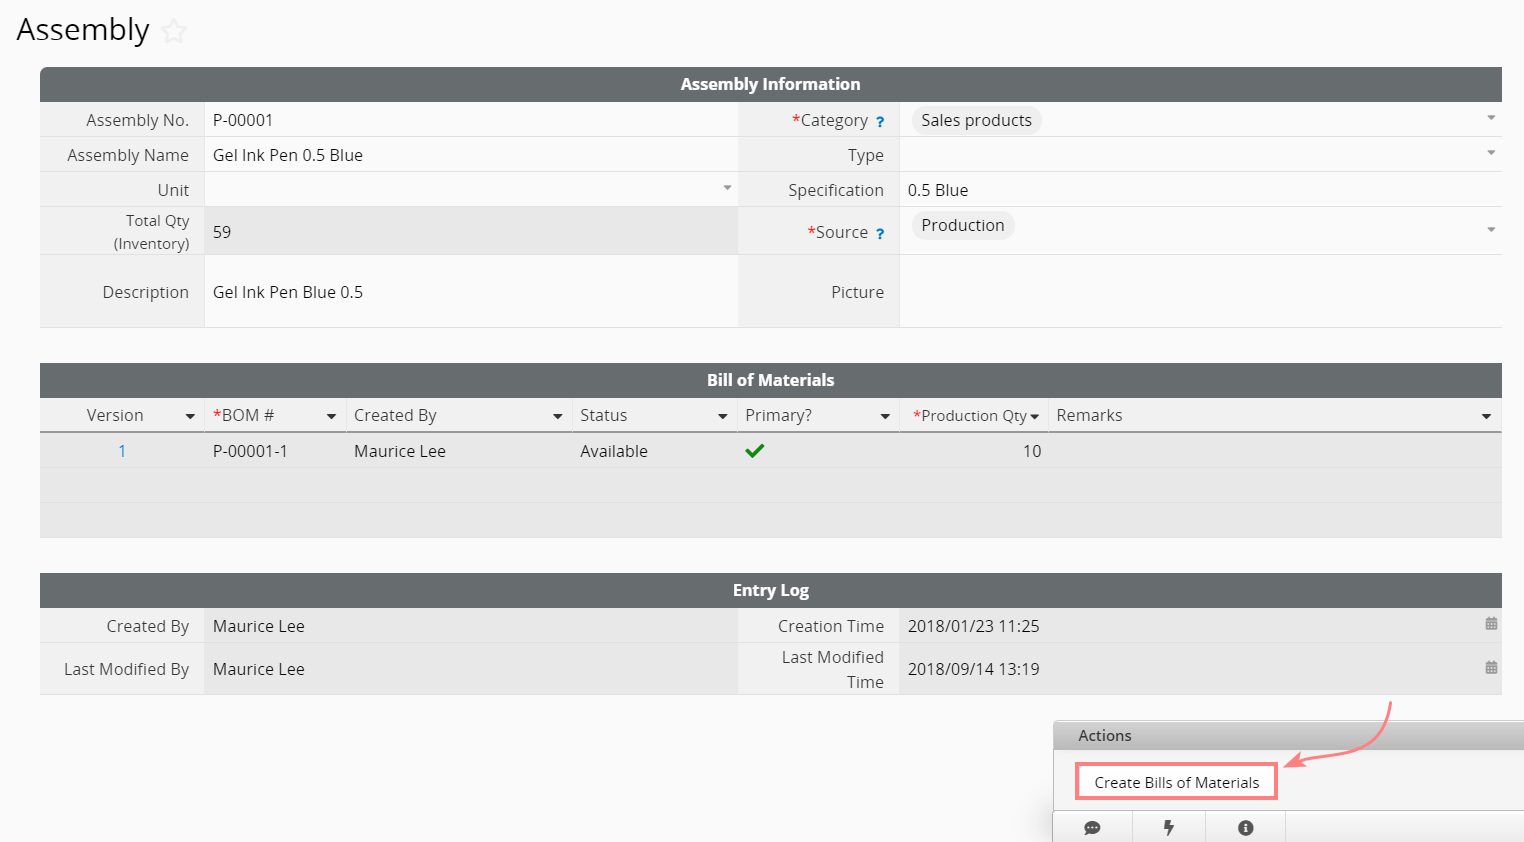
Whether it's the product for sale, the materials, the packaging materials, the semi-finished product, or the finished product, they all need to be created in this sheet. The "Assembly" sheet is actually one of the Multiple Versions of the "Inventory" sheet in the "Inventory Management" template, the "Products (SO)" sheet in the "Sales Order Management" template, and the "Products (PO)" sheet in the "Purchasing" template. In the "Product Management" template, the "Assembly" sheet shows a View with a filter applied where only entries with Production in the Source field are shown. If Procurement is selected as the source, the product will show up in the "Products (PO)" sheet. And if the Sales Product is not selected for its Category, the entry will not show up in the "Products (SO)" sheet.
The "Bill of Materials" Subtable in the sheet is used to list the various "BOMs" of the Assembly item. Since the BOM information should not be created within this sheet, it is set as Read Only here. To quickly look at a specific BOM, click on the "Version" item directly to open the "BOM" sheet. If you want to know how this function is designed, see this section.
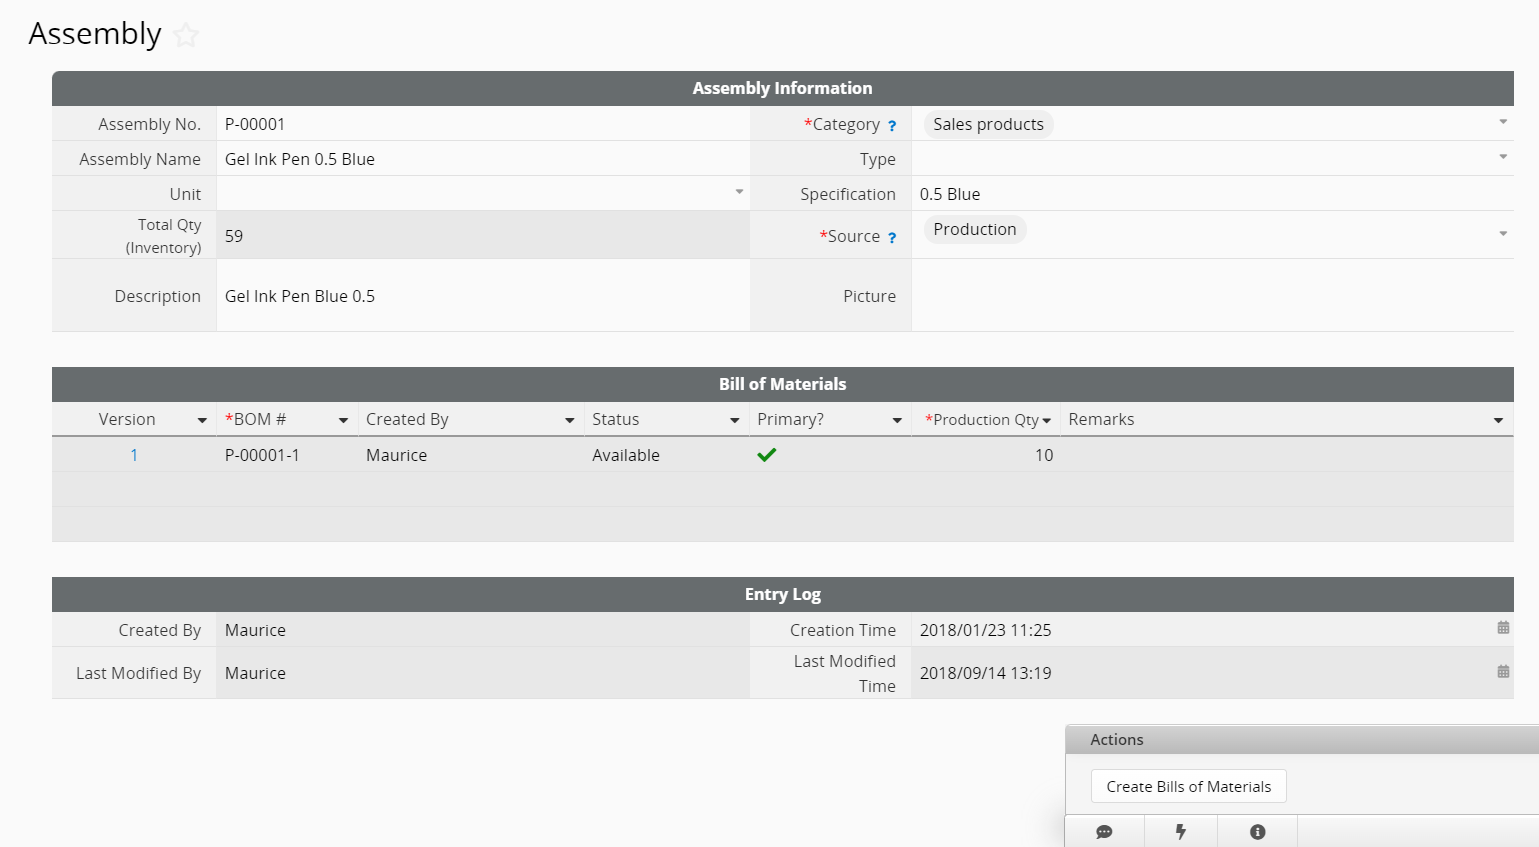
This is a sheet used to list objects that make up an "Assembly" item. As "Assembly" items whose Source field value is Production require the BOM to provide a reference list of materials required to produce it, and allow for exploding the BOM from the "Work Order" (by executing the Action Button). An "Assembly" item can have multiple BOMs, but only one of which can be set as the primary (while also being valid).
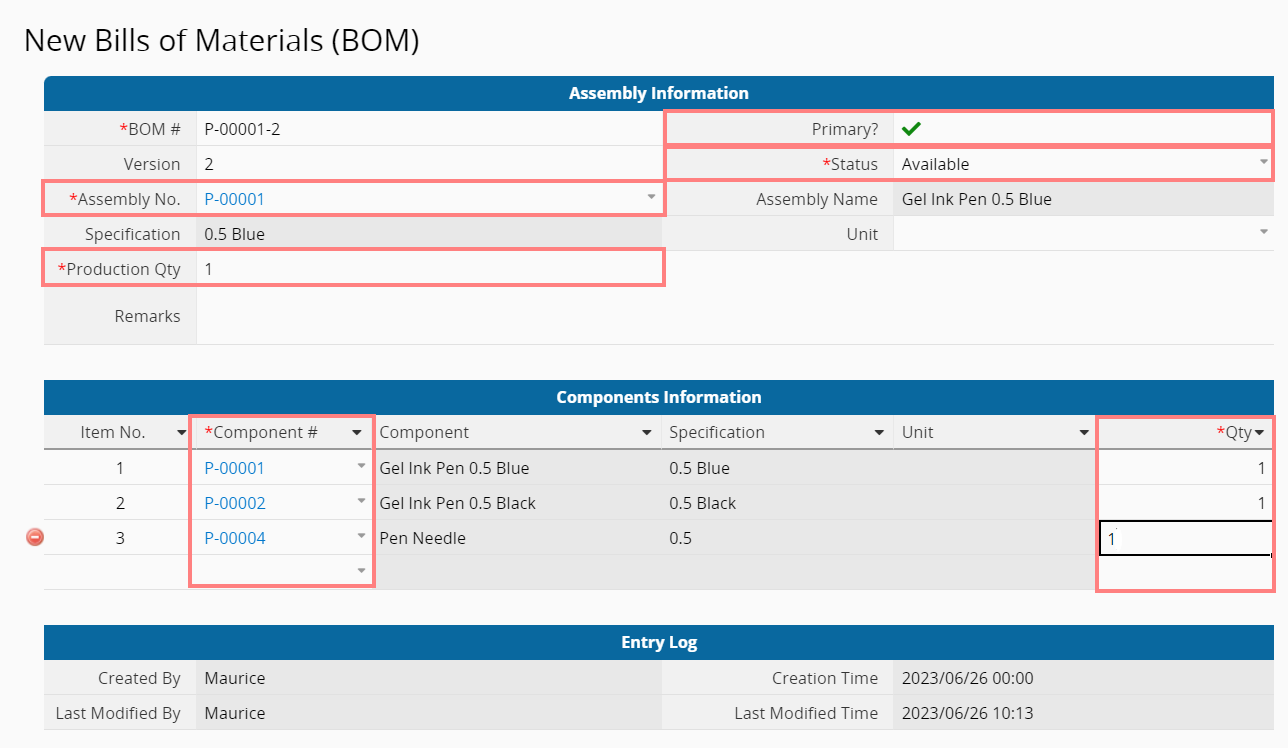
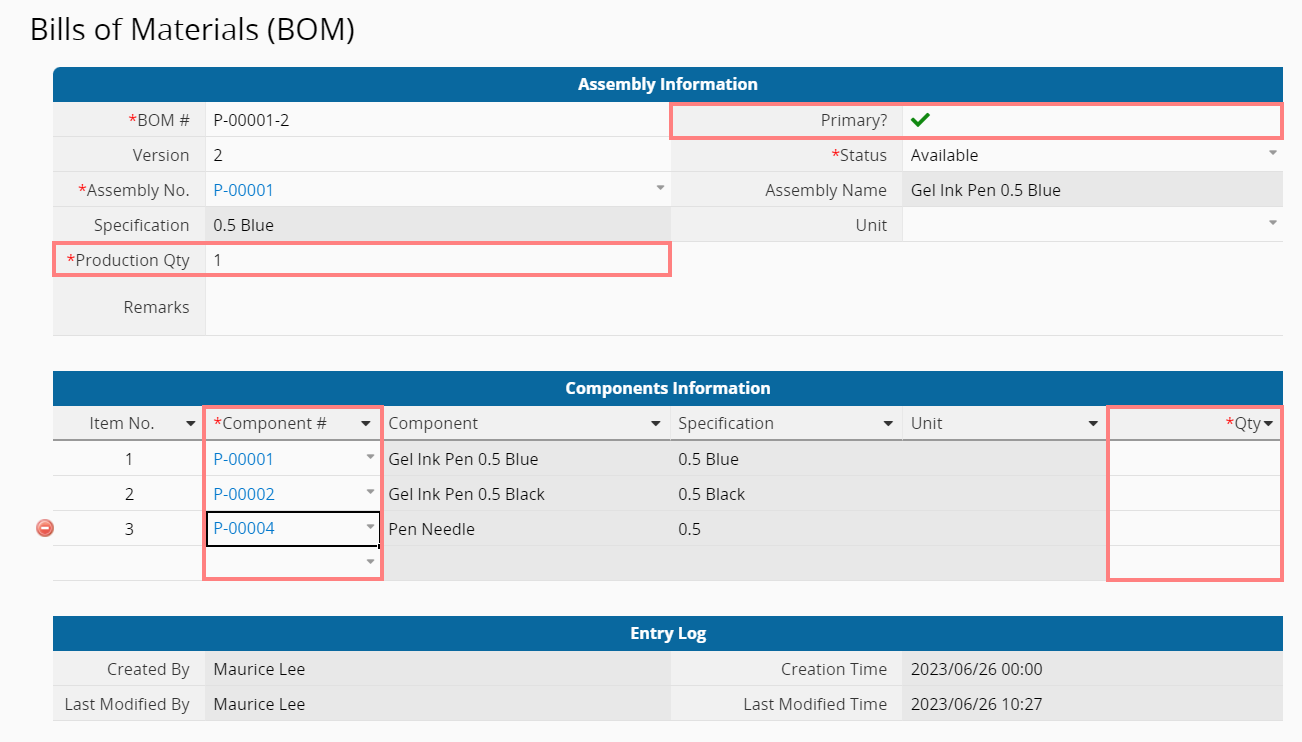
Create a new entry on this sheet, select the linked "Assembly" and load its bill of materials information. The fields are described below:
Assembly No.: Select from the list the "Assembly" to which this BOM belongs. Note that it will only show Assemblies whose Source field value is Production.
Production Qty: Determines how many of the selected assembly to produce at a time.
Primary: Since an "Assembly" can have multiple "BOMs", one must be set as the primary. It's sort of like how a particular dish can be made using different sets of ingredients, but there can only be one standard recipe.
"Components Information" Subtable: Contains information about what component materials are required to produce this assembly. It's like a list of ingredients in a recipe; select the Component# used, then fill in the quantity. After filling in the third row, the system will automatically add a fourth row for you, so don't worry about having too many components.
Note: Each of the Component # has been set up with Link and Load, which allows you to select from the "Assembly" sheet and automatically populate related information such as name, specification, and unit. The Version field is generated automatically by adding 1 to the current largest version number of the BOM belonging to this "Assembly", while the BOM # is composed of the Assembly No. and the Version number. If you don't want to use this numbering convention, you can enter Design Mode and remove the Formula.
Or, you can directly use the Action Button to create a new BOM for this "Assembly".
If you use the Action Button, you don't have to manually select the related "Assembly", the system will do that automatically for you. All you need to do is fill in the rest of the sheet.
Once your "BOM" has been completed, it'll automatically be listed in the Subtable on the sheet of the "Assembly" to which it belongs.

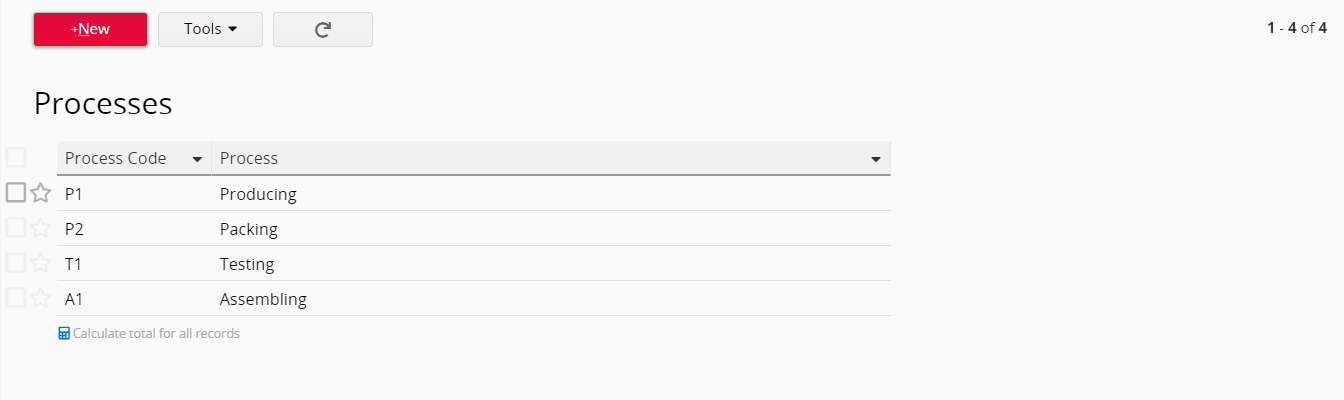
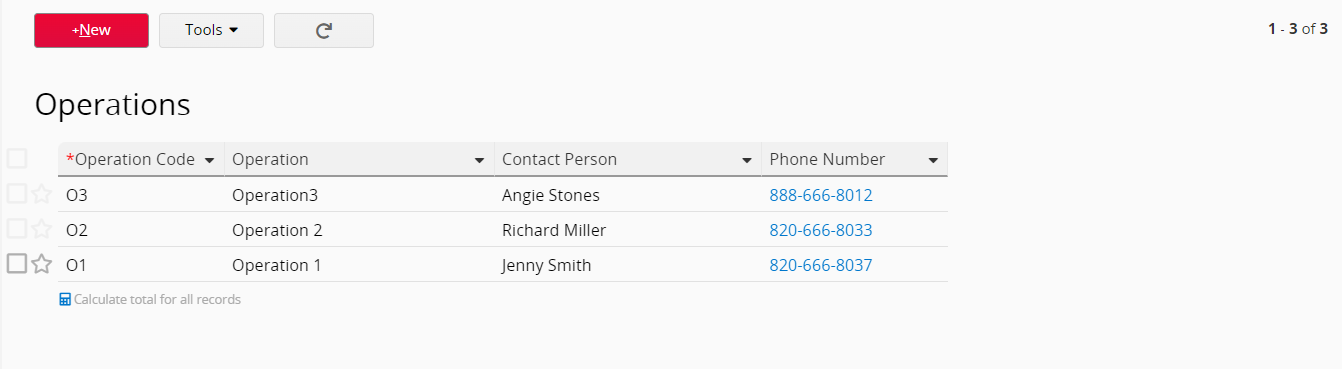
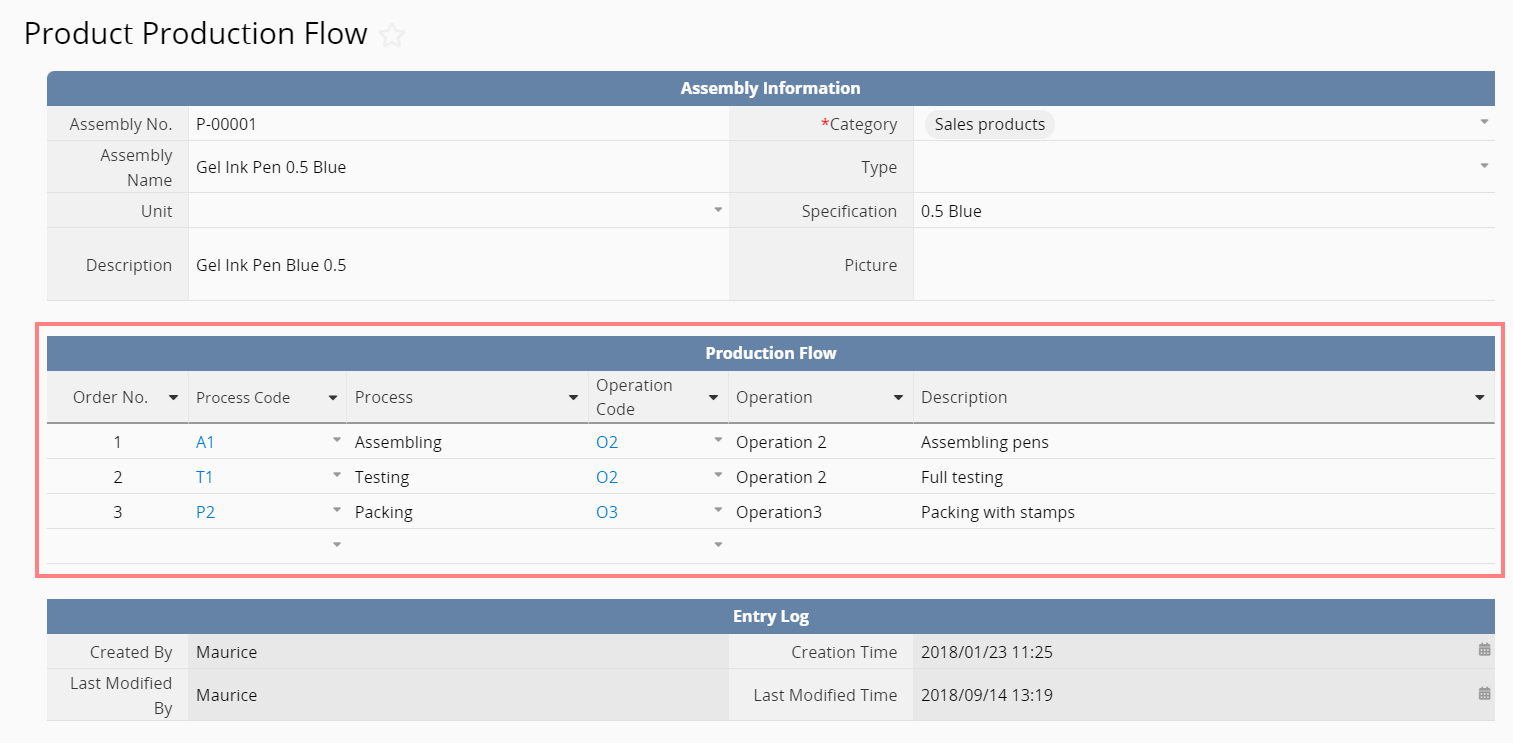
In these two sheets, you can include information about manufacturing processes and operations, so when you are creating the "Product Production Flow", you can select the relevant "Process Code" and "Operation Code" at each step.
An "Assembly" will have only one production flow. The "Product Production Flow" is one of the Multiple Versions of the "Assembly" sheet, used to record the production flow of a material. A Fixed Filter is applied to the sheet so that it only shows assemblies whose Source is Production, allowing you to create or edit its production flow.
Click on an assembly to open the entry, and you can then record its production flow in the "Production Flow" Subtable. The Process and Operation Codes have been set up to be linked to the corresponding "Processes" and "Operations" sheets. Select a code to automatically fill the process and operation names, then manually type in the description of the operation.
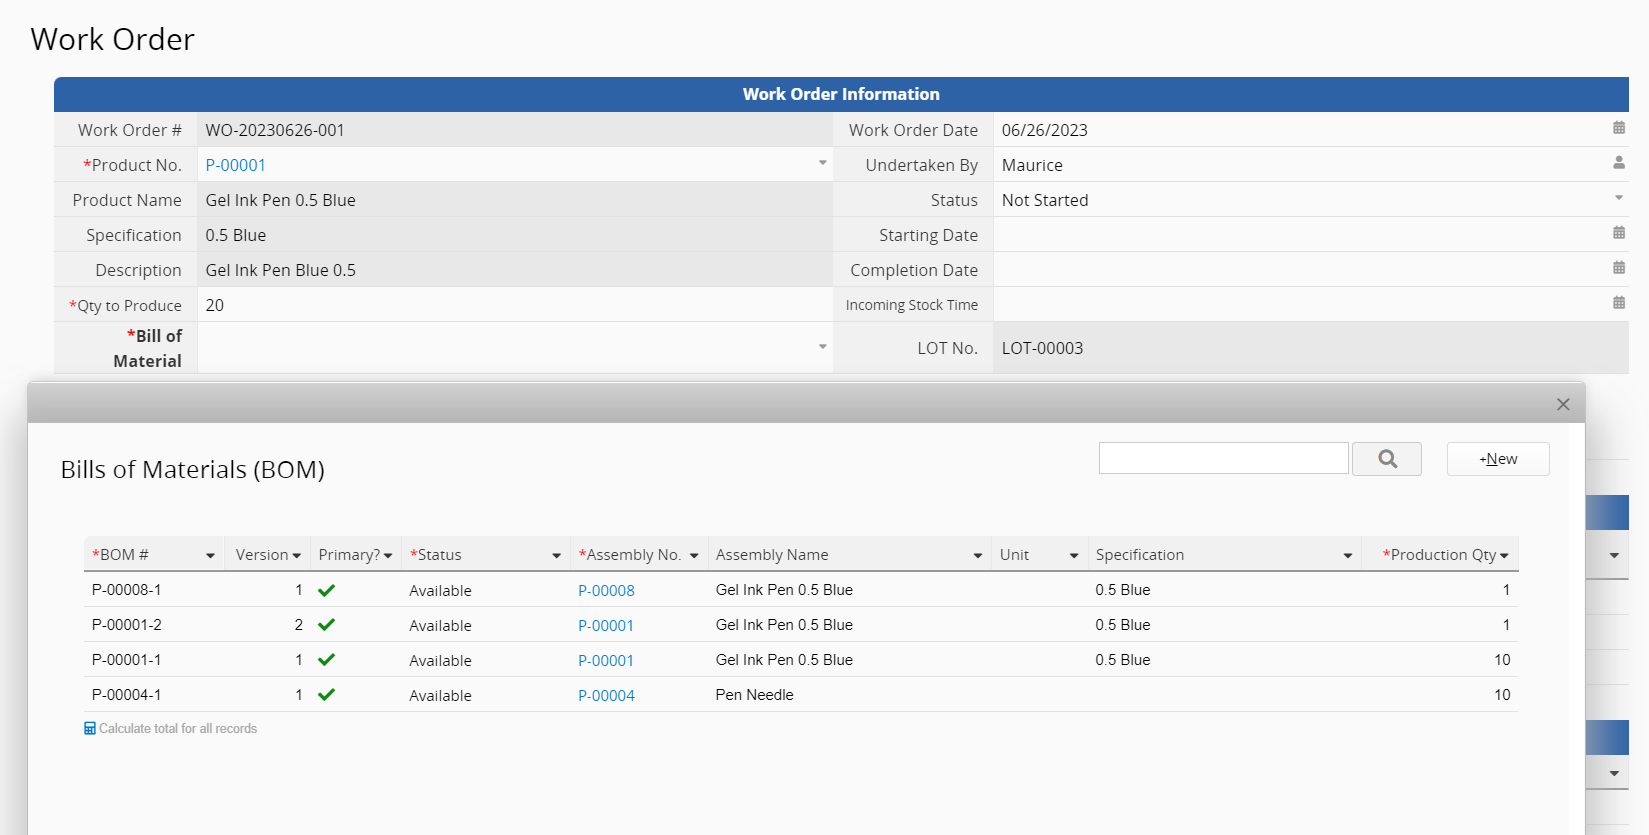
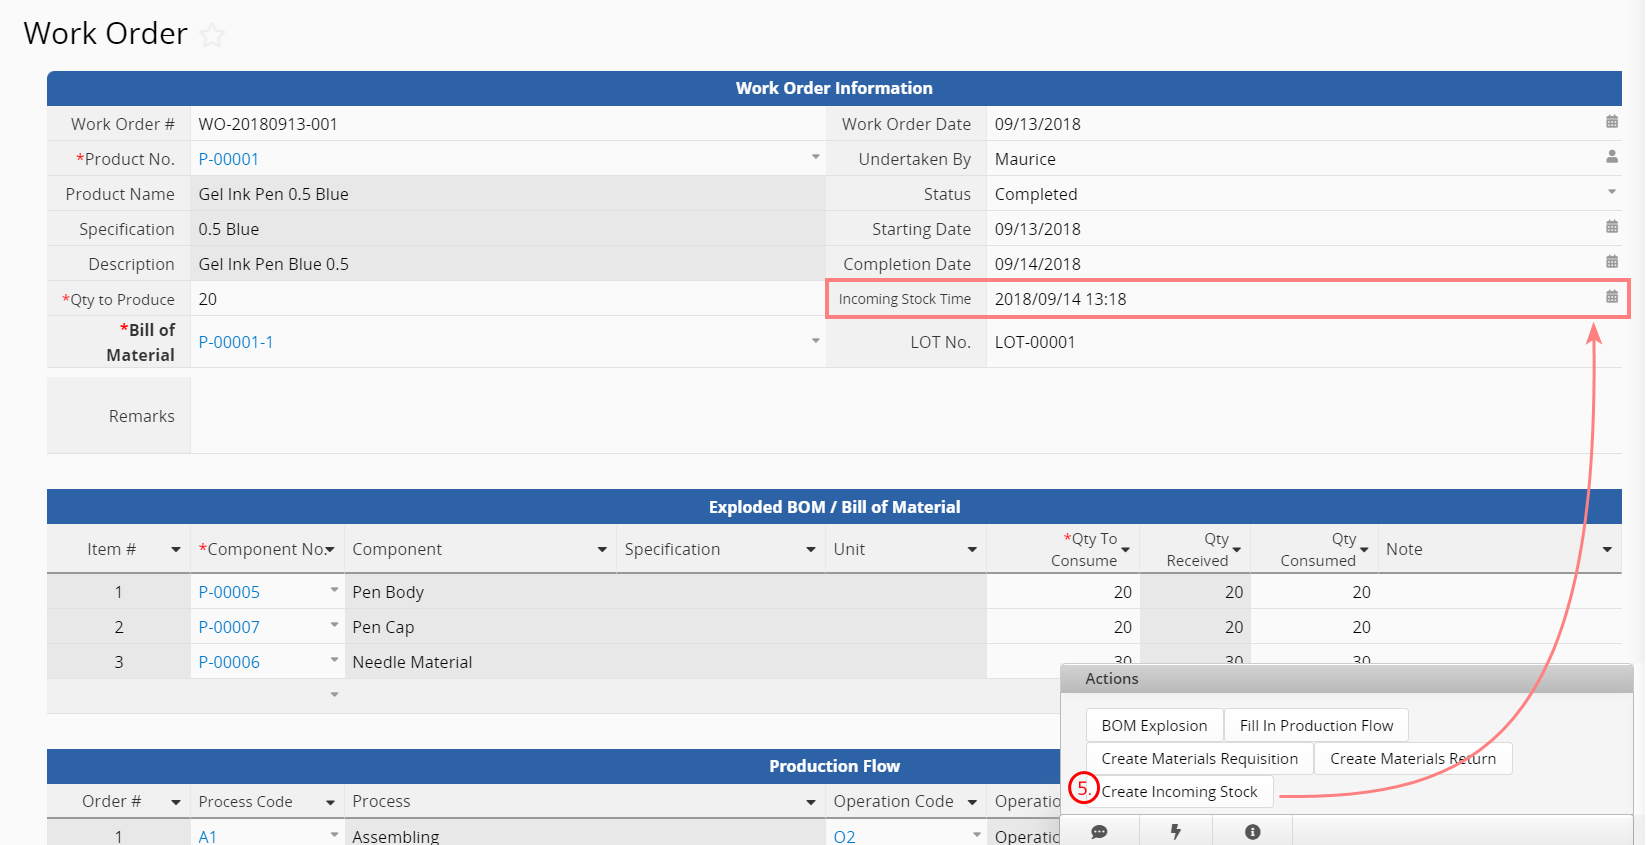
The "Work Order" is used to record information such as the assembly, the BOM required to reference for production and the quantity to produce (entered manually), the raw materials and the quantities required to produce it, and the relevant production flow (automatically filled with an action button). The "Work Order" is divided into five sections.
First, fill out the work order information at the top, which includes the following:
Product No.: The assembly to produce. This field is configured to be selected from the "Assembly" sheet with Dynamic Filtering applied with lists only assemblies that have Production as its source.
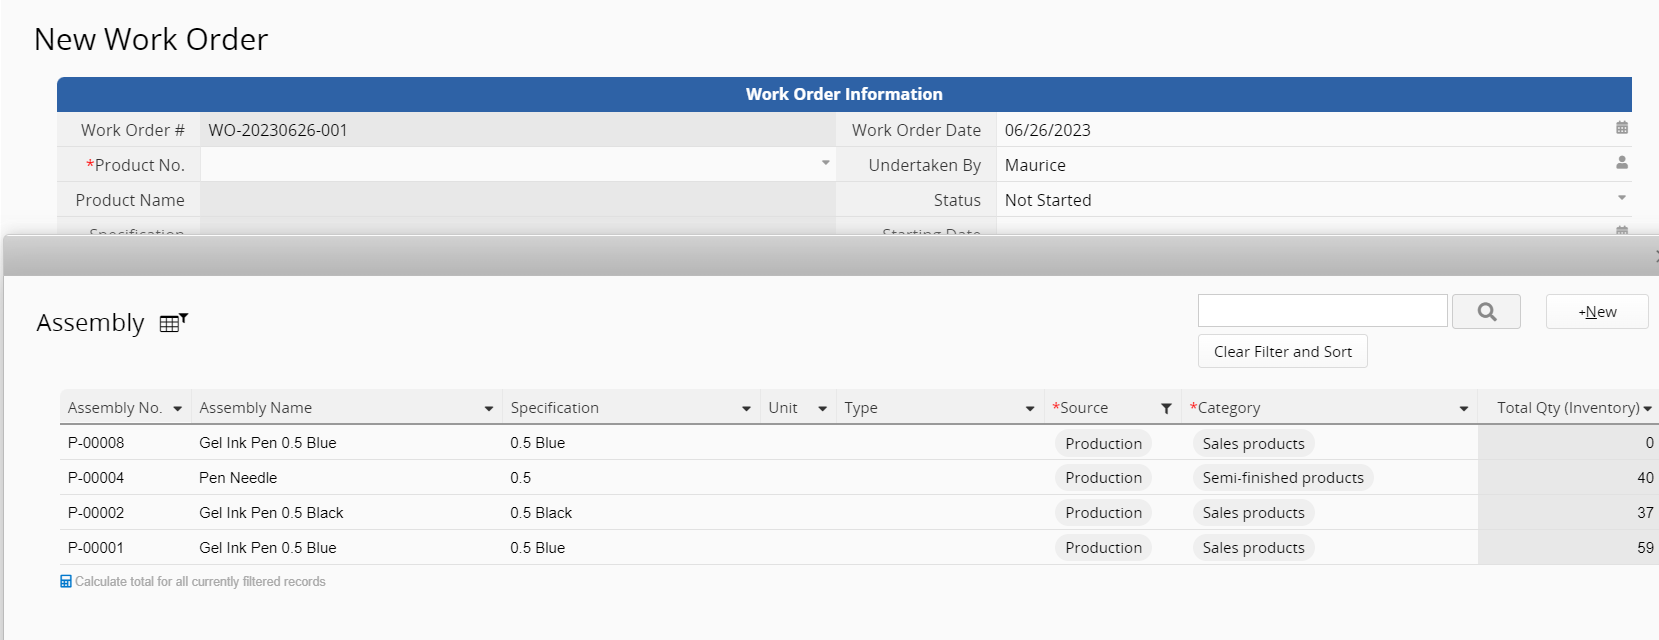
Qty to Produce: Fill in the quantity you want to produce.
Bill of Material: Select which "BOM" you will reference for production. This field is also configured with Dynamic Filtering, so it will only list the BOMs related to the assembly you have already selected.
Status: Defined by a formula and therefore does not require manual input. After you fill in the Starting Date, the Status will automatically change to In Process.
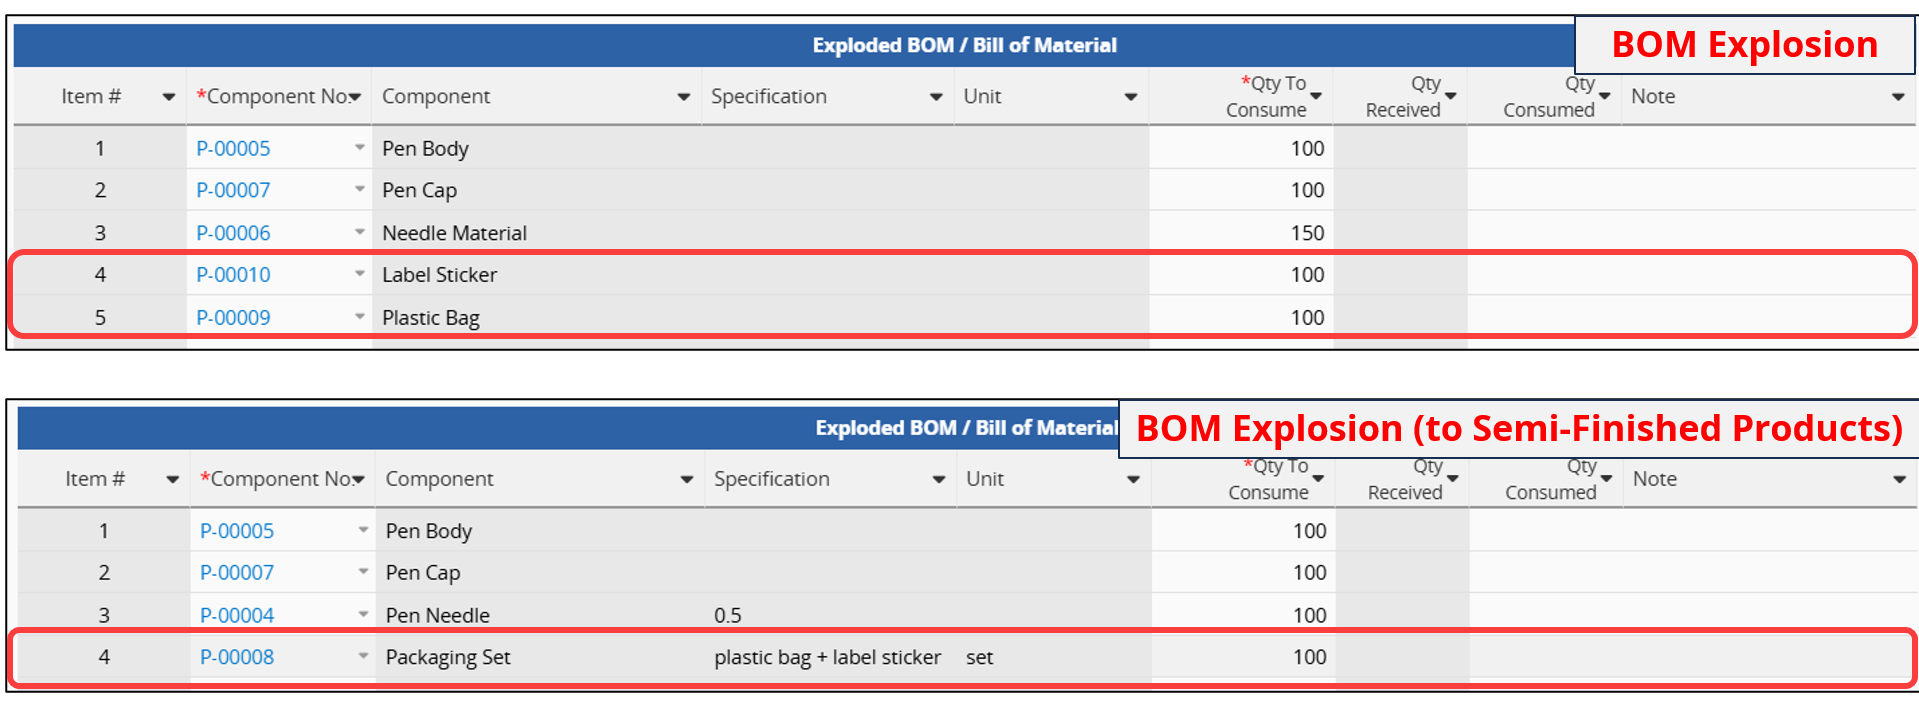
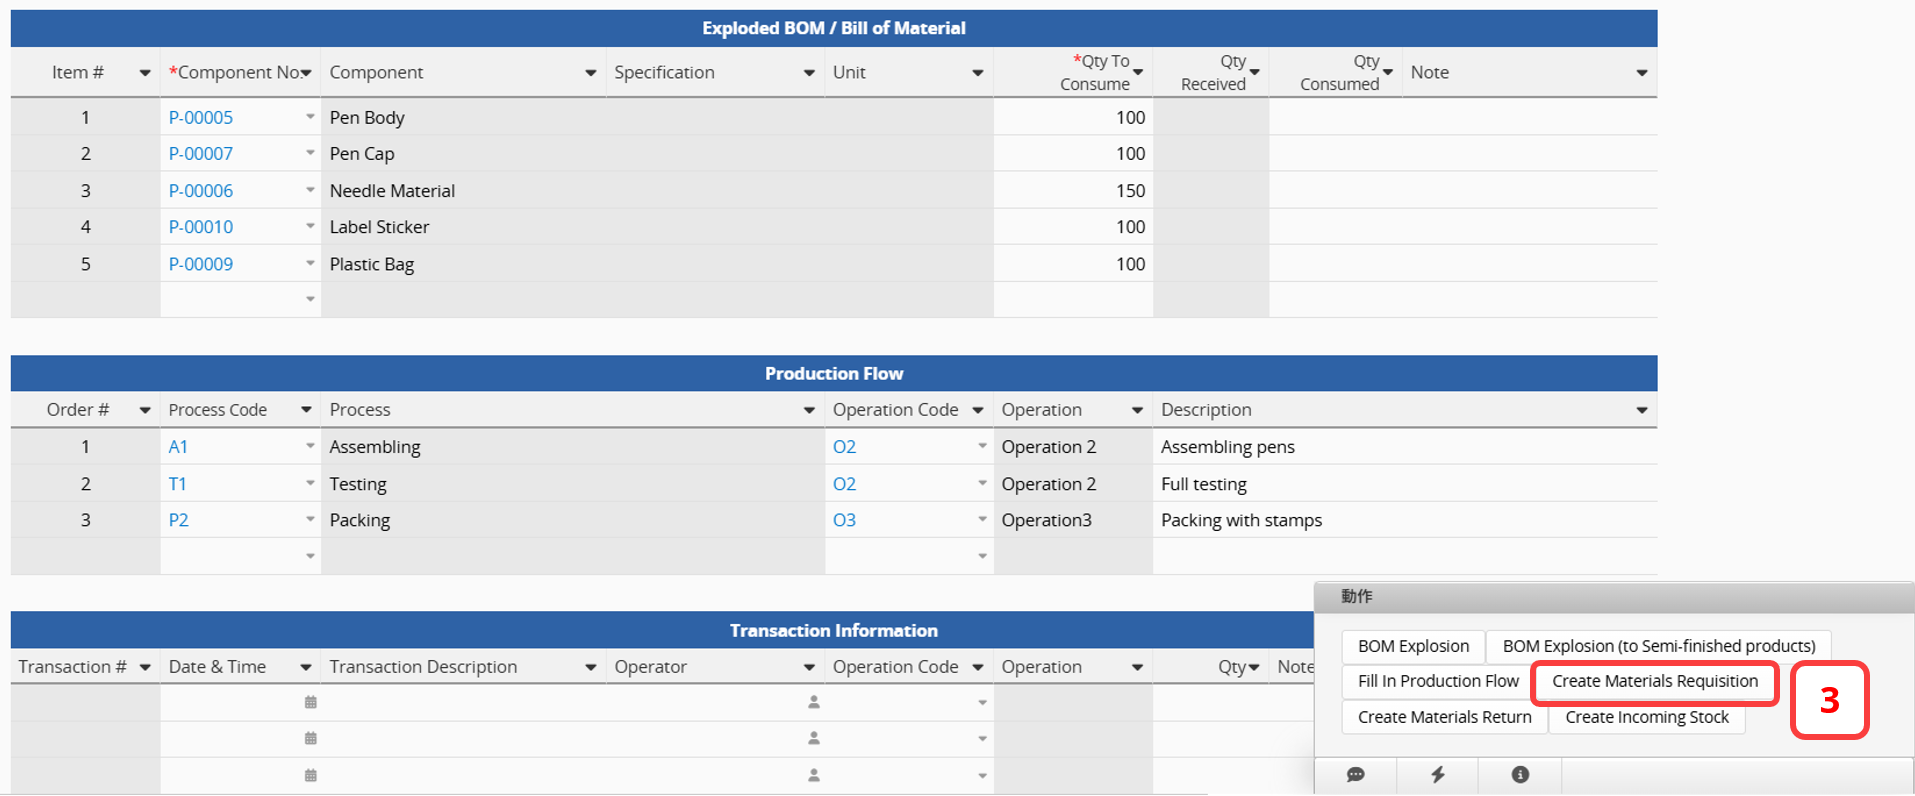
After saving the data, click the following Action Buttons in order: "BOM Explosion" or "BOM Explosion (to Semi-finished products)" and "Fill in Production Flow" to explode the BOM and list the materials and their quantities required to produce the specified quantity of products, as well as the specified production flow.

If a material you are producing includes a "semi-finished product"—a component composed of other materials (e.g., a Packaging Set consisting of a plastic bag and a label sticker)—it is treated as a "semi-finished product" required for your final product.
Clicking "BOM Explosion" will display all material levels, including the components within semi-finished products. To view only the first-level materials without expanding the details of semi-finished items (e.g., if their production is not part of the current process), use "BOM Explosion (to Semi-Finished Products)" instead.
Once you have checked that the materials and production flow automatically filled are correct, you can click on the third Action Button, "Create Materials Requisition". This Action Button converts records, transferring the materials and quantities information from the "Work Order" to the "Materials Requisition" sheet to facilitate requisition.
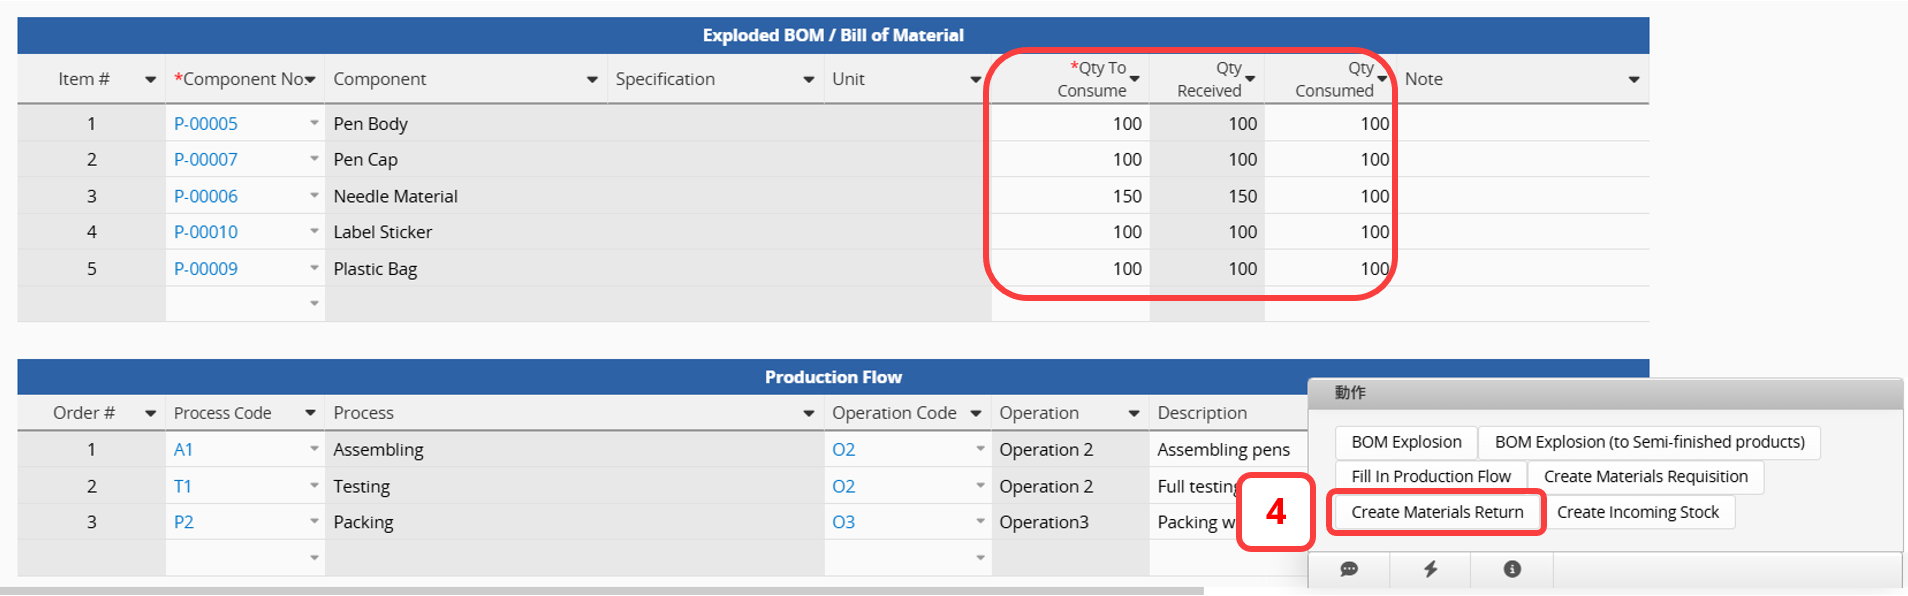
If quantity received is greater than quantity consumed (meaning there is unused material) and the excess needs to be returned, then the fourth Action Button, "Create Materials Return" can be used. This Action Button also performs a record conversion, sending the component and the Qty Left (hidden field with a formula calculating "Qty Received - Qty Consumed") to the "Materials Return" sheet for the return process.
For details about requisitions and returns, please see this section.
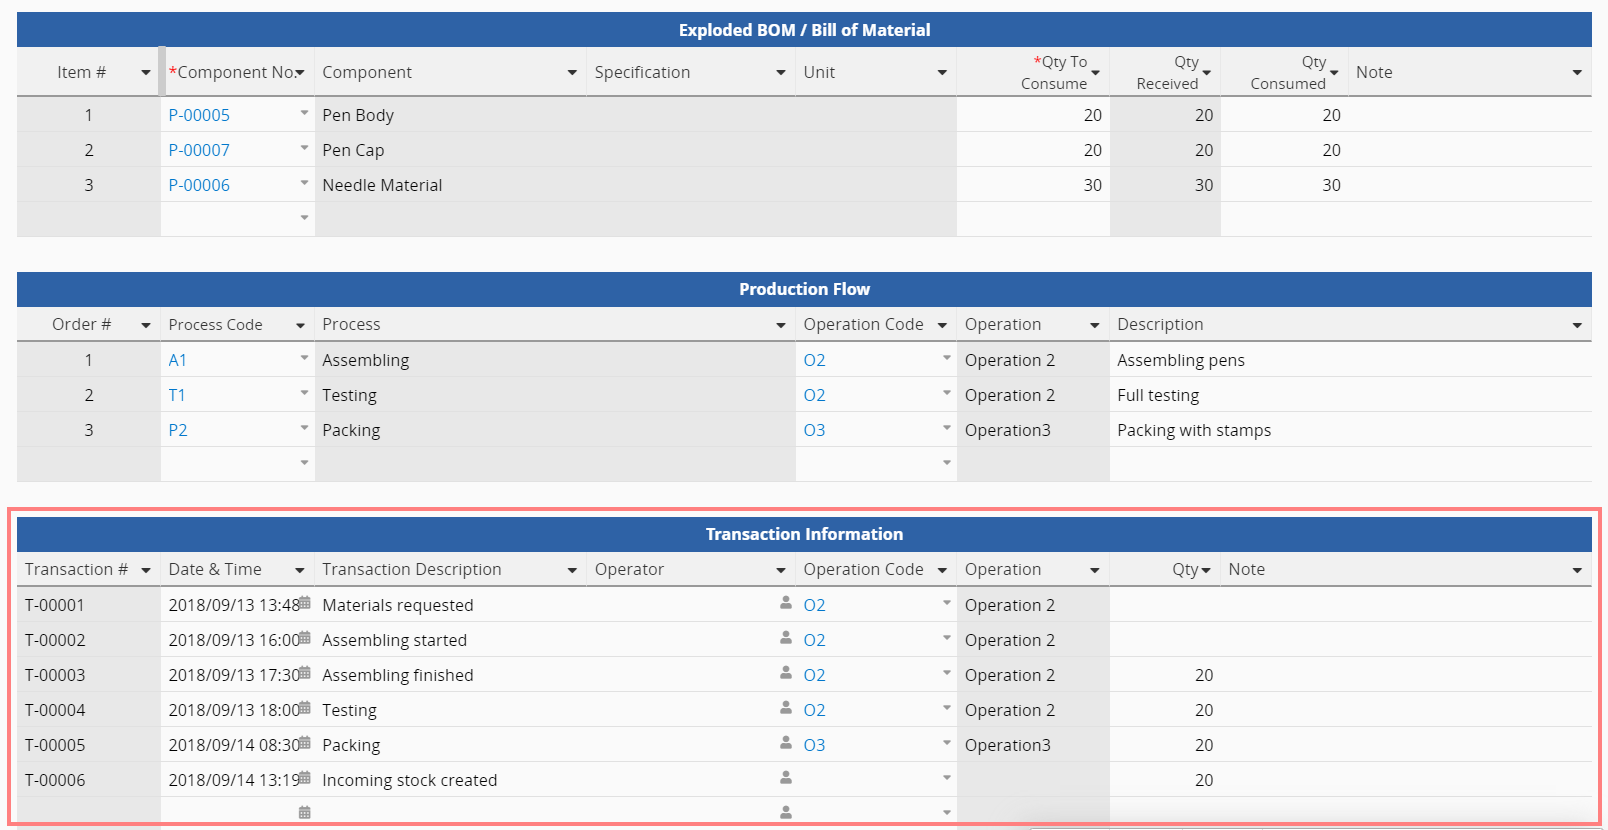
The "Transaction Information" Subtable below allows you to manually enter information about transactions that occur during production.
When the product has completed production, just fill in the Completion Date, and the Status field formula will pick this up and automatically change the status to Completed.
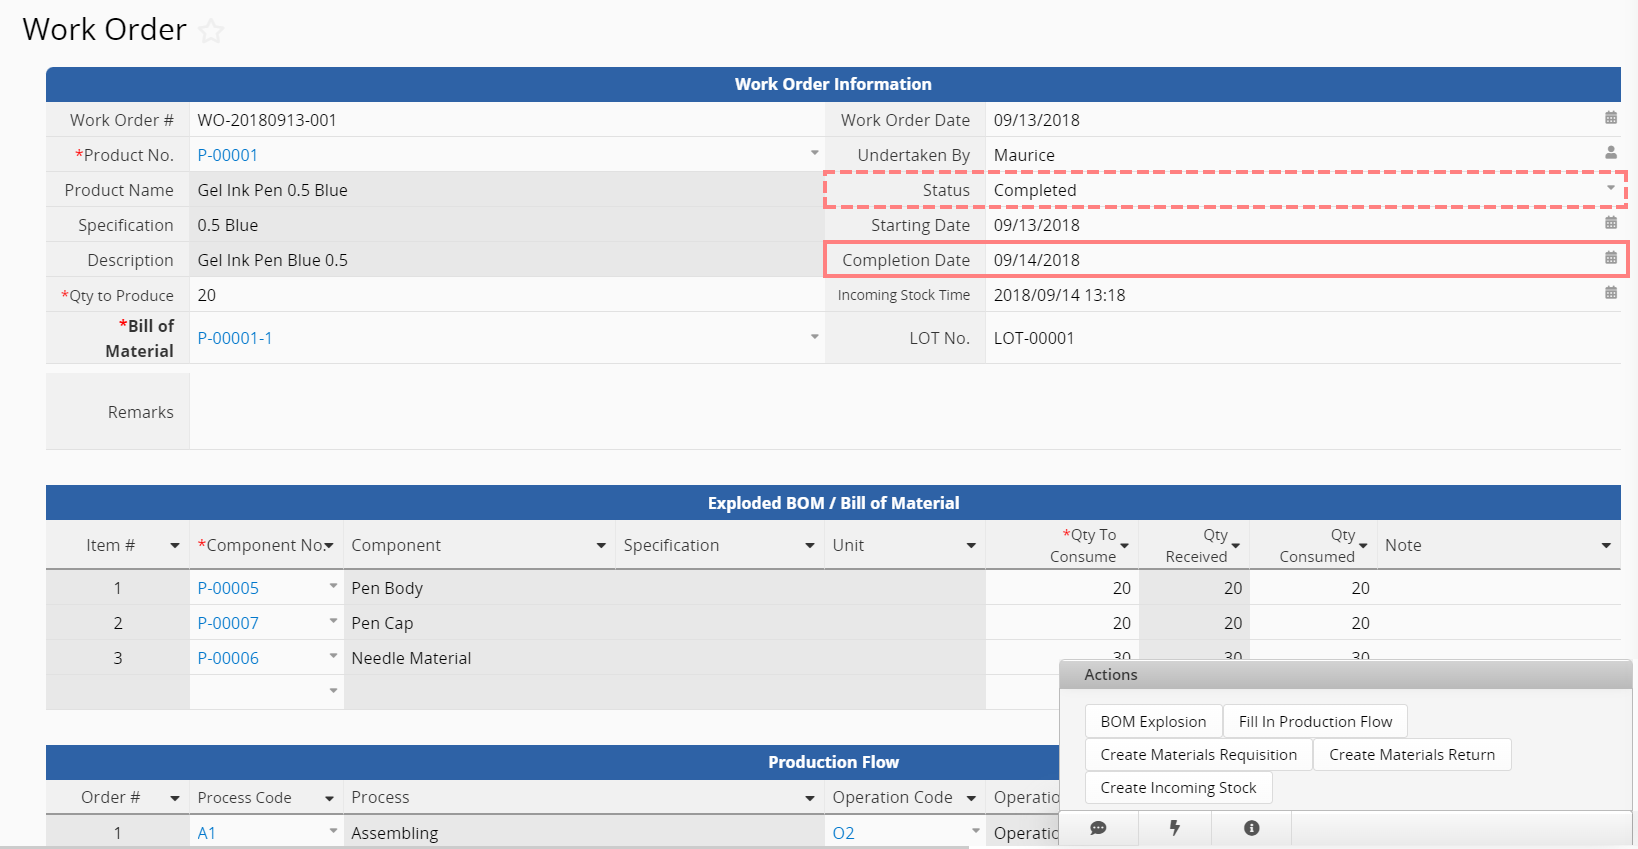
Once the "Work Order" Status is set as Completed, you can use the fifth Action Button, "Create Incoming Stock", to convert it to an "Incoming Stock" sheet ("Inventory Management" template). Clicking this button will automatically fill in the Incoming Stock Time. Note that the actual stock-in still needs to be done on the Incoming Stock sheet.
(The "Materials Requisition" sheet is used as an example in the images below.)
The data on both sheets can be created through record conversion using the Action Buttons in the "Work Order". The required material information, such as the Material No., Material Name, and Qty, will automatically populate in the requisition and return sheets. In particular, the Qty is converted from the "Qty to Consume" and the hidden field "Qty Left" from the Exploded "BOM" Subtable in the "Work Order" to the requisition and return sheets, respectively.
Here, all you have to do is fill out the Location Code and Inventory No. to determine where the material must come from or go to for requisition and return, respectively.

Once the data is saved, use the "Process Requisition / Return" button to update the quantity received on the "Work Order".
To prevent double execution, the "Material Requisition / Return" entry will be automatically locked after clicking the "Process Requisition / Return" button. To edit or delete the entry, please click the "Reverse Process Requisition / Return" button to unlock the entry.
This is a new sheet created from the Exploded "BOM / Bill of Materials" Subtable in the "Work Order", so the data is synchronized. Since all manual editing and addition of data are done on the work order, all fields on this sheet are Read Only and cannot be modified. However, if the data is updated through the Action Buttons, such as, for example, updating Qty Received using the "Update Work Order Qty Received" button on the "Material Requisition" or "Return" sheet, then the value is actually updated to this sheet.
When you need to analyze and link each material used in a given "Work Order", you can also use this sheet to generate a Report or create additional linking relationships.
 Thank you for your valuable feedback!
