The Ragic REST API allows you to query any data that you have on Ragic, or to execute create / update / delete operations programmatically to integrate with your own applications.
Since the API is based on REST principles, it's very easy to write and test applications. You can use your browser to access URLs, and you can use pretty much any HTTP client in any programming language to interact with the API.
HTTP requests can be issued with two content types, form data and JSON. However, for file uploads, form data is the only option.
You can test most GET method APIs easily by entering API endpoint URLs in your browser. For example, you can try the following URL to access customer account information on the Ragic demo:
https://www.ragic.com/demo/sales/1?api
Note that you may need to modify www to na3, ap5, or eu2 in your URL based on your Ragic account URL.
But it's not as easy to create POST method requests on your browser, so we recommend a tool called cURL for you to create all types of HTTP requests you want to test our API. Our document will also be using cURL commands as samples API calls, but you can also use any tool that you're familiar with to create HTTP requests and parse responses.
You can download cURL for your platform at http://curl.haxx.se/download.html , and you can also read its full documentation at http://curl.haxx.se/docs/manpage.html . But don't worry, we'll tell you about the necessary usages of cURL as we explain the Ragic HTTP API.
After you have downloaded cURL, you can use the following command to access the same endpoint we described above, and you should see the same output as you would in a browser.
curl https://www.ragic.com/demo/sales/1?api
Please note that when using CURL, -d does not encode the content as URL string. If your string content has characters like % or & please use the option --data-urlencode instead of -d.
Postman is a tool that helps to send HTTP requests without having to code. You can see Postman’s documentation here, and Postman can be downloaded here.
Postman is recommended for users with little technical experience, and the fundamentals will be introduced in this tutorial.
The user interface for Postman looks like the image below:
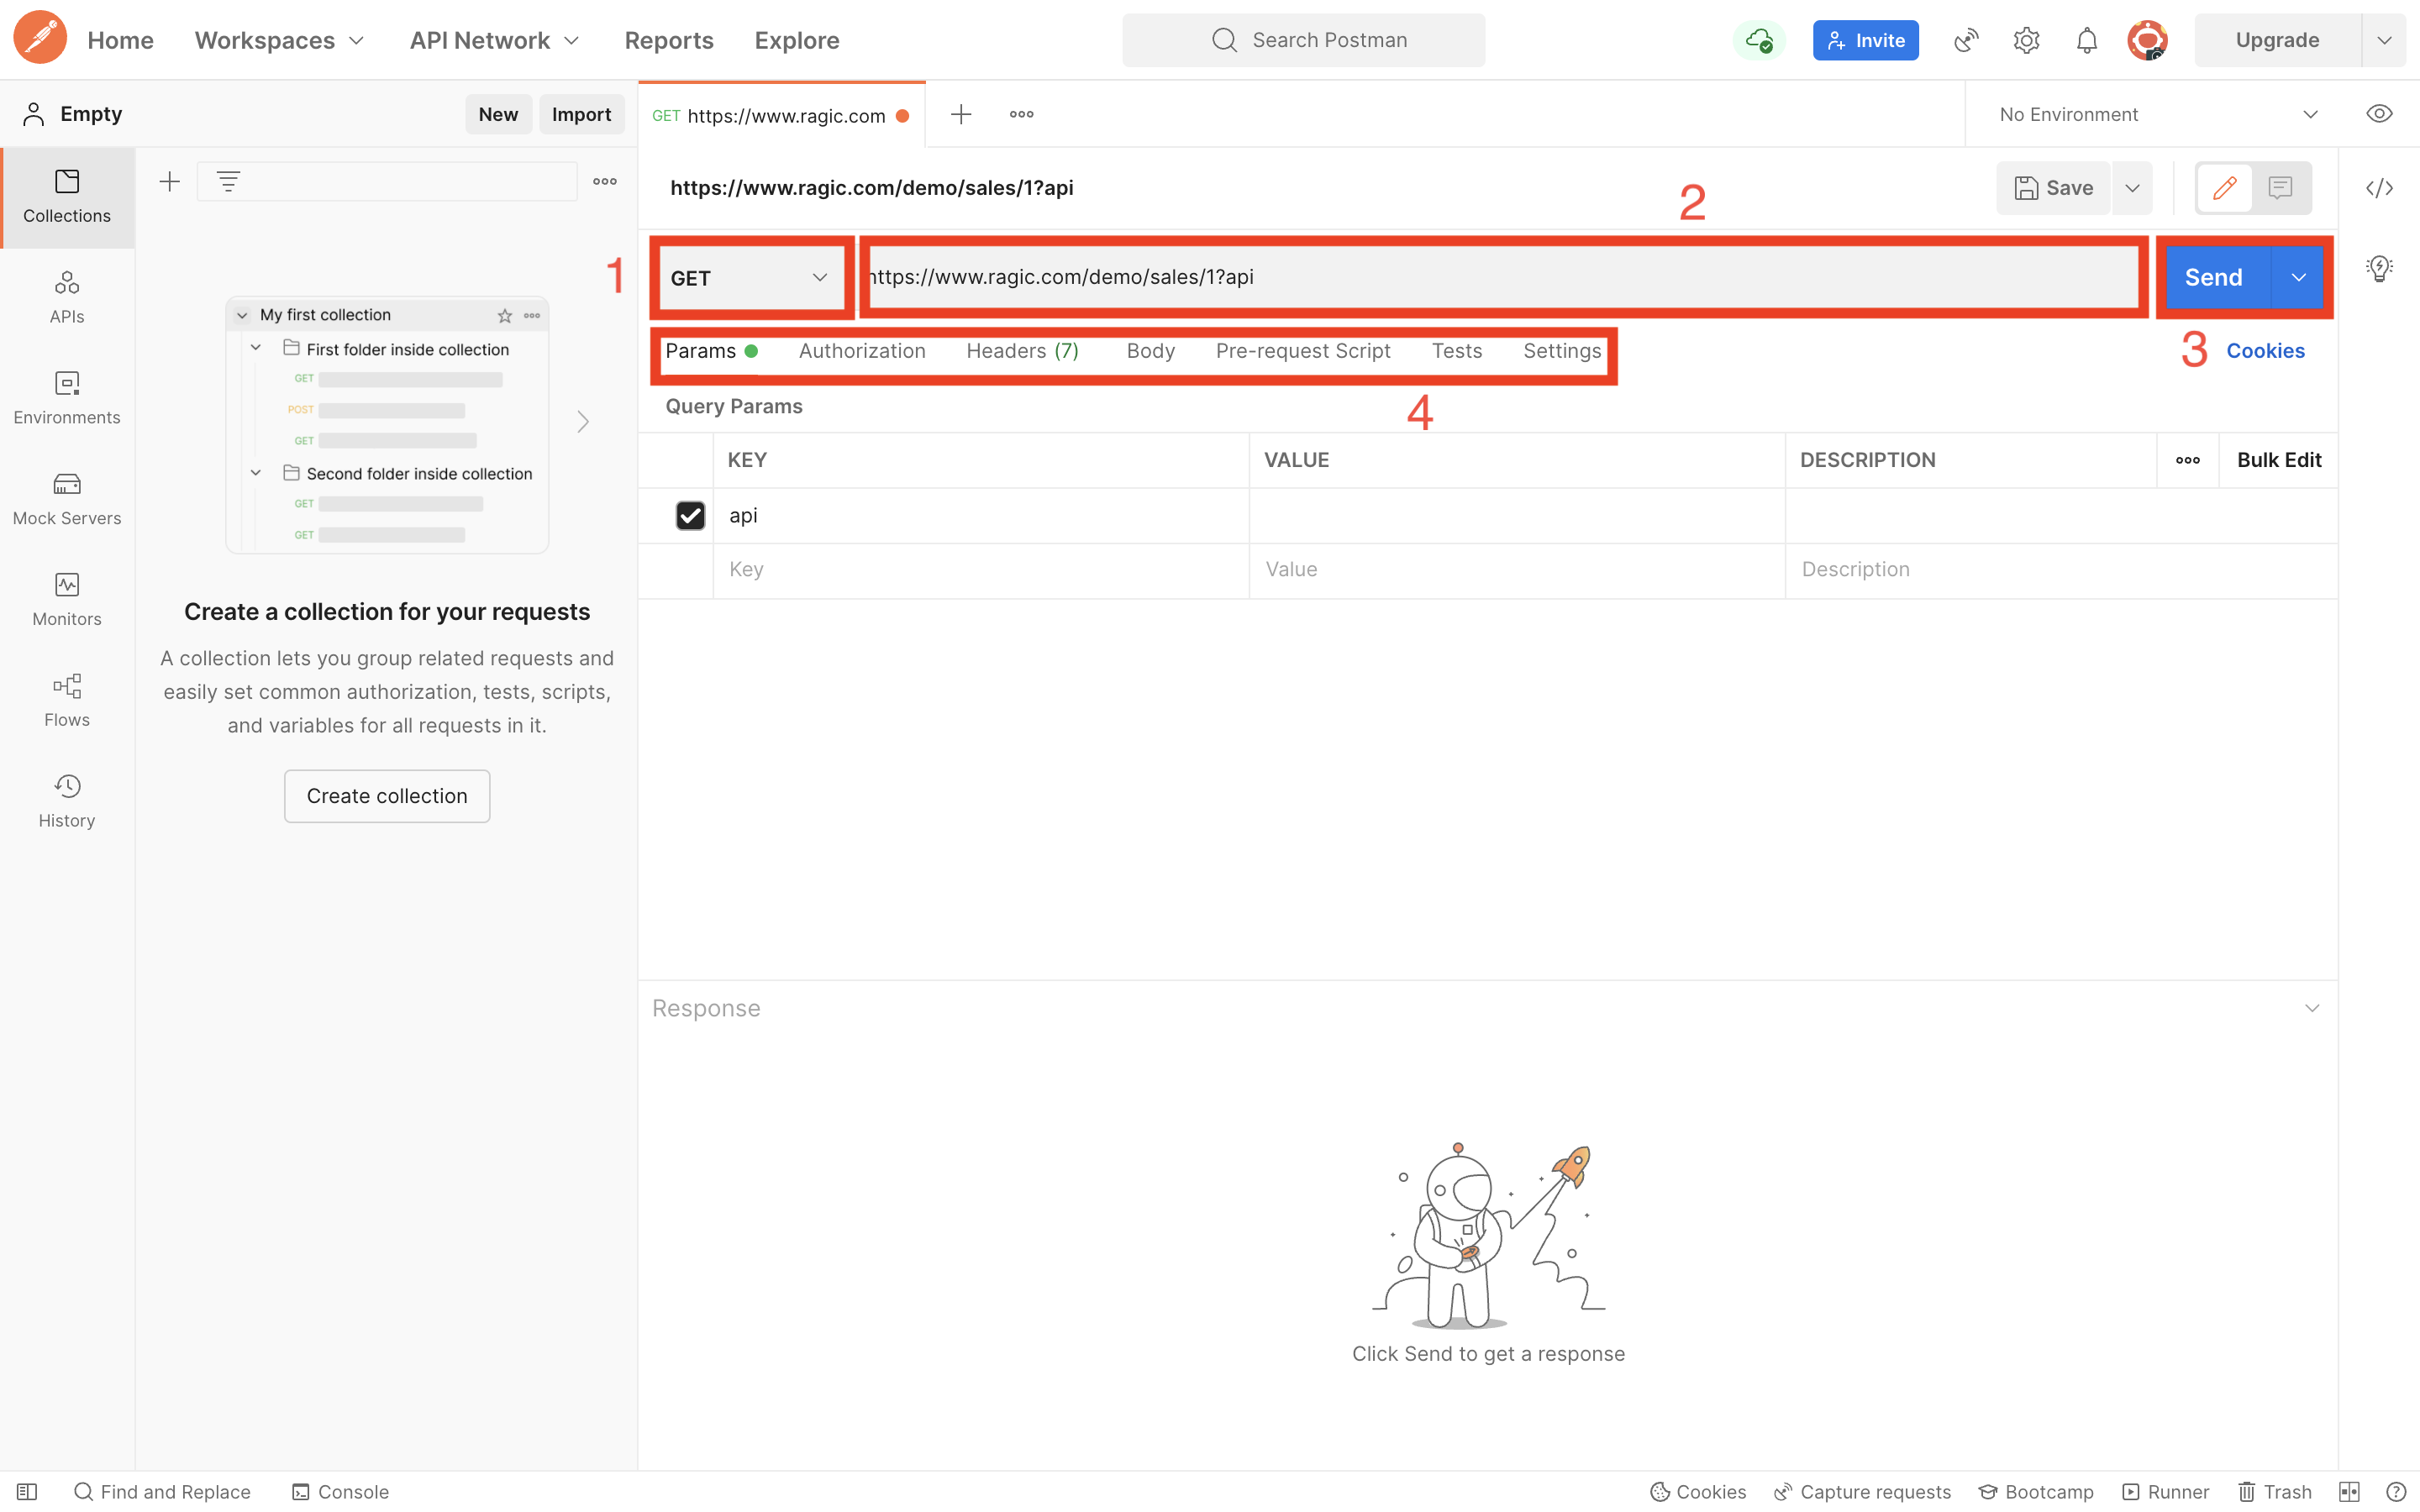
For the image above, the HTTP request is a GET request, and it is being sent to https://www.ragic.com/demo/sales/1 with a query parameter "api" that has no value attached to it.
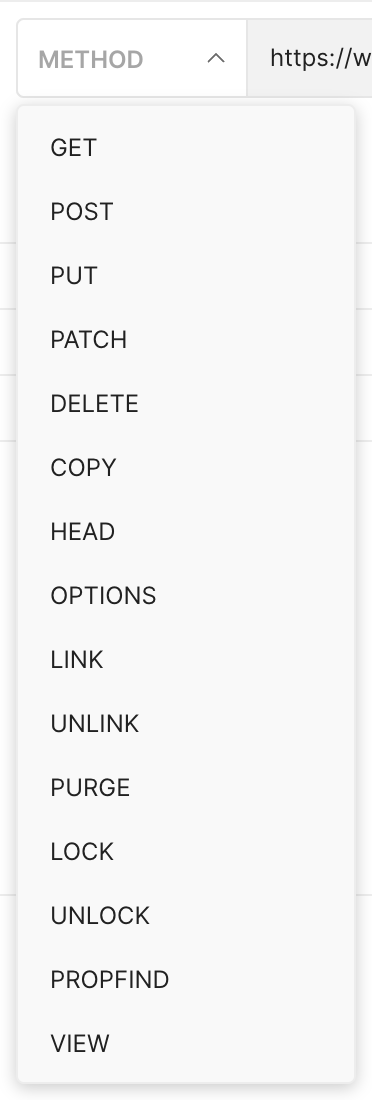
The image below shows the list of HTTP methods from the dropdown menu.
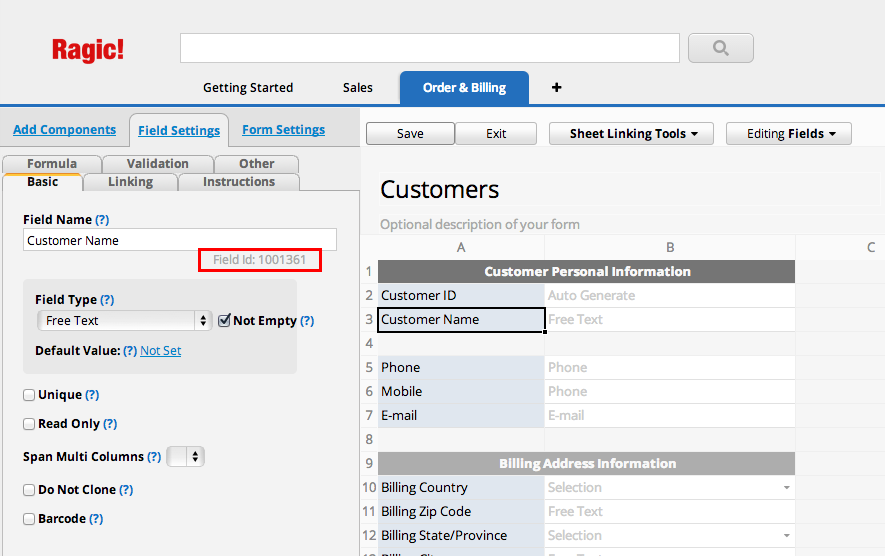
In a lot of cases you need to find a field id for a field. The field id is an unique number that Ragic assigns to each field that you created. It gives your program an unambiguous way to refer to a field. With this design, fields can even have the same name under a sheet and Ragic will still be able to distinguish between them.
Go to the design mode, and click on the field you want to reference to. On the left sidebar, you're going to see the Field Name. The Field Id is right under the field name.
You can find the API endpoint for your Ragic form or entry by passing api as a query string parameter to specify this is an API request.
https://www.ragic.com/{ACCOUNT_NAME}>/{TAB_FOLDER}>/{SHEET_INDEX}/{RECORD_ID}?v=3&api
Please Note:
It's a good practice to specify the API version every time you send your request to ensure a correct version. If the version is not specified, the latest version will be used, but unexpected changes to the API may cause problems in your application.
For example if you usually access your Ragic form using the following URL:
https://www.ragic.com/demo/sales/1
Its HTTP API endpoint URL would be:
https://www.ragic.com/demo/sales/1?v=3&api
Or for a single entry in your form, you would include an id (for example record id of 1) to specify an entry:
https://www.ragic.com/demo/sales/1/1
Its corresponding HTTP API endpoint URL is simply:
https://www.ragic.com/demo/sales/1/1?v=3&api
We don't have a limit on our API calls as long as it's under reasonable use. If you're not sure about your use, feel free to just drop us a message at support@ragic.com to check with us.
While there is no limit on API usage, there is a queue mechanism for each database account. The maximum size of the queue is 50, and it stops accepting API requests when it is full. Therefore, we encourage waiting for the response of one request before sending another. Note that this limit currently only applies to GET API requests.
This is only to ensure reasonable use of our system, so that there will not be disproportionately heavy use in smaller accounts.
A manual review process will be triggered, if the usage exceeds 5 requests per second, to determine whether throttling will be applied.
You authenticate to the Ragic API by providing one of your API keys in the request. Your API keys carry many privileges, so be sure to keep them secret!
Because when your code accesses Ragic via an API key, it will basically log in as the user of the API key and execute read write as this user. We highly recommend creating a separate user for API key access. This way the API access will not be mixed with a organizational user, which will make the system audit trail much clearer and debugging of your API program much easier.
Authentication to the API occurs via HTTP Basic Auth. Provide your API key as the basic auth username. You do not need to provide a password.
All API requests must be made over HTTPS. Calls made over plain HTTP will fail. You must authenticate for all requests.
curl https://www.ragic.com/demo/sales/1\
   --get -d api \
   -H "Authorization:Basic YOUR_API_KEY_GOES_HERE"

Note that the HTTP header name is Authorization, and the value is your API key preceded with "Basic ", Basic with a space at the end, and you may need to modify www to na3, ap5, or eu2 in your URL based on your Ragic account URL.
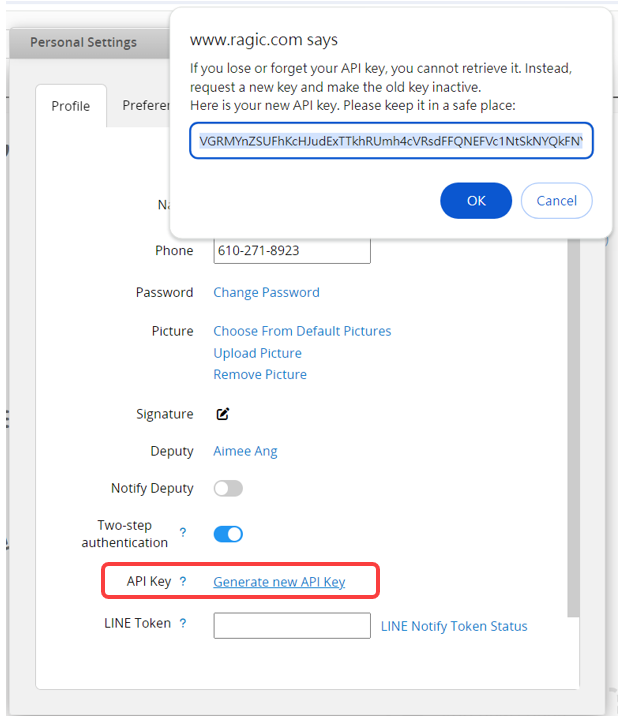
You can generate your API key in Personal Settings.
Most HTTP clients (including web-browsers) present a dialog or prompt for you to provide a username and password (empty) for HTTP basic auth. Most clients will also allow you to provide credentials in the URL itself.
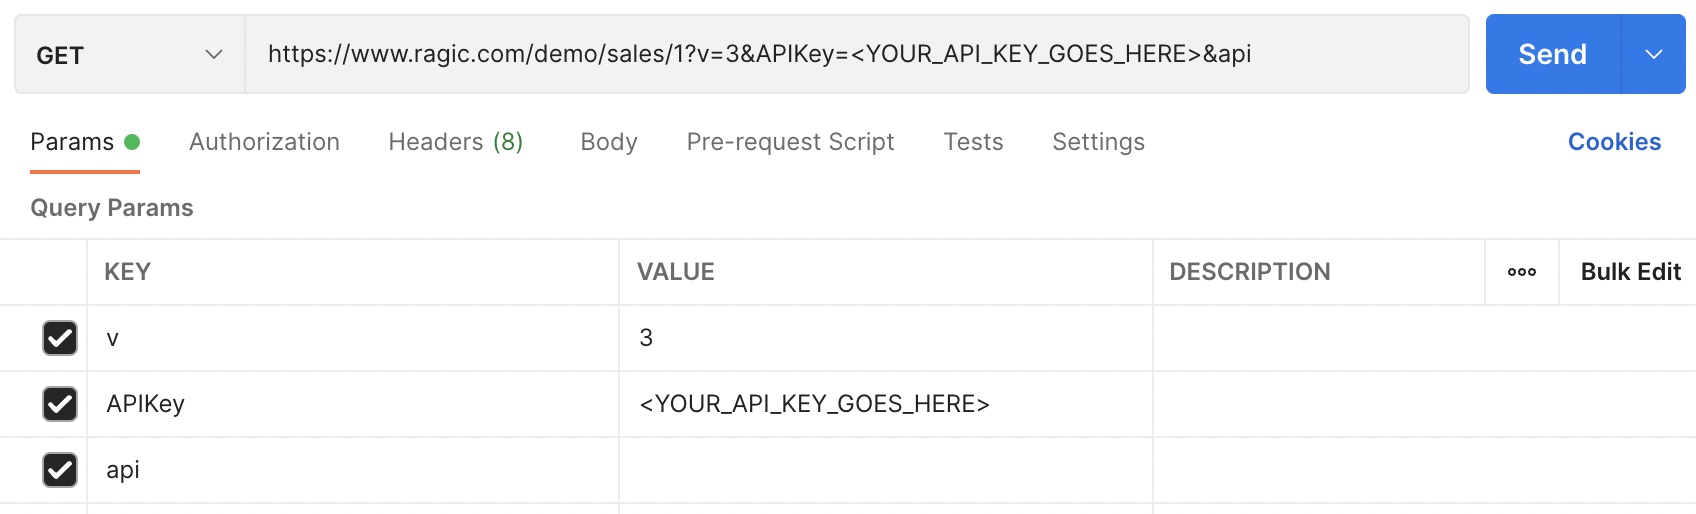
If for some reason that you are not able to send the API key as HTTP header or basic authorization, you can send the API key as a parameter with the name APIKey. You will need to add this parameter for every single request you send.
curl https://www.ragic.com/demo/sales/1\
   --get -d api \
   -d "APIKey=YOUR_API_KEY_GOES_HERE"
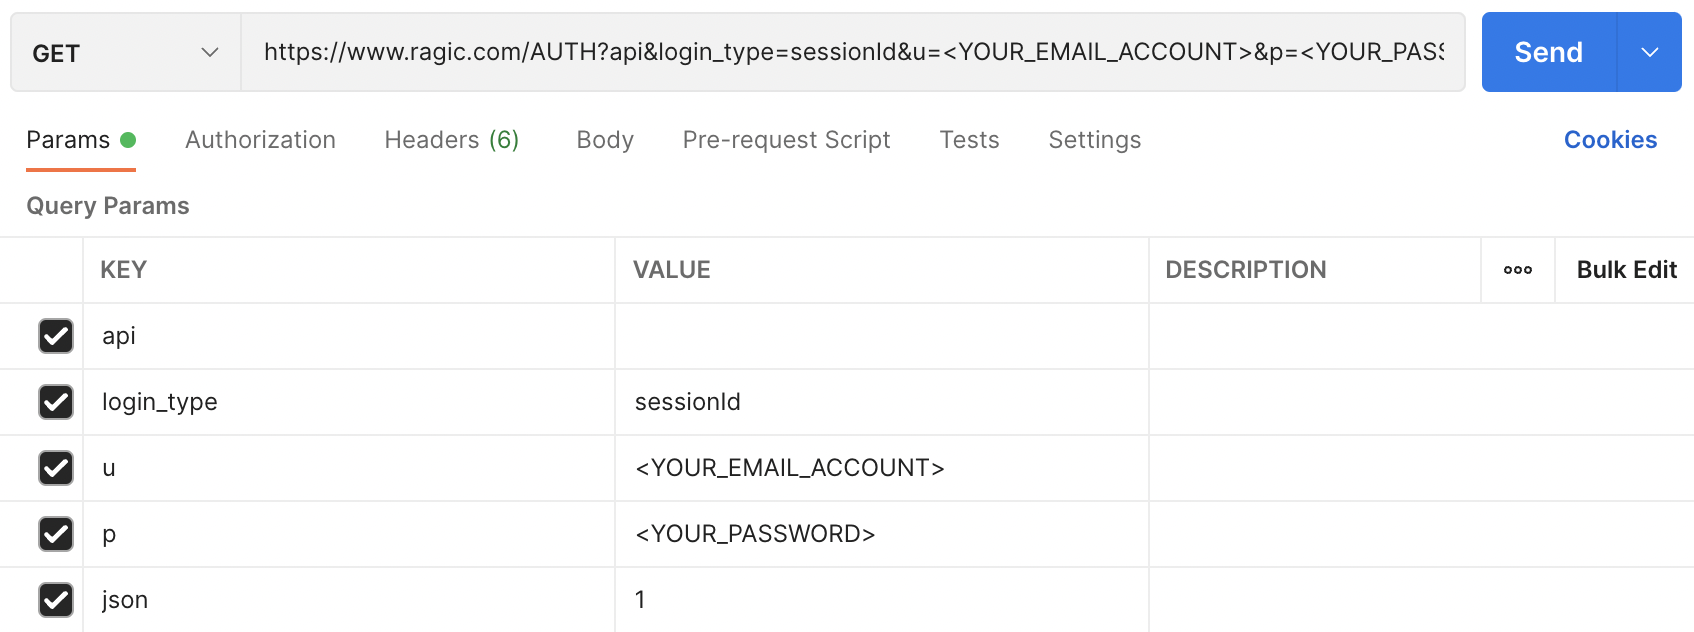
Sometimes if your platform does not support HTTP Basic authentication, you can pass the user's e-mail and password as log in credentials to authenticate your program.
If you registered through Sign in with Google, make sure to register a Ragic password before proceeding with this tutorial.
Please only use this when you can not authenticate with HTTP Basic Authentication.
You send a request for a session id with a valid e-mail and password. You can issue a HTTP request using the -d argument containing the id and password. The -c parameter will store sessionId in the cookie jar file specified:
curl --get -d "u=jeff@ragic.com" \
 --data-urlencode "p=123456" \
 -d "login_type=sessionId" \
-d api \
 -c cookie.txt \
 -k \
 https://www.ragic.com/AUTH

If authentication failed, server will return -1. If authenticated, you will receive a session id in the response like this:
2z5u940y2tnkes4zm49t2d4
Note that this authentication method is session based, and session is server dependent. You may need to modify the url based on the location of the account you wish to access. For example, https://ap8.ragic.com/AUTH for accounts that reside on server https://ap8.ragic.com.
To use the returned sessionId in future requests to remain authenticated, please include the sessionId in url parameter as sid=
The use of Ragic API will be covered in later chapters, just remember to include your session ID in this manner to remain authenticated.
If you would like to retrieve detailed info on the log in user, you can also provide an additional json=1 parameter so that Ragic will return a json object containing the details of the user.
curl --get -d "u=jeff@ragic.com" \
 --data-urlencode "p=123456" \
 -d "login_type=sessionId" \
 -d "json=1" \
-d api \
 -c cookie.txt \
 -k \
 https://www.ragic.com/AUTH
The returned format will look something like this:
{
"sid":"8xkz874fdftl116vkd3wgjq0t",
"email":"jeff@ragic.com",
"accounts":
  {
    "account":"demo",
    "ragicId":25,
    "external":false,
    "groups":["EVERYONE","SYSADMIN"]
  }
}
For example, this is the API response for https://www.ragic.com/demo/sales/1?v=3&api. Remember to specify your cookie jar file in the call like "-b cookie.txt"
{
"1":{
  "_ragicId": 1,
  "_star": false,
  "Account Name": "Alphabet Inc.",
  "_index_title_": "Alphabet Inc.",
  "Short Name": "",
  "Account ID": "C-00002",
  "EIN / VAT Number": "",
...
...
},
"0":{
  "_ragicId": 0,
  "_star": false,
  "Account Name": "Ragic, Inc.",
  "_index_title_": "Ragic, Inc.",
  "Short Name": "Ragic",
  "Account ID": "C-00001",
  "EIN / VAT Number": "",
...
...
The listing is defaulted to 1000 entries. You can add paging parameter limit according to the following sections to get more entries.
The data in the subtables are displayed as the sample below. The attribute name is _subtable_ followed by the subtable ID to identify which subtable it is. The content of the subtable is presented the same way as the fields in a form.
"_subtable_2000154": {
    "0": {
      "_ragicId": 0,
      "Contact Name": "Jeff Kuo",
      "Title": "Technical Manager",
      "Phone": "886-668-037",
    },
    "1": {
      "Contact Name": "Amy Tsai",
      "Title": "Marketing",
      "Phone": "",
    },
If your application does not need the data in the subtables, you can add the parameter subtables=0 to turn off the fetching of subtable data.
The comments of the entries is retrieved as subtables also. It will be retrieved in a subtable with the field id of 61, but you will need to add parameter comment=true when retrieving data for comment data to be returned.
Very often your database contains a large amount of entries, so it's better to apply filters when you retrieve data. Ragic API filters are in a special format
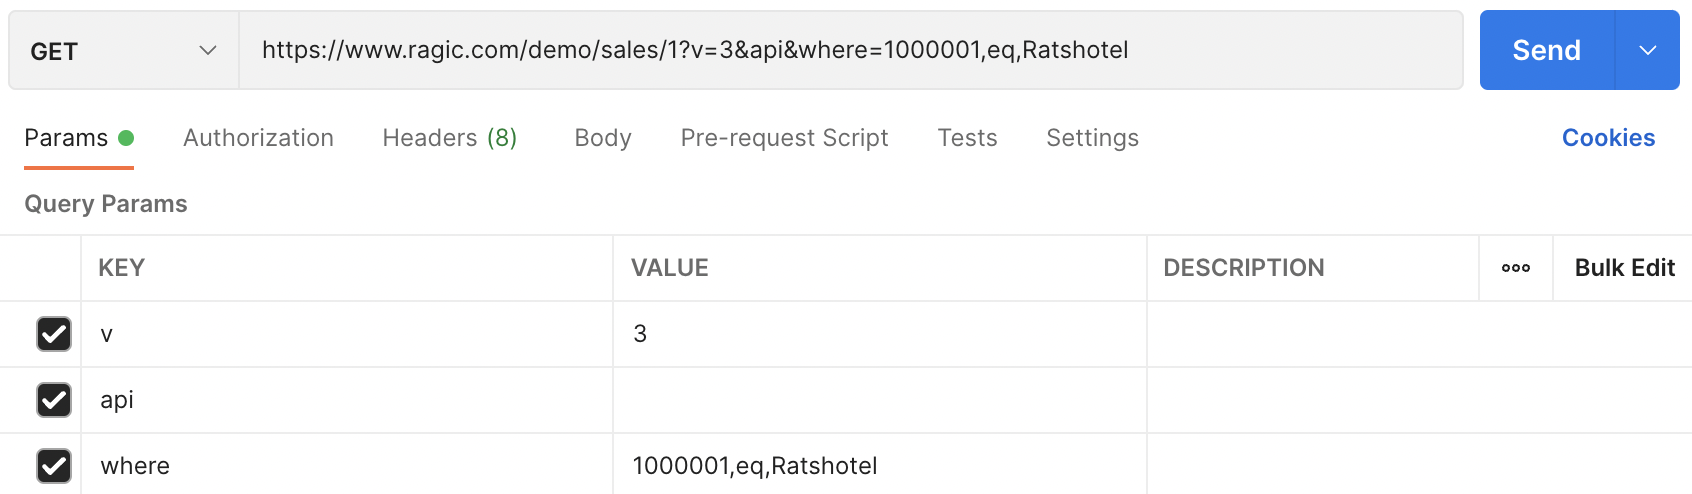
You can use the parameter "where" to add a filter condition to a query as below:
curl --get -d "where=2000123,eq,Alphabet Inc." \
-H "Authorization:Basic YOUR_API_KEY_GOES_HERE" \
-d api \
https://www.ragic.com/demo/sales/1
The parameter is a "," comma delimited format, with at least 3 arguments.
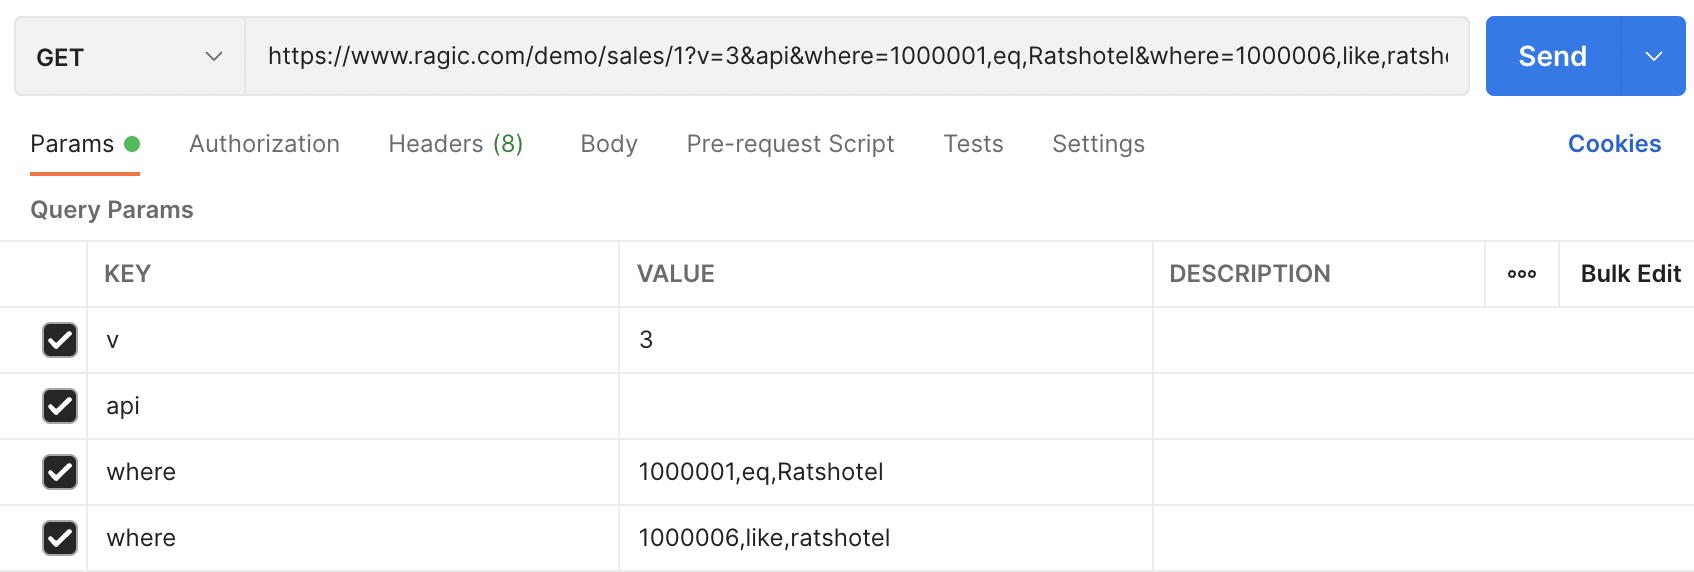
You can supply a query with multiple filter conditions as below:
curl --get -d "where=2000123,eq,Alphabet Inc." \
-d "where=2000127,eq,Jeff Kuo" \
-H "Authorization:Basic YOUR_API_KEY_GOES_HERE" \
-d api \
https://www.ragic.com/demo/sales/1
Here's the list of operands that you can use:
| Operand Name | Operand Value |
|---|---|
| Equals | eq |
| Regular Expression | regex |
| Greater or equals | gte |
| Less or equals | lte |
| Greater | gt |
| Less | lt |
| Contains | like |
| Equals a node id | eqeq |
Please note that:
1.When you filter by date or date time, they will need to be in the following format: yyyy/MM/dd or yyyy/MM/dd HH:mm:ss.
2.You don't need to fill the third argument if you want to filter empty values, for example, "where=2000127,eq," \.
3. OR filtering for the SAME field can be achieved by supplying multiple where queries. For example, to retrieve records where field id 1000001 is either Ratshotel OR Claflin, "where=1000001,eq,Ratshotel&where=1000001,eq,Claflin" .
There are some system fields that has special field ids that you can use in your query. Common system fields listed below:
| System field name | Field id |
|---|---|
| Create Date | 105 |
| Entry Manager | 106 |
| Create User | 108 |
| Last Update Date | 109 |
| Notify User | 110 |
| If Locked | 111 |
| If Starred | 112 |
You can also use a full text search as a query filter. Just provide your query term in the parameter fts and the matched result will be returned.
curl --get -d "fts=Alphabet" \
-H "Authorization:Basic YOUR_API_KEY_GOES_HERE" \
-d api \
https://www.ragic.com/demo/sales/1

You can also apply Shared View. Just set the id as below.
curl --get -d "filterId=YOUR_SHARED_VIEW_ID" \
-H "Authorization:Basic YOUR_API_KEY_GOES_HERE" \
-d api \
https://www.ragic.com/demo/sales/1
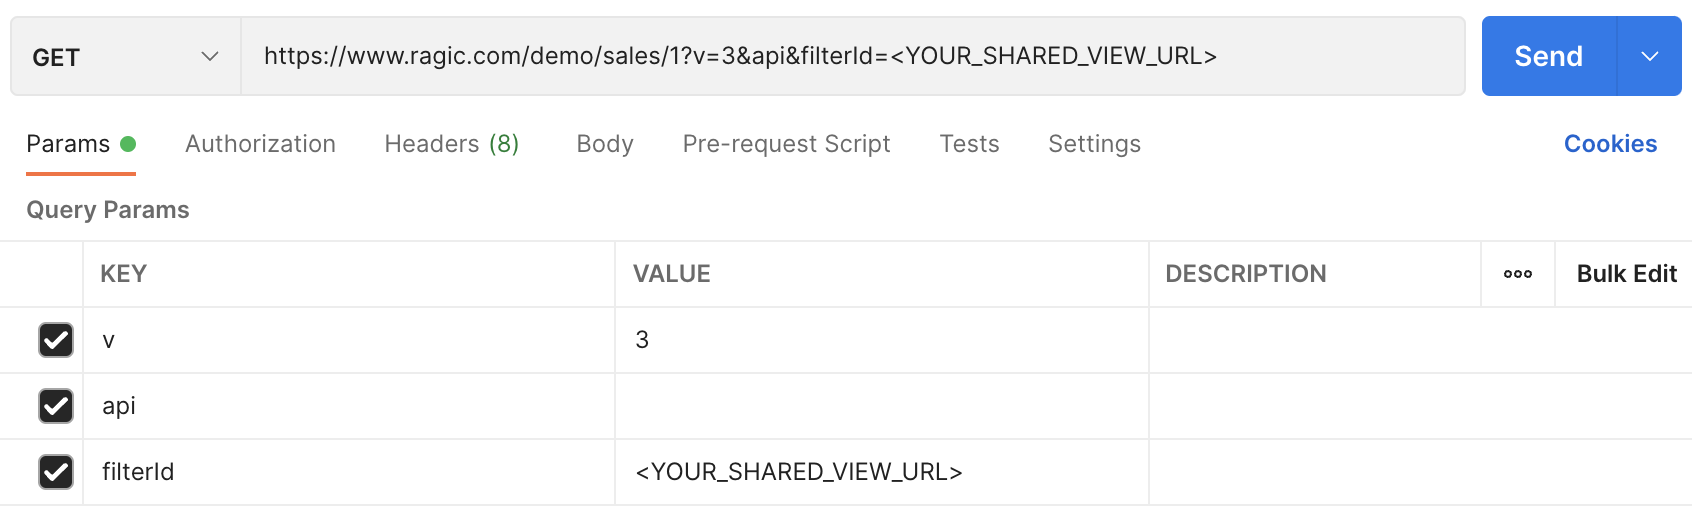
You could get the id by clicking the Shared View URL.

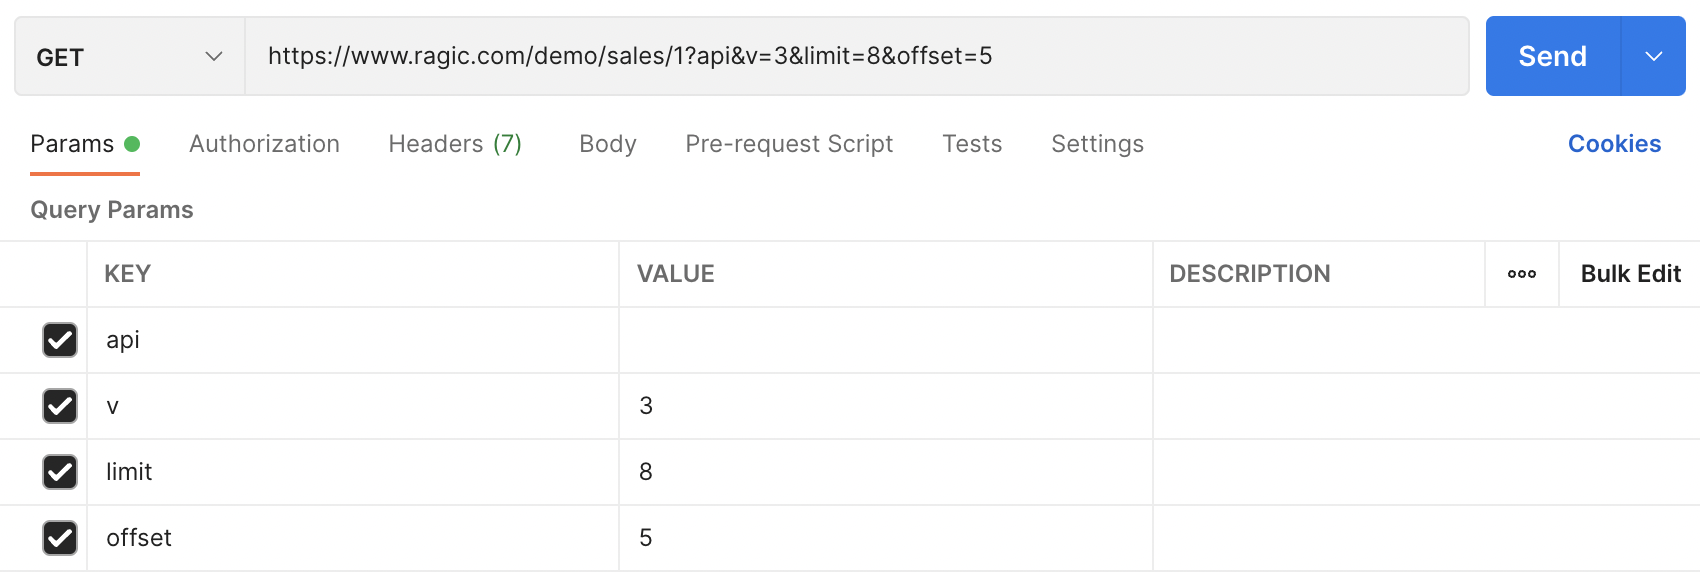
Very often you do not want to fetch all entries with one request, you can use the limit and offset parameters to specify how many entries that you would like to retrieve, and how many entries that you would like to skip at the start, so clients can implement pages for viewing entries.
The usage of limit and offset parameters is similiar to SQL limit parameter. Offset is how many entries that you would like to skip in the beginning, and limit is how many entries that you would like to be returned.
Returned data is defaulted to 1000 entries, you will need to provide limit parameters if you want your response to have more than 1000 entries.
The format is as follows:
limit=
&offset=
The offset parameter is the number of entries that should be skipped before returning, used for going through pages that has been retrieved. The limit parameter is the max number of records that should be returned per call.
For example the below call will skip the first 5 entries, and return 6 ~ 13, a total of 8 entries.
curl --get -d "limit=8" \
-d "offset=5" \
-H "Authorization:Basic YOUR_API_KEY_GOES_HERE" \
-d api \
https://www.ragic.com/demo/sales/1
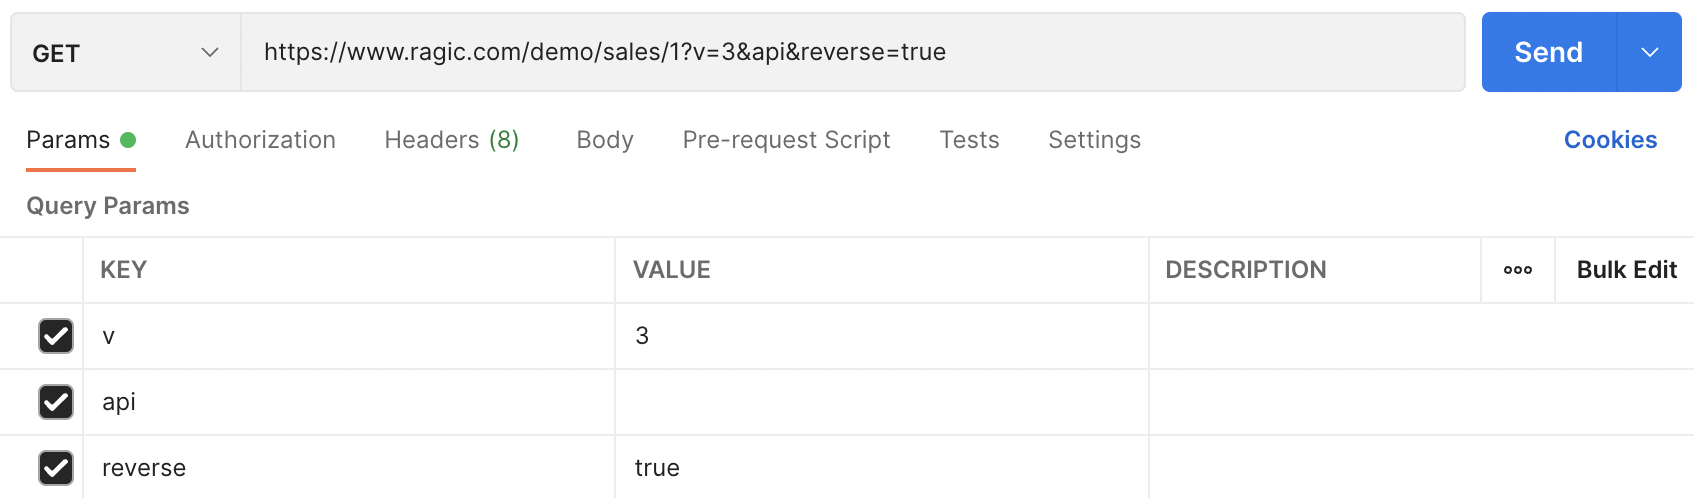
Without any ordering, the data is by default ordered by creation date and time, from oldest to latest. If you would like to have the latest result first, you can specify reverse=true like this:
curl --get -d "reverse=true" \
-H "Authorization:Basic YOUR_API_KEY_GOES_HERE" \
-d api \
https://www.ragic.com/demo/sales/1
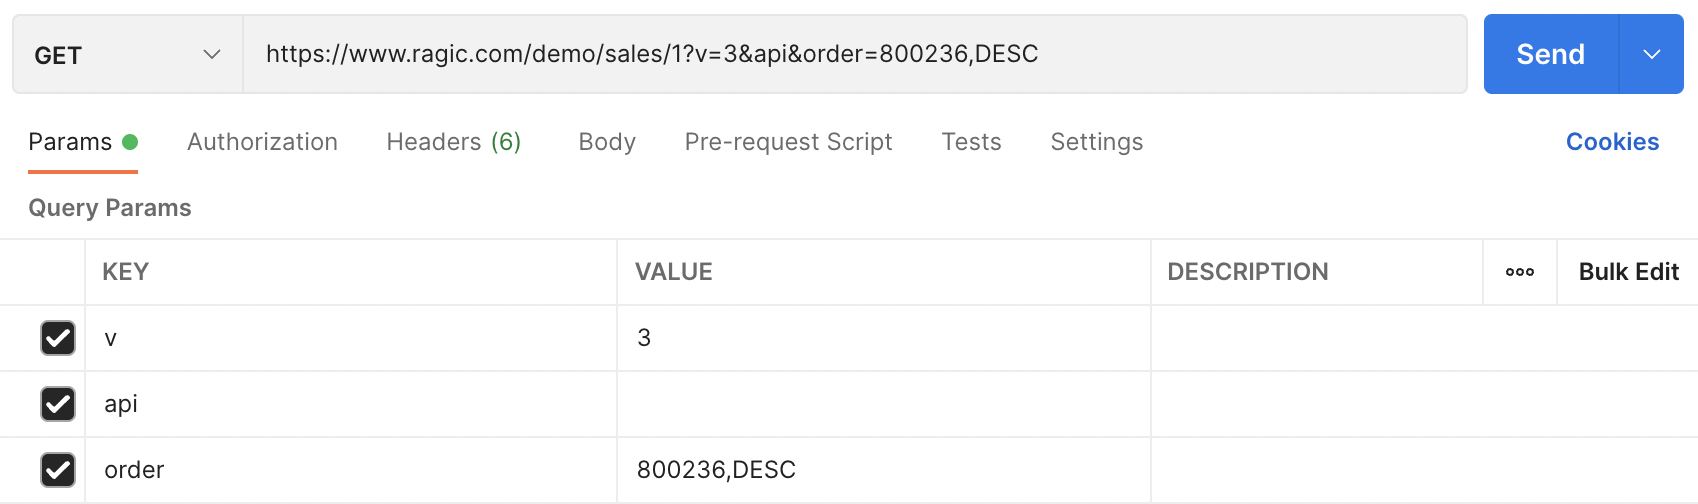
You can also specify how the entries are ordered by adding the order parameter. It's also kind of similar to the ORDER BY clause in SQL, its value is a comma separated string with two arguments. The first one is the field id of the domain that you would like the entries to be sorted according to, and the second one is the order: either ASC for ascending order, or DESC for descending order.
curl --get -d "order=800236,DESC" \
-H "Authorization:Basic YOUR_API_KEY_GOES_HERE" \
-d api \
https://www.ragic.com/demo/sales/1
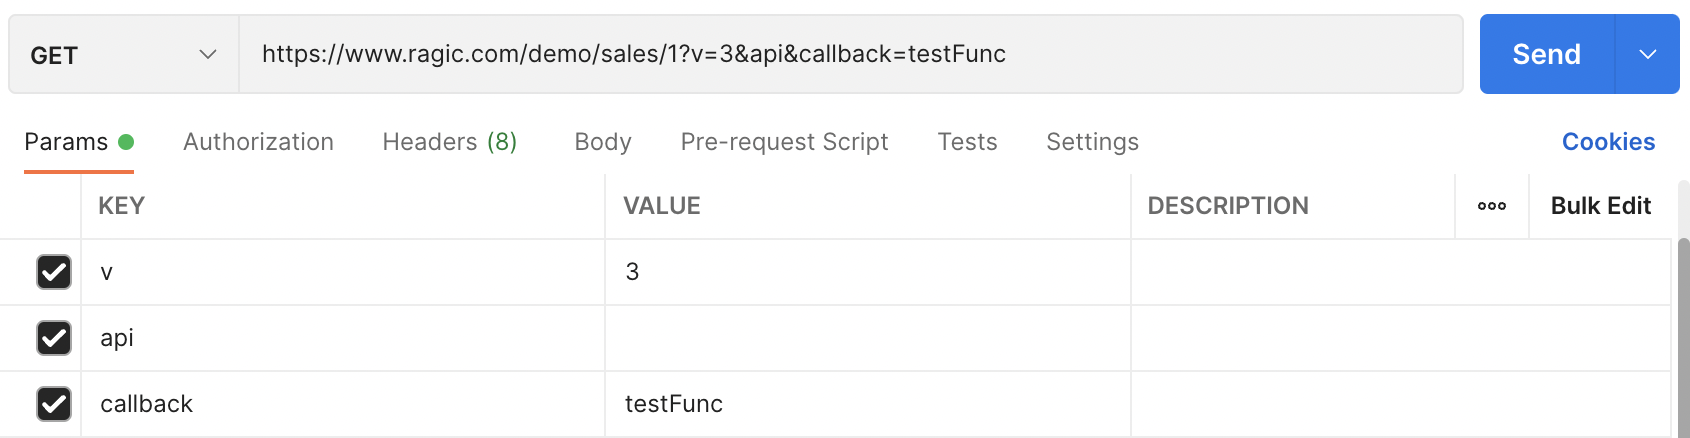
Adding a callback function parameter will enclose the returned JSON object as a argument in a call to the callback function specified by you. This is especially useful when you're accessing our API using Javascript, you may need this to do cross domain ajax calls.
For example, adding callback=testFunc as below:
curl --get -d "callback=testFunc" \
-H "Authorization:Basic YOUR_API_KEY_GOES_HERE" \
-d api \
https://www.ragic.com/demo/sales/1
Will enclose the returned JSON object in a function call so you can process the returned data in your callback function:
testFunc({"17": {

"Account Name": "Dunder Mifflin",

"Account Owner": "Jim Halpert",

"Phone": "1-267-922-5599",

 ...

 ...

});
The JSON data format uses the field name string as the attribute name, you can use a "naming" parameter to specify that you would like to use field id as the attribute name to identify a field.
Possible values include: EID (Field Id), FNAME (Field Name). This type of attribute will only need to be set once, and the configuration will be applied to all subsequent requests in this session.
curl --get -d "naming=EID" \
-H "Authorization:Basic YOUR_API_KEY_GOES_HERE" \
-d api \
https://www.ragic.com/demo/sales/1

There are several other useful parameters that you can apply to your HTTP GET request to change the content of the response:
| Parameter Name | Description |
|---|---|
| subtables | Specifying subtables=0 tells Ragic API to not include subtable information in the response. |
| listing | Specifying listing=true tells Ragic API to only include fields in the Listing Page. |
| reverse | Specifying reverse=true tells Ragic API to reverse the default ordering of the listing page response. |
| info | Adding the info=true parameter will add "Create Date", "Create User" information to the response |
| conversation | Adding the conversation=true parameter will add the email conversation information related to this record to the response |
| approval | Adding the approval=true parameter will add the approval information related to this record to the response |
| comment | Adding the comment=true parameter will add the comment thread related to this record to the response |
| bbcode | Adding the bbcode=true parameter will retrieve the raw BBCode value saved to the field instead of being translated to HTML |
| history |
Adding the history=true parameter will add the edit history related to this record to the response. Edit Histories are in the form of JSON, which contains information about the time, type, sheet, user, detail.
|
| ignoreMask | When ignoreMask=true is given, the field value of "Masked text" will be unmasked if you are in the viewable groups. Click here for more information about "Masked text" field. |
| ignoreFixedFilter | When ignoreFixedFilter=true is given, the fixed filter on this sheet will be ignored. But note that this will only work when the API call API key user has the SYSAdmin privilege. |
On the JSON returned by your HTTP API call, you will see something like this for file upload field or image upload fields:
"1000537": "Ni92W2luv@My_Picture.jpg",
You will be able to download the file using a separate call like this (assuming your account name is "demo" and API call url being https://www.ragic.com/demo/sales/1?v=3&api) :
https://www.ragic.com/sims/file.jsp?a=demo&f=Ni92W2luv@My_Picture.jpg
The format is:
https://www.ragic.com/sims/file.jsp?a=< account name >&f=< file name >
Remember to encode your file name when you send it as an URL. Your actual file name will start after the @ character, this is to avoid file name collision.
For example, if you have an URL to the record as follows
https://www.ragic.com/demo/sales/1/41
You can retrieve an HTML printer friendly version like this, by adding a .xhtml to the end:
https://www.ragic.com/demo/sales/1/41.xhtml
You can add a .pdf for a PDF version, .xlsx for an Excel version:
https://www.ragic.com/demo/sales/1/41.pdf
https://www.ragic.com/demo/sales/1/41.xlsx
You can retrieve a Mail Merge of a record, by adding .custom? and a Mail Merge CID to specify which template (which is 1 for the mail merge template used in this case):
https://www.ragic.com/demo/sales/1/41.custom?cid=1
To obtain the cid of a mail merge, you can manually download a mail merge from the Ragic user interface first, and pay attention to the cid parameter in the download url.
https://www.ragic.com/demo/sales/1/41.custom?rn=41&cid=1
You can retrieve a Custom Print Report of a record by appending .carbone? to the URL, along with the following parameters (joined with &).
https://www.ragic.com/demo/sales/1/41.carbone?fileFormat=pdf&customPrintTemplateId=1&fileNameRefDomainId=1001000
(1) File format syntax: fileFormat="file format" (e.g., pdf, png, docx).
Example: fileFormat=pdf
(2) Custom template ID syntax: customPrintTemplateId="Template ID".
Example: customPrintTemplateId=1
To obtain the "Template ID", first manually download the Custom Print Report and find the Template ID parameter in the download URL:
https://www.ragic.com/demo/sales/1/41.carbone?fileFormat=pdf&fileNameRefDomainId=-1&customPrintTemplateId=2
(3) File name referenced field syntax (Optional):fileNameRefDomainId="Field ID".
Example: fileNameRefDomainId=1001000
If you just need to create your own HTML form to save data to Ragic, you don't need to write any API code to do that. Ragic has a very simple way for your form data to be posted to Ragic.
Suppose you want to create a form that saves entry in this sample pet store merchandise form.
1. Find the Field Id for each field that you would like to save in the HTML form. You can find them in design mode when you focus on a field.
2. Create a form like this HTML sample, Your HTML form saves data to the same form URL, with the query string parameter "api". You put down the field id as the parameter name for each field to map them to a field on the Ragic form:
3. Make sure that the user have access right to enter data on this form.
Note that to upload files through our API, JSON data format is not supported, and form data is the only option.
If you are not using simple HTML forms to create entries on Ragic, you will need to create API requests to create the entries. The endpoints for writing to a form is the same as reading them, but you issue a POST request instead of a GET request.
The API now supports JSON data, and it is the recommended way to make HTTP requests.
To POST JSON data, you need to change Body settings to raw JSON, as the image below.
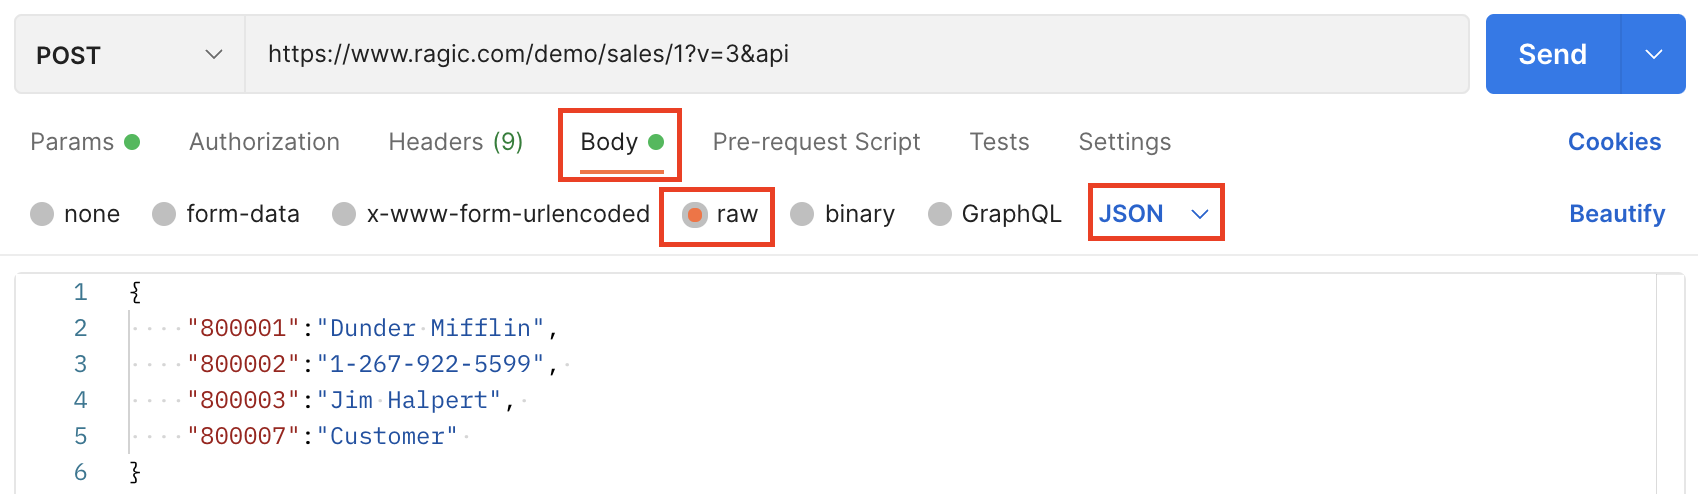
What you need to do is use the field ids of the fields as name, and the values that you want to insert as parameter values.
Please note that your user will need write access to the form for this to work.
curl -F "2000123=Dunder Mifflin" \
 -F "2000125=1-267-922-5599" \
 -F "2000127=Jeff Kuo" \
-F "api=" \
 -H "Authorization:Basic YOUR_API_KEY_GOES_HERE" \
 https://www.ragic.com/demo/sales/1

The equivalent JSON format is as below,
{
    "2000123": "Dunder Mifflin",
    "2000125": "1-267-922-5599",
    "2000127": "Jeff Kuo",
}
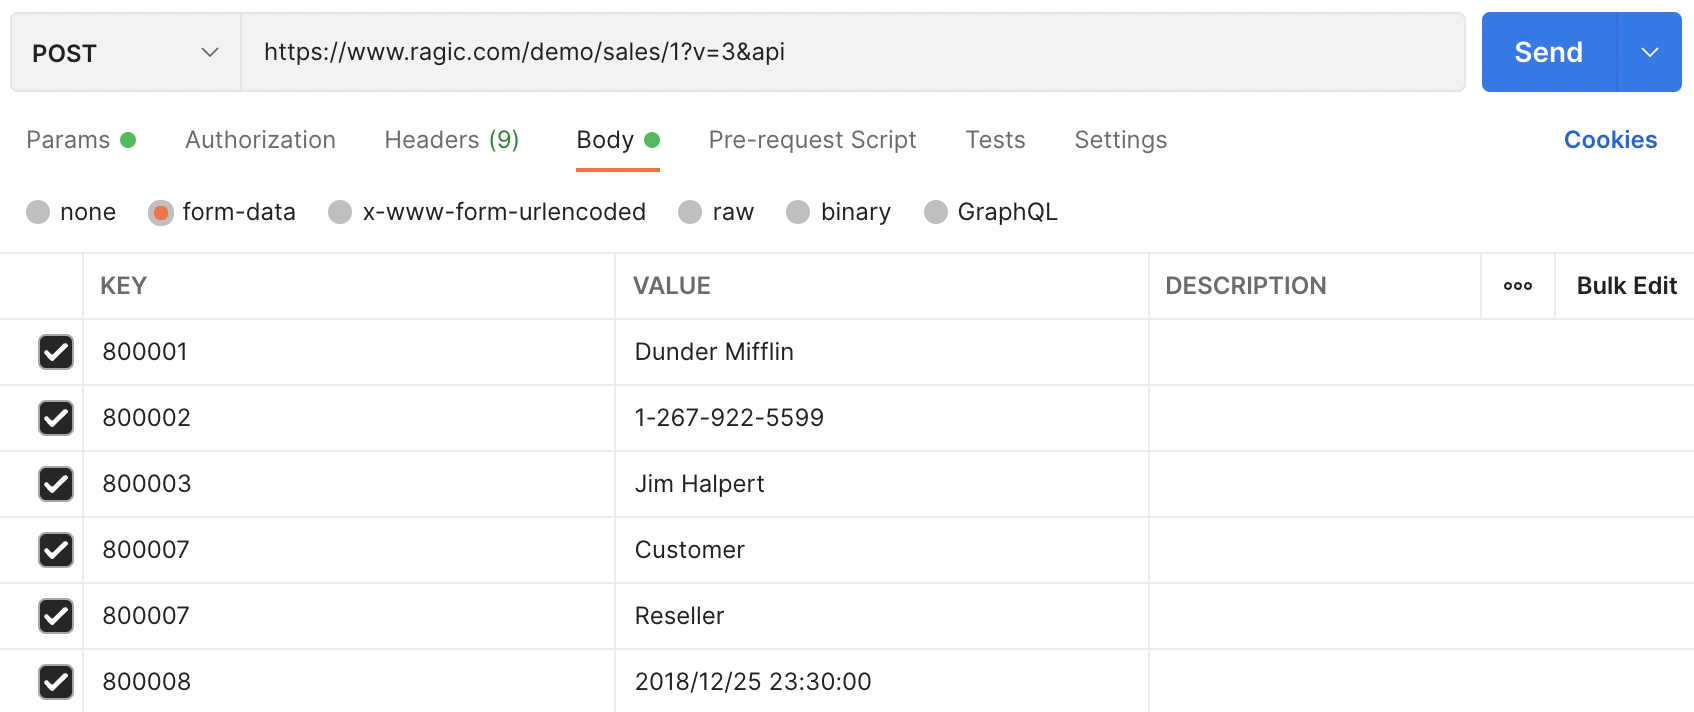
If the field is a multiple selection that can contain multiple values, you can have multiple parameters with the same field id as names. If the field is a date field the value will need to be in the format of yyyy/MM/dd or yyyy/MM/dd HH:mm:ss if there's a time part. So a request would look like this:
curl -F "2000123=Dunder Mifflin" \
 -F "2000125=1-267-922-5599" \
 -F "2000127=Jeff Kuo" \
 -F "1000001=Customer" \
 -F "1000001=Reseller" \
 -F "2000133=2018/12/25 23:30:00" \
 -F "api=" \
 -H "Authorization:Basic YOUR_API_KEY_GOES_HERE" \
 https://www.ragic.com/demo/sales/1
The equivalent JSON format is as below,
the squre brackets for the field ID 1000001 allows for multiple values in one statement.
{
    "2000123": "Dunder Mifflin",
    "2000125": "1-267-922-5599",
    "2000127": "Jim Halpert",
    "1000001": ["Customer", "Reseller"],
    "2000133": "2018/12/25 23:30:00"
}
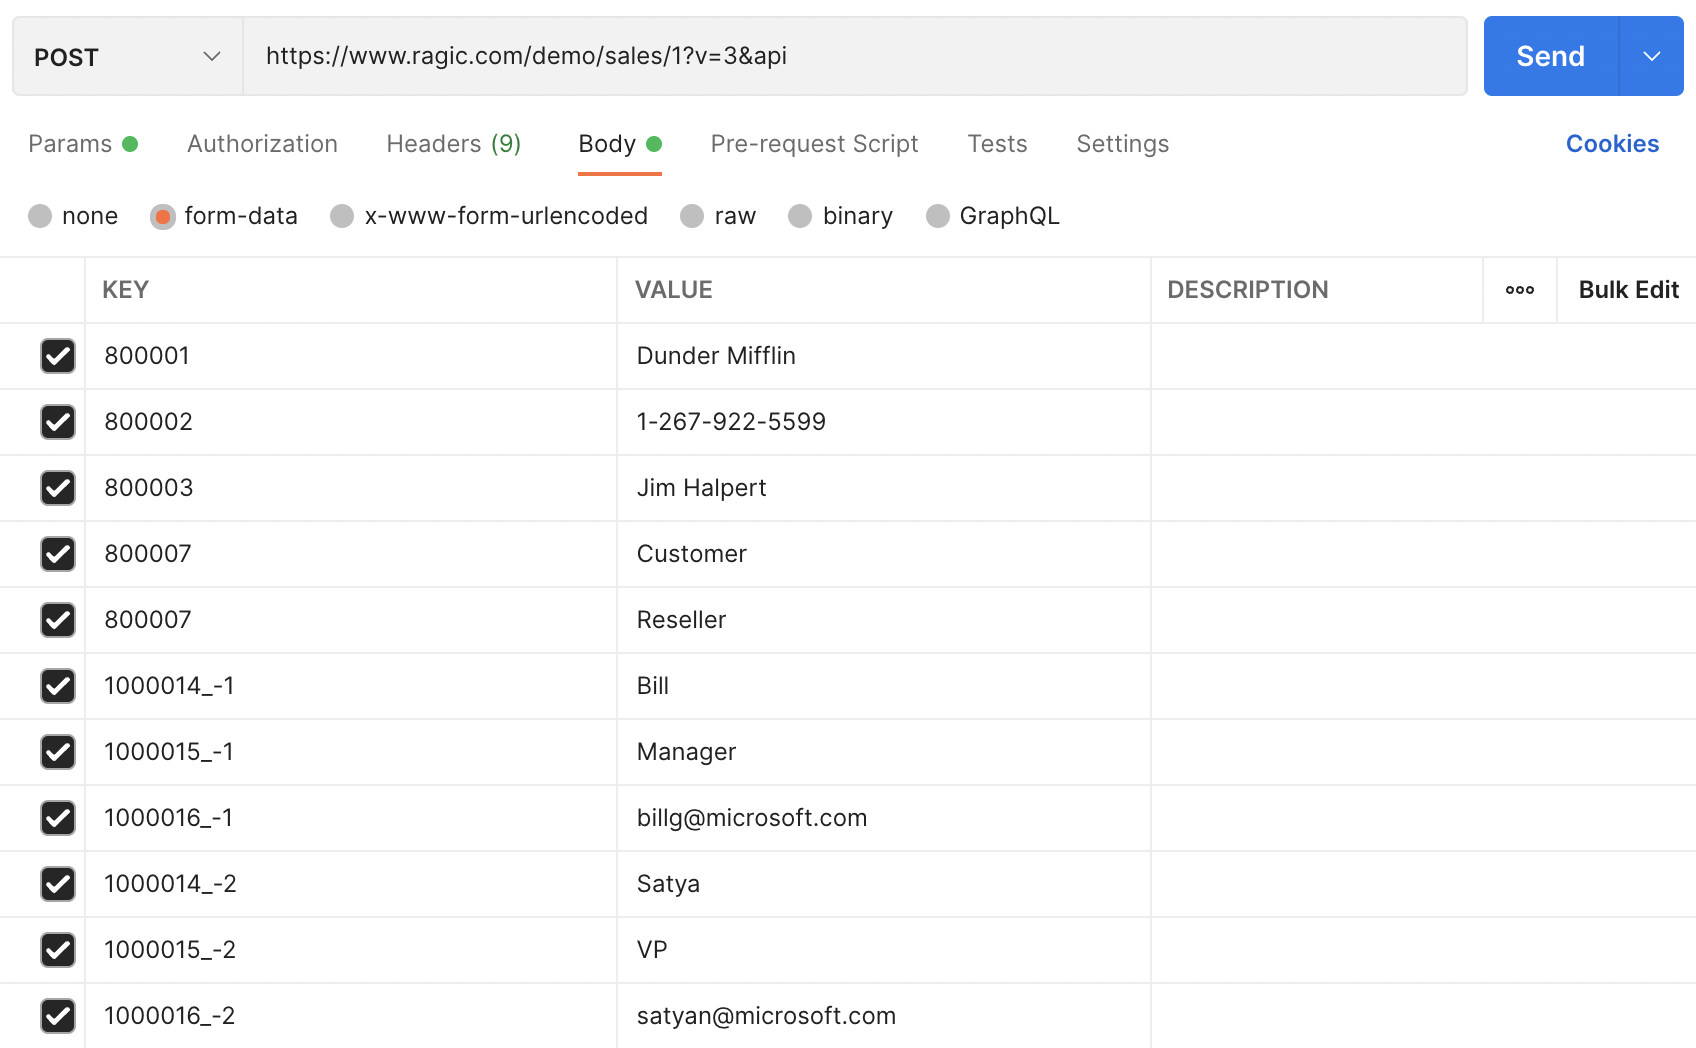
If you would like to insert data into the subtables at the same time, you will need a slightly different format for the fields in the subtables because Ragic needs a way to determine if the field values belong to the same entry in a subtable.
If the field values are in the same subtable row, assign them with the same negative row id with each other. It can be any negative integer. It's only a way to determine that they are in the same row.
2000147_-1=Bill
2000148_-1=Manager
2000149_-1=billg@microsoft.com

2000147_-2=Satya
2000148_-2=VP
2000149_-2=satyan@microsoft.com
The whole request would look like this:
curl -F "2000123=Dunder Mifflin" \
 -F "2000125=1-267-922-5599" \
 -F "2000127=Jeff Kuo" \
 -F "1000001=Customer" \
 -F "1000001=Reseller" \
 -F "2000133=2018/12/25 23:30:00" \
 -F "2000147_-1=Bill" \
 -F "2000148_-1=Manager" \
 -F "2000149_-1=billg@microsoft.com" \
 -F "2000147_-2=Satya" \
 -F "2000148_-2=VP" \
 -F "2000149_-2=satyan@microsoft.com" \
-F 'api=' \
 -H "Authorization:Basic YOUR_API_KEY_GOES_HERE" \
 https://www.ragic.com/demo/sales/1
The equivalent JSON format is as below,
{

    "2000123": "Dunder Mifflin",
    "2000125": "1-267-922-5599",
    "2000127": "Jim Halpert",
    "1000001": ["Customer", "Reseller"],
    "2000133": "2018/12/25 23:30:00"
    "_subtable_2000154": {
        "-1": {
            "2000147": "Bill",
            "2000148": "Manager",
            "2000149": "billg@microsoft.com"
        },
       "-2": {
            "2000147": "Satya",
            "2000148": "VP",
            "2000149": "satyan@microsoft.com"
        }
    }
}
If you would like to populate a file upload field, just make sure that the request encoding type is a multipart/form-data. The HTML equivalent would be setting enctype='multipart/form-data'
With a multipart request, you can put the file in your request, and just put the file name as the field value.
1000088=test.jpg
Ragic supports using POST, PUT, and PATCH method to modify an entry.
The endpoint for modifying an entry is the same as reading an existing entry. Notice that when you create an entry, the endpoint points to a Ragic sheet, but when you edit an entry, your endpoint will need an extra record id to point to the exact record.
https://www.ragic.com/
/ / / ?api
All you need to provide is the field ids of the fields that you would like to modify to. If the field is a date field the value will need to be in the format of yyyy/MM/dd or yyyy/MM/dd HH:mm:ss if there's a time part.
curl -F "2000123=Dunder Mifflin" \
 -F "2000127=Jim Halpert" \
 -F "api=" \
 -H "Authorization:Basic YOUR_API_KEY_GOES_HERE" \
 https://www.ragic.com/demo/sales/1/3
The equivalent JSON format is as below,
{
    "2000123": "Dunder Mifflin",
    "2000127": "Jim Halpert"
}
For subtables, it's a bit more tricky. Because Ragic will need to know which row that you're editing. So you will need to find the row id of the row that you're editing. This information can be found from an API call.
As we mentioned in earlier chapter, the returned format for an entry with subtables look like this:
"_subtable_2000154": {
    "0": {
      "Contact Name": "Jeff Kuo",
      "Title": "Technical Manager",
      "Phone": "886-668-037",
      "E-mail": "jeff@ragic.com",
...
...
    },
    "1": {
      "Contact Name": "Amy Tsai",
      "Title": "Marketing",
      "Phone": "",
...
...
    },
    "2": {
      "Contact Name": "Allie Lin",
      "Title": "Purchasing",
...
...
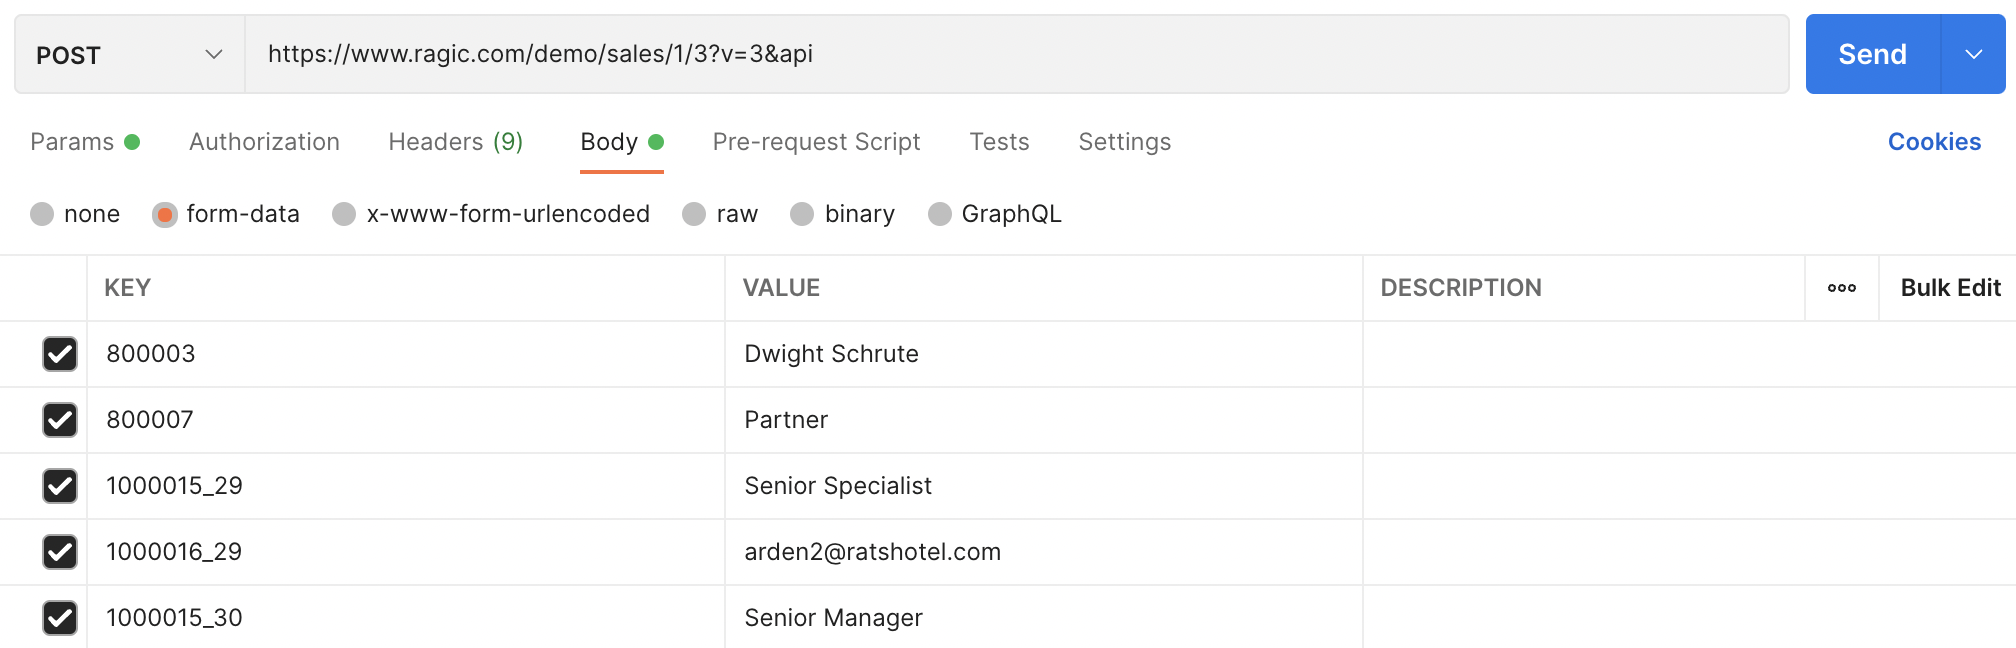
In the subtable, 1 is the row id for the contact Amy Tsai, and 2 is the row id for the contact Allie Lin. With this row id, you can modify data in the subtable pretty much like how you create an entry with subtable data.
You use the row id as the identifier following the field id. You only need to put in the fields that you want to modify:
2000147_1=Ms. Amy Tsai
2000148_1=Senior Specialist

2000148_2=Senior Manager
The whole request would be like this:
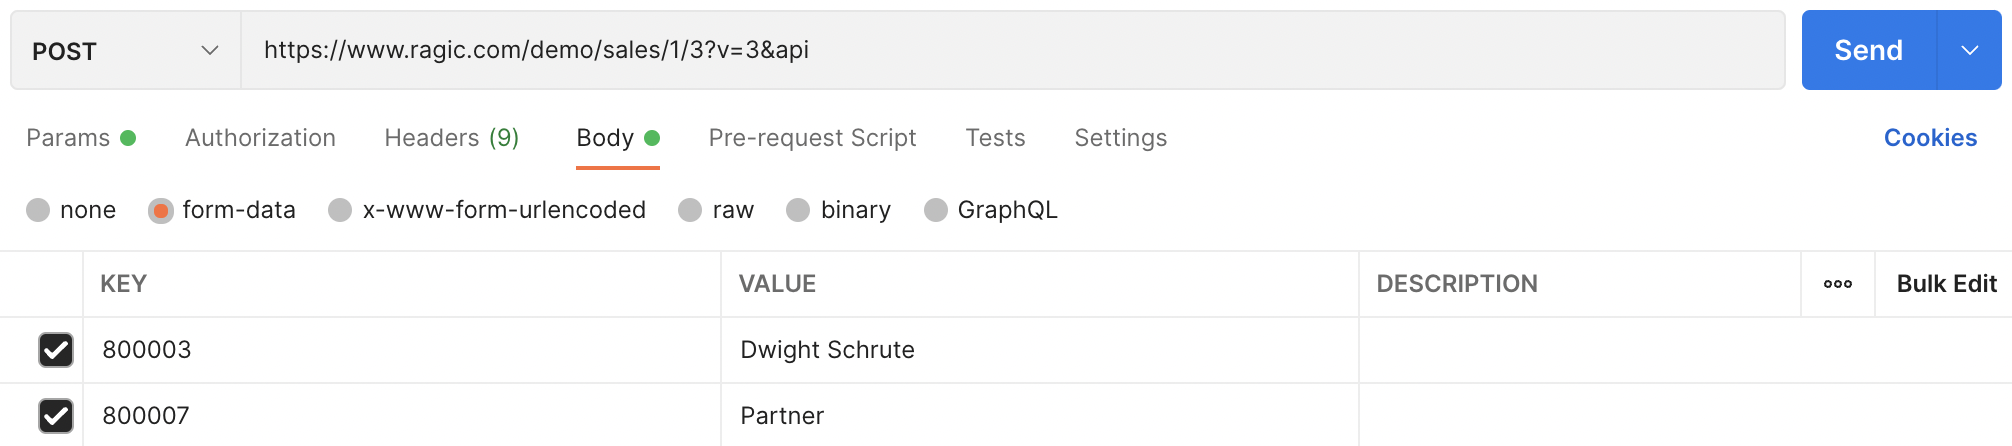
curl -F "2000123=Dunder Mifflin" \
 -F "2000127=Jim Halpert" \
 -F "2000147_1=Ms. Amy Tsai" \
 -F "2000148_1=Senior Specialist" \
 -F "2000148_2=Senior Manager" \
 -F "api=" \
 -H "Authorization:Basic YOUR_API_KEY_GOES_HERE" \
 https://www.ragic.com/demo/sales/1/3
The equivalent JSON format is as below,
{
    "2000123": "Dwight Schrute",
    "2000127": "Jim Halpert" ,
    "_subtable_2000154": {
        "29" :{
            "2000147": "Ms. Amy Tsai",
            "2000148": "Senior Specialist"
        },
        "30" :{
            "2000148": "Senior Manager"
        }
    }
}
If you want to delete a subtable row, you can create a request like:
DELSUB_
=
The equivalent JSON format is as below,
_DELSUB_
=[ , ,..., ];
For example, if you want to delete the contact Arden Jacobs, the whole request would be like this:
curl -F "DELSUB_2000154=3" \
 -F "api=" \
 -H "Authorization:Basic YOUR_API_KEY_GOES_HERE" \
 https://www.ragic.com/demo/sales/1/3

The equivalent JSON format is as below,
{
    "_DELSUB_2000154": [3]
}
Using the JSON format for subtable row deletion allows you to specify multiple rows in a simple manner,
{
"_DELSUB_subtable key": [
,..., ] }
There are many useful parameters that you can use when creating or updating records on Ragic to save your time writing duplicate code for what can be done on Ragic.
| Parameter Name | Description |
|---|---|
| doFormula | Specifying doFormula=true tells Ragic API to recalculate all formulas first when a record is created or updated. Do note that if this is set to true, the workflow scripts that you configured on the sheet will not run to avoid infinite loops. |
| doDefaultValue | Specifying doDefaultValue=true tells Ragic API to load all default values when a record is created or updated. |
| doLinkLoad | Specifying doLinkLoad=true tells Ragic API to recalculate all formulas first and then load all link and load loaded values when a record is created or updated.
Specifying doLinkLoad=first tells Ragic API to load all link and load loaded values first when a record is created or updated and then recalculate all formulas. |
| doWorkflow | Specifying doWorkflow=true tells Ragic API to execute the workflow script associated with this API call. |
| notification | Specifying notification=true tells Ragic API to send out notifications to relevant users, or false, otherwise. The default is true when not specified. |
| checkLock | Specifying checkLock=true tells Ragic API to check if the record is locked before an update, and not edit the record if the record is locked. |
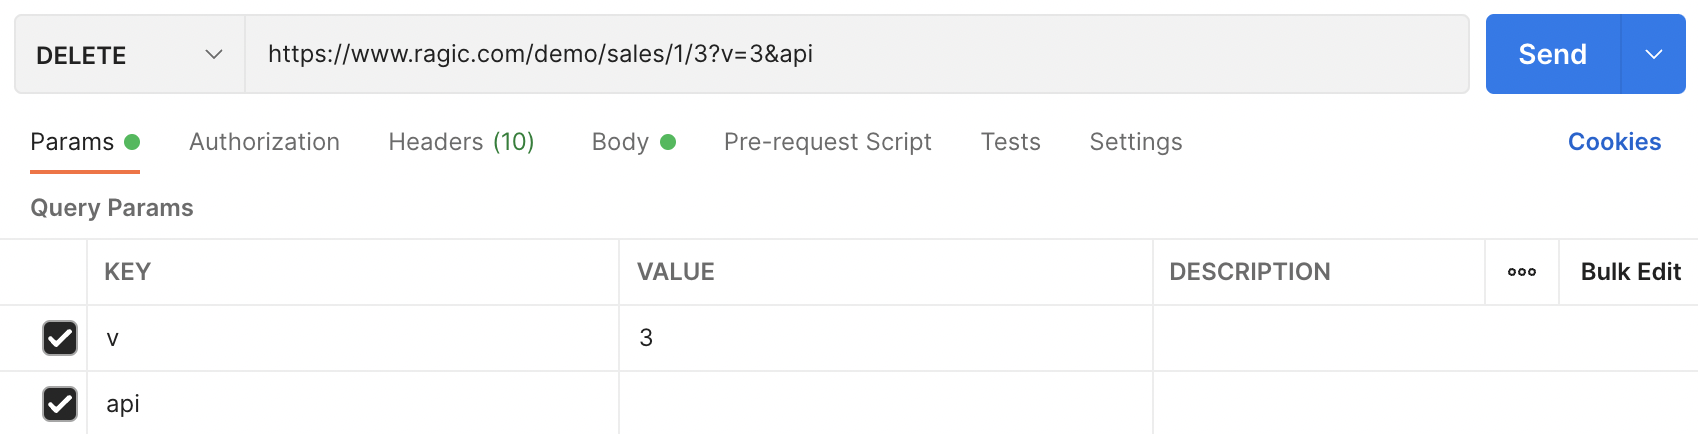
Deleting an entry is very similar to reading an entry. All you need to do is change the request method from GET to DELETE. When it's a DELETE request, the entry at the API endpoint will be deleted.
curl -X DELETE \
-H "Authorization:Basic YOUR_API_KEY_GOES_HERE" \
-d "api"  \
https://www.ragic.com/demo/sales/1/3
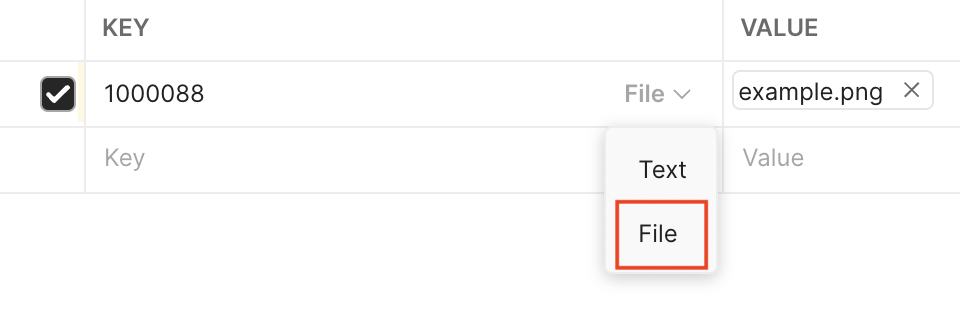
Make sure your content-type is multipart/form-data, and you will be able to upload files.
curl -F "1000088=@/your/file/path" \
-F "api=" \
-F "v=3" \
-H "Authorization:Basic YOUR_API_KEY_GOES_HERE" \
https://www.ragic.com/demo/sales/1
After a success uploading, you will receive your file in this format.
"1000088": "Ni92W2luv@test.jpg",

Hover your mouse over the boxed area to expose the drop-down list, and select the "File" option to allow file uploads.
If you want to get files just uploaded, follow instruction here.
If you want to upload files via link, download it first and then follow instruction above.
curl -o __TEMP_FILE__ YOUR_IMAGE_LINK
curl -F "1000002=@__TEMP_FILE__" -F "api=" -F "v=3" -H "Authorization:Basic YOUR_API_KEY" https://www.ragic.com/demo/sales/1
Remember to replace YOUR_IMAGE_LINK and YOUR_API_KEY
You can find your API key in your Personal Settings page.
Make sure your content-type is multipart/form-data.
curl -F "at=@/your/file/path" \
-F "c=yourComment"
-F "api=" \
-H "Authorization:Basic YOUR_API_KEY_GOES_HERE" \
https://www.ragic.com/demo/ragicsales-order-management/10001/2
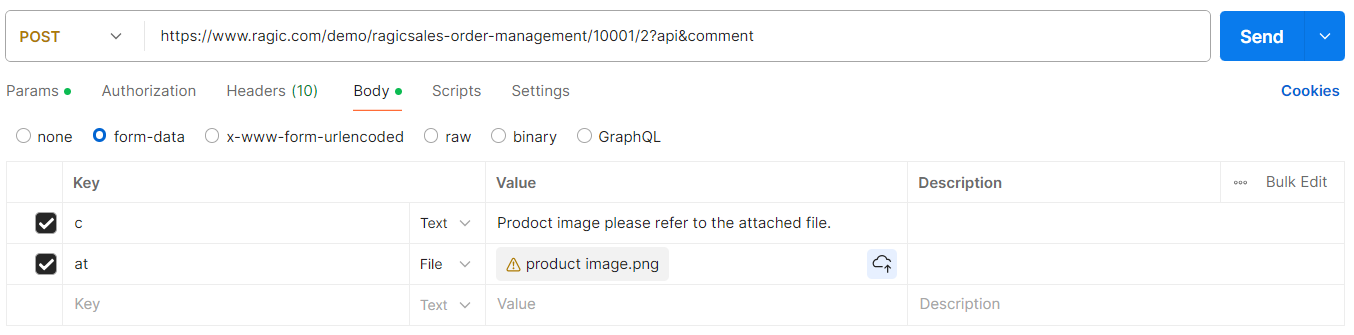
In the request body, the value of the parameter c is the comment(required), and the value of the parameter at is the attachment(optional).
You can find your API key in your Personal Settings page.
You must have SYSAdmin privileges to use this API.
Before using this API, please enable the "Periodic Import from URL" feature. Once the setup is complete, you can trigger the import by calling the following API:
curl -F "importData="
-F "api=" \
-H "Authorization:Basic YOUR_API_KEY_GOES_HERE" \
https://www.ragic.com/demo/ragicsales-order-management/10001
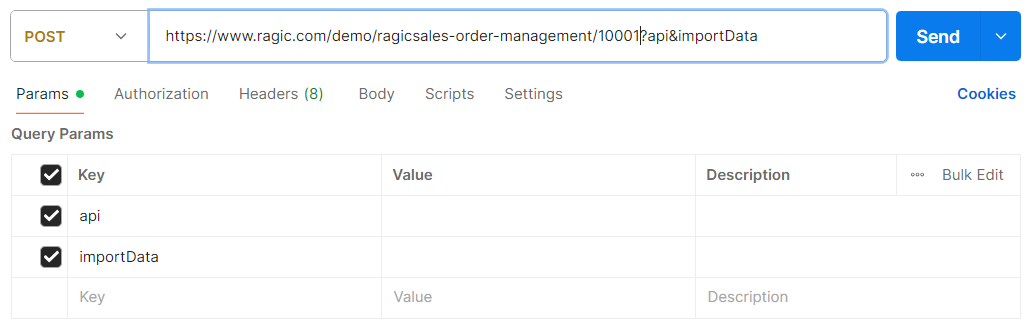
When you need to create or update a large amount of data, you can also use this method to import all at once instead of making multiple API calls.
You can find your API key in your Personal Settings page.
If the request returned in error, it will look something like this:
{
"status": "ERROR",
"code": 303,
"msg": "Your account has expired."
}
Here is a list of the HTTP status code that might be returned on a Ragic request:
| HTTP Status | Description |
|---|---|
| 200 | OK - Everything worked as expected. |
| 400 | Bad Request - Often missing a required parameter. |
| 401 | Unauthorized - No valid API key provided. |
| 402 | Request Failed - Parameters were valid but request failed. |
| 404 | Not Found - The requested item doesn't exist. |
| 500, 502, 503, 504 | Server errors - something went wrong on Ragic's end. |
If there was an error processing your request, it will generally contain an error code and a description. Here is the list of error codes that you might receive as a response to a Ragic request:
| Error Code Id | Error Description |
|---|---|
| 101 | Invalid Account Name: {Account_Name} |
| 102 | Invalid Path: {Path} |
| 103 | Invalid Form Index: {Form_Index} |
| 104 | Cannot POST Data To A Custom Form |
| 105 | Authentication Required Before Using API |
| 106 | No Access Right |
| 107 | Resource Bundle Not Found |
| 108 | Error Loading Requested Form |
| 109 | Cannot Create More Records |
| 201 | Error Processing Request Parameters |
| 202 | Error Executing Request |
| 203 | POST Request Did Not Finish |
| 204 | Request Frequency Too High |
| 301 | Sid Parameter / Session Has Timed Out |
| 303 | Account Expired |
| 304 | Secret Key Is Invalid |
| 402 | Record Locked |
| 404 | Record Not Found |
You can find sample codes in different programming languages on Ragic's GitHub page
If you're having trouble understanding how to work with RESTful APIs, you can also check out some REST samples here.
For JSON parsing, you can find tons of info on finding tools to parse JSON on json.org
Unfortunately, this feature is currently not supported. However, we do have plans supporting this feature. We also welcome suggestions and ideas, please contact us at support@ragic.com.
Currently, the only way to achieve this is by setting the correct limit parameter.
For more details, please refer to this documentation.
Note that reading a large number of entries in a single request can significantly slow down the response rate of Ragic API.
GET API by default only returns 1000 entries. If you wish to modify this behavior, please use the limit and offset parameters.
For more details, please refer to this documentation.
Note that reading a large number of entries in a single request can significantly slow down the response rate of Ragic API.
This feature is currently not supported. However, we do have plans supporting bulk APIs. We also welcome bulk API suggestions and ideas, please contact us at support@ragic.com.
We do not impose any limit on reasonable use. We will only send notification and apply throttling if we detect unfair usage from a specific IP or user.
For more details, please refer to this documentation.
There is a queue mechanism implemented for Ragic API, and each database account has an independent queue. All requests will be delayed until the ones in front have completed. In the event of serious delays, the queued requests will eventually timeout. It is recommended to send one request at a time, and to only send a new request, after the current request has received a response.
| Parameter | Common Question |
|---|---|
| where= |
Some fields can contain special symbols such as spaces and newlines, and these symbols should be taken into account when filtering.
It is recommended to first fetch the data with an API request to inspect the field values, before constructing your filter query parameters. |
| Parameter | Common Question |
|---|---|
| doLinkLoad=true |
If the specified linked field value does not exist in the source sheet, the linked field and all relevant loaded fields values will be cleared.
Link and Load operation will overwrite the specified field value within the HTTP request. |
| doFormula=true |
If the formula referred fields do not contain sensible values (i.e. empty field values or non-numeric values for arithmetic formulae), the formula field may have its value cleared.
Formula calculation will overwrite the specified field value within the HTTP request. |
| doWorkflow=true |
Workflow can contain complex operations, it is indeed difficult to debug. We suggest comparing the result with the web version. |
| doDefaultValue=true |
There are two types of default values: (1) “create xxx”, with $ as the first symbol (2) “last modified xxx”, with # as the first symbol
$ starting default values are only triggered on creation of a data entry, while # starting default values are triggered every update.
For example, $DATETIME is only triggered on data entry creation, while #DATETIME is triggered every update.
|
Mass operation APIs are designed to perform the same set of operations for multiple records on a sheet in one single request.
There are two ways of specifying the records to be updated:
https://www.ragic.com/< account >/< tab folder >/< sheet index >/massOperation/< Mass Operation Type >?api&where=< Field ID >,< Filter Operand >,< Value >
https://www.ragic.com/< account >/< tab folder >/< sheet index >/massOperation/< Mass Operation Type >?api&recordId=< recordId >
HTTP Method - POST
URL - https://www.ragic.com/< account >/< tab folder >/< sheet index >/massOperation/< Mass Operation Type >?api

Headers
Authorization: Basic < API Key >

Body
{
// JSON data that describes the operation to be performed
}

==========

Response
{
"taskId": < A UUID That Identifies The Task >
}
The mass lock API allows locking or unlocking multiple records at once.
HTTP Method - POST
URL - https://www.ragic.com/< account >/< tab folder >/< sheet index >/massOperation/massLock?api

{
"action": < lock or unlock >
}

==========

Response
{
"taskId": "6dbc796a-07d5-475b-b578-d254eb30f7d2"
}
The mass approval API allows approval or rejection of multiple records at once.
HTTP Method - POST
URL - https://www.ragic.com/< account >/< tab folder >/< sheet index >/massOperation/massApproval?api

{
"action": < approve or reject >,
"comment": < optional comment > // optional
}

==========

Response
{
"taskId": "6dbc796a-07d5-475b-b578-d254eb30f7d2"
}
The mass action button API allows the execution of an action button on multiple records at once.
HTTP Method - POST
URL - https://www.ragic.com/< account >/< tab folder >/< sheet index >/massOperation/massActionButton?api

{
"buttonId": < button ID >
}

==========

Response
{
"taskId": "6dbc796a-07d5-475b-b578-d254eb30f7d2"
}
To Fetch The List Of Available Action Buttons On A Sheet
HTTP Method - GET
URL - https://www.ragic.com/< account >/< tab folder >/< sheet index >/metadata/actionButton?api&category=massOperation

==========

Response
{
"actionButtons": [
{
"id": < button ID 1 >,
"name": < button name 1 >
},
.....
,{
"id": < button ID 2 >,
"name": < button name 2 >
}
]
}
The mass update API allows updates of field values on multiple records at once.
HTTP Method - POST
URL - https://www.ragic.com/< account >/< tab folder >/< sheet index >/massOperation/massUpdate?api

{
    "action": [
        {
            "field": < Field ID >,
            "value": < New Field Value >
        }
    ]
}

==========

Response
{
    "taskId": "6dbc796a-07d5-475b-b578-d254eb30f7d2"
}
The mass update API also supports using on Internal Users and External Users, but there are some restrictions.
The following fields cannot be mass updated:
Mass updating Ragic Groups (domainId: 3) has to follow the rules below:
HTTP Method - POST
URL - https://www.ragic.com/< account >/< tab folder >/< sheet index >/massOperation/massUpdate?api

{
    "action": [
        {
            "field": 3,
            "value": "[\"SYSAdmin\"]"
        }
    ]
}

==========

Response
{
    "taskId": "6dbc796a-07d5-475b-b578-d254eb30f7d2"
}
The mass search and replace API allows value replacement on multiple records at once.
Mass Search And Replace Document
HTTP Method - POST
URL - https://www.ragic.com/< account >/< tab folder >/< sheet index >/massOperation/massSearchReplace?api

{
"action": [
{
"field": < Field ID >,
"valueReplaced": < Value To Be Replaced >,
"valueNew": < Value To Replace With >,
}
]
}

==========

Response
{
"taskId": "6dbc796a-07d5-475b-b578-d254eb30f7d2"
}
Mass operations are asynchronous operations.
The task Id of the operation can be used to monitor its progress.
HTTP Method - GET
URL - https://www.ragic.com/< account >?api&taskId=< task ID >

==========

Response
{
"id": < task ID >,
"ap": < account >,
"taskName": < task name >,
"status": < status >
}
Webhook is a way for your external application to subscribe to changes to your Ragic application.
By subscribing to the changes, whenever a change is made on Ragic, Ragic will call the Webhook URL you provided to notify you of the change, including the ID of exact record that has been changed.
The biggest advantage of using a webhook API instead of a RESTful API, is that it is a lot more efficient in processing changes. You no longer have to poll the API every X hours to watch for latest changes.
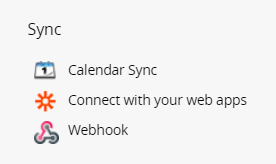
You can find webhook for a sheet on Ragic by clicking on the Tools button at the top. You will find the webhook in the Sync section.
Things to note on the webhook API:
1. It will be triggered on create, update, and delete.
2. It is not completely synchronized, there may be a slight delay when the loading is high.
3. Changes will not include changes on related sheets like multiple versions.
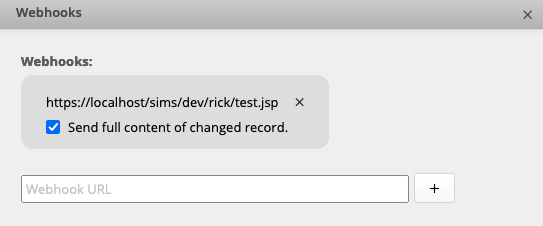
Click on the “webhook” feature and enter the URL that should receive this notification, and you’re done. You can also opt in to receive full information on the modified data by checking the checkbox "send full content on changed record". To cancel the webhook configuration, click on the x in the corner of the webhook configuration box.
The JSON format without full content would look like
[1 ,2 ,4]
For this example, it means entries with node ID 1 & 2 & 4 were changed.
The JSON format with full content would look like
{
  "data": [
          < THE MODIFIED DATA ENTRY IN JSON >
   ]
  "apname": "< ACCOUNT NAME >",
  "path": "< PATH NAME >",
  "sheetIndex": < SHEET INDEX >,
  "eventType": "< EVENT TYPE CREATE/UPDATE/DELETE >"
}

