No matter what industry you're in, you may encounter demanding or impolite customers. In such cases, having a "Customer Blacklist" can be invaluable. It allows you to cross-reference customer information instantly, receive alerts that the customer has been blacklisted, and cancel further orders, avoiding potential unpleasantness.
In this article, we will introduce two mechanisms for creating a blacklist in Ragic, which enable the system to automatically pop up alerts or block orders when you place orders or quotes, preventing accidental transactions with blacklisted customers.
The first approach is suitable for B2B scenarios where you already have a "Customer List" sheet and maintain records for all customers. In this case, you can simply add a "Blacklist" field to your existing "Customer List" sheet to meet your needs.
The second approach is suitable for B2C scenarios with a large user base where you don't necessarily create records for each customer or lack an existing "Customer List". In this case, you can create a separate "Customer Blacklist" sheet and set it up to achieve your requirements.
For detailed steps on how to design these two mechanisms, please refer to the following:
If your company primarily serves the B2B market and already maintains a "Customer List" sheet to record information for all customers, you can add a "Blacklist" field to your existing "Customer List". This field is used to mark whether a customer is on the blacklist.
By utilizing the Link and Load function on the "Sales Order" sheet to load this field, you can design corresponding mechanisms for "displaying warning messages" or "directly blocking saves". You can follow these steps:
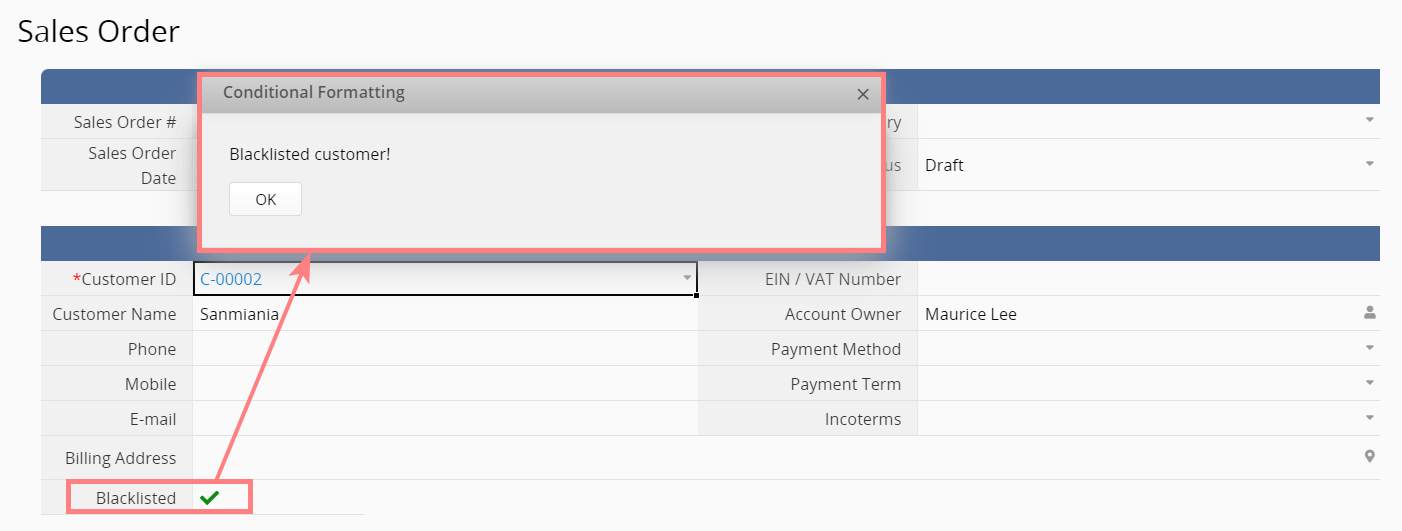
If you want the system to automatically display a warning message when you select a customer with a blacklist mark, you can adjust the design by setting up Conditional Formatting:
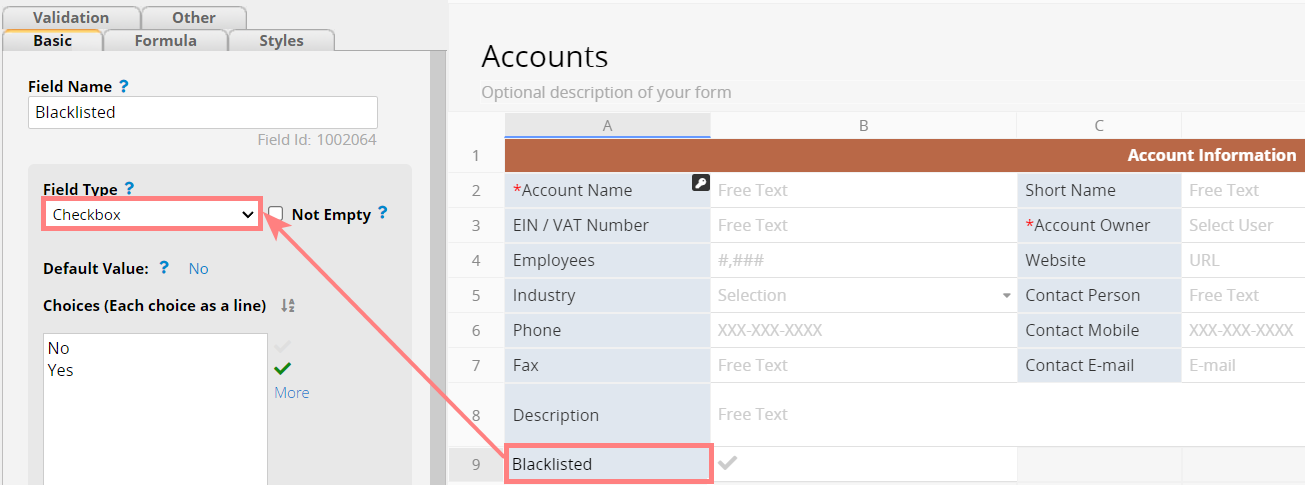
(1) In the "Customer List" (or "Accounts") sheet, add a "Blacklisted" field and set its Field Type as a Checkbox.
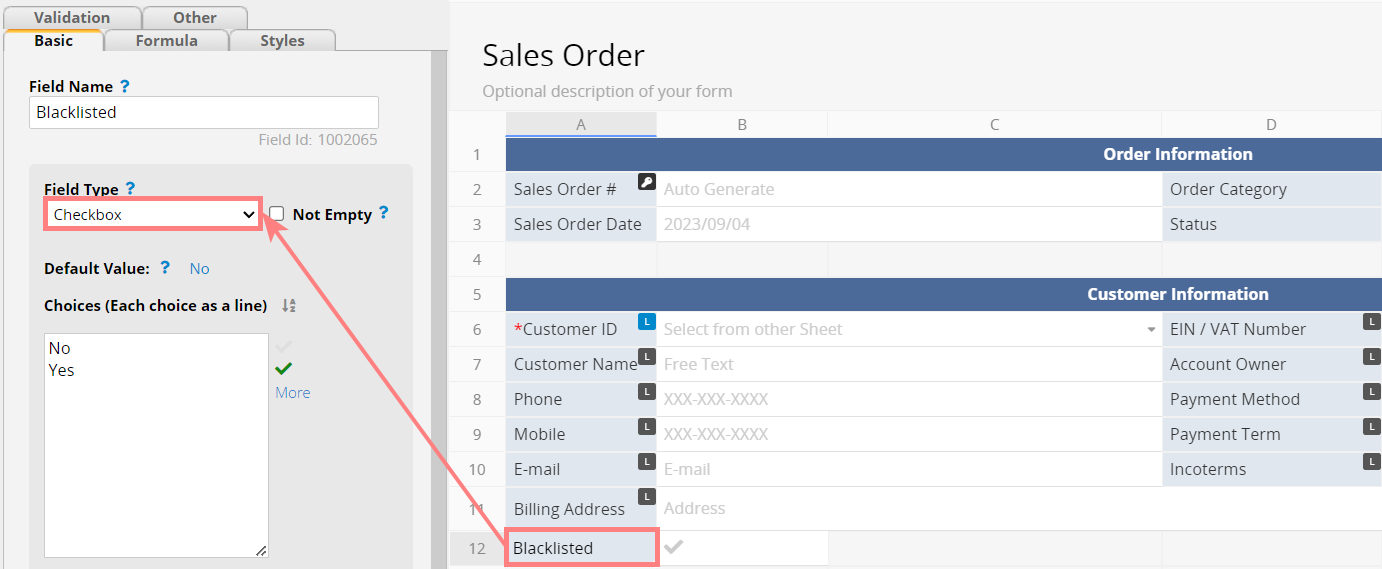
(2) Create a corresponding "Blacklisted" field on the "Sales Order" sheet.
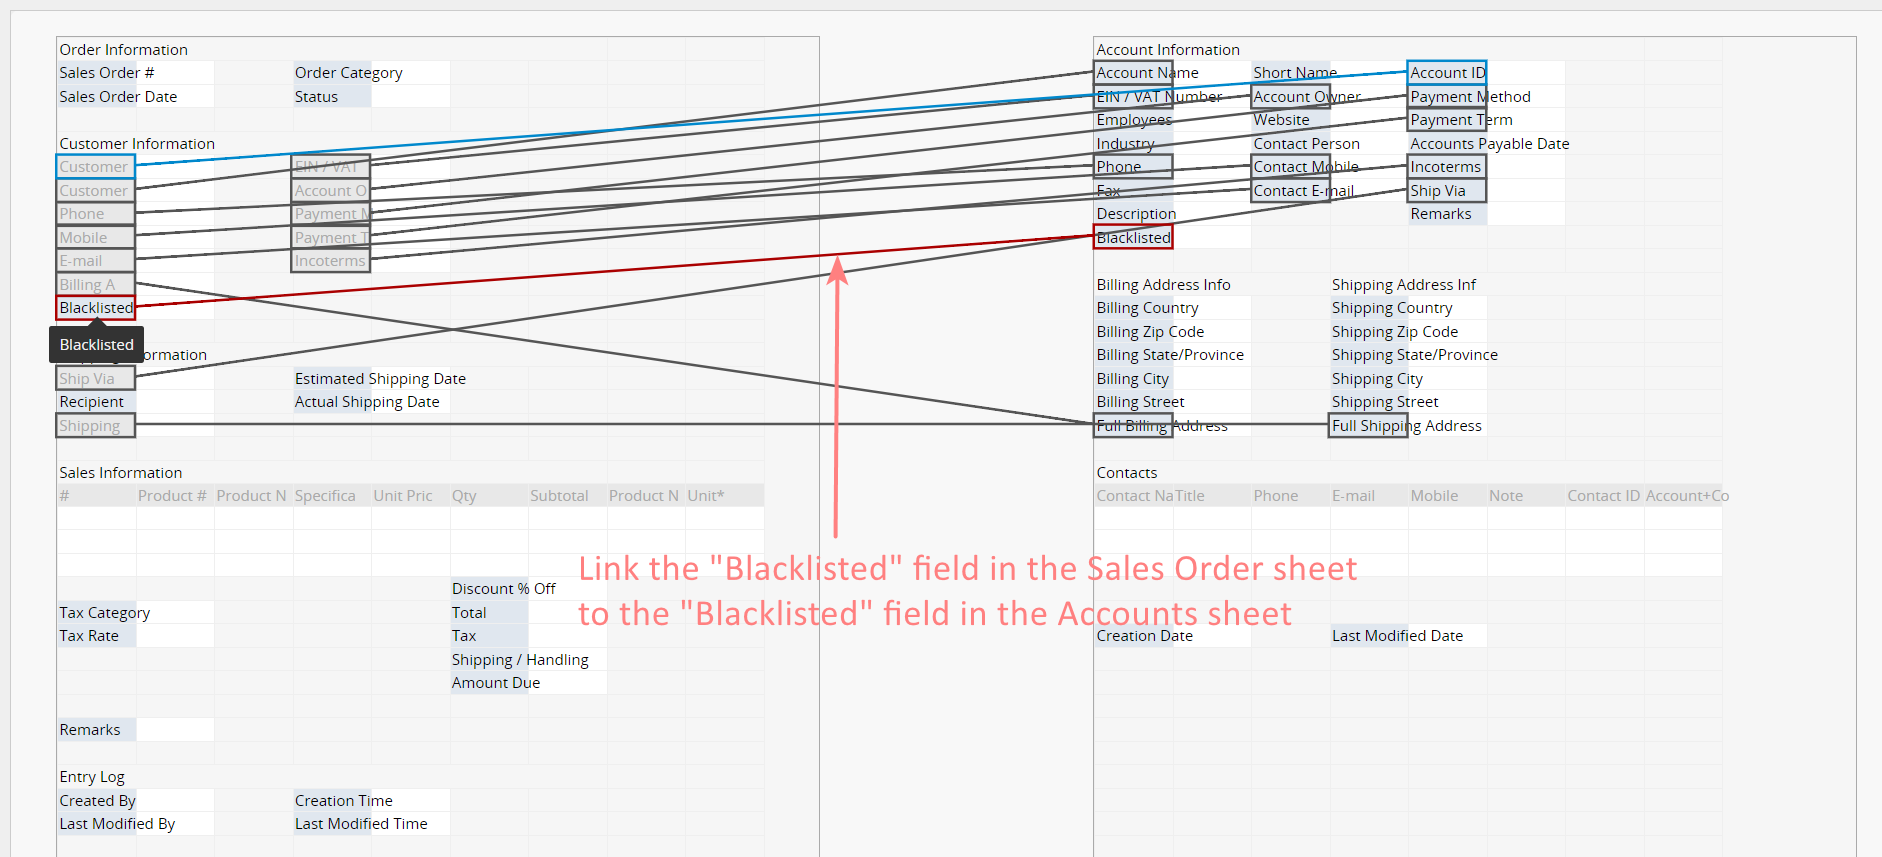
(3) Select Form Tools > Link and Load in the Design Mode on the "Sales Order" sheet, and link the "Blacklisted" field on the "Sales Order" sheet to that on the "Customer List" ("Account").
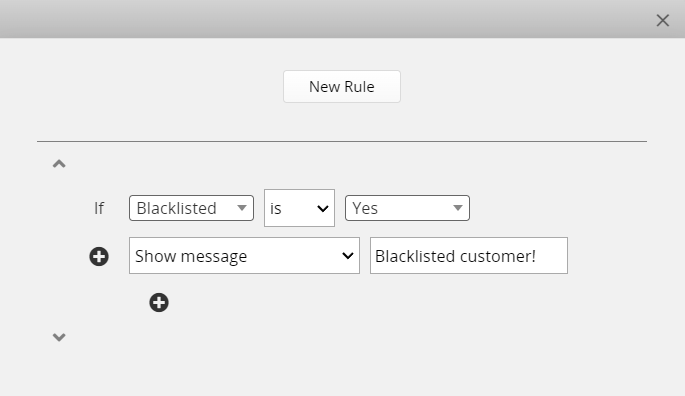
(4) In Form Tools > Conditional Formatting click on New Rule to add a rule that states if the value in the "Blacklisted" field is "Yes", then display the predefined warning message.
(5) Once configured, whenever you select a customer with a blacklist mark on the "Sales Order" sheet, the system will display the warning message.
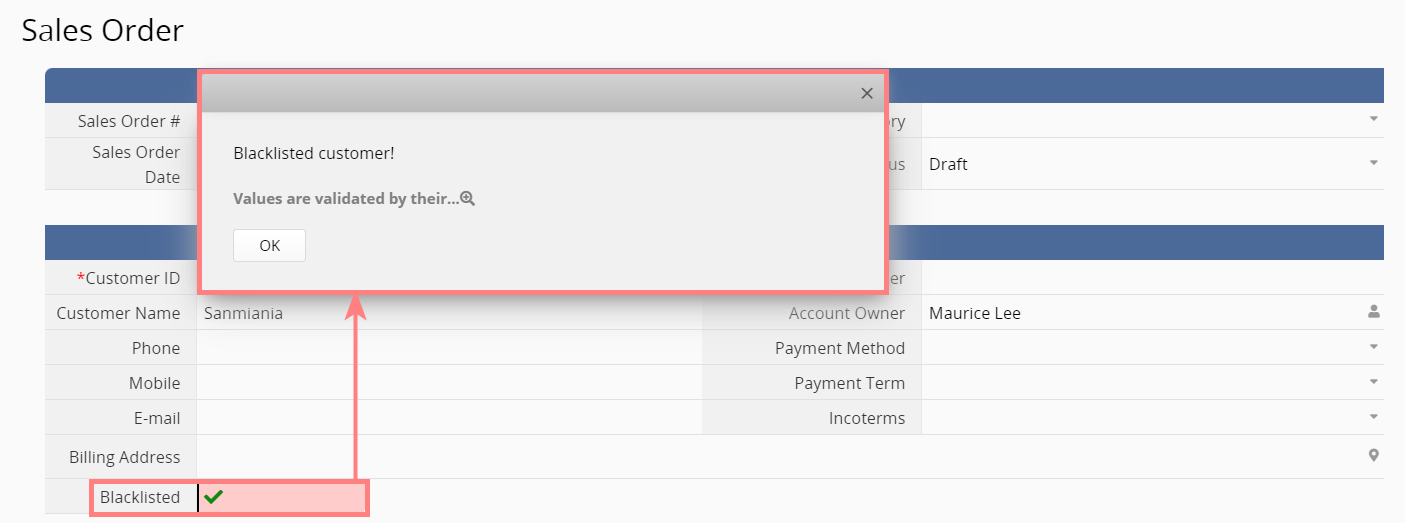
If you want the system not only to "remind" you when a blacklisted customer is selected in a "Sales Order" sheet but also to directly block the save function, you can modify the steps 4 and 5 above by using Validation:
(1) In Design Mode of the "Sales Order" sheet, click on the "Blacklisted" field, and on the left under Field Settings > Validation, fill in "^[No| ]" in the Validation field to perform input validation with Regular Expressions, and fill in the "Customized error message" field with a warning message. This setting means that if the value in the "Blacklisted" field is not "No" or blank, the system will display a warning message.

(2) With this setting, if a customer with a blacklist mark is selected, the system will automatically block the save function when you try to save the "Sales Order".
If your company primarily deals with B2C, serving a large number of customers, and typically doesn't create individual customer records, you might not have a pre-existing "Customer List" to mark blacklisted information. In this case, you can directly create a separate "Customer Blacklist" sheet and design a mechanism for the system to instantly match blacklisted customer names, and even perform multiple checks using potentially more accurate information like email addresses, phone numbers, and more. You can refer to the following methods for design:
1. Display Warning Message When Matched
If you want the system to display a warning message immediately when entering a customer's name, you can use Conditional Formatting. Here are the steps:
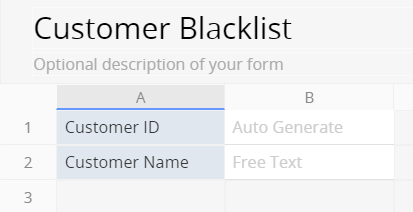
(1) Firstly, create a "Customer Blacklist" sheet, adding fields for "Customer IDs" and "Customer Names".
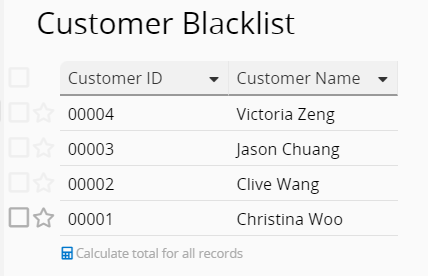
(2) Enter the names of blacklisted customers into the sheet.
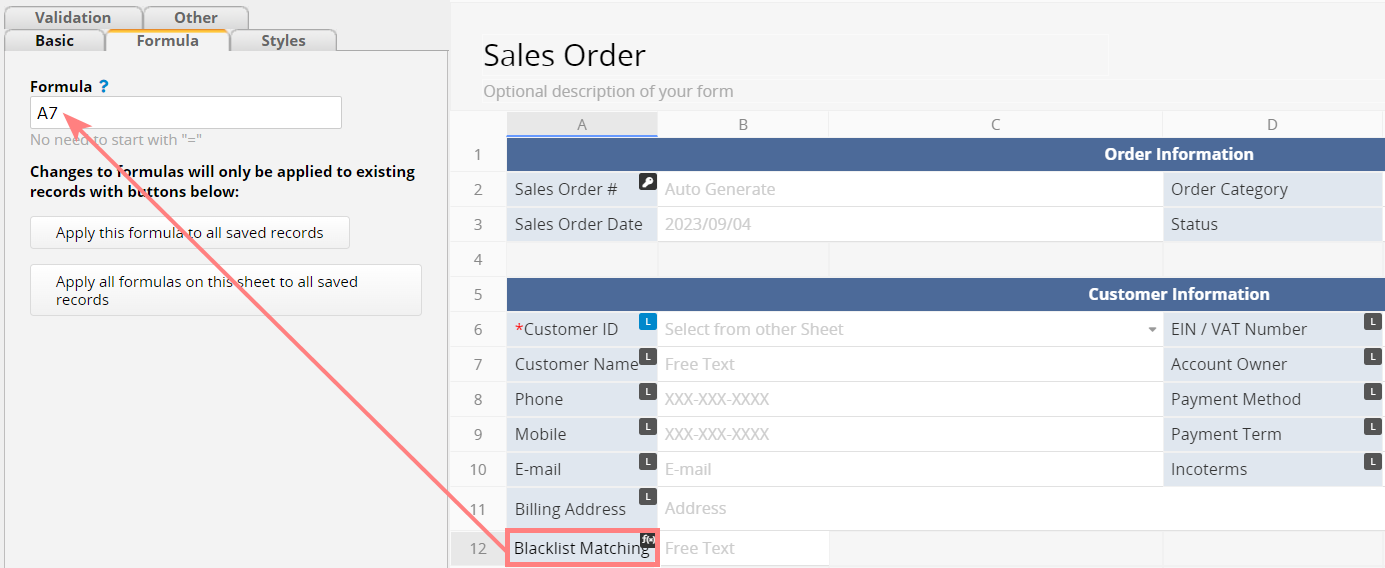
(3) In the "Sales Order" sheet, add a "Blacklist Matching" field, and set the formula as A7 (the "Customer Name" field).
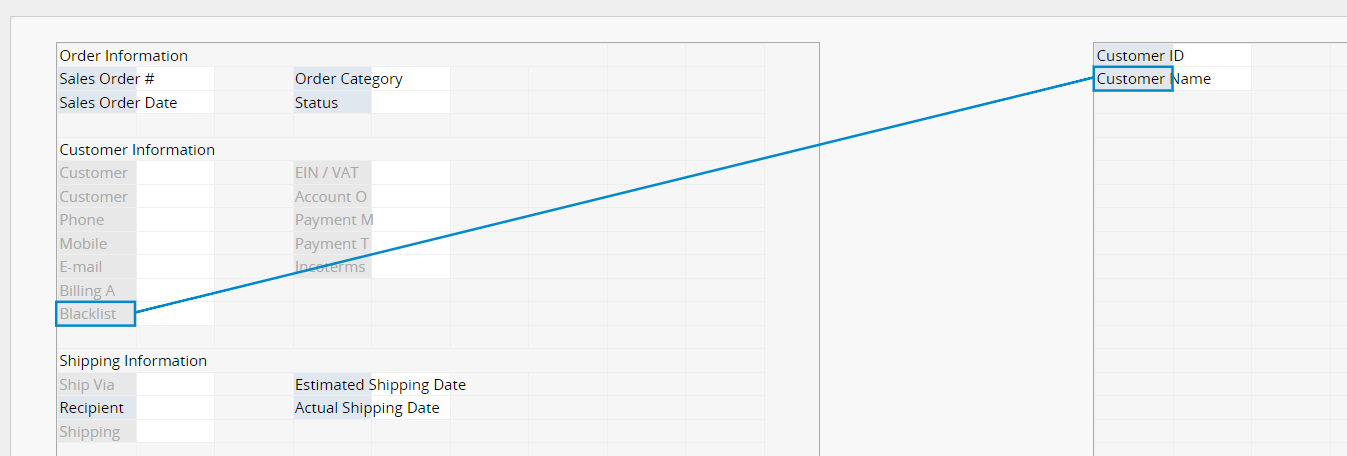
(4) Click on Form Tools > Link and Load to link the "Blacklist Matching" field in the "Sales Order" sheet with the "Customer Name" field in the "Customer Blacklist" sheet.
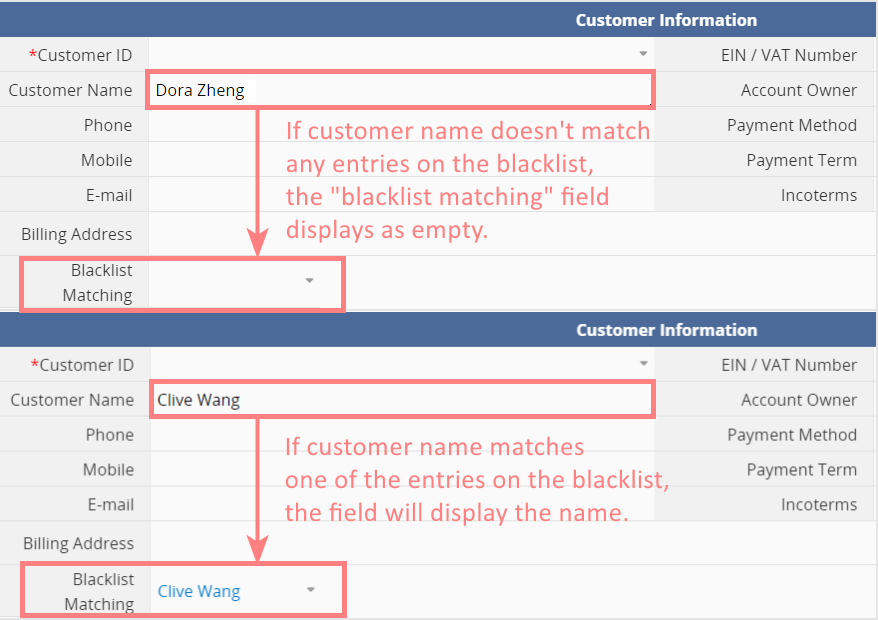
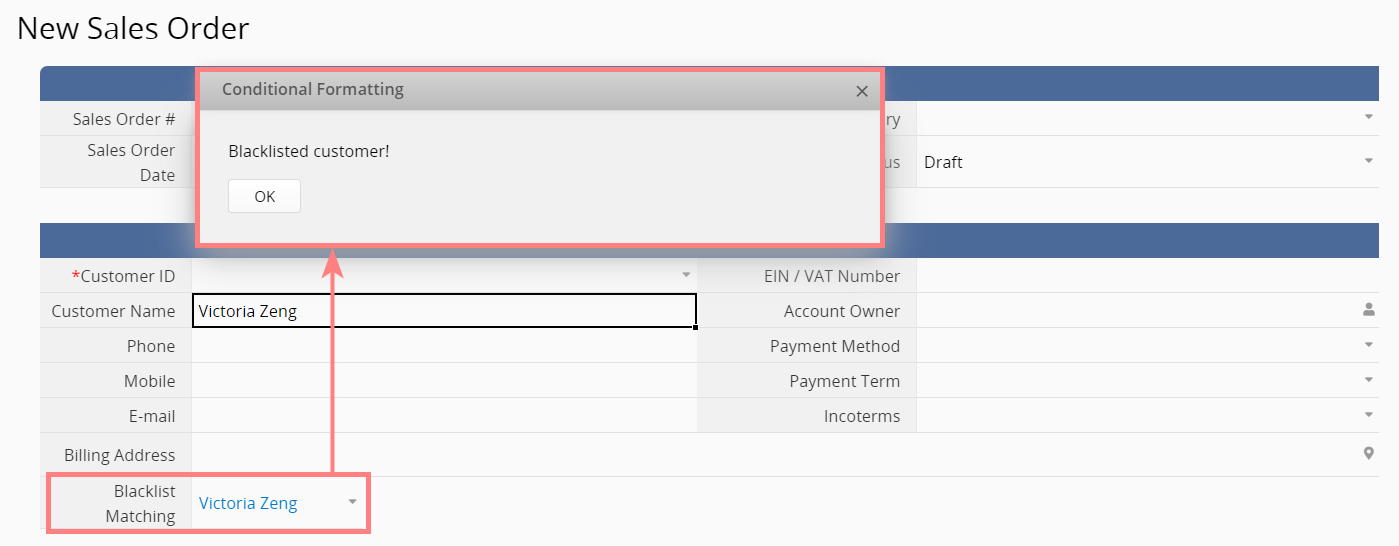
(5) Once the sheet is saved, if the customer's name on the "Sales Order" sheet isn't on the "Customer Blacklist", the "Blacklist Match" field will be empty. It will only display a field value when the name matches a blacklist entry.
(6) In the Form Tools, click on Conditional Formatting and then select "Add Rule". Set the rule to show a warning message when the "Blacklist Matching" field is not blank.
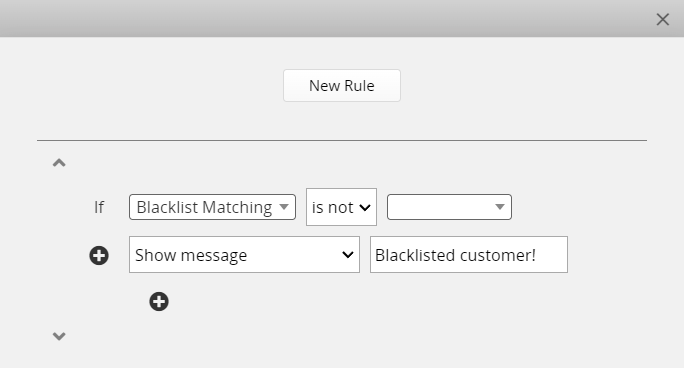
(7) Once the design is saved, whenever a customer's name on a "Sales Order" matches a name on the blacklist, a warning message will immediately appear, helping you avoid dealing with difficult customers!
2. Prevent Saving When Matched
If you want the system to directly block sales orders placed by blacklisted customers, you can make slight modifications to steps 6 and 7 above by using Validation. Here are the steps:
(1) In Design Mode, click on the "Blacklist matching" field, then find Field Settings > Validation on the left. In the Validation field, enter "^[ ]" to perform input validation with Regular Expressions, and fill in the "Customized error message" field with a warning message. This setup means that if the value of the "Blacklist matching" field is not empty, the system will display a warning message.
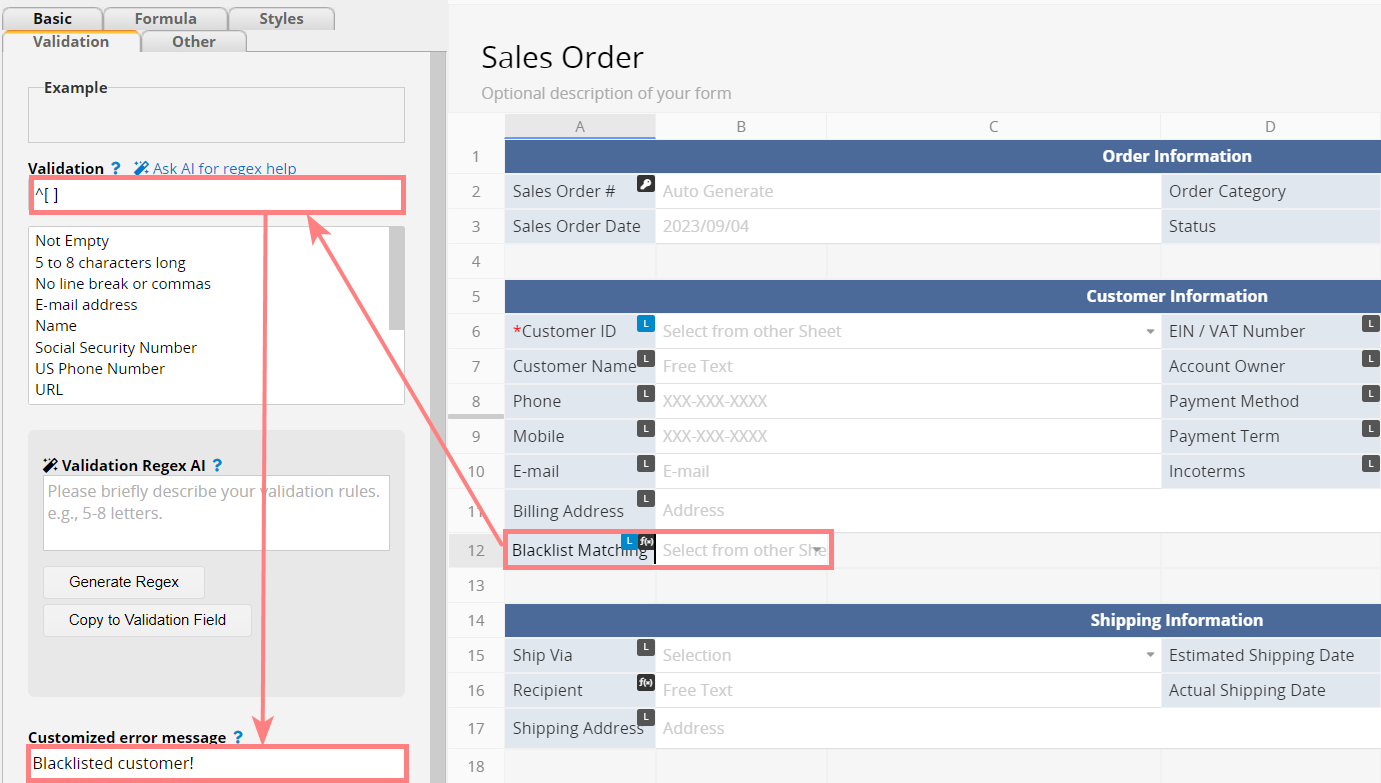
(2) After the design is saved, if you enter a blacklisted customer's name in the "Sales Order", when you attempt to save it, the system will pop up a warning message and prevent it from being saved, helping you avoid saving orders from blacklisted customers.

If customers don't necessarily use their real names when placing orders, matching names alone might not be accurate. You might need to rely on other information to determine if a customer is on the blacklist. In such cases, you can set up the system to match multiple conditions, and if any of them are met, the system will display a warning message. You can refer to the following two methods to set it up:
1. Display Warning Message When Matched
(1) Create a "Customer Blacklist" sheet and add required fields such as Email, phone number, address on the sheet.
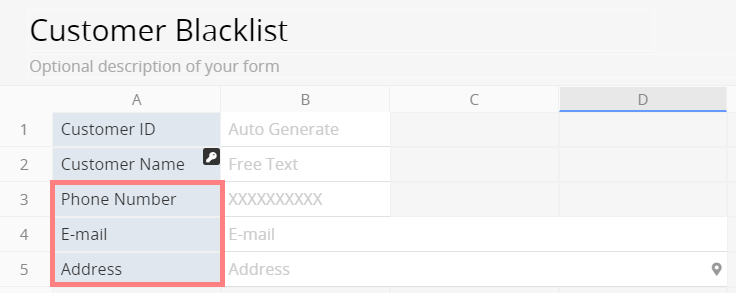
(2) Enter the relevant information for blacklisted customers in the sheet.

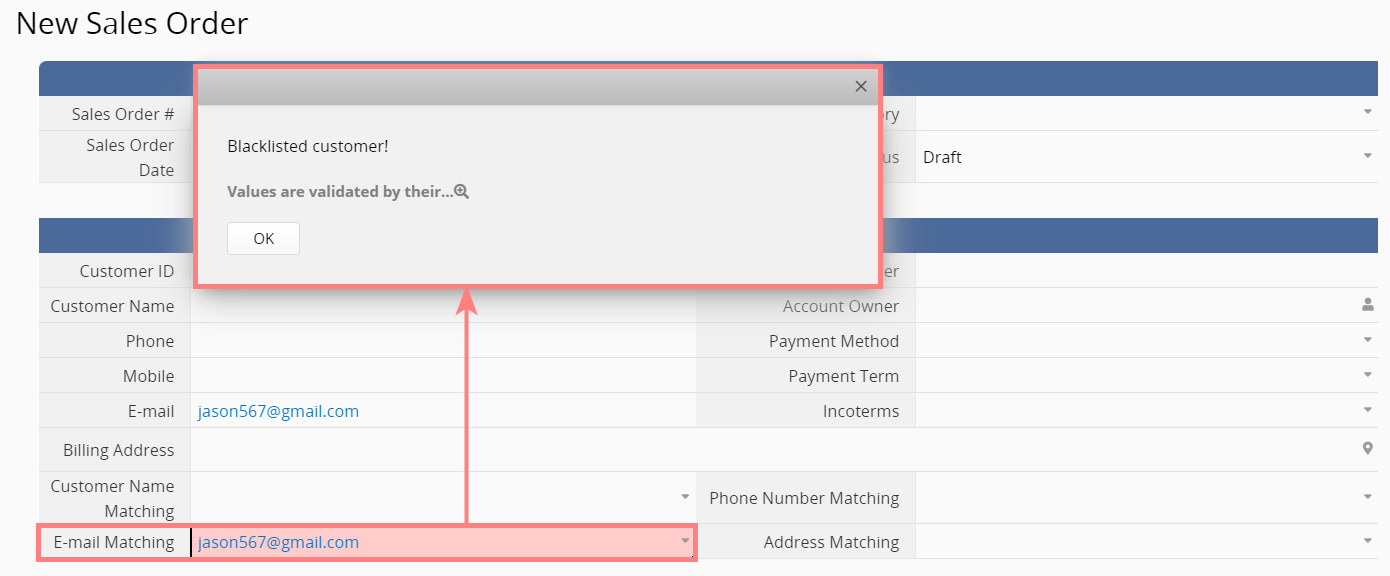
(3) In the "Sales Order" sheet, add fields for customer name matching, phone number matching, Email matching, and address matching, and reference the corresponding fields in the sheet with formulas. For example, for the phone number matching field, reference the "Phone" field, and set the formula to A9.
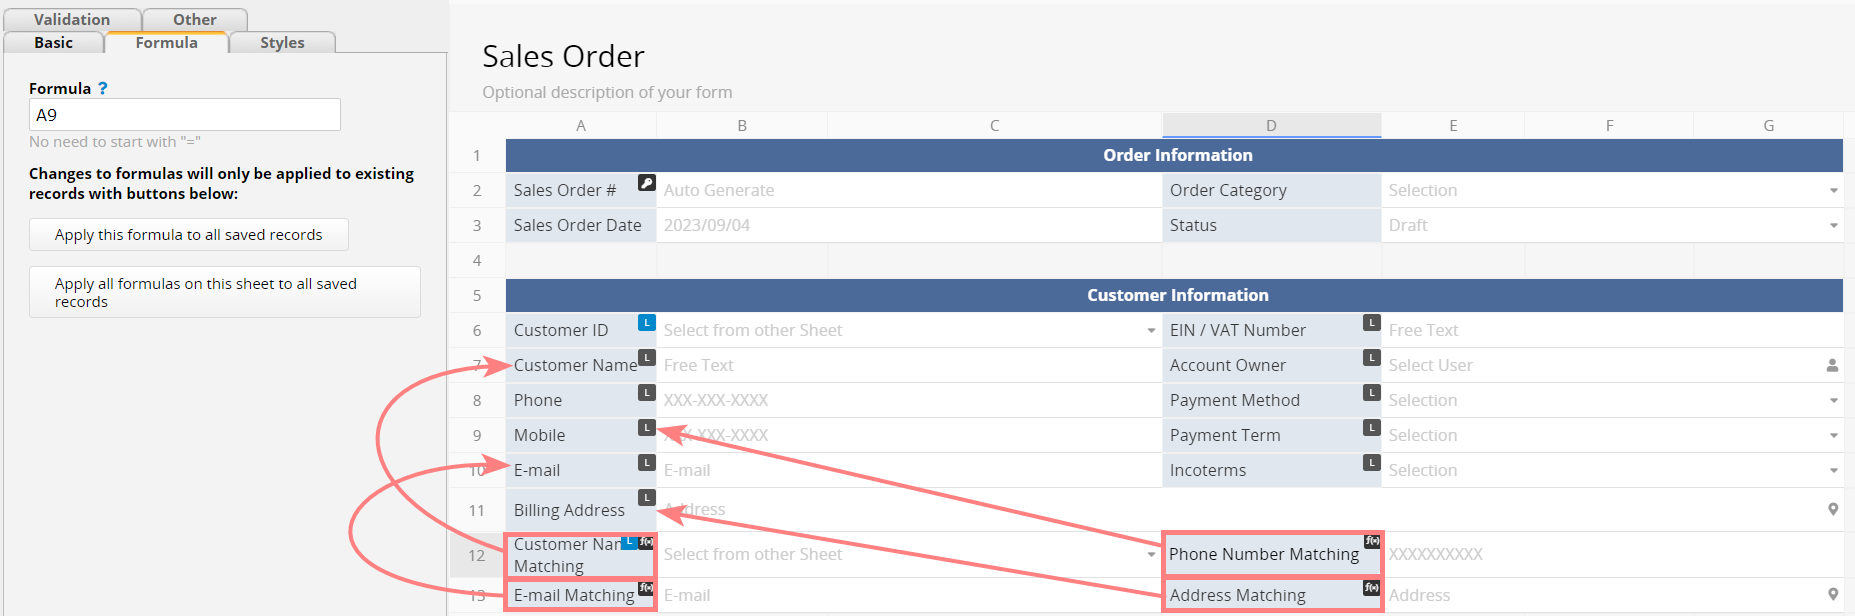
(4) Click on Form Tools > Link and Load and link the newly added fields to the corresponding fields in "Customer Blacklist". It's important to note that you will need to create multiple separate links to the same sheet, one for each field. You can achieve this using the Linking Multiple Sets of Link and Load to the Same Sheet feature.
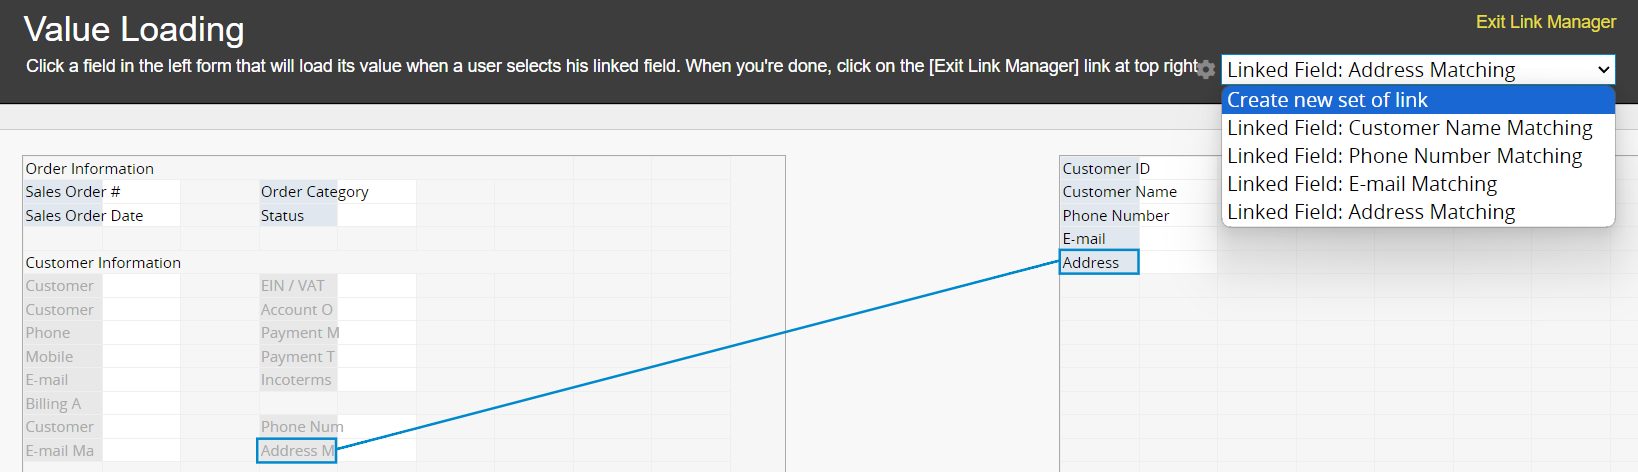
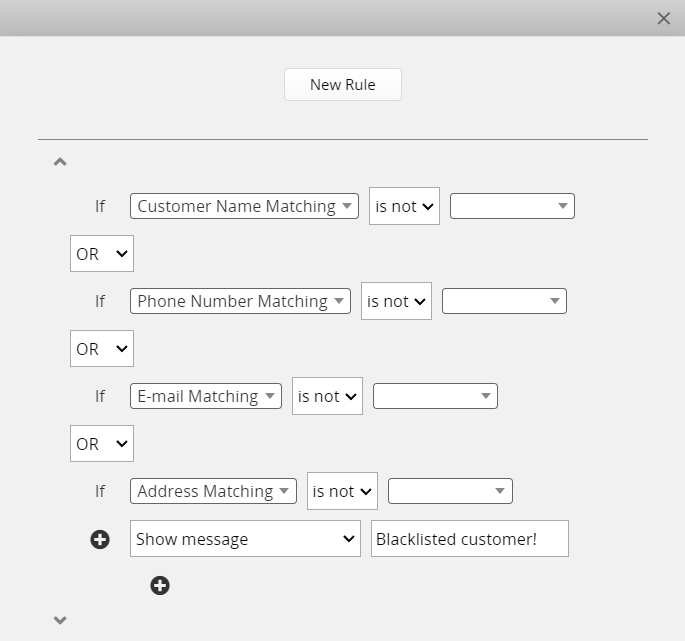
(5) Click on Form Tools > Conditional Formatting and add a new rule for these four fields to show warning messages when they are not empty. Use "OR" to separate these four conditions. With this setup, if any of the conditions match, the system will display a warning message.
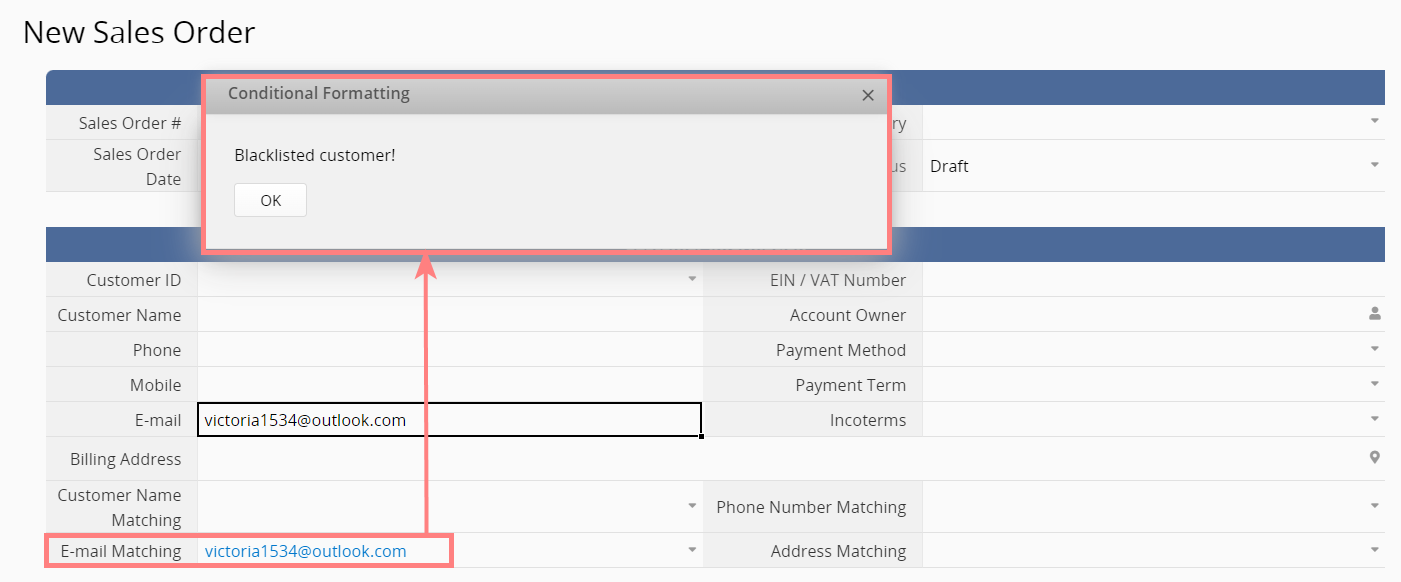
(6) Once configured, whenever the data you enter into the customer name, phone, Email, or address fields on a sales order matches the entries on the blacklist, the system will display a warning message.
2. Prevent Saving When Matched
If you want the system to directly block the sheet from saving when conditions match, you can also modify steps 5 and 6 above with Validation. The steps are as follows:
(1) In Design Mode, sequentially click on the four newly added fields, and click on Field Settings > Validation on the left. Enter "^[]" in the Validation field, and fill in the warning message below.
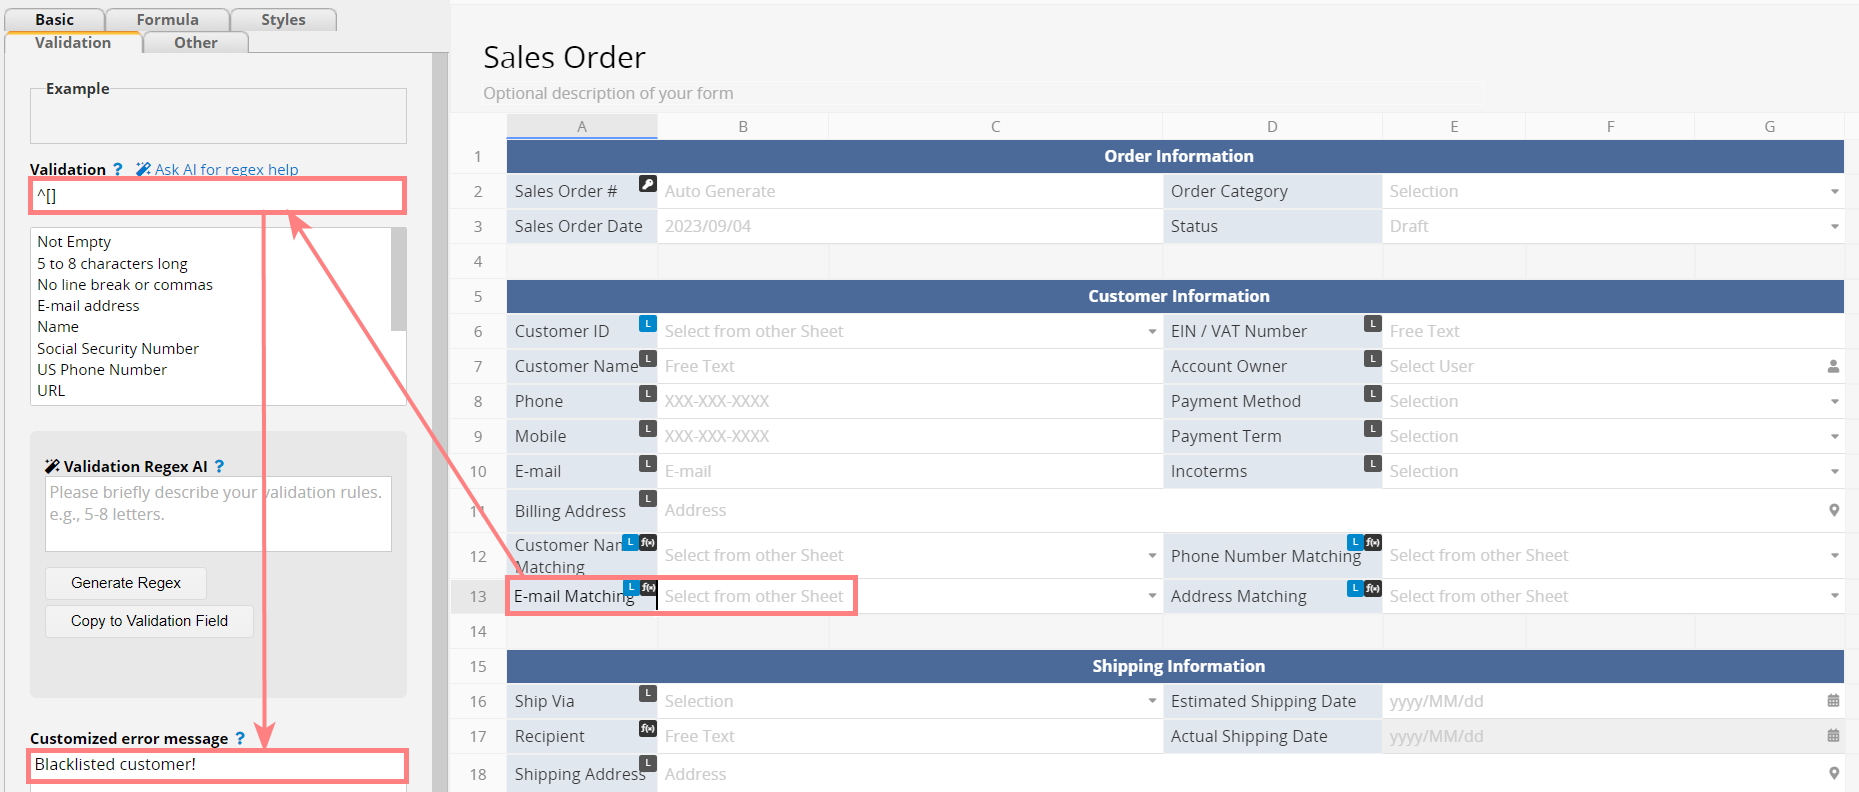
(2) After the sheet is saved, whenever you enter data in the customer name, phone, E-mail, or address field matching the entries on the blacklist, the system will prevent you from saving the order.
 Thank you for your valuable feedback!
