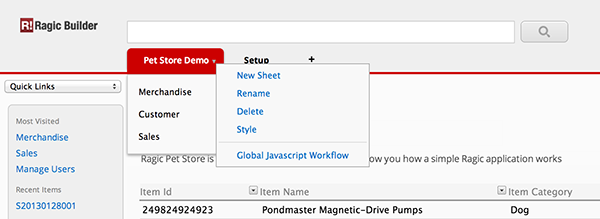
Choosing "Delete" will delete the tab or the sheet.
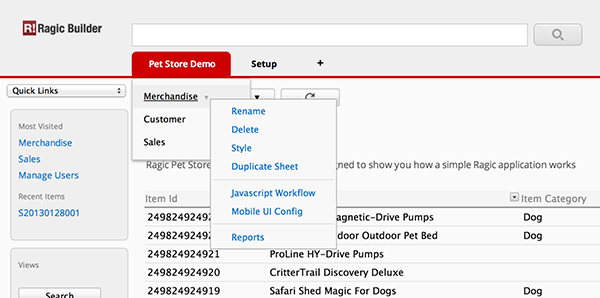
To delete a report, you can right click on the report name to access the context menu and choose "Delete".
If the system stop you from deleting a sheet, please refer to this document.
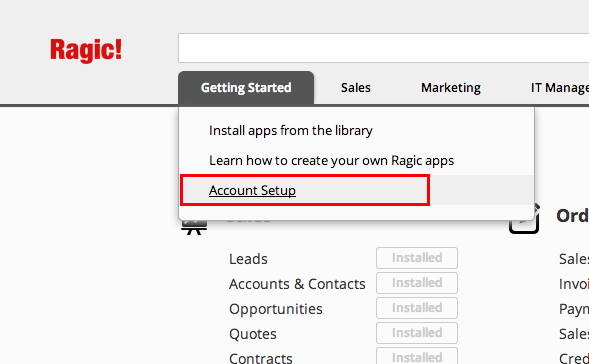
If you acccidentally deleted an application tab or sheet and would like to recover it, you can check to see if it's under the Recycle Bin of your Account Setup.
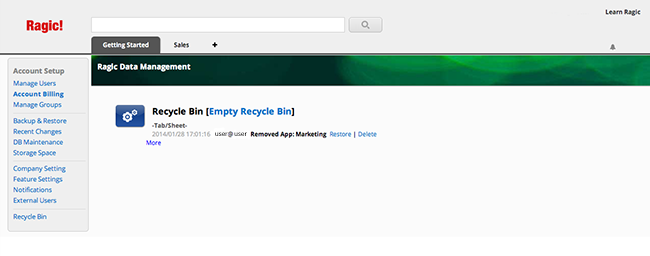
If you cannot find your deleted sheet or tab, you can contact Ragic Support at support@ragic.com to help you restore a backup.

Remember to save your form design after you're done. When the design changes are saved, the changes will be applied to everyone's view on this sheet.
You can also change the width and height without entering the design mode while looking at a form by dragging the locations where the row and column definition borders would be in the design mode, but these changes will not be preserved next time you see this sheet.
These methods are explained more clearly in our documentation:
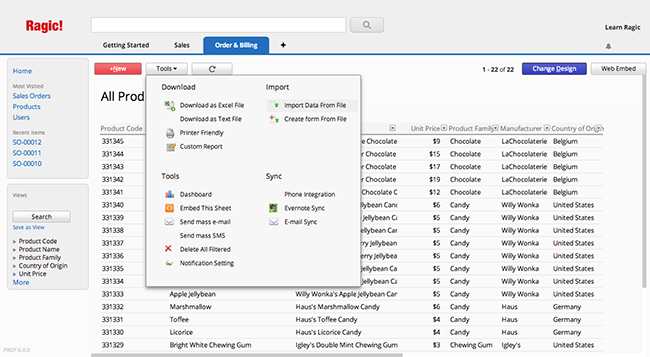
Ragic has a convenient import wizard for users to import from their existing data from Excel or CSV files. To import from your files to Ragic, you can go to the listing page that you would like to import your data to, and choose Import Data From File under Tools. There will be a step-by-step wizard to guide you through the field mapping process as well as other configurations for the data to import correctly.
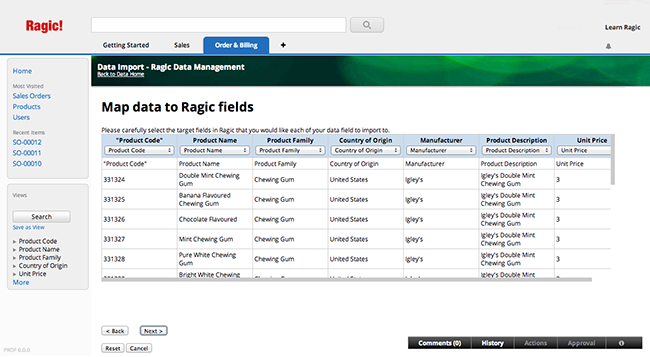
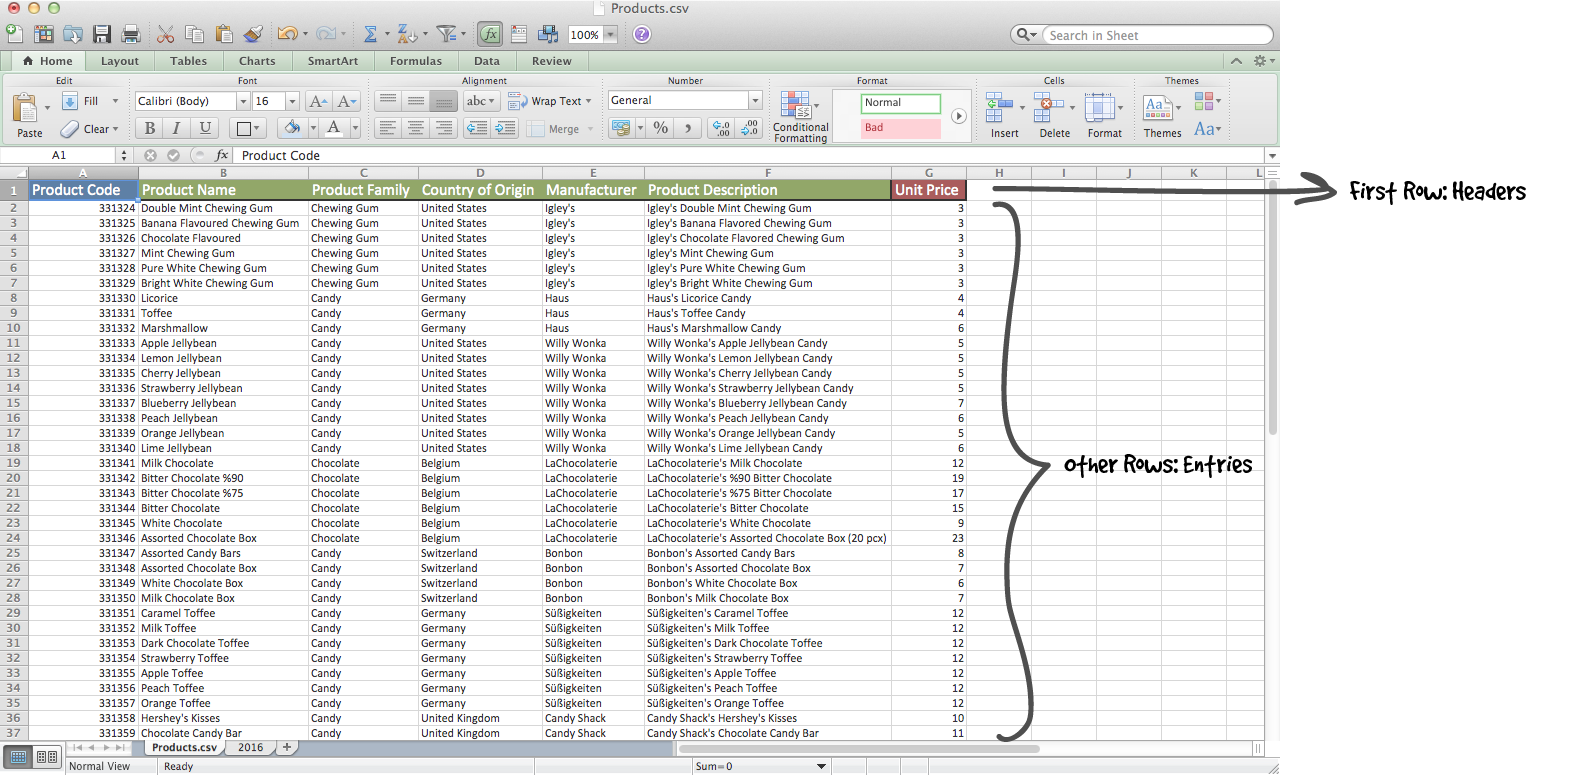
For Ragic to map your information correctly to entries, you will need to have a unique identification that we call key field, such as "Product ID" for products, or "Customer No." for your customers. To make your database easier to use, let the first column of your import data be this type of key field.
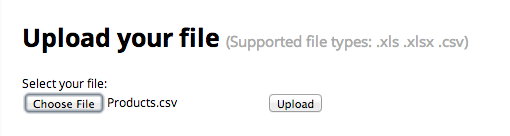
Upload your file. Ragic supports .xls .xlsx and .csv files. We recommend that you save your file as .csv for the best performance.
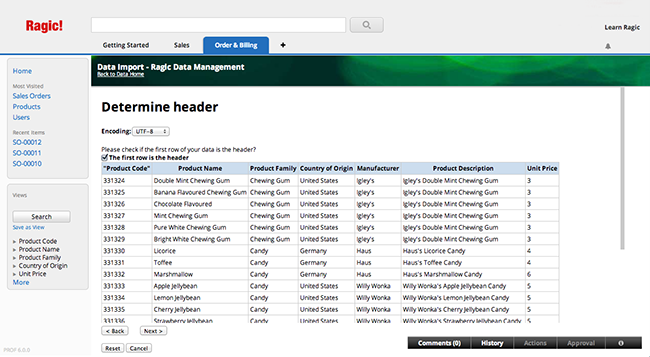
Determine if your first row is the header. If so, Ragic will automatically determine how the data in this row will be mapped to your fields for the next step.
Check to see if all the target fields are correct. This is especially important if you have similar names for two seperate fields. You can also choose to ignore columns of data that you do not want to import. Note that the target field values should also be in the correct formatting, such as the date format. If you're importing into a "select user" field, you will need to have the user's e-mail that's used in Ragic instead of the username that you see to uniquely identify the person.
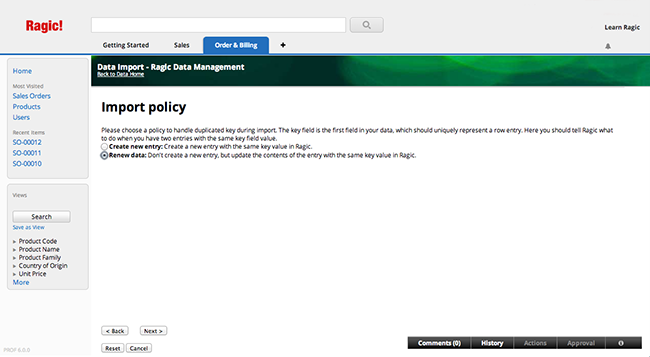
Choose the import policy to handle duplicated keys during your import. If you choose Create new entry, new entries will be created containing data with the same key values. If you choose Renew data, your existing data will be updated if you have entries with the same key value, and new entries will be created for the key values that aren't in your database. This type of import policy is especially useful when you are doing mass editing.
You can configure Advance Settings in Import Policy as well if necessary.
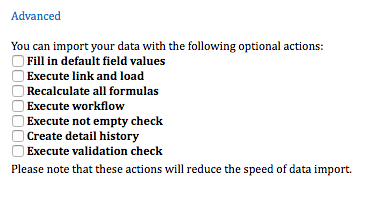
| Advanced Setting | Description |
|---|---|
| Fill in default field values | If you have a configured default value in your sheet, please check this box so that the field value will be updated or populated with the import. |
| Execute link and load | If there are sets of link and load configured on your sheet, please check this box to have the loaded fields auto-populated. Otherwise, the loaded fields will be left empty if the field values aren't included in your import file. |
| Recalculate all formulas | Recalculate all formulas during the import. |
| Execute work-flow | Execute work-flow, if any, in your sheet. |
| Execute not empty check | Check if there are field values configured with the "Not Empty" feature. If there is no field value, Ragic will skip that row during the import. |
| Create detail history | Show editing history in entry's information panel. |
| Execute validation check | Check if the field value meets the configured validation . If it doesn't, Ragic will skip that row during the import. |
If you're not importing into an existing Ragic sheet, you can also use the Excel or CSV file to create a new sheet as you import. Just choose "Create Form From Excel" in the "Tools" menu instead.
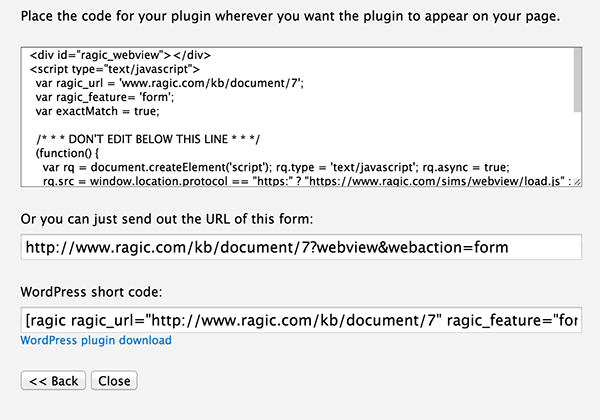
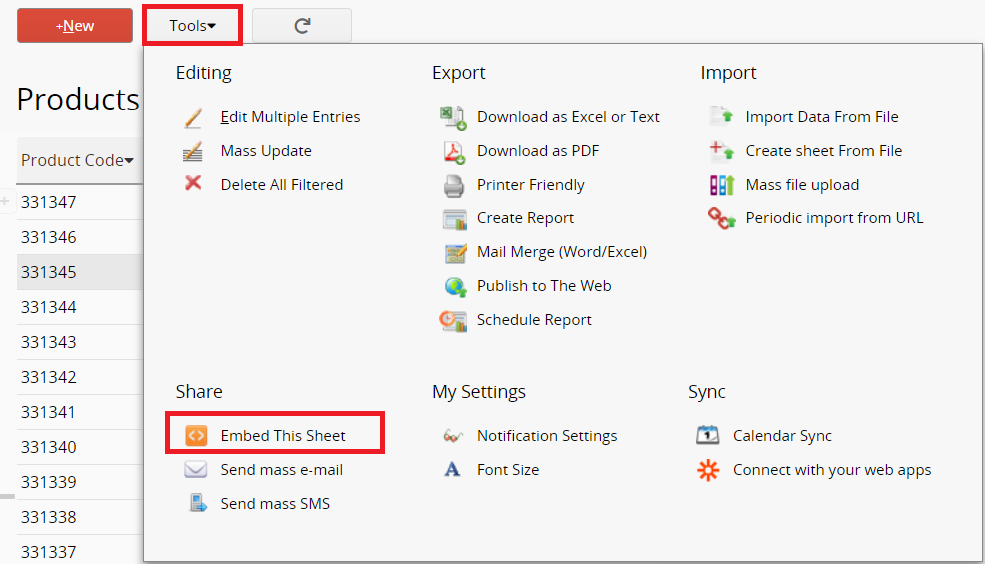
Ragic applications come with a variety of useful Website Plug-ins that could be embedded on your website, or sent as a separate link to others. These website plug-ins become available automatically as you create the sheets in your applications.
You can view our documentation on how to use the Web Embed Feature in Ragic for more information.
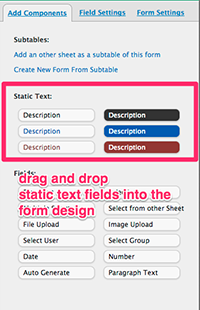
Another way to do this is to simply drag and drop the File Upload or Image Upload components from the "add component" tab at the left.
To upload a file, users can find and select it from your computer or drag and drop it into the field.
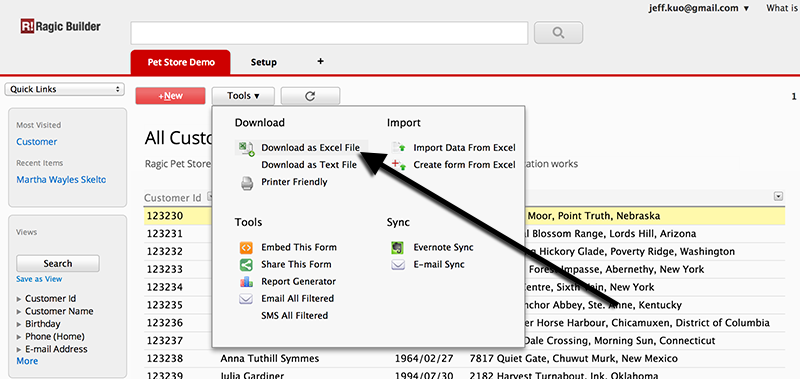
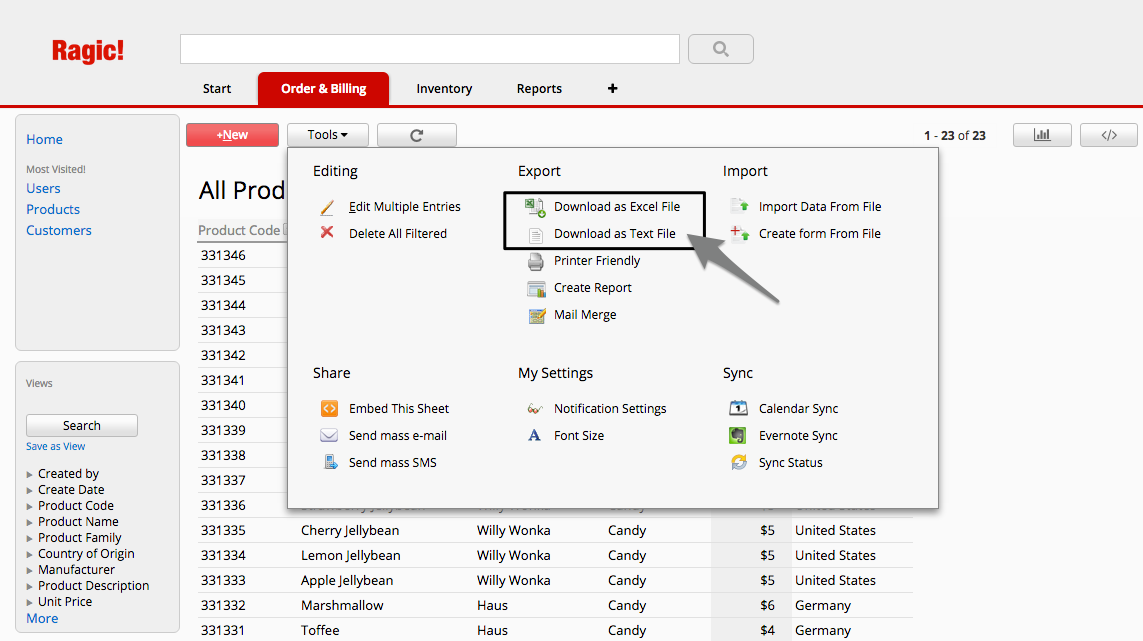
Yes, simply go to "Tools" and choose "Download as Excel File". For a printer friendly version, just choose "Printer Friendly" instead.
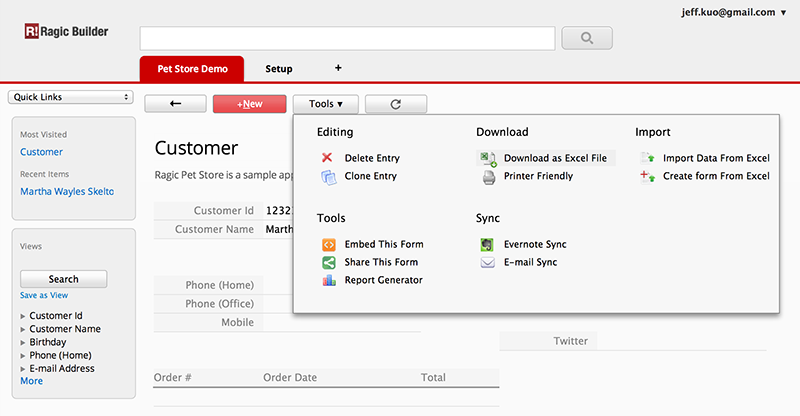
This works both on listing and form pages. If you would like to download from the listing page, Ragic can download all entries regardless of the paging. However please note that the Excel saved on the list page does not include the content of subtables within each form page. On the other hand, on the form page, it saves a single data record only, but including subtables.
This is very simple to do with Ragic if you know how to create forms in HTML. Suppose you want to create a form that saves entries in this sample pet store merchandise form.
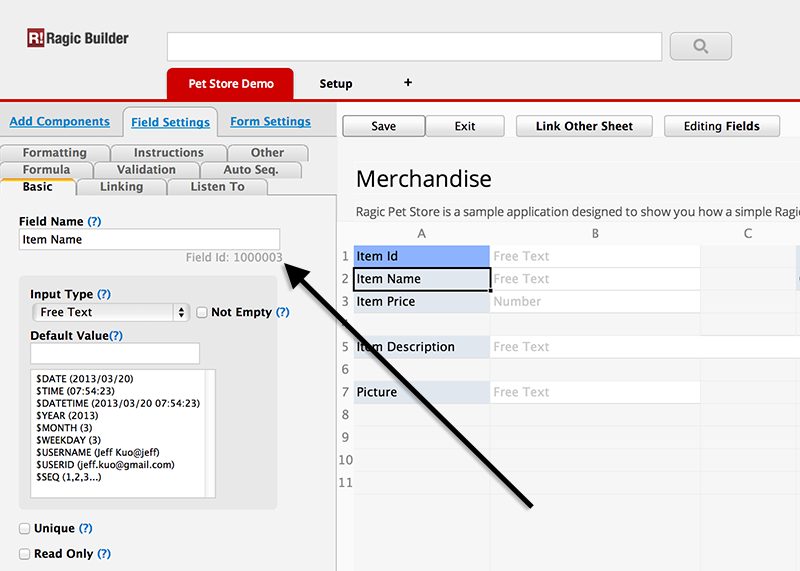
1. Find the Field Id for each field that you would like to save in the HTML form. You can find them in the Design Mode when you focus on a field.
2. Create a form like this HTML sample, Your HTML form saves data to the same form URL, adding the query string parameter "api". Put down the field id as the parameter name for each field to be mapped on the Ragic form:
<!-- Your HTML form saves data to the same form URL, except change www.ragic.com to api.ragic.com -->
  <!-- Adding the web parameter means that api server returns html instead of default JSON -->
  <form action="https://www.ragic.com/start/petstore/1?html&api" method="POST">
    <!-- Put down the field id as the parameter name for each field to map them to a field on the Ragic form -->
    <p>Item Id: <input type="text" name="1000001" /></p>
    <p>Item Name: <input type="text" name="1000003" /></p>
    <p>Item Price: <input type="text" name="1000005" /></p>
    <!-- Selections work the same way, just pass the selection value as parameter value -->
    <p>Item Category:
      <input type="radio" name="1000002" value="Dog" /> Dog
      <input type="radio" name="1000002" value="Cat" /> Cat
    </p>
  </form>
3. Make sure that the user has the correct access rights to enter data on this form.
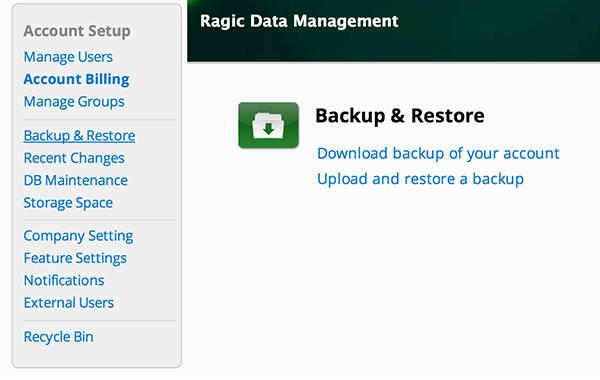
Ragic servers are backed up daily automatically. But if you need an extra layer of protection, you can manually back up your data by going to the Backup & Restore section in your Account Setup page.
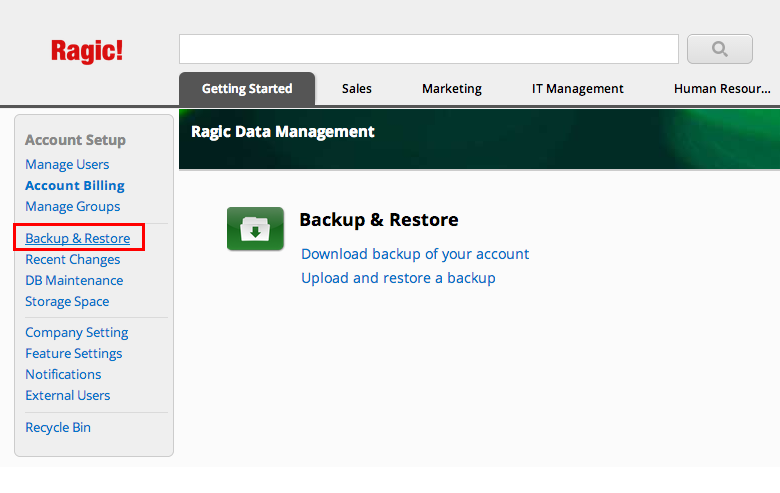
Choose Download backup of your account, and download the backup.

If you want to download your data in a format that is easier to read, you can also use the Download as Excel File or Download as Text File feature that could be accessed in the listing page of a form from Tools.
Ragic has native Android and iOS apps you can download on your smartphone


You can also open your mobile browser and log in to www.ragic.com for a direct web access.
You can simply give out the URL of your database to other people for them to access. All accounts, sheets and entries have their unique URL, which is also the URL in the address bar of your browser.
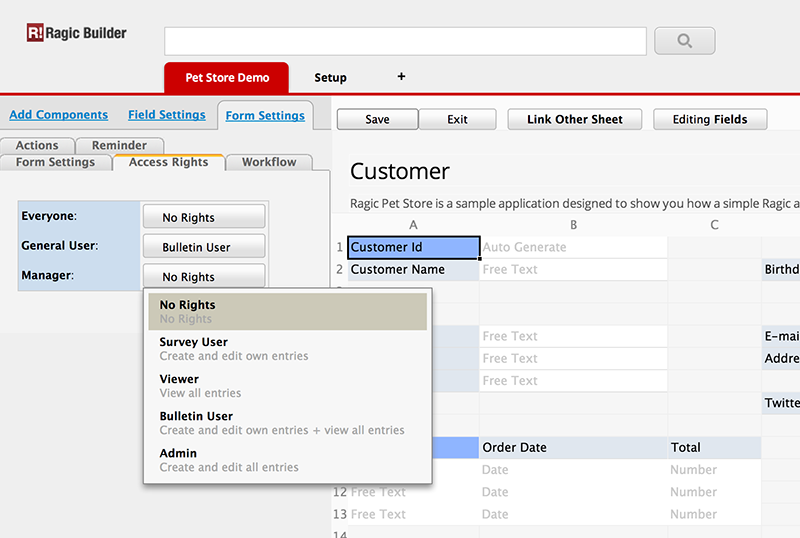
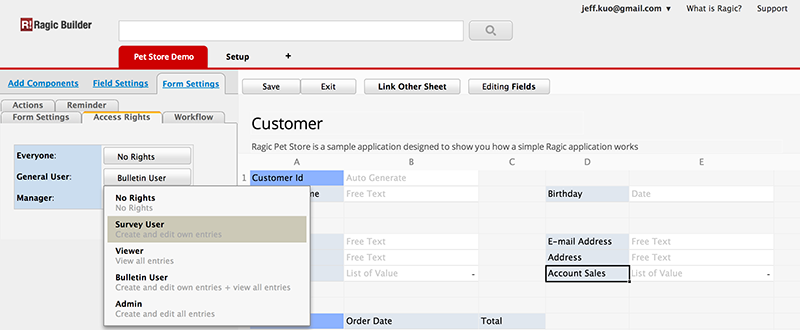
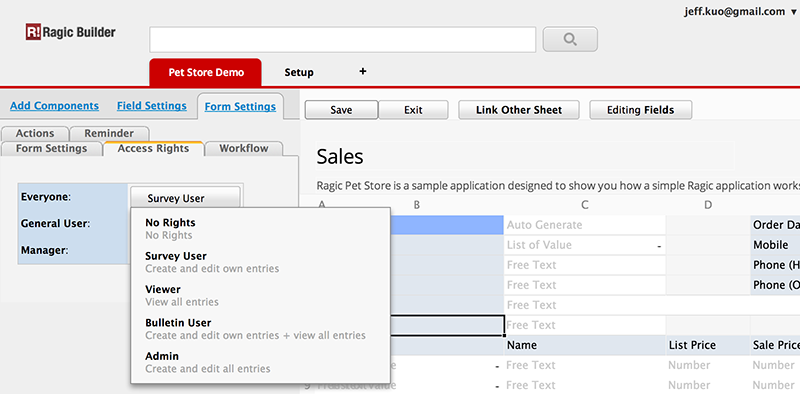
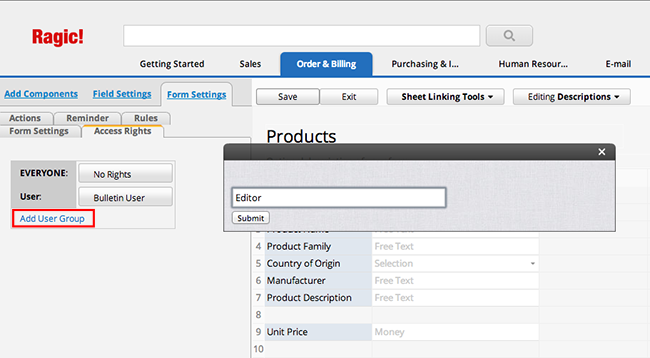
For other people to actually see your data, they must have the correct access rights to your sheet. You can change the access right settings on your sheet by going to the Design Mode. You will find the Access Rights tab under Form Settings.
All of the user groups in your account will be listed here, as well as an additional group Everyone, which represents everyone, including the users who haven't logged in, or individuals who are not a user in your account.
You can set the access rights for every group of users listed here. The access privileges that are being set is specified on the configuration interface. If a user is in multiple groups, they will access the form with the group that grants them the most privilege.
You can also add custom groups by clicking on "Add User Group", under the list of your user groups.
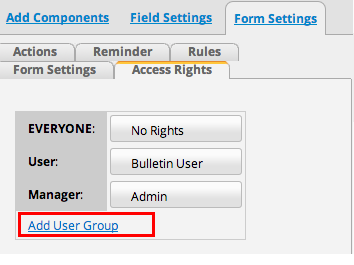
Remember to save the form design after you change the access right setting. You do not need to set this to both listing page and form page, the access right is applied to all pages of a sheet.
If a user still cannot see the data after you grant them the privilege, ask them to log out and log back in to refresh their access right settings.
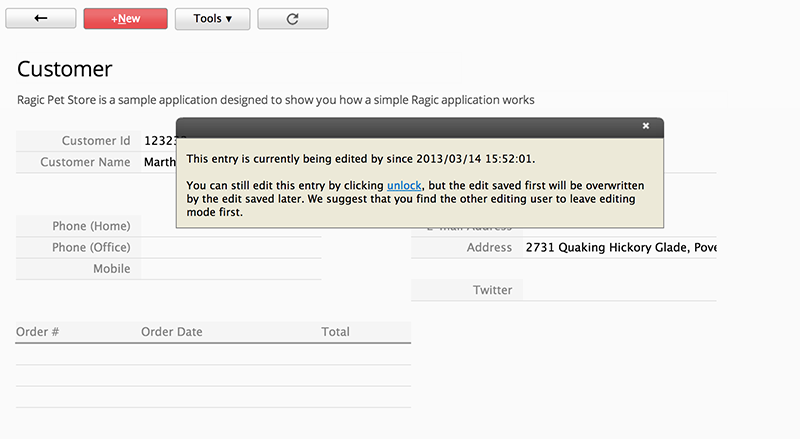
When a user begins editing an entry, he will create a lock for this entry. So when another user tries to edit this entry, Ragic will display a screen telling the other user that the entry is locked, and that they should wait until that other user has finished editing to avoid overwriting each others' changes.
The entry will be unlocked when the editing user saves or cancels their edit, or leaves the page without saving. Ragic allows a user to manually unlock the lock that another user has created, in case the editing user cannot be found, and that there is an urgency to edit this entry. But in this scenario, the users must understand the risk of overwriting each other's edits, as the system will only save the changes of the last edit.
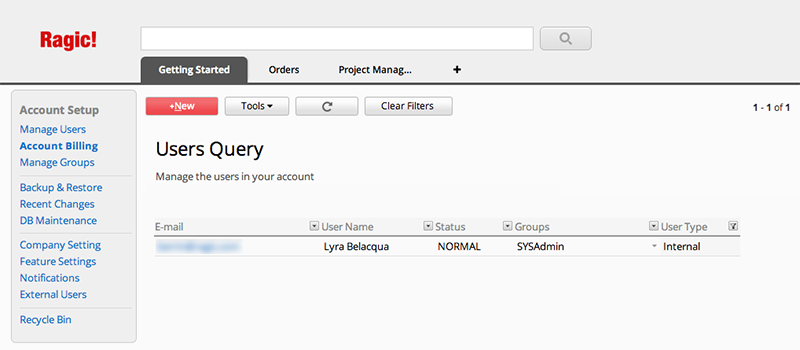
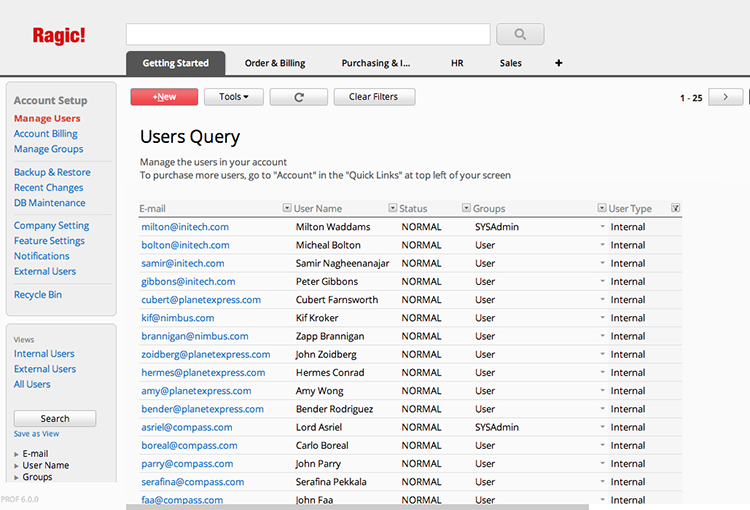
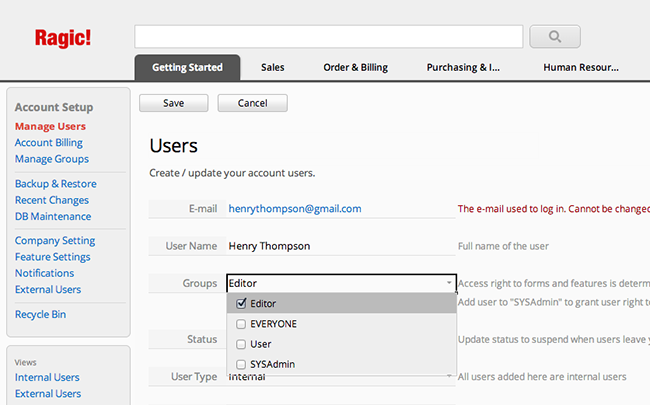
Manage your users from your Account Setup. Access the user management menu through the Start tab, or on the right side of your account homepage.

Choose Manage Users, which will show a list of all the users in your account.
You can add a new user by clicking on the +New button and enter their user information.
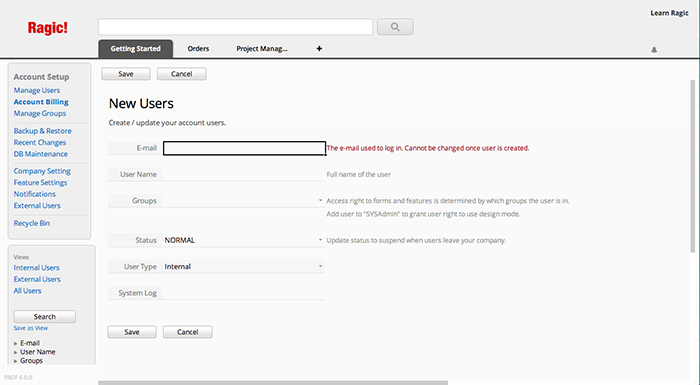
When the user information is saved, Ragic will automatically send an e-mail to the new user containing their temporary password to log in to the system. The user can then change their password when they log on to Ragic.
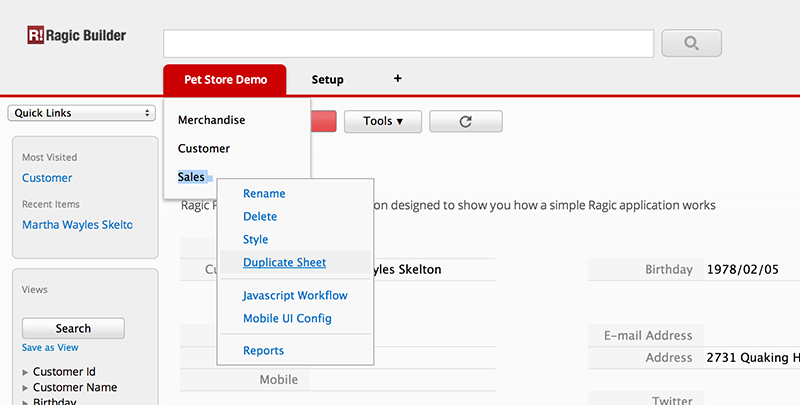
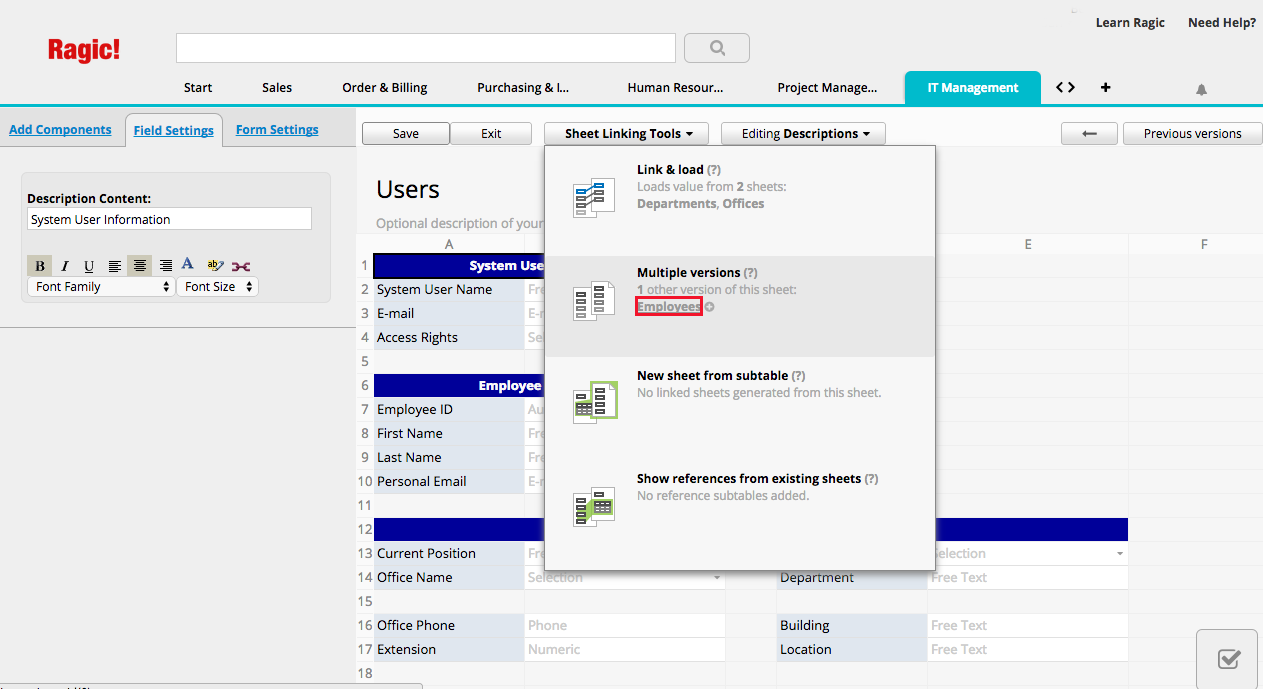
Yes. To do this you will need to create multiple versions for your sheet, because in this type of use, the sheets usually look different for different groups of users.
To create two versions of the same sheet, first right click on the sheet, or click on the little arrow when you hover on a sheet, and choose "Duplicate Sheet". (You can also access this option from the Sheet Linking Tools. Ragic will create two sheets of the same name, fields, and everything. These two sheets point to the same set of entries in the database; when you enter a new entry in one, it will also appear in the other. All edits and deletions will also be on both sheets.
You can change the access right for these two sheets, you can set up one sheet visible to one group, and the other sheet only visible to the other group of users.
You can go to Change Design for both sheets, and add and remove the fields that were intended for different groups of users, which will let different groups of users see different versions of the same sheet.
For more Information, please check out our document on how to create multiple versions of a form.
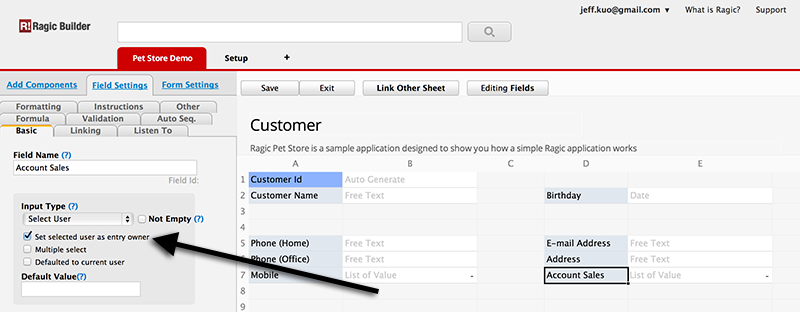
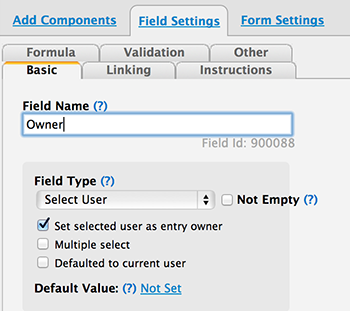
By default, a user is owner to only entries that he created, but by changing the input type for one of the fields in the form to Select User or Select Group and choose Set selected user as entry owner, owner of the entry can be added as the entry is created or edited. You can also change the owner of a field to a group, this way all the users in the group will be able to see or edit the entry as the privilege is assigned to them when this field is set.
Please check our documentation on access rights for more information.
There are some alternatives to handling a large number of external users.
1. Public sheets: You can set up the sheet so that everybody can access it without logging in with a Ragic account. If your application does not require access right management by users, you can simply set the access right from Everyone to Survey User so everyone can fill it out. Or to Bulletin Users so that everyone can not only fill it out, but also see other people's entry.
If the user needs to log back in the system later and look at the latest status of their entry or provide updates, take a look at the next approach "E-mail Id".
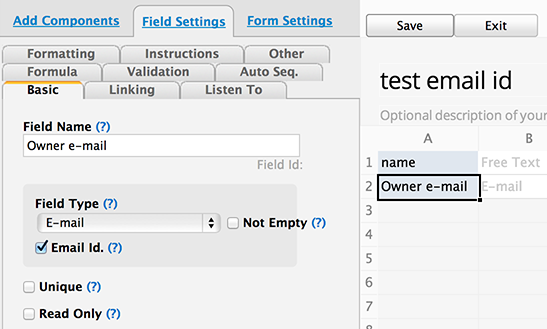
2. E-mail Id: Ragic has a convenient way of giving a user temporary log in without him having an account on Ragic. It can be done by setting an E-mail Id. attribute. When this attribute is set to a field in the form, user will need to put down his e-mail in this field. As the form is saved, Ragic will automatically send an e-mail to this e-mail address. This e-mail will contain a link that can authenticate that the user is the owner of this e-mail as he use the link to log in Ragic.
Now Ragic knows who this user is, even though he has no Ragic account. Ragic can determine which records that he can see and which records he can edit. This is usually used so that the user can see changes or edit the entry that he created.
The shortcoming of this approach is that (1) the user will always need that e-mail to log in, (2) users cannot be managed in groups, therefore cannot assign different privileges to them through Ragic's standard groups and role.
3. Volume Licensing: While Ragic is not a costly solution, but if the number of user license needed is large, it can seem pretty expensive. Ragic understands this and have volume license and site licenses for you to choose from. Please contact "sales@ragic.com" and describe your license use, so we can assist you on choosing the best plan for your organization.
2. The Lite version does not support server-side Javascript customization. In the professional version, all forms can trigger our server-side Javascript scripting engine to execute complex business logic. Basically any business logic that you would like to execute, but cannot be covered by Ragic's existing functions, can be covered by server-side scripting.
3. You can only have one system administrator that can access the design and backend in the Lite version while the professional version has no limit.
For more information, see our pricing page, or contact sales@ragic.com.
About starting subscription, please refer to this page.
No. You can enjoy the full trial days even if you subscribe before your free trial expires. The new subscription will be added on to your free trial, and will start when your trial ends.
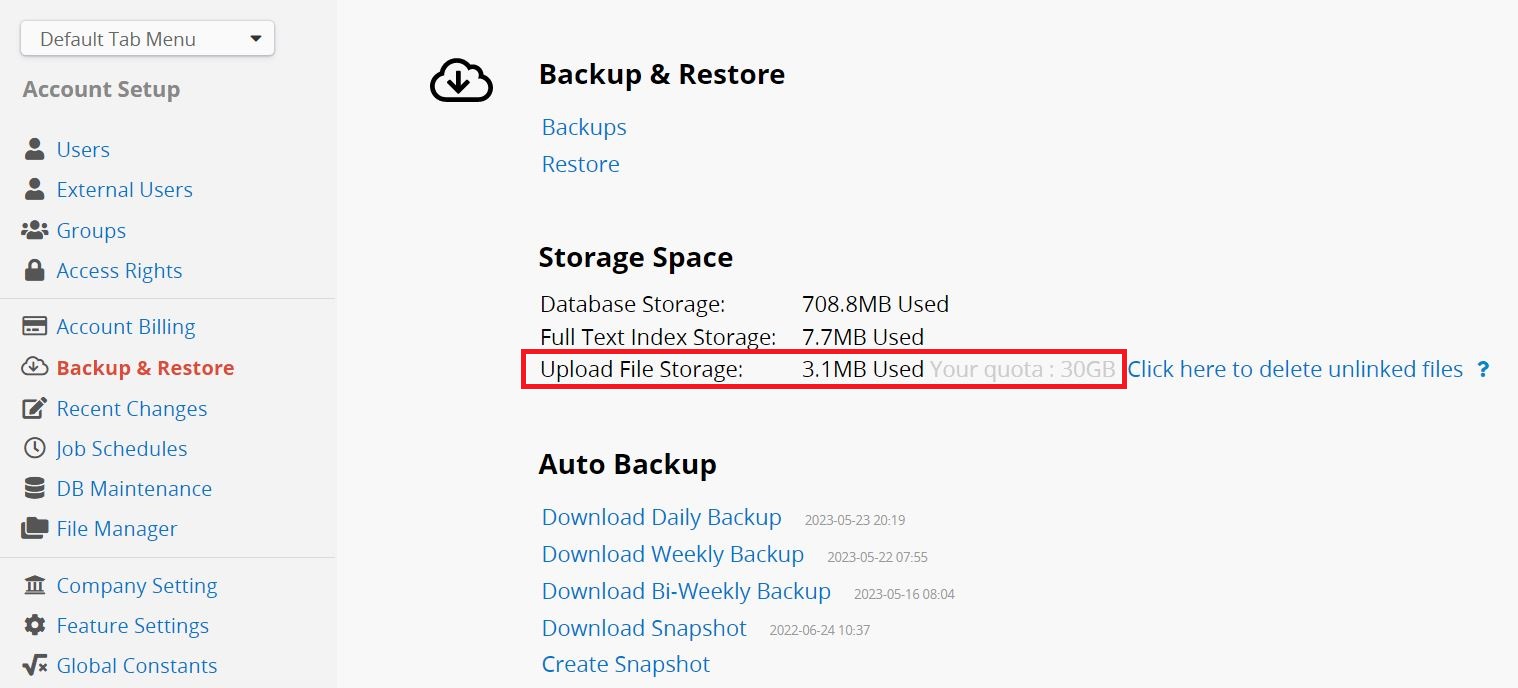
In Ragic's paid plan, there is no limit to the storage of the data itself. However, in many situations, users may utilize file upload fields, image upload fields, or attachments in comments to store files related to the record, such as uploading invoices, product images, and attached files. These methods contribute to the upload storage.
Please refer to the following image for the upload storage provided in each plan:

The upload storage is shared among all users. For example, if you subscribe to a Professional plan for 5 users, the storage space for the database would be 30 GB x 5 = 150 GB altogether.
On the Backup and Restore page, you can see the current usage of upload storage.
Most of our limits are "soft limits", meaning that your application will not stop functioning when the limit is reached. We will simply notify you that you must upgrade your account or increase the number of user licenses to accommodate your current usage.
ISO/IEC 27001 is a global standard for managing information security, introduced by ISO and IEC in 2005 and updated in 2013. It provides guidelines for creating and continually improving an Information Security Management System (ISMS) to enhance the security of organizational information assets.
Ragic has been certified with the ISO/IEC 27001 :2013 standard. We implement information security protection and prevention measures following relevant governance methods. You may refer to this page for relevant information and click here to download the certificate.
The EU-U.S. Privacy Shield Framework and the Swiss-U.S. Privacy Shield Framework (“Privacy Shield”) provide a mechanism for companies in Europe and America to comply with data protection requirements.
Ragic has certified to the Privacy Shield Framework as set forth by the U.S. Department of Commerce regarding the collection, use, and retention of personal data transferred from the EEA, the United Kingdom, and Switzerland to the United States. You may refer to this page for relevant information.
Ragic complies with the General Data Protection Regulation (GDPR) with procedures for data erasure, personal info protection, and data transfers.
We routinely evaluate risks, bolster security, and detail our practices in our privacy policy.
We have European servers located in Belgium and Ireland. Users from other regions can also inquire about moving their databases to European servers.
Ragic complies with the Health Insurance Portability and Accountability Act (HIPAA), safeguarding the process of handling, storing, and transmitting Protected Health Information (PHI).
Our hosting service providers, AWS and GCP, also adhere to these standards and can sign a Business Associate Agreement (BAA) when required.
Our servers are provided by well-known public clouds (Google, AWS), with features including:
1. Annual audits for the following standards: ISO 27001, SOC1, SSAE16 / ISAE 3402 Type II: SOC 2, SOC 3, PCI DSS v3.0
2. Information Security Team consisting of more than 500 top experts.
3. Custom-designed electronic access cards, alarms, vehicle access barriers, perimeter fencing, metal detectors, and biometrics
SSL Encryption: All data transmission support bank level HTTPS/SSL encryption.SSL encryption are always enforced when sending sensitive information.
Intrusion Detection: Packets sent to servers will go through a series of strict firewall rules and application level intrusion detection and blocking program to stop malicious requests and IP at real time.
Complete Audit Logs: All requests, system events, application events, database events are logged and ready for expert analysis. Periodic review of all logs to make adjustments for new defense policies.
Disk Encryption: All data written to disk is encrypted on the fly and then transmitted and stored in encrypted form. Conforming to ISO 27001, SSAE-16, SOC 1, SOC 2, and SOC 3 certifications.
RAID storage: All data are mirror to multiple RAID hard disks, ensuring your data is safe from hard disk failures.
Server Backup: All servers are backed up daily to a different set of persistent storage.
Database Backup: All customer databases are backed up to a different location for disaster recovery.
Database security: Ragic's database has an unique design that does not support SQL or any other query language. There is zero chance of SQL or script injection. Different tenant's database are store on separate physical files, ensuring zero chance of application level sharing exploits from other accounts.
Periodic Security Scan: We work with major service providers to do periodic security scan on all possible weaknesses to ensure your data safety.
Regular Security Updates: Our system administrator monitor security updates very closely and apply patches to deflect zero day attacks.
Data Access Control: Nobody, including system administrators at Ragic, can access your data without your permission. When providing technical support, we can only see your database design, but not your data by default.
No Database Management Interface: Unlike most other databases, there is no interface to manage databases or play around with your data. Without such feature, your data is safe from any unauthorized access to your data via database consoles or any management interfaces.
Complete Access Log: All data access are logged and special events are reviewed regularly.
System Wide Backups: All Ragic servers are fully backed up on a daily basis to ensure service can be quickly recovered in case of any problem.
Account Database Backups: For professional plans and above, accounts have their own individual full daily, weekly, and bi-weekly database backups to a different location on a service by a different provider to ensure that you can restore your data in any situation. We also allow you to manually backup, take snapshots, or restore your account database with a backup yourself.
Manual Backups: Ragic also allow users to manually backup and download your data to manage your backups yourself.
You can host Ragic on your own servers if necessary, provided that your organization have the ability to maintain your own servers. For more information please click here.
With Ragic's backup and restore feature, you can move your hosted account to your on-premise server any time, or move your on-premise account to hosted accounts.
We strongly recommend companies to only use on-premise servers if they have an experienced IT crew who understands how to maintain and keep a server safe and secure.
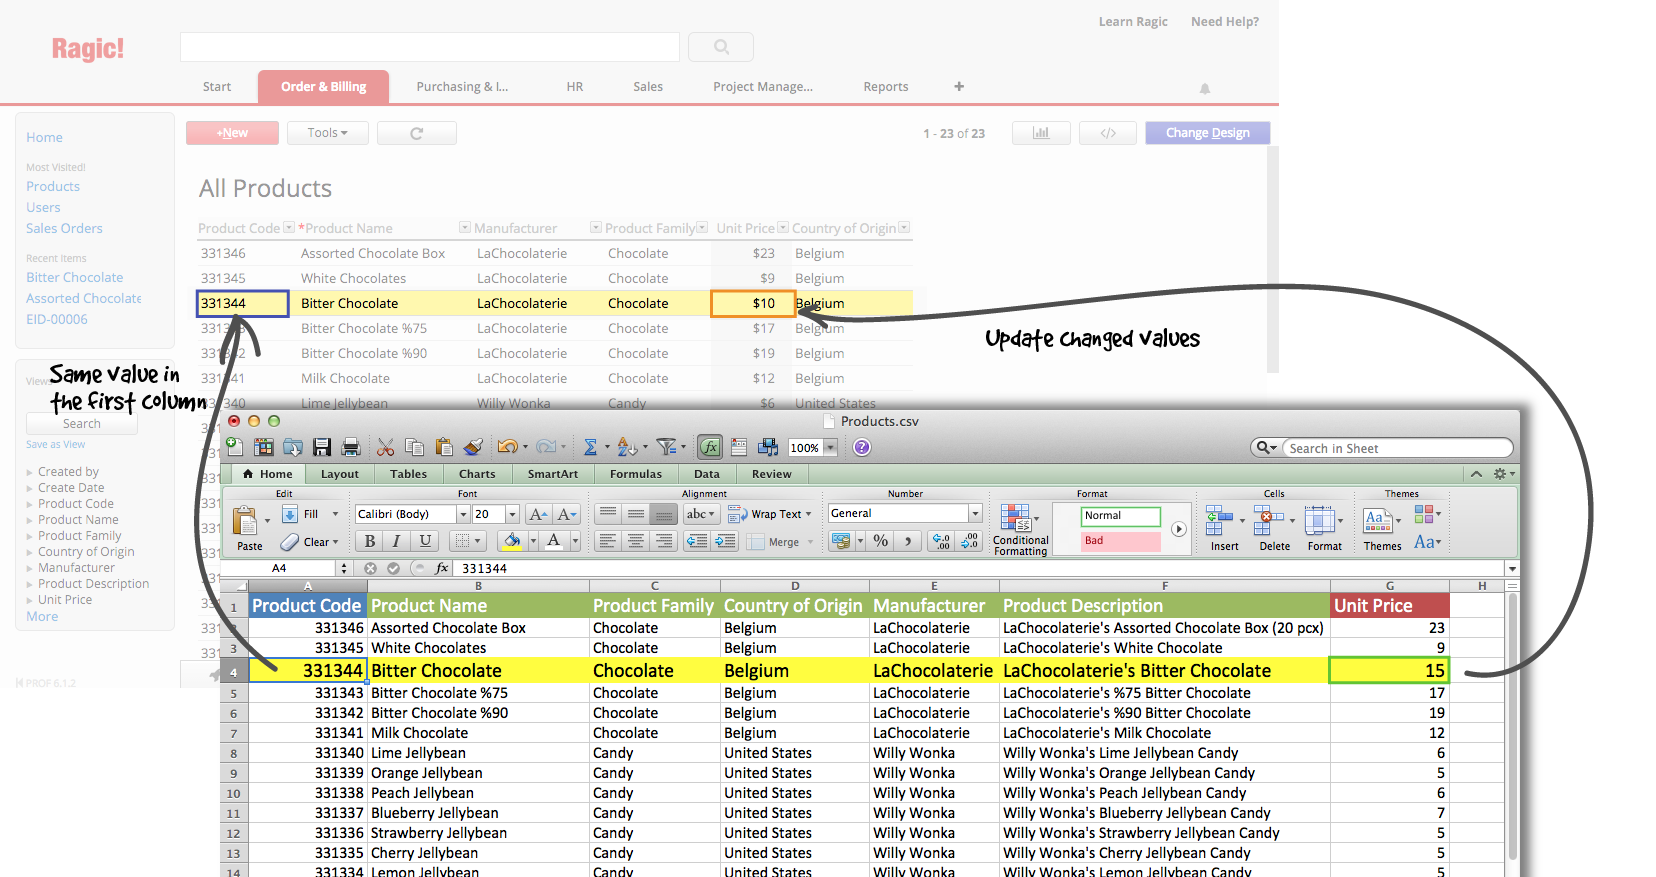
1. You can do a mass edit by exporting the sheet as an .xls or .csv file, fill in the new field, and then import the file back if you have existing data. Don't forget to click on Renew data for the Import policy step. Learn more about importing in our documentation here.
2. Write a Javascript workflow program to fill it in.
When a user is selected, he will have the same right as the entry creator.
Learn more about access rights in the Access Rights documentation.
Ragic currently does not support querying for empty values for the "Select from other sheet" field type. A workaround to query for empty values would work as described below:
Step 1. Create a new free text field
Step 2. Configure formulas so that the field value of new field will equal to the field you would like to query
Step 3. Run a formula recalculation to populate values for your new field.
With this method, you'll be able to query the empty value from your new field.
Learn more about setting reminders here.
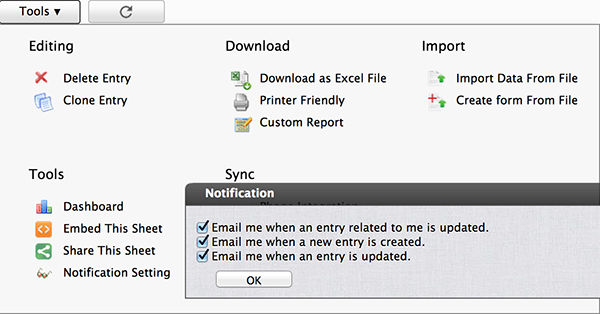
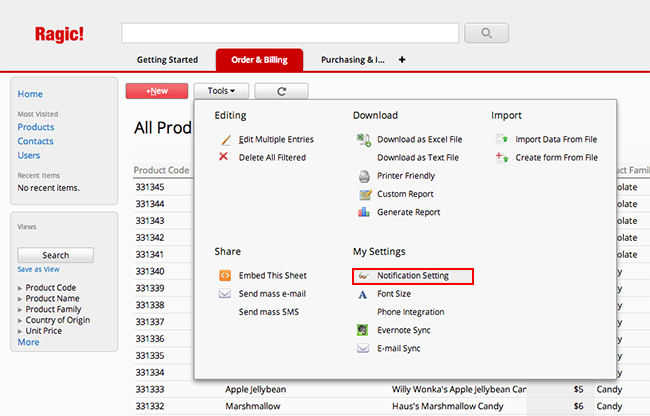
Users can also change their personal notification settings through the Tools button at the top:
You can view more detailed information about configuring notification settings here.
You can also create custom e-mail notifications. Learn how to here.
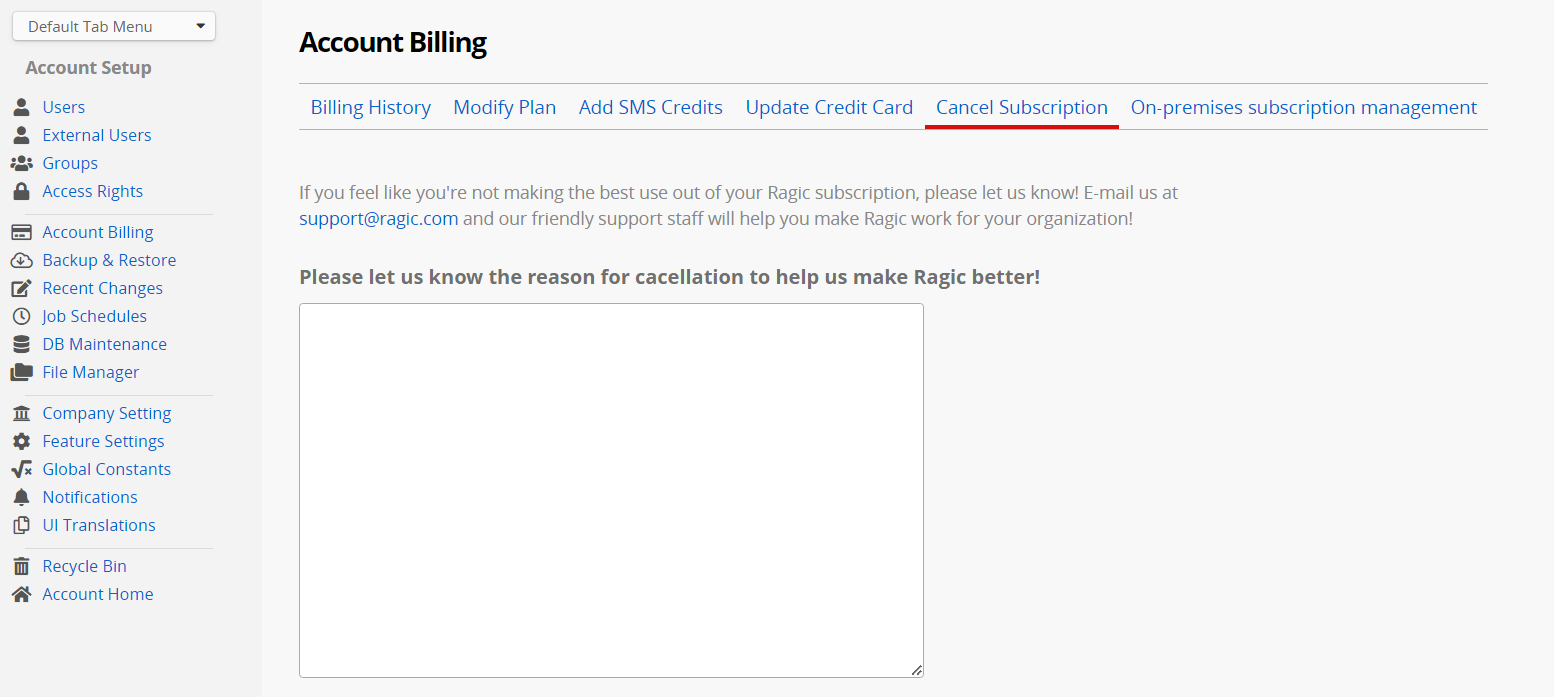
Canceling subscription will not affect your data. Your data would be suspended but secure, and you can always return to using Ragic. If you would like to delete your account entirely, please refer to this article.
http://api.ragic.com/AUTH?json
adding the param "json" will provide you with user information in JSON.
We have some authentication, read and write samples for integration on our GitHub page.
Drag and drop the new fields you would like to add that have already been added to your other sheet from this configuration.
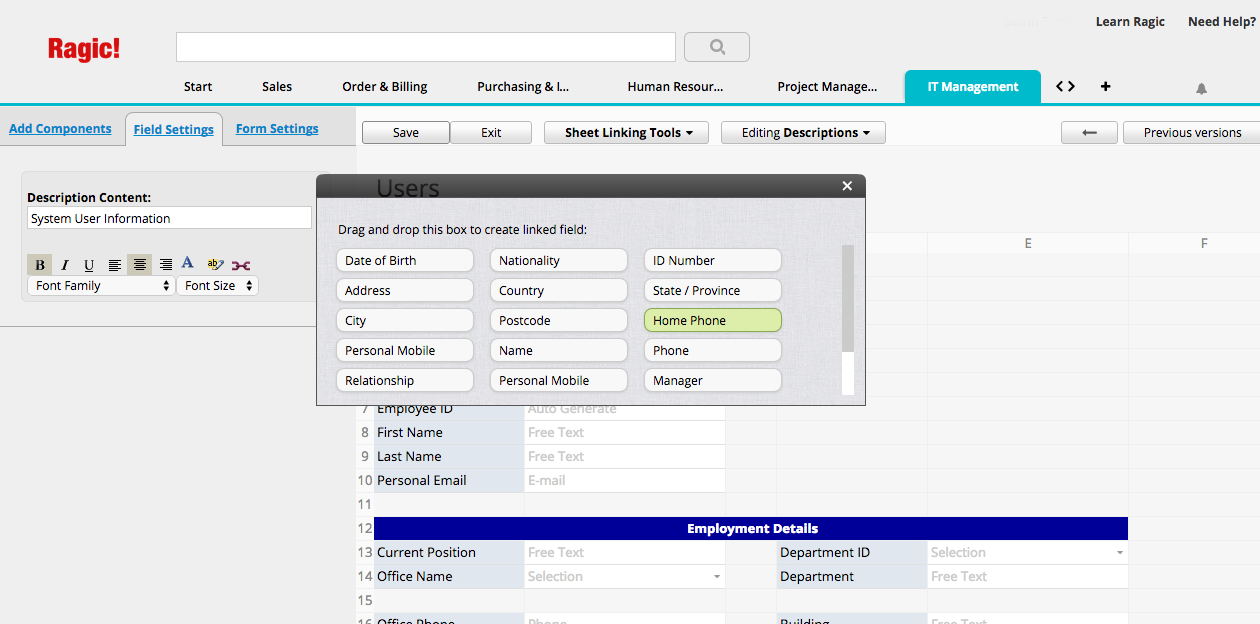
Just remember that the fields that you are adding will show up for every user that has the correct access rights for this sheet.

If you are not logged in, you will see a link for you to log in:

Note. You cannot log in with two different accounts in the same browser, please log out with one account first then log in with another account, or please open in an incognito window or another browser to do it.
If you need more detailed examples of access rights settings, please refer to this page.
We have some authentication, read and write samples for integration on our GitHub page.
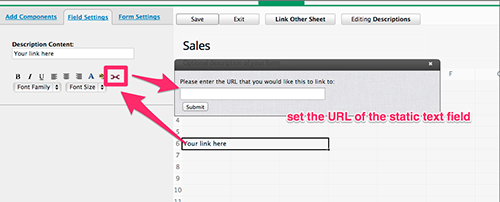
For your external users to be able to see a URL link you would like to send them to whenever they access the form, you might want to make a static text field, which you can set to an external link. This would show up on the form your external users see as a link.
You can also check out our HTTP API integration samples on GitHub.
Ragic's HTTP API is RESTful, meaning that a GET command will retrieve data, and a POST command will insert/update data. The -d or --data parameter you used will make the request a POST request. You need a GET request to retrieve data. You can see https://curl.haxx.se/docs/manpage.html for more details on the parameters of curl.
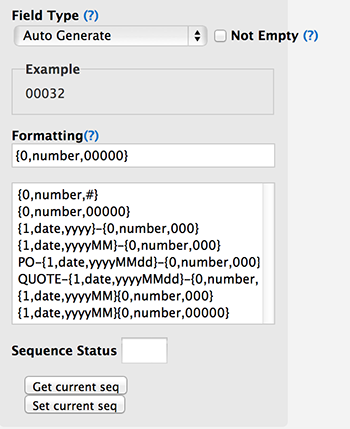
For more information about auto generated fields, please see our documentation here.
The regular expression
^.{6,7}$
validates that the field has a minimum of 6 characters and a maximum of 7.
Other than changing the set of numbers, you can also set it to a maximum, such as ^.{,7}$ (a maximum of 7 characters), or a minimum, ^.{6,}$ (a minimum of 6 characters).
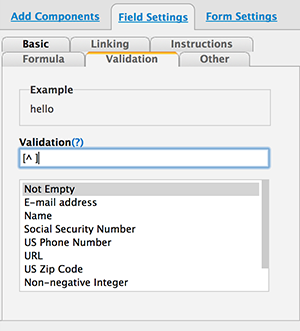
For other kinds of validation, you can check here.
About more detailed account billing information, please refer to this page.
For detailed information regarding Backup & Restore, please refer to here.
Just put the fields that you pulled from the contact sheet lined up horizontally into a subtable, and you will be able to enter multiple contacts into it.
For more info on subtables, please visit the Creating Subtables documentation.
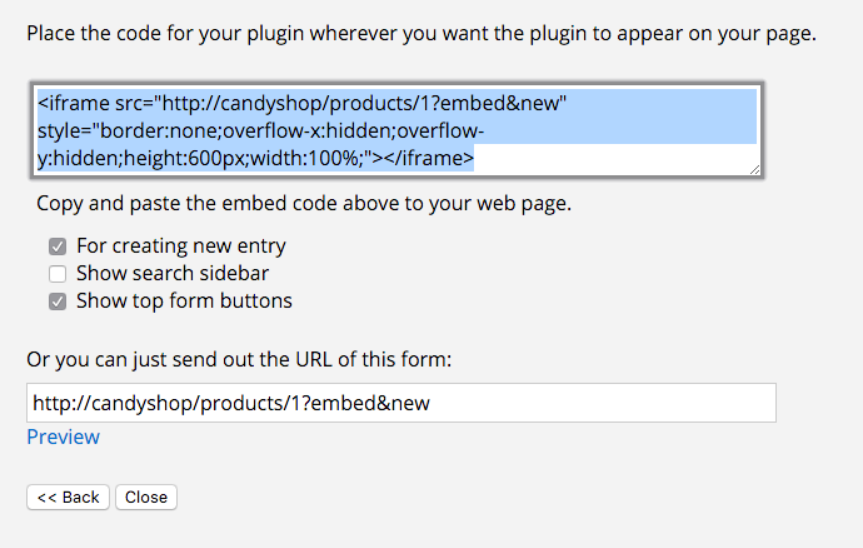
Step2: Selecting Raw Embed which can embed the exact same spreadsheet UI you see on Ragic with an iframe on your website.
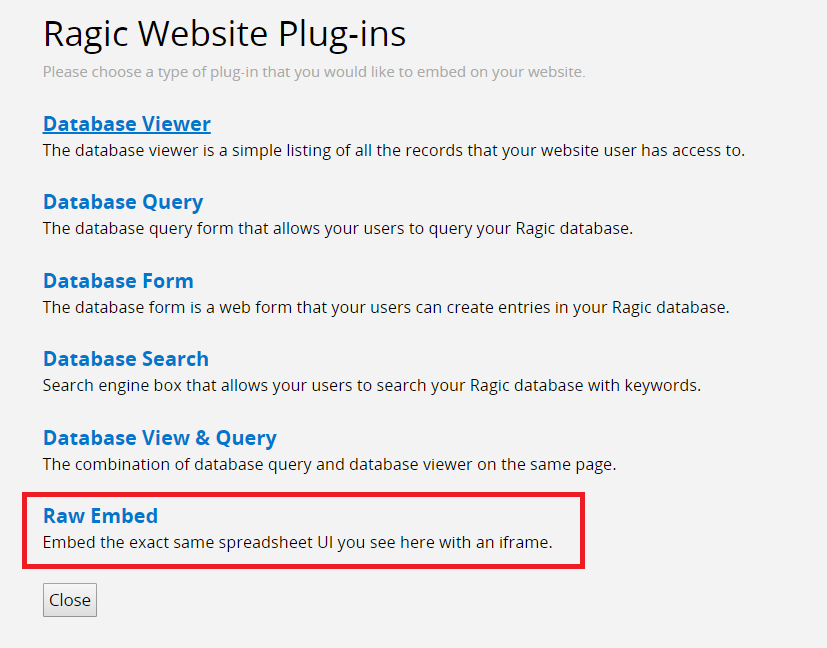
Step3: After setting up, you can copy and paste the embed code and use it to embed Ragic on your website.
You can view our license plans on our pricing page.
Click here to download system requirements.
Our free plan has no limit on the number of users. If you would like to switch to free version, your database will need to be in accord with our policy.
For more information about Ragic's plans, please visit our pricing page.
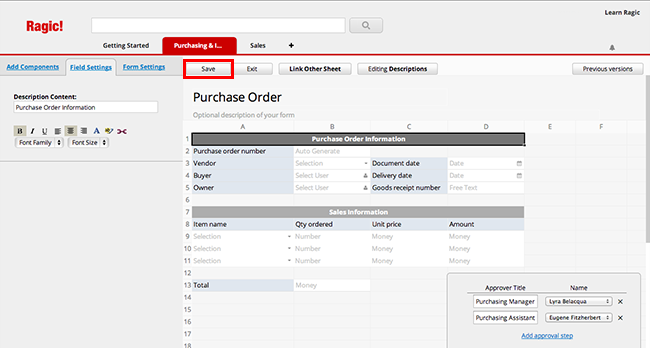
You may configure the Approval process for your application sheets in Ragic for all users in your account.
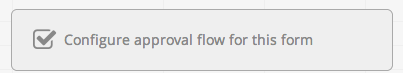
Configure the approval flow of a form by going to the Design Mode. You will see a checkbox in the lower-right hand corner.
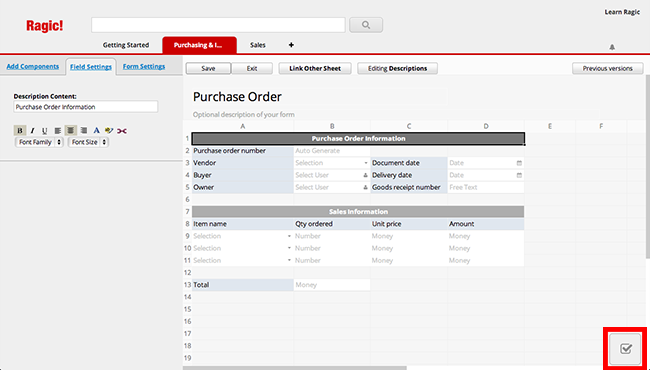
Hovering on this checkbox will display where you can set the approval steps.
You can add as many approval steps as you would like to from the configuration box.
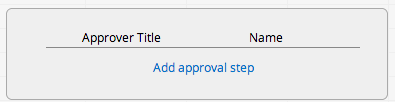
Set the Approver Title you wish to use for an approval step such as "Purchasing Manager", or "Project Manager", and Name for each approval step. You may select this approver Name from certain Users that are in your account. On the other hand, if an approver can be anyone from a certain user group in your account, you can select this user group instead.

After finishing setting up the approval steps, don't forget to Save the changes you have made in the design mode.
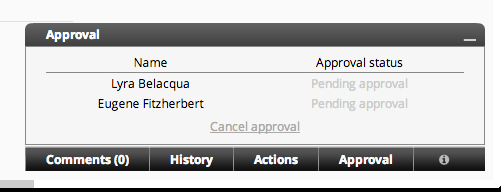
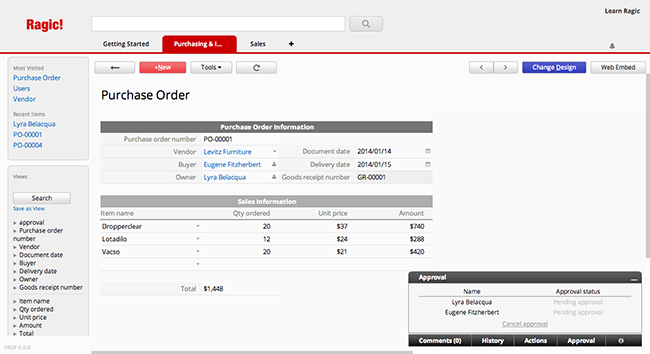
The approval steps you have set for the form will show up in every entry for your users. After an entry is saved, clicking the Start Approval button will begin the approval process.
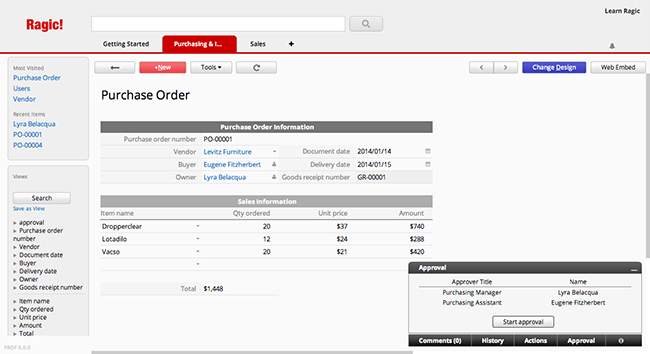
Doing so will display the Approval status as "Pending approval". The selected user or users in the user group that were configured for this approval flow will be notified for an Approval Request. The Approval Status will update as the sheet is approved during each step.
a) Make the fields that contain paragraphs taller by adjusting them in the design mode. The change of width and height will be reflected on your web embed.
b) Adjust the columns that you are displaying on the listing page, so that the listing is not so wide and cluttered.
We recommend that you only have a few fields in the listing page, since users can click on one entry to see the full detail.
Just make sure to choose the Database Form option, and follow the steps in the wizard. Ragic will provide you with the URL for the auto-fill web form.
But you can issue your queries via our HTTP API to integrate Ragic with your own applications.
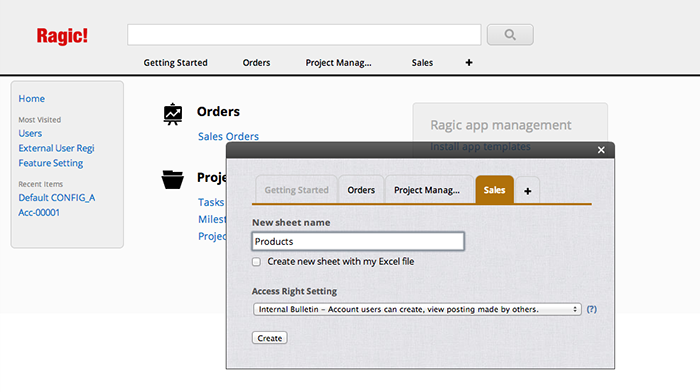
1. If you haven't created a Ragic database sheet, but have an organized spreadsheet that contains your data, you can create a new Ragic sheet with your spreadsheet file.
2. If you already created a Ragic database sheet, you can import your existing data from your spreadsheet into your new sheet.
3. If you don't have data to import, but would like to create a form for others to fill out, you can first follow the steps to create a Ragic database sheet, and set up the necessary access rights so that anyone can create entries.
This can also be resolved with our HTTP API, which will give you a JSON format of the data, you can just replace www.ragic.com with api.ragic.com to get this URL for pages that do not require authentication.
For manual payments, your subscription must be paid yearly. During the subscribed year, you will not be refunded if you decide to subtract the number of subscribed users, downgrade your subscription or stop using your database. If you need to add additional users during your subscription period, the subscription price of the additional users will be calculated by the plan selected multiplied by the time remaining (calculated in months) in the yearly subscription.
For example, let’s say you’ve manually paid for a 5-user professional plan yearly subscription, and the subscription starts on 2018/03/21 and ends on 2019/03/20. And on 2018/09/01, if you then email us asking to add three users, there are two options:
1. Start their subscription on 2018/09/01, but these three users will be additionally charged for the seven remaining months of the yearly subscriptions (in billing terms, these three users' subscriptions will start on 2018/08/21).
2. Start their subscription on 2018/09/21, and these three users will be additionally charged for the remaining 6 months of the yearly subscription.
If you would like to flexibly modify your plan and add or subtract the number of subscribed users, we suggest subscribing with a credit card so the system can automatically pro-rate your subscription fee according to your current plan and number of subscribed users, and then automatically process your payment. For more information about how Ragic's subscription fee changes with the number of users, please refer to this document.
If you would like to proceed with manual bank payments, please e-mail sales@ragic.com with your Company Title, the plan and number of users you would like to subscribe with, and we can provide you with the details to proceed.
First make sure both fields are set the correct input format of "Date", and the result field with the formula should be set to "Number".
Now simply do a subtraction between the two fields and you will get the difference.
The if the two dates have a date element (ex. yyyy/MM/dd) in the date format, the result will be in number of days. Otherwise if the dates does not have a date element (ex. HH:mm), the result will be the number of minutes.
If you need to translate the result from minutes, you can simply divide the result by 60 with the formula.
You can also check our documentation regarding using formulas to calculate dates and times here.
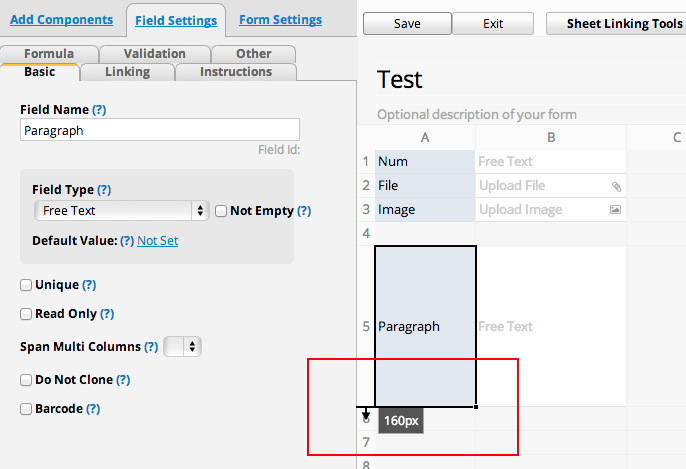
Basically, go to the design page by clicking on the Change Form Design button, and drag the side of the row number to adjust the height, as you would do on other spreadsheet software like Excel. After saving the layout change in the form design mode, the display would also become a longer paragraph input field.
You can also add a paragraph text field from left side panel Add Components > Fields > drag and drop the "Paragraph Text" field.
For example if you want to make sure the language is in Cyrillic, you can use:
[\u0400-\u04FF\u0500-\u052F]
Below is a list of language code ranges for each languages. You can also go to this link for more references.
0000-007F Basic Latin
0080-00FF Latin-1 Supplement
0100-017F Latin Extended-A
0180-024F Latin Extended-B
0250-02AF IPA Extensions
02B0-02FF Spacing Modifier Letters
0300-036F Combining Diacritical Marks
0370-03FF Greek and Coptic
0400-04FF Cyrillic
0500-052F Cyrillic Supplement
0530-058F Armenian
0590-05FF Hebrew
0600-06FF Arabic
0700-074F Syriac
0750-077F Arabic Supplement
0780-07BF Thaana
07C0-07FF NKo
0900-097F Devanagari
0980-09FF Bengali
0A00-0A7F Gurmukhi
0A80-0AFF Gujarati
0B00-0B7F Oriya
0B80-0BFF Tamil
0C00-0C7F Telugu
0C80-0CFF Kannada
0D00-0D7F Malayalam
0D80-0DFF Sinhala
0E00-0E7F Thai
0E80-0EFF Lao
0F00-0FFF Tibetan
1000-109F Myanmar
10A0-10FF Georgian
1100-11FF Hangul Jamo
1200-137F Ethiopic
1380-139F Ethiopic Supplement
13A0-13FF Cherokee
1400-167F Unified Canadian Aboriginal Syllabics
1680-169F Ogham
16A0-16FF Runic
1700-171F Tagalog
1720-173F Hanunoo
1740-175F Buhid
1760-177F Tagbanwa
1780-17FF Khmer
1800-18AF Mongolian
1900-194F Limbu
1950-197F Tai Le
1980-19DF New Tai Lue
19E0-19FF Khmer Symbols
1A00-1A1F Buginese
1B00-1B7F Balinese
1D00-1D7F Phonetic Extensions
1D80-1DBF Phonetic Extensions Supplement
1DC0-1DFF Combining Diacritical Marks Supplement
1E00-1EFF Latin Extended Additional
1F00-1FFF Greek Extended
2000-206F General Punctuation
2070-209F Superscripts and Subscripts
20A0-20CF Currency Symbols
20D0-20FF Combining Diacritical Marks for Symbols
2100-214F Letterlike Symbols
2150-218F Number Forms
2190-21FF Arrows
2200-22FF Mathematical Operators
2300-23FF Miscellaneous Technical
2400-243F Control Pictures
2440-245F Optical Character Recognition
2460-24FF Enclosed Alphanumerics
2500-257F Box Drawing
2580-259F Block Elements
25A0-25FF Geometric Shapes
2600-26FF Miscellaneous Symbols
2700-27BF Dingbats
27C0-27EF Miscellaneous Mathematical Symbols-A
27F0-27FF Supplemental Arrows-A
2800-28FF Braille Patterns
2900-297F Supplemental Arrows-B
2980-29FF Miscellaneous Mathematical Symbols-B
2A00-2AFF Supplemental Mathematical Operators
2B00-2BFF Miscellaneous Symbols and Arrows
2C00-2C5F Glagolitic
2C60-2C7F Latin Extended-C
2C80-2CFF Coptic
2D00-2D2F Georgian Supplement
2D30-2D7F Tifinagh
2D80-2DDF Ethiopic Extended
2E00-2E7F Supplemental Punctuation
2E80-2EFF CJK Radicals Supplement
2F00-2FDF Kangxi Radicals
2FF0-2FFF Ideographic Description Characters
3000-303F CJK Symbols and Punctuation
3040-309F Hiragana
30A0-30FF Katakana
3100-312F Bopomofo
3130-318F Hangul Compatibility Jamo
3190-319F Kanbun
31A0-31BF Bopomofo Extended
31C0-31EF CJK Strokes
31F0-31FF Katakana Phonetic Extensions
3200-32FF Enclosed CJK Letters and Months
3300-33FF CJK Compatibility
3400-4DBF CJK Unified Ideographs Extension A
4DC0-4DFF Yijing Hexagram Symbols
4E00-9FFF CJK Unified Ideographs
A000-A48F Yi Syllables
A490-A4CF Yi Radicals
A700-A71F Modifier Tone Letters
A720-A7FF Latin Extended-D
A800-A82F Syloti Nagri
A840-A87F Phags-pa
AC00-D7AF Hangul Syllables
D800-DB7F High Surrogates
DB80-DBFF High Private Use Surrogates
DC00-DFFF Low Surrogates
E000-F8FF Private Use Area
F900-FAFF CJK Compatibility Ideographs
FB00-FB4F Alphabetic Presentation Forms
FB50-FDFF Arabic Presentation Forms-A
FE00-FE0F Variation Selectors
FE10-FE1F Vertical Forms
FE20-FE2F Combining Half Marks
FE30-FE4F CJK Compatibility Forms
FE50-FE6F Small Form Variants
FE70-FEFF Arabic Presentation Forms-B
FF00-FFEF Halfwidth and Fullwidth Forms
FFF0-FFFF Specials
Moreover, you can manage all your data on our online spreadsheet data backend. You can also embed Web Forms on your website for people to submit data into your database.
If you need a customized UI for your web pages, you can also use our HTTP API to create custom web pages and retrieve/post data from the database.
1. Export the data on your SQL database to an Excel or CSV file and import this data to Ragic manually with our import feature. You can learn more about importing here.
2. Write a program to read data from your SQL database and post to Ragic with our HTTP API. View our HTTP API documentation here.
Both ways should be fairly simple and serve different purposes.
For example, when used on free text or selection fields that contain strings, .RAW is required to be added to the referenced field name (please see below for "Referencing a string condition with the IF function"), while this is not needed when used to reference a numeric field. Date fields are calculated as days.
Conditional formulas can be nested.
The IF Function
The IF function returns one value if a specified condition evaluates to TRUE, or another value if it evaluates to FALSE.
| Formula | Syntax |
|---|---|
| IF | IF(value==condition,[value_if_true],[value_if_false]) |
Examples
Basic example: IF(A2==10,10,0)
If the value in the reference field A2 equals to 10, the value in this field would be 10. For any other value of A2, the value of this field will be 0.
Having a string value as a result: IF(A1==1,'true','false')
If the value in the reference field A1 equals to 1, the value in this field would be "true". For any other value of A1, the value of this field will be "false".
Practical usage: IF(A2>=60,'yes','no')
If the age field is equal or greater than 60, the value in this field "qualifies for senior discount?" would be "yes", otherwise, the value would be "no".
Note
An older syntax of using the IF function in Ragic is still supported.
Value=='condition'?'[value_if_true]':'[value_if_false]'
Basic Example: A1=='open'?'O':'C'
If A1 is open, give O. if not, give C.
Referencing a string condition with the IF function
If you would like to reference string values in numeric or selection fields, please add .RAW after the field that you're referencing to.
| Syntax |
|---|
| IF(value.RAW='string condition',[value_if_true],[value_if_false]) |
Examples
Basic Example: IF(A1.RAW=='Active',1,0)
If the value in the reference field A1 is "Active", the value in this field would be 1. For any other value of A1, the value of this field will be 0.
Having a string value as a result: IF(A1.RAW=='Pending','Open','Closed')
If the value in the reference field A1 is "Pending", the value in this field would be "Open". For any other value of A1, the value of this field will be "Closed".
The LOOKUP Function
The conditional process in formulas can also be done with the LOOKUP function, which is the equivalent of conditional processing.
| Formula | Syntax |
|---|---|
| LOOKUP | LOOKUP(value,lookup_list,[result_list]) |
Searches for the value in the lookup_list and returns the value from the same position in the result_list.
value is the value to search for in the lookup_range.
lookup_list is an array like [0,100,500]. The LOOKUP function searches for value in this list.
result_list is optional. It is an array that is the same size as the lookup_range like ['Small','Medium','Large']. If the result_list parameter is omitted, the LOOKUP function will return the value in the lookup_list. If the LOOKUP function can not find an exact match, it chooses the largest value in the lookup_range that is less than or equal to the value. If the value is smaller than all of the values in the lookup_range, then the LOOKUP function will return empty string.
Examples
Basic Example: LOOKUP(A1,[0,45,65],['Small','Medium','Large'])
The value would be 'Small' if A1 is between 0 and 45, 'Medium' for 45~65 and 'Large' for over 65.
Referencing multiple fields: LOOKUP(A1,[0,45,65],[A3+A4,B5,B6])
The value would be A3+A4 if A1 is between 0 and 45, B5 for 45~65 and B6 for over 65.
The AND Function
Returns TRUE if all its arguments evaluate to TRUE; returns FALSE if one or more arguments evaluate to FALSE.
| Formula | Syntax |
|---|---|
| AND | AND(logical1, [logical2], ...) |
The AND function syntax has the following arguments:
logical1 is required. The first condition that you want to test that can evaluate to either TRUE or FALSE.
logical2, ... is optional. Additional conditions that you want to test that can evaluate to either TRUE or FALSE.
The OR Function
Returns TRUE if any argument is TRUE; returns FALSE if all arguments are FALSE.
| Formula | Syntax |
|---|---|
| OR | OR(logical1, [logical2], ...) |
The OR function syntax has the following arguments:
logical1 is required. Subsequent logical values such as logical2, ... is optional. Additional conditions that you want to test that can evaluate to either TRUE or FALSE. The arguments must evaluate to logical values such as TRUE or FALSE, or in arrays or references that contain logical values.
The Knowledge Base and FAQ sections on Ragic provides answers to most commonly experienced problems by users. Solutions provided here are easy to follow and implement, using step-by-step instructions. This may be the fastest way to get your problems resolved. These sections are updated regularly based on the feedback that we receive from users. You can find the "Learn Ragic" link under your start tab or access from the "Learn Ragic" link on the upper right corner of your homepage.
You can also use the Ragic Developer Guide that helps you the with designing your database with Ragic.
You can click the "Need Help?" link on the upper-right corner in your account, and fill up the form that comes up about problems that you are having or e-mail Ragic Support directly.
This option allows you to do a chat with our bot which will return the needed information according to key words. The link is on the lower-right corner of your homepage.
You may post in the forum to discuss with other users. Our customer support team also checks the forum regularly and reply to questions that you may have.
Ragic offers a wide variety of support options for developers, such as the HTTP API documents and the Javascript Workflow Engine documentation.
To do a mass update, you can use filters to filter out the data you would like to export as a .csv or excel file, make mass editing on this spreadsheet file, and later import your file back to Ragic. If you would like to export every entry in your sheet, make sure that you have cleared all filters.
Edit your spreadsheet file and don't forget to save. During this step, you can feel free to add new entries as well.
Import your edited Excel file back to Ragic.
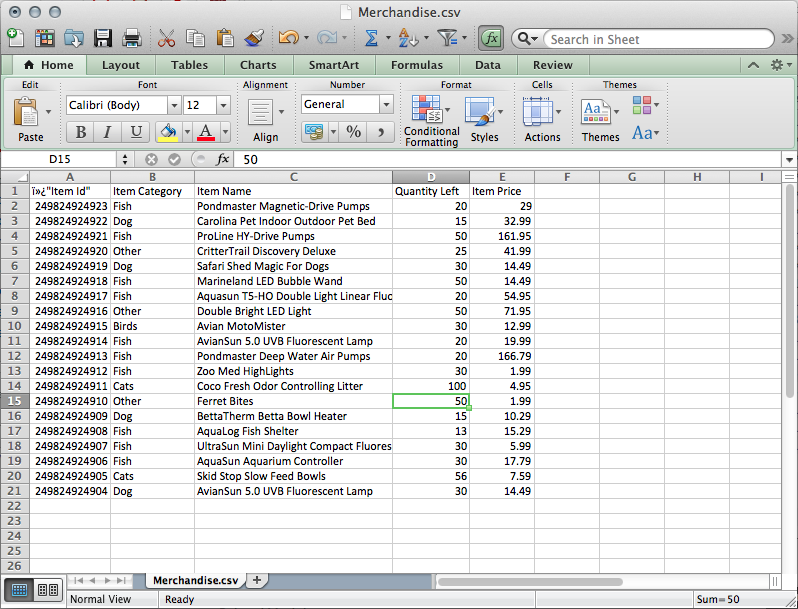
On your import file, the first row of your spreadsheet consists of your headers, and your other rows will be updating your entries.
We will use the first field on your Excel file as a key to map the entry to an entry on Ragic.
During your import, you will need to choose to renew your existing data in the Import policy step.
You can configure Advance Settings in Import Policy as well if necessary.
| Advanced Setting | Description |
|---|---|
| Fill in default field values | If you have a configured default value in your sheet, please check this box so that the field value will be updated or populated with the import. |
| Execute link and load | If there are sets of link and load configured on your sheet, please check this box to have the loaded fields auto-populated. Otherwise, the loaded fields will be left empty if the field values aren't included in your import file. |
| Recalculate all formulas | Recalculate all formulas during the import. |
| Execute work-flow | Execute work-flow, if any, in your sheet. |
| Execute not empty check | Check if there are field values configured with the "Not Empty" feature. If there is no field value, Ragic will skip that row during the import. |
| Create detail history | Show editing history in entry's information panel. |
| Execute validation check | Check if the field value meets the configured validation . If it doesn't, Ragic will skip that row during the import. |
Tip: if you would only like to edit a few entries from the listing page, you can use the hotkey E on your keyboard. Please take caution as the edits done with this method are not kept in the edit history for your entries.
You can use some of the BBCode tags that you would normally use in forums or bulletin boards when you are filling your form in Ragic. Using BBCode tags are extremely useful when you are filling free text fields for internal communication.
These are the supported tags and how they will be displayed:
Make a text into a URL by adding the [url] BBCode.
Run your business smarter
Tag a text with square brackets so that it could be searchable in your database. This works great in comments if you know a related entry's ID, and would like to tag these entries.
[search query term]
![]()
You can use formulas in Ragic to display values from other fields with the [formula] BBCode.
[formula]A3[/formula]
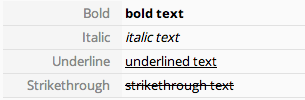
Change the text formatting to bold, italic, underlined, strikethrough, subscript, or superscript with the following BBCodes.
bold text
italic text
underlined text
strikethrough text
subscript
superscript
Change the color of a text with the [color] BBCode.
Red color text
![]()
Below you can see some examples:
| BBCode | Display |
|---|---|
| blue text | blue text |
| yellow text | yellow text |
| green text | green text |
| pink text | pink text |
| gray text | gray text |
| orange text | orange text |
| purple text | purple text |
| brown text | brown text |
| cyan text | cyan text |
This would also work with a hexadecimal color value.
Red color text
![]()
Insert an image, using the [img] BBCode.
https://www.ragic.com/sims/img/logoRed_150x56.png

You can also add "width x height" as a parameter in the BBCode to resize your image if needed:
image_url
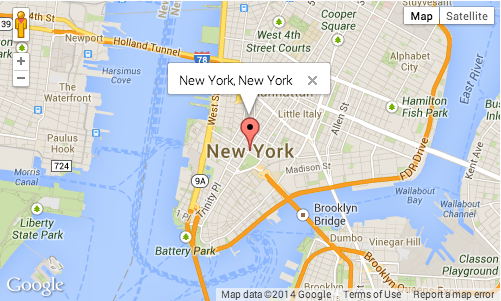
Embed a map by entering an address in the [addr] BBCode.
New York, New York
Embed a video using the [embed] BBCode.
https://www.youtube.com/v/rEUYC4kh2k0

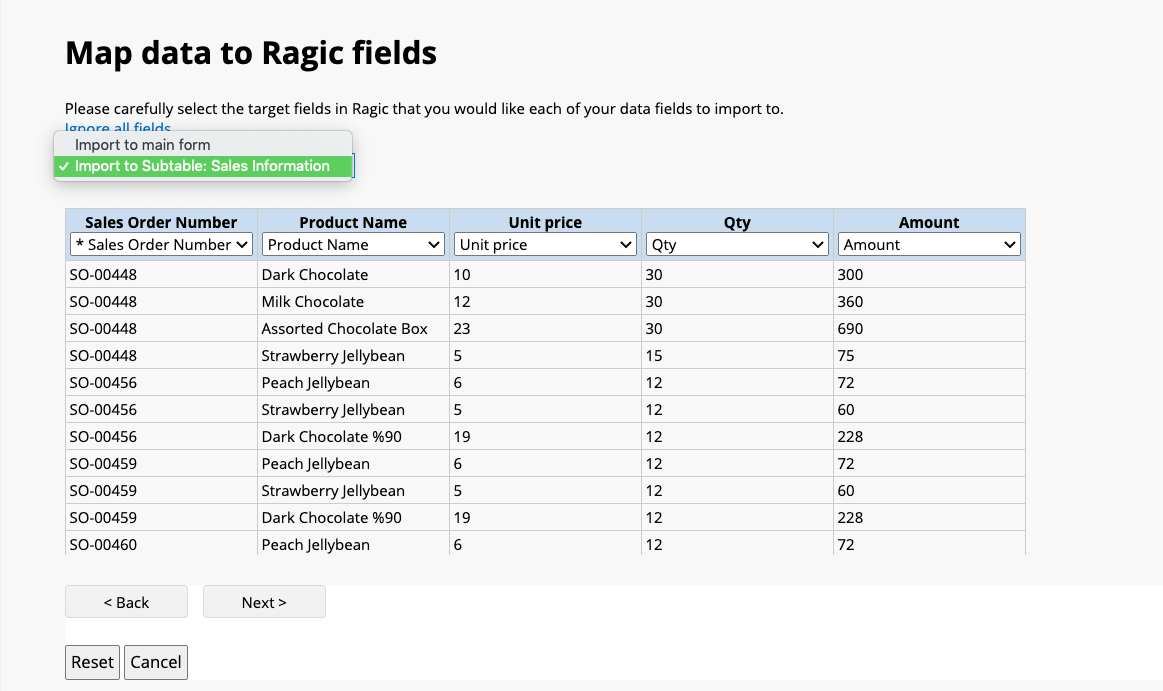
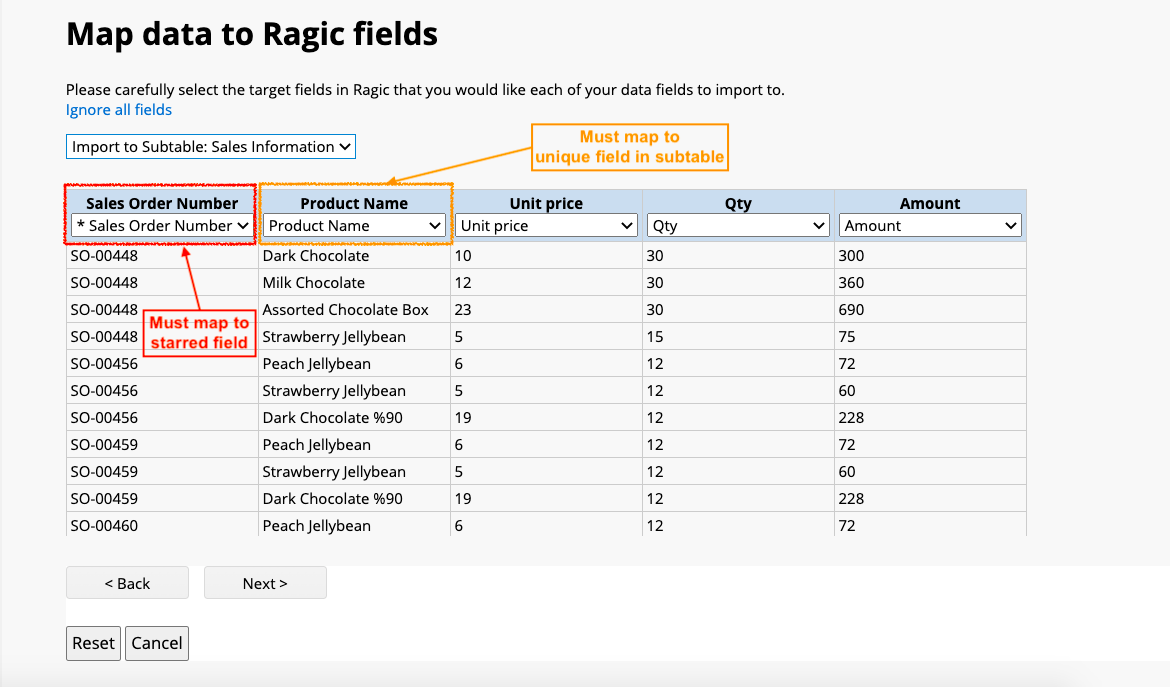
Then, you can select the fields you would like to import to from the drop-down lists. However, please note that the first column must be mapped to the field with the star sign (the "selection title field") for the system to recognize which main entry does the imported data belong to.
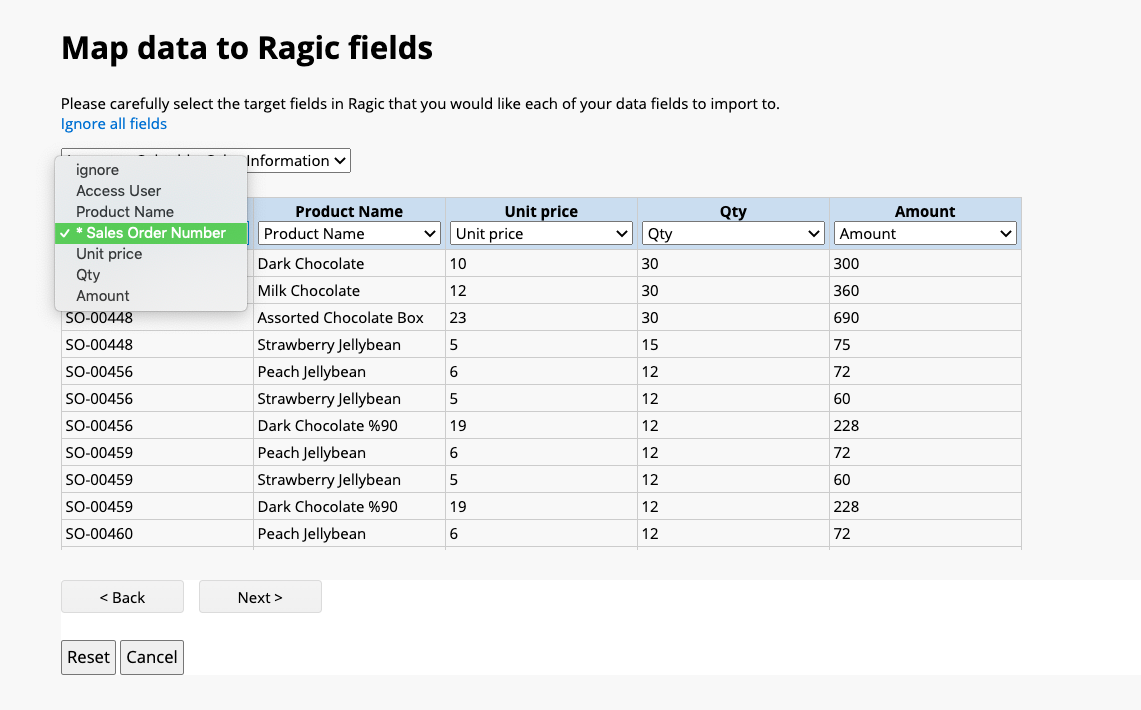
And the second column must be mapped to the unique field in the subtable (such as product name or product ID).
After mapping fields, you may select proper import policy and advanced settings and then import your data.
You may follow this article to change the "Selection Title Field" if necessary. However, please make sure you set a field that is without duplicates to avoid errors when importing.
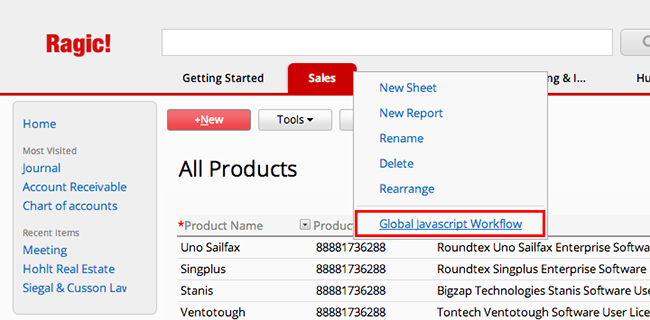
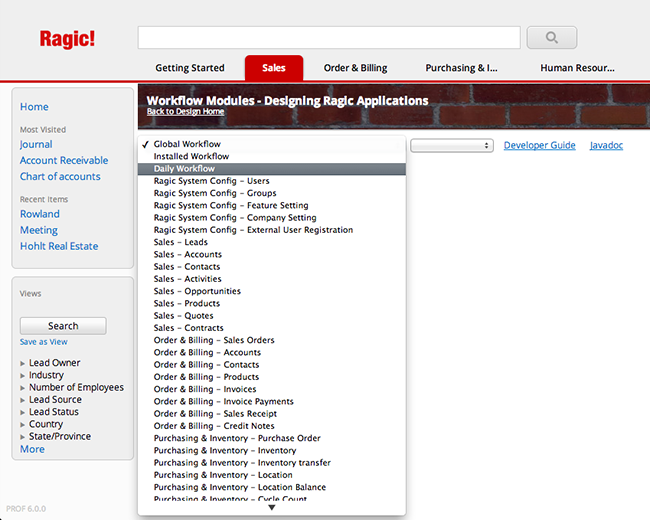
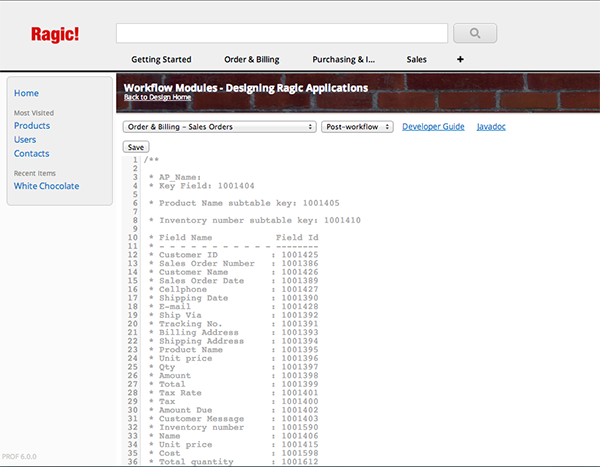
This will take you to the Workflow Module.
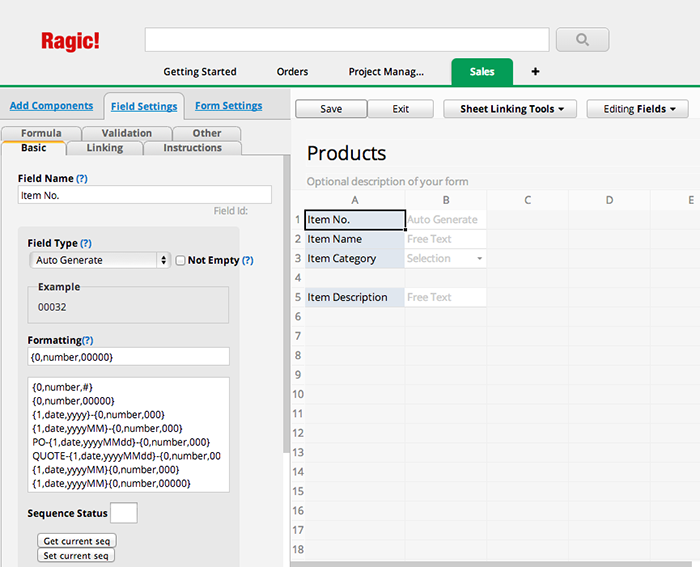
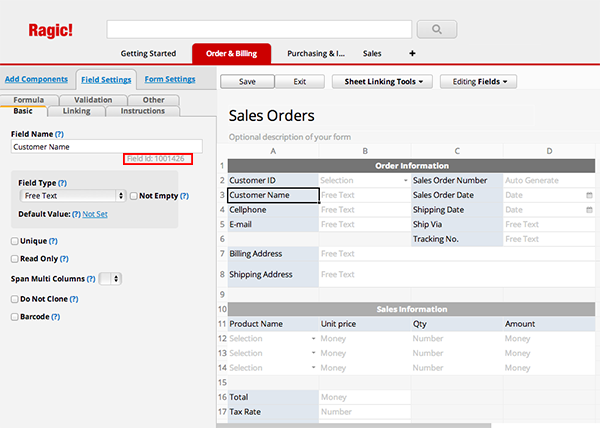
You can view all the Field Ids under their respective sheets.
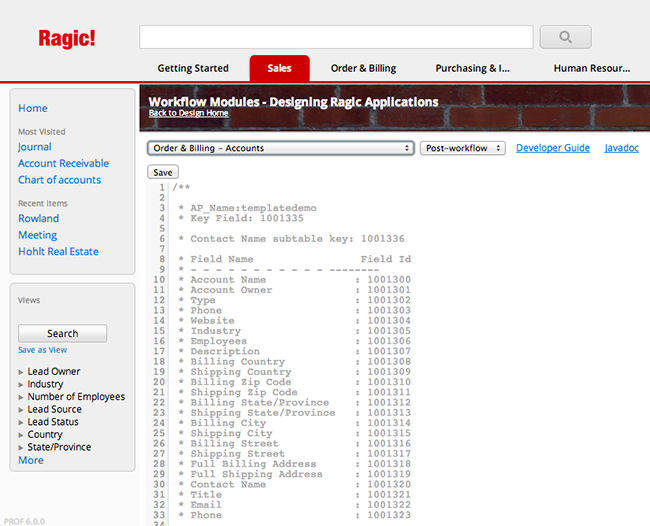
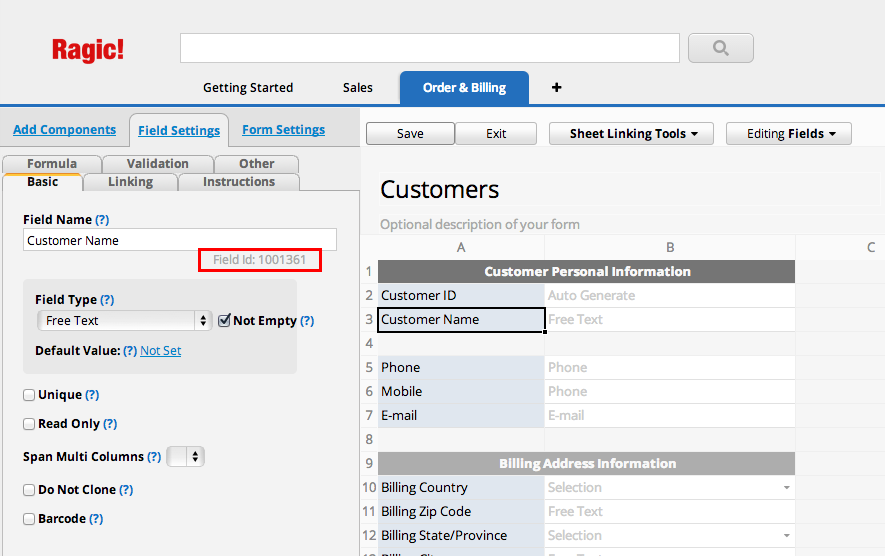
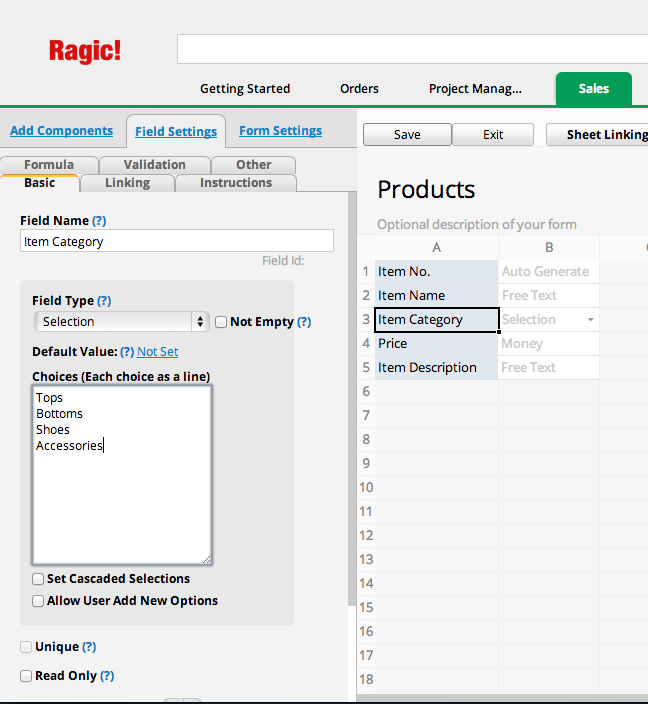
Alternatively, you can go to the design mode, and click on the field you want to reference to. On the left sidebar, you're going to see the Field Name. The Field Id is right under the field name.

If you cannot find your deleted sheet or tab, you can contact Ragic Support at support@ragic.com to help you restore a backup.
If you are not sure about the difference between a listing page and a form page, please view our documentation. Learn more about the normal process of developing a sheet here.
For other terms, please check our glossary.
Field: A normal field consists of two parts that are connected to each other: the field header, and the field value. You can create new fields in the design mode of the form page.
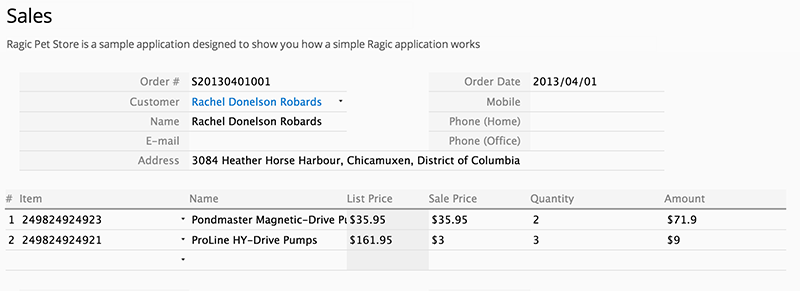
This form currently has 4 fields:
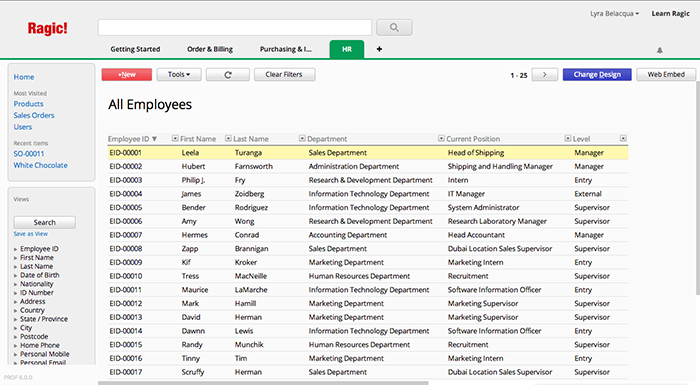
Record (Entry): A record is an instance of form data that a user fills out, which consists of all the values entered in fields in a form page. Records are shown with their full details in form pages, and are summarized as rows in listing pages.
This is a highlighted record in a listing page:
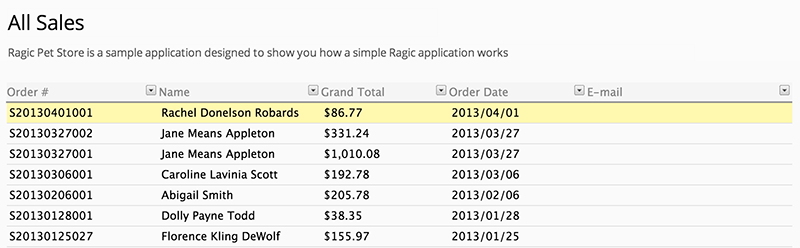
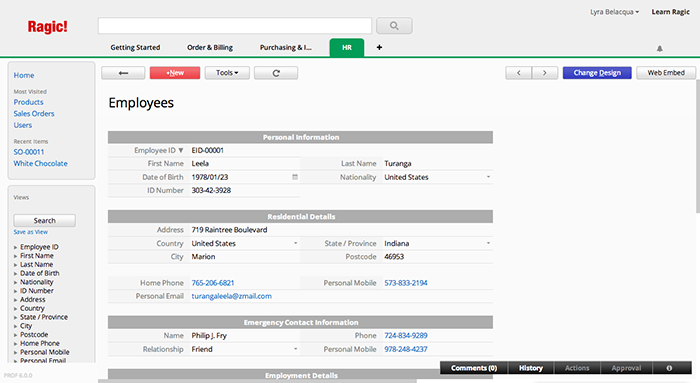
Clicking on a record in the listing page will take us to the form page of this record, which shows us detailed information:
Form Page: A Form page is the full detail of a single record as a page. This can contain as many fields as you want. Learn more about the normal process of developing a sheet in our documentation here.
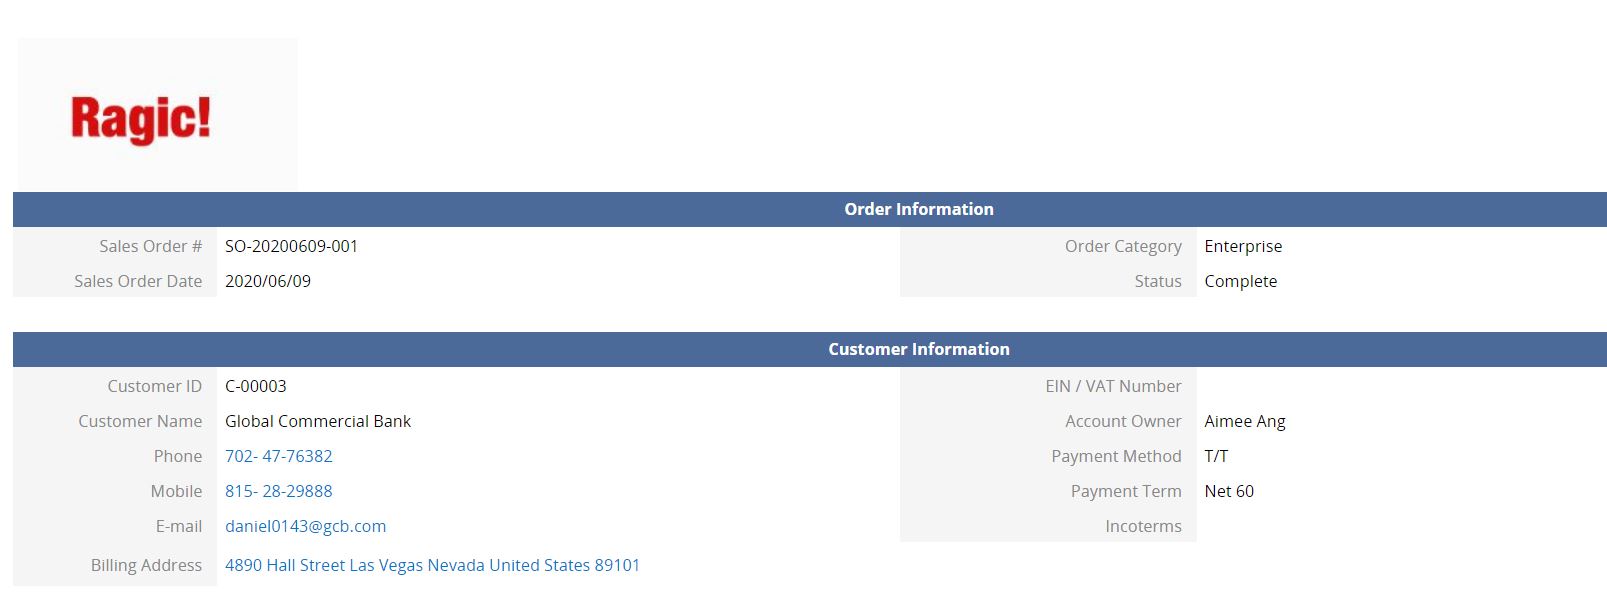
This form page shows detailed information about a sales order:
Listing Page: A listing page is a table that contains the summary of many records. This is automatically generated when you create your form page. In a listing page, the first row consists of field headers, which show columns of field values in their respective records. Learn more about the normal process of developing a sheet in our documentation here.
This listing page shows us all the records in a sales sheet:
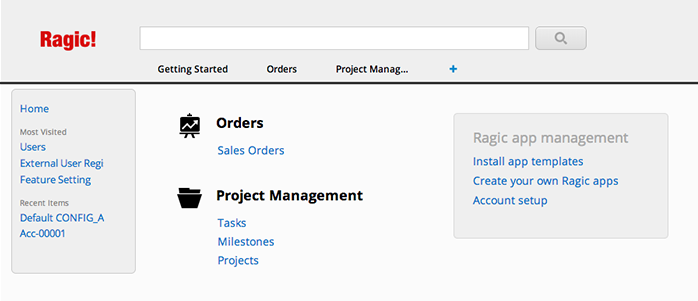
Sheet: A sheet contains the entire information of all the records in a certain listing page, or all the form pages that show the details of one category. Sheets can be found under your tabs.
A list of your sheets can be viewed in your account homepage:
Subtable: A subtable is a table that you add in a form page, and is usually used to show detailed information in an record. Subtables consist of fields placed side by side. Learn how to create and use subtables in our documentation here.
This subtable shows the quoted line items in a sales order form:

Tabs: A tab is a collection of your sheets in Ragic. You can have an unlimited number of tabs. Tabs are used to organize your sheets in categories of your choice, and have no effect on linking.
Design Mode: The design mode is where a form page or a listing page can be created or modified. The design mode can be accessed by clicking on the "Change Design" button on the upper-right hand corner, given that the user has the necessary access rights. Learn about the normal process of designing your Ragic sheet in our documentation here, and how to design great looking Ragic forms in our documentation here.

Description Field: A description field (also called a static text field) is a field without a field value, and is used for viewing purposes. Learn more about how to use description fields in our documentation here.

Field Header: The field header describes what a field will be used for. In a form page, the field header is the set name of a field. In a listing page, the field headers are the column headers, with the field values listed below in their respective records. In the design mode, the field headers are shown as light blue, where you can rename them. Formulas should refer to the location of field headers.
The field header of the selected field is "Item Category":
Field Value: The field value is the value entered to a field when creating or modifying an record. Ragic will format the entered field value according to the field type. In a listing page, the field values will be shown under the records they belong to in rows, and under the column order of the field headers that have been set for the listing page in the design mode. In a form page, the white cells when fields are created depict where the field values will be, with the field type written as the description.
The field value of the selected field would be one of the selection choices, "Tops", "Bottoms", "Shoes", or "Accessories":
Field Type: There are different field types in Ragic, since the field value formatting can vary. The field type is defaulted to Free Text, which allows the user to enter field values without restrictions, like most other spreadsheet applications. While this works in most cases, the application will generally work better if you specify the right field types. The field type can be set in the design mode. In the design mode, you can also view the field types of existing fields written in the white cells depicting where the field values will be. Learn more about different field types here.
The field type of this field is a "Selection":
Linking: Ragic supports several ways of one-to-many relationships to link your sheets, which can be found under the Sheet Linking Tools button in the design mode. Learn more about how to configure linking in our documentation here.
An example of linking - linking a sheet as a subtable with the Link & Load option:
Formulas: You can add formulas in Ragic to make calculations in your form pages and display them on your listing pages. Formulas in Ragic work very similar to the formulas you use on spreadsheet software, but the major difference is, instead of assigning formulas to field values, you assign cell references to field headers. This makes calculations much easier, especially for subtables, for which you can write more complicated formulas with less effort. You can add formulas to fields in the design mode. View a list of formulas supported in Ragic here.
Account Homepage: Your account homepage is a page that displays all the tabs and sheets under your account, and can be accessed by clicking on the Ragic logo on the upper-left corner of your account.
Access Rights: Ragic has a variety of access rights that allows you to determine users and user groups that can see the data on your sheets. Learn more about access rights in our documentation here.
Account: An account is a Ragic database account created for an organization, it can contain many users, which are actually user e-mail and password combinations that a person can log in with. Ragic uses the number of users to determine the price of an account's subscription fee.
In some cases, a user can also be in multiple accounts when multiple companies are using Ragic, and the user would like to access both of these Ragic databases with the same set of user e-mail and password.
Users: A user is an e-mail address that can be used to log in to your Ragic account. Your account can have any number of users you need, and they will access the same set of database sheets in your account. Ragic charges by the number of internal users in your account, an internal user is generally a person inside your organization. External users are free, and they can only be people outside of your organization, like clients, vendors, partners and freelancers. You can add internal and external users to your Ragic account from your account setup. You can configure the access rights of these users by adding them to user groups. Learn more about adding users in our documentation here.
User Groups: User groups are groups of users in Ragic. As you add new users to your account, you can manage which sheets they can view or edit. The default user group SYSAdmin has the access rights to the design backend of your sheets.
Account Setup: Your account setup can be found in the Start tab, where you can configure your users, user groups, billing information, account and company information, and other Ragic features. You can also download backups to your account, view recent changes, and access your recycle bin for accidental deletion of sheets, tabs, or records.


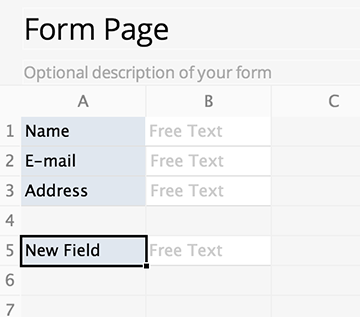
After naming your new sheet, make sure that it's under the correct tab. This sheet will become your Form Page, as described in the last section. Clicking on Create will take you to the Design Mode of youre new Form Page.
Usually, the process of designing the page starts with creating new form fields for the Form Page. Just type in the field names that you would like to create, and line them up vertically. You can put these fields in more than one column if needed. Just remember to keep the space needed for the values of these entries.

When a field is created, remember that you can set the Input Types, which is generally the most often used attribute. If the field value is like a category, or if it will be repeated many times during input, choose Selection or Multiple Select. If the field is a Number or Date, it should be a good idea to set them accordingly. These fields all have their own formatting options, which will be discussed in the Field Types documentation.

When the fields are created, you can adjust the height and width of a cell with your mouse by dragging the edges of the description column and rows of the sheet, just like how you would do it on a spreadsheet application such as Excel. This will make the form look a lot better.

When you're done, click Save and exit the design mode, you will see your form online and ready to take input.
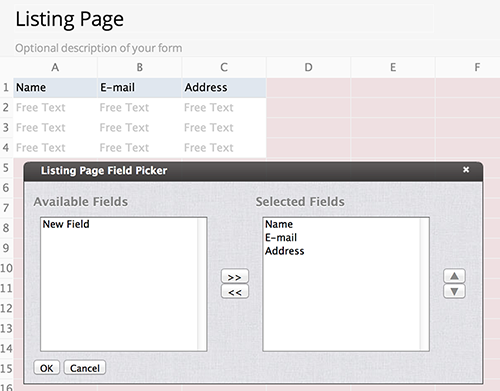
Now let's take a look at your Listing Page, you can click on the back button at the upper left corner of your sheet to go to the listing page, which should contain all the fields that you just created.
Users usually don't like to have many fields in a listing, and to remove columns from the listing page, you can click on the Change Design button on the listing page to go to the design mode.Here you will see a listing page field selector. You can select the fields that you would like to display on the listing page, and decide on the order that these fields are displayed. You can also adjust the width of the columns like you have done in your Form Page. When you're done, don't forget to click Save to save your design.

This is a brief overview of the process of designing a simple form on Ragic, but of course there are tons of other things that you can do with Ragic to do almost anything that you would like to do on a database application. Check out the rest of this manual and your imagination is the limit.
If you have already saved your design, you can restore a previous design from the Design Mode, by clicking the Previous Versions button.
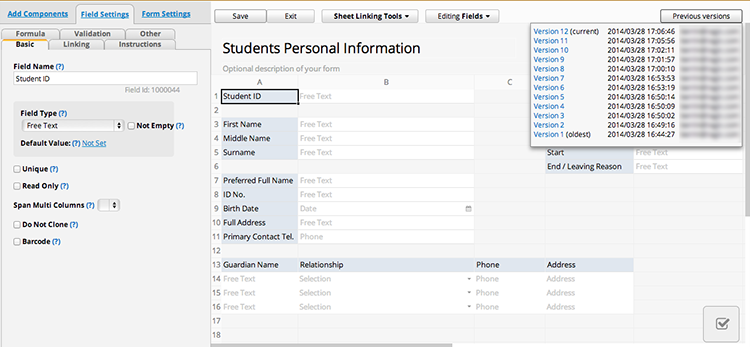
It is best practice to save periodically while working on a form design.
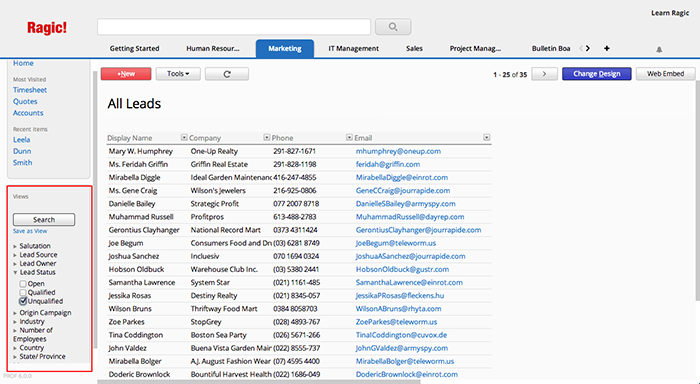
The top search bar works like a search engine, which can help you to find full values, while also offering you search suggestions when you begin to type. This is a very useful tool when you are looking for a specific entry where you know at least one of the values.
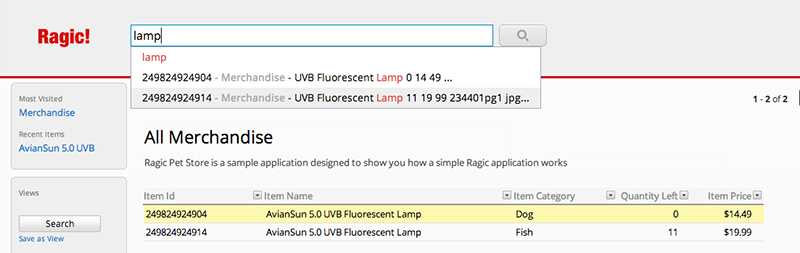
The top search bar cannot be used to search partial data, which means that you cannot search for the last three digits "001" if you have a value such as "1234567001". For this kind of query, you can use the left sidebar search tool.
The left sidebar search tool is able to find more complicated search queries, since you can select one or more filters to narrow down your search results. These filters are defined according to the corresponding value type of every field in the form, therefore different query methods are offered for different types of fields. For example, if the field type is a Selection field, all the choices within the selection field will be listed as a multiple selection, so that you can click on the ones you need to filter. If the field type is a Number field, you can search in a range. After setting all of the filters you need in the search bar, click on the Search button above the filter categories for the results.
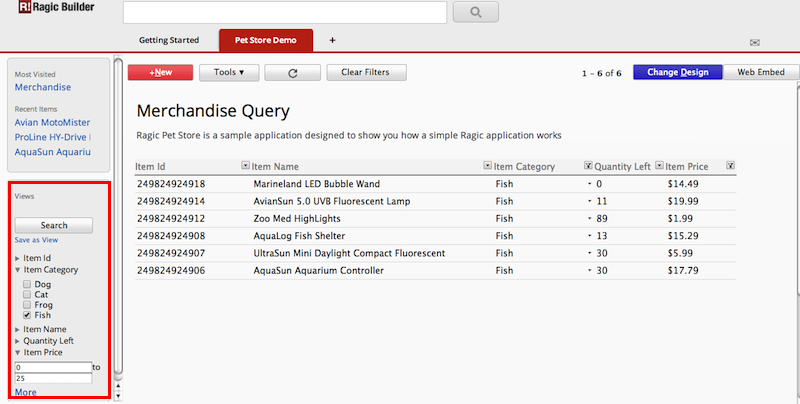
You can save your search as a View if you would like to use the same filters frequently.
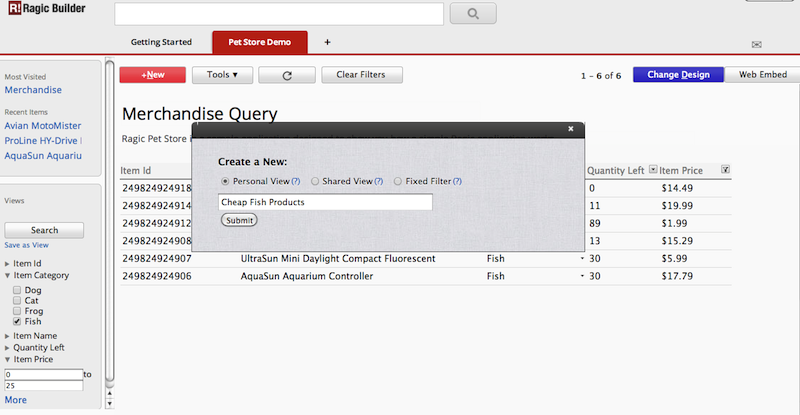
Your saved Views are listed on the left side, above the Search button.
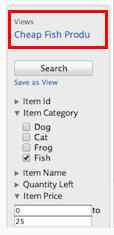
After finishing your search, clicking on the Clear Filters button will lead back to the full database.
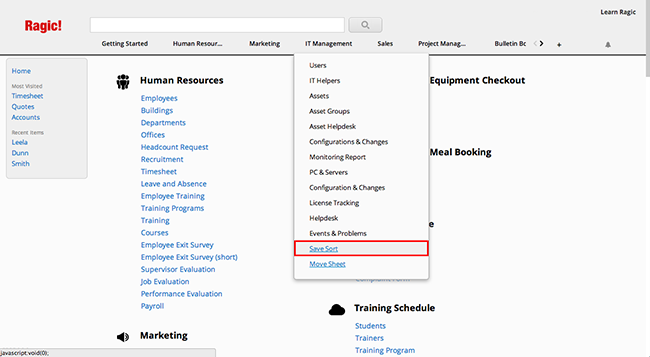
Don't forget to click Save Sort when you are done.
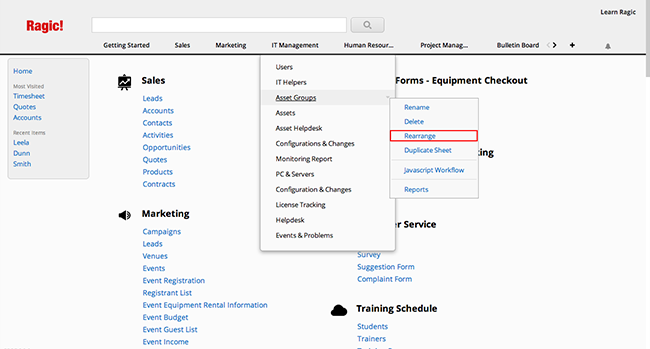
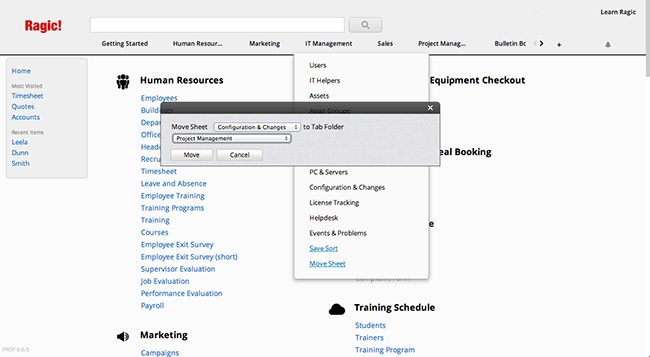
To move a sheet under a different tab, click Move Sheet under Rearrange.
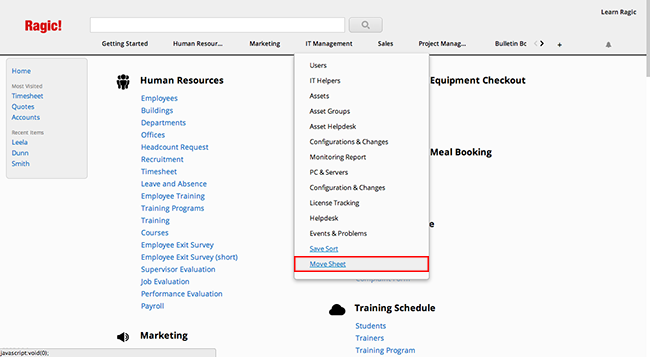
Doing so will display a popup where you can choose a specific sheet to move to a specific tab.
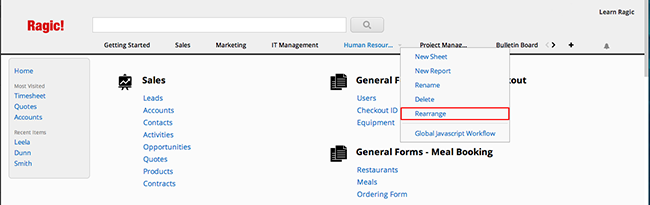
The process when rearranging your tabs is the same with rearranging sheets. Click on the arrow that appears on the right side when you hover over any tab. Click Rearrange and drag to change the order of your tabs.
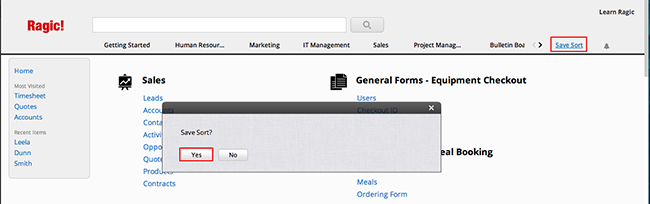
Don't forget to click on Save Sort when you are done.
To enable the external user function in your account, navigate to your Account Setup in Ragic under the Start tab. Click on External Users on the left side.
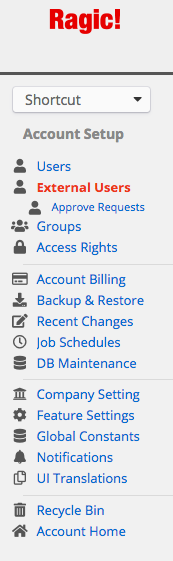
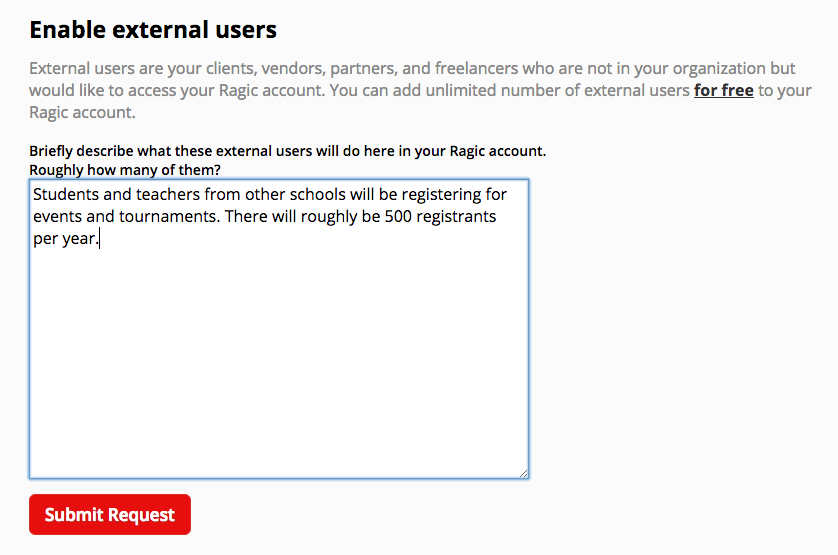
Fill the form to submit your application to enable external users in your account for the Ragic team to review.
Once your application is approved, you will have access to the external user management panel that will display external users in your account.
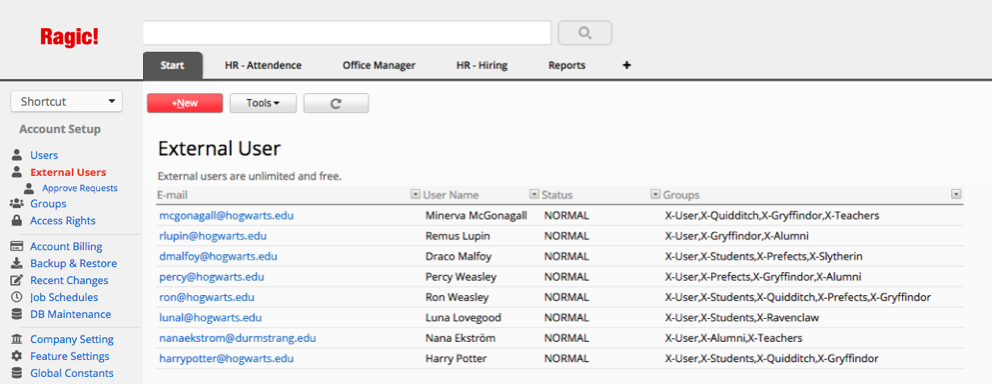
After your application to add external users is approved by the Ragic staff, you will be able to add new external users to your account from your Account Setup under the External Users menu by clicking on the +New button, or by importing to your database under the Tools menu.
For more information about external users, please refer to this document.
Navigate to the form page of the entry you would like to delete, by clicking on the entry in the listing page.
Click on the Tools button in the form page, and select Delete Entry.

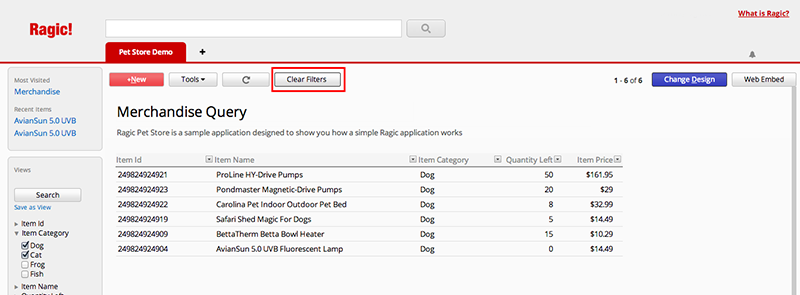
You can use filters on the left sidebar search tool, the top search bar, or through field headers to view all the entries you would like to delete.
Click on the Tools button and select Delete All Filtered to delete all filtered entries.

To delete all of the entries under your listing page, you can select Delete All Filtered without creating a filter.
You can also do this by clicking on the Edit multiple entries under the Tools menu in your listing page.

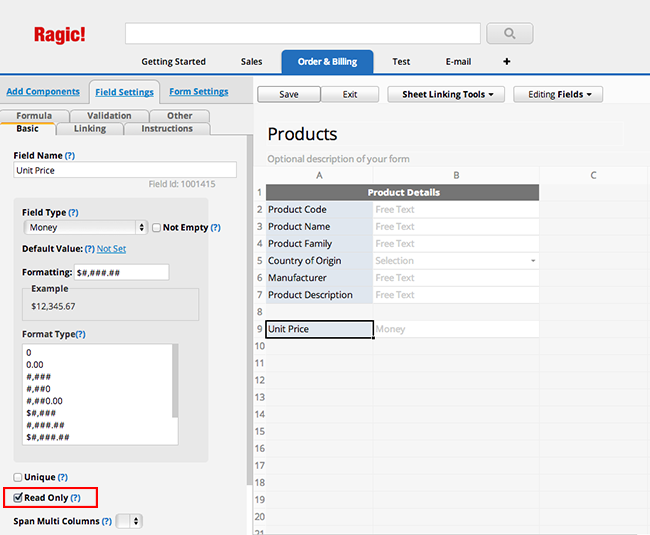
Note that these changes will not be reflected in the entry history, so if you have sensitive data that you are sharing with others, you may want to set up the correct Access Rights, or make the field Read Only from the design mode.
If you would like to edit many entries at once, please refer to our documentation file on mass editing.
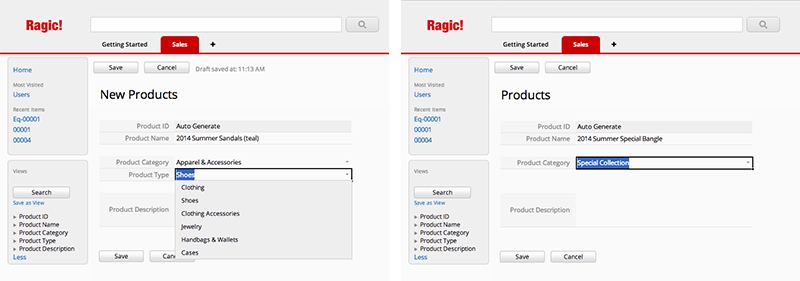
Our example form design is a shop that has different categories and subcategories of products, named "Product Category" and "Product Type" respectively. We have set the product types in cascaded selections, but don't want to display the "Product Type" field when it's empty (when the category "Special Collection" is selected).
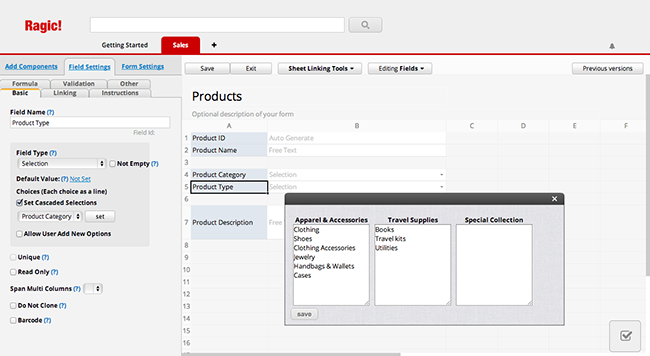
Navigate to Rules under Form Settings in the Design Mode.
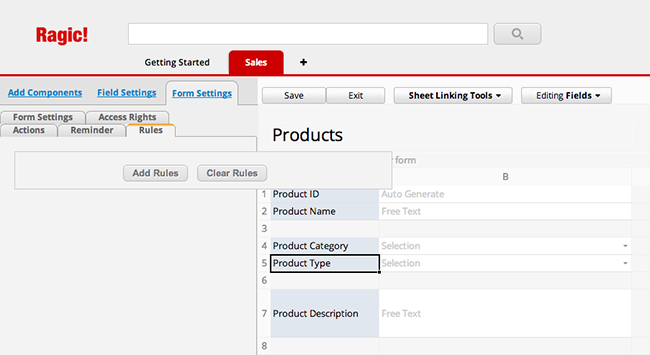
Click Add Rules and set the options according to your form design. For our example, we have set to show the field "Product Type" if the "Product Category" is not "Special Collection".

Make sure you save your form design. You can see that the rule we have just set works great to avoid confusion during form filling.
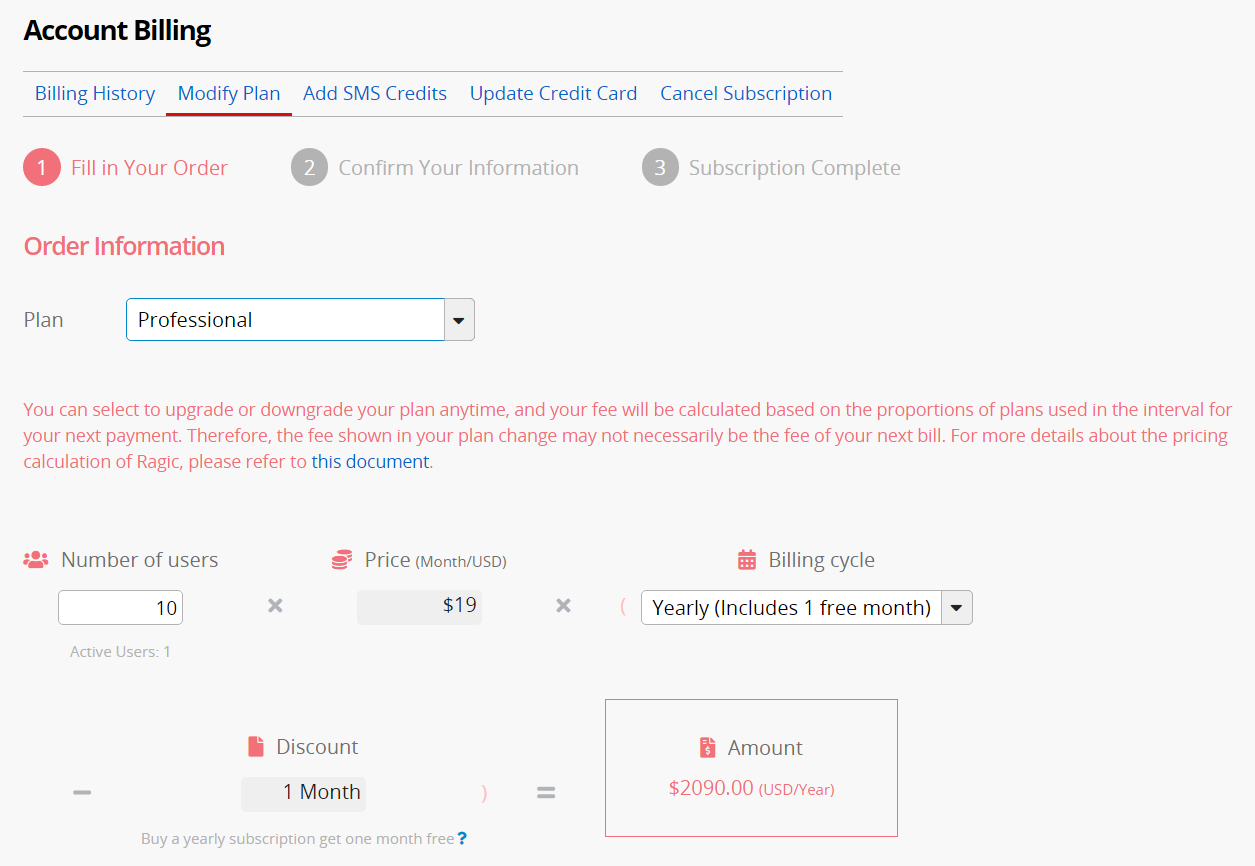
Learn how to modify your subscription here.
You can see the next additional payment or refund amount under "Modify Plan" in the "Account Billing" section.
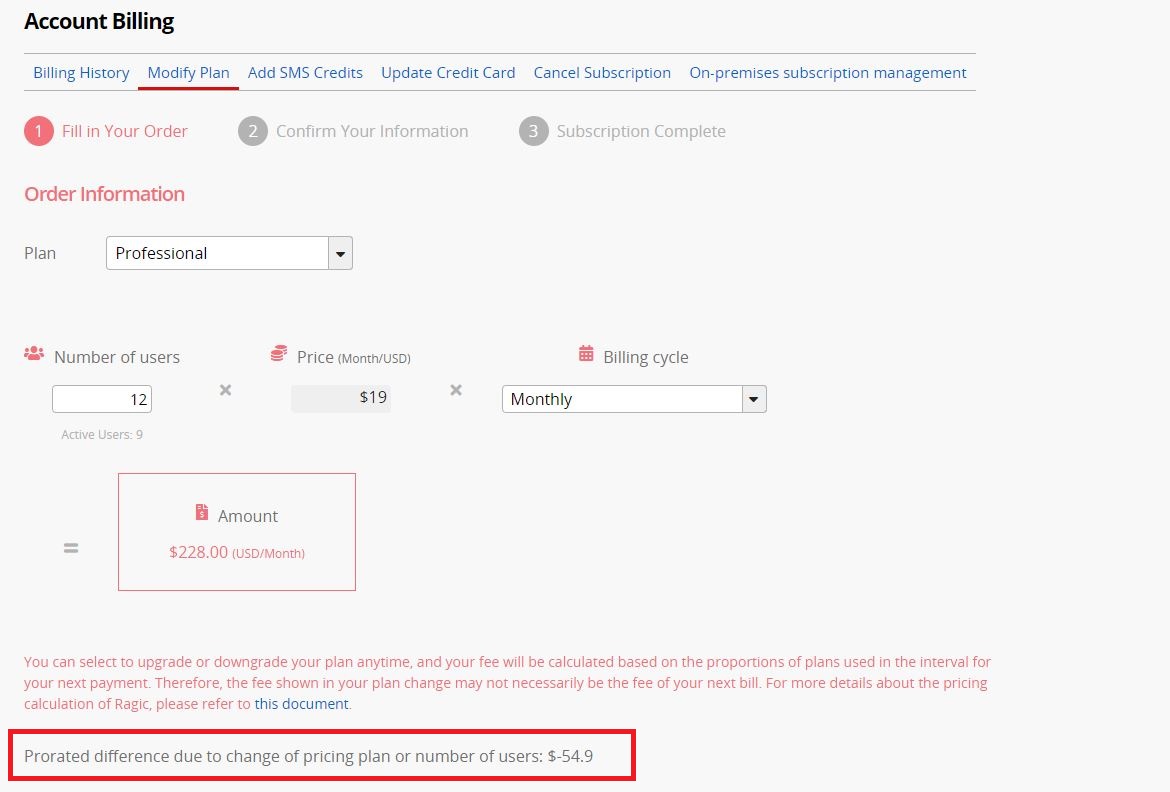
You can change the number of users or your subscription plan anytime you want. Ragic pro-rates subscription changes. Here is how prorating is handled if you change the details of your subscription:
(ex. monthly payment to yearly payment)
The first full period of the new billing cycle begins immediately, but you will be credited for the unused portion of the previous plan.
For example, if a customer signs up on May 1 for a plan that costs $30 per month and then switches to a yearly plan that costs $300 on May 15. The customer is credited $15 for the unused portion of the monthly plan and owes $300 for the first year of the new plan. The customer is invoiced—at the time of the switch—$285, and the annual billing cycle begins that day.
(Note that if the payment fails, the plan change will not go into effect).
The first full period of the new plan begins immediately. However, your new payment will be credited with the unused portion of the original plan on the upcoming billing date.
Besides, a downgrade will generate a credit to be applied to the next invoice. If your account balance amount is larger than the amount due (if you have decreased the number of users), you won't be charged anything, and the account balance is carried over to future billing periods until there are no remaining account balances.
For example, if a customer signs up on May 1 for a $10 plan, he or she will be billed $10 immediately. If she then switches to a $20 plan on May 15, on June 1 she'll be billed $25 ($20 for a renewal of her subscription and a $5 prorating adjustment for the previous month).
You can change the number of users or your subscription plan anytime you want. The change will take effect immediately and the fee will be settled directly at the moment. For downgrading, the difference will be directly converted into the account balance. Canceling the subscription will immediately charge the unpaid amount, and the excess amount will be automatically refunded.
(ex. monthly payment to yearly payment)
The first full period of the billing cycle begins immediately, and your payment will be credited with the unused portion of the previous plan.
For example, if a customer signs up on May 1 for a plan that costs $30 per month and then switches to a yearly plan that costs $300 on May 15. The customer is credited $15 for the unused portion of the monthly plan and owes $300 for the first year of the new plan. The customer is invoiced—at the time of the switch—$285, and the annual billing cycle begins that day.
(Note that if the payment fails, the plan change will not go into effect).
The first full period of the new plan begins immediately. However, you'll be charged for the difference immediately.
For example, if a customer signs up on May 1 for a $10 plan, she'll be billed $10 immediately. If she then switches to a $20 plan on May 15, she will be charged $5 immediately. On June 1 she'll be billed $20.
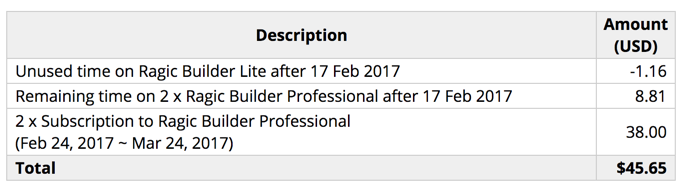
An example of changing the number of users from 8 to 7.
1. You may link & load data from other forms as a subtable. This works best if you would like to manually select (or type to see options) in one field of the data, and load the corresponding information in other fields in a row of the subtable.

Please refer to our documentation for generating a linked sheet and adding a reference subtable for more linking options regarding subtables.
2. You can rename the fields anytime - this would not affect the linking or your entries.
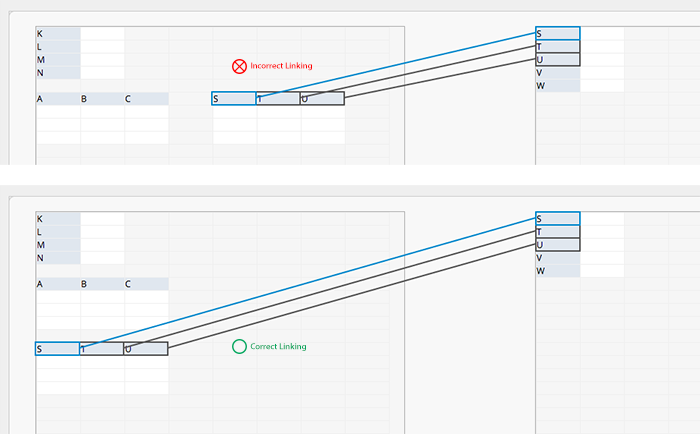
Common mistakes when creating links are listed below. Please check if you are attempting any of the listed linking types below if you are having problems with using link & load.
1. Linking data from subtables to your form.
The reason for this is you cannot link from a subtable and load to a regular field (from a subtable on the right side of the link manager to the left side), since a subtable could have many different values entered in an entry, but a regular field would only have one value.
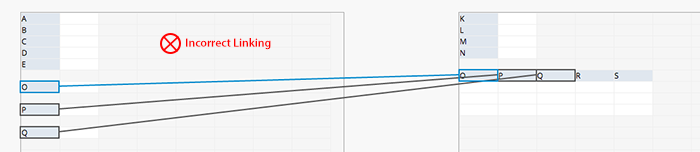
2. Linking a different subtable on the same row.
There might be issues that could arise in interpreting your links when you create different subtables on the same row, so it's best to avoid doing so. Moreover, if you have other users that use the same account, it having different subtables on the same row could lead to confusion.
A window will pop up that shows the options available for e-mail notifications
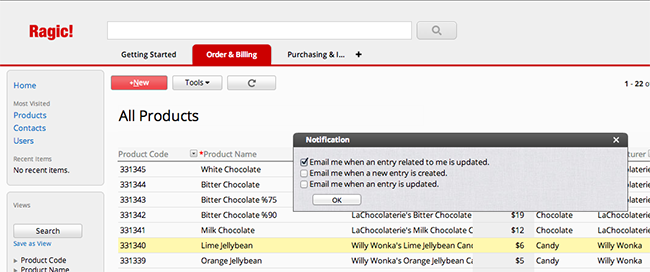
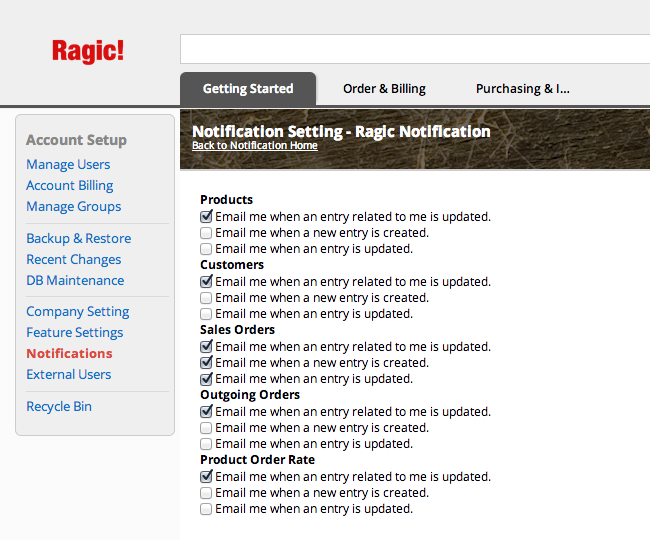
If you would like to set the notifications for many sheets at the same time, or for your Ragic System configurations, you can go to the Notification Settings from the Account Setup under the Start tab, where you can also see your past notifications. (This page can also be reached through the URL https://www.ragic.com/accountname/notificationSetting - make sure to replace your account name in the URL.)
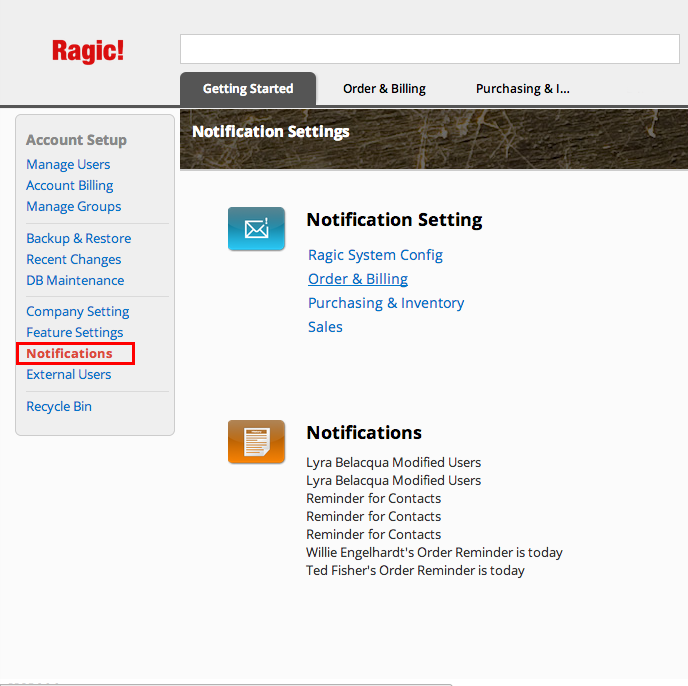
Clicking on any of your application tab names in the menu will take you to a list of all the sheets under that application tab where you can configure the e-mail notifications you would like to receive.
If you are the administrator of the Ragic account and would like to configure the notifications being sent to other users under this account, you can use this type of URL by replacing the account name and the user's e-mail.
https://www.ragic.com/accountname/notificationSetting?e=user@email.com
var name=param.getNewValue(1001426);
var email=param.getNewValue(1001428);
var title=param.getNewValue(1001386);
mailer.sendMail(email,'Your Sales Order'+
                title,
                'Hi '+name+',<br><br>we have received your sales order '+
                'and will be processing your order very soon.<br><br>'+
                'You can see your order details at https://www.ragic.com/example/1<br><br>'+
                'Thanks.<br><br><br>Best Regards,<br><br>Sophia, Sales Manager<br><br>www.ragic.com');
If you're sending e-mail to multiple recipients, just separate each e-mail addresses with commas.
You can add this script to the form's "post-workflow" from the Javascript Workflow module.
As you can see in the e-mail example above, you can use HTML tags to format your e-mail. The e-mail being sent is in HTML format, so basically all HTML tags would work. You can also add your form entries as an attachment within the e-mail by appending the URL of the record as an extra parameter.
You can follow this format:
mailer.sendMail(email,subject,content,attachmentURL)
The last number in the URL is the record id of an entry, you can find the record id of a record by calling param.getNewNodeId to the key field. The key field field id can be found when you open the Javascript workflow editor.
Special pricing is available for educational and non-profit organizations.
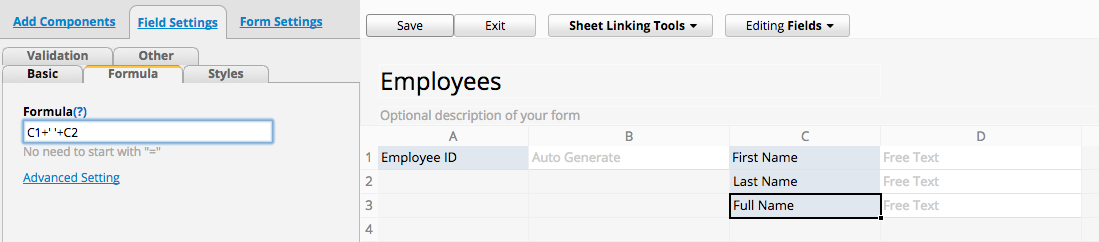
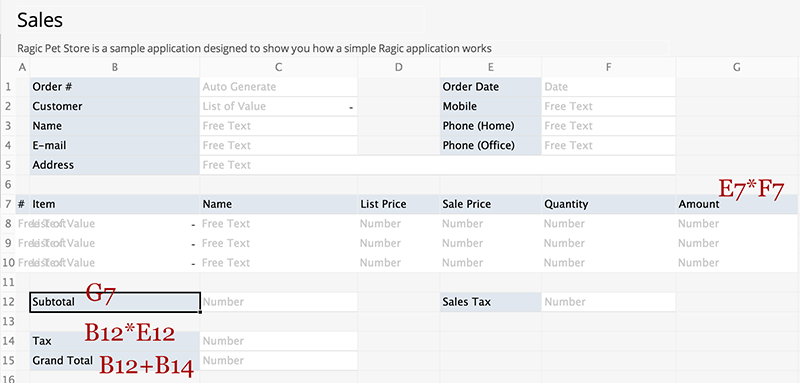
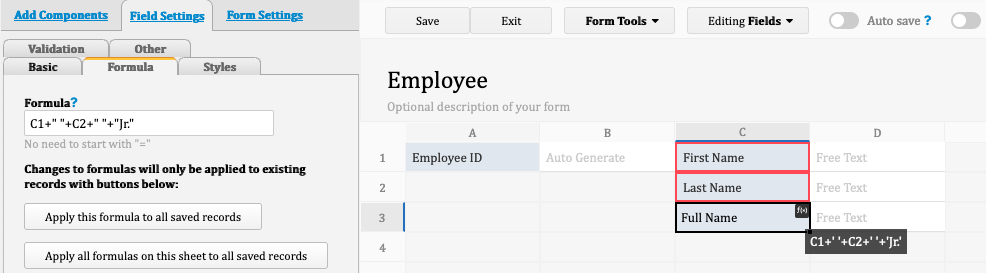
Further to the previous example, if you want to add a fixed string into your formulas, please mark the string with either single quotes or double quotes. For example, C1+" "+C2+" "+"Jr.". Then, the result would "Michael Scott Jr.".
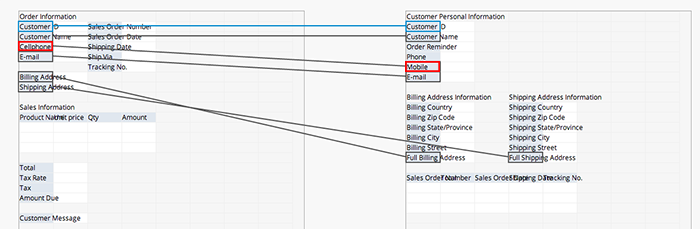
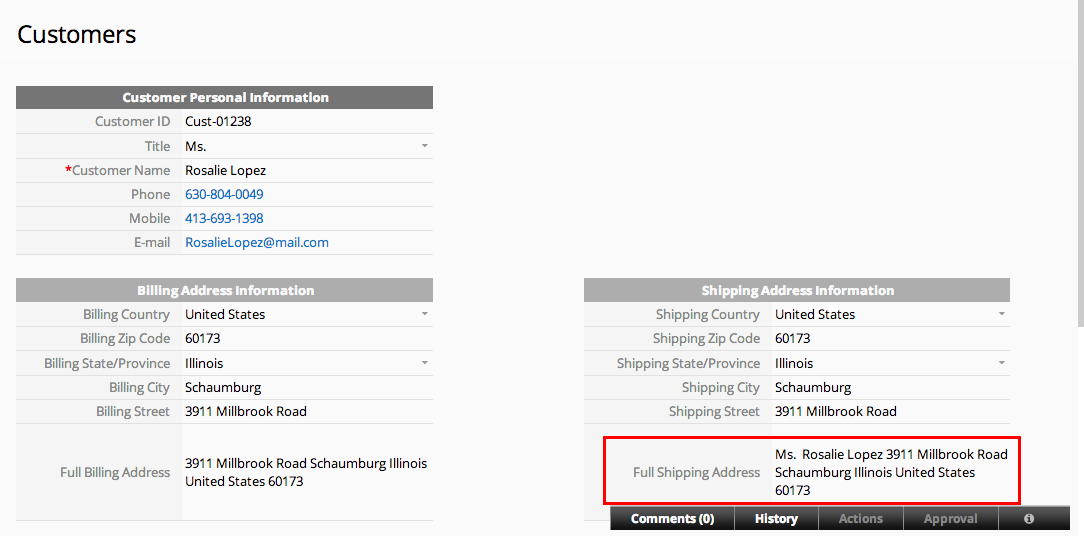
As a more advanced example, we will create a field that will display an address in standard postal format for shipping purposes in the U.S.
Make sure you have all the fields that you need to display the information required.
Here we would like to have the field header Full Shipping Address display the title and name of the customer, with the shipping address written in the standard postal format. We add the following formula to the field settings:
A3+' '+A4+' '+D14+' '+D13+' '+D12+' '+D10+' '+D11
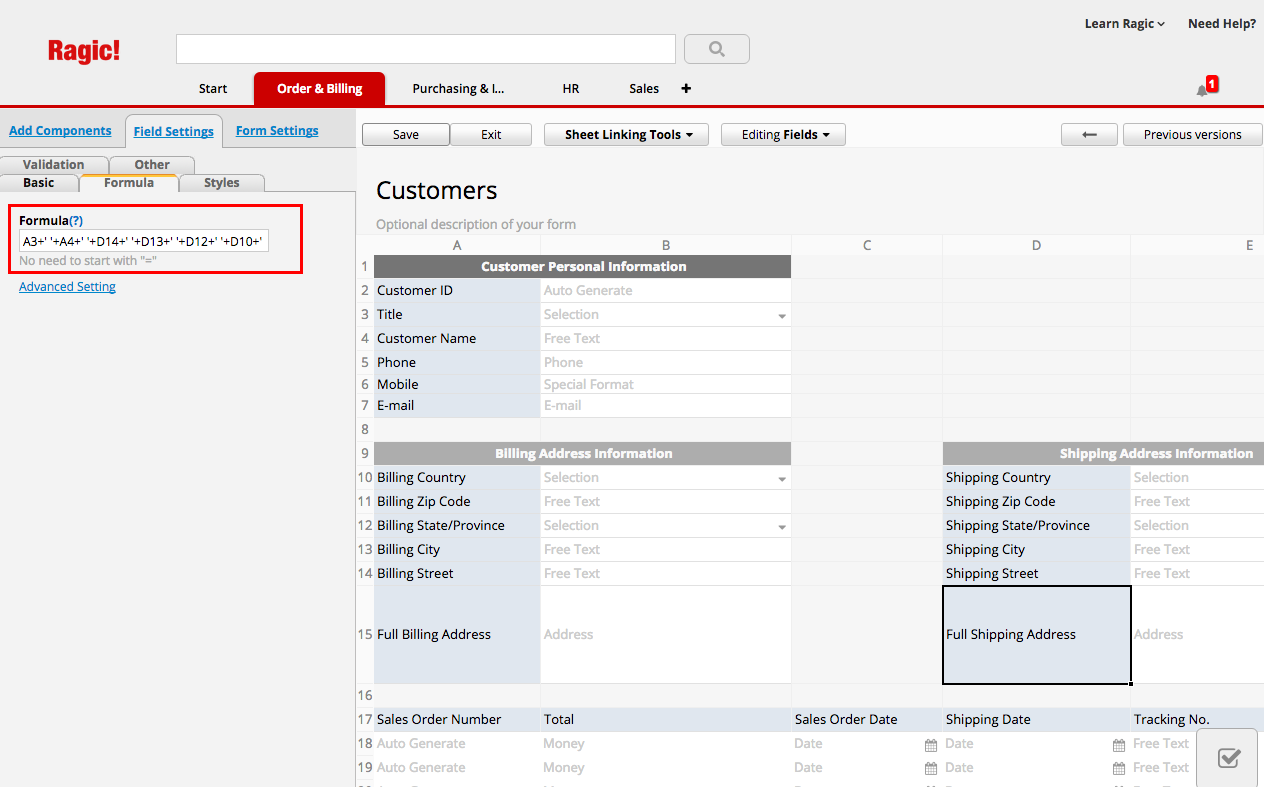
Now that the Full Shipping Address displays, we can use information from this field whenever we need a full address, for example when printing shipping labels.
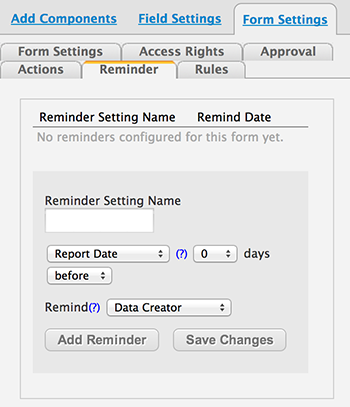
To access the reminder settings in a form, go to the Reminder tab under the Form Settings in the Design Mode.
Here you can set reminders according to the fields that contain dates. You will only have to do this once in your form design, and Ragic will send reminders automatically according to the date values that are entered in entries. You can set as many reminders as you want.
In the example below, we have already set two reminders for a Sales Order form that contains two date fields that are sent to the data creator, and we're adding a new one for the field "Shipping Date", which will send a notification to the Customer's e-mail the day an order is shipped.
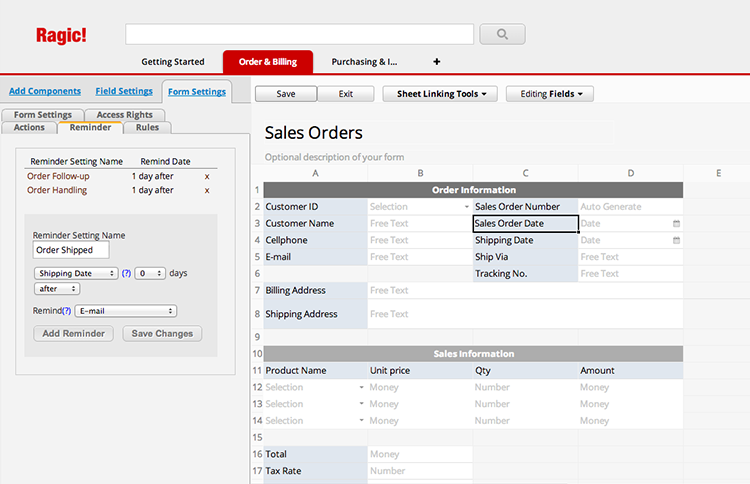
If you would like to have a customized message upon an action being completed instead of Ragic's default reminder e-mail, please check our documentation on creating an automatic e-mail notification.
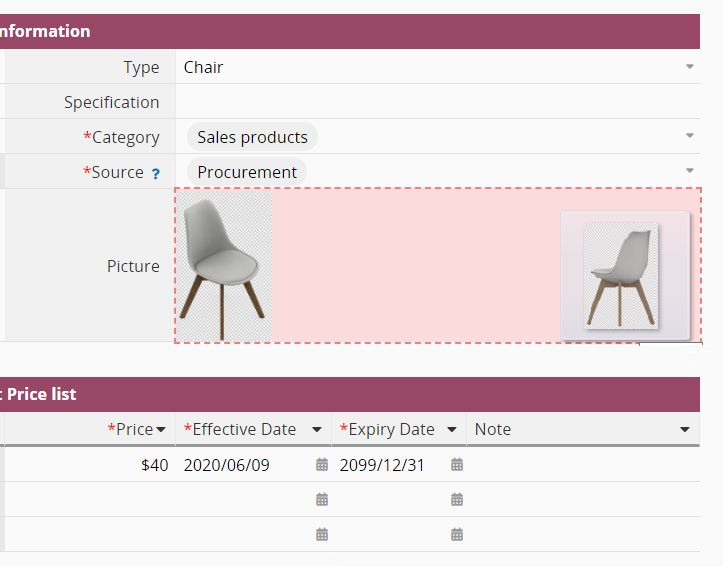
In this window, you upload an image or fill in the image URL and then set the width and length of the picture.
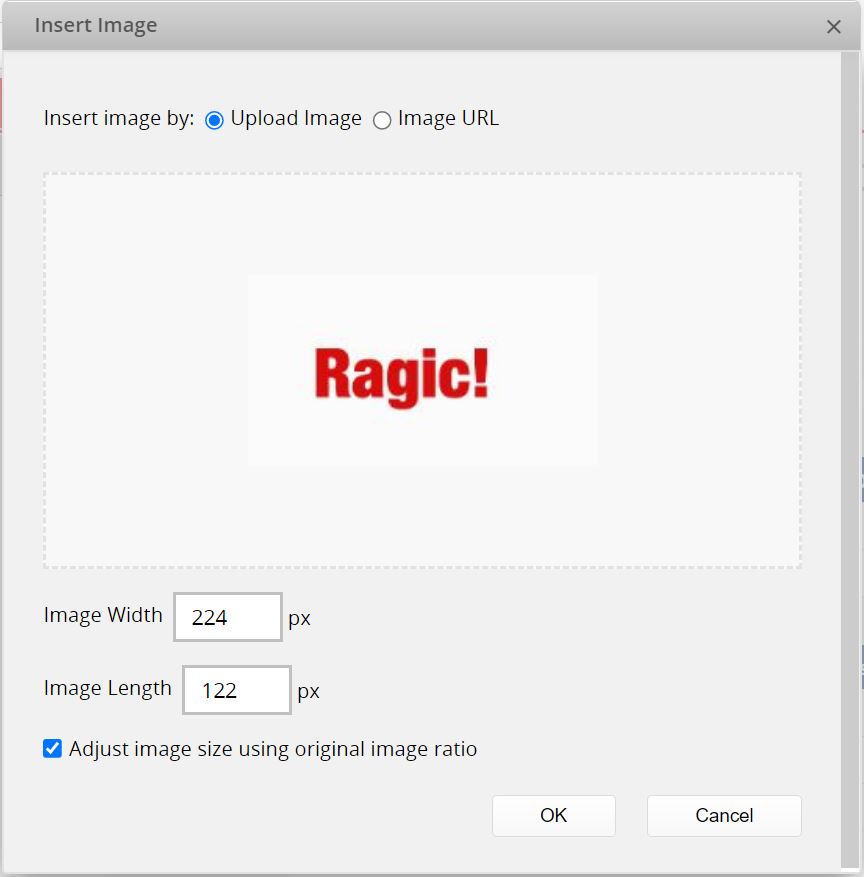
Click on the image to edit or delete it.
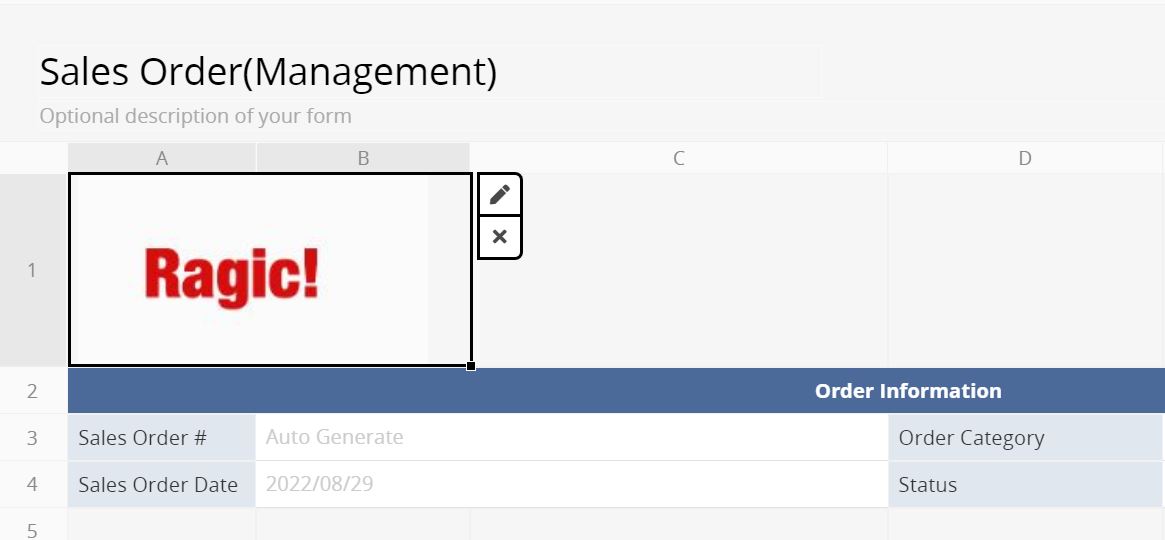
After saving the design, it will display in the form.

The image will also show on the printer-friendly page.
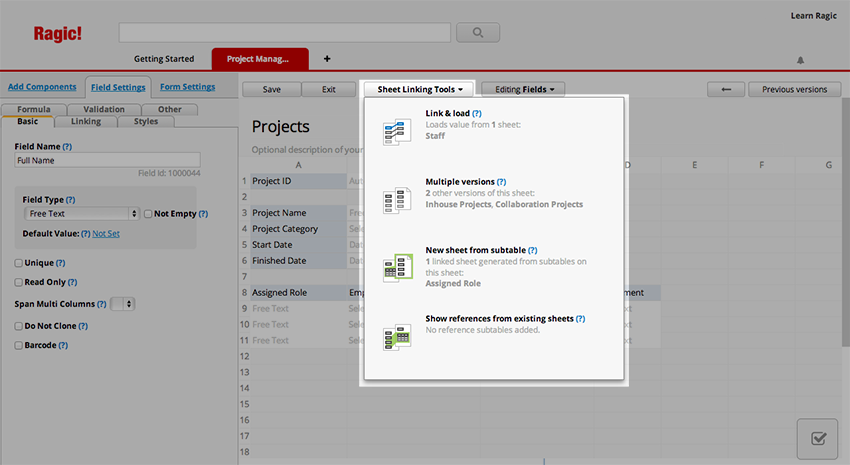
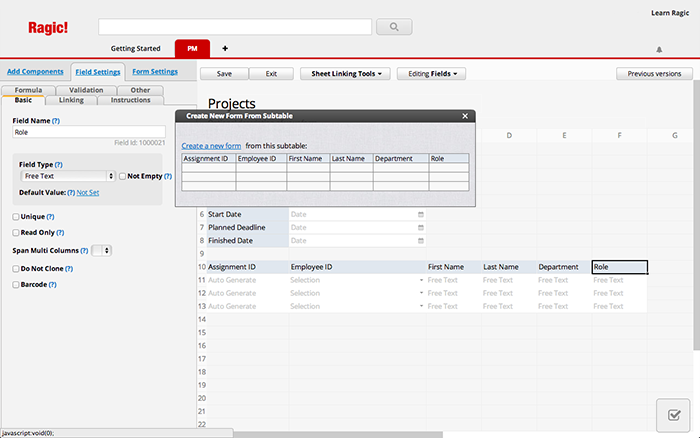
To make the data in the subtables more accessible, you can create a new form from a subtable. When you're in the Design Mode, simply click on the Sheet Linking Tools button, and choose the New sheet from subtable option.
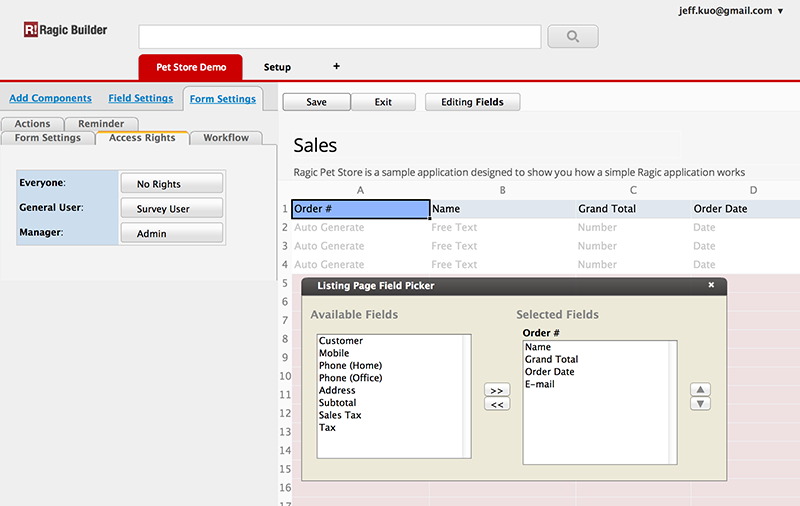
Click on the Change Design button on the upper-right corner to go to the Design Mode of your listing page that has too many columns.
By default, all the regular fields you have in your listing page will be selected fields for your listing page. Select the fields you would like to display from the Listing Page Field Picker. You can also change the order of selected fields.
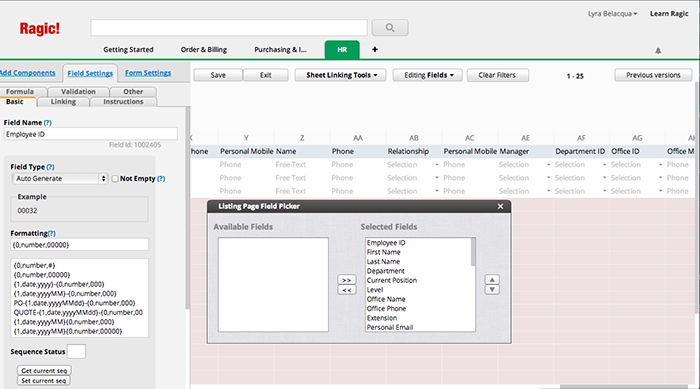
You can also change the width of the columns according to your fields.
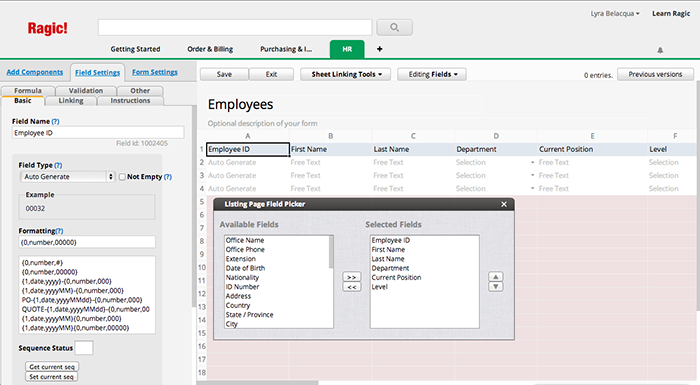
After saving your changes in the design, your listing page will look more organized.
You can always click on the summary of an entry in the listing page to view the entry's details in the form page.
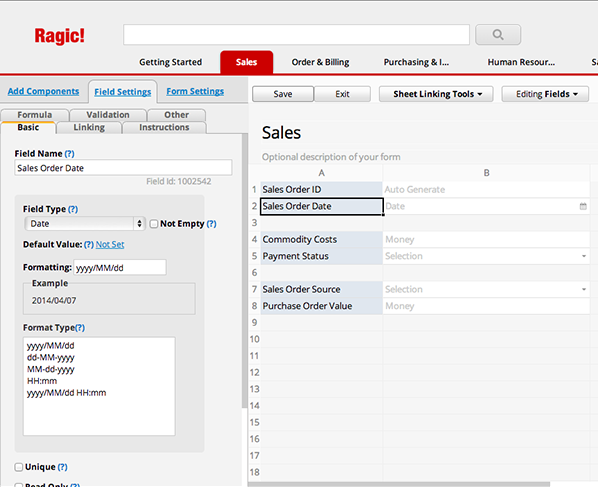
It's recommended to use the format yyyy/MM/dd, which is the ISO standard format for calendar dates in your .csv file.
You can change the date formatting that is displayed in date fields in Ragic in the Design Mode. Navigate to the Basic tab under Field Settings. You can select the format type from the formatting options, or edit the chosen formatting manually.
Check how the normal process for developing a sheet is done here.
Learn more about different field types here.
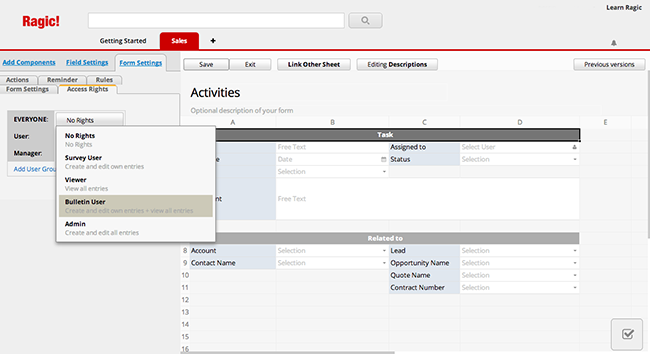
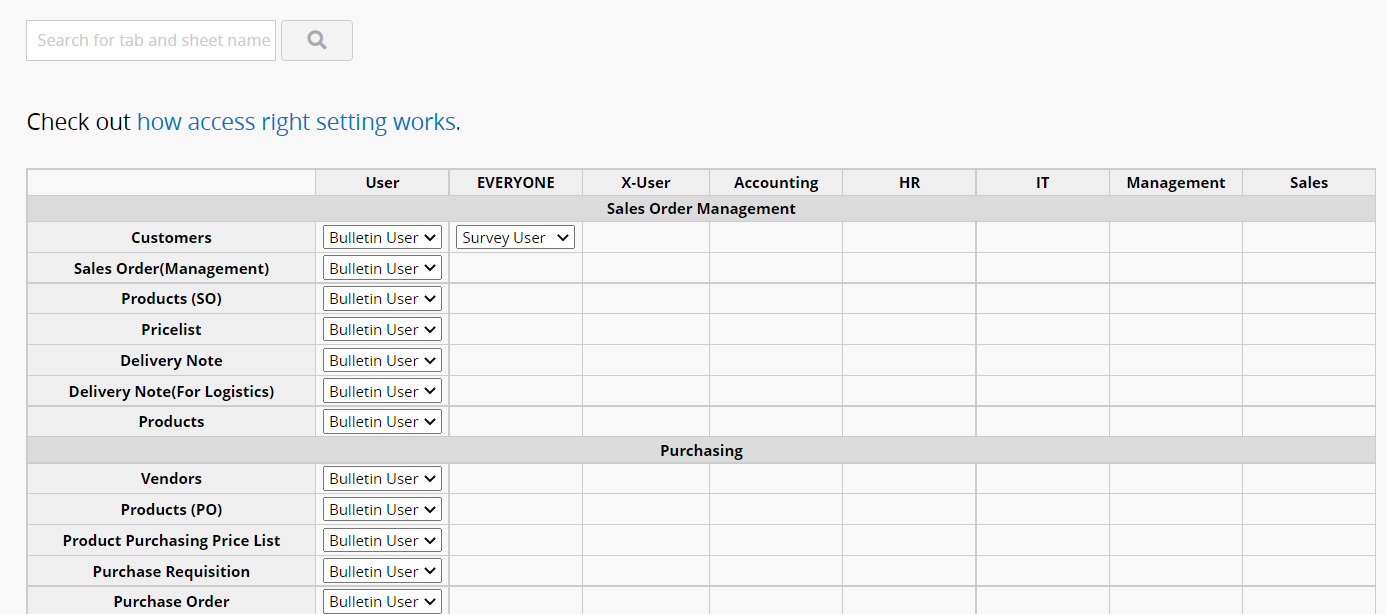
You can find a comparitive table for system default access rights below:
| Access Right Setting | View | Create | Modify | Level |
|---|---|---|---|---|
| No Rights | Nothing | No | No | |
| Survey User | Own entries | Yes | Own entries | ** |
| Viewer | All entries | No | No | *** |
| Bulletin User | All entries | Yes | Own entries | **** |
| Admin | All entries | Yes | All entries | ***** |
Here is a detailed explanation of how they work:
No Rights: The user group will not be able to see this sheet at all.
Survey User: The user group will be able to create and edit their own entries, and won't be able to see other entries.
Viewer: The user group will be able to view all entries and entry details, but won't be able to edit or create new entries.
Bulletin: The user group will be able to create and edit their own entries, and view all other entries. They won't be able to edit or delete entries that they don't own.
Admin: The user group will be able to create, edit, view and delete all entries in the sheet.

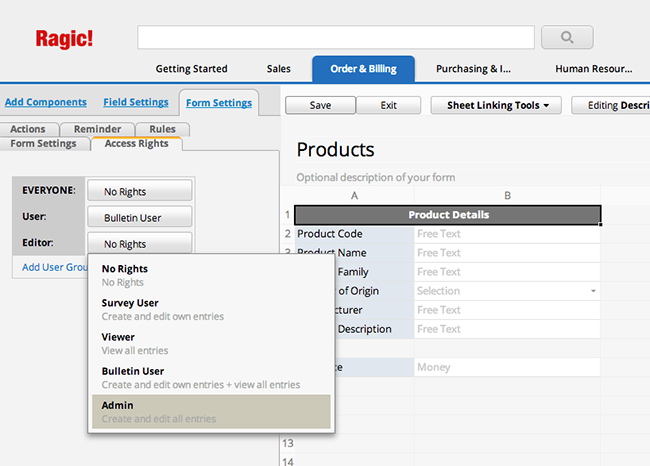
If you would like to give administrator privileges for a user group on one sheet, change the access rights settings of the sheet in the Design Mode. You will find the Access Rights tab under Form Settings. Change the access rights of that user group to Admin.
Set the newly created user group to have administrator rights by selecting the Admin option. Users in this user group will now be able to create and edit all entries under this form.
To add a user to the newly created user group, navigate to your User Management Settings in your Account Setup.
You can always change the amount of users under your account from the Account Billing settings. Learn how to here.
When you need to change a user’s email address, you can go enter the user’s respective entry on the users sheet and click on the “Change Email” action button.
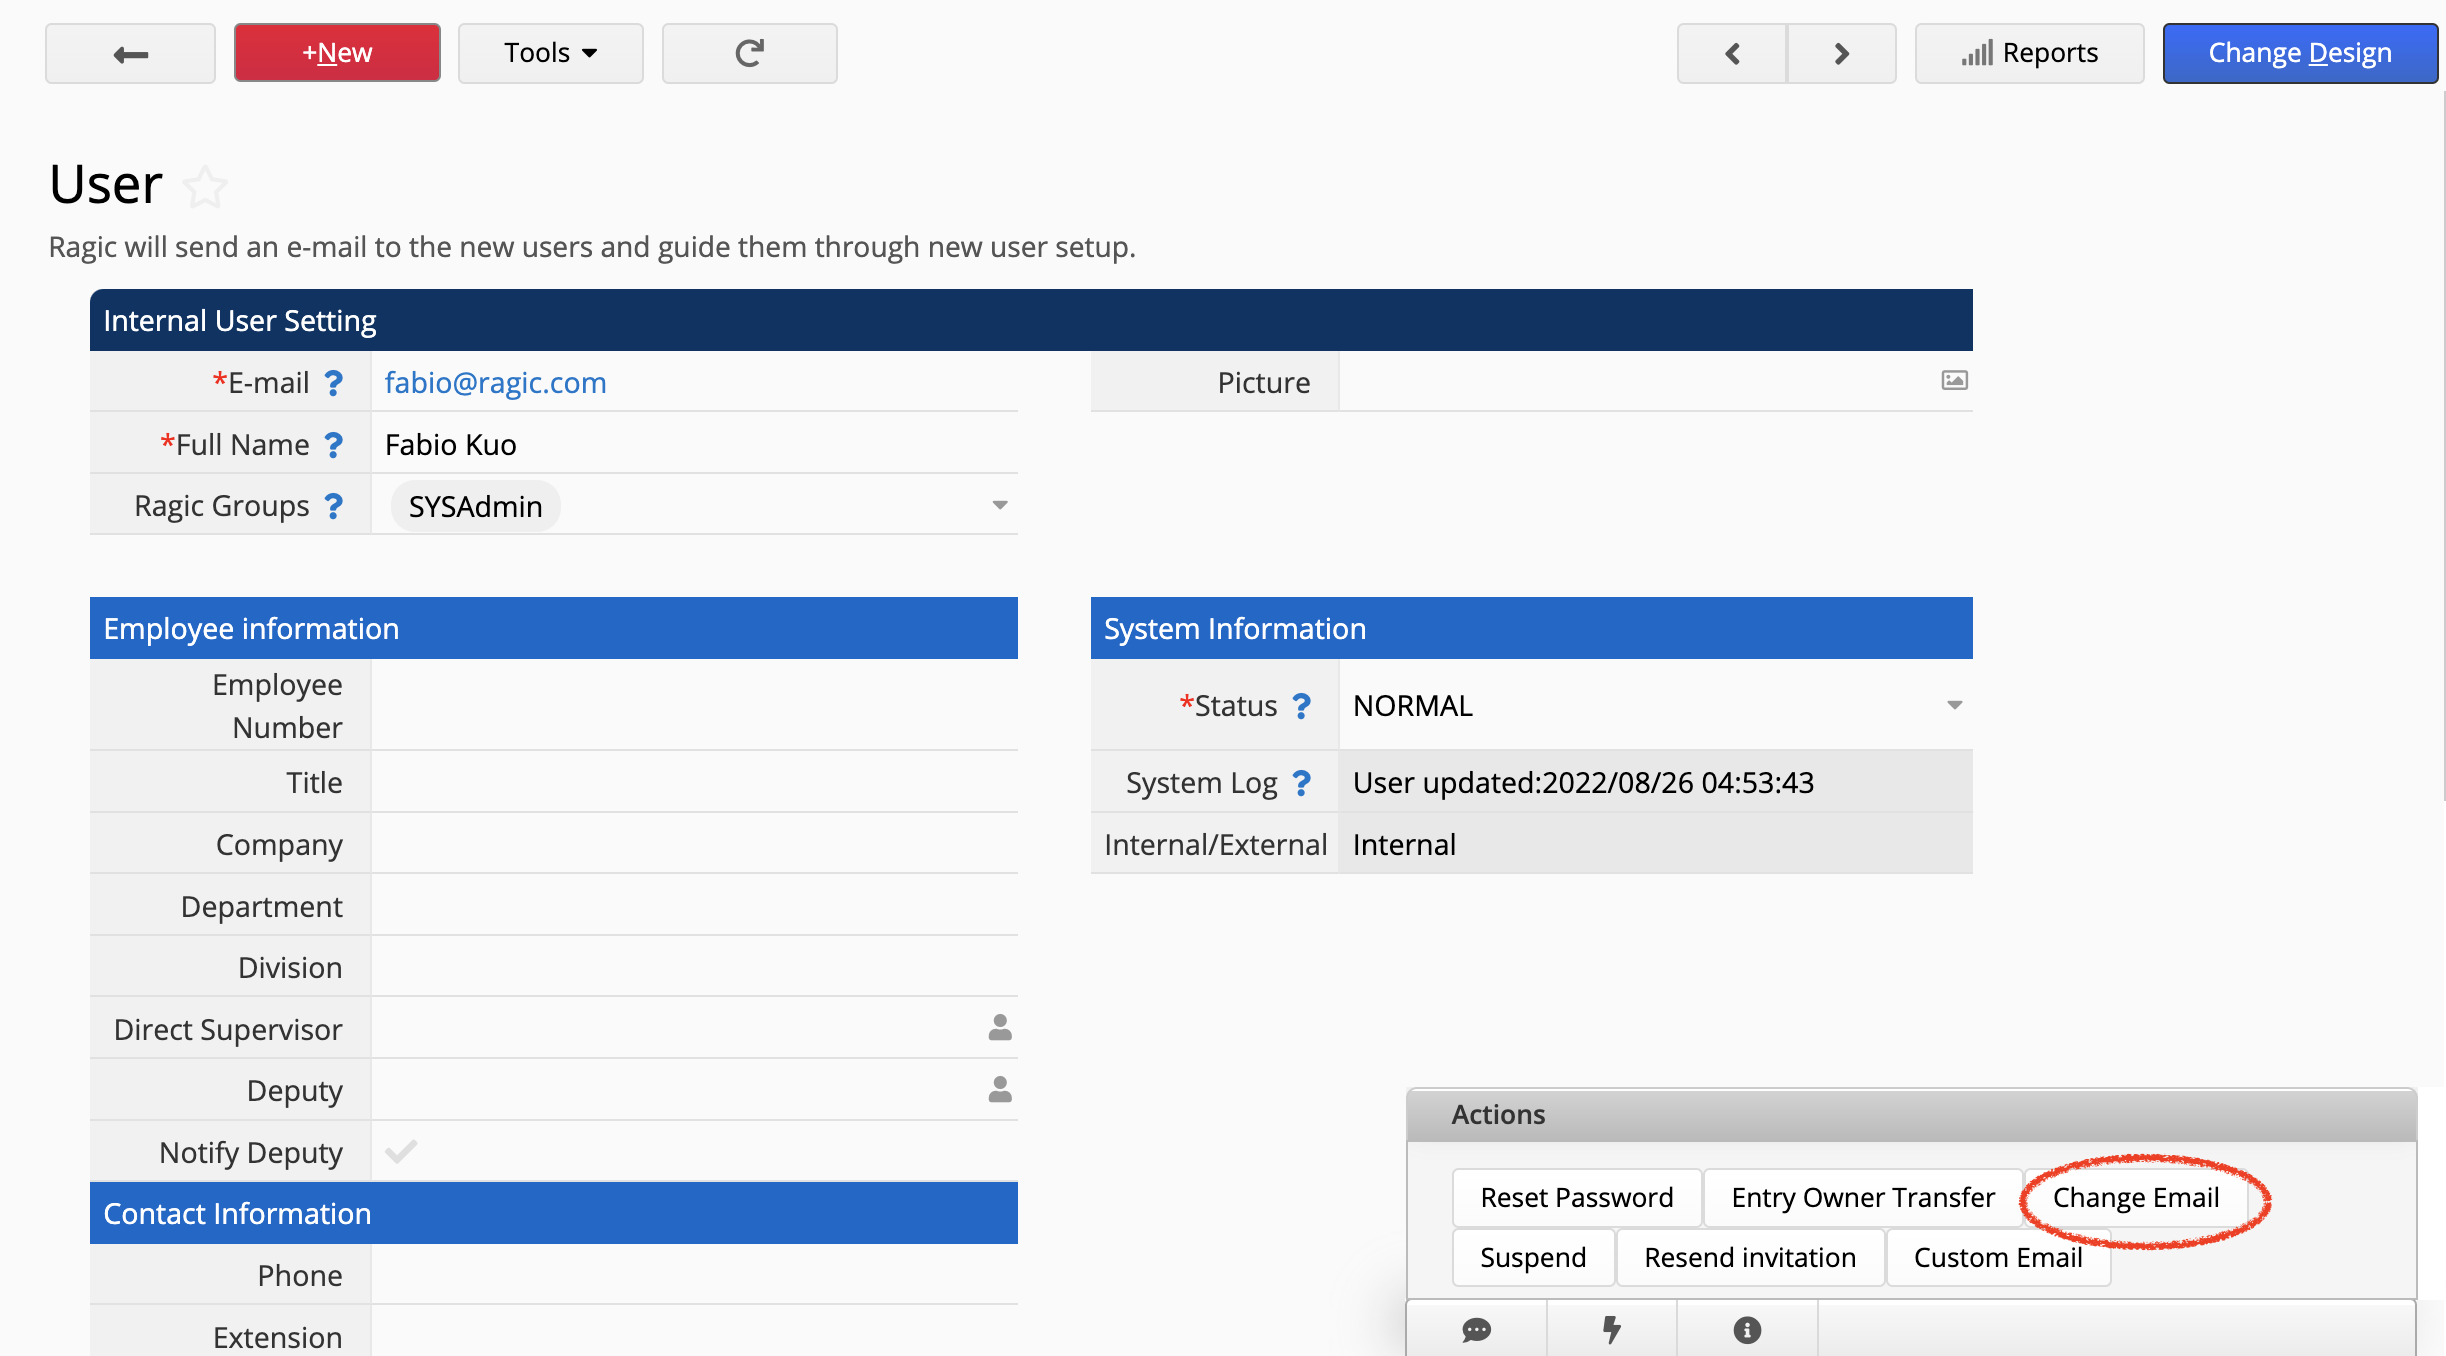
A popup will then appear, and you can then enter the user’s new email address here.
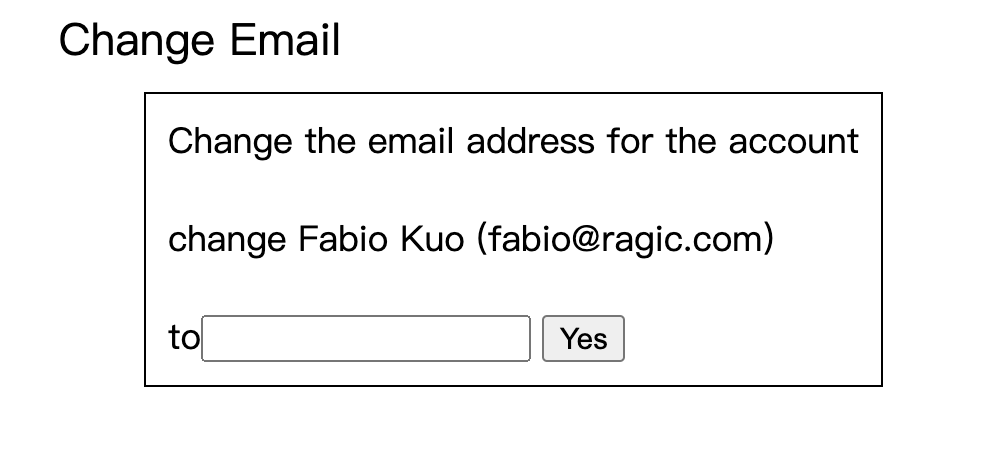
After saving the updated email address, the system will send a confirmation email to the user's new email address with a temporary password. The user can then log in to Ragic with the updated email address and temporary password, and change his or her password after logging in to Ragic successfully.
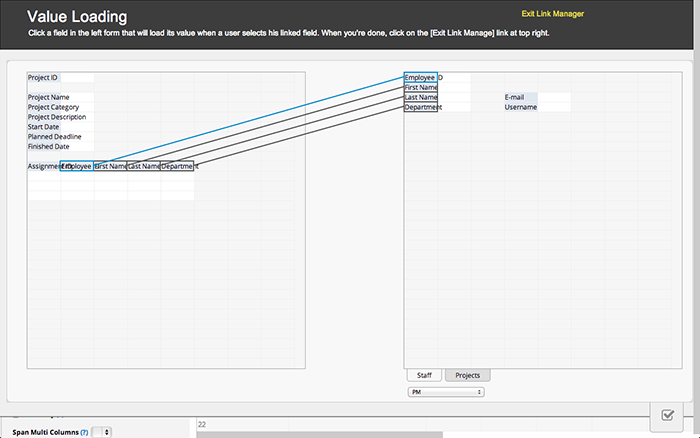
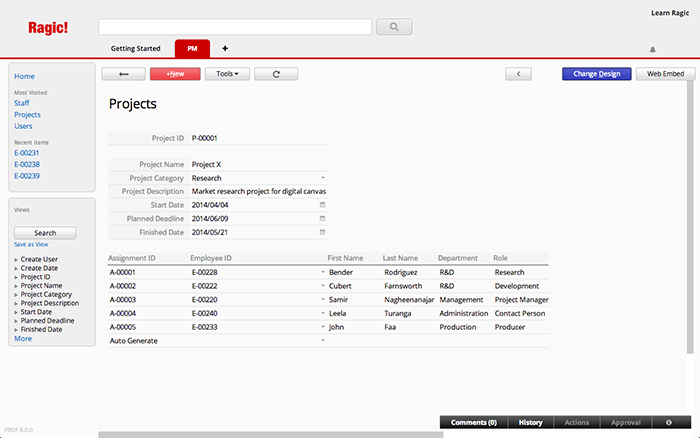
In this example, we will build a simple project management tool in which we list employees under projects, and be able to filter for either sheet, so that we could view all employees that had worked in a project, or all projects a certain employee has worked in.
We will begin with two simple forms that show Staff Members, and Projects.
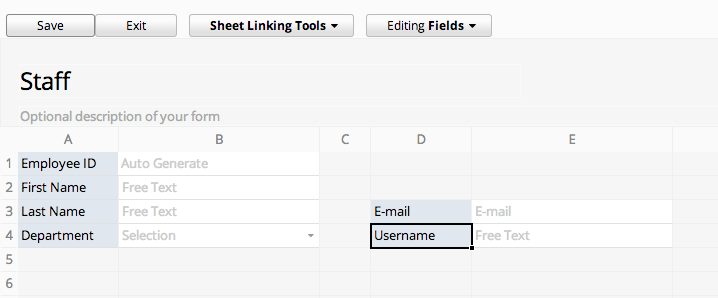

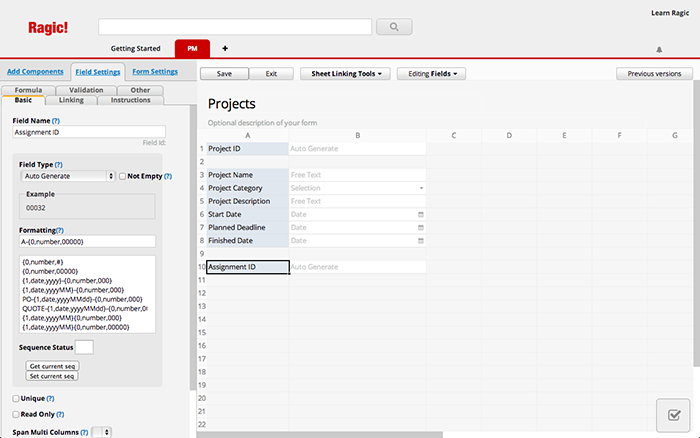
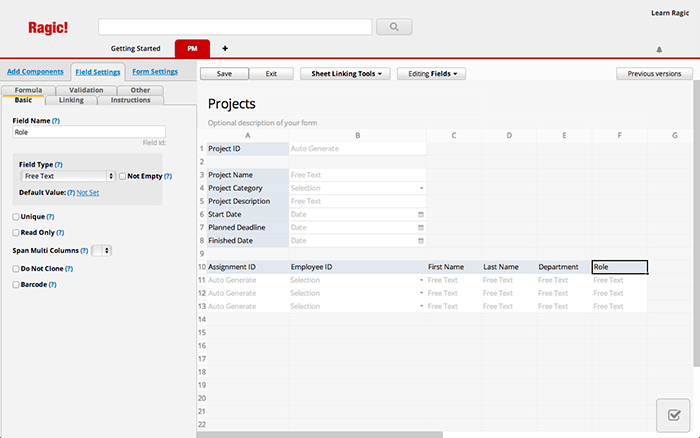
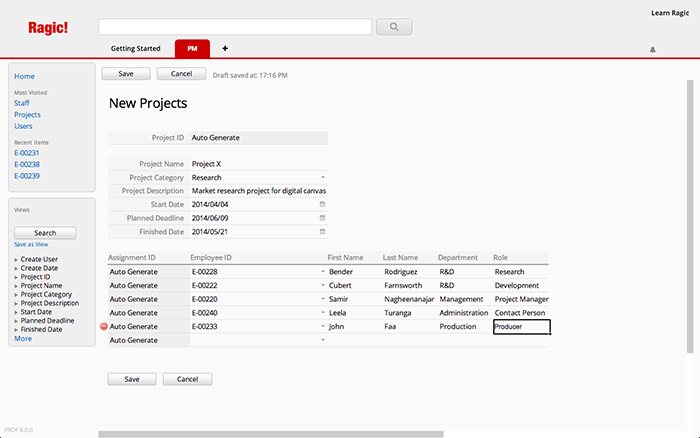
Since we would like to list employees involved in projects, we will be editing the Projects sheet. We would like to have the detail of more than one entries, so we'll add the employees with the link & load function as a subtable. But first, we'll add an assignment ID so that we can have a separate reference number.
Now we can link fields from our staff members sheet as a subtable that starts with the assignment ID.
You can add other fields that you would like to display in this sheet, such as the persons' specific function in the project.
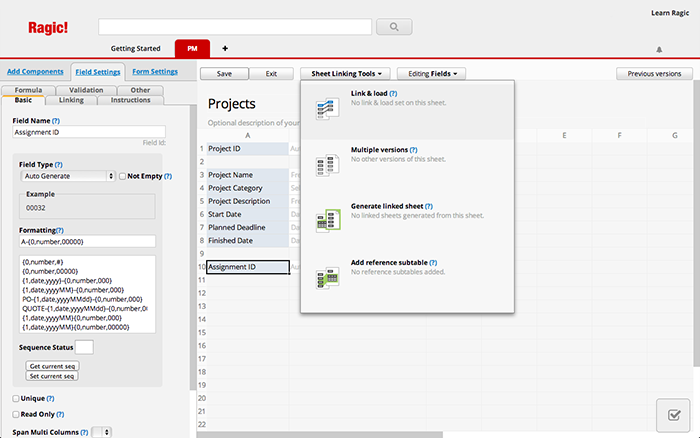
Now that we have a more complete project form, we can create a new sheet from this subtable that will show each staff members' assignment to each project. Pick the option new sheet from subtable under the sheet linking tools.
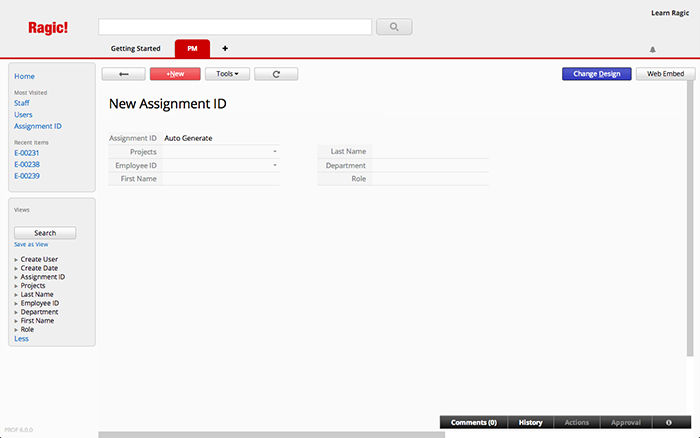
Testing the project form shows that after saving project entries, an assignment ID will be generated for each assignment of staff members, which will also be automatically saved in the assignment sheet. This is very convenient when used with filtering options to check previous assignments.
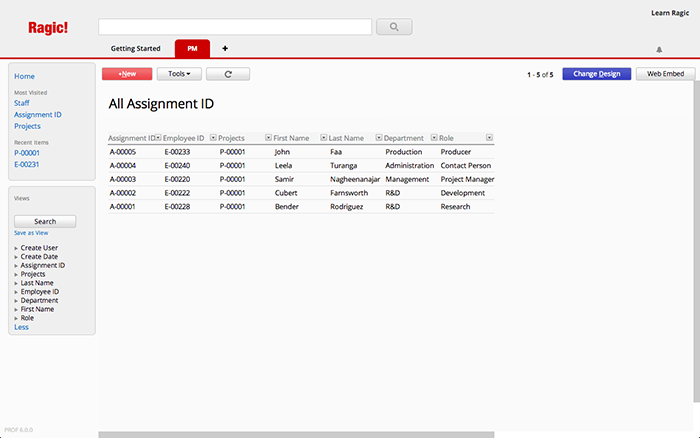
You can always add new fields to the generated Assignments sheet for more details about project assignments.
If you'd like to see related "Assignment ID" as subtable entries under each staffs, you can use Show references from existing sheets on "Staff" sheet to insert a reference subtable from "Assignment ID" sheet.
Hotkeys for browsing data:
| Hotkey | Listing Page | Form Page |
|---|---|---|
| ↑ | to previous entry | to previous field |
| ↓ | to next entry | to next field |
| → | go to form page of entry | |
| ← | back to listing page of entry | |
| Page Up | to previous page | to previous entry |
| Page Down | to next page | to next entry |
| E | edit multiple entries | edit entry |
Hotkeys for creating / editing data:
| Hotkey | Function |
|---|---|
| N | Create a new entry |
| E | Edit entry/entries |
| F2 | Edit entry |
| Alt+↓ | Show selection drop-down |
| Tab | Switch between cells (clockwise) |
| Shift+Tab | Switch between cells (counter-clockwise) |
| Alt+Enter | New line |
| Ctrl+S | Save entry |
| Esc | When editing a field: Revert edited value on that field When not editing a field: Go back to browsing mode |
| Space | Switch to the next option in Check Box Field |
Interactive Tutorials
Your start page has interactive tutorials with step-by-step instructions, covering the basics of Ragic. You can access your start page from the Learn Ragic link on the top-right corner, or from the Start tab, under Learn how to create your own Ragic apps.
Ragic Developer Guide
The Ragic Developer Guide covers clear instructions on how to develop your own database app, including the following categories:
Ragic Knowledge Base
You can search our knowledge base for its many articles on developing Ragic apps from your start page.
Video Tutorials
Ragic has some video tutorials available on your start page that shows you the basics of designing a database app.
Ragic Forum
You can post on our forum and also view past posts for discussions among other users and our support staff on building Ragic database apps.
Developer Support
Ragic offers a wide variety of support options for developers, such as the HTTP API documents and the Javascript Workflow Engine documentation.
Have other questions? E-mail us at support@ragic.com.
Remember if you set the number of records too high, the listing page may load slower. We generally recommend displaying no more than 100 records per page unless necessary.
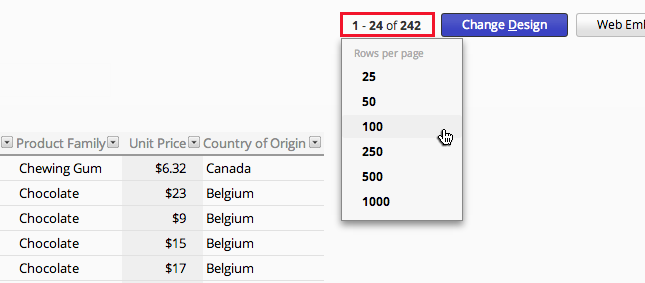
Click on the Change Design button, and click on the field header you would like to edit. Navigate to the Styles tab on the left sidebar, where you can edit the formatting of your field.

It's always a great idea to customize Ragic to fit your company's look & feel. If you are using Ragic's professional or on-premise plan, you can replace the Ragic logo in the top-left to your company's logo. (if you're using a different plan, check the next tip!)
Go to your Company Setting under your Account Setup. You can upload your company logo on this page so that it'll show up on every page.
![]()
2. Add images to your form design
Adding a header or footer on paper or on digital forms usually works great to establish your corporate identity. Same goes for banners and your logo. The design elements you add here will be displayed in the printer-friendly version as well.
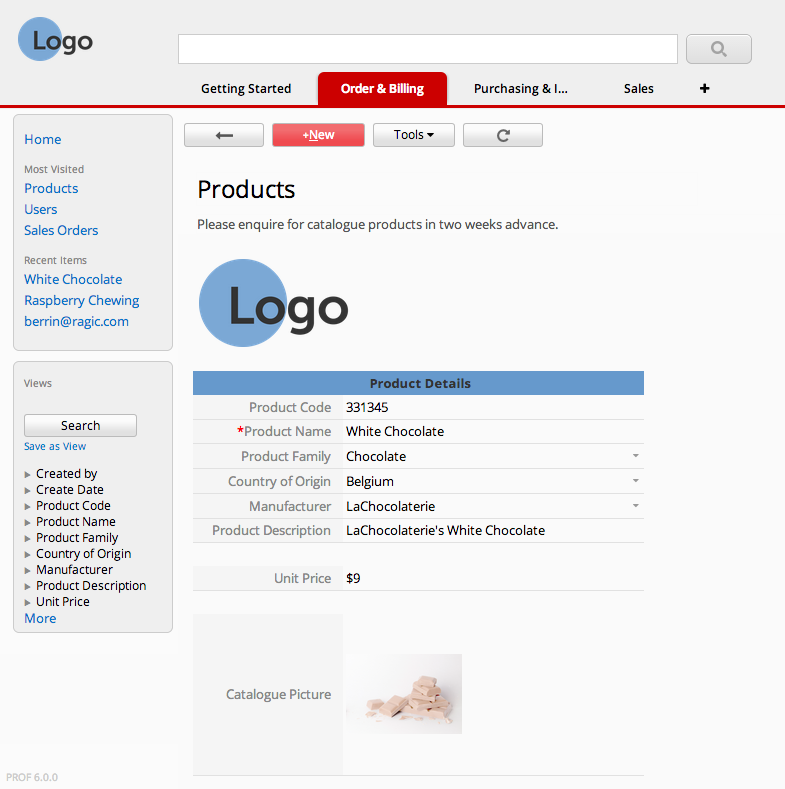
To add a default image that will always display on all your forms, simply add a static text field with an HTML image tag containing a link to your image. Learn how to do this by following the simple instructions here.
3. Mix and match your colors
You can change the style of static text fields as well as the headers of regular fields to fit your company's corporate identity. Whether the colors you choose match your logo or your website's color scheme, editing the colors will add a sense of integrity to your overall design.
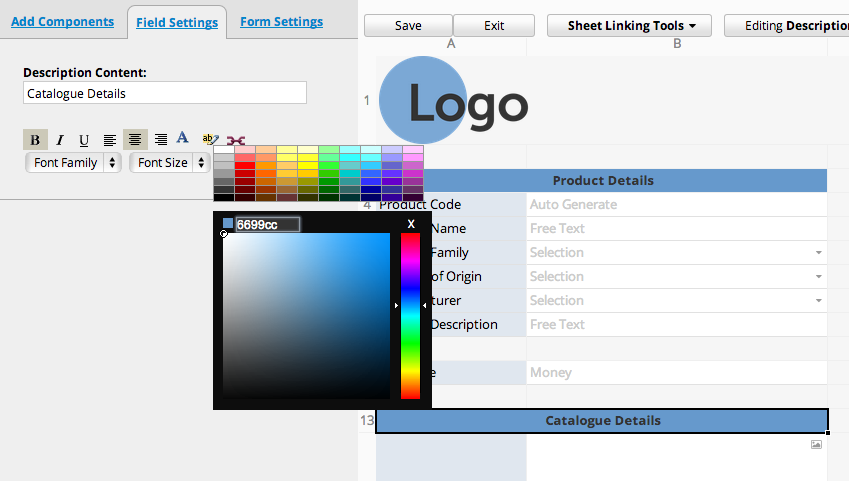
4. Make the columns fit just right.
Whether it's your listing page or form page, having overset text is pretty unseemly. To avoid this, you can drag the edges of the column header from the design mode to fit your field header, or the width of your field values.
Additionally, you can change the field header text from the design mode of your listing page. The changes made for what is displayed on the listing page will not reflect to the form page, and vice versa.
5. What about the rows?
If you'd like to keep everything on one line, you can have a field span multiple columns from the Basic tab while designing your form page.
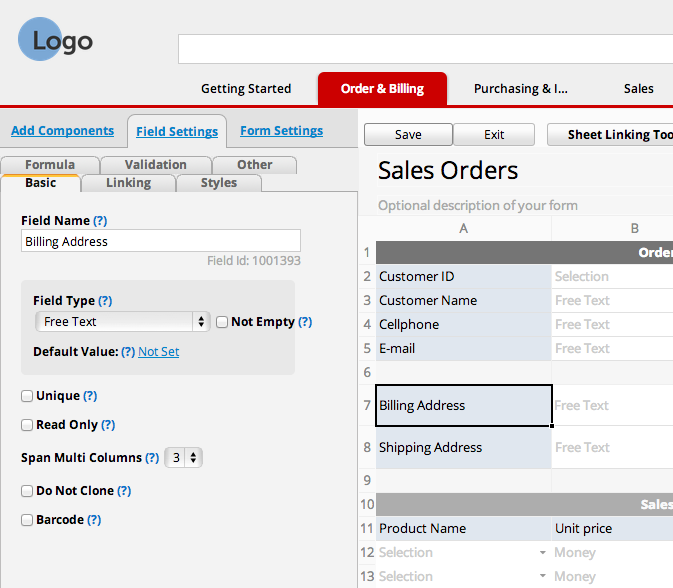
If you'd rather have a paragraph-like field that would expand as you enter more data, you can resize the height of the row, just like editing the width of the columns in the design mode.
6. Add some space
It's always a good idea to leave some white space for better readability, like how you'd leave a margin when composing a text document.
I've discovered that the best way for this in Ragic is to leave an occasional empty column (for me a 50-px width looks great) between fields in the same row in the form page.
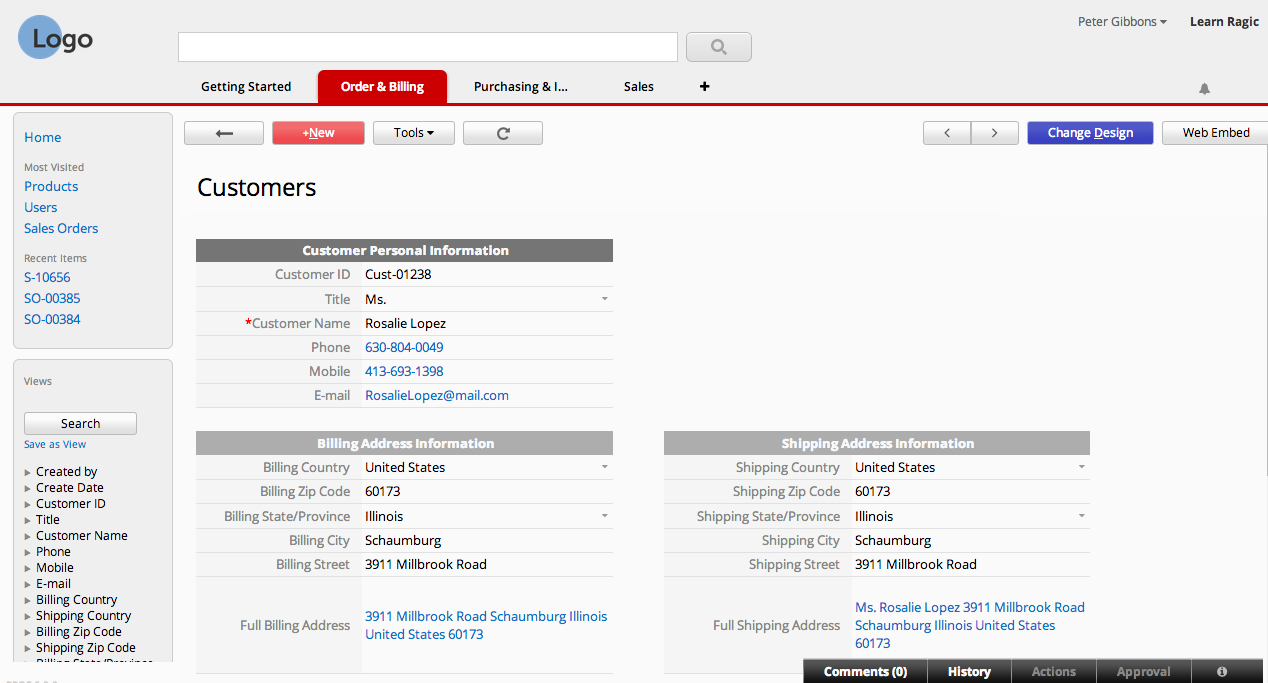
7. Keep your listing page clean.
One of the best features that comes with using Ragic is the powerful search engine — you can search for values that aren't displayed on the listing page with any of the search tools.
You can also click on individual entries to go to the form page and view the details of each entry.
This means that you don't have to display most of the fields on your listing page, save the important data. You can choose which fields are displayed as columns in the listing page from the design mode.
before:
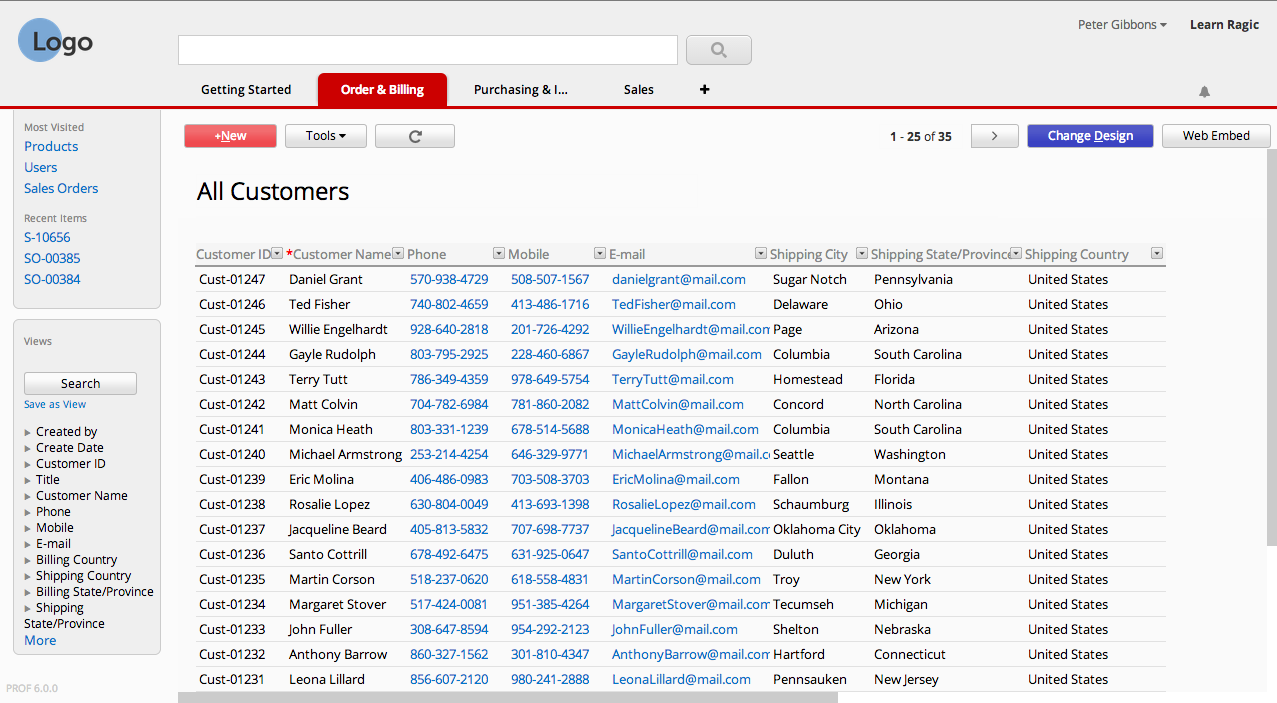
after:
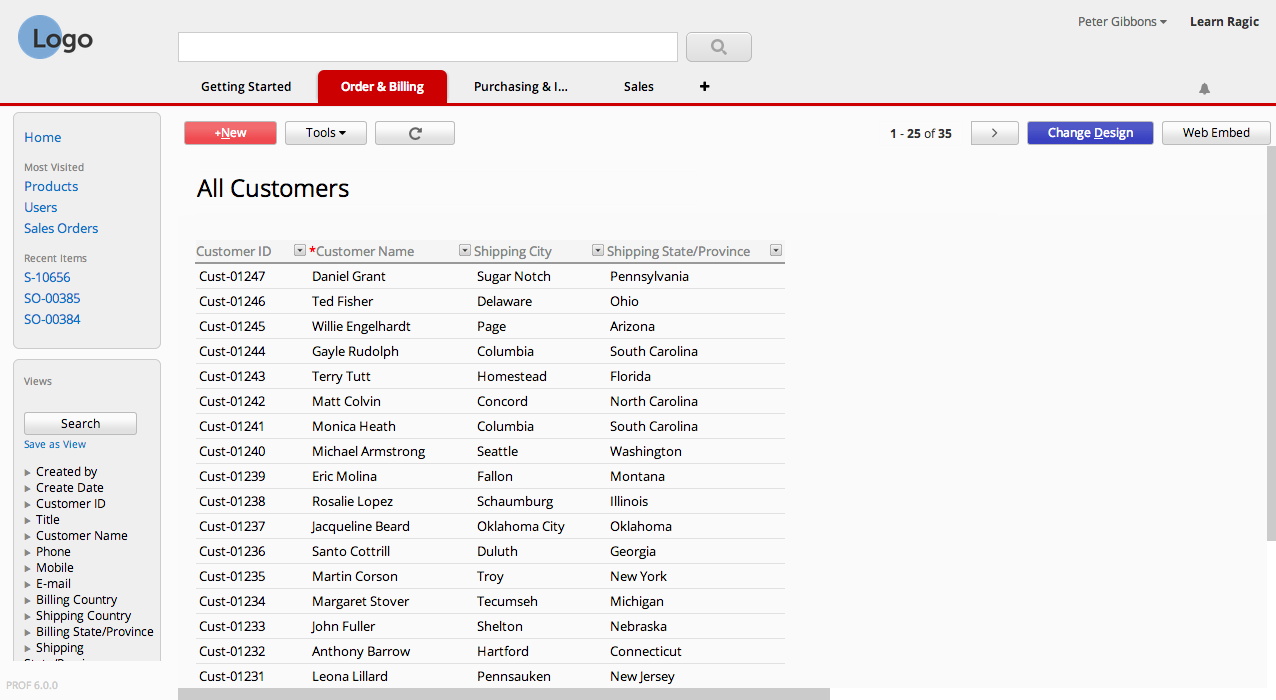
8. Be consistent.
However you wish to design your forms, make sure that the design of your forms are consistent with each other to avoid confusion.
This knowledge base entry was originally posted in our blog.
SYSAdmins can grant selected users the right to access the Design Mode of sheets under certain tabs. This can be done by navigating to the Hamburger Menu > User Acesss > Groups, and assigning the selected users as Group Administrators. After completing the steps, please enter the URL slug of the tabs you would like them to edit in the Group Tabs field (e.g. /forms1, as it appears in the last part of the tab’s URL). Once completing all the steps, the group administrators will be able to add sheets to a Group Tab, make design changes to the sheets under that tab, and access all features under the Group Tab.
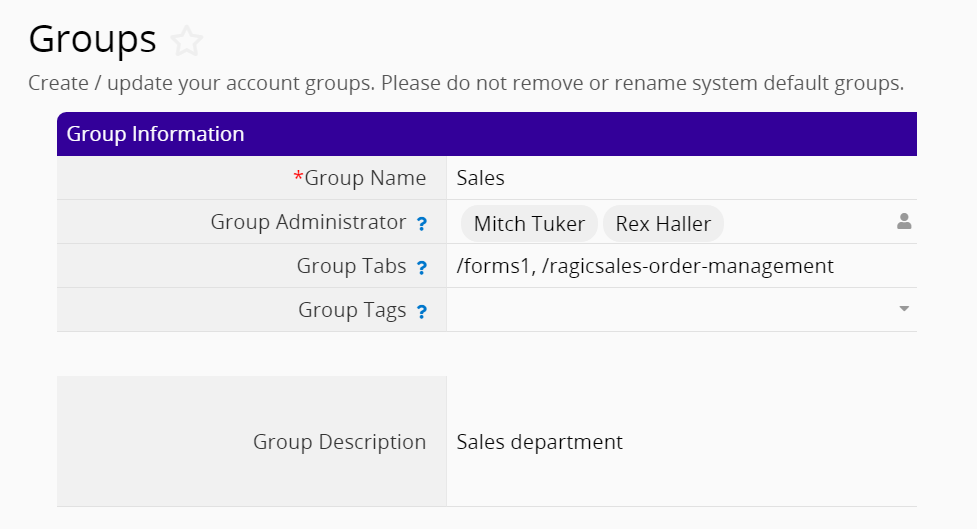
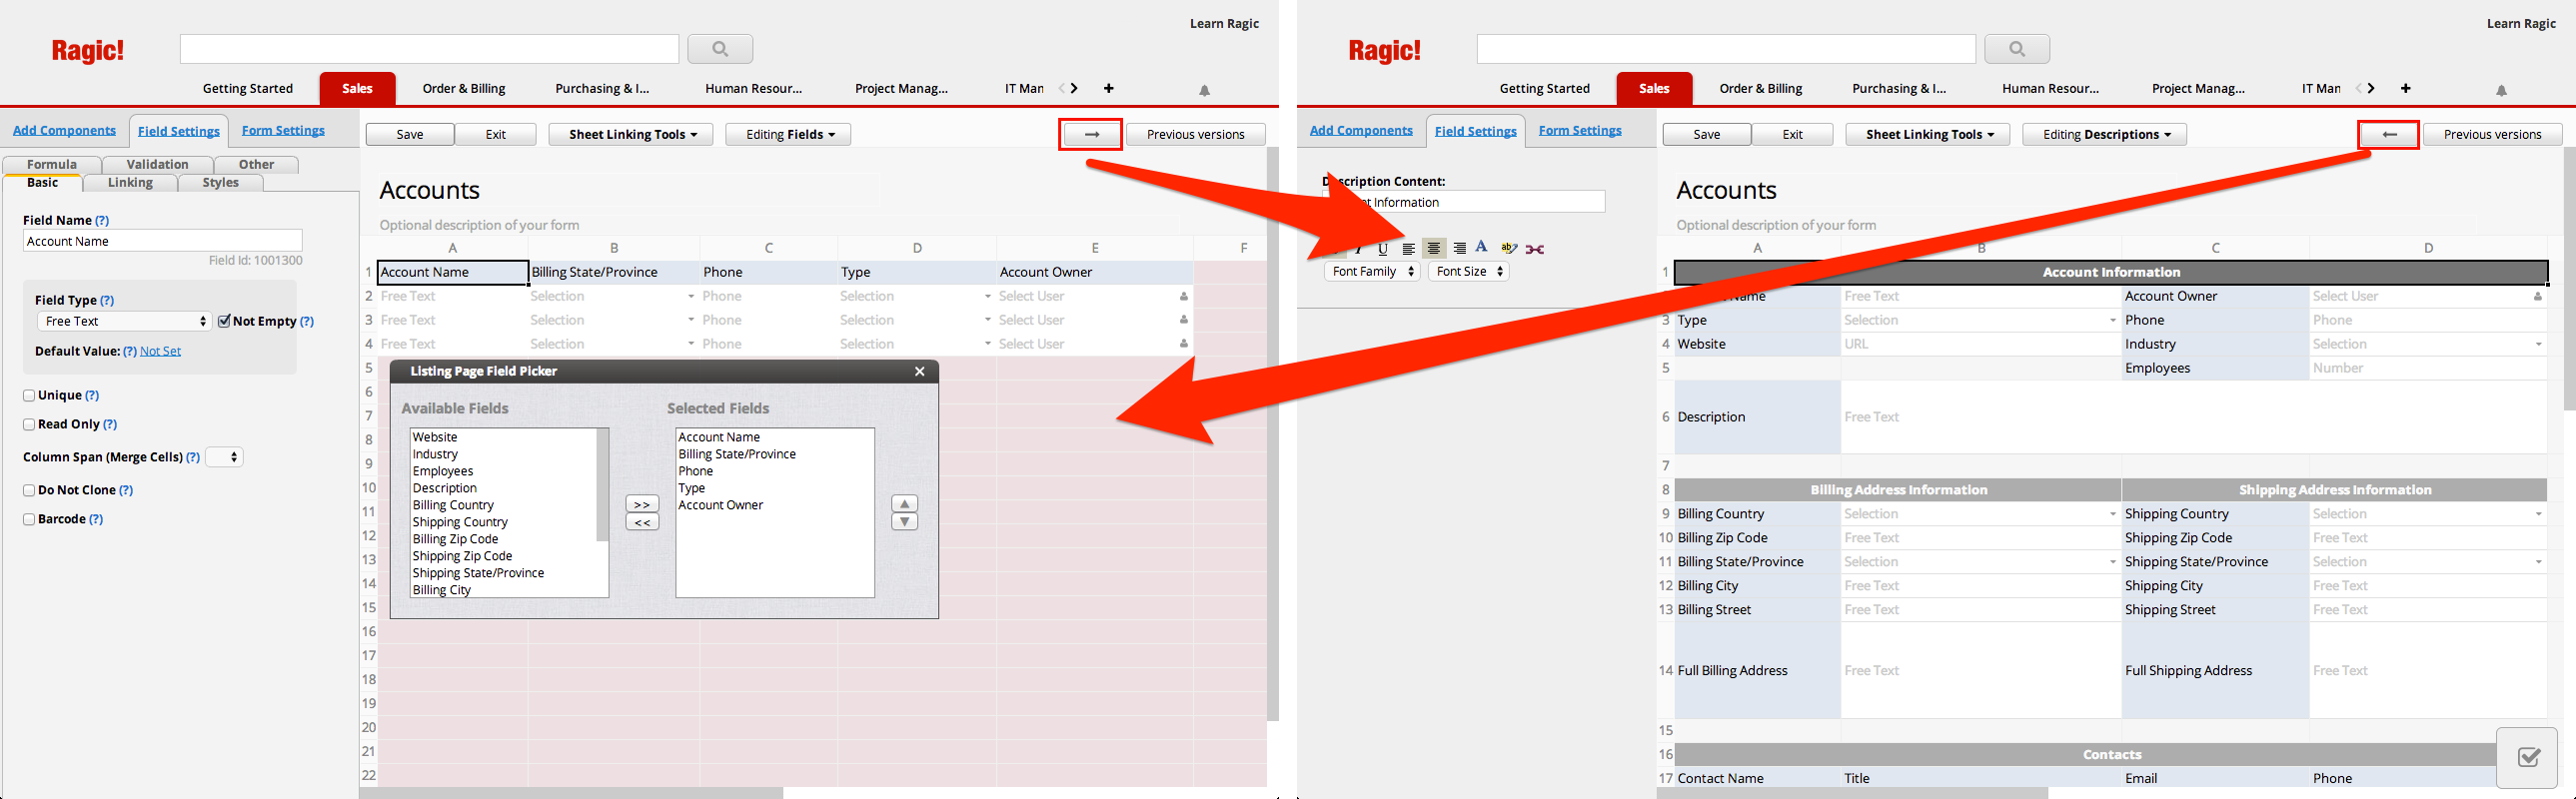
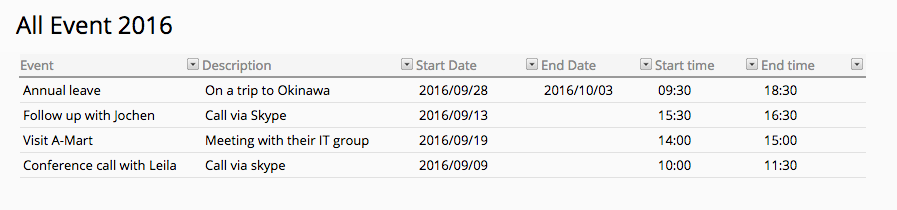
You can add your event data from Ragic database sheet to your calendar applications with more information like title, description, and duration with beginning and ending date & time.
To do this, navigate to the Calendar Sync option found under Tools
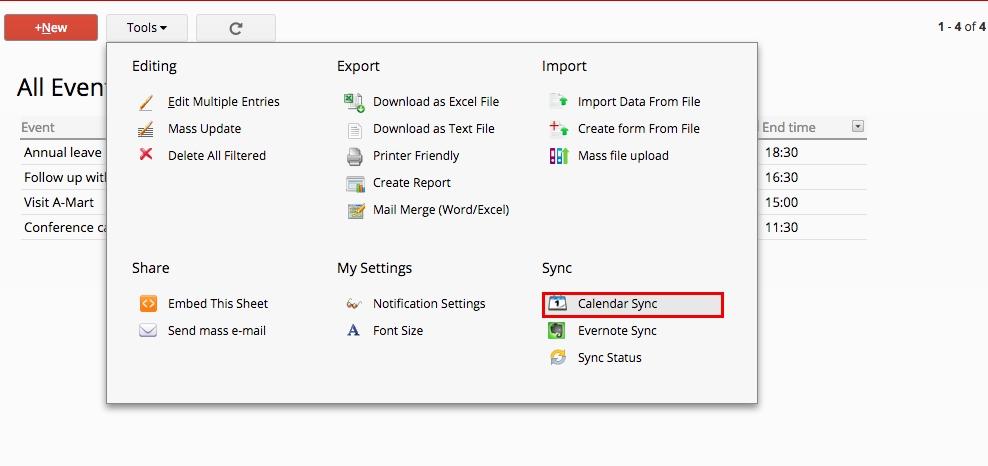
Select the fields you would like to add to your calendar like Title, Description, Start Date, Start time, End Date, and End time of a event from the pop-up menu, you can create another set by clicking plus button if needed.

Obtain your iCalendar URL from the button below, and follow the instructions to add these dates to your favorite calendar application.
Ragic's calendar feature is supported on major calendar applications, including iCal, Google Calendar, IBM Lotus Notes, and Microsoft Outlook, which means that you'll be able to track the important dates within your Ragic database from all devices.
Below is the result of Calendar sync with Google calendar:
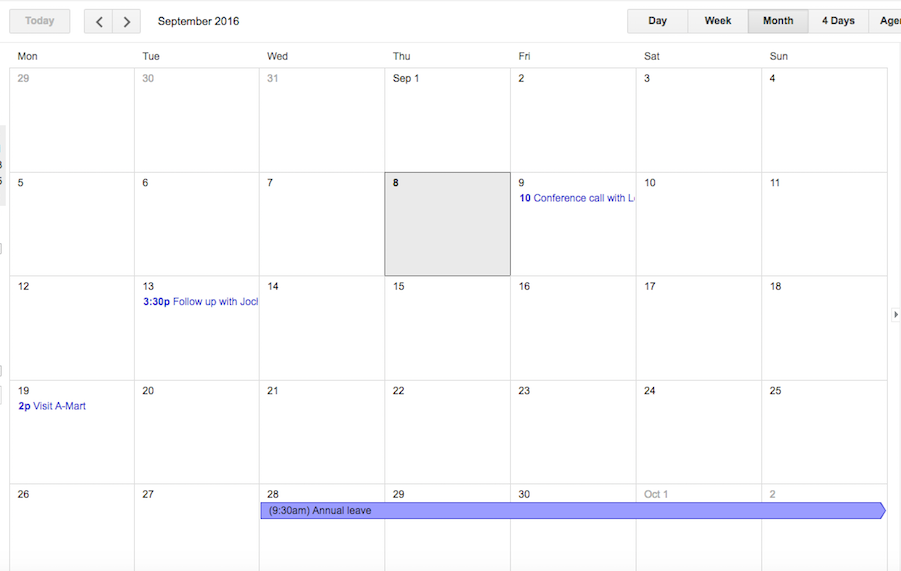
You can also refer to this topic about how to force refresh Google Calendar.
Ragic has certain default access rights for user groups for features, that is visible under the Feature Settings menu. This is accessible from Start tab > Account Setup > Feature Settings.
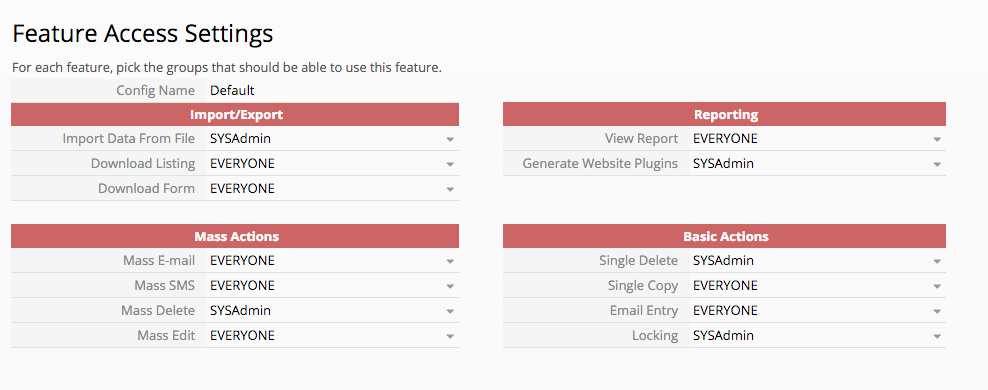
Below are the features that are listed in the Feature Access Setting menu.
| Feature Access Setting | Description | Default Setting |
|---|---|---|
| Import/Export | ||
| Import Data From File | The ability to import data from .csv and .xls files. This includes doing a mass update by importing data | SYSAdmin |
| Download Listing | Exporting data from the listing page | Everyone |
| Download Form | Downloading single entries from the form page | Everyone |
| Mass Actions | ||
| Mass E-mail | Sending out mass e-mails | Everyone |
| Mass SMS | Sending out mass text messages | Everyone |
| Mass Delete | Deleting filtered entries from the listing page | SYSAdmin |
| Mass Edit | Editing entries through the listing page | Everyone |
| Reporting | ||
| View Report | Viewing reports that are saved under the Reports tab | Everyone |
| Generate Website Plugins | Creating a website plugin through the web embed tool | SYSAdmin |
| Basic Actions> | ||
| Single Delete | Deleting a single entry that does not belong to a user | SYSAdmin |
| Single Copy | Cloning an entry | Everyone |
| Email Entry | E-mailing an entry | Everyone |
| Locking | Locking an entry so it cannot be edited without unlocking | SYSAdmin |
You can configure the access rights for certain features within Ragic if you have a professional plan subscription or above. Simply select the user groups that should have access to use a certain feature.

Ragic uses Twilio to send text messages, and you can send text messages to phone numbers in almost any country in the world. So if you're outside US or Canada, please format your mobile phone numbers in international format E.164 like +18886668037.
E.164 international phone number formatting can have a maximum of fifteen digits, and are usually written as follows:
[+][country code][subscriber number including area code]
For example, for a mobile number 05 12 34 56 78 in France, you will have to write +33512345678.
For a mobile number 0911-010203 in Taiwan, you will have to write +886911010203
If you have a "Phone" field already, you may use string formulas to retrieve international format.
For example, if the "Phone" field locates in A2 with format 310-123-4567, you can create a "SMS" free text field with formulas below:
"+1"+LEFT(A2,3)+MID(A2,4,3)+RIGHT(A2,4)
To do this, go to the design mode of the form page you would like to add the action in. You will find a list of your linked sheets under the Sheet Linking Tools menu, sorted beneath the type of linking. Click on the + icon next to the version of the sheet you would like to navigate to through your entries.
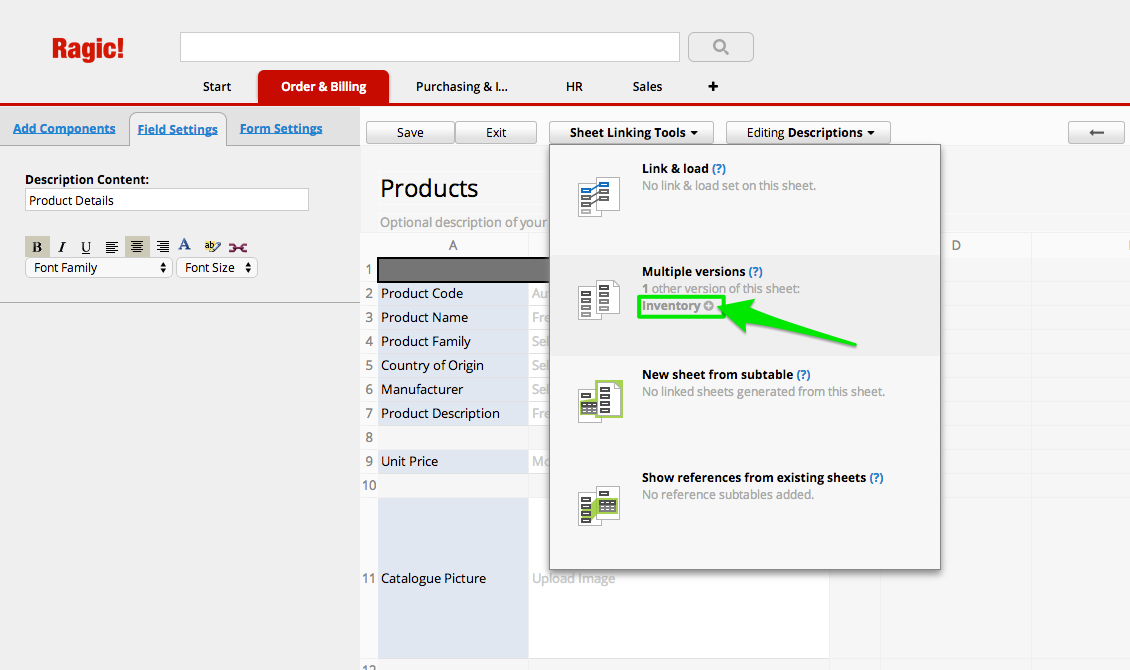
You will be prompted to name the button that will be added to your action.
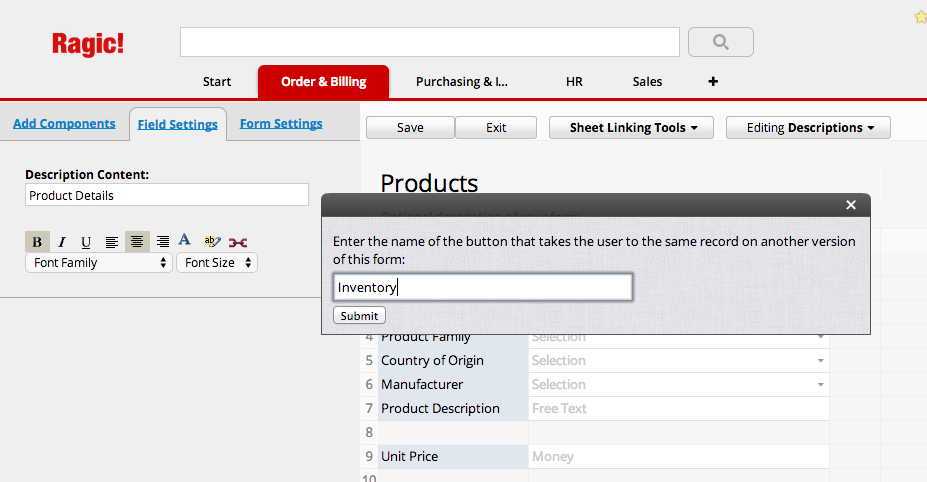
This will create an action button that will take you to the URL from each entry to the associated entry in your duplicated sheet.
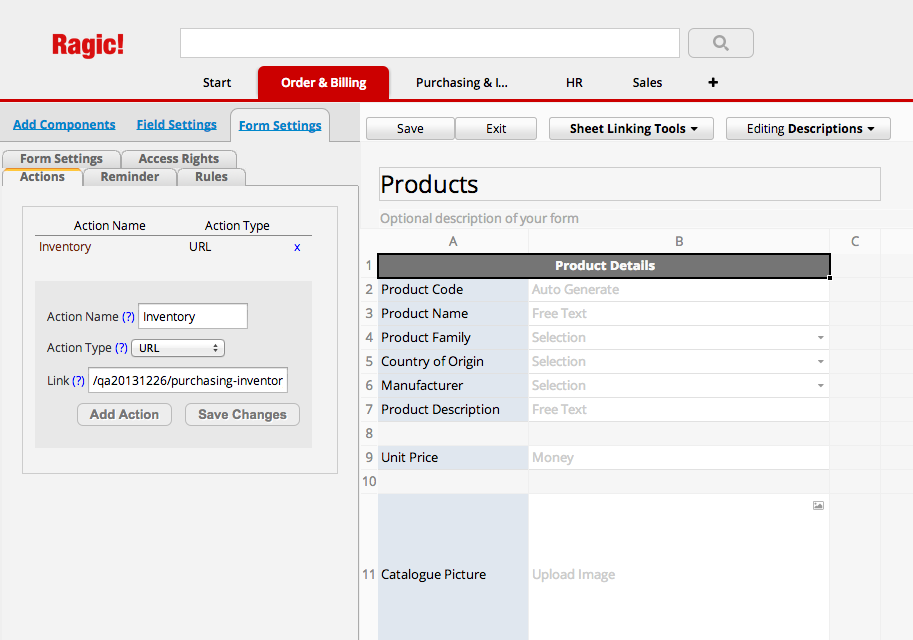
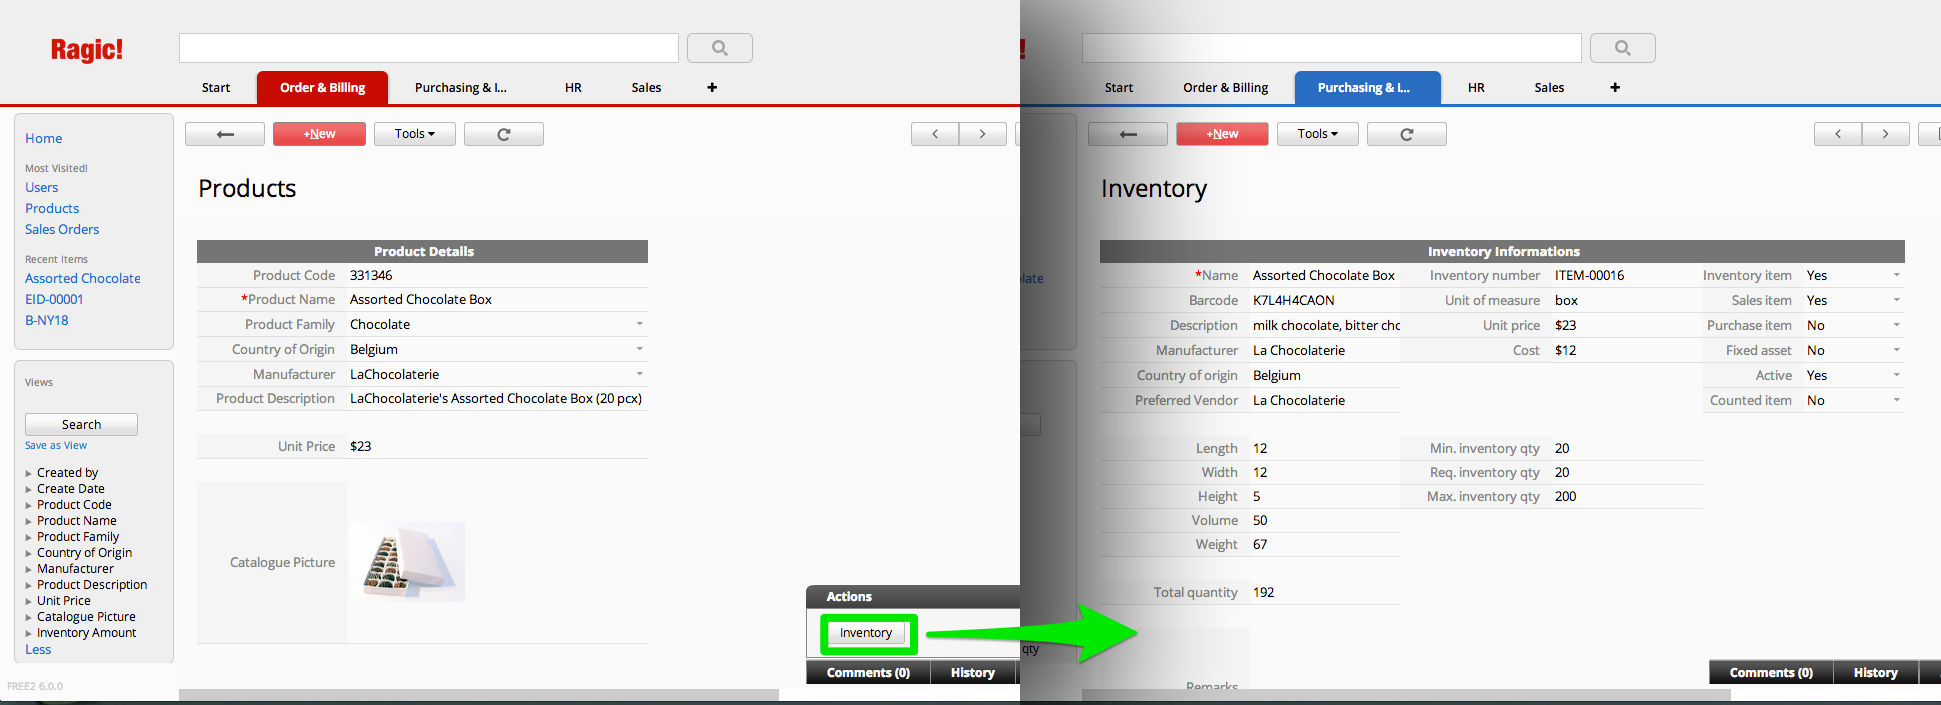
To have a link back to the first sheet, you can redo these steps in your second sheet.
To do this, go to the design mode of the form page you would like to add the action in. You will find a list of your linked sheets under the Sheet Linking Tools menu, sorted beneath the type of linking. Click on the + icon next to the linked sheet you would like to add a new entry in.
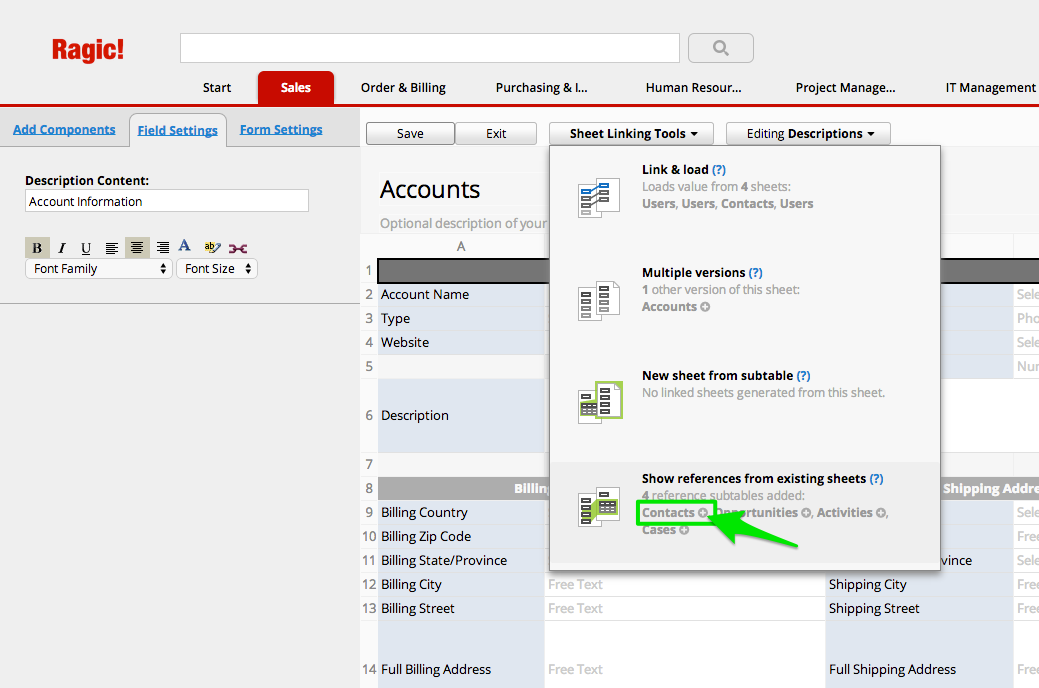
You will be prompted to name the button that will be added to your action.
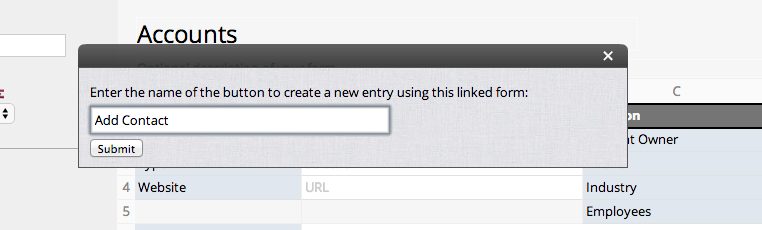
This will create an action button that will allow you to add a new entry to your subtable by filling out the full version of the form.
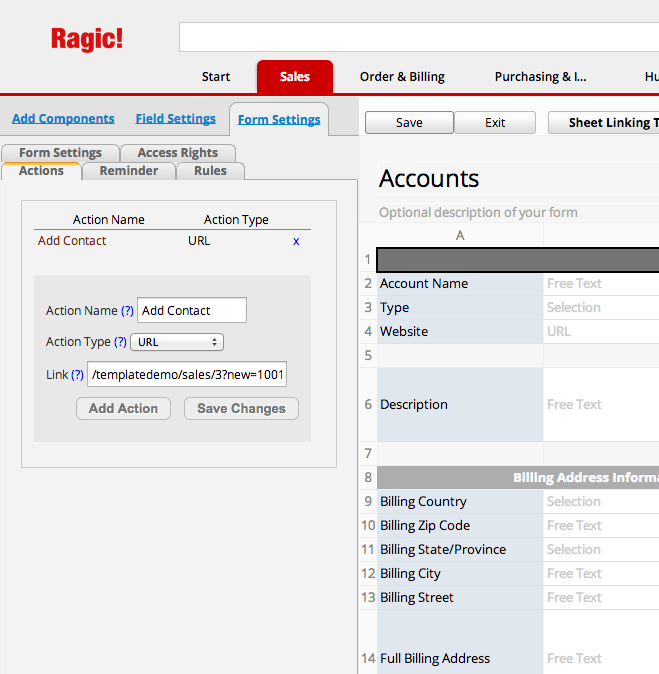
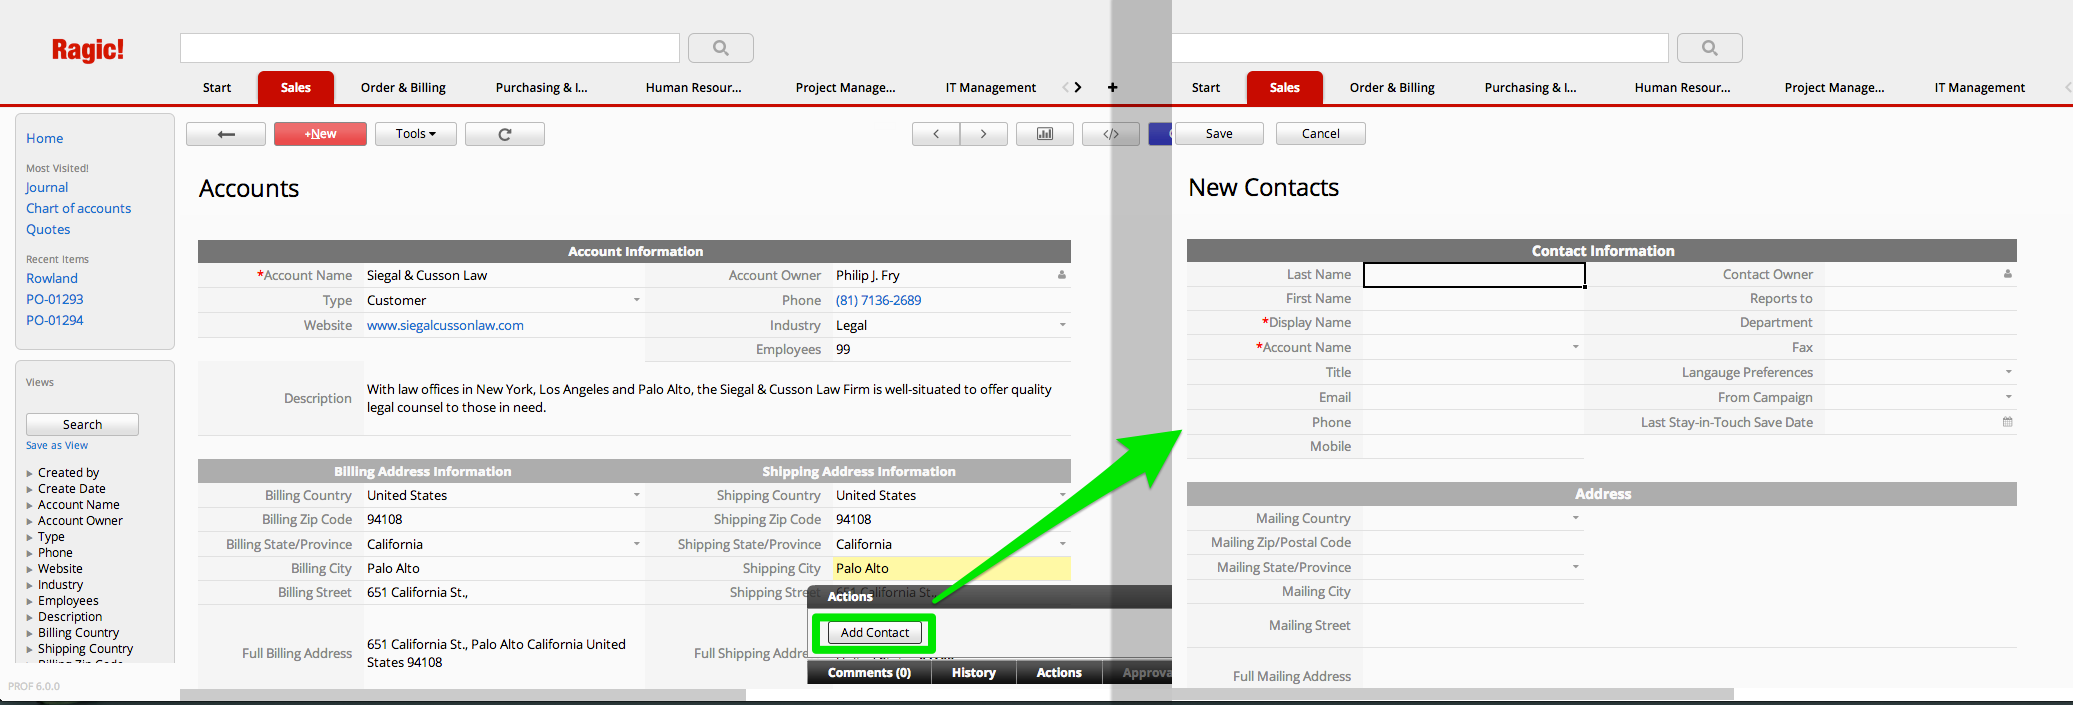
Ragic has a convenient import wizard for users to import from their existing data from Excel or CSV files.
To import multiple values for your multiple selection fields, you can format your fields in the file you are importing with a vertical bar character (|) separating your values.
For example, with a custom domain name, users can sign in to their Ragic account at ragic.yourdomain.com instead of at the longer default address www.ragic.com/youraccountname.
First we need to know what is the server name. If the URL of your database account is:
ap2.ragic.com/demo
then your server name is:
ap2.ragic.com
After that, you can add a new CNAME record from where you manage your DNS. Make
ragic.yourdomain.com
point to
ap2.ragic.com
Note that adding a CNAME record requires logging in to your account at your domain host's website, not with Ragic. (You might have already done this to verify your domain, in which case you'll find the steps are similar.) If you can't access your domain's DNS records, contact your domain host directly for assistance.
You can also refer to this document on typical CNAME configurations
Next, navigate to Company Setting under Start tab > Account Setup in your Ragic database account.
Fill the Company Domain field with the URL you have assigned for this custom domain. For this case it will be:
ragic.yourdomain.com
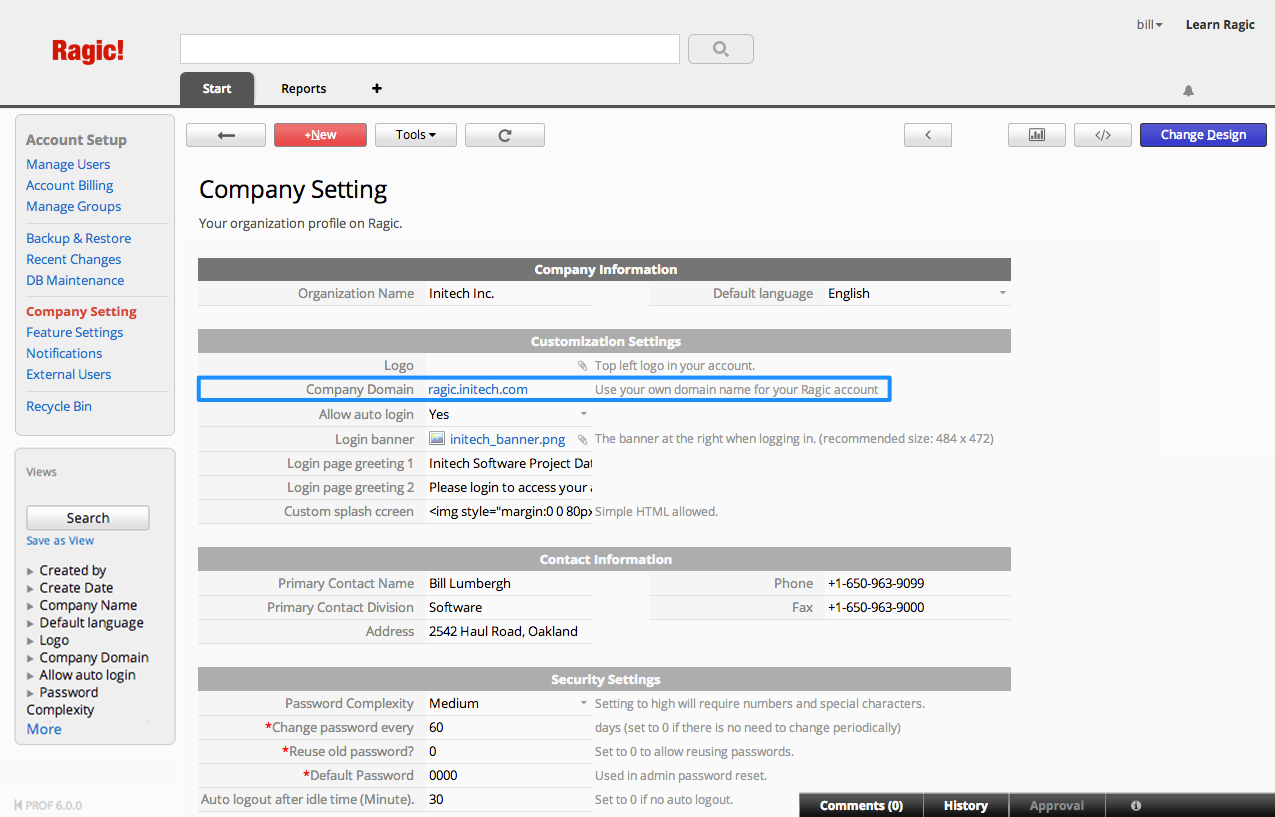
Finally, you can then use the URL created with your custom domain name to enter your Ragic database!
To do this setting, under your Start tab, click on Account Setup. Navigate to go to your Company Setting.
Upload a custom banner image to the Login banner field with the specified recommended image size setting. You can also change what the greeting message header is through the Login page greeting1 field, and the greeting message text through the Login page greeting2 field.
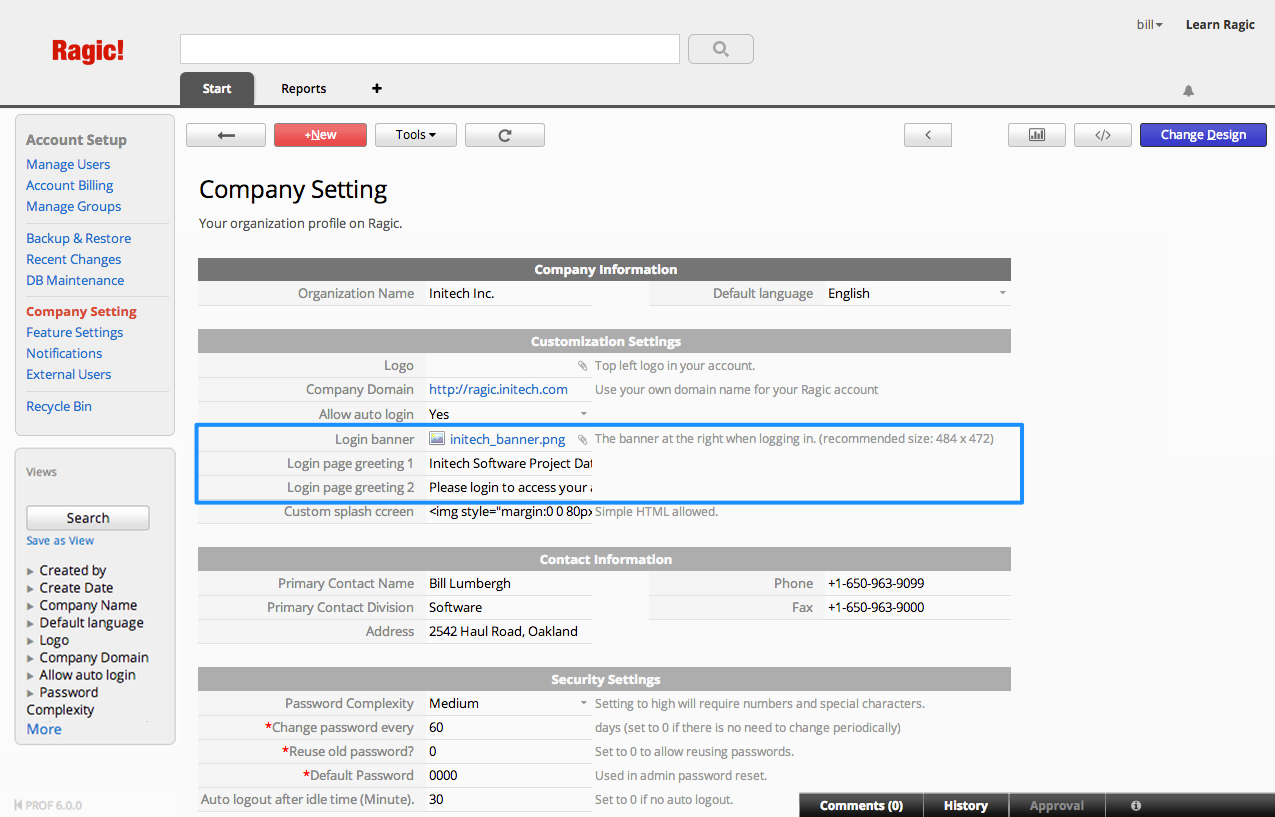
Your custom login screen will be displayed according to the settings you have made in the company setting page.
To do this setting, under your Start tab, click on Account Setup. Navigate to your Company Setting.
For your custom splash screen, you can use basic HTML in the Custom Splash Screen field to add your company logo or other type of image.
Example HTML code:
<img src="https://www.companywebsite.com/companylogo.png"/>
Design tip: depending on the size of the image you are using, the progress bar might overlap your image. For your progress bar to display below your image, you can add a margin property to your image to adjust your overall layout.
Example HTML code:
<img style="margin:0 0 100px 0;" src="https://www.companywebsite.com/companylogo.png"/>
Your custom splash screen will be displayed according to the settings you have made in the company setting page.

To do this setting, access your Company Setting Panel.
View the last section, Security Settings and make the necessary changes to the fields.
Setting the password complexity to high will require the passwords include numbers and special characters. Your password will need to have at least two of the following: numbers, symbols, and uppercase characters.
Setting the password complexity to medium will require the passwords include at least 6 characters in their passwords.
When set, the user will be prompted to change their password according to the number of days you enter. If there is no need for your users to change their passwords periodically, enter 0 for this value.
Input number only.
Set to 0 to allow your users to reuse passwords that they have used before.
Set to 1 to allow your users to reuse passwords except last passwords.
Set to 2 to allow your users to reuse passwords except last two passwords.
And so on.
This password will be the default password for users who have had their password reset by the admin. You can change this to another string if required.
If set, Ragic will automatically log the user out after the specified minutes of idle time. Set to 0 if this is not required.
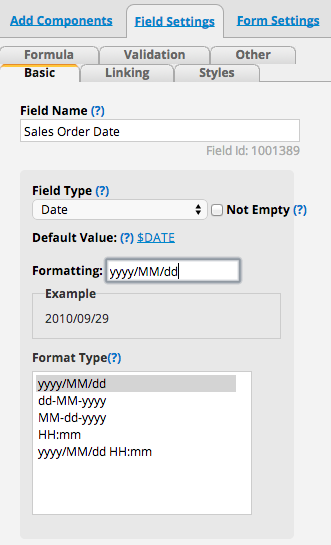
If none of the date formats fit your requirements, you can write your own formatting with the table below:
| Field | Full Form | Short Form |
| Year | yyyy (4 digits) | yy (2 digits), y (2 or 4 digits) |
| Month | MMMM (full name Ex. January), MMM (abbr. Ex. Jan) | MM (2 digits), M (1 or 2 digits) |
| Day of Month | dd (2 digits) | d (1 or 2 digits) |
| Day of Week | EEEE (name) | E (abbr.) |
| Hour (1-12) | hh (2 digits) | h (1 or 2 digits) |
| Hour (0-23) | HH (2 digits) | H (1 or 2 digits) |
| Hour (0-11) | KK | K (1 or 2 digits) |
| Hour (1-24) | kk (2 digits) | k (1 or 2 digits) |
| Minute | mm (2 digits) | m (1 or 2 digits) |
| Second | ss (2 digits) | s (1 or 2 digits) |
| AM/PM | a |
If, for any reason, you need to collapse this left sidebar, you can hover over the edge between the left sidebar and the listing page, you'll notice that your pointer will turn into a double-sided arrow. Use this arrow to drag the listing page to the right or left as needed.
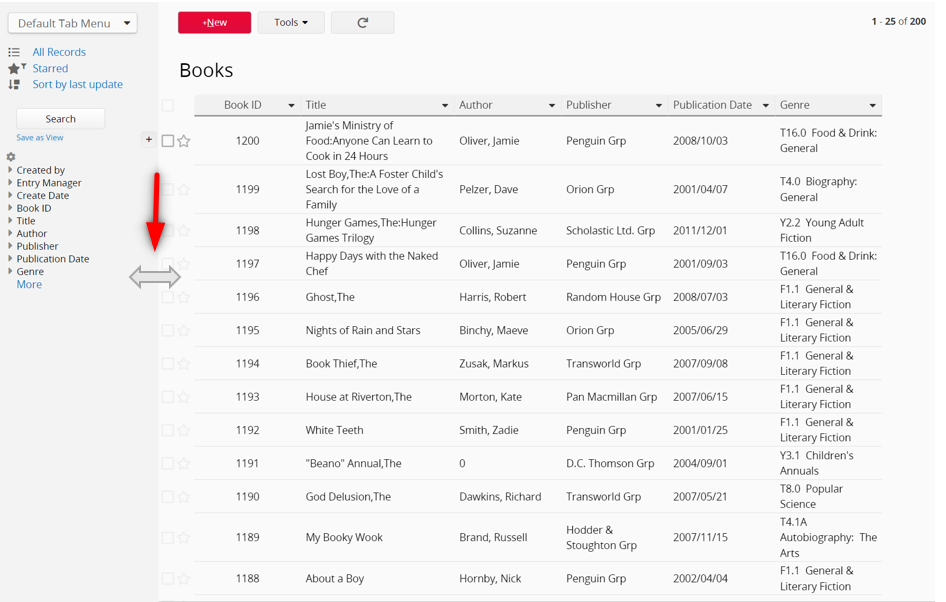
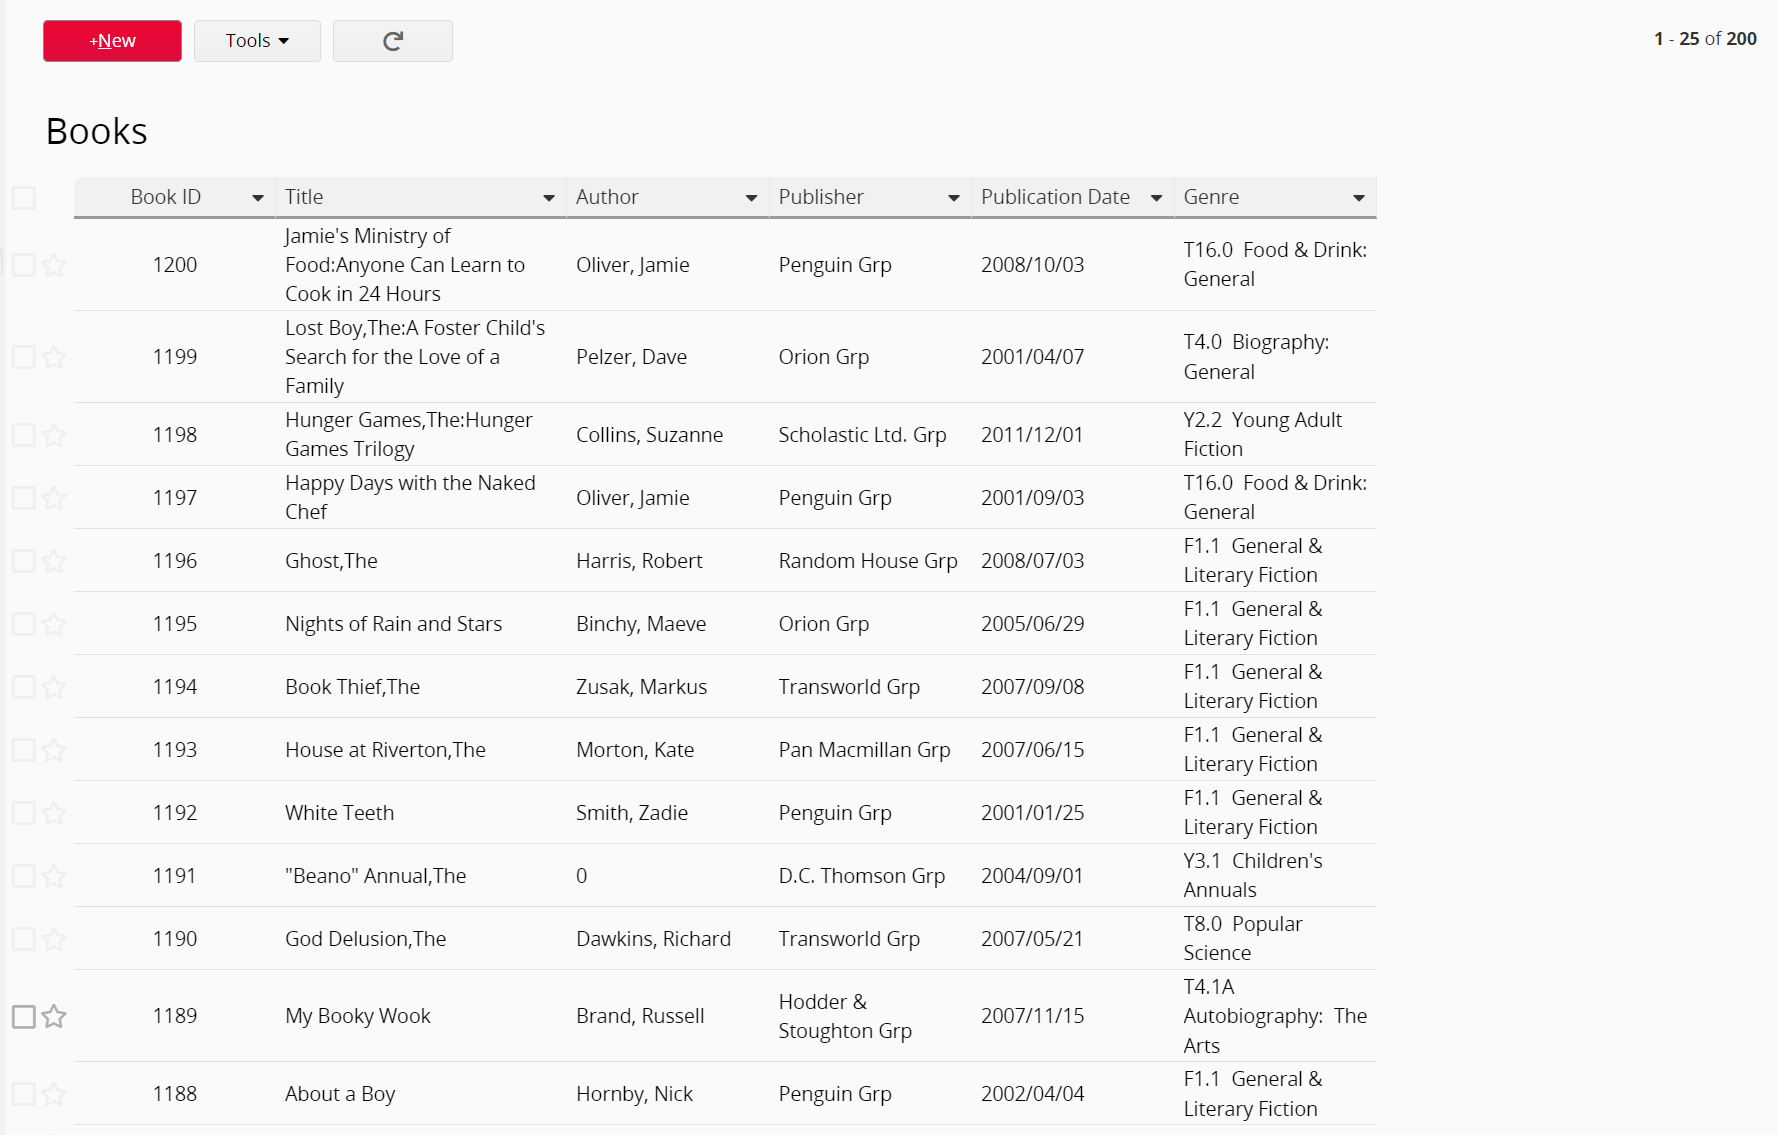
You can create a new sheet by clicking on the + sign at the top of your page.
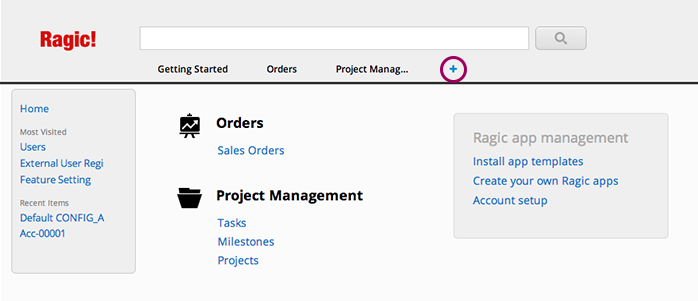
Name your new sheet and check the box Create new sheet with my Excel file. This will take you to the import wizard. The step-by-step wizard will guide you through the field mapping process as well as other configurations for the data to import correctly.
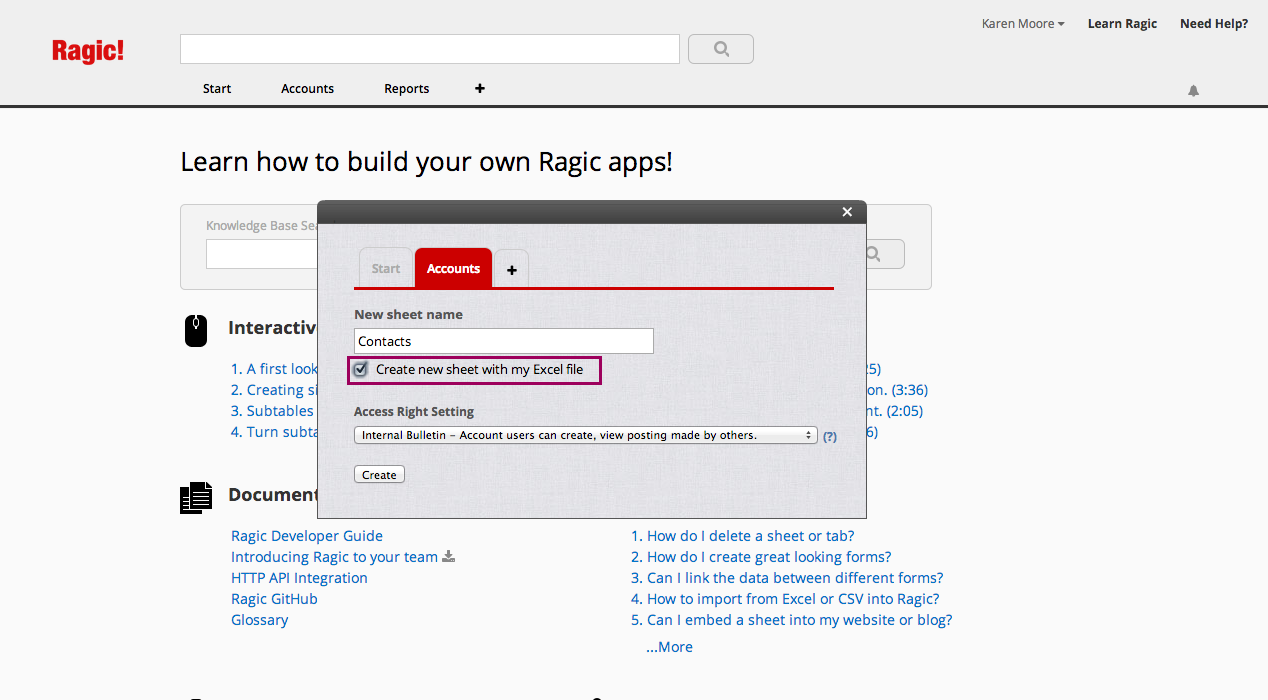
Pick a file from your computer to upload into Ragic.
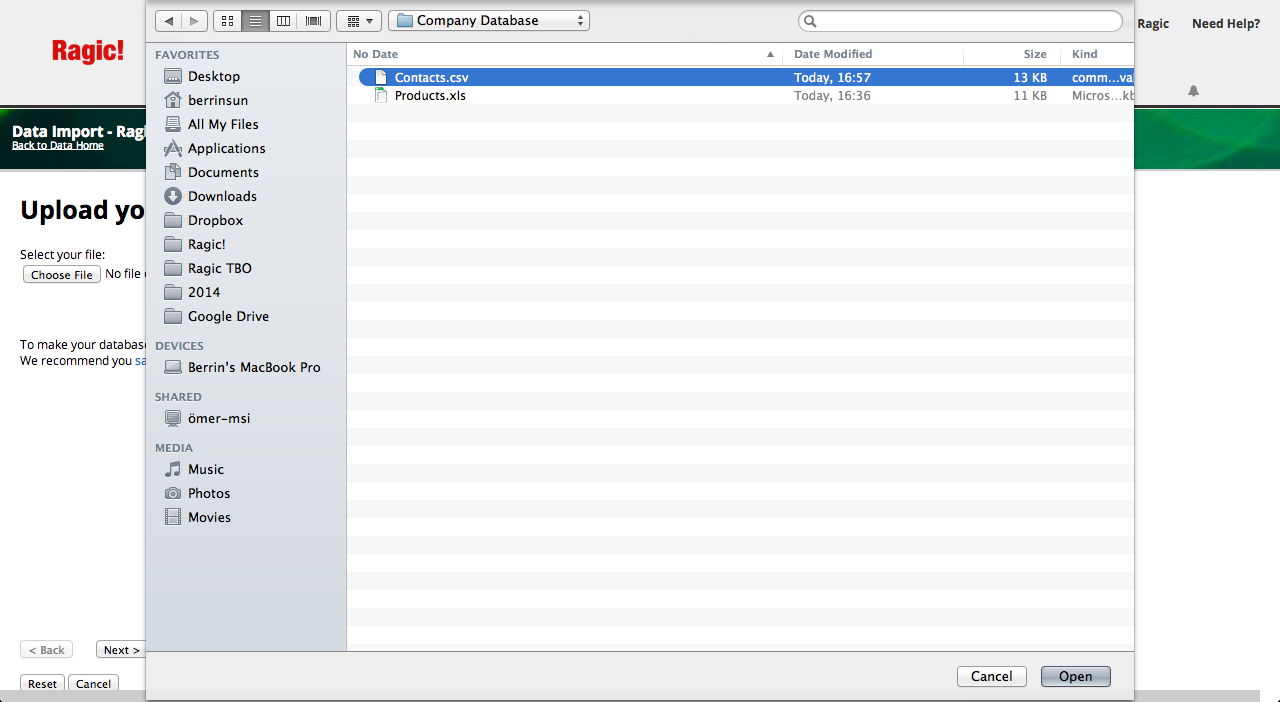
Ragic supports .xls .xlsx and .csv files. We recommend that you save your file as .csv for the best performance.
For Ragic to map your information correctly to entries, you will need to have a unique identification that we call key field, such as "Product ID" for products, or "Customer No." for your customers. To make your database easier to use, let the first column of your import data be this type of key field.
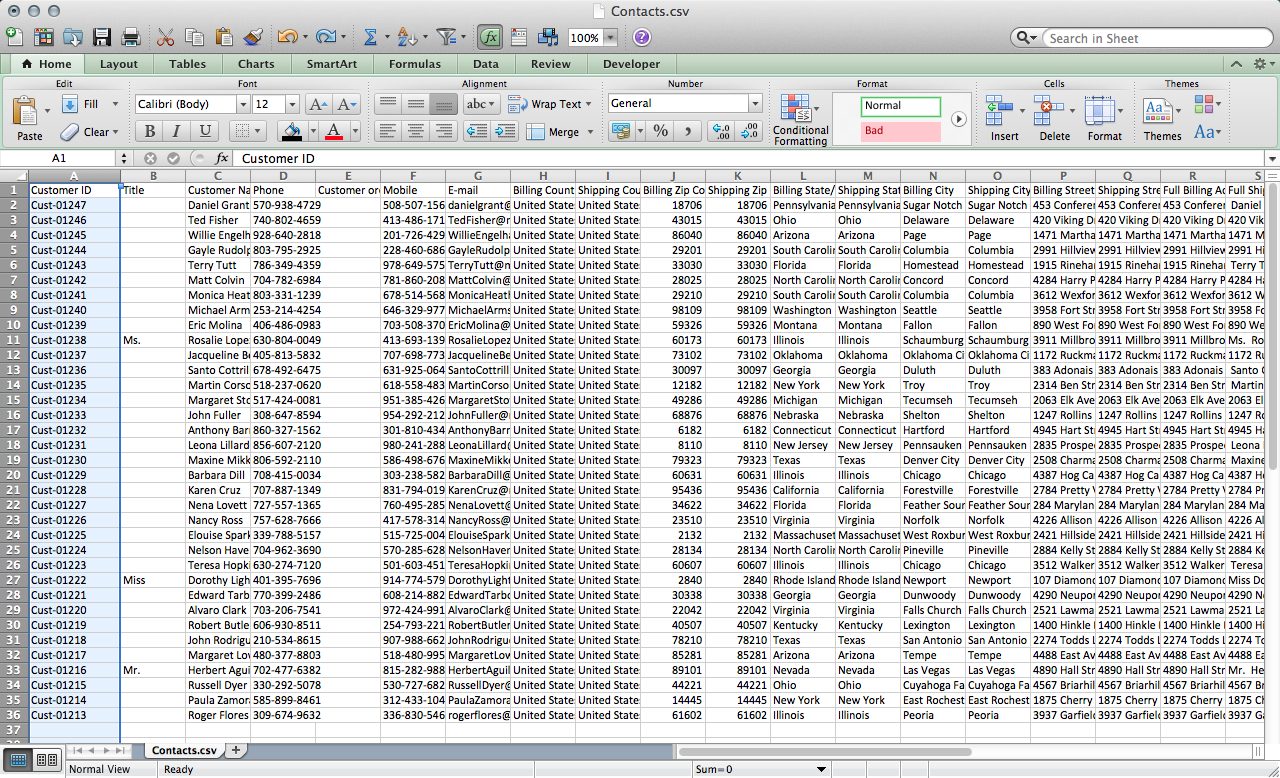
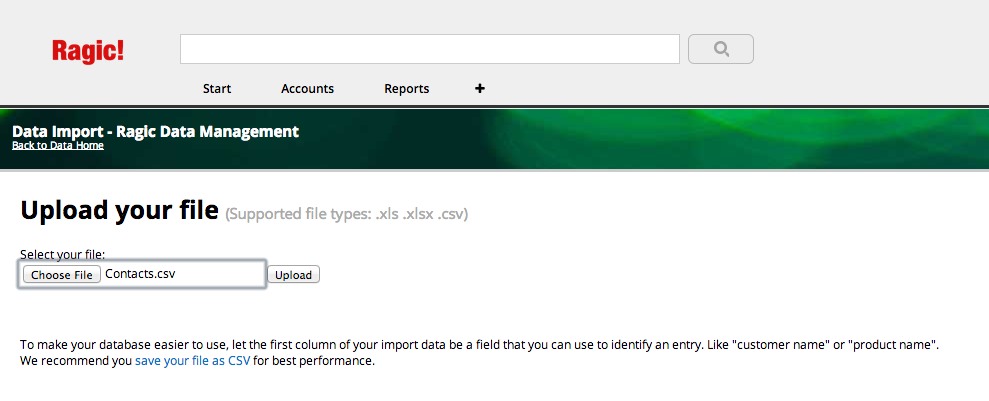
Determine if your first row is the header. If so, Ragic will automatically determine how the data in this row will be mapped to your fields for the next step.
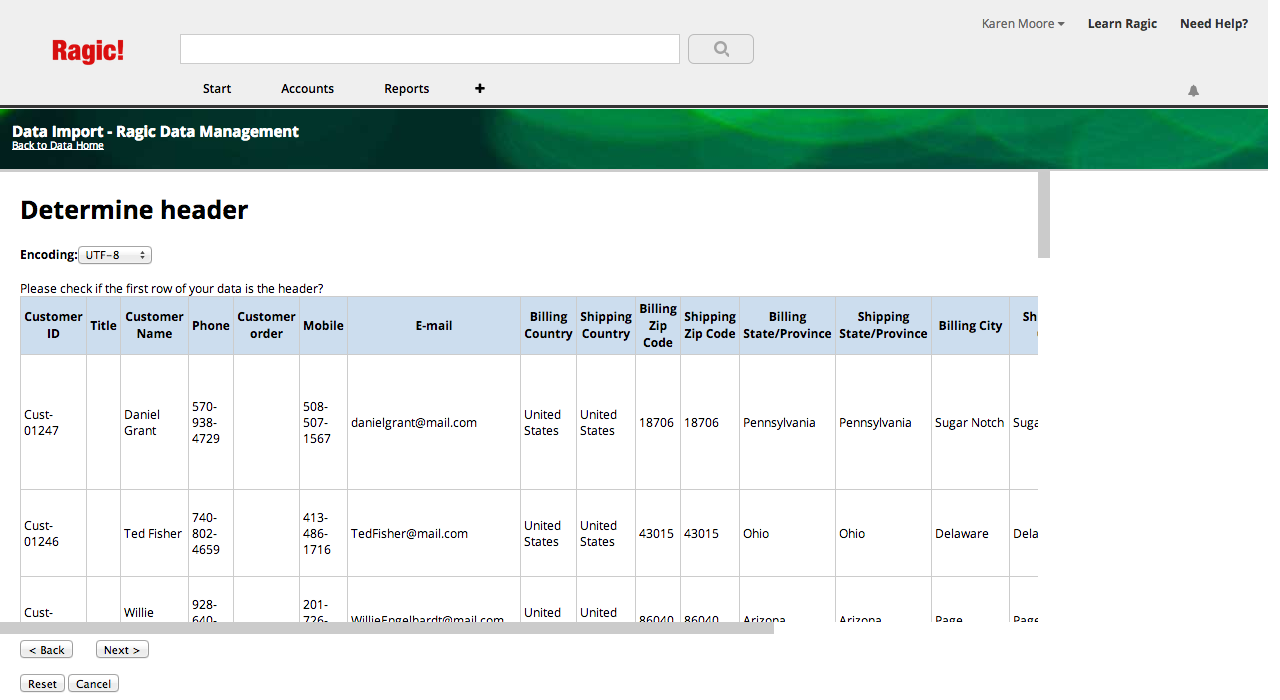
You can choose an initial field type for each field.
There are many other field types available in Ragic, and you can later edit your fields according to your own requirements.
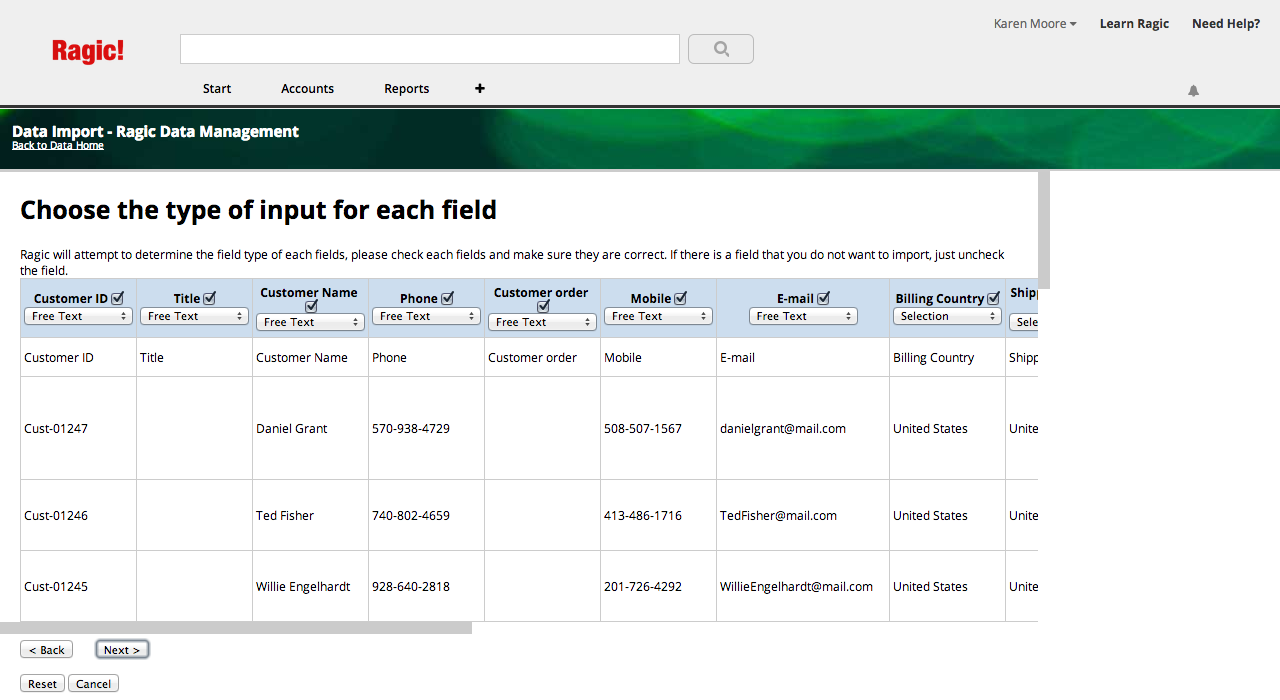
The last step is to import your data and create your new sheet in Ragic. This step can take up to a few minutes if you have a lot of columns and rows in your spreadsheet.
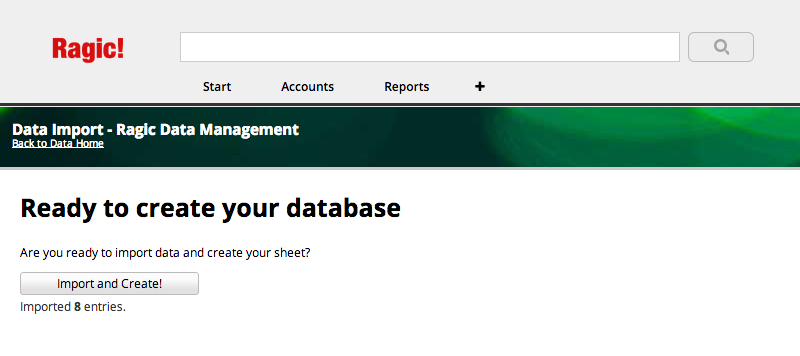
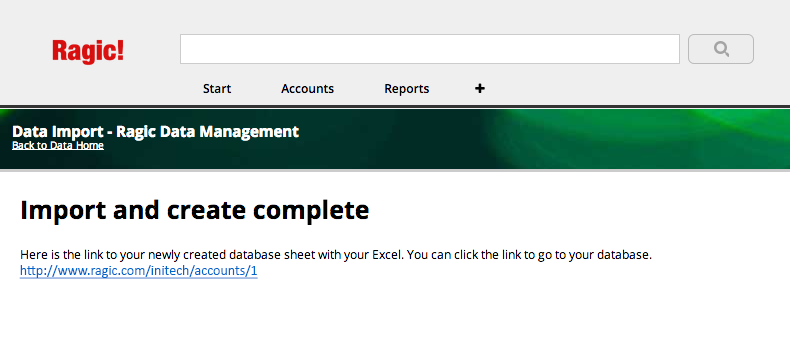
Congratulations, you have now created your new database sheet in Ragic.
Please make sure that you have exported all your data beforehand, or you do not have any data of importance on your account.
Please click the hamburger icon on the upper-left of the database and navigate to the DB Maintenance Menu page. You'll see the Delete My Account option on the bottom.
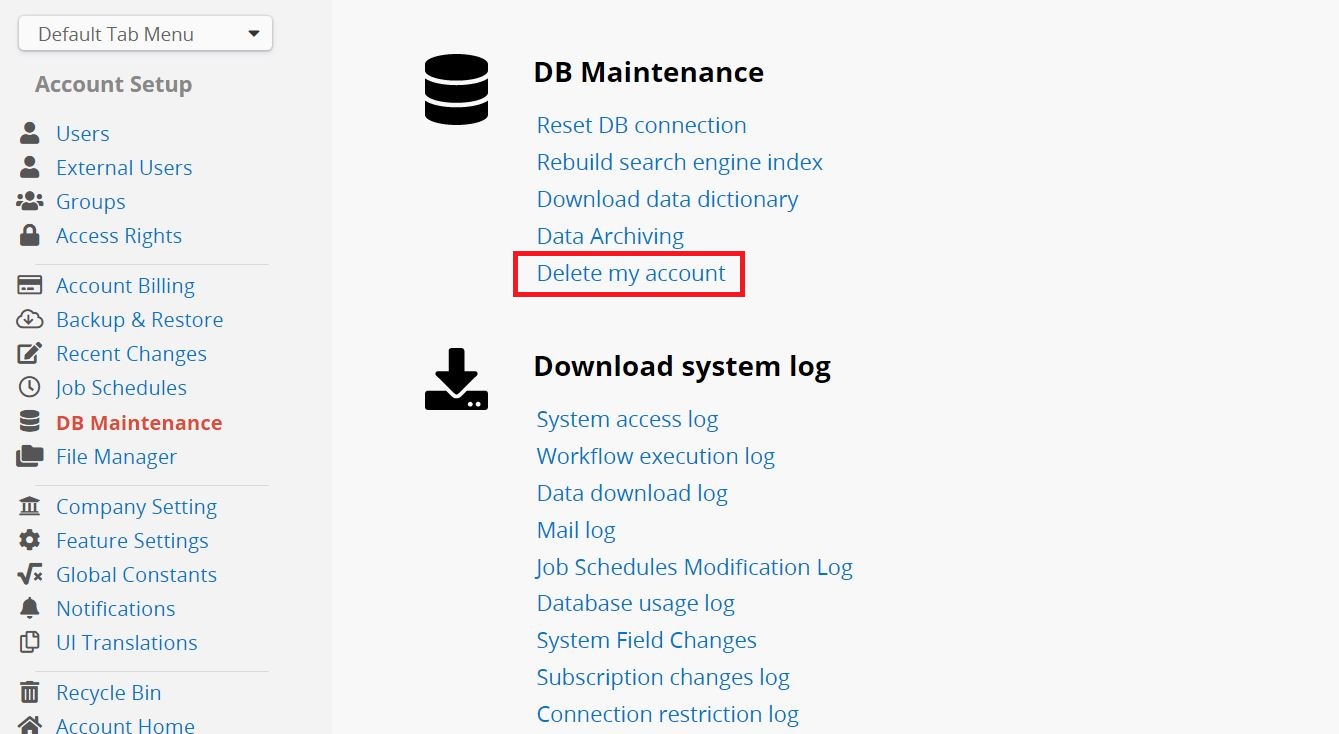
Please check this documentation if you are looking to cancel payment to your account.
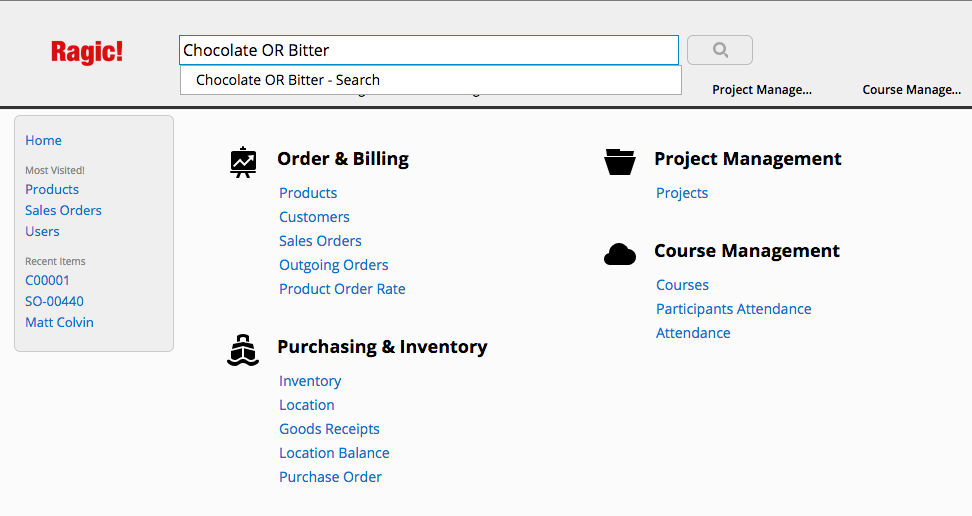
You can also modify query terms to provide a wide range of searching options.
While doing this, you can search any field by typing the field name followed by a colon ":" and then the term you are looking for.
Boolean operators allow terms to be combined through logic operators. Ragic supports AND, "+", OR, NOT and "-" as Boolean operators. Please note that the boolean operators are case-sensitive.
OR
The OR operator is the default conjunction operator. This means that if there is no Boolean operator between two terms, the OR operator is used. The OR operator links two terms and finds a matching entry if either of the terms exist in an entry. The symbol || can be used in place of the word OR.
To search for documents that contain either "customer service", or just "customer" use the query:
"customer service" customer
or
"customer service" OR customer
AND
The AND operator matches documents where both terms exist anywhere in the text of a single entry. The symbol && can be used in place of the word AND.
To search for documents that contain "customer service" and "Service Issues" use the query:
"customer service" AND "Service Issues"
+
The "+" or required operator requires that the term after the "+" symbol exist somewhere in a the field of a single entry.
To search for entries that must contain "customer" and may contain "service" use the query:
+customer service
NOT
The NOT operator excludes entries that contain the term after NOT. The symbol ! can be used in place of the word NOT.
To search for entries that contain "customer service" but not "Service Issues" use the query:
"customer service" NOT "Service Issues"
Note: The NOT operator cannot be used with just one term. For example, the following search will return no results:
NOT "customer service"
-
The "-" or prohibit operator excludes entries that contain the term after the "-" symbol.
To search for entries that contain "customer service" but not "Service Issues" use the query:
"customer service" -"Service Issues"
You can place single and multiple character wildcard searches within single terms (not within phrase queries).
To perform a single character wildcard search, use the "?" symbol.
To perform a multiple character wildcard search, use the "*" symbol.
The single character wildcard search looks for terms that match that with the single character replaced.
For example, to search for "text" or "test" you can use the search
te?t.
Multiple character wildcard searches looks for 0 or more characters. For example, to search for test, tests or tester, you can use the search
test*.
You can also use the wildcard searches in the middle of a term, such as
te*t
Note: You cannot use a * or ? symbol as the first character of a search.
To do a fuzzy search (finding stings that match a pattern approximately, rather than exactly) use the tilde, "~" symbol at the end of a single word term. For example, to search for a term similar in spelling to "roam" use the fuzzy search
roam~. This search will find terms like foam and roams.
An additional (optional) parameter can specify the required similarity. The value is between 0 and 1, with a value closer to 1 only terms with a higher similarity will be matched. For example:
roam~0.8
The default that is used if the parameter is not given is 0.5.
You can find words that are within a specific distance away. To do a proximity search use the tilde, "~", symbol at the end of a phrase. For example, to search for a "customer" and "breakfast" within 10 words of each other in an entry, use the search:
"customer breakfast"~10
Usually, the left sidebar search tool would have options to do a range search for specific field types, such as date fields, but range searches are also supported in Ragic.
Range queries allow one to match entries whose field values are between the lower and upper bound, specified by the range query. Range queries can be inclusive or exclusive of the upper and lower bounds. Sorting is done lexicographically.
Date:[20020101 TO 20030101]
This will find entries whose "Date" field has values between 20020101 and 20030101. These dates would be inclusive to the search. Note that range queries are not only reserved for date fields. You could also use range queries with other fields:
title:{Aida TO Carmen}
This will find all entries whose titles are alphabetically between Aida and Carmen, but not including Aida and Carmen.
Note: Inclusive range queries are denoted by square brackets. Exclusive range queries are denoted by curly brackets.
You can boost the relevance level of matching entries, based on the terms found. To boost a term use the caret "^" symbol with a boost factor (a number) at the end of the term you are searching. The higher the boost factor, the more relevant the term will be.
Boosting allows you to control the relevance of an entry by boosting its term. For example, if you are searching for customer service,
and you want the term "customer" to be more relevant, you can boost it using the ^ symbol along with the boost factor next to the term. You can type:
customer^4 service
This will make documents with the term customer appear more relevant. You can also boost Phrase Terms as in the example:
"customer service"^4 "Customer Service"
By default, the boost factor is 1. Although the boost factor must be positive, it can be less than 1 (e.g. 0.2)
You can use parentheses to group clauses to form sub queries. This can be very useful if you want to control the boolean logic for a query.
For example, to search for either "customer" or "service" and "address" use the query:
(customer OR service) AND address
This eliminates any confusion, and makes sure that address must exist, and either term customer or service may exist in the resulting entries.
You can use parentheses to group multiple clauses to a single field.
To search for a title that contains both the word "return" and the phrase "pink panther", use the query:
title:(+return +"pink panther")
This way the entries in your database will not be copied to the new account, but all your database design will be copied.
Navigate to the database sheet you want to make public.
Click on "Change Design" to go to the Design Mode.
Navigate to Form Settings and Access Rights
Set the default user group "Everyone" to "Viewer".
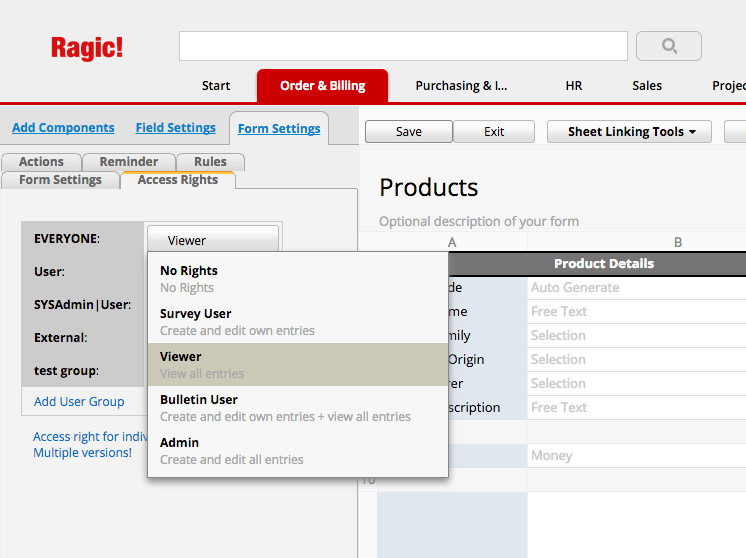
This method will allow anyone to see your database entries. The best way to display your public database is through the web embed option, where you can embed your database as a list of entries, database search options, or a form that will populate your database when filled on your website.
Below is a short list of math objects properties and methods available. These can be applied with your formulas.
| Property | Description |
|---|---|
| Math.E | Returns Euler's number (approx. 2.718) |
| Math.LN2 | Returns the natural logarithm of 2 (approx. 0.693) |
| Math.LN10 | Returns the natural logarithm of 10 (approx. 2.302) |
| Math.LOG2E | Returns the base-2 logarithm of E (approx. 1.442) |
| Math.LOG10E | Returns the base-10 logarithm of E (approx. 0.434) |
| Math.SQRT1_2 | Returns the square root of 1/2 (approx. 0.707) |
| Math.SQRT2 | Returns the square root of 2 (approx. 1.414) |
| Method | Description |
|---|---|
| Math.acos(x) | Returns the arccosine of x, in radians |
| Math.asin(x) | Returns the arcsine of x, in radians |
| Math.atan(x) | Returns the arctangent of x as a numeric value between -PI/2 and PI/2 radians |
| Math.atan2(y,x) | Returns the arctangent of the quotient of its arguments |
| Math.cos(x) | Returns the cosine of x (x is in radians) |
| Math.exp(x) | Returns the value of E raised to the power of a number |
| Math.log(x) | Returns the natural logarithm (base E) of x |
| Math.sin(x) | Returns the sine of x (x is in radians) |
| Math.tan(x) | Returns the tangent of an angle |
In some cases, this might be inconvenient when you're viewing your data.
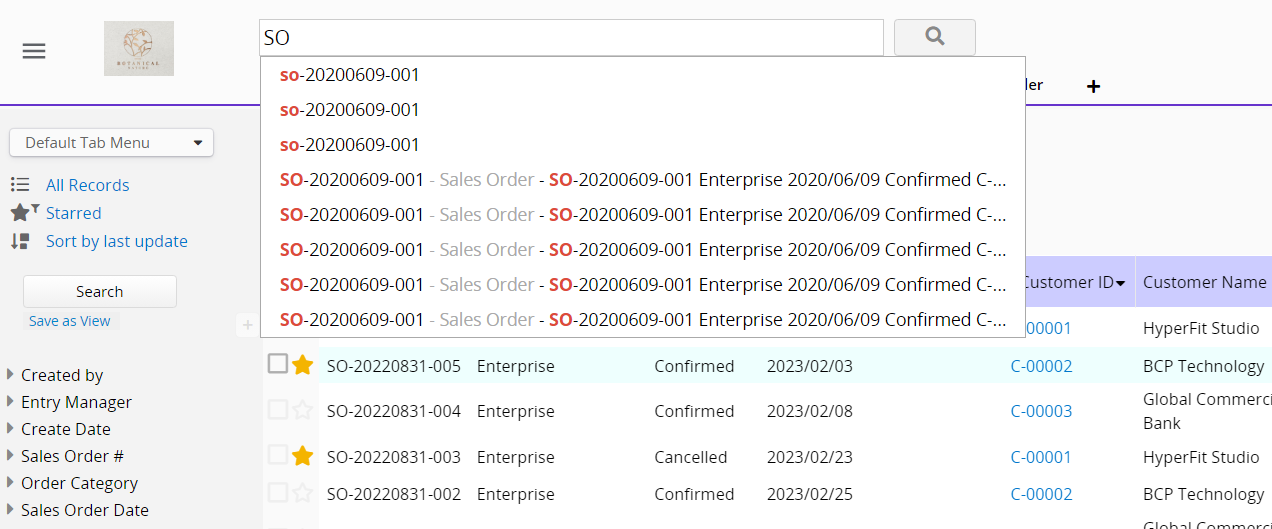
You can change the field to display as the title of your entries, through the design mode of your form. Navigate to Form Settings > Form Settings, and change the Title Field from the dropdown menu that will show you all the available fields.
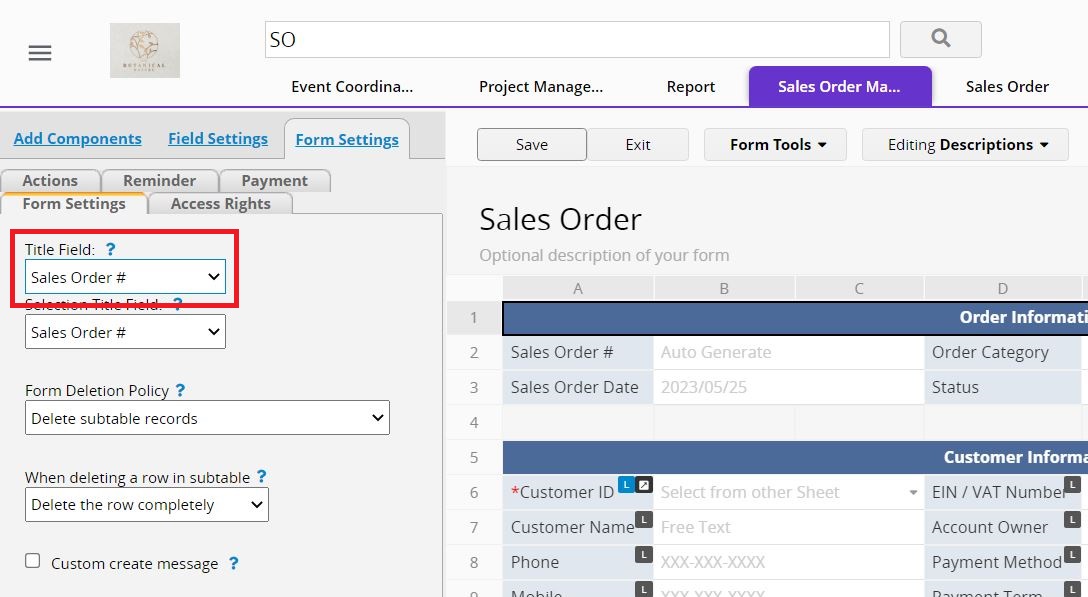
This will change the title field for the top search bar.
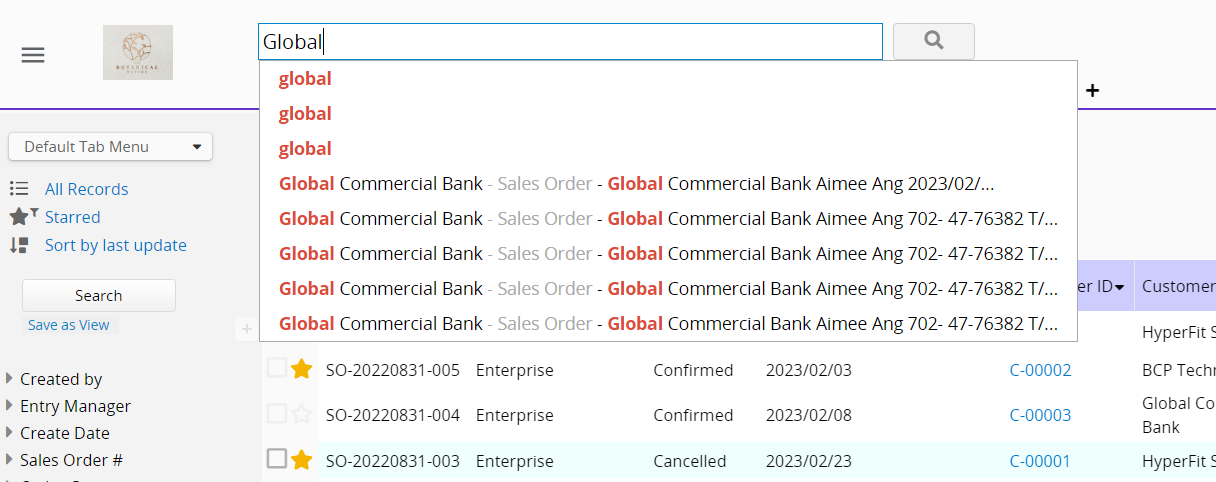
After modifying, the change may not be immediately reflected. If you need to update immediately, you can Rebuild Search Engine Index.
Go to your Company Setting under your Account Setup. You can upload your company logo on this page so that it'll show up on every page.
![]()
Example:
IF(A1==1,"Bad",IF(A1==2,"Good",IF(A1==3,"Excellent","No Valid Score")))
The above formula means that
if A1 is 1, the result is "Bad"
if A1 is 2, the result is "Good"
if A1 is 3, the result is "Excellent"
if A1 is anything else, the result would be "No Valid Score".
If the system stop you from deleting a field, please refer to this document.
Here is a flowchart showing how these sheets are linked to each other.
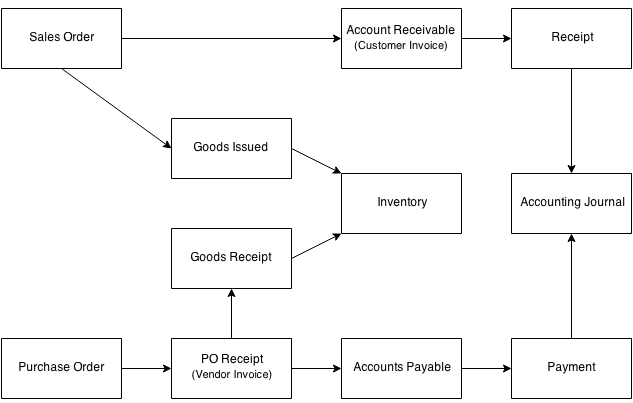

You can choose to open the original entry, or close this panel.
If you would like to disable the right panel, you can run the following URL:
https://www.ragic.com/sims/sharedProperties.jsp?update&fpHoverDisabled=true
If you would like to enable the right panel again, you can run the following URL:
https://www.ragic.com/sims/sharedProperties.jsp?update&fpHoverDisabled=false
Navigate to the database sheet you want to make public.
Click on "Change Design" to go to the Design Mode.
Navigate to Form Settings and Access Rights
Set the default user group "Everyone" to "Survey User".
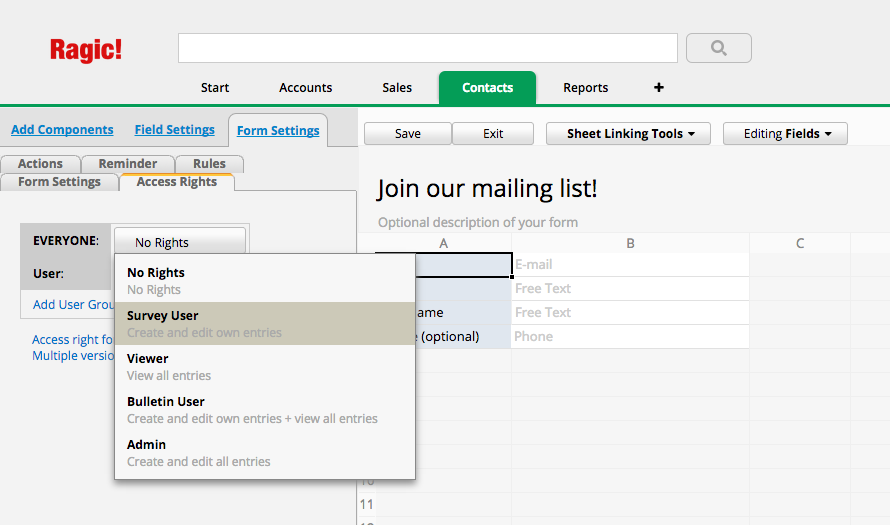
This method will allow anyone to create records in your database. For others to fill out this form, you can embed it with the web embed option, as a form that when saved, will automatically populate your database.
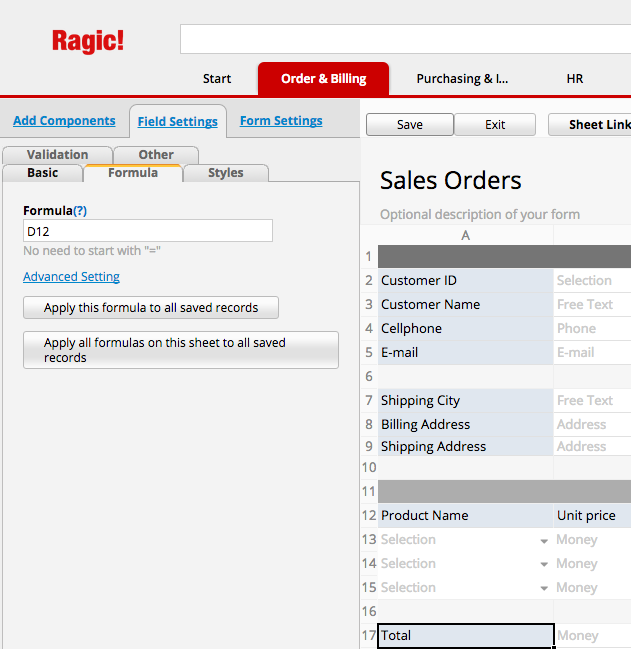
Short answer first: When you add or make changes to a formula of a pre-existing field, you will need to click on the "Advanced Setting" link under the formula and choose to apply this formula to all saved records.
The reason behind this is that Ragic is actually a database application, not just a flat spreadsheet file. So every record you have is saved in a database as a record with revision history, metadata, approval flow, comment threads, etc. Therefore, changes will need to be applied explicitly so that your database records are not changed unknowingly.
Another reason is that the formulas in Ragic work as a type of default value, meaning that after the value is being calculated, you can still change it afterwards and save your database record. This enables you to for example use formula to calculate a default price for a sales order, or a estimated shipping date, and change the value of the result to make manual adjustments. Ragic will keep a history of every edit you make, which is visible through each entry's information panel.
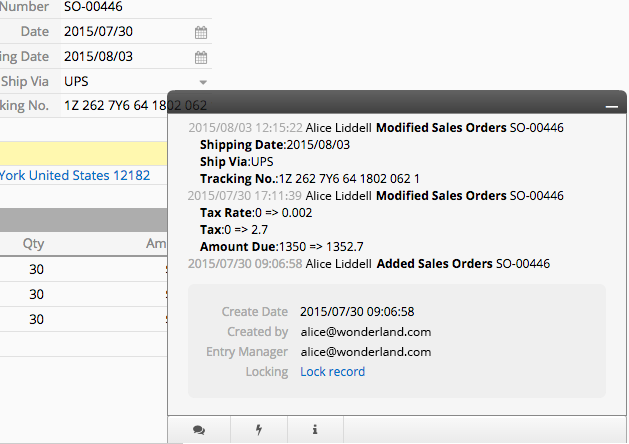
For example, if your Ragic server's domain name is ragic.example.com, you can assign an additional domain name called ragic-api.example.com and point this domain to the same IP as your Ragic server. This way ragic.example.com will serve the normal Ragic service, and ragic-api.example.com will serve the API content.
Also remember to restart your Ragic service after you change configurations here for it to take effect.
For configuring SSL / HTTPS
# If SSL enabled, must create ./keystore file for java key# Must provide password to enable
SSL_ENABLED=false
SSL_PASSWORD=
SSL_KEY_PASSWORD=
SSL_TRUST_PASSWORD=
SSL_KEYSTORE=./keystore
SSL_TRUSTSTORE=./keystore
For configuring mail:
# For sending out notifications, using a free Mandrill account as default# Shared with other Ragic on-premise users, 12k emails per month
# If left blank, no notifications will be sent
SMTP_SERVER=
SMTP_SENDER_EMAIL=
SMTP_SENDER_PERSONAL=
SMTP_SENDER_AUTH_USER=
SMTP_SENDER_AUTH_PWD=
SMTP_PORT=587
SMTP_SSL_ENABLE=
SMTP_SSL_PORT=
There are also other optional configurations that you can try out. Remember that you will need to restart your Ragic service when you make edits to the configuration file.
Zapier lets you easily connect the web apps you use, making it easy to automate tedious tasks. Ragic now support integrating with other on-line service via Zapier. If you'd like to join in to use Ragic as a trigger or action application, you can navigate to the Tools menu, and selecting Connect with your web apps under the Sync section.
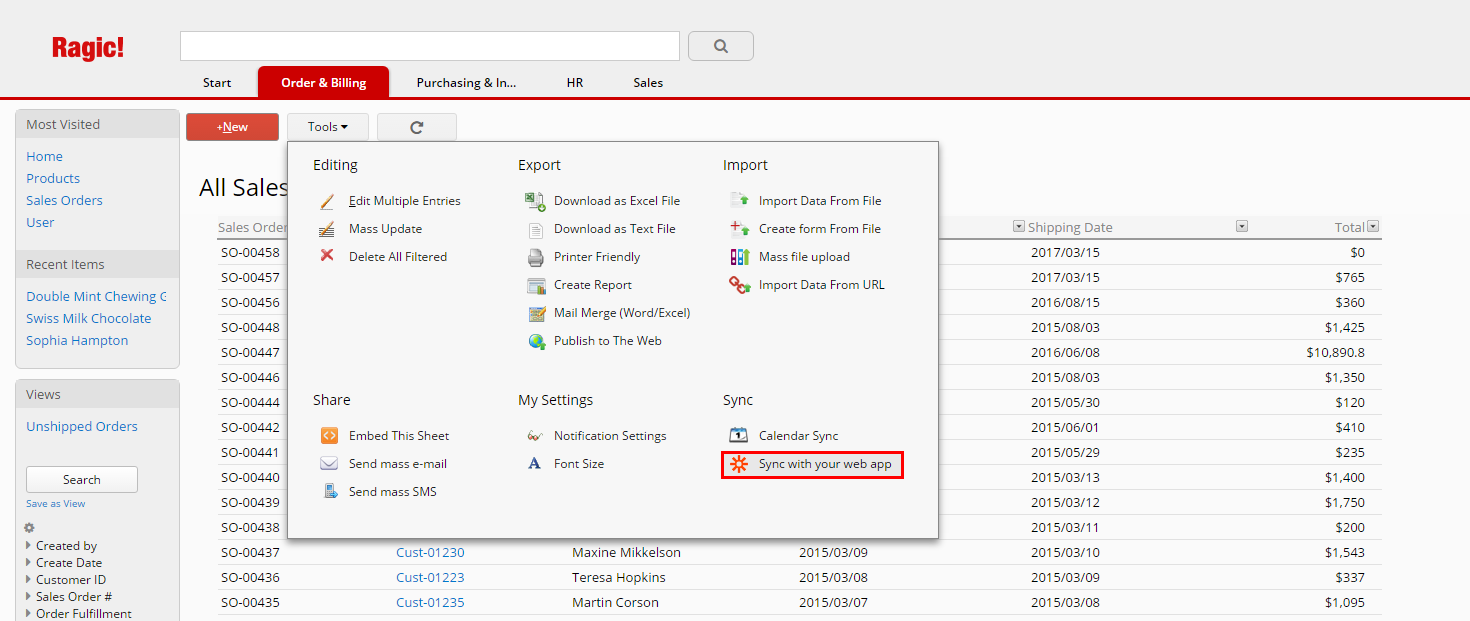
Once you click on Connect with your web apps, you’ll have a pop-up window with pre-built suggestions.
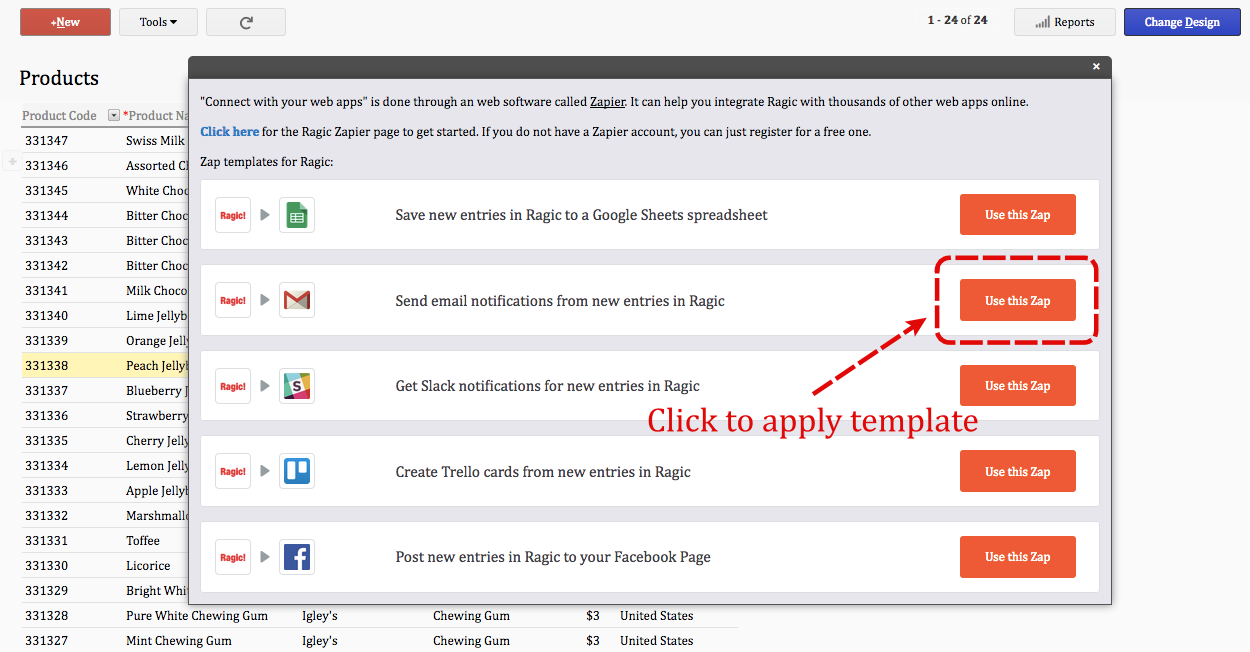
Click on any of the suggestions will lead you to the configuration wizard. With our example of connecting with Gmail, you’ll be asked to log into your Google account before proceed with next step.
With our examples, you’ll need to set Ragic as trigger application while create a new record as trigger action.
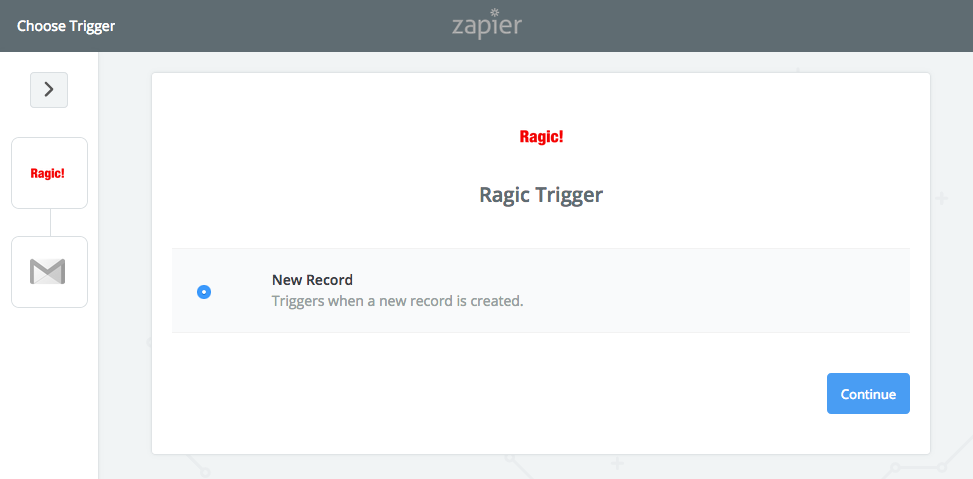
Then, you'll need to connect the API Key and Sheet Path. These can be found on your Ragic API page, which will be linked from Zapier in this step.
You may click on Ragic API page to have the full list of your sheets or select from the dropdown menu.
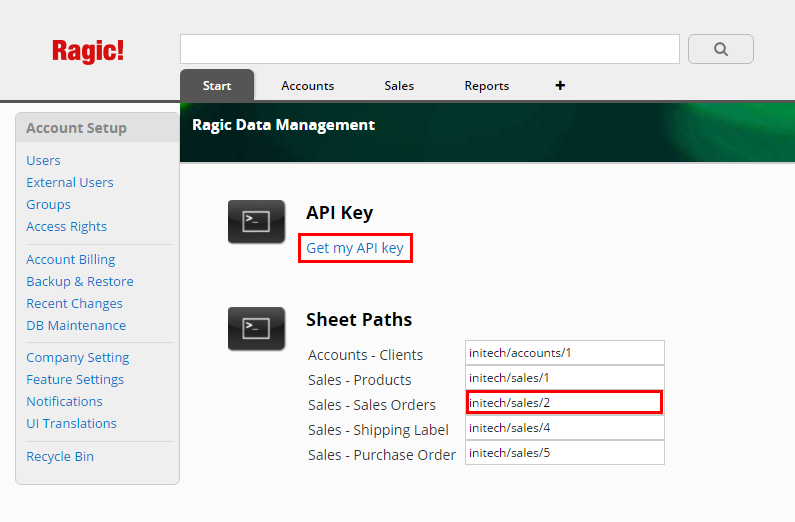
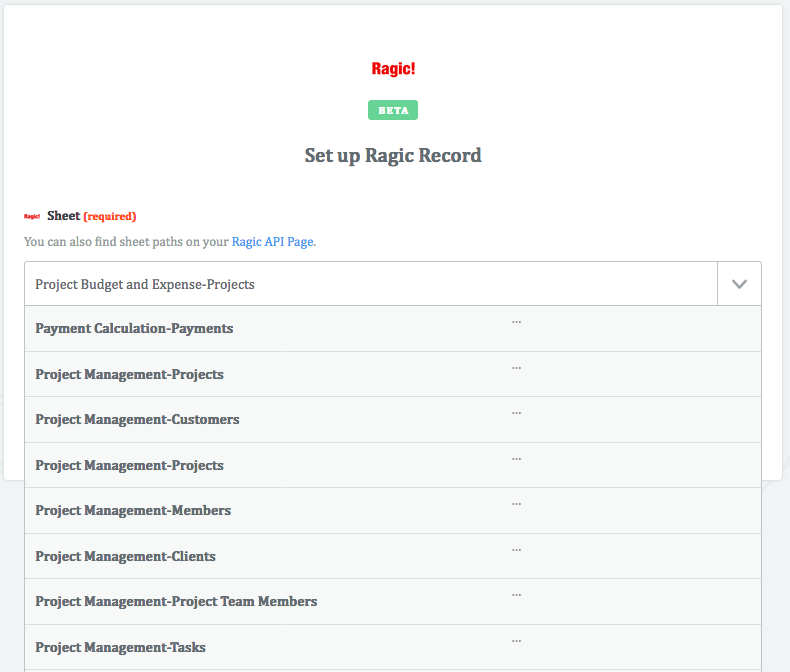
Since you can have many different apps on your Ragic account in different sheets, make sure that you are connecting the correct sheet path.
After connecting to your Ragic accounts, you can continue on with the next step. With our examples, you’ll need to set Gmail as action application while send an email as action.
In this step, you’ll need to create the mail template and decide what kind of information you would like to populate in the e-mail subject and the e-mail body.
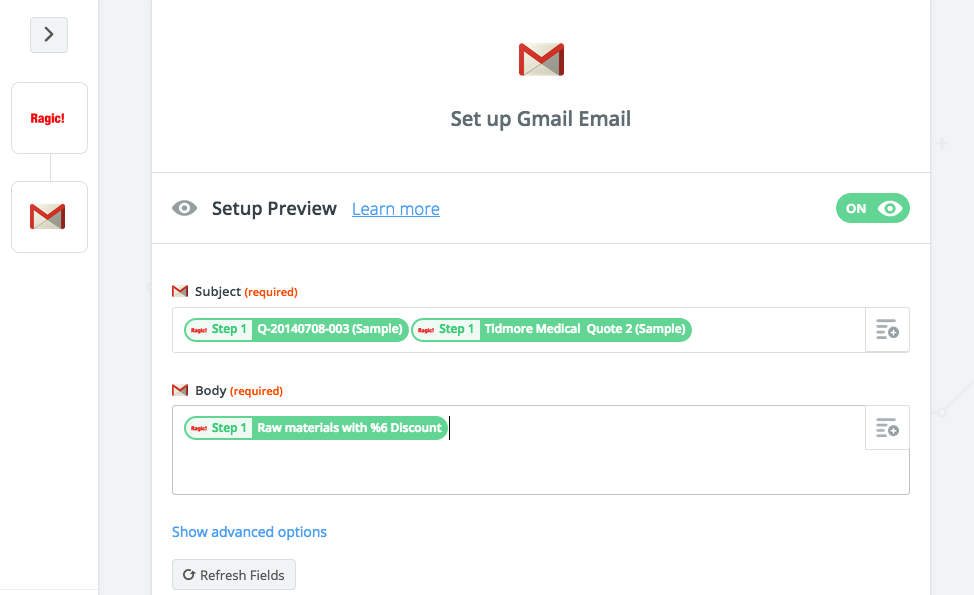
Once you have mapped all the necessary fields, you will be able to test and view samples from Gmail you are using.
If the test mail works perfectly, you can name your Zap which will automate actions that you have specified according to your settings, in the timeframe that is specified depending on your Zapier account.

Log into your Zapier account (or create an account if you don't have one yet.) Click "Make a new Zap" to get started on your integration. You should be able to see Ragic in the available apps.
Ragic can be used as either a trigger or an action on Zapier for creating entries.
In this example, when a new record is created in Ragic for a project task, a new card for this task will be created in Trello, a team collaboration tool. The possibilities are endless with all the available apps that have Zapier integration.
With our examples, you’ll need to set Ragic as trigger application while create a new record as trigger action.
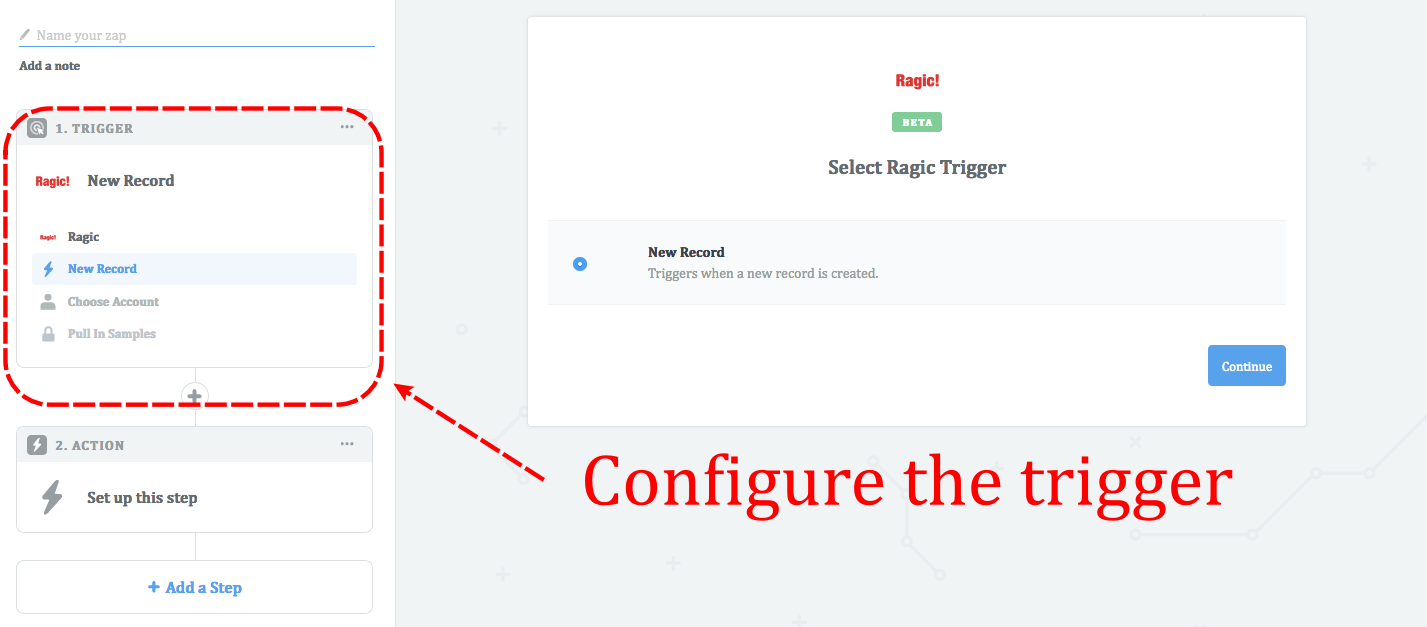
If you're doing an integration with an app on Zapier for the first time, you'll need to connect the apps you use to allow Zapier access to read and write data.
In Ragic's case, you'll need to connect the API Key and Sheet Path. These can be found on your Ragic API page, which will be linked from Zapier in this step.
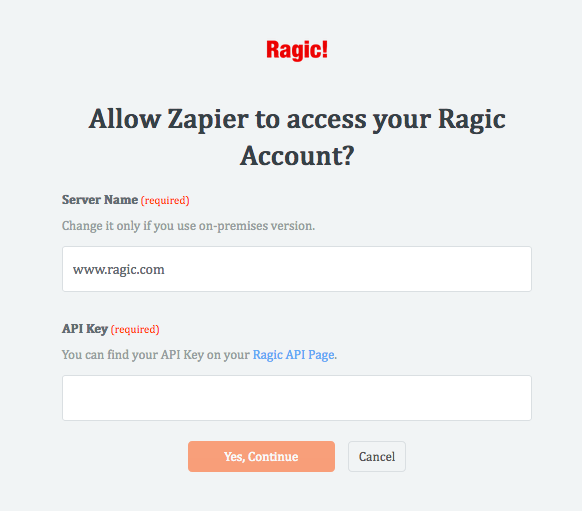
You may click on Ragic API page to have the full list of your sheets or select from the dropdown menu.
Since you can have many different apps on your Ragic account in different sheets, make sure that you are connecting the correct sheet path.
Once you have connected your accounts, you can continue on with the next step.
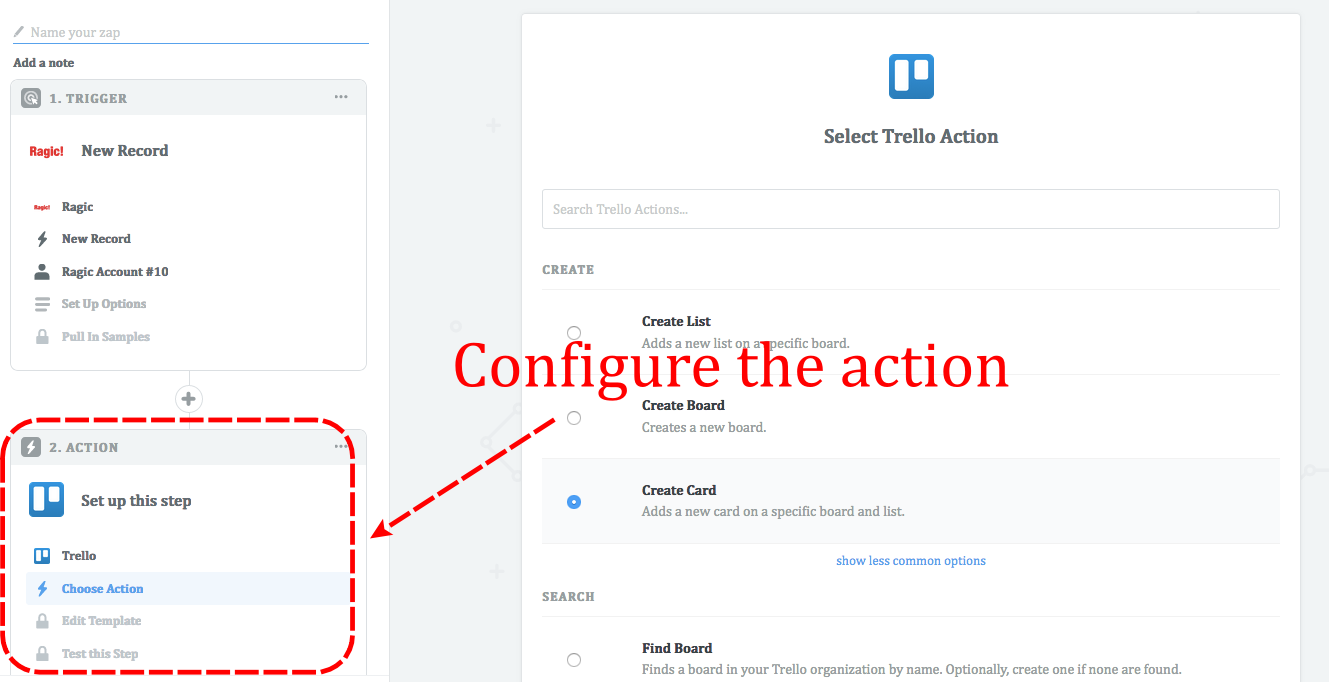
The steps that Zapier offers for integration might differ according to the app combination you are creating. Usually, you will need to map which fields correspond to each other.
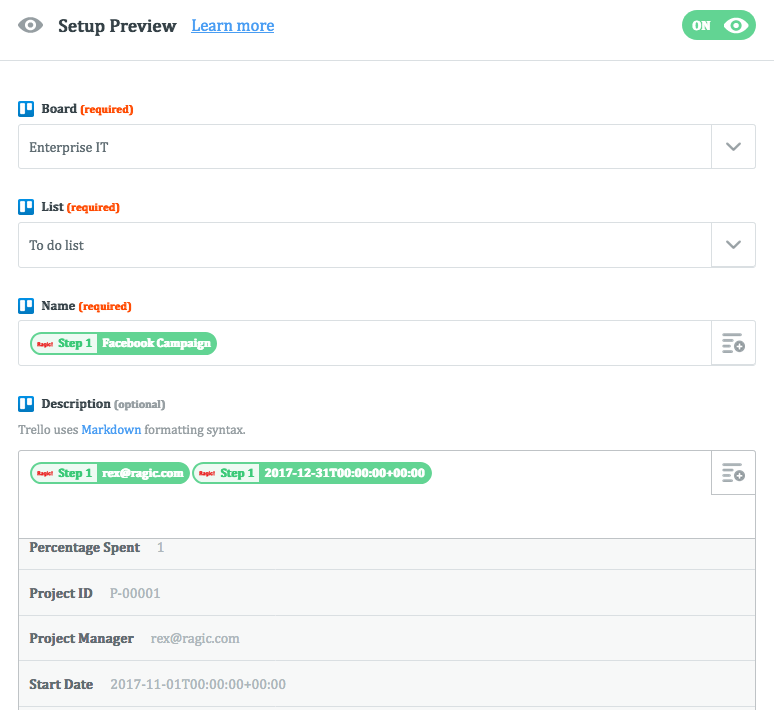
Tip: Since the fields available on Ragic differs depending on your sheet design, you can always go back to design your sheet if you would like to make modifications, such as adding extra fields if necessary. Zapier will save the zap you are editing as a draft.
Once you have mapped all the necessary fields, you will be able to test and view samples from each app you are using.
Once you have finished linking your apps together, you can name your Zap which will automate actions that you have specified according to your settings, in the timeframe that is specified depending on your Zapier account.
In this example, Zapier would automatically check for new Ragic records in our Project tasks sheet every 15 minutes, and will post them to Trello if there are new records with no further action required from the user.
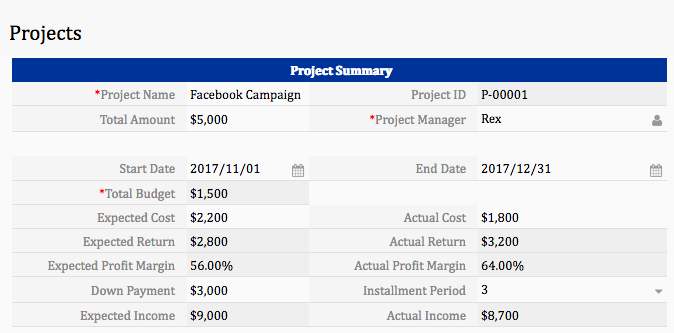
Important note: If your account was created after Fall 2015, please view this documentation on managing your external users.
If a visitor who is not logged in to Ragic tries to access a Web Plug-in that does not allow unregistered users (set to have the user group to "Everyone"), they will be redirected to a log-in screen for your account. From here, they can log in or register for a free external user account. After this step, they will be redirected to your Web Plug-in.
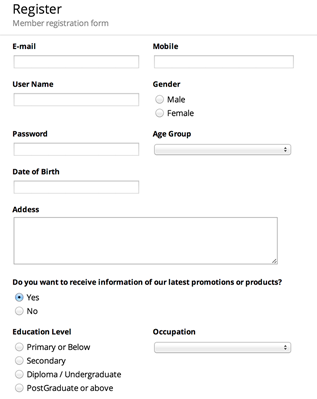
You can check the external users registered for your application from
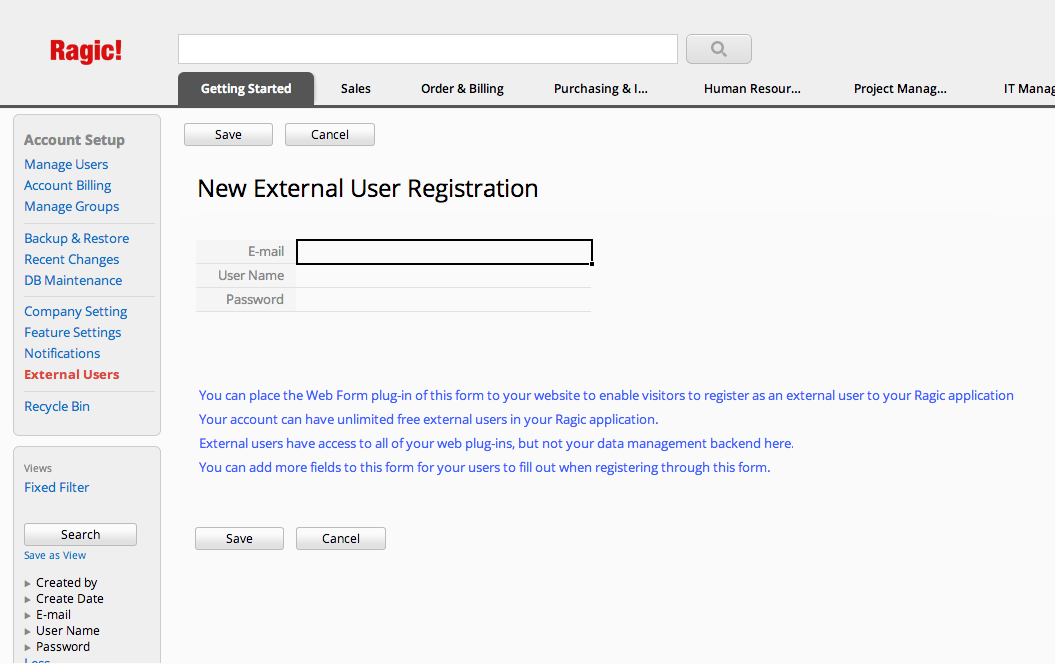
Through this way, Ragic can act as a flexible and powerful medium in managing your website members and content that they can access, with multiple Web Plug-ins embedded on different pages.
Your external users will go through the process of viewing your embedded database or forms according to whether they have the right access rights. The following chart displays how this process is.
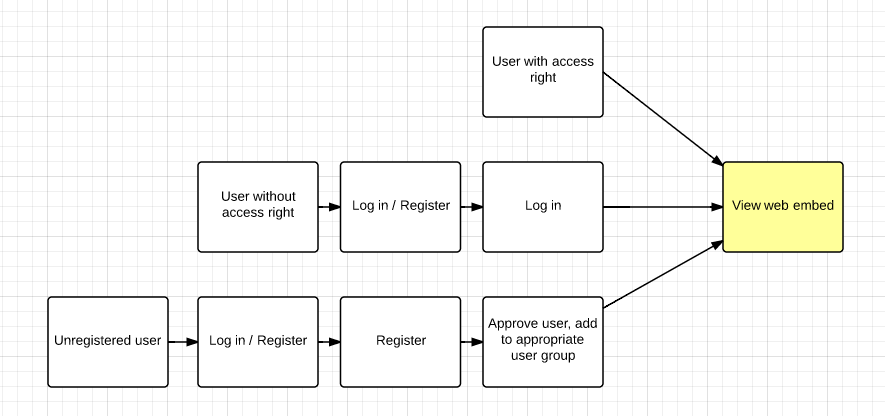
You can also have public sheets and control how everyone can see your Ragic database through Ragic's access rights settings.
Ragic also has a convenient way of giving a user temporary log in without him having an account on Ragic, by setting an E-mail Id. attribute.
It is also possible to sign into Ragic with open ID.


You can also use the patterns below for your banner, these wrap the length of your screen so they will look seamless even if you have a very large monitor.


If you would like to create your own banner, the recommended size is 1366x102 px. You can change the width according to your preference.
If you think that this problem is caused by a slow connection to Ragic, and would like to troubleshoot this problem, on Windows operating systems you can do the following:
1. Open a command prompt window on your computer.
A command prompt is an entry point for typing computer commands in the Command Prompt window. By typing commands at the command prompt, you can perform tasks on your computer without using the Windows graphical interface.
Open a Command Prompt window by clicking the Start button, clicking All Programs, clicking Accessories, and then clicking Command Prompt.
You can also use the Search box in your computer or Cortana in Windows 10 to find the Command Prompt.
2. Run the following command in the command prompt
Write or paste the following command in the command prompt window.
tracert www.ragic.com
(If your database is hosted on our US server.)
or
tracert eu2.ragic.com
(If your database is hosted on our EU server.)
Basically this will do a network testing on Windows to www.ragic.com or eu2.ragic.com
3. Send us the content from the command prompt
Once the trace is complete, copy and paste the content that comes up to us at support@ragic.com. This will help our developers to identify your issue.
If you want to learn more about the tracert command please refer to this support documentation on microsoft.
Please also provide us with the following info for us to diagnose your problem:
1. Do you always feel the same latency when connecting to every single page? Like:
Our homepage: https://www.ragic.com/intl/en/home
Your account home, the listing page for a sheet, or the form page for a record, or maybe the page where you download a backup?
2. Do you experience the same latency when you go to your account home or Ragic homepage without logging in?
3. How much latency are you experiencing, is it 1 second, 5 seconds, 10 seconds, or 30 seconds?
If you change a formula or a variable that is used in a formula very often, you have the option to add a script that will recalculate your formula every day. Please follow this guide to add your script.
Step 1: Open the Ragic workflow editor.
Right-click on any of the application tabs and select Javascript Workflow, which will take you to the Workflow Module.
Step 2: Switch edit page to "Daily Workflow".
Step 3: Add the code for sheet formula recalculation.
If the URL link of the sheet you want to do this job is https://www.ragic.com/accountname/tabname/1
Add this line to the daily workflow:
db.recalculateAll("/tabname/1");
Don't forget to save your changes!
Step 1: Open the Ragic workflow editor.
Right-click on any of the application tabs and select Javascript Workflow, which will take you to the Workflow Module.
Step 2. Switch edit page to "Daily Workflow"
If the URL link of the sheet you want to do this job is https://www.ragic.com/accountname/tabname/1
Add this line to the daily workflow:
Please insert the field ID of the field you wish to perform formula recalculation.
db.recalculateAll("/tabname/1", 1000001);
For multiple fields, the function call would be something like this:
db.recalculateAll("/tabname/1", 1000001, 1000002, 1000003);
Once you set up the daily workflow, you can manually trigger it from job schedules to see if it works as expected.
All forms can trigger Ragic's server-side Javascript workflow engine to execute complex business logic, such as calculating costs and posting inventory balance. Basically, any complex business logic that you would like to execute but cannot be covered by Ragic's existing functions can be covered by server-side scripting.
Ragic's spreadsheet design interface can handle most of your data management work, such as creating, editing, and querying records without much problem. On the other hand, manual data maintenance can be a bit time consuming and routine after a while. This is the time when Ragic users will start thinking of ways to automate these processes.
Inside Ragic, there is a pretty powerful scripting engine where you can write Javascript that runs on the server-side, to retrieve data you have on your spreadsheet, make modifications, or even create many records with one click. Typical usage includes updating inventory, creating a new record based on another (creating a sales order from a quote, creating contact from a sales lead), or doing record validation based on database data.
There are several ways to run your Javascript workflow:
This is the most common and cleanest way to run Javascript workflow, and generally our first recommendataion. You can write your script in the installed sheet scope of your sheet, and configure an action button to execute the script when the user clicks on the button that will be displayed in the "Actions" panel in the lower right side.
To add an installed sheet scope script, just right click on a sheet, and choose Javascript Workflow:

And choose installed sheet scope from the top dropdown:
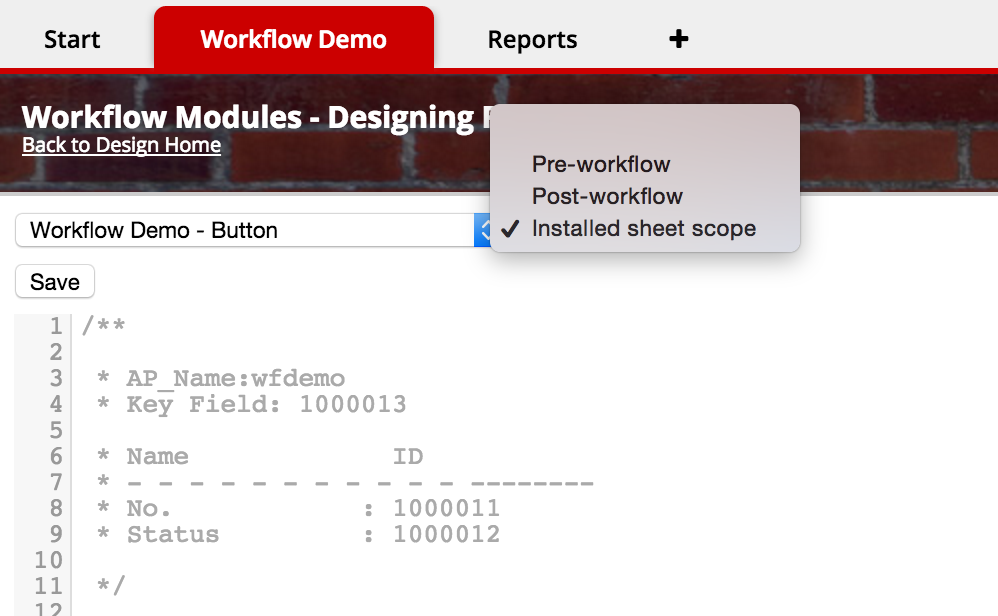
You can then go to the form page of your sheet design, and add an Action Button of the type JS Workflow, and refer to the Javascript function that you have written.
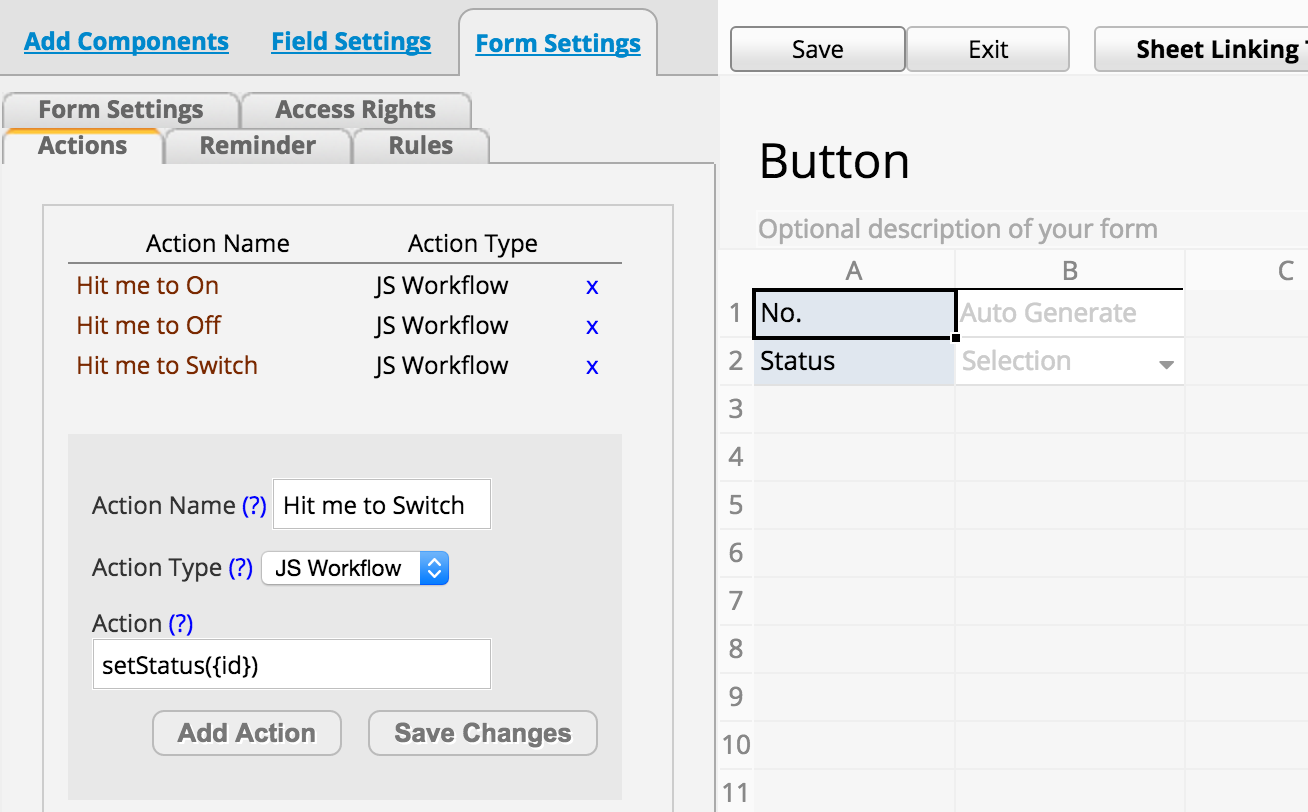
Note that you can pass the record id of the current record by using {id} in the argument for the function call like:
setStatus({id})
Of course, we will talk more about how to write these functions in the following sections.
Post-workflows are executed immediately after a record is saved. With post-workflow, it's very convenient to automate changes that you would like to make on the record that you just saved that cannot be done with formulas. Or you can make modifications to records on other related sheets, like updating inventory balance.
To add a post-workflow, just right click on a sheet, and choose Javascript Workflow:
And choose Post-workflow from the top dropdown.
Pre-workflows are executed before a record is saved, so it can be used as a way of validation to check the data entered against data in the database. Generally most validation can be done with our front-end regular expression checks, or the unique checkbox for free text fields. But for more complex backend checks, sometimes pre-workflow will be needed.
To add a pre-workflow, just right click on a sheet, and choose Javascript Workflow:
And choose Pre-workflow from the top dropdown.
Daily workflow runs on a daily basis. It's useful for doing modifications that needs to be refreshed every day. Like updating the results of the formulas based on the current date.
To add a daily workflow, just right click on a tab, and choose Global Javascript Workflow:
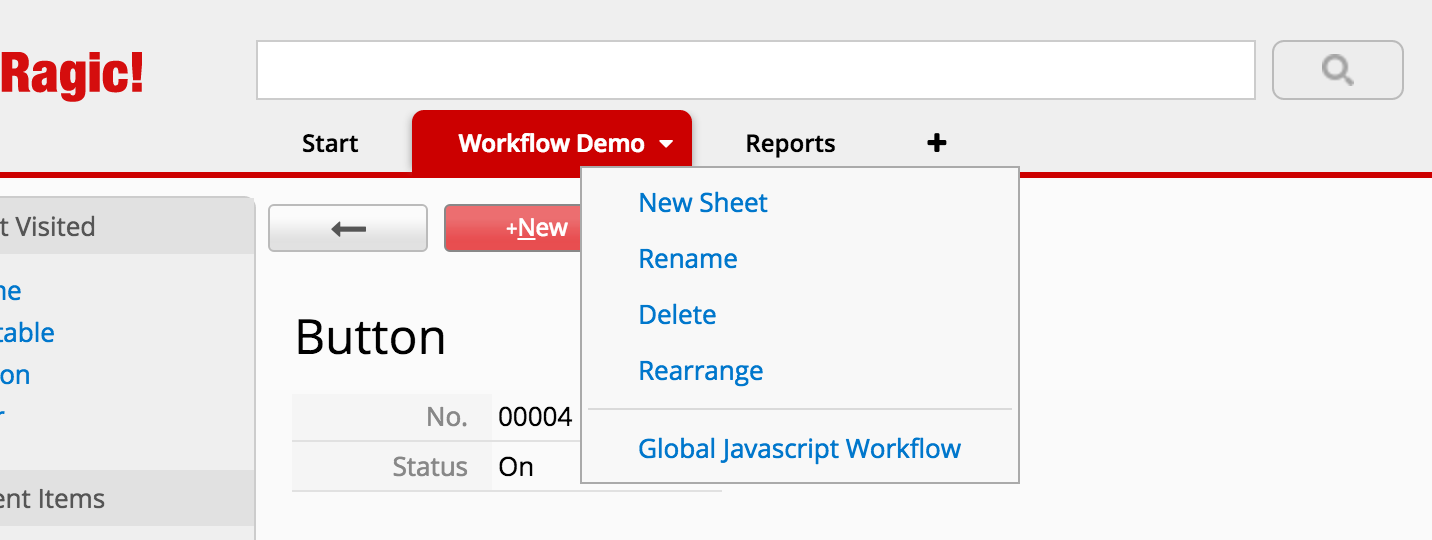
And choose Daily Workflow at the first top dropdown.
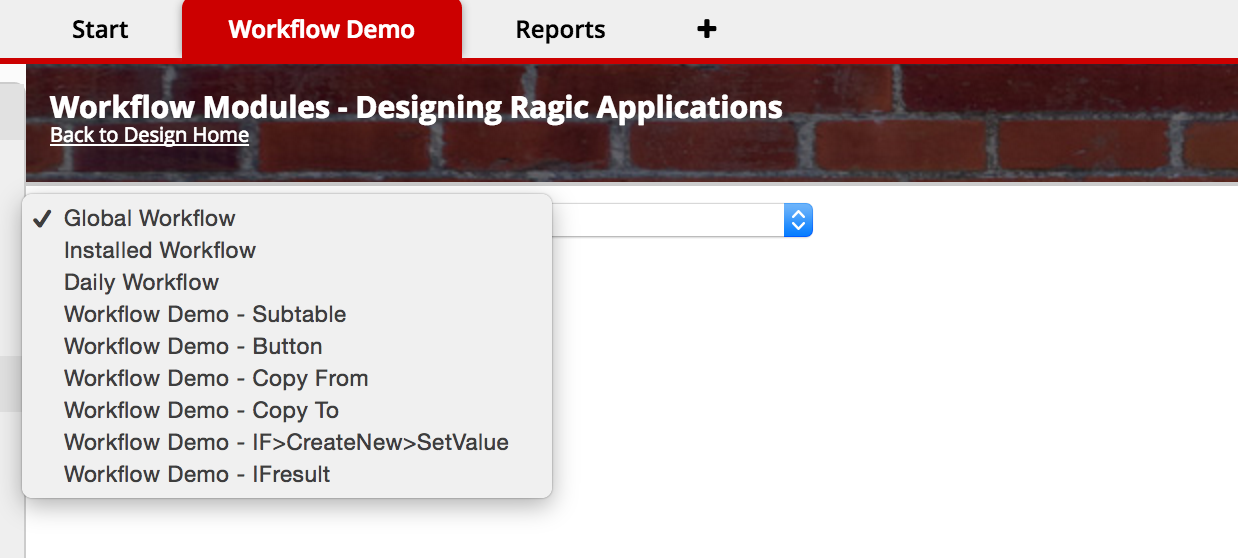
Global workflow is a place where you can write Javascript workflow modules that other workflow functions can reference. It will not be exeucted by itself, but can be referenced in any types of the workflow listed above. It's a great place to put scripts that you might need to duplicate across multiple sheets otherwise.
To add a global workflow, just right click on a tab, and choose Global Javascript Workflow:
Let's start with a simple example which retrieves the current record as an object, update its value with a button, and then saves it back to the database. Here is what the demo form looks like:

We would like to design some buttons that will change the value of our status field with the click of a button executing simple server-side Javascript workflow. Here's the code behind the button:
/**

 * AP_Name:wfdemo
 * Key Field: 1000013

 * Name             ID
 * - - - - - - - - - - - --------
 * No.            : 1000011
 * Status         : 1000012

 */
function setStatus(recordId, status) {

  var STATUS_FIELD = 1000012;	//field id of the status field
  var query = db.getAPIQuery("/workflow-demo/2");	//get the query object for a sheet with path to sheet
  var entry = query.getAPIEntry(recordId);	//get the record object for the current record

  //set the status value for the current record to the object
  if (status) {
	entry.setFieldValue(STATUS_FIELD, status);
  }
  else {//for switching
    var newStatus = entry.getFieldValue(STATUS_FIELD) == 'On' ? 'Off' : 'On';	//get the current value of a field
	entry.setFieldValue(STATUS_FIELD, newStatus);
  }

  //save the record back to the database
  entry.save();
}
When writing Javascript workflow, the variable db is predefined. You can reference to it anywhere. Generally we call the method getAPIQuery(pathName) to retrieve the query object for a sheet.
Then you can retrieve a record with its record id on the sheet object with getAPIEntry(recordId), and call setFieldValue(fieldId,value) to set value to a field, or getFieldValue(fieldId) to retrieve value from a record.
If you're retrieving a value from a multiple selection field, where there may be multiple values, use getFieldValues(fieldId) to retrieve all the values in an array. You can also call setFieldValue(fieldId,value,true) with an extra true argument at the end to specify that you're "adding" an option to the current list of values, not overwriting the existing ones. Note that these operations is only suitable for multiple selection fields.
After you're done, just call save() on the record object to save it back to the database.
If you have subtables in a sheet, you can also use our API to retrieve data from it, or make edits like the following example. The form looks like this:
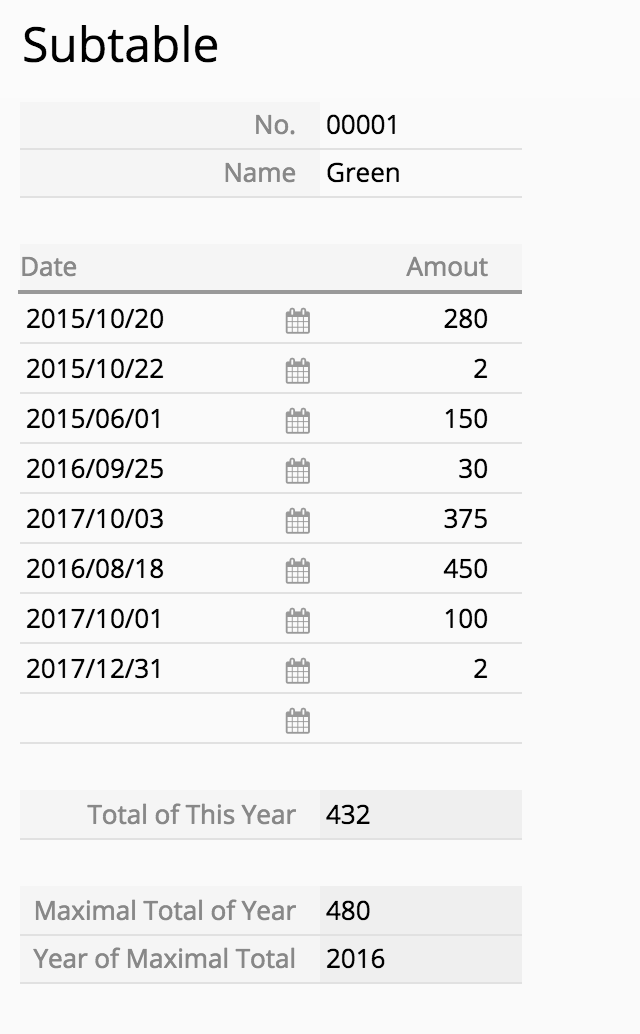
The workflow will walk through each row in the subtable, and find the total amount for this year (according to date field in the subtable), the total for the year with the most amount, and identify which year has the highest total. This is designed as a post-workflow, so the three read-only fields will be filled by workflow after the record is saved.
/**

 * AP_Name:wfdemo
 * Key Field: 1000006

 * Date subtable key: 1000007

 * Field Name               Field Id
 * - - - - - - - - - - - --------
 * No.                     : 1000001
 * Name                    : 1000002
 * Date                    : 1000003
 * Amout                   : 1000004
 * Total of This Year      : 1000010
 * Maximal Total of Year   : 1000009
 * Year of Maximal Total   : 1000008

 */

var KEY_FIELD             = 1000006;
var AMOUNT_SUBTABLE_ID    = 1000007;
var DATE_FIELD            = 1000003;
var AMOUNT_FIELD          = 1000004;
var MAX_YEAR_FIELD        = 1000008;
var MAX_TOTAL_FIELD       = 1000009;
var THIS_YEAR_TOTAL_FIELD = 1000010;

var query = db.getAPIQuery("/workflow-demo/1");

var entry = query.getAPIEntry(param.getNewNodeId(KEY_FIELD));
var subtableSize = entry.getSubtableSize(AMOUNT_SUBTABLE_ID);

var yearTotal = {}
for (var i = 0; i < subtableSize; i++) {
  	var year = parseInt(entry.getSubtableFieldValue(AMOUNT_SUBTABLE_ID, i, DATE_FIELD).substr(0, 4));
	var amount = parseInt(entry.getSubtableFieldValue(AMOUNT_SUBTABLE_ID, i, AMOUNT_FIELD));
	if (year in yearTotal) {
		yearTotal[year] += amount;
	} else {
		yearTotal[year] = amount;
	}
}

var maxYear;
for (var year in yearTotal) {
	if (!maxYear || yearTotal[maxYear] < yearTotal[year]) {
		maxYear = year;
	}
}

entry.setFieldValue(MAX_YEAR_FIELD, maxYear);
entry.setFieldValue(MAX_TOTAL_FIELD, yearTotal[maxYear]);
entry.setFieldValue(THIS_YEAR_TOTAL_FIELD, yearTotal[new Date().getFullYear()]);
entry.save();
The basic idea is to use getSubtableSize(subtableId) to get the number of rows for a record, and use getSubtableFieldValue(subtableId,subtableRowIndex,subtableFieldId) to retrieve their values. You should be able to find subtable id, field id information in the auto generated comments when you start editing workflow scripts.
You can also use setSubtableFieldValue(subtableFieldId,subtableRootNodeId,value) to set values to a subtable. The subtableRootNodeId is used to specify which subtable row that you're referring to. To find a subtableRootNodeId for an existing subtable row, you can use the following call getSubtableRootNodeId(subtableId,subtableRowIndex) which will return an integer containing the subtableRootNodeId.
If you need to add a row to the subtable, you can use a negative subtableRootNodeId like -100, this way all values set to the same negative subtableRootNodeId will be applied to the same new subtable row, and values set to a different negative subtableRootNodeId like -101 will create different row in the subtable with this different set of values.
Link to example: Copy From and Copy To
Copying records is one of the most common workflow program we encounter. We have written a pretty simple function to simplify this type of operation. Let's say we would like to see a record on this sheet:
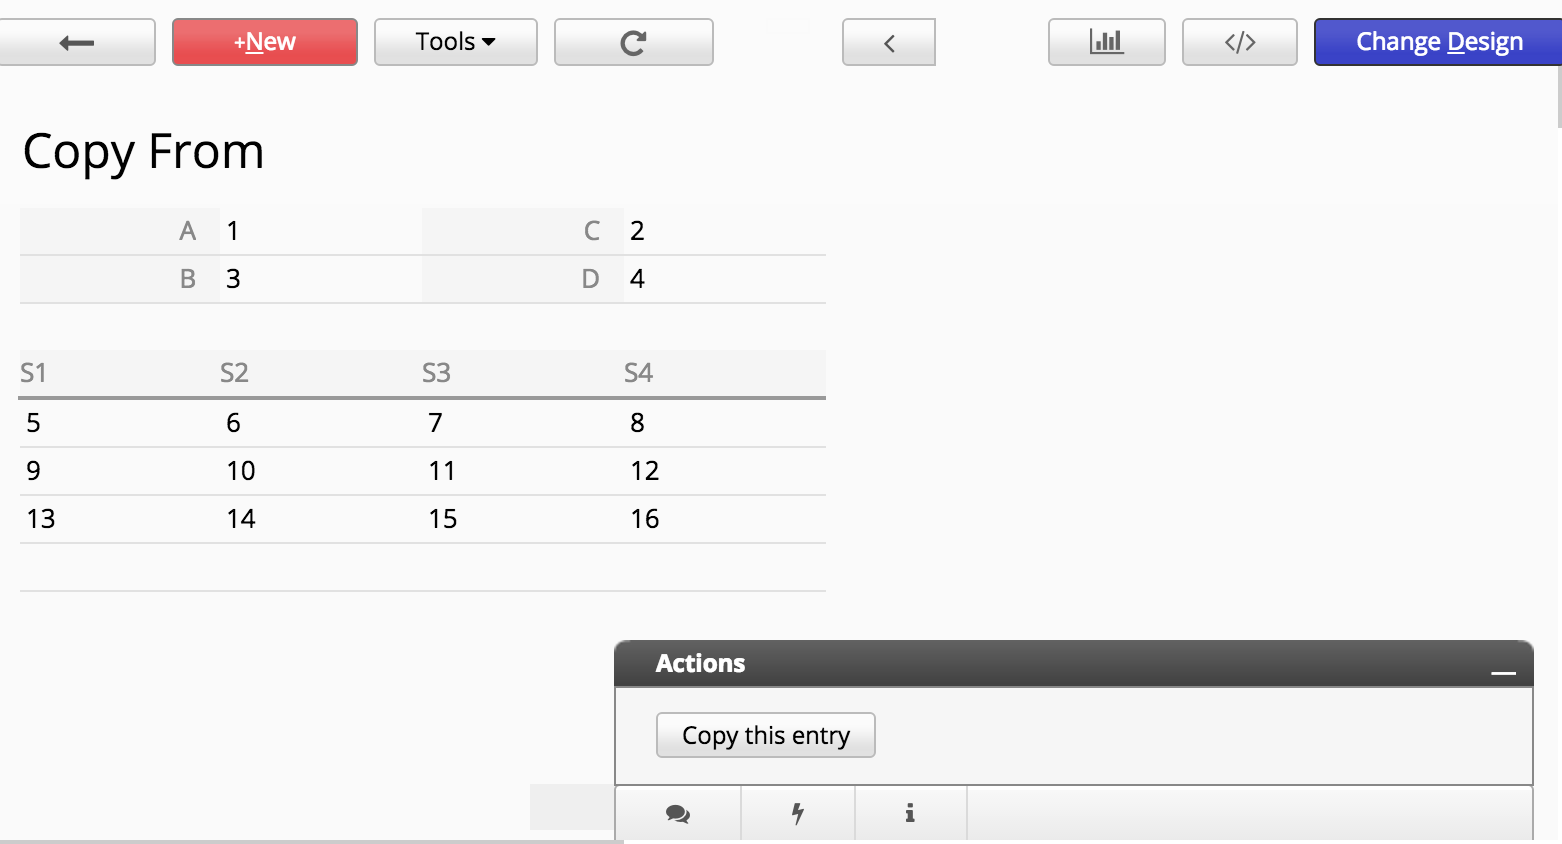
With the click of the button, generate a record on this sheet:
Here is the code for this action button:
/**

 * AP_Name:wfdemo
 * Key Field: 1000022

 * S1 subtable key: 1000023
 * T1 subtable key: 1000029

 * Field name    Field ID
 * - - - - - - - - - - - --------
 * A              : 1000014
 * C              : 1000015
 * B              : 1000016
 * D              : 1000017
 * S1             : 1000018
 * S2             : 1000019
 * S3             : 1000020
 * S4             : 1000021
 * T1             : 1000024
 * T2             : 1000025
 * T3             : 1000026

 */

function copyEntry(nodeId) {

  db.entryCopier(JSON.stringify({
    THIS_PATH:"/workflow-demo/3",
    THIS_NODEID:nodeId,
    NEW_PATH:"/workflow-demo/4",
    COPY:{
      1000030:1000014,    // A
      1000031:1000015,    // C
      1000032:1000018,    // S1
      1000033:1000020     // S3
    }
  }),response);
}
Here you can see we can do the copy with one simple function call to entryCopier. entryCopier takes a JSON string as its parameter. Just put down the source sheet, target sheet, the record that we're copying, and most importantly, which field should be mapped to which field. When the mapping is complete, you can create action buttons to copy records from one sheet to another very easily.
Sometimes you would like to send e-mail notifications based on a set of conditions, or you would like to really customize your notification message content. You can write server-side Javascript workflow for this purpose. Here is the script that you will use to send out e-mail, it's really simple:
//omitted...retrieve record object first
var name=entry.getFieldValue(1001426);
var email=entry.getFieldValue(1001428);
var title=entry.getFieldValue(1001386);
mailer.compose(
email, //to
null, //cc
'support@example.com', //reply to
'Acme, Inc.', //displayed from
title,
'Hi '+name+',
we have received your sales order '+'and will be processing your order very soon.
'+'You can see your order details at https://www.ragic.com/example/1
'+'Thanks.
Best Regards,
Sophia, Sales Manager
Acme, Inc.');
//mailer.attach(myURL); //you can use .attach to attach content from a URL
mailer.send();
For attachments, you can use mailer.attach(myURL); to attach a record on Ragic by using the record's URL. For example, here is a record URL on Ragic (always ignore URL after the hash) :
https://www.ragic.com/wfdemo/workflow-demo/2/9
Here is its HTML printer friendly URL:
https://www.ragic.com/wfdemo/workflow-demo/2/9.xhtml
Here is its Excel version URL:
https://www.ragic.com/wfdemo/workflow-demo/2/9.xlsx
You can also use a Mail Merge URL like this, the cid being the id of the Mail Merge, you can get the cid in the URL when trying to download the Mail Merge document:
https://www.ragic.com/wfdemo/workflow-demo/2/9.custom?rn=9&cid=1
We do enforce some limitations on how many e-mails you can send. So send reasonably! If you have some questions on e-mail sending quota, send us an e-mail at support@ragic.com.
You can first issue the following command to the query object you get from db.getAPIQuery to include full record info:
query.setIfIncludeInfo(true);
and then you can get the approval information for a record like this:
entry.getFieldValue('_approve_status');//getting status of current approval
entry.getFieldValue('_approve_next');//getting the next person who should sign this record
entry.getFieldValue('_create_date');//getting the create date of the record
entry.getFieldValue('_create_user');//getting the create user e-mail of the record
The approval status will be F is approved, REJ for rejected, P for processing.
If you want to get more than one records by filtering:
var query = db.getAPIQuery("/workflow-demo/1");
query.addFilter(1000002, '=', 'Green');
query.addFilter(1000008, '=', '2017');
var results = query.getAPIResultList();
for (var i = 0; i < results.length; i++) {
  var entry = results[i];
  // ...
}
You can add filters to query by addFilter(fieldId, operator, value), and call getAPIResultList() to get the list of records.
You can show message in a pop-up window:
response.setStatus('WARN');
response.setMessage(message);
You can send an HTTP GET/POST request to an URL and get returned result:
util.getURL(String urlstring)
util.postURL(String urlstring,String postBody)
The variable util is predefined.
| Method | Description |
|---|---|
| getAPIResult() | Get first entry when iterate over the query |
| getAPIResultList() | Get array of entries of the query |
| getAPIEntry(int rootNodeId) | Get entry by node ID |
| insertAPIEntry() | Insert a new entry to the query, the method returns the new entry |
| addFilter(int domainId, String operand, String value) | Filtering entries by specified condition |
| setOrder(int orderDomain, int orderDir) | Sort entries of the query by specified field domain ID and order direction, parameter orderDir is set to 1 if sort ascending, and set to 2 if sort descending. |
| deleteEntry(int nodeId) | Delete entry by node ID |
| Method | Description |
|---|---|
| save() | Save a entry |
| setCreateHistory(boolean createHistory) | Set if the entry need to create history |
| isCreateHistory() | Whether the entry is set to create history |
| setIfExecuteWorkflow(boolean executeWorkflow) | Set if executing workflow (pre-workflow and post-workflow) of the entry is needed |
| setIgnoreEmptyCheck(boolean ignoreEmptyCheck) | Set if checking not empty fields would be ignored |
| setRecalParentFormula(boolean recalParentFormula) | If this sheet is created by subtable of other sheet, or is referenced by other sheet, which means, this sheet has the parent sheet, then you can call this method to set if you want to recalculate the parent sheet or not. |
| setFieldValue(int domainId, String value) | Set value to specified single field |
| setFieldValue(int domainId, String value, boolean appendValue) | Set value to single field which is a multiple select field, parameter appendValue need to be true |
| setSubtableFieldValue(int domainId, int subtableRootNodeId,String value) | Set value to subtable field, you can get parameter subtableRootNodeId by method getSubtableRootNodeId. |
| setSubtableFieldValue(int domainId, int subtableRootNodeId, String value, boolean appendValue) | Set value to subtable field which is a multiple select field, parameter appendValue need to be true |
| getJSON() | Get JSON of the entry |
| getFieldValue(int domainId) | Get value of the field by domain ID |
| getRootNodeId() | Get root node ID of the entry |
| getRootDomainId() | Get root domain ID of the entry |
| getSubtableSize(int subtableRootDomainId) | Get size of subtable, specified by root domain ID of subtable. |
| getSubtableRootNodeId(int subtableRootDomainId, int rowNumber) | Get root node ID of subtable, specified by its root domain ID and row number in subtable. |
| deleteSubtableRowByRowNumber(int subtableRootDomainId, int rowNumber) | Delete subtable row by its root domain ID and row number in subtable. |
| deleteSubtableRowAll(int subtableRootDomainId) | Delete every row in specified subtable |
| deleteSubtableRow(int subtableRootDomainId, int subtableRootNodeId) | Delete subtable row by root domain ID and root node ID of subtable |
| loadAllListenFields() | Load value of all loaded fields in the entry. |
| recalculateAllFormulas() | Recalculate every field that contains formula in the entry. |
| recalculateFormula(int domainId) | Recalculate formula of specified field. |
| loadAllDefaultValues(ScriptUser user) | Load value of every field that is set with default value, parameter user is predefined. |
| loadDefaultValue(int domainId, ScriptUser user) | Load default value of specified field, parameter user is predefined. |
| lock() | Lock the entry |
| unlock() | Unlock the entry |
| Method | Description |
|---|---|
| getEmail() | Get user's email address |
| getUserName() | Get user name |
The reason for this we can explain with an example. Let's say sheet A is sales orders, and sheet B is customers. When a sales order is entered by user Martha Stewart, her address information is populated with link & load on your sales order. Let's say Martha changed her address. Her previous sales order would still be under her previous address for the records, but new sales orders will be saved with her new address.
We do understand this might not be how you use link & load, and that you will need to repopulate the loaded fields in all your previous records in sheet A.
To do so, navigate to the Form page Design Mode, and click on Sheet Linking Tools to see a list of sheets that are linked with Link & Load under the category. Click on the gear icon next to the appropriate sheet.
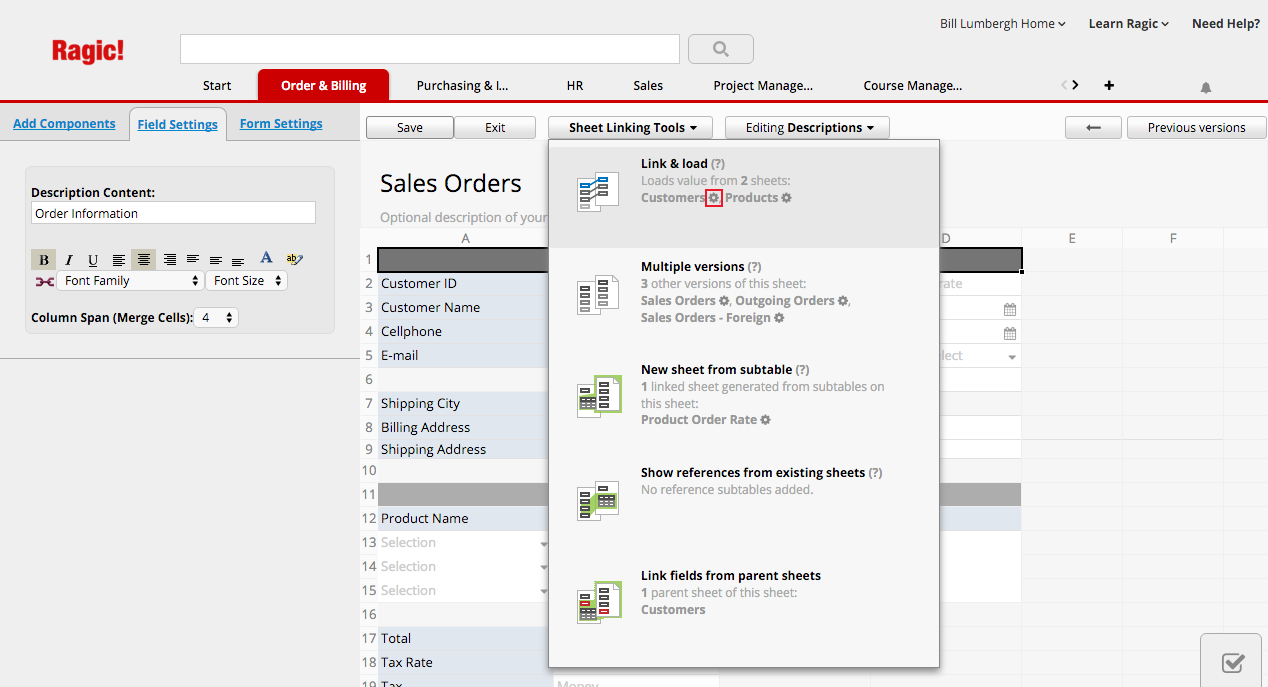
A prompt will show you the option for dynamic filtering above, and the option for repopulating below, that gives you the option to synchronize a single set of linked fields with the updated source value for all records, or all of your linked fields on this form.
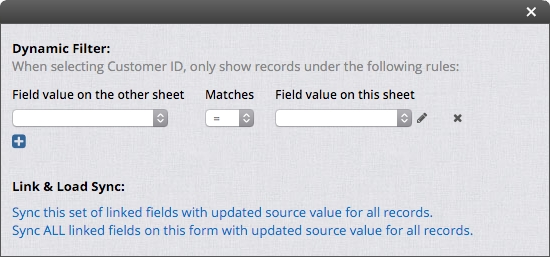
After choosing your option, a prompt will state that loading has started. This means that your loaded fields are reloading in the background, so you may now close this window and continue using your database while your data is synchronizing.
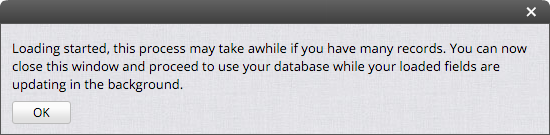
1. Manually download a backup of your database as a .ragicdb file so that you keep both your design and the data in your database, and restore your backup to your new trial account.
2. Do the modifications you need on the trial account, since changes will not affect your current production system in your company account.
3. After you're done, download a backup of this test account's design without any data, as a .ragic file. This way only the form designs are backed up.
4. Restore this new backup to your current account (don't forget to save a manual backup or a snapshot of your database first just in case). Restoring a .ragic backup without any data will not change the data that you already have in your account. This way, only the new form design is being applied to your production account.
To manually edit the Field ID, navigate to the Design Mode, and focus on the field that you'd like to edit. Double-click on the Field ID number below the Field Name. A window will prompt you to enter the new Field ID number.
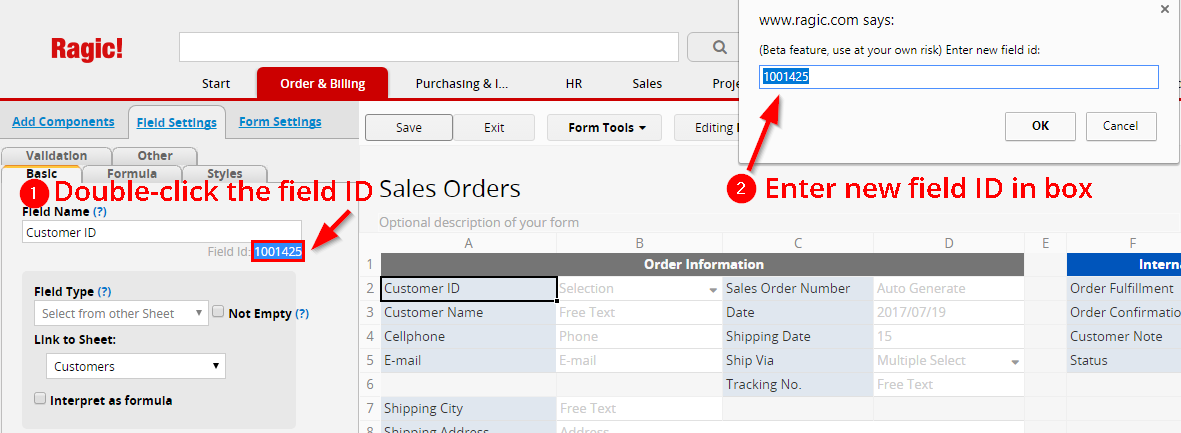
If you accidentally deleted a field from your form, but the field and values are still in the listing page, you can add this field back to your form page.
If you really need to edit this record, you can still manually unlock this record from the pop-up menu at your own risk. Since the edit saved first will be overwritten by the edit saved later, it is suggested that you find the other editing user, and ask them to save their entry first, or leave the editing mode if they're not doing an edit.
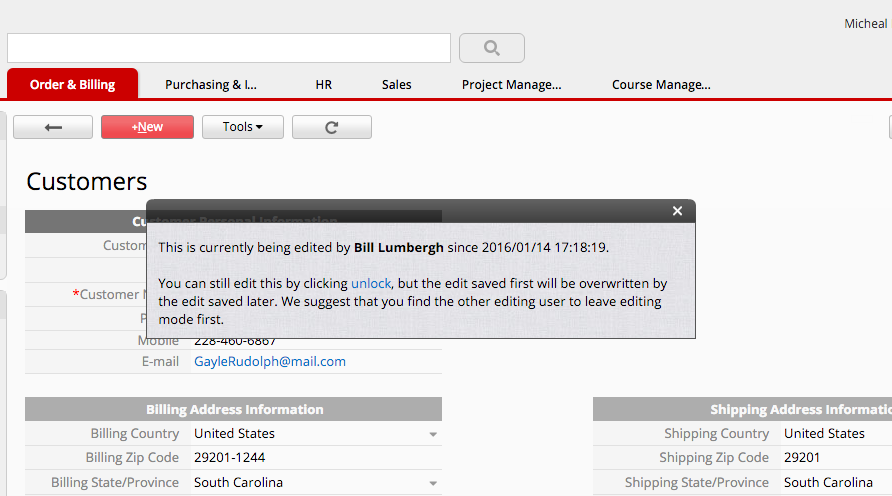
Sometimes you might need to manually lock a record from the information panel in the lower right corner, which will make this record read-only for all other users in your account until it is unlocked by you.
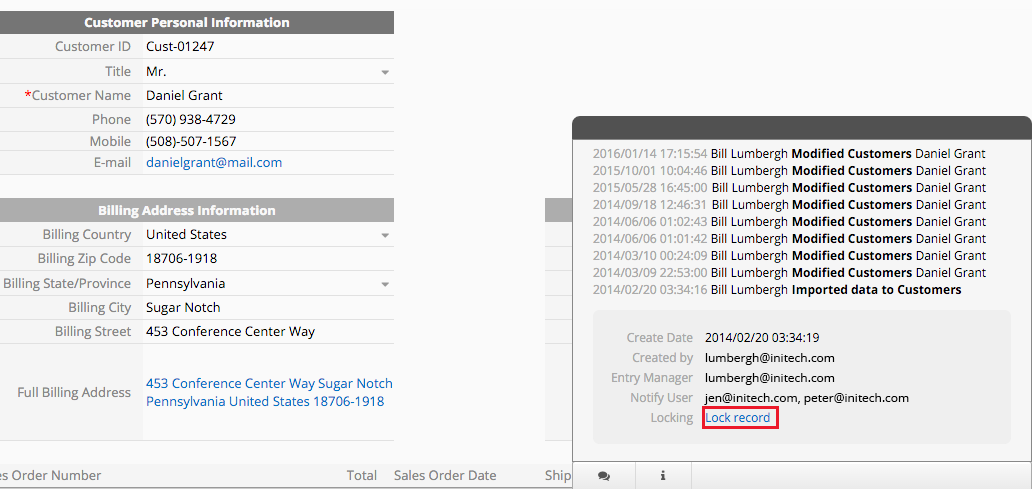
In addition, you can add a lock record action button with this method if needed.
If you want to receive reminder e-mails on a certain day of the week instead, you can use a simple formula that will calculate this day of the week first, and set this date to send out reminders.
The following formula example will calculate the date of the next Sunday, and send reminders on the next Sunday for a date in field A1.
A1+8-WEEKDAY(A1)
For the sheet
https://www.ragic.com/accountname/tabname/3
You can use
https://www.ragic.com/accountname/tabname/3?pqv100003=New
The part before ? is your sheet path.
The parameter name is pqv
(Your field ID can be found with this method.)
The value after = is the value to filter with, which is "New" in our example above. Please note that this value is case-sensitive.
For multiple queries, you can use the ampersand symbol &.
Comparison operators such as, <, >, or >= will not work with this method. If you need to do this type of comparison, you can use the left sidebar to filter your data.
You can click on any of the announcements to read more details.
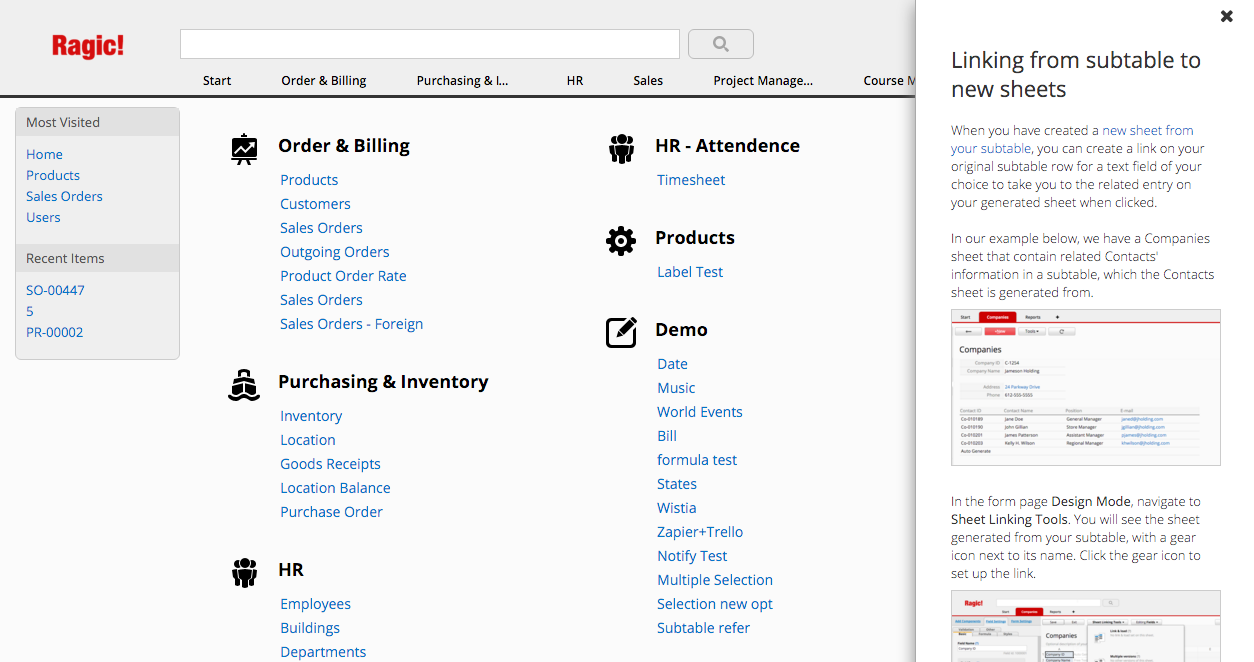
Click on any image thumbnail to see an enlarged version.
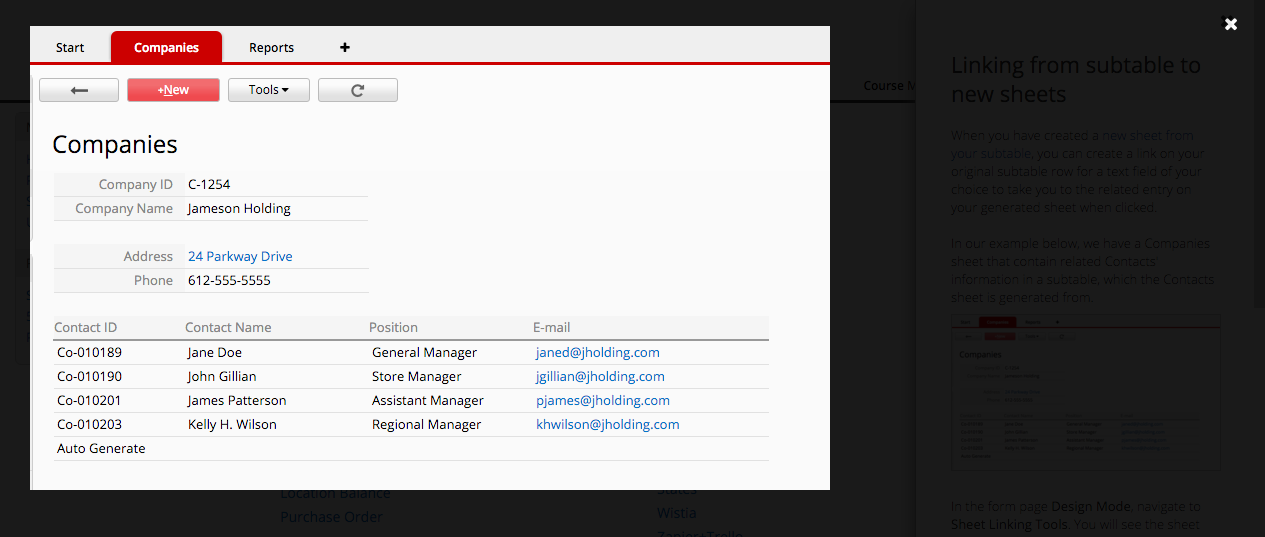
The pop-up will be hidden when there are no new announcements, but you can always display the announcements again by hovering on the Learn Ragic link on the upper-right corner of your account, and clicking on "What's New?"
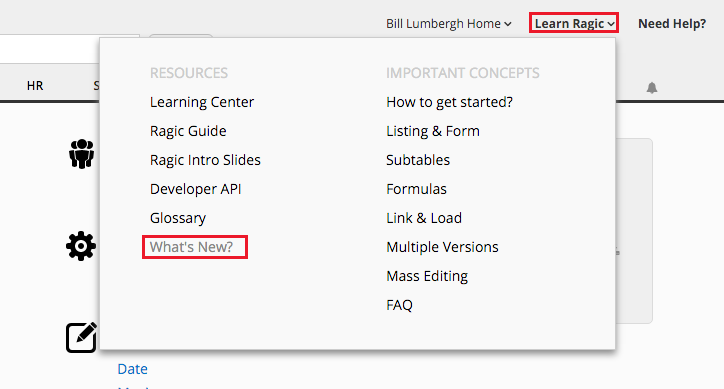
1. Download the backup containing the data from the time and state that you would like to restore to.
2. Register for a new empty Ragic account, and restore your downloaded backup to this new account.
3. You can now export the sheet that you would like to restore as an Excel or csv file from the new account. The downloaded spreadsheet should have the original values before the import.
4. Import the values from your downloaded spreadsheet file to your original account.
To translate Ragic into your own language, navigate to Start Tab > Account Setup > UI Translations
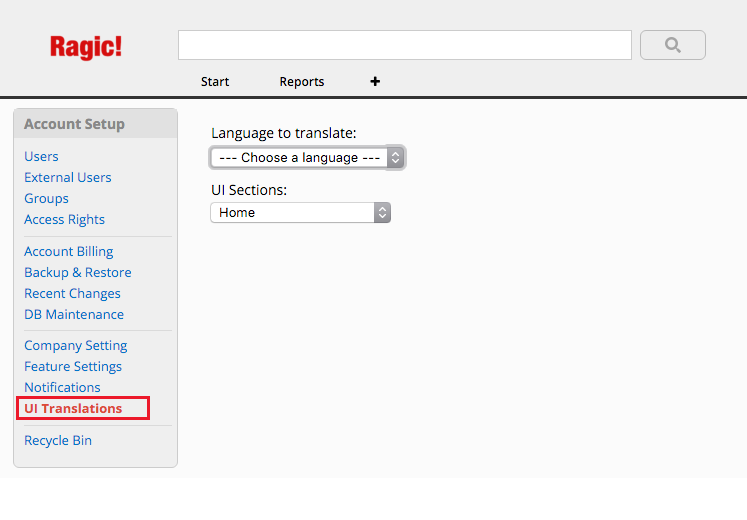
Pick the language you would like to translate Ragic into under Language to translate. The UI Sections are the sections to translate.
You'll see the names of the classes Ragic uses to identify where your text goes in blue. Do not edit this blue text.
The green text is where you'll be editing into the language you are translating to. After editing the text, click Save above the translation window.
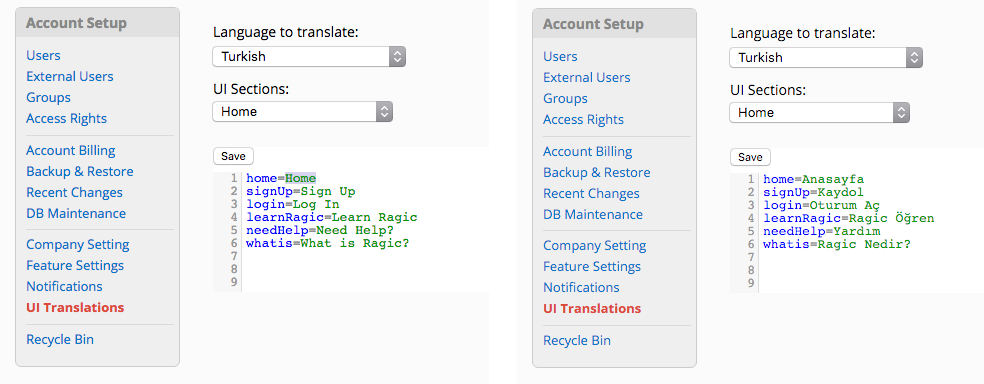
After you're done with a few sections, you'll start noticing that your saved translations are automatically being displayed in the Ragic menus where your UI sections were pointed at.

You can keep translating to your own language. Users in your account will be able to see these translations and interact with Ragic in the language you're translating to.
On the other hand, if you have important constants or formulas that you would need to display results, but you don't want to display these values to other parties externally, you have the option to hide these fields with the hidden attribute.
This might be a requirement when you have to edit fields or values quite often, as you'll still need to refer to values in the hidden fields.
In the example below, the Internal copy has a few fields such as the profit that we're making, and the original vendor price that are sensitive, and will need to be hidden in the customers' invoice.
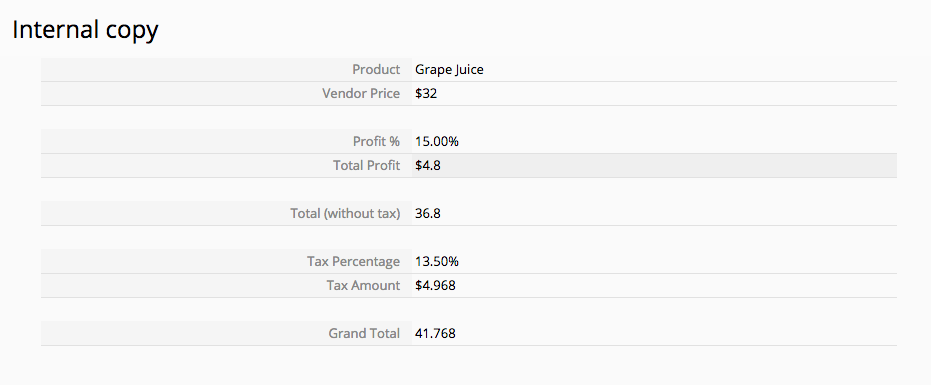
In the customer invoice, we can still have the fields that we need to refer to with formulas, but keep them hidden.
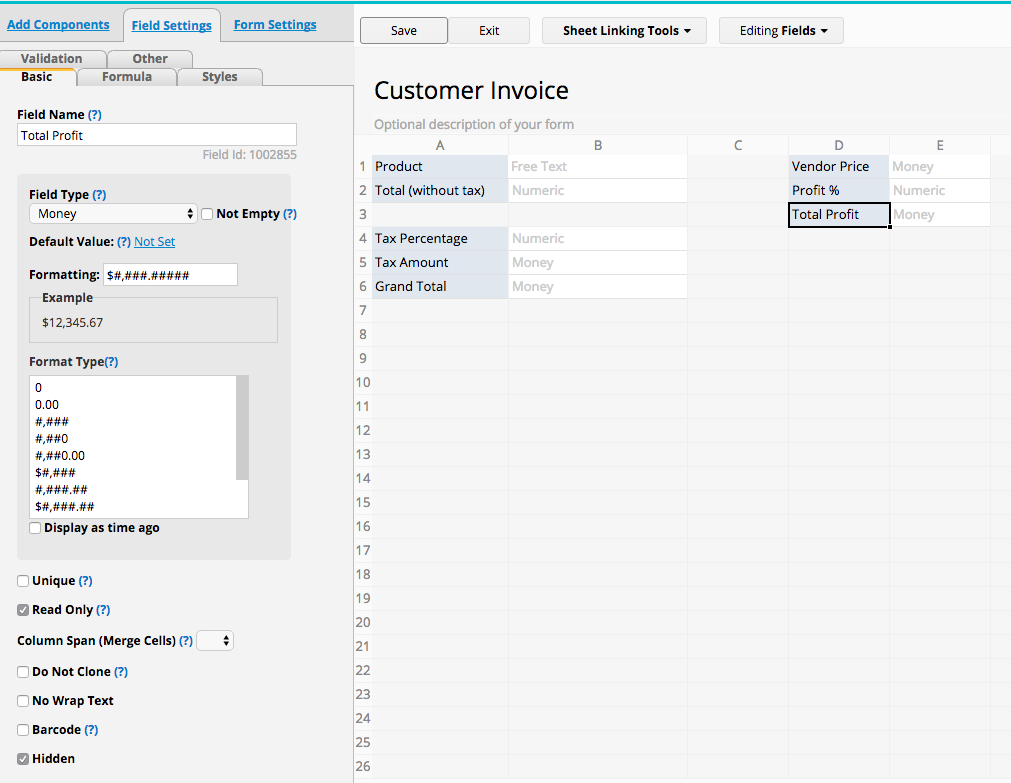
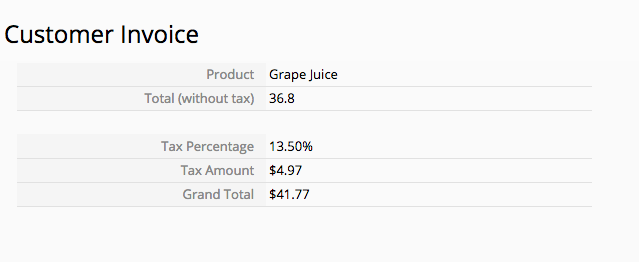
You can view more about the available report types in Ragic through this link.
You can move your subtable field to the front or the last by dragging it horizontally and dropping it at where you want it to be.
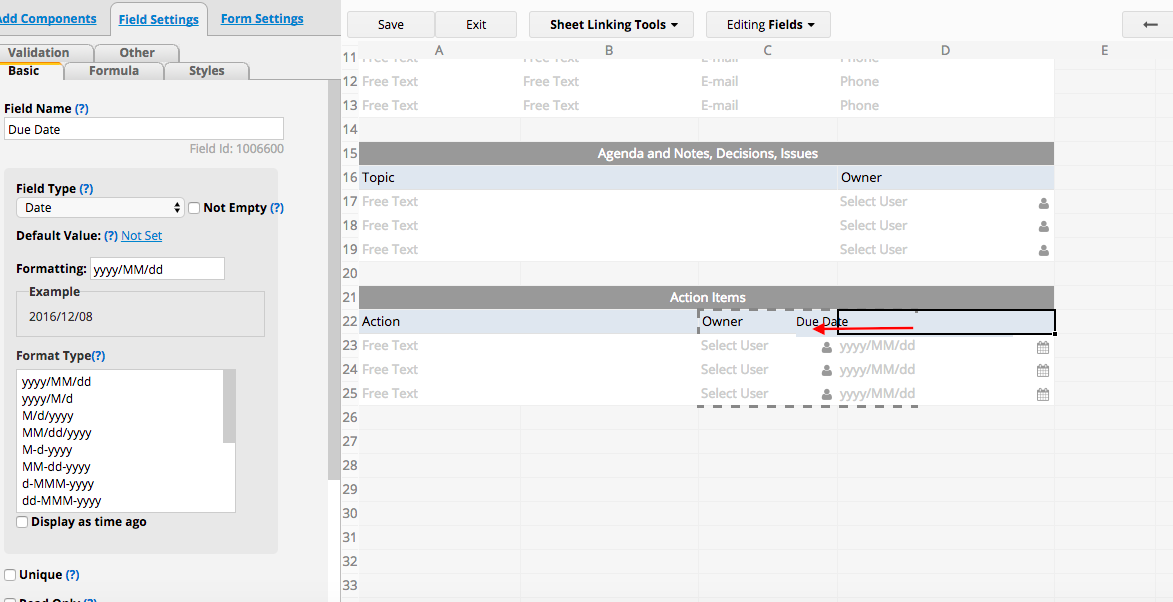
Moving subtables to another row can be done in the design mode by dragging your subtable field into an empty cell.
First make sure that you have enough space (3 cells beneath your subtable field headers (these will expand in your form in editing mode later).
You can drag one of your subtable fields to an empty space on your form to start the process.
Ragic will show you a prompt, asking if you want to move your subtable. Select the cell that you would like your first subtable field (the leftmost) would go to.
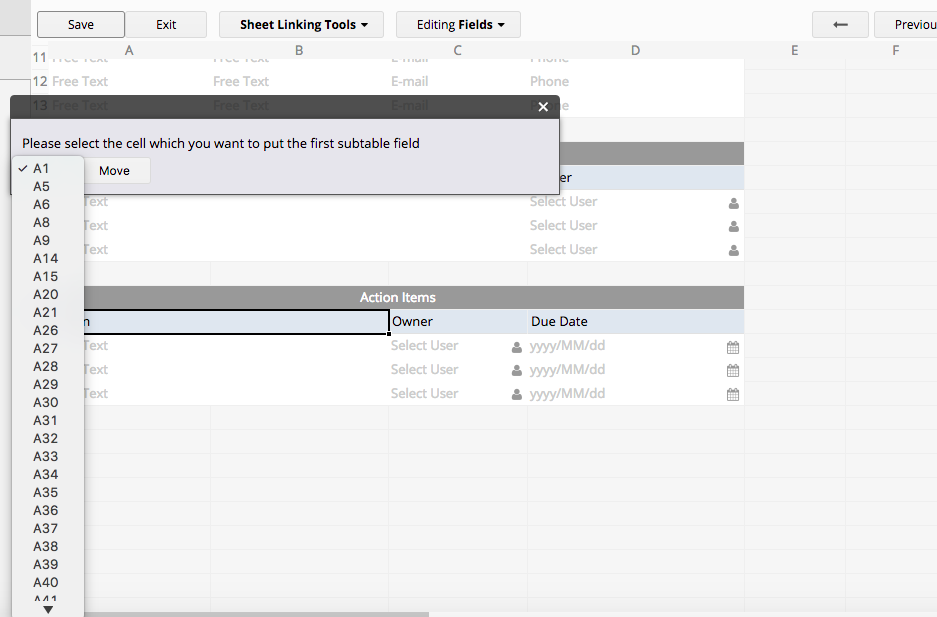
Ragic will move your entire subtable upon confirming.
The external user structure is different in the way that you can add the users you want, or have others request access to your account.. It's also possible to assign entries to external users to have more control over what an external user can access.
Afterwards, backup your data manually on your previous account to restore your data in your new account.
There are two ways of saving a manual backup in Ragic, you can either back up your entire database that includes your data as well (saved as .ragicdb format), or use the "Backup database definition only" option to save the design elements without your data (saved as .ragic format).
You can restore either type of backup on your new account.
1. Check the "Unique" option for the field that identifies your records from one another. This can be something like a product ID, or an e-mail address. Here's more about the "Unique option.
2. While doing your upload, there will be an import policy step that asks you if you want to "renew" or "create new". If you click "renew", Ragic will check if the key field exists (usually the first column of your import file), and ignore the ones that are already there.
Ragic's number formatting options, such as #,####.## and #,####.00 would actually display the decimal points rounded, but will store the numbers with their actual decimal values.
If you're looking to round to the nearest two decimal points, as is found with currency or other financial transactions, you are most likely looking to calculate according to the nearest 2 decimal places, which would be the nearest cent for the resulting sum to be accurate.
An example for a workaround that will have Ragic store numbers rounded to the nearest two decimals is shown below:
Original formula that needs to be rounded: A1/4
Suggested formula: ROUND(A1*100/4)/100
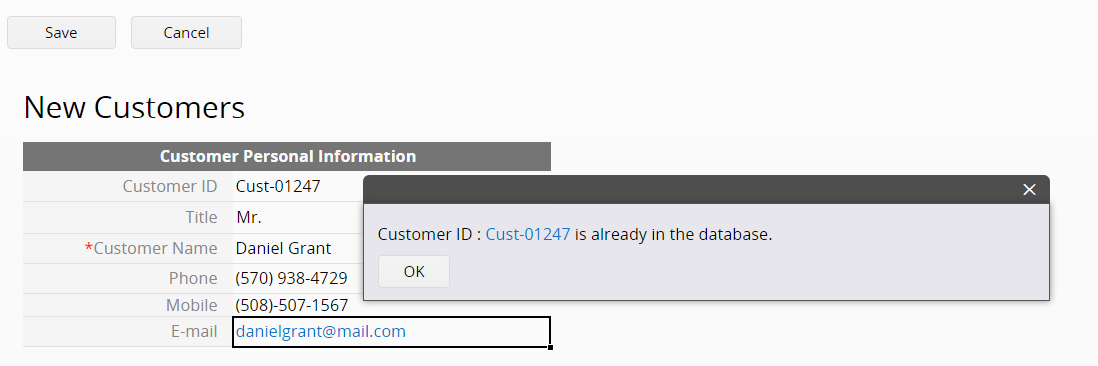
Creating and editing entries from mobile devices are available for both our iOS app and Android app.
iOS app :

Android app :

Screenshots:
Navigate to the tab and sheet you would like to access.
In the Listing Page, you can browse multiple records. And click on the record to see the detailed information.
In the Form Page, you can edit entry here.
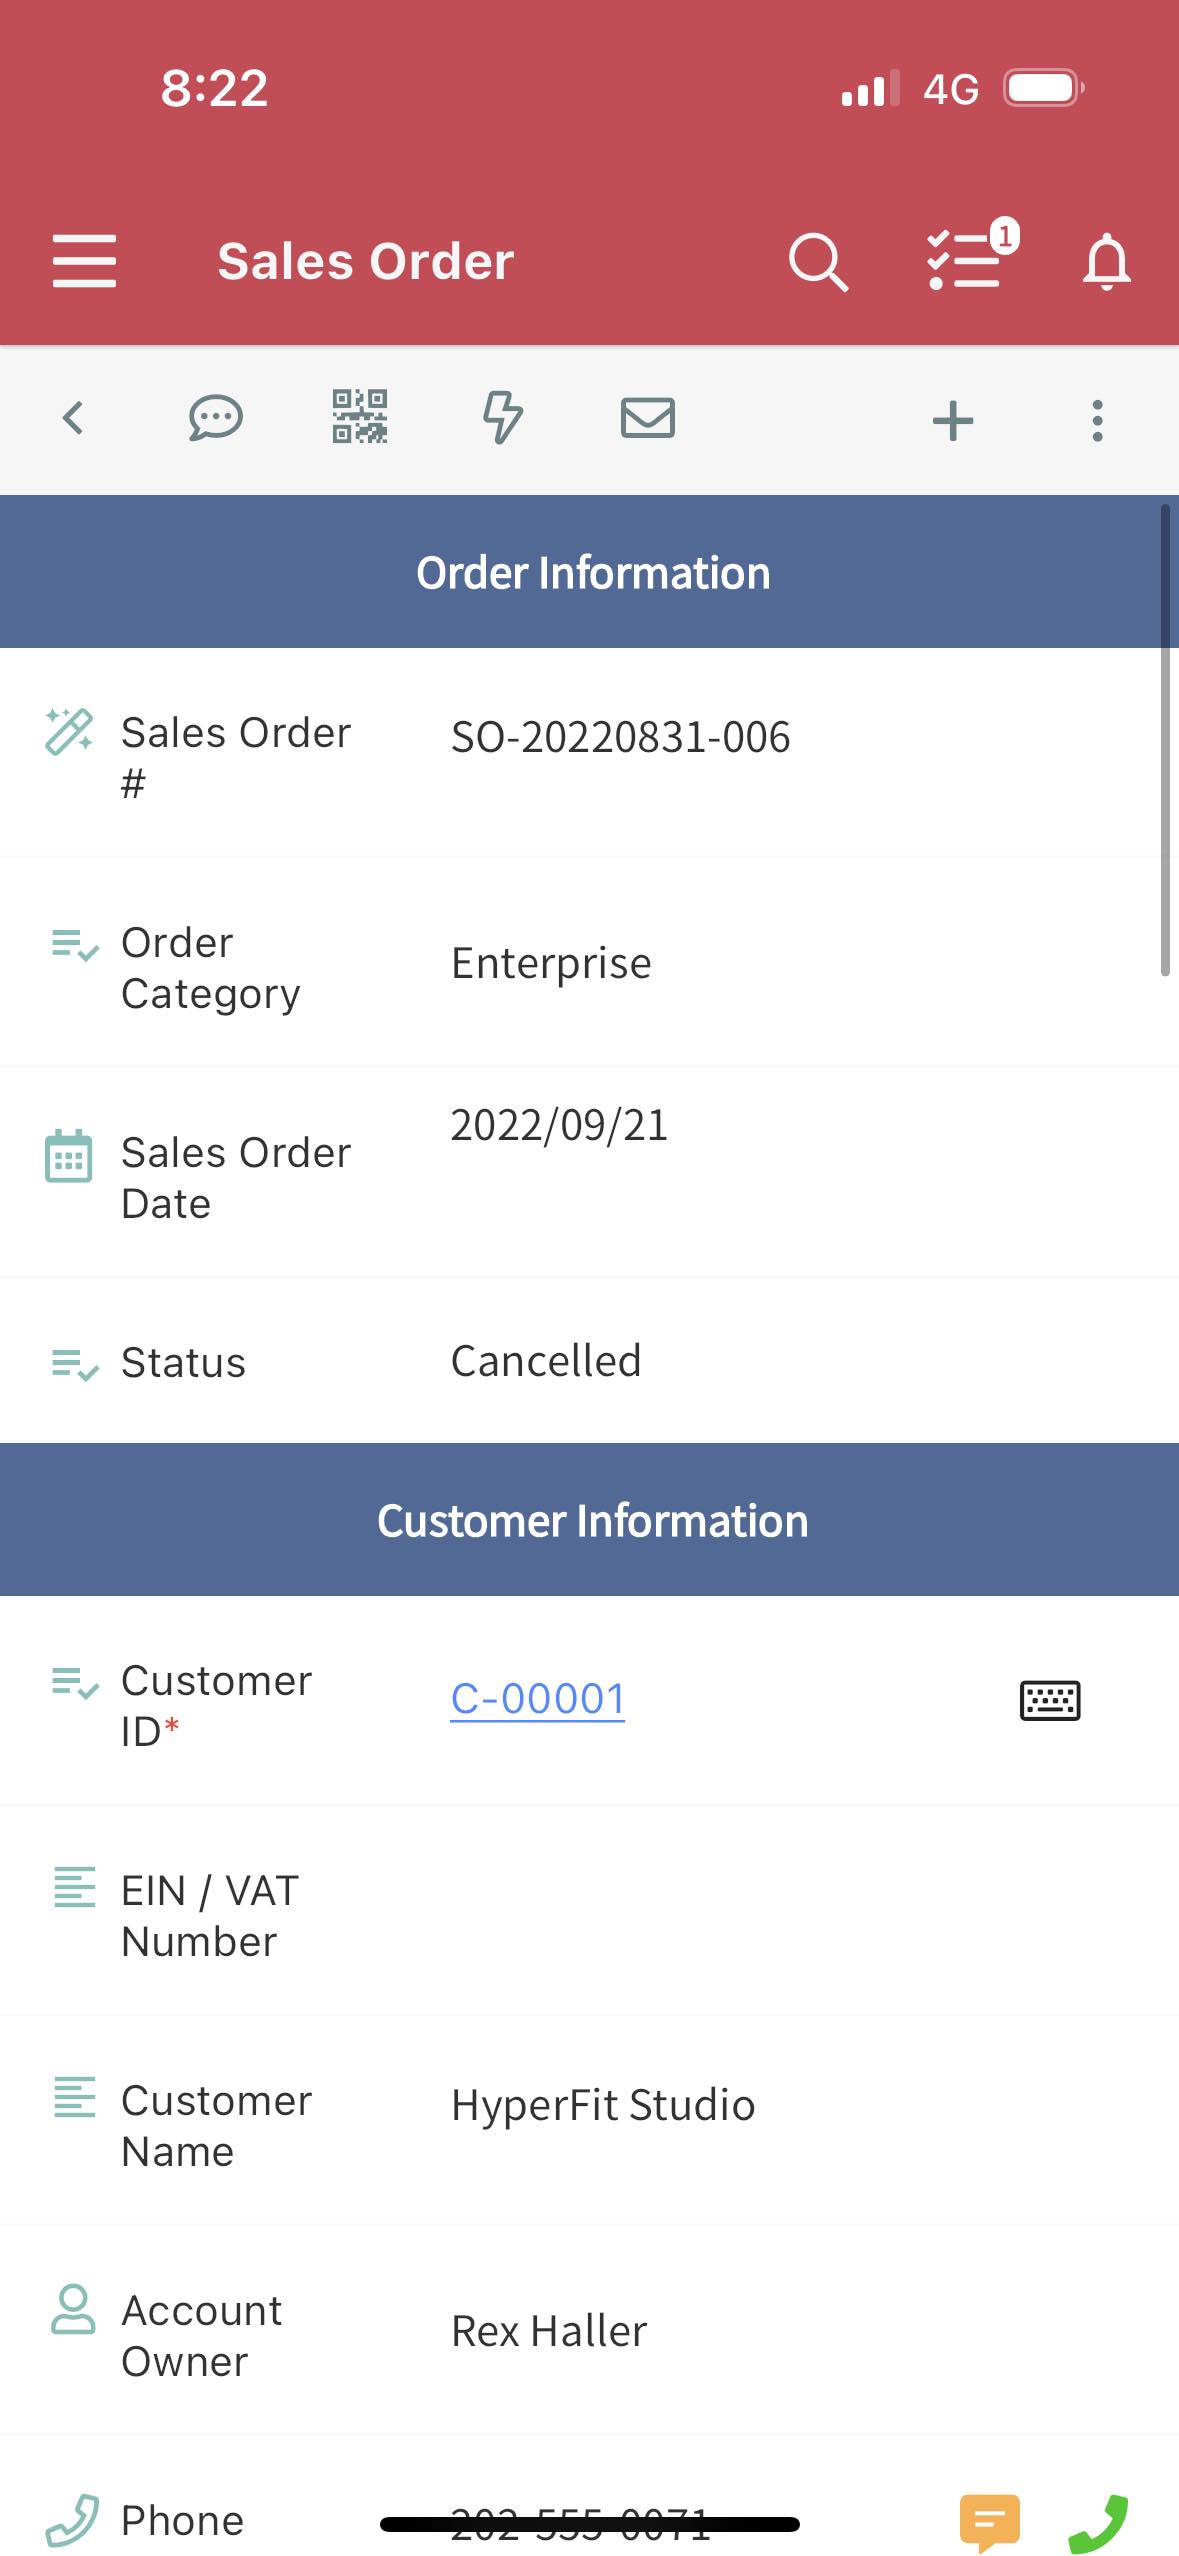
It's best to display only the essential fields that you would need at a glance for better readability, and a faster loading time.
Click on the Change Design button on the upper-right corner to go to the Design Mode of your listing page that has too many columns.
By default, all the regular fields you have in your listing page will be selected fields for your listing page. Select the fields you would like to display from the Listing Page Field Picker. You can also change the order of selected fields.
You can also change the width of the columns according to your fields.
After saving your changes in the design, your listing page will look more organized.
You can always click on the summary of an entry in the listing page to view the entry's details in the form page.
You can change the number of entries that are displayed in your listing page by clicking on the range shown in the upper-right hand corner.
Remember if you set the number of records too high, the listing page may load slower. We generally recommend displaying no more than 100 records per page unless necessary.
Image upload fields will display a thumbnail of your uploaded image, but displaying this thumbnail necessitates the full-sized image to be loaded before it is displayed.
This may affect your listing page loading time significantly.
You can remove the image upload field from the listing page with the Listing Page Field Picker using the method above to remove the image upload field to be displayed on the listing page.
If it's absolutely necessary to display a thumbnail, you can upload images with smaller file sizes.
If it's not necessary to display a thumbnail at all, you can use a file upload field instead of an image upload field.
Consider removing the fixed filter or field sorting, to see if it helps. If the problem is caused by the fixed filter, you can further check if there are conditions with non-exact match including in the filter.
If your form page is loading slowly, and have over 100 records for subtables, you can consider using our sheet sections feature to put subtables in sections.
If you think that your database account connection is slow, please try the slow database connection troubleshooting option here.
If you don't want some of your fields on your form to show up in the left sidebar search tool, you can add "__" as a prefix to the field name.
So if your field name is "Project Assistant", writing "__Project Assistant" will make the system ignore your field while showing the fields available for querying on the left sidebar.
Please note that this does not make your field entirely invisible while doing queries. If your field is selected to be displayed as a column in the listing page, or if a user searches for the content in the top search bar, the results will still be displayed.
The text formula is used for combining a number or date value into a specified format.
For the format 12,345.67 you can use TEXT(A1,'#,###.##')
Other number formats can also be used.
To format a date field into the name of the weekday like "Friday", you can use TEXT(A1,'EE')
To format a date field into the abbreviated name of the weekday like "Fri", you can use TEXT(A1,'E')
You can refer to other custom date formatting types here.
In the example below, we will get the first and last name of a person, using the space character.
Our form design is quite simple, with the full name on A1.

Using LEFT(A1,LEN(A1)-FIND(" ",A1,1)) for the first name,
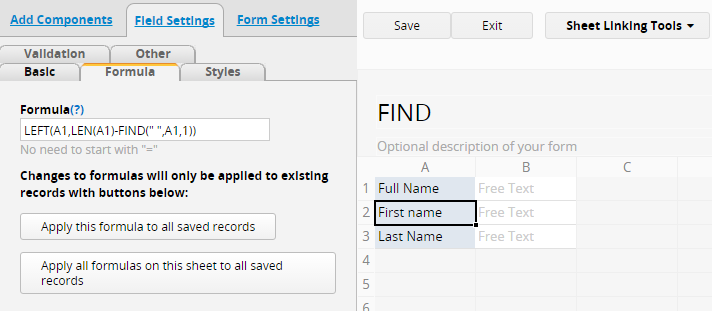
and RIGHT(A1,LEN(A1)-FIND(" ",A1,1)) for the last name. Notice that we're looking for the space character with the blank space in between quotation marks (" ") with FIND.
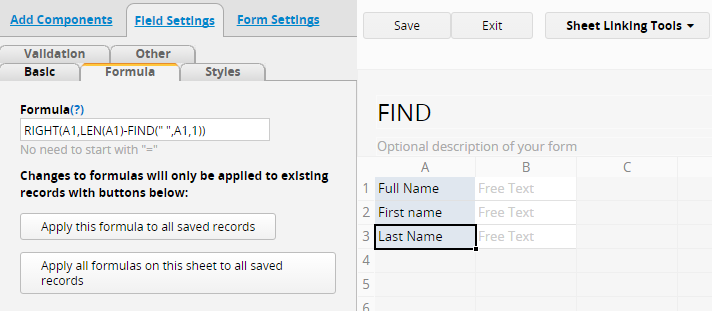
The output is the first name and last name that is extracted from the full name.
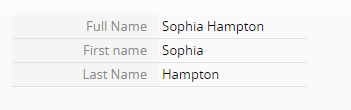
If you use the "Enter" key, the order goes from top to bottom.
You can use the arrow keys to navigate to the next field in the direction of the arrow key.
Since the image will need to be referred to with a URL, the image will need to be hosted online. This can be on your own website, on a free image hosting service, or even in an attachment you've made in a form comment on Ragic. In our example, we're using imgur to host 3 traffic light icons.
We would like our project proposals to show a red icon if the project proposal has the status "Rejected", a yellow icon if the project proposal is "On Hold", and a green icon if the status is "Approved".
Traffic Light Icons
Using a nested conditional formula on field A5, where our Status Indicator will be,
IF(A4.RAW=='Rejected','https://i.imgur.com/JTH6pcq.png',
	IF(A4.RAW=='On Hold','https://i.imgur.com/cVorwf4.png',
		IF(A4.RAW=='Accepted','https://i.imgur.com/xqtgvSV.png','please make a status selection'
		)
	)
)
the end result is displaying the appropriate icon link with the [img] BBCode tag, and the text 'please make a status selection' if a selection is not made.
Selecting the field A4, which is the project status, we're able to view the icon on our form page.
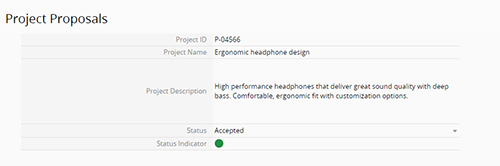
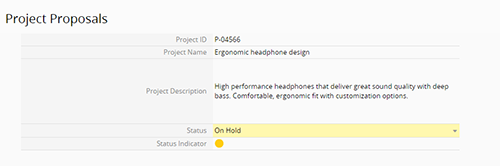
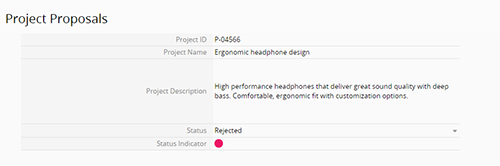
The status indicator is also visible from the listing page.
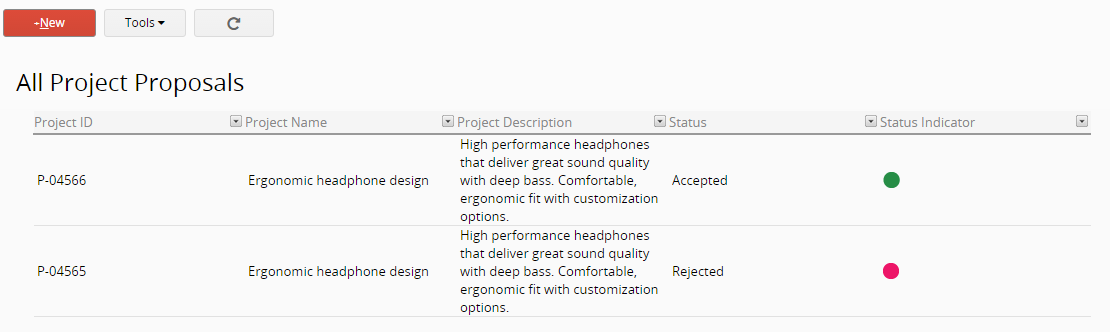
If your users don't have access right to see "Tool" on Ragic sheets (external users don't have tool button) or if your users don't have access right of features "Download as Excel File","Download as PDF file"or "Printer Friendly" under Export section from tool, you can add action buttons to let them have chance to download data in Ragic to Excel file or get printer friendly page.
To add this kind of action buttons on your sheet Form page(to export a single record), please navigate to Form design mode >"Form settings" from left side panel > "Actions", and you can use parameter /{id}.xlsx(to download as Excel file) ,/{id}.pdf(to download as PDF file) and /{id}.xhtml(Printer Friendly) to create action buttons.
Action Name: user defined.
Action Type: URL
Action: /account_name/tab_path/sheet_index/{id}.action_parameter
Below is the example of adding a "Download as Excel file" action button to the Form page.

Remember to click on "Add Action" once you finish this action setting.
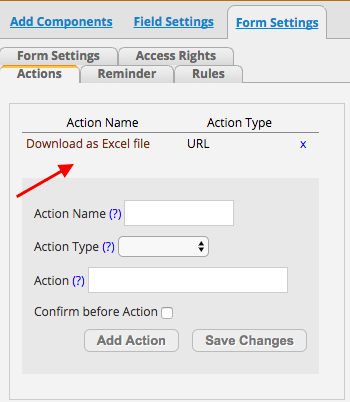
This action is now added, please save your design change before exiting design mode.
You will now see this action button at lower right corner on your Form page.
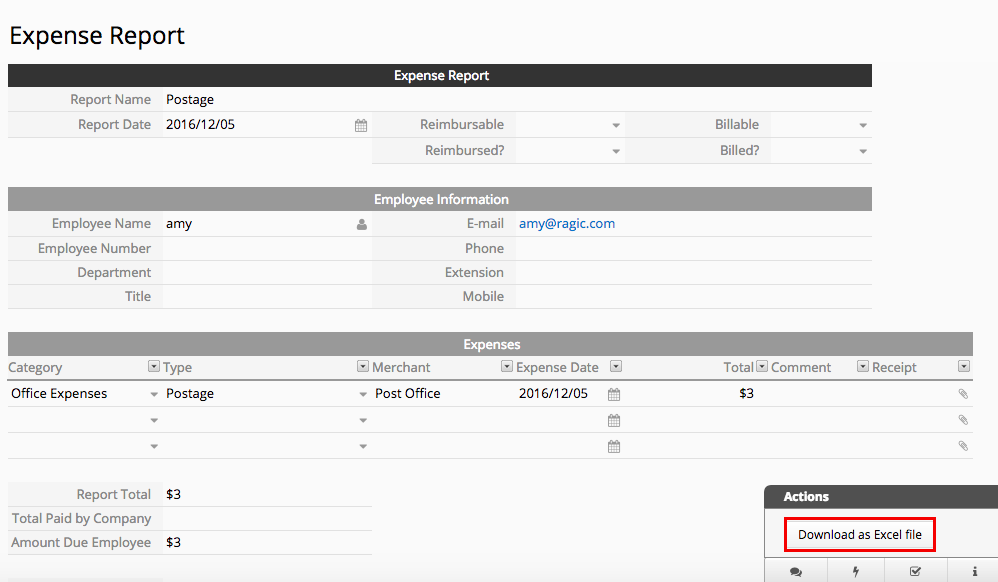
Below is the result of clicking this action button.
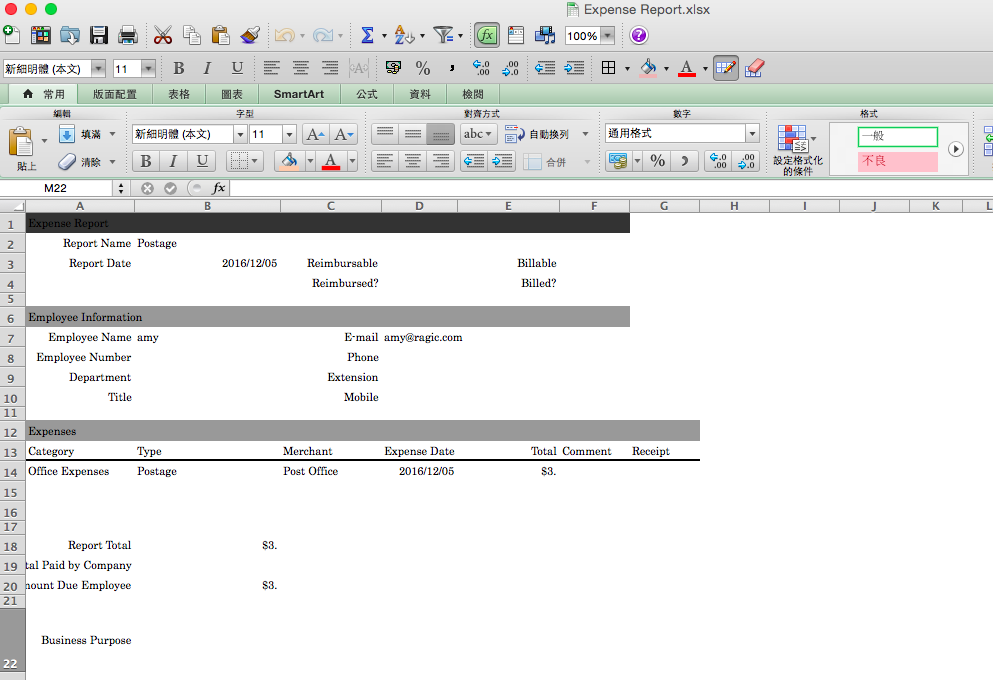
If it's to export all records or filtered records in rows, please add action buttons to your Listing page. You can navigate to Listing design mode >"Form settings" from letf side panel > "Actions", and you can use parameter /.xlsx(to download as Excel file), /.pdf(to download as PDF file) and /.xhtml(Printer Friendly) to create action buttons.
Action Name: user defined.
Action Type: URL
Action: /account_name/tab_path/sheet_path.action_parameter
Below is the example of adding a "Printer Friendly" action button to the Listing page.
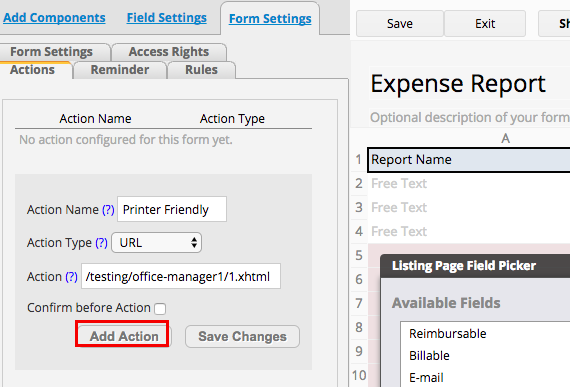
Remember to click on "Add Action" once you finish this action setting.
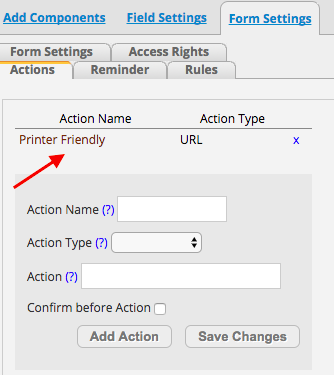
This action is now added, please save your design change before exiting design mode.
You will now see this action button at lower right corner on your Listing page. (Refresh your page if you didn't see this action button.)
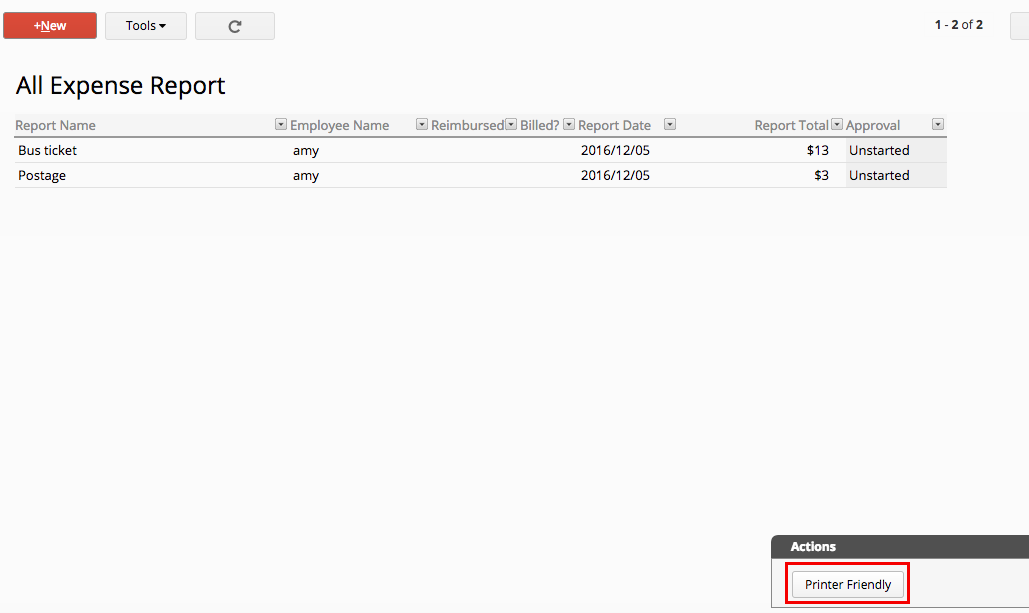
Below is the result of clicking this action button.
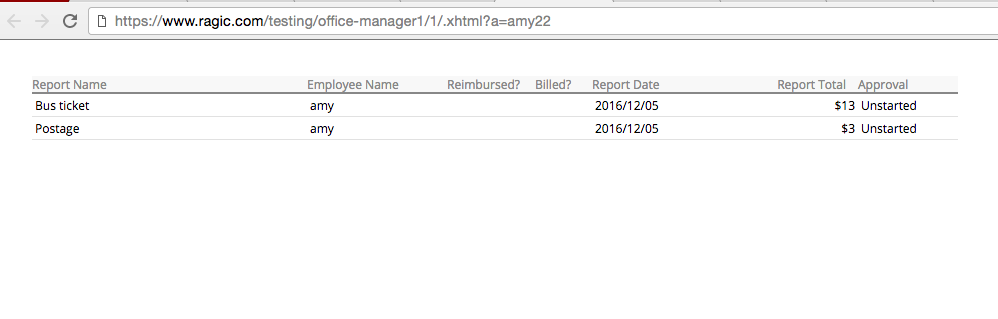
Let's take the sheet "Account Balance" and the new sheet from subtable "Transaction ID" as our example here.
We start with the "Account Balance" sheet design, in the sheet, we create a subtable that can keep all transactions in records.
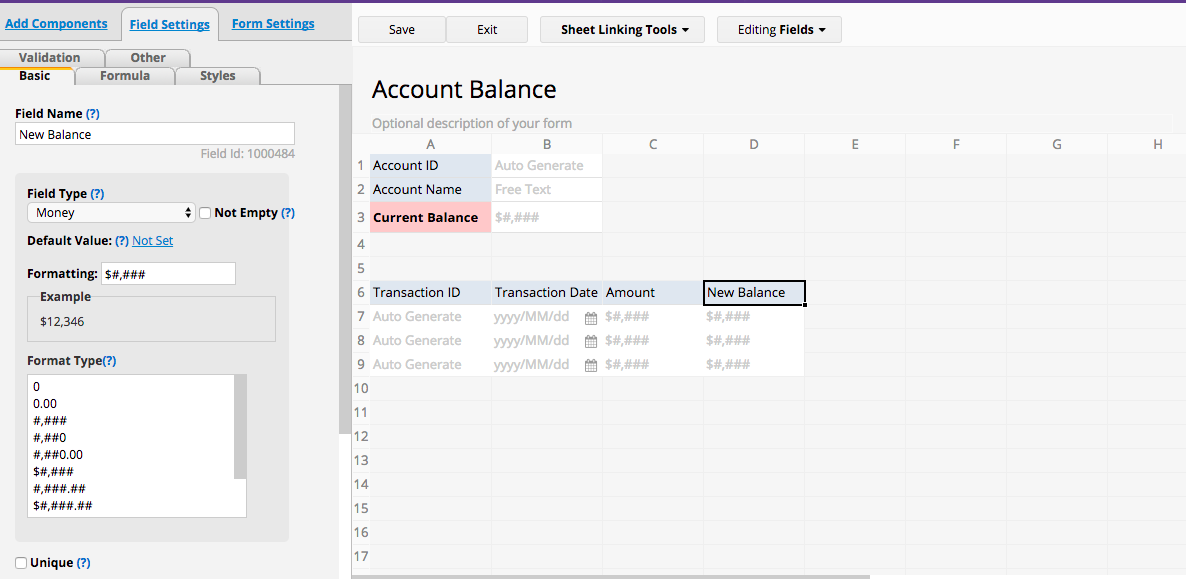
And we use linking tool "new sheet from subtable" to create a new sheet "Transaction ID" that list each subtable records as separate entries.
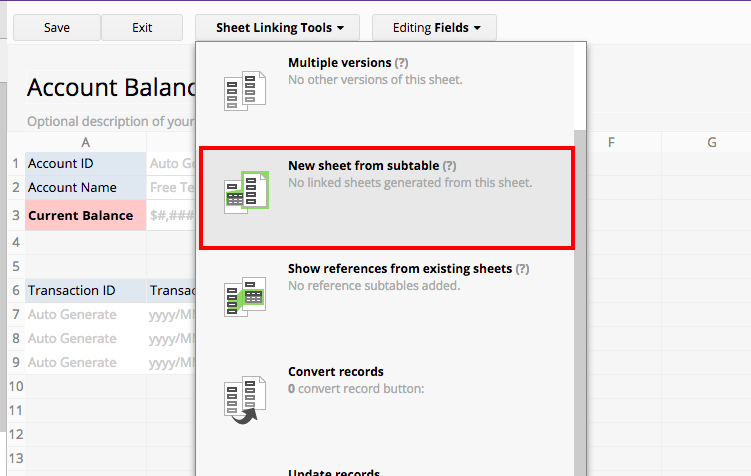
You can select "Account ID" as the Key linking field to the new sheet.
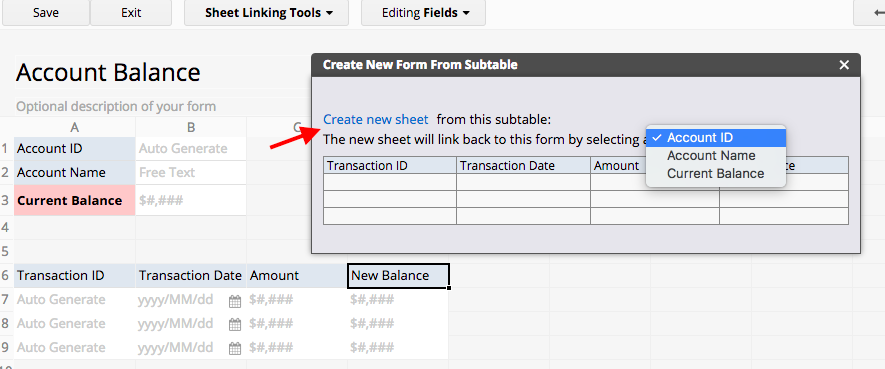
After clicking "Create new sheet", you can now see this new sheet is with the fields that are actually from the subtable in sheet "Account Balance"
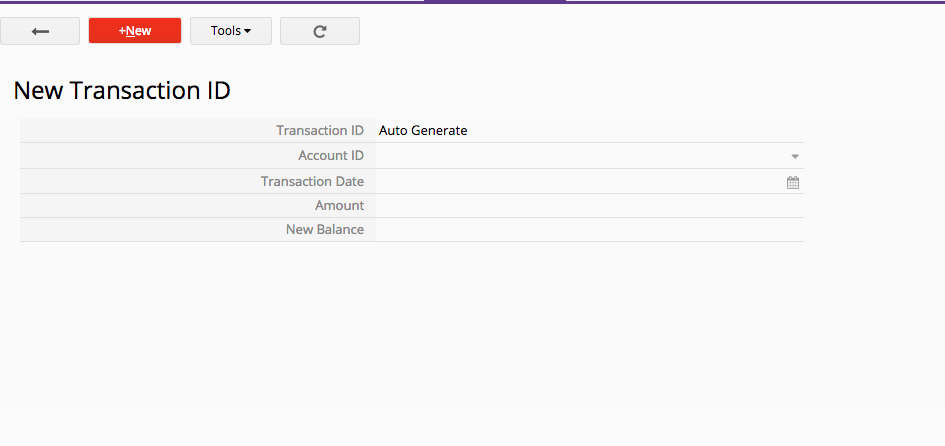
We can add some more fields and assign formulas to calculate balance for a transaction under design mode.
To load "Account Name" and "Current Balance" data according to its "Account ID", we can use link&load to link them as loaded fields for our existing set "Account Balance". (Click on the name under link&load section in sheet linking tool.)
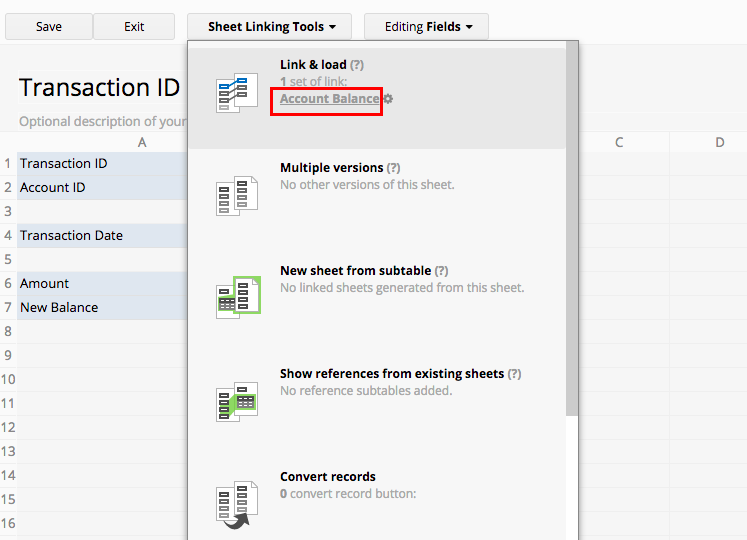
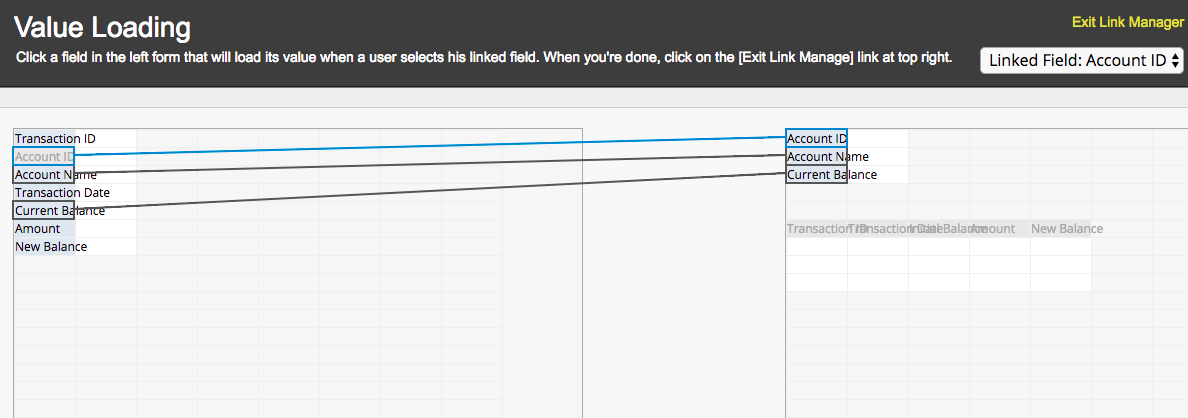
Assign formulas for field "New Balance". (Current balance from its account plus this transaction amount.)
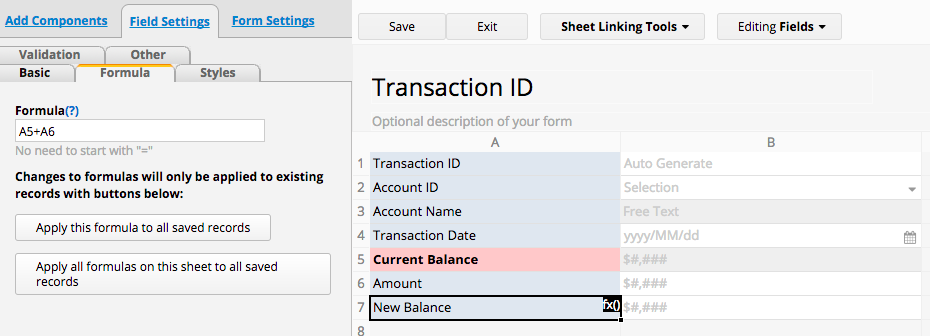
And now we can create an action button to update value on sheet "Account Balance".
You can find this feature in sheet linking tool:
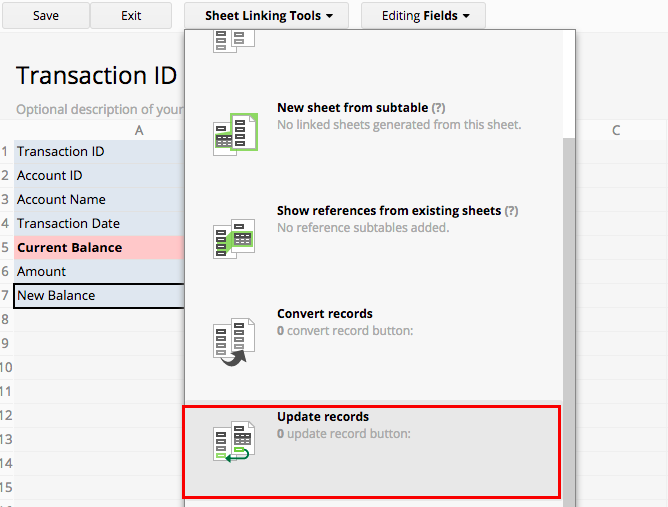
Select sheet "Account Balance" as the sheet to be update.
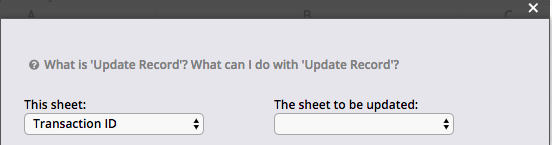
Configure your update value on another sheet settings.
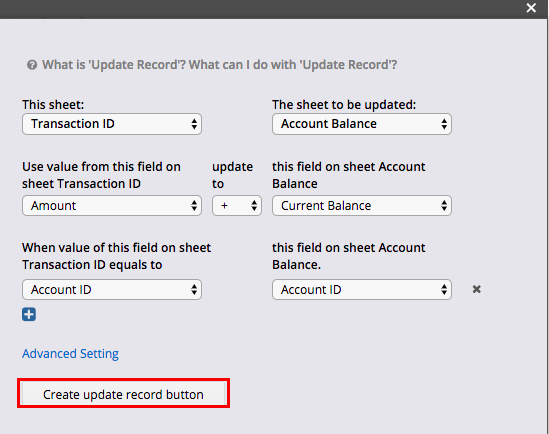
You can decide to have "force formulas recalculation on target sheet" after value is updated or "create reverse action button" in Advance Setting.
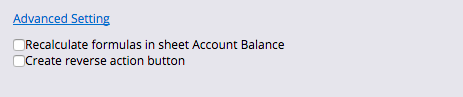
Click on "Create update record button", you will be prompted to name the button, which will be added to your "Actions", visible in every records' form page on the lower-right corner.
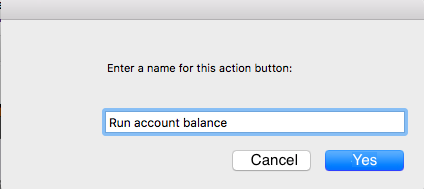
Now this action button is created.
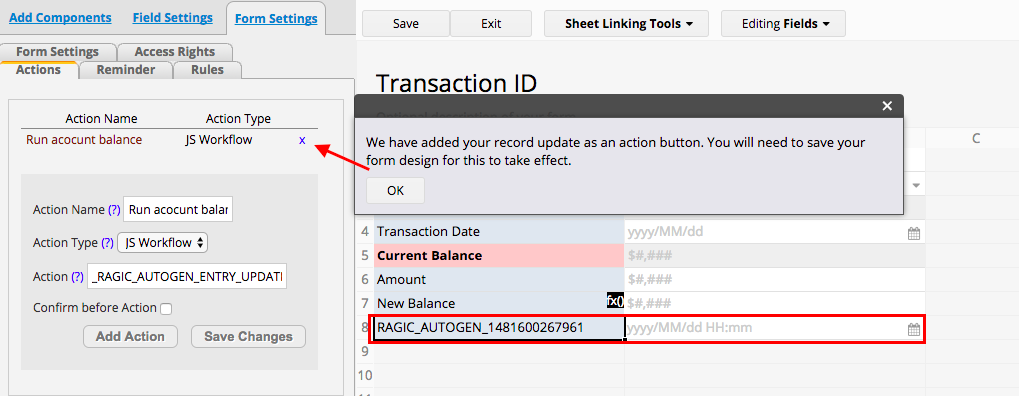
You may notice there is a new date & time field created by the system in order to record the time you execute an update value on another sheet action. You can rename it, but please do not delete this field.

Now we can navigate back to our sheet "Account Balance" to adjust the layout.
You can add one more subtable field "Initial Balance", move it to the place with the order you want and apply formula (New Balance less Amount.)
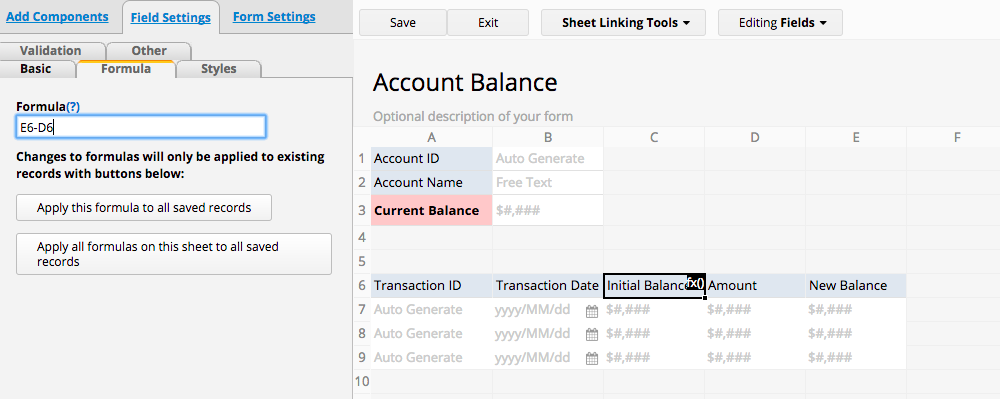
To create full transaction entry in the new sheet "Transaction ID", you can create an action button from linking tool to help you.
Click on the "gear icon" next to the sheet name under section New sheet from subtable in sheet linking tool.

And click "Create Button"
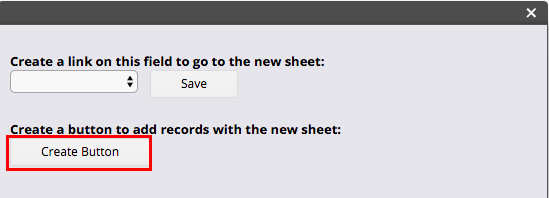
Name this action button.
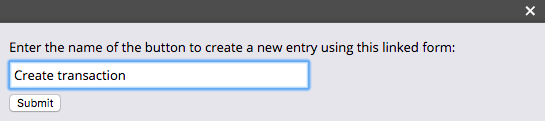
You can now see this action button is created from left side panel.
Please configure the parameter to be without "Close", so your tab won't be closed once you create and save your transaction entry on the new sheet.
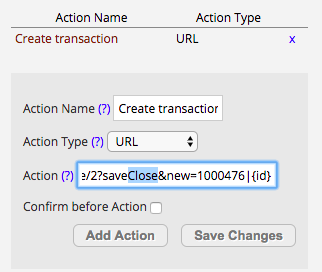
Don't forget to "Save changes" to this action button.

Now we can try create a full transaction record for our Account "ABC Mart".
Click on the action button we just created at the lower right corner "Create transaction".
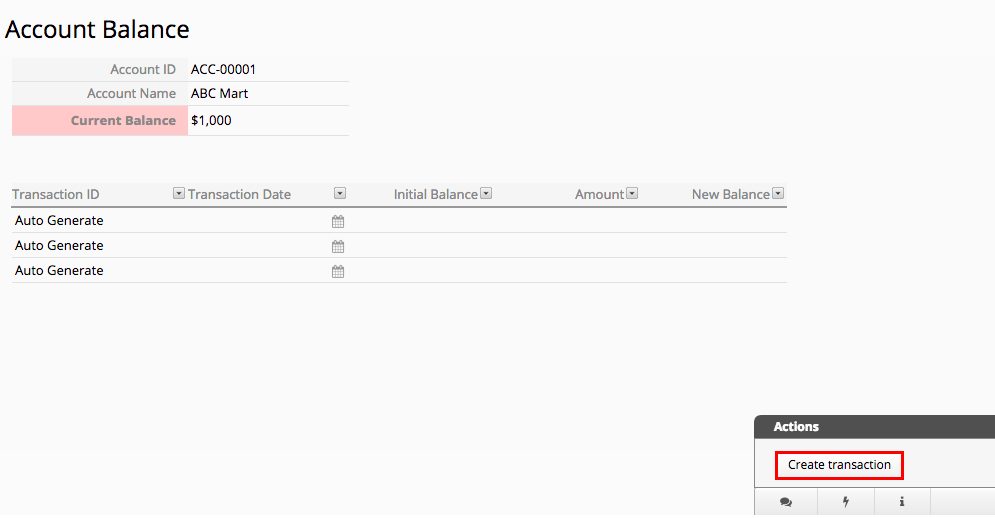
Fill up the transaction Date and the Amount, save this entry.
And you can click the action button "Run account balance".
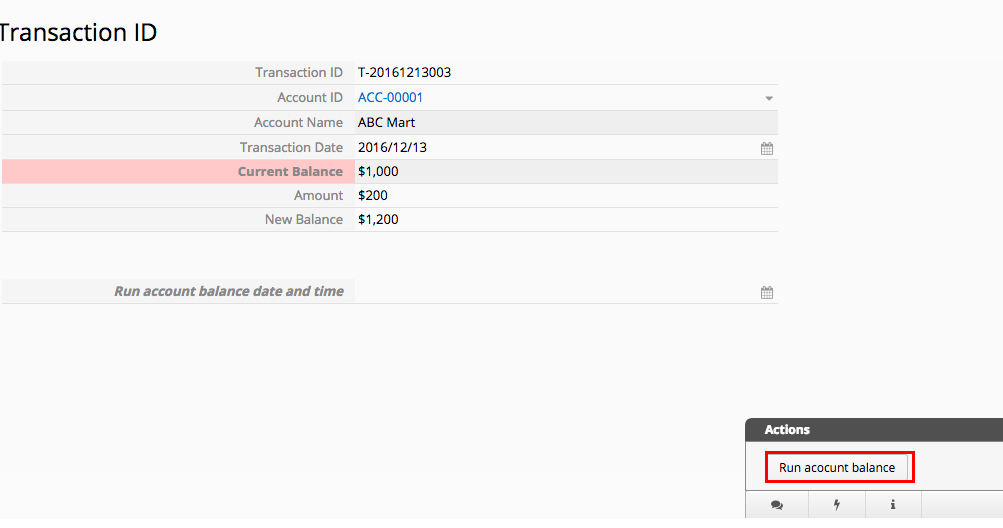
The system will prompt you with a message that the update is finished, and will automatically fill the date & time field.

As you can see, the Account Balance of "ABC Mart" is now $1200.
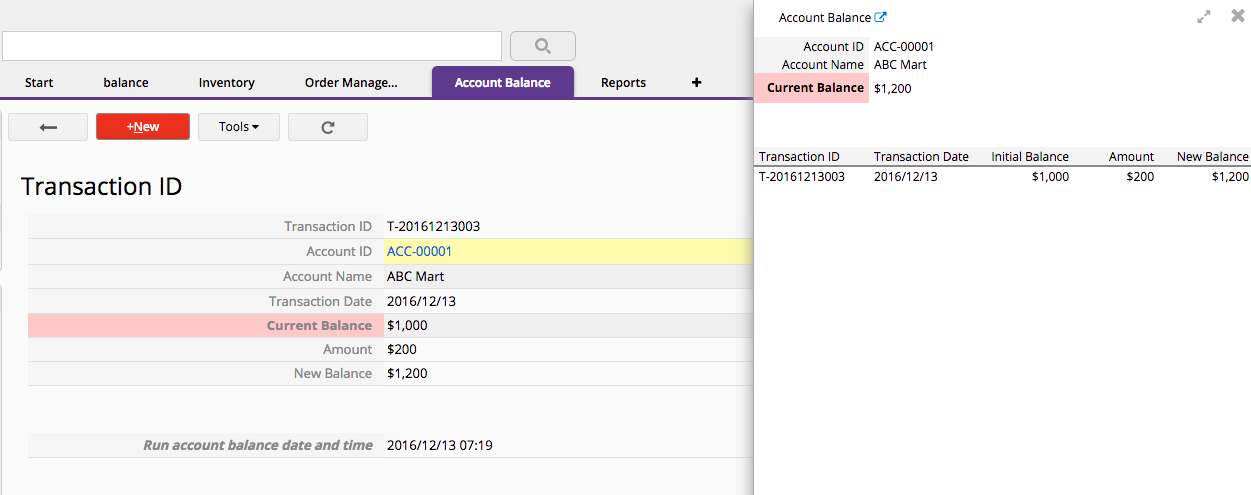
You can try creating multiple transactions for this Account.
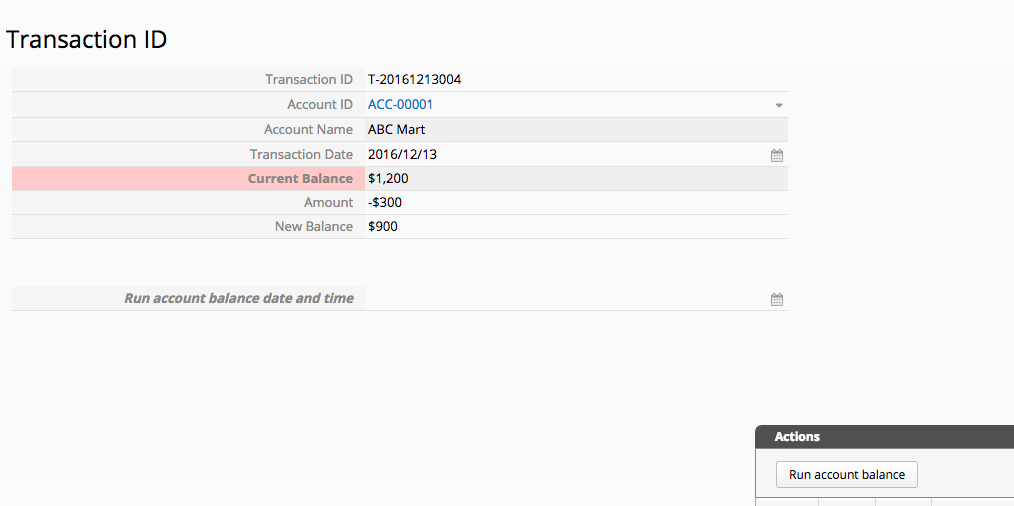
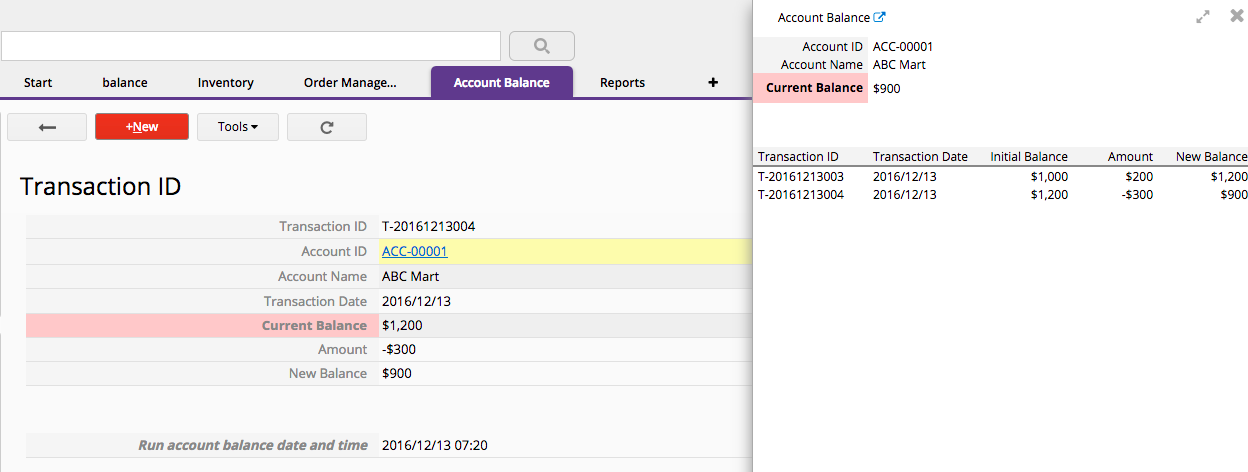
This type of link will not be permitted in the link manager, as you cannot link from a subtable and load to a regular field (from a subtable on the right side of the link manager to the left side), since a subtable could have many different values entered in an entry, but a regular field would only have one value.
On the contrary, you can link & load from regular fields to a subtable, this works best if you would like to manually select (or type to see options) one field of the data, and load the corresponding information in other fields within a row of the subtable, such as having multiple line items for products in a sales order.
The linked field is a kind of selection field (select from other sheet). In order to identify each selection as unique, the linked field should be linked from a key value that can identify each entry on the source sheet as a unique entry, which is usually the id number or serial number field. Thus, you cannot link from a linked field or a numeric field as the linked field. However, you can link from a linked field or numeric field as a loaded field.
1. Under Form Design Mode > On the left side panel > Form Settings > Actions > click "x" next to the action button you don't need > Save design changes.
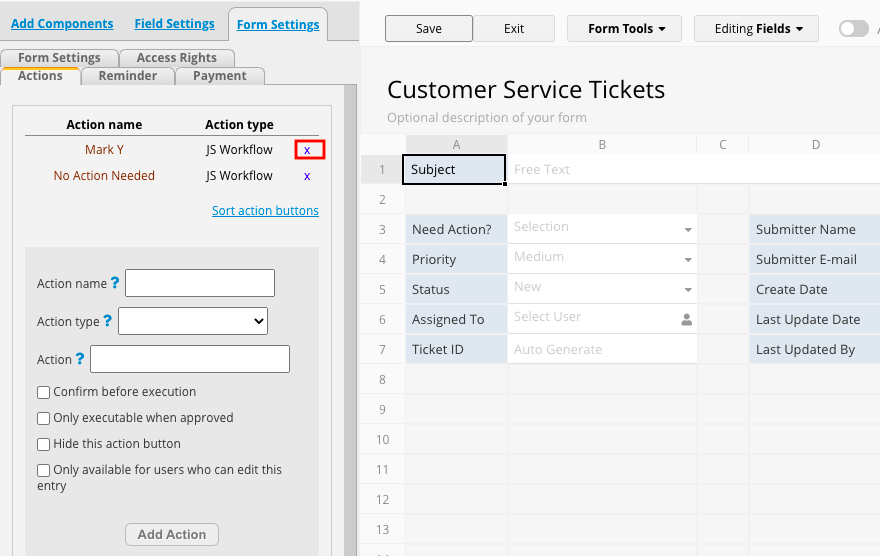
2. Or under Form Design Mode > click Form Tools > and find Actions under Form Tool settings.
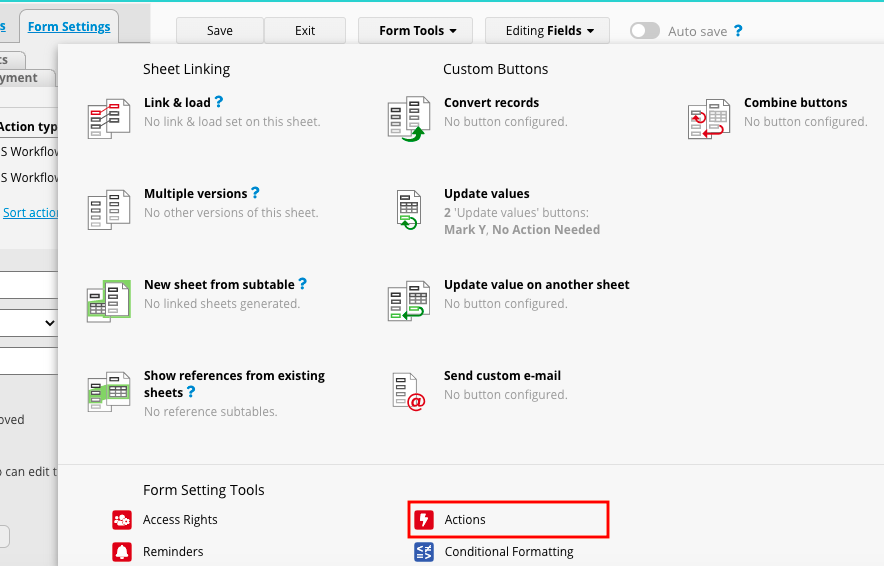
You will see the configuration of your action buttons is on the left side panel > click "x" next to the action button you don't need > Save your design changes.
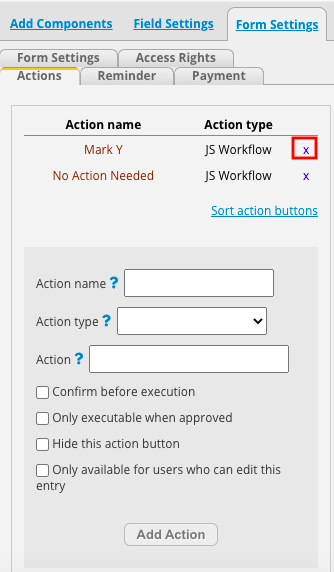
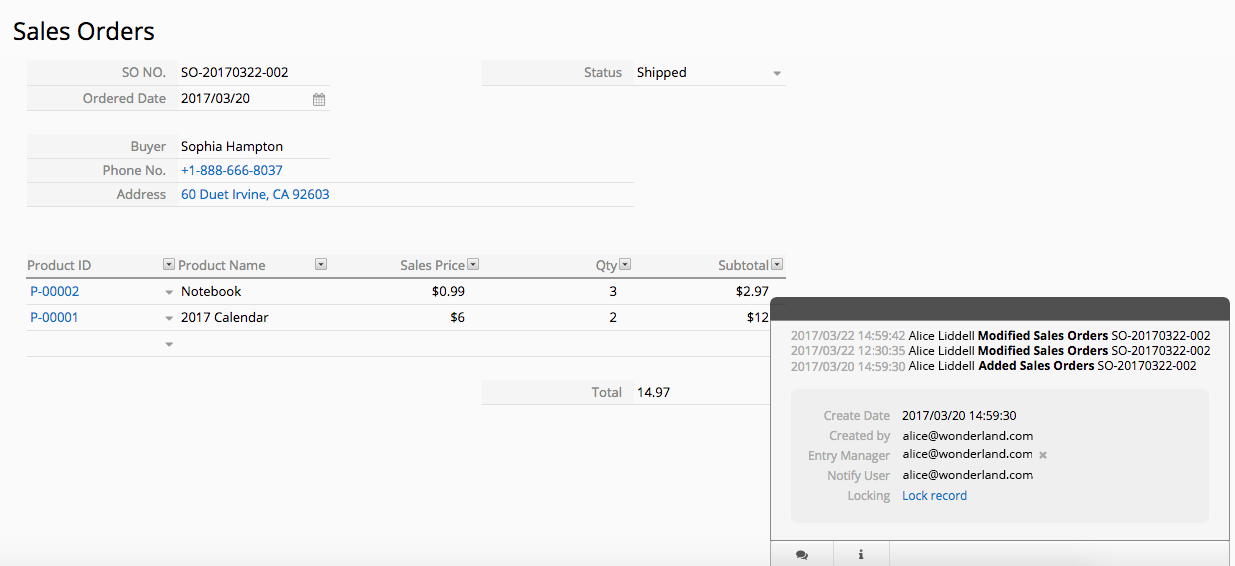
Clicking the i icon at the lower-right corner of the form page while browsing your entry will display the history details, such as the create date, user the entry was created by, entry manager, users that are notified, and locking status.
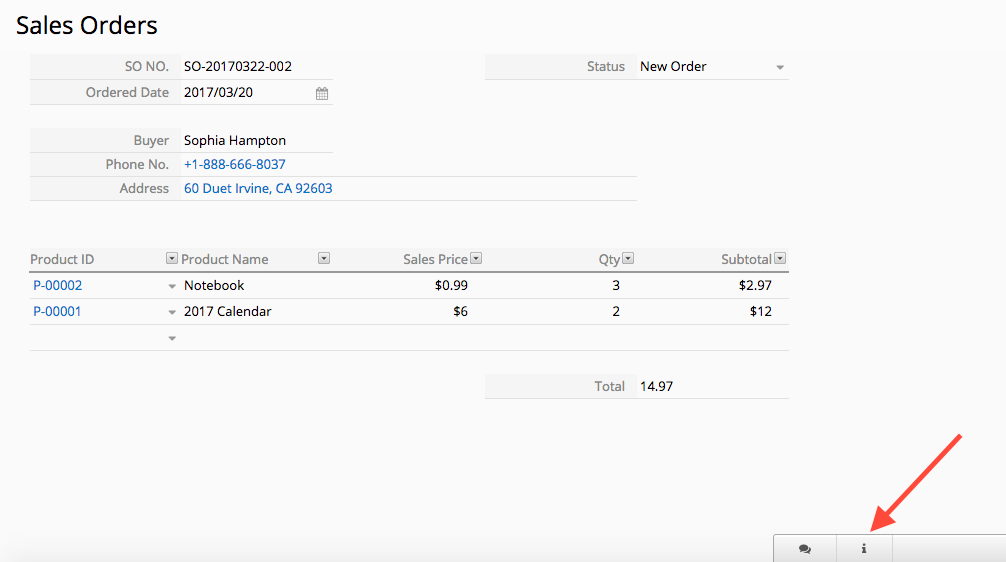
If you have access rights higher than survey user (such as viewer, bulletin user, or admin), you will be able to view the history details of records.
You can click on the added/modified records, to view details on additions and modifications.
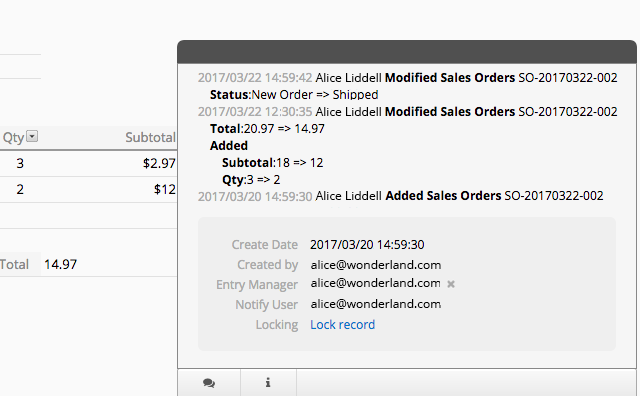
For a subtable row to be saved to the database, it needs to have at least one non-empty values for a row. However, there are some exceptions that we need to consider. For example, if a field is configured to have a default value, its value is auto generated or generated by formulas, it will always have a value, regardless of the rest of the row being filled out or not. Therefore, Ragic has a rule in place to prevent empty rows to be generated. Fields in the subtable row with default values, formulas, or auto generated fields will need another fields' value filled in the same subtable row, so that this subtable row is saved to the database. Otherwise the default, formulas result, or auto generated value will not be counted as a non-empty field.
Leaving the form rule condition blank in this example ensures that the Select User field used for the assignment is hidden when a user is already assigned to a record.
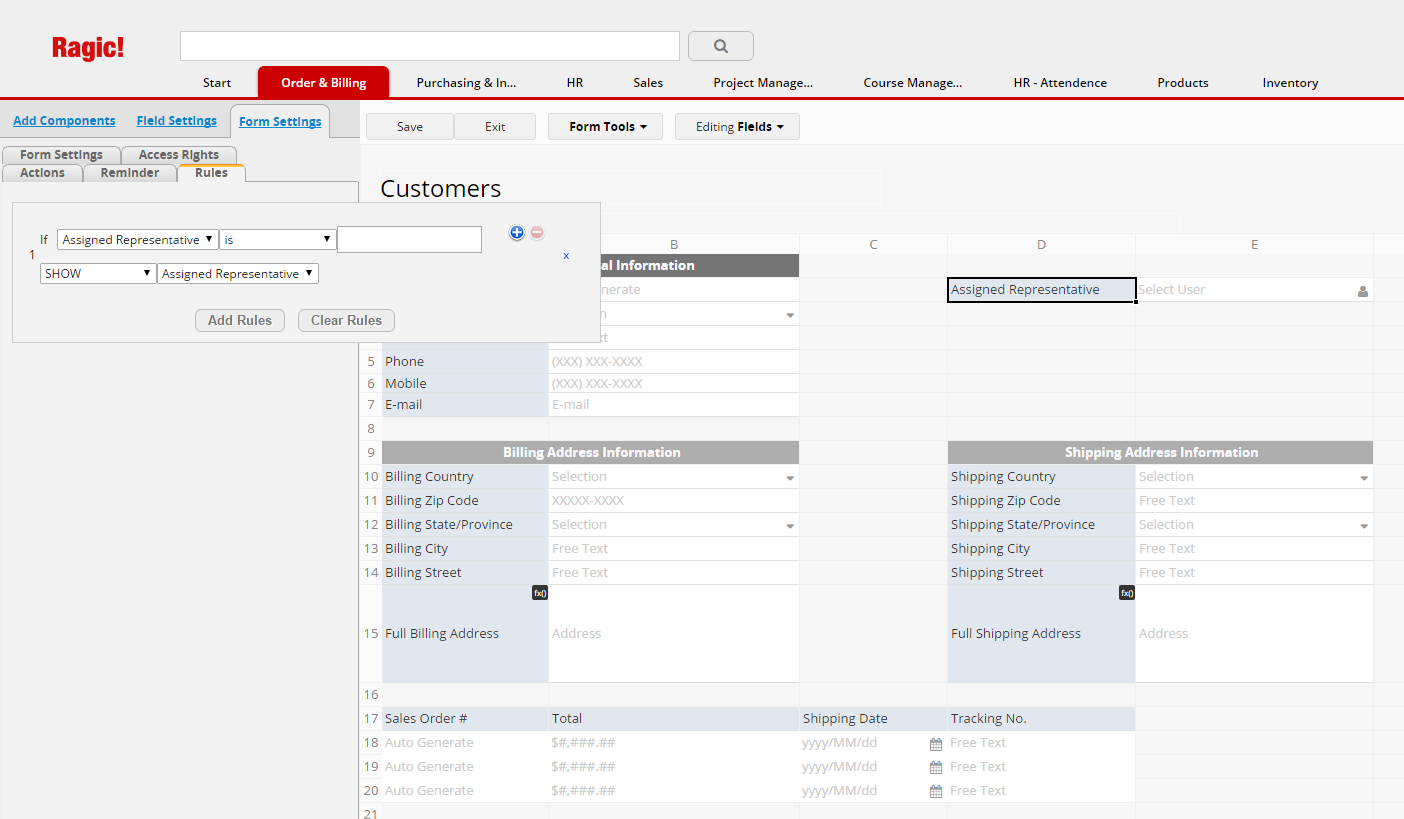
This will display your current account plan, including the billing cycle, next billing date, the number of licensed users, billing amount, as well as your accounts' billing contact.
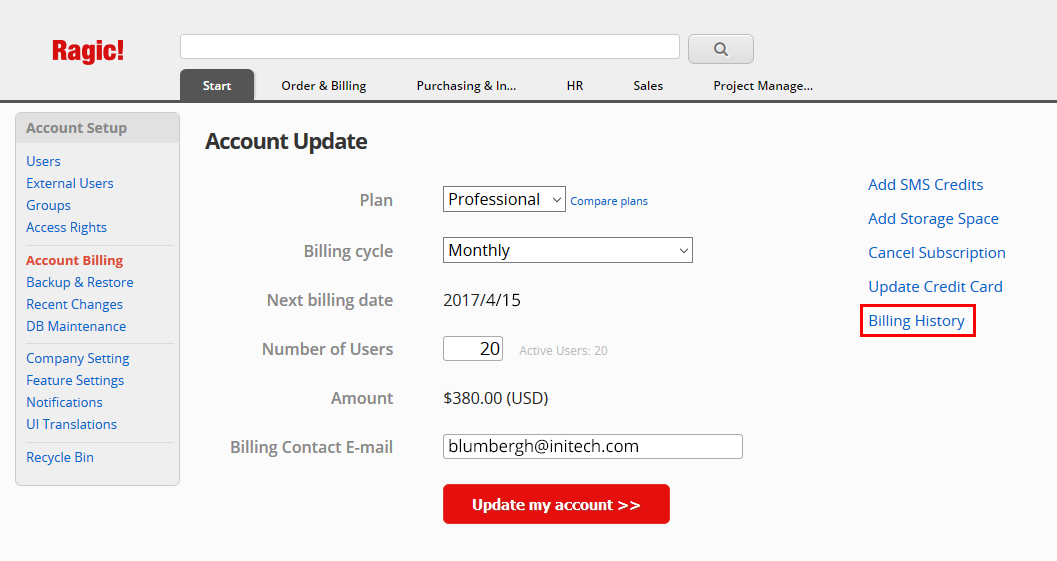
Through this setup window, you can change your plan or plan details, update your credit card information, or purchase add-ons such as SMS credits or extra storage space. Clicking on the Billing History link on the right side will show you a breakdown of your previous payments.
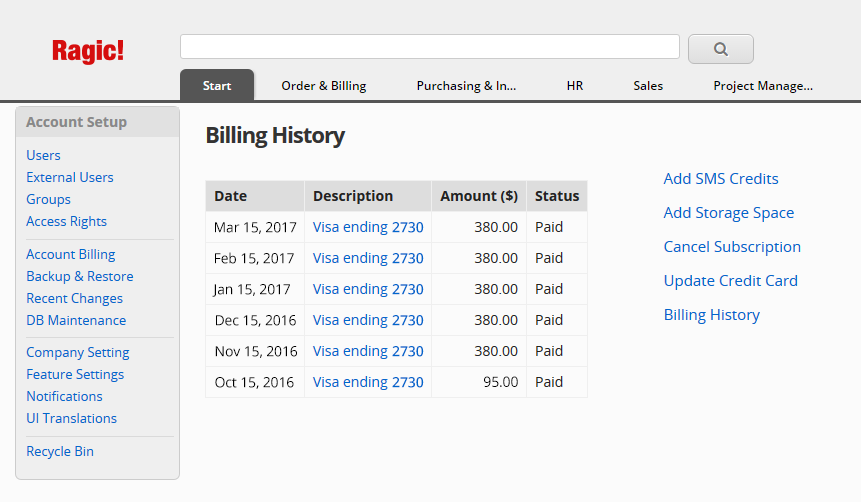
You can access each payments' invoice by clicking on a line item through the links on your payment description column.
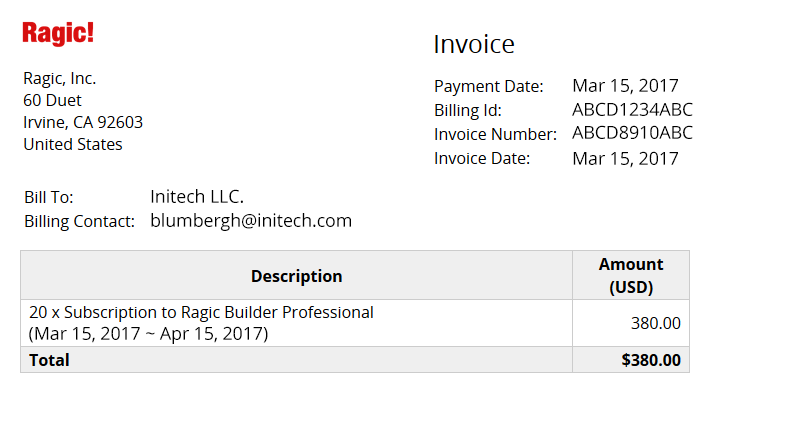
Start Typing:
You can type directly into a linked field, which will automatically display related records.
Using the link & load pop-up:
Click on the empty linked field value to bring up a pop-up displaying the listing page of your linked sheet.
You can use the full-text search bar on the top to show related results,
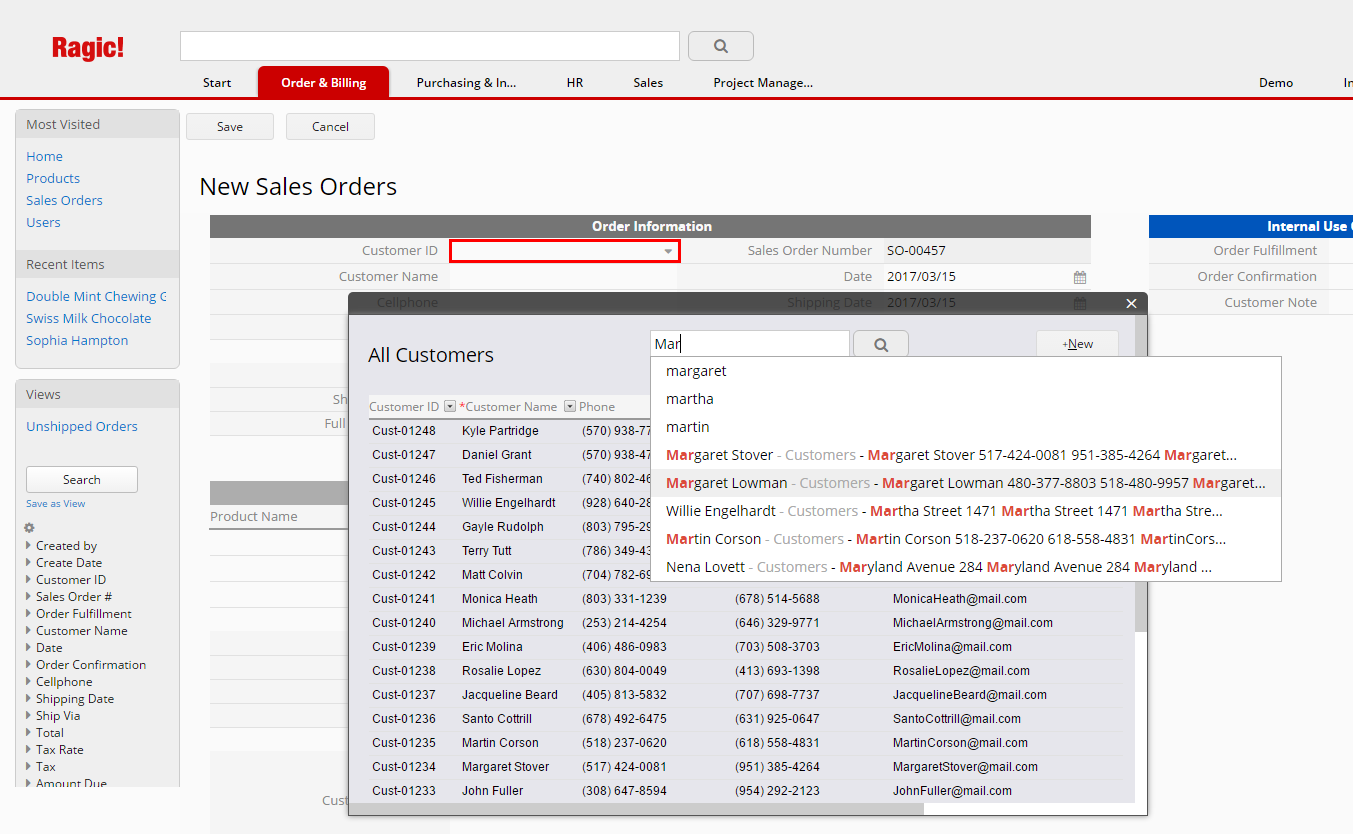
or filter individual fields with the arrows next to the field headers.
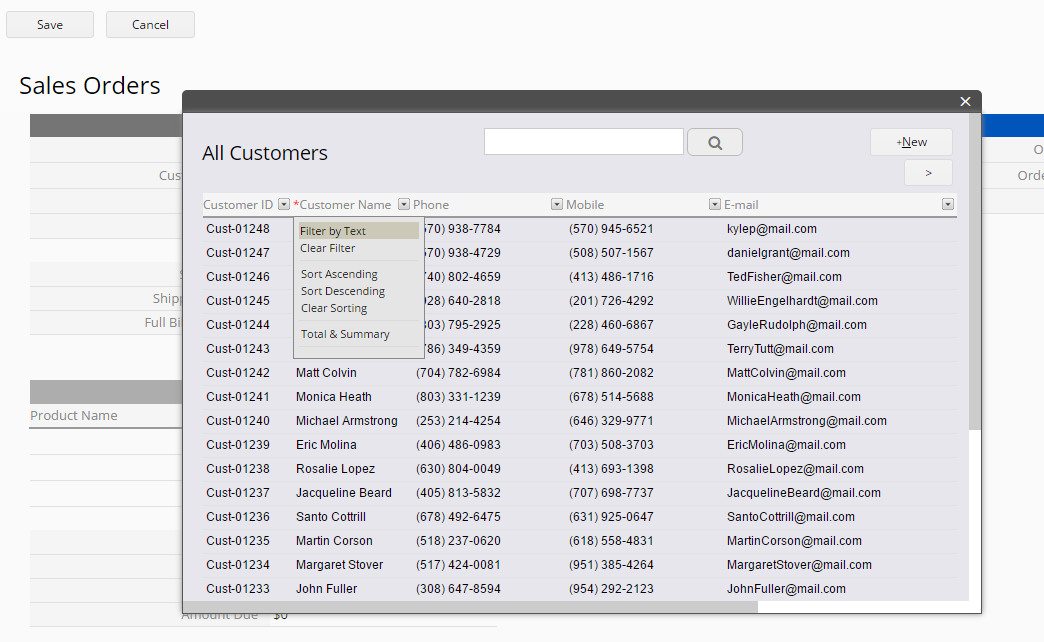
Both of these search options behave according to the search tools available in Ragic.
To access the Personal Settings panel, hover on your name (if you don't have a name registered, your e-mail address will be shown) on the upper-right side of your screen. Under Personal, click Personal Settings.
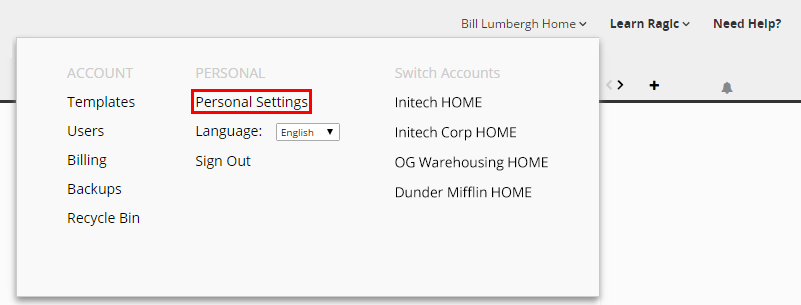

Your Profile will let you set your display name, change your password, and set your phone, picture, and signature. This information will only be visible to System Administrators in your Ragic account through the internal user information panel, and anywhere this information is linked to within your database for users with the access rights to view this information.
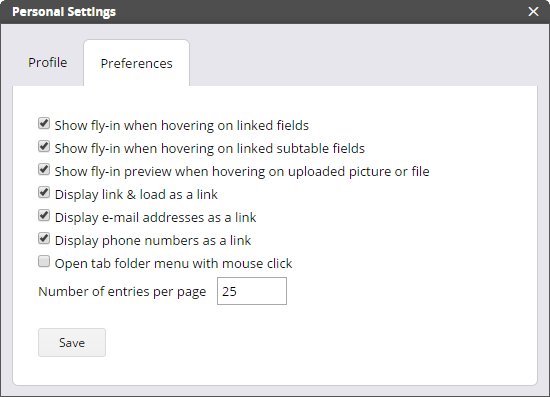
Your Preferences panel is a global display setting that affects how you interact with your Ragic database sheets. The default values and what these preference options mean are explained below:
| Preference | Default Value | Description |
|---|---|---|
| Show fly-in when hovering on linked fields | On | Displays the right panel fly-in when hovered on linked fields. |
| Show fly-in when hovering on linked subtable fields | On | Displays the right panel fly-in when hovered on linked fields in subtables. |
| Show fly-in preview when hovering on uploaded picture or file | On | Displays an image or file preview for image upload fields or file upload fields when hovered on an existing uploaded image or file. |
| Display link & load as a link | On | Displays linked fields as links that take the user to the corresponding linked record. |
| Display e-mail addresses as a link | On | Displays E-mail fields as links, and behaves according to how the user has configured their browser setting for e-mail addresses. |
| Display phone numbers as a link | On | Displays Phone fields as links, and behaves according to how the user has configured their browser setting for phone links. |
| Open tab folder menu with mouse click | Off | Toggles setting for tab menus to display sheet names when hovered or clicked. |
| Number of entries per page | 25 | Global setting for the number of entries displayed on listing pages. This can be configured for individual sheets with this method. |
There are three additional settings for action buttons that you can configure if necessary:

These settings can be found under Design mode > Form Settings > Actions.
To prevent users from accidentally clicking on action buttons and cause unexpected situations, such as creating new data or modifying data you can configure the action buttons to be Confirmed before execution.
With this configuration, users will have to confirm that they would like to execute the action.
In some situations, executing action buttons make significant changes to existing entries. In order to have another layer of security, you can configure the action buttons to be executable only when approved in the approval flow.
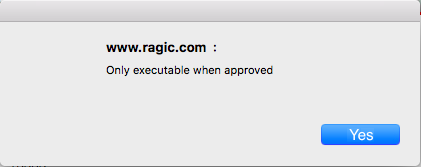
If you would like to hide some action buttons, for example, after combining two action buttons, you will not have the option to delete the old action buttons, but you can hide it to prevent users from accidentally clicking them to execute actions that are irrelevant. You can configure the action buttons to be hidden by selecting the Hide this action button option.
It's very common for a sheet to be accessible by multiple user groups, with different access right privileges.
For example, while a user group might be a "Viewer" who can only view entries, "Admin" or "Bulletin Users", on the same sheet would be able to modify entries. In most cases users who have "Viewer" access rights shouldn't be able to view or click on the action button.
As the result, you can have a more fine-tuned control on the access rights for each action button through this additional setting.
By default, the action buttons are available for the EVERYONE user group, which means that anyone who has access to the sheet would be able to execute this action.
You can click on the dropdown arrow under "Action available for these user groups" to select the user groups you would like to grant access to.
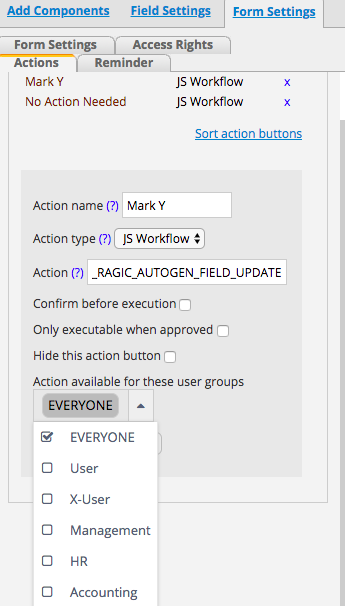
Don't forget to Save the changes made in Design Mode.
Sometimes you would like to allow users to modify entries with action buttons, but only the entries that they have editing rights to. In this case, you can check Only available for users who can edit this entry. With this being configured, this action button will be only available for users on the records that they have editing rights to, and not on the records that they can only view.
Below are some examples on how these files are displayed:
PDF files
Word documents
Excel files
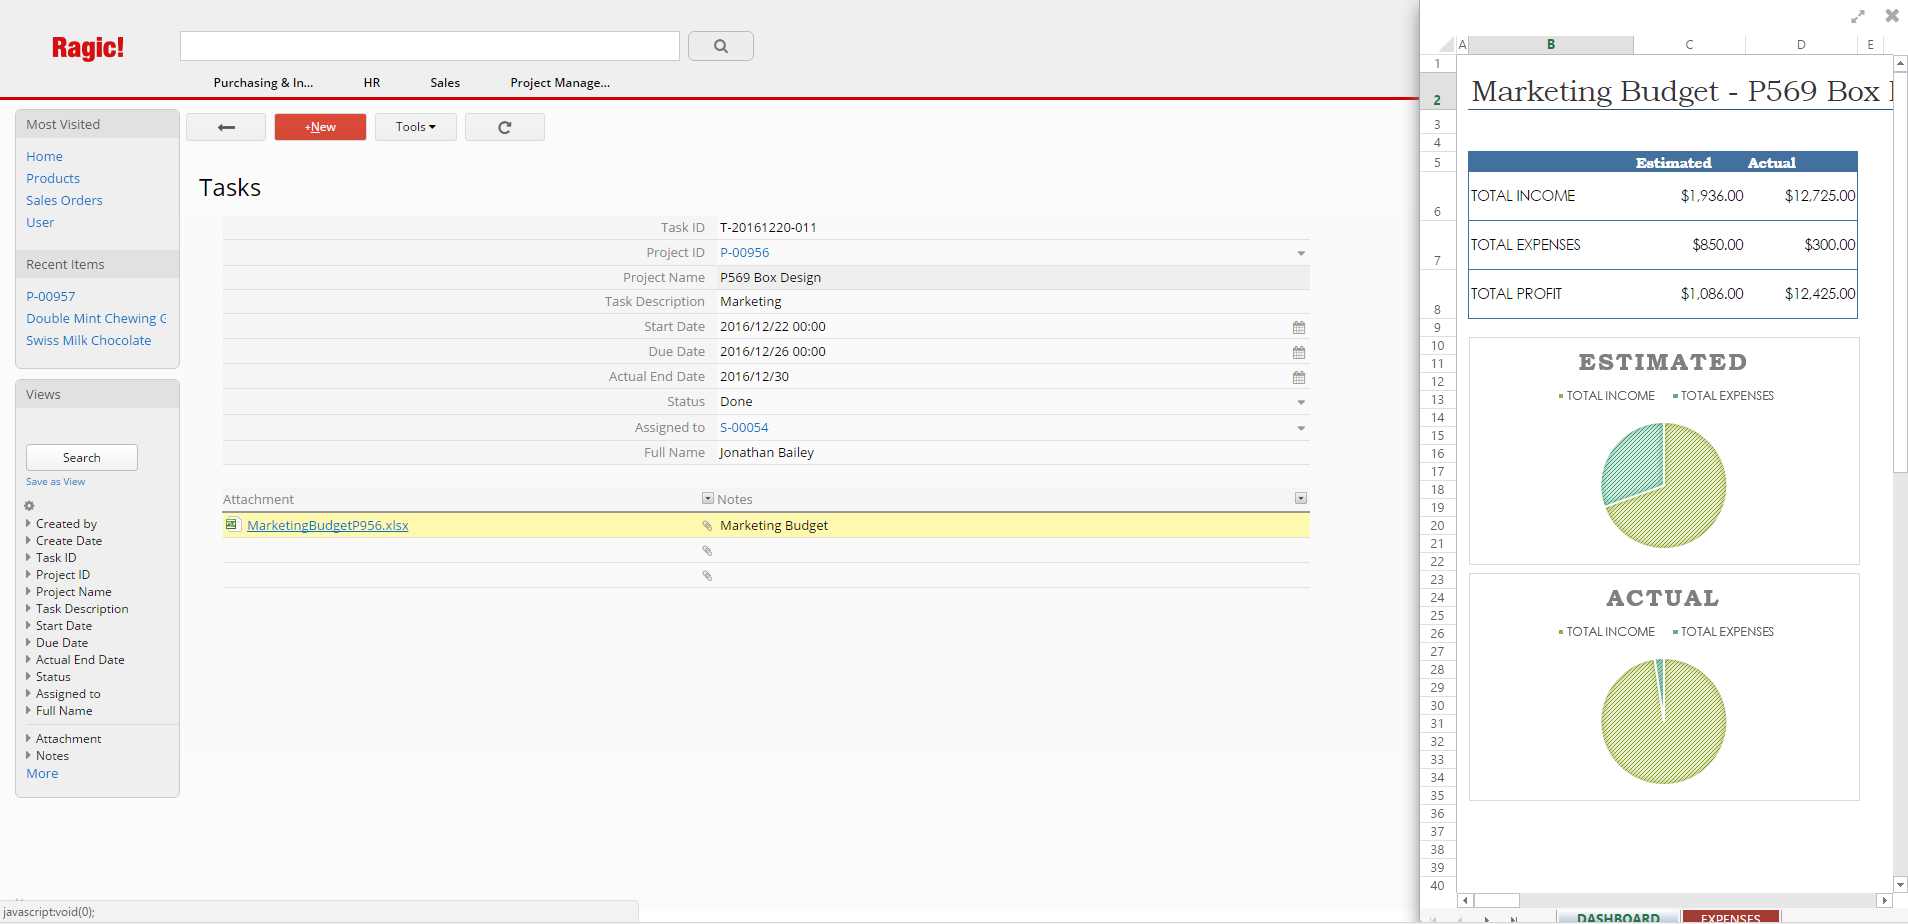
Image files
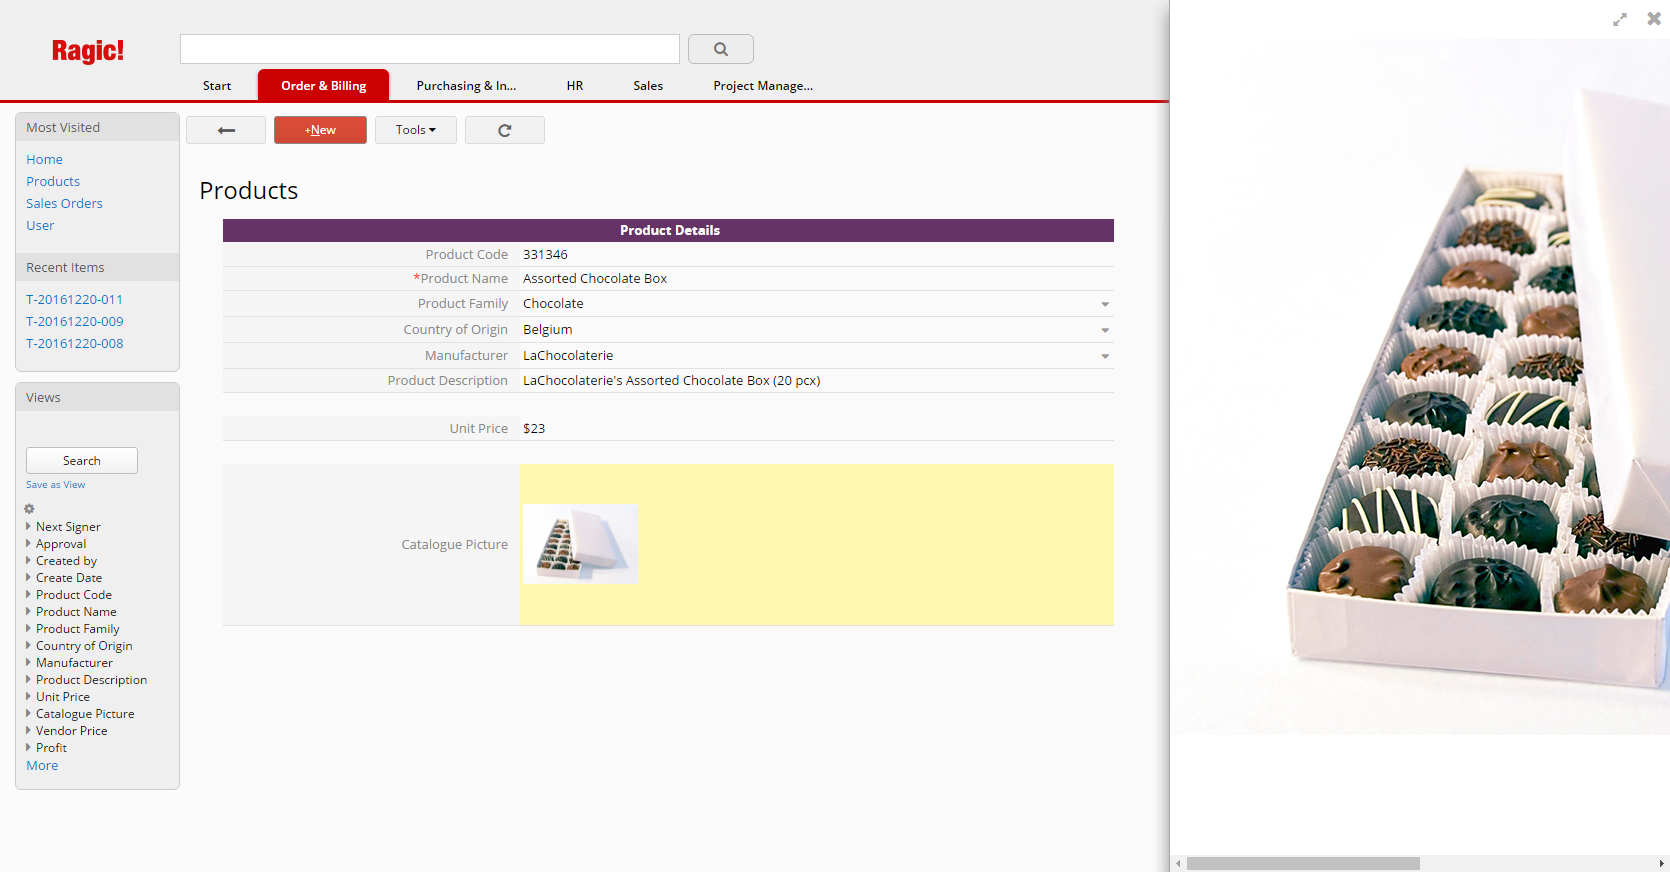
To e-mail an entry, you can click on the Tools menu on the top of the form page, and select E-mail this entry.
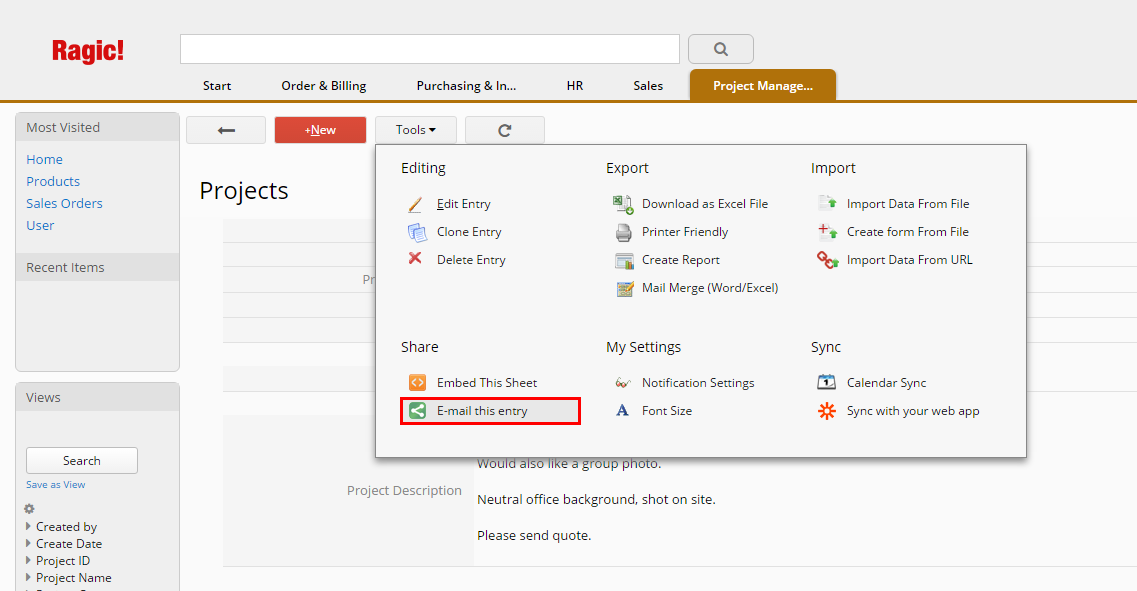
You will have the option to include a link to this record, which will be displayed on the bottom of the entry. While the record details are sent on the e-mail body, if the receiver doesn't have access to the database sheet, they will not be able to access the record on Ragic, so you can choose to exclude the link.
You can also choose to include an Excel copy of this record.
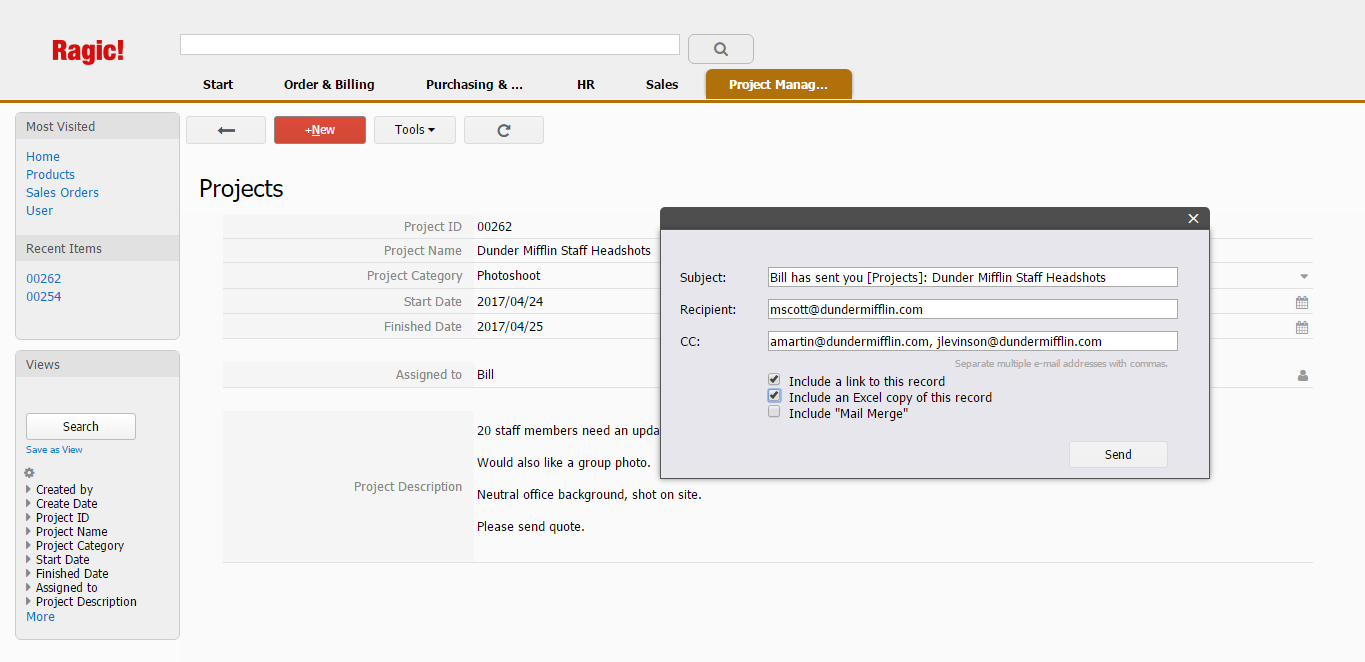
An additional option, including a Mail Merge of this record can also be selected. This will give you an option to choose from Mail Merge templates you already have on this sheet.
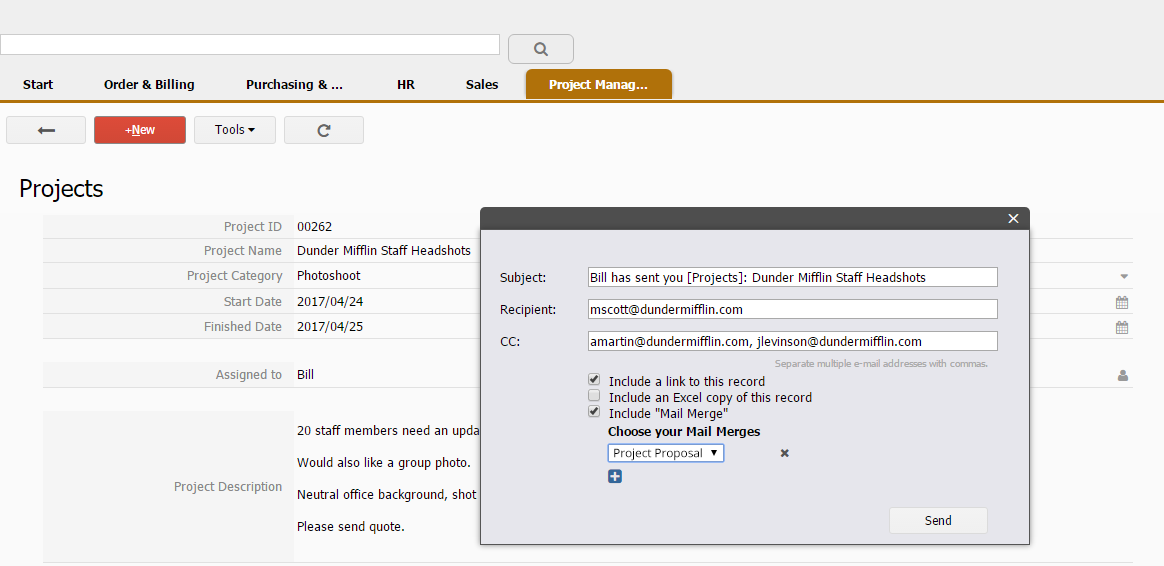
Once the e-mail is sent, it will be displayed in your e-mail history within Ragic. You can access sent e-mails through the records you have sent them.
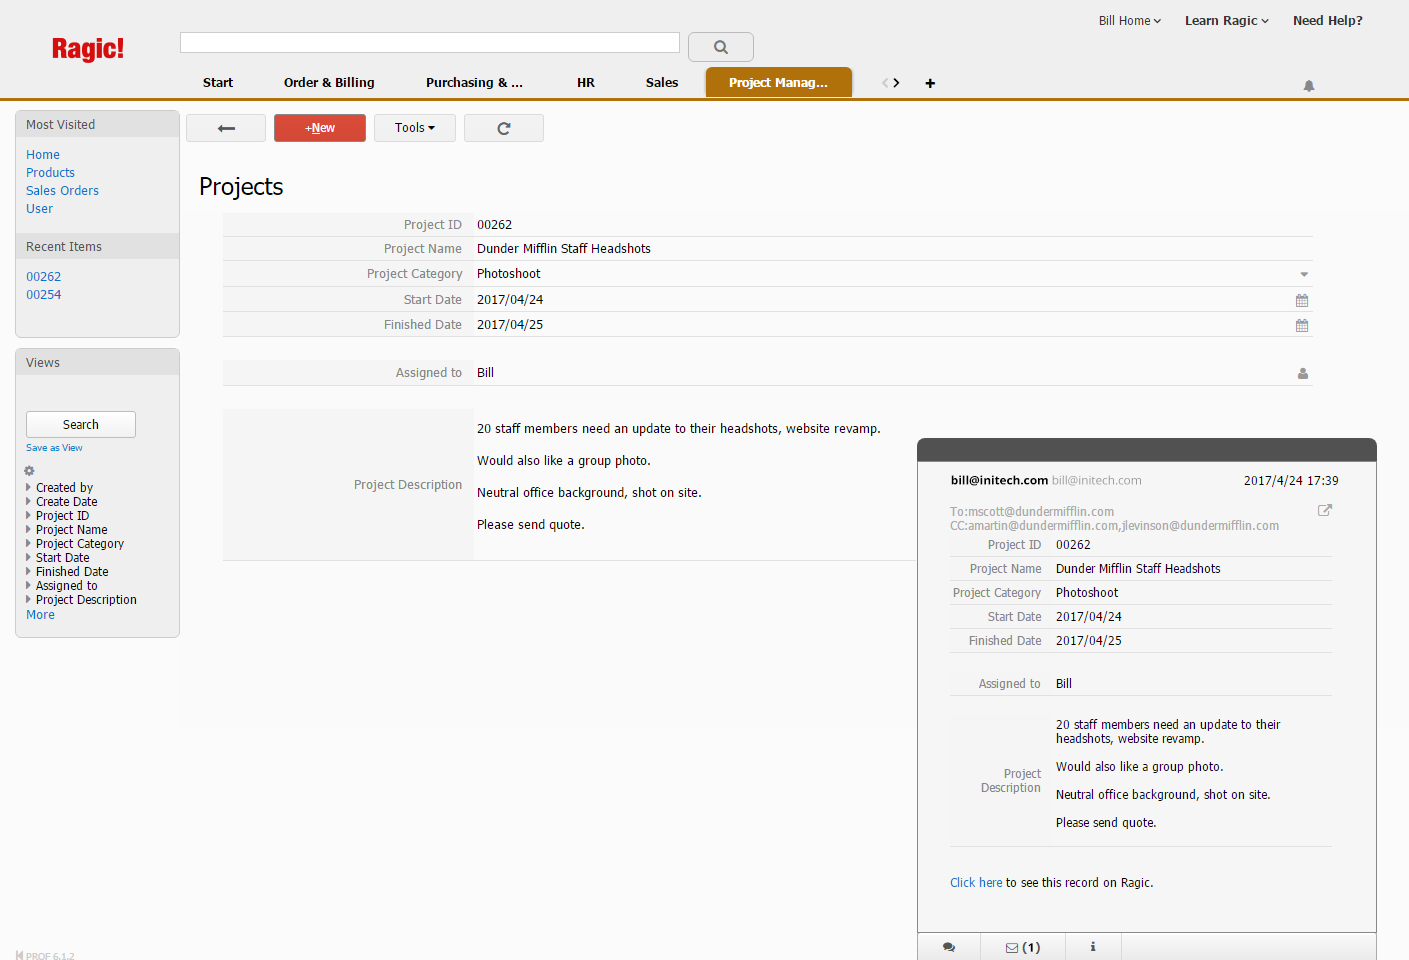
Users will also be able to reply to this e-mail through this record.
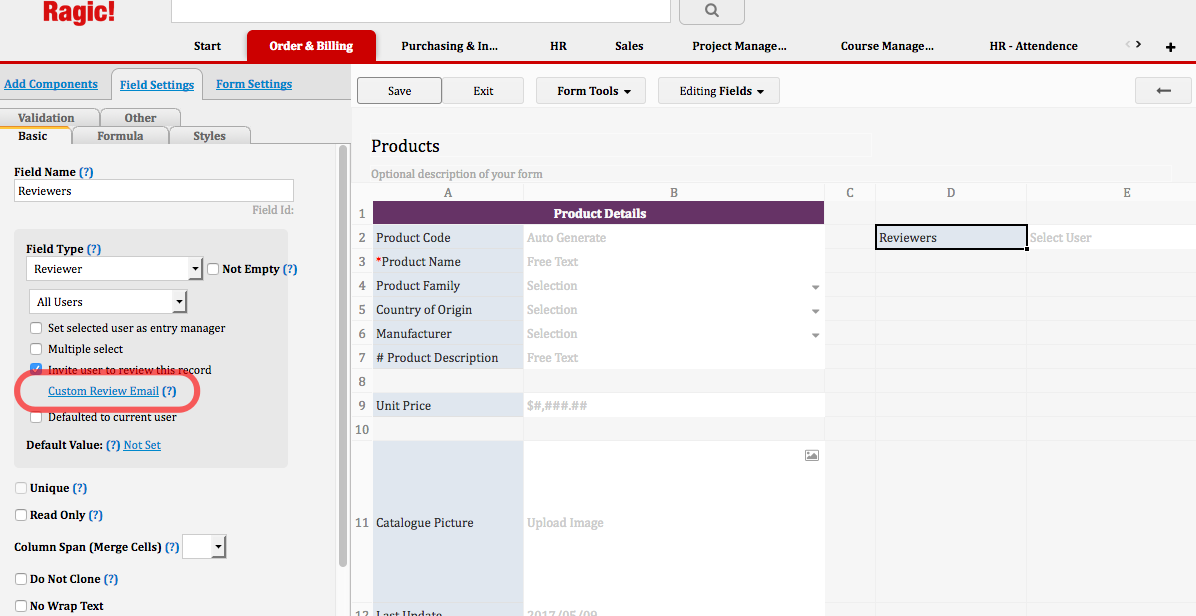
In the pop-up window, you can design the e-mail template using HTML formatting and use variables. Check all supported variables here.
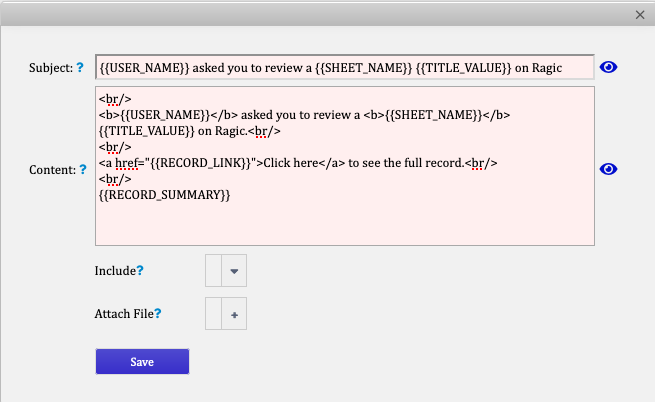
You can click on ![]() which will show you a demo on how the custom e-mail looks like. If you decide to use our standard template instead, click on
which will show you a demo on how the custom e-mail looks like. If you decide to use our standard template instead, click on ![]() will discard all the changes you've made.
will discard all the changes you've made.
Furthermore, you may also attach URL, Excel, PDF, or mail merge file of the record; or other attachments. When you attach the URL of the record, please make sure you have granted the access right of the sheet to the recipients. Otherwise, they'll have a blank page when they access the database through the entry URL.
Once the editing completed, remember to save before you exit the pop-up window.
You can manage all of your support e-mails in this Ragic sheet that you can install as a template. Received e-mails will create a new entry, and your users can reply the e-mail directly through Ragic. All responses in the e-mail thread will be stored in the same entry as well.
You can also assign the ticket to another user, or decide if this ticket still needs to be replied or followed up.
By using this template, you can easily manage all your support tickets in the same place.
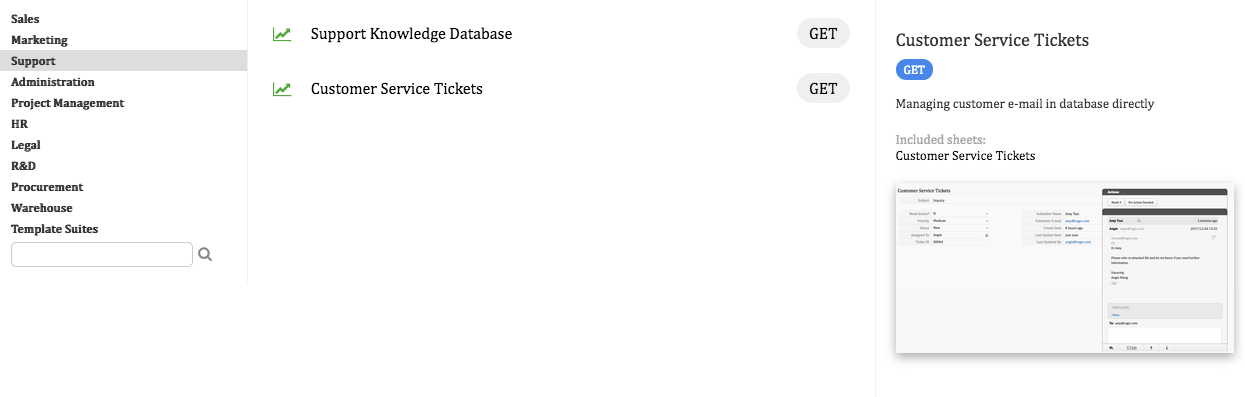
The E-mail Support Ticket System Template can be installed to your database account from Start Tab > Install Template > Support > Customer Service Tickets > GET .
The corresponding e-mail address will be "apname.support1.1@tickets.ragic.com".
(The corresponding e-mail address above is generated by the following: apname.tab_path.sheet_index@tickets.ragic.com)
For example, if your template URL is https://www.ragic.com/accountname/support1/1, then your corresponding e-mail address for this template will be accountname.support1.1@tickets.ragic.com. (This address is case sensitive, you may send an e-mail to this address to test if the e-mail is received in your template as a new entry.)
After installing the template and having the corresponding e-mail address, you will need either add this e-mail address into your company e-mail group (or mailing list) or configure automatic forwarding of your mail box, so when people send e-mails to your company's support e-mail address, new support tickets will be generated as entries in this template.
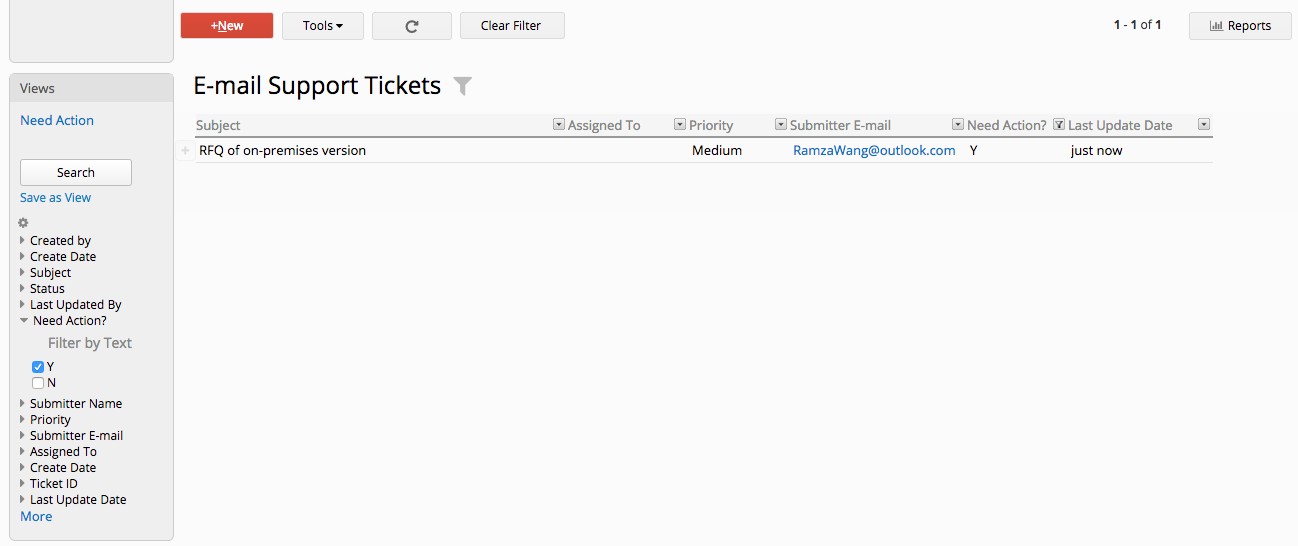
The default filter applied on the listing page is "Need Action?: Y", which will show only the tickets that need action on the listing page as default. This can be changed if necessary.
When you reply to an e-mail, the "Need Action?" status will be changed to N, and will not be shown in the default filter that's applied.
You can clear the filter if you'd like to see all e-mails.
When you receive a reply to an e-mail, they will have the "Need Action: Y" status again, and will be shown in your listing page with the default filter.
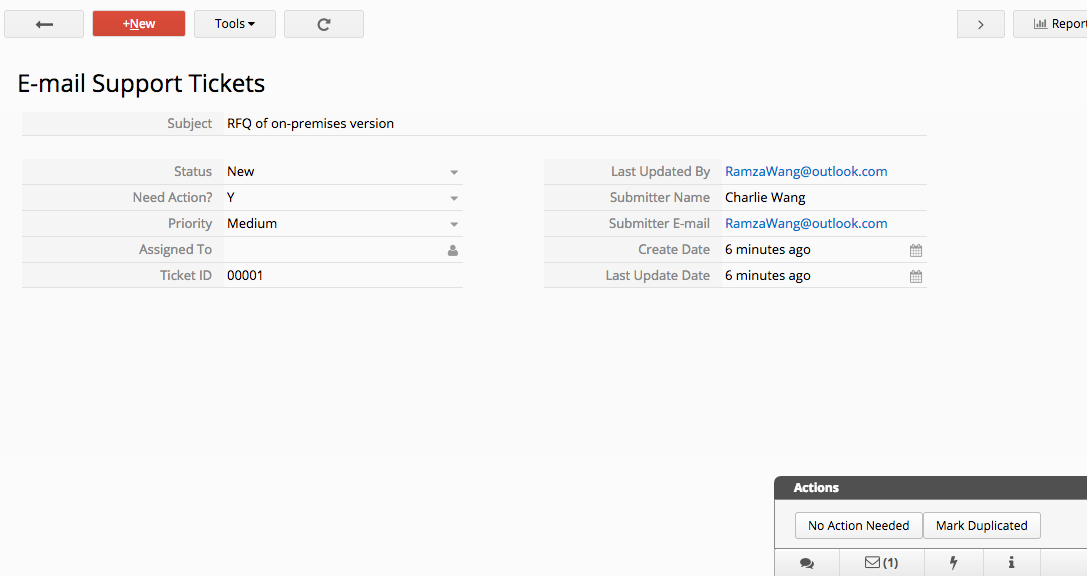
Fields
| Field Name | Content |
|---|---|
| Status | The ticket status, can be changed by selecting from the drop down menu. The default setting for new tickets are "New". |
| Need Action? | The default value to this field is "Y" for new tickets. Once you reply to an e-mail, it will be changed to "N" automatically. This field value can also be changed to "N" by clicking the "No Action Needed" button through the Actions panel. |
| Priority | To mark the priority of this ticket, which helps collaborating with other users. |
| Assigned To | You can assign this ticket to another user. The assigned user will receive a notification within Ragic, and via e-mail. |
You can click on the mail icon on the lower-right corner to view an e-mail thread.
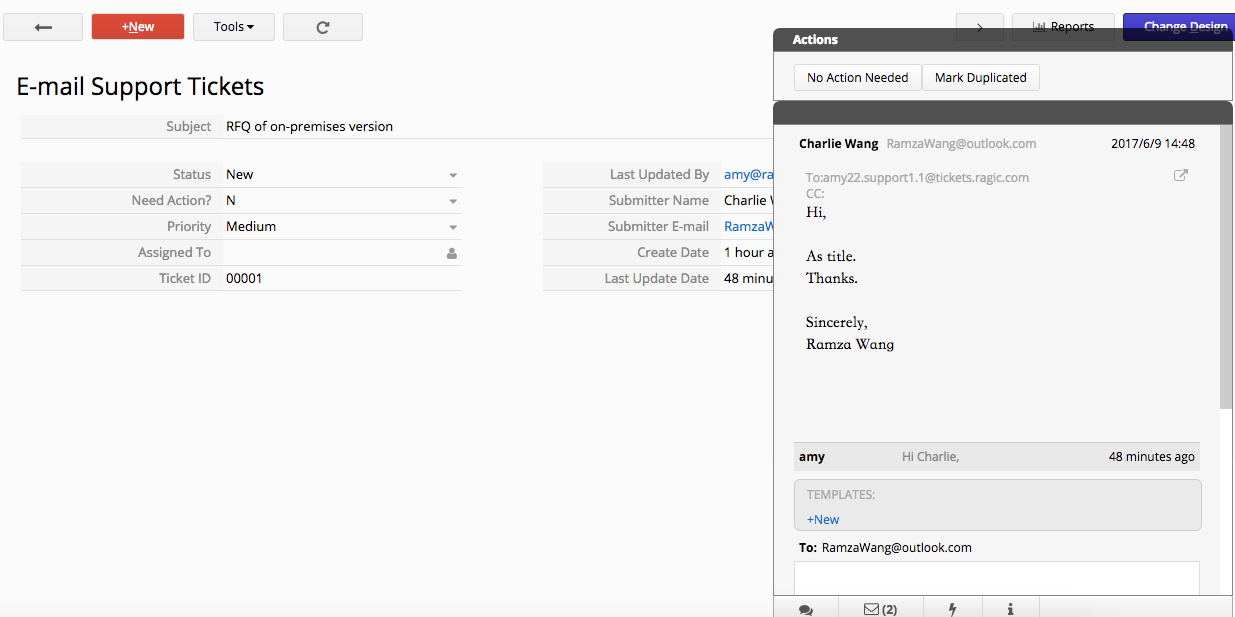
You can send a reply to an e-mail after scrolling down an e-mail thread. An e-mail draft will be saved even if you leave this page.
BBCode tags can be used here as well, which are useful to insert images and links.
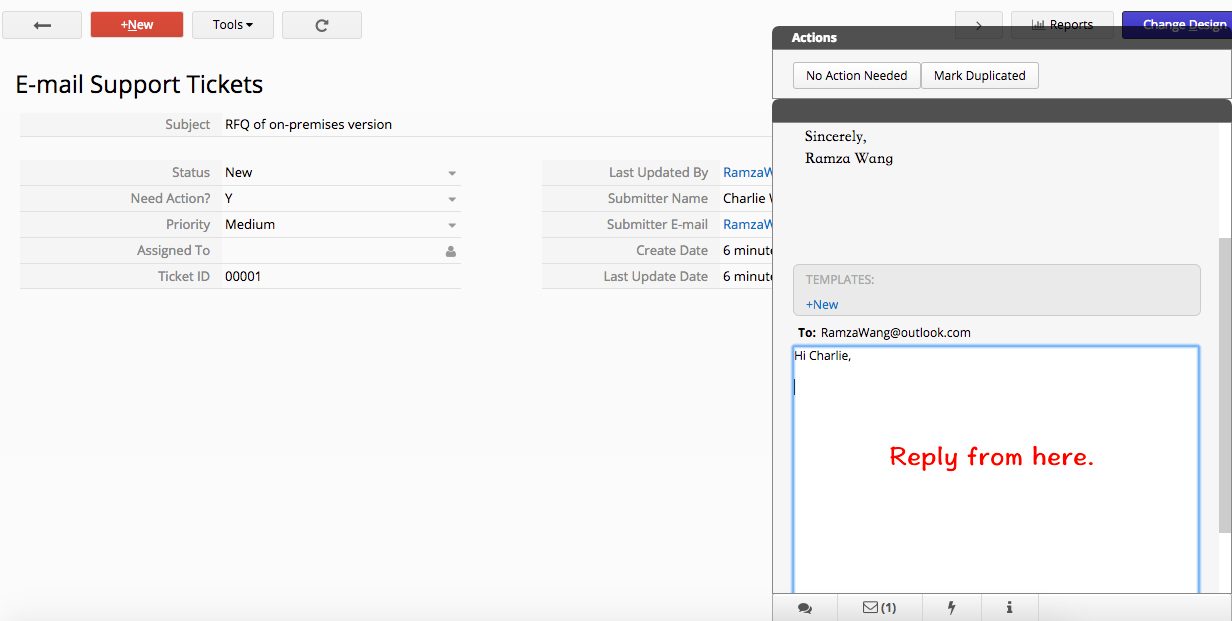
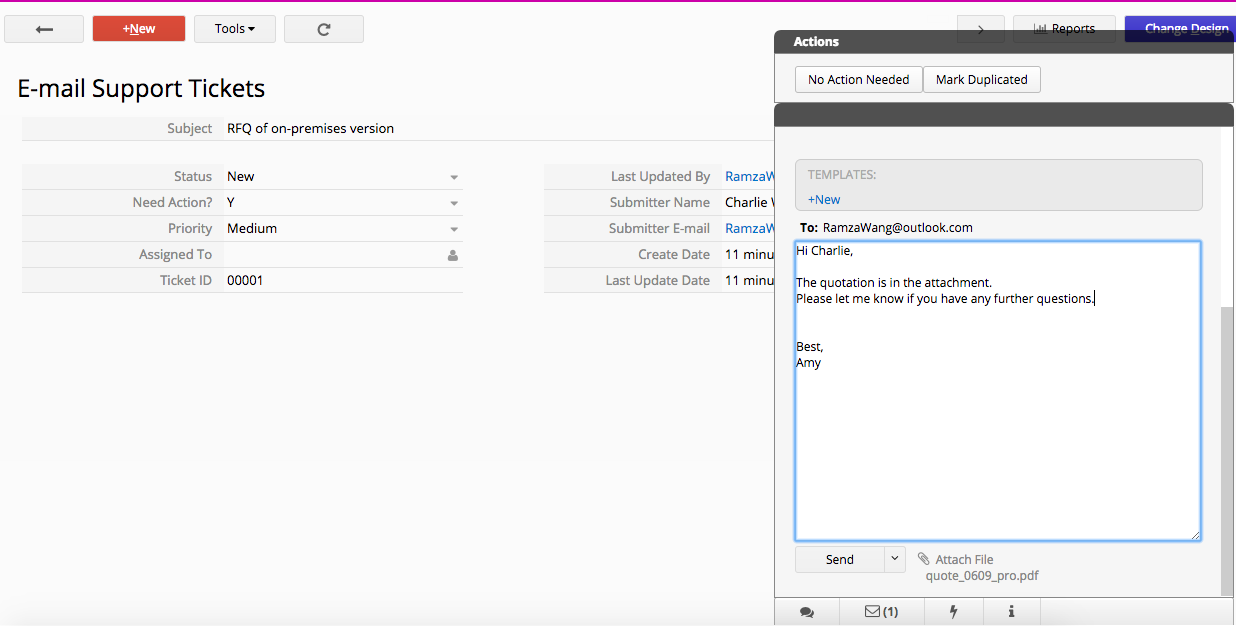
Tip: You can paste an image from your clipboard directly into an e-mail, the system will help turn this into an inserted image using BBCode.
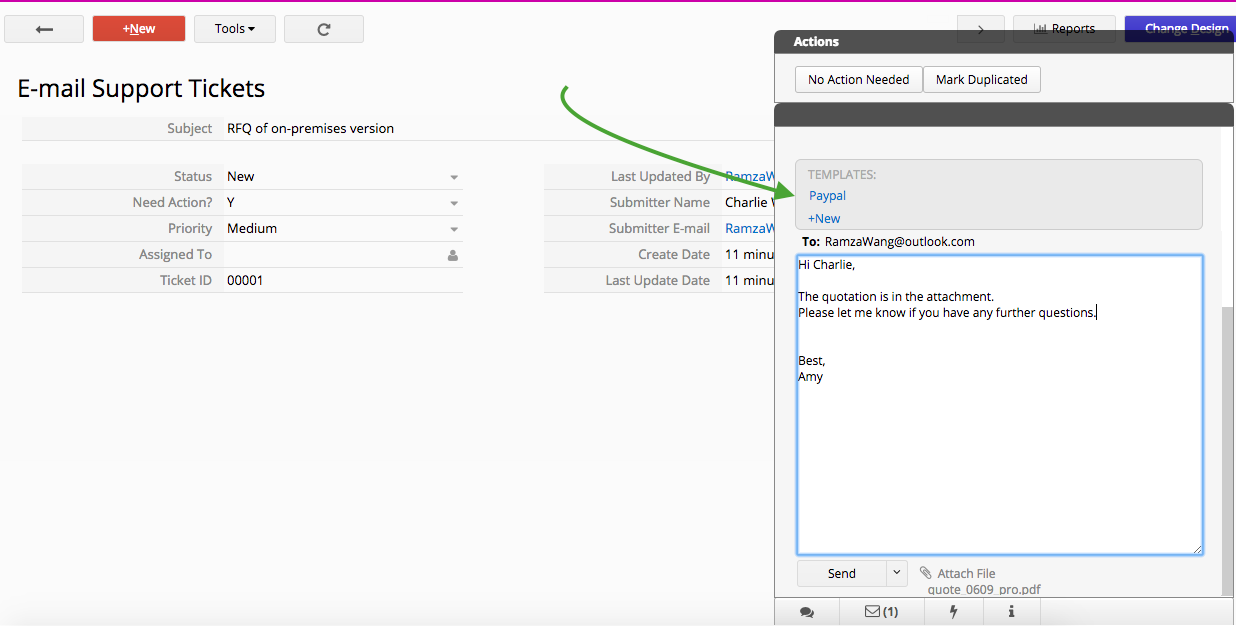
Common replies that you write often can be added to your template. Your reply will be auto-filled with the reply template contents by clicking on the saved template name. Reply templates are shared within the account, so all users will be able to see all reply templates.
You can click +New under the TEMPLATES section to add a reply template.
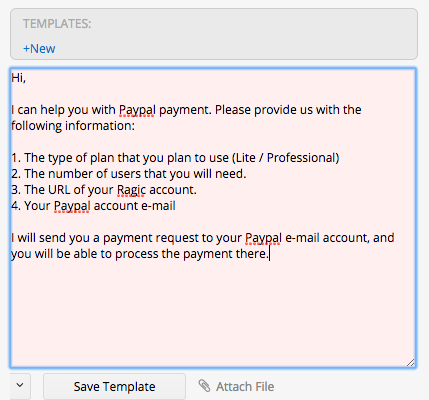
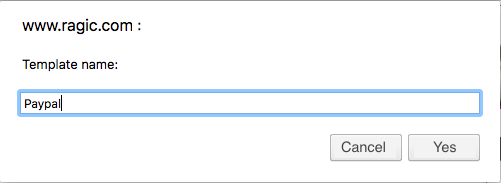
You can add/edit your signature by clicking the arrow next to Send button > Edit Signature.
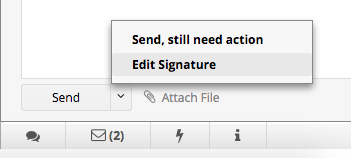
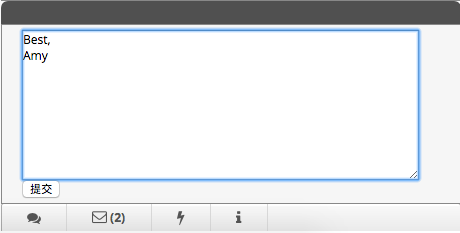
You can attach files from the Attach File link below the e-mail body. The size limitation of an e-mail is 25MB, however, it's still recommended to check the policy of your recipient's server.
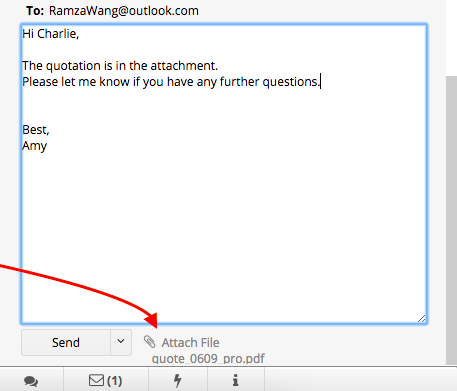
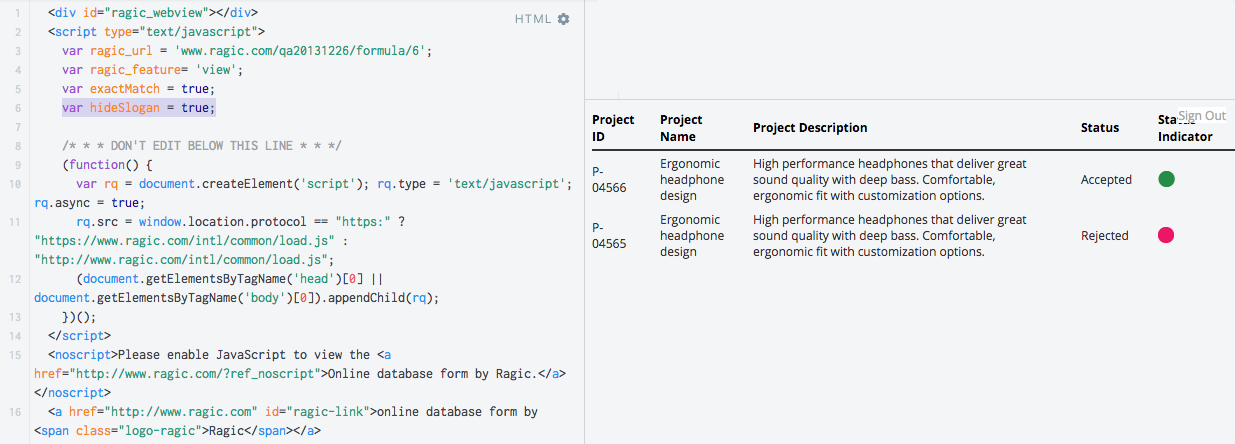
If you use Ragic's Website plug-ins to embed your Ragic database to your website or blog, you might notice that there will be a footer "Online database powered by Ragic" displayed on the bottom of the embedded sheet.
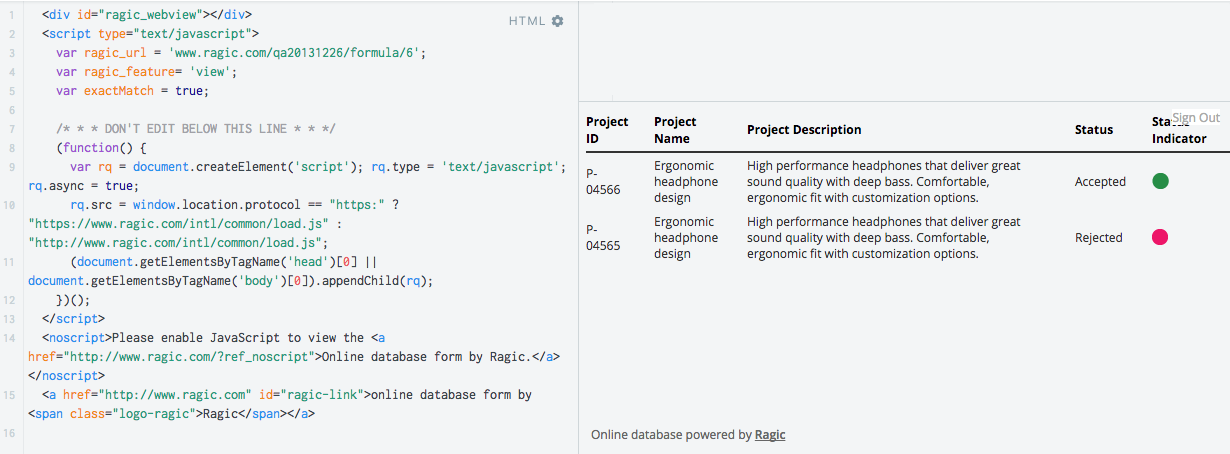
To disable this footer, you can add the code snippet below to the JavaScript code used to embed your database sheet:
var hideSlogan = true;
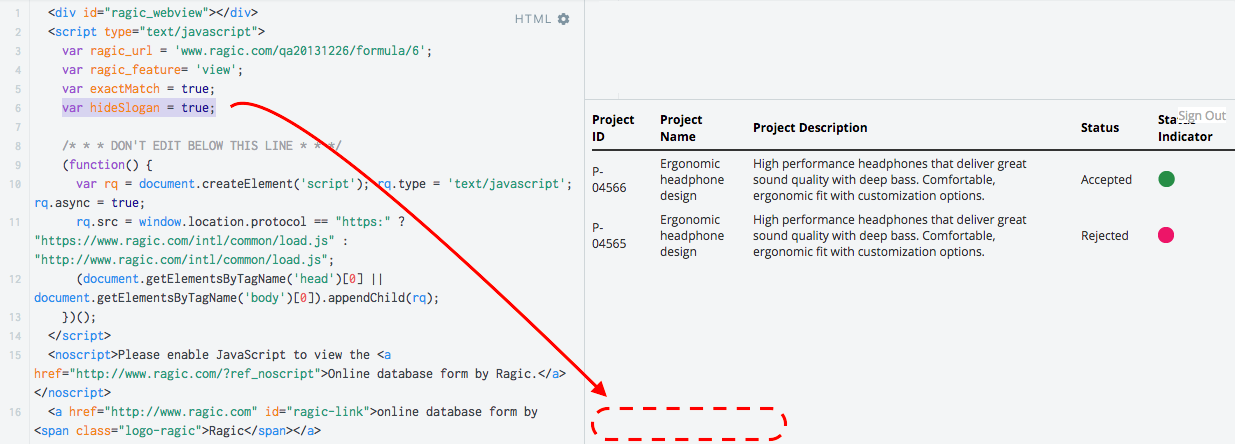
While the E-mail Support Ticket System Template allows users to manage received e-mails within Ragic, it is possible to create entries from received e-mails to save in your Ragic database by setting "apname.tab_path.sheet_index@tickets.ragic.com" as the e-mail recipient.
Let's say your database account name is testing123, and the sheet url is "www.ragic.com/testing123/forms1/1", then the corresponding e-mail address would be "testing123.forms1.1@tickets.ragic.com".
After entering the corresponding e-mail address, you will need to set up automatic forwarding to this e-mail address or add this e-mail address into your company e-mail group (or mailing list), so when you receive e-mails through your company's support e-mail address, they will be generated as entries in this sheet.
Your users can reply to the e-mails that are recieved directly through Ragic. All responses in the e-mail thread will be stored in the same entry as well.
In order to retrieve e-mail content data in corresponding fields, you can map the e-mail content to fields by adding manual attributes to each field, such as the subject, sender's e-mail address, name, etc.
Below are the parameters you can add for e-mail content mapping:
| Parameter | Value | Description |
|---|---|---|
| email_subject | 1 | The e-mail's subject field will be mapped to this field |
| email_content | 1 | The e-mail's full content will be mapped to this field |
| email_updateDate | 1 | The ticket's last update date will be mapped to this field |
| email_fromAddress | 1 | The sender's e-mail address will be mapped to this field |
| email_fromPersonal | 1 | The e-mail from user name will be mapped to this field |
| email_updateEmail | 1 | The e-mail of the person who last updated this field |
| email_toAddress | 1 | The recipient's e-mail address will be mapped to this field |
| email_toPersonal | 1 | The recipient's name will be mapped to this field |
| email_ccAddress | 1 | The CC e-mail address will be mapped to this field |
| email_ccPersonal | 1 | The CC name will be mapped to this field |
| email_needAction | 1 | The need action Y/N will be mapped to this field |
| email_upload | 1 | The e-mail's attachment will be mapped to this field(The field type need to be File Upload) |
After adding manual attributes to the fields, you can send a test e-mail to check if the e-mail content is now correctly mapped to the fields.
To add manual attributes to a field, you can enter the Design mode of the form page, select the field, and navigate to Field Settings > Other > Manual attributes on the left side of the page.
After entering your parameter to the Manual attributes configuration, click the "+" button next to it.
You might notice the entered parameter is now cleared, which means it has been added to the field.
Before exiting the design mode, please don't forget to save your design changes.
To remove an attribute, simply try to add an empty attribute value to an attribute and the attribute will be removed.
To send out mass e-mails, you can first filter your records if necessary, and use the Send Mass E-mail function under the Tools menu.
Not filtering records would mean that the mass e-mail will be sent to all contacts in your database sheet.
Select the e-mail field that you would like to send e-mails to, and enter the Subject and contents of the e-mail.
You will be able to refer to field values within the record that you're using to send out this e-mail with variable syntax:
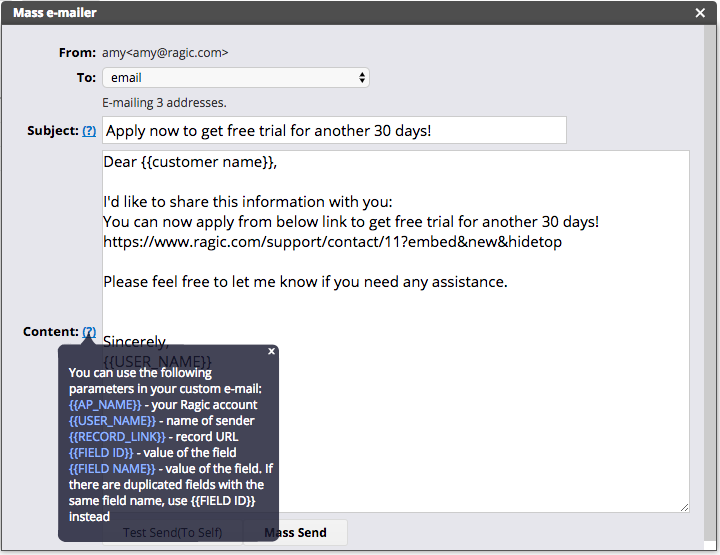
Below is the list of variables you can use in the e-mail content:
| Variable | Description |
|---|---|
| {{AP_NAME}} | Your Ragic account name |
| {{USER_NAME}} | Name of sender |
| {{RECORD_LINK}} | Record URL |
| {{FIELD ID}} | Value of the field |
| {{FIELD NAME}} | Value of the field |
Note. If there are duplicated field names on the sheet, please use {{FIELD ID}} to retrieve the field value instead.
After clicking the "Mass Send" button, you be able to view the sent e-mails' status.
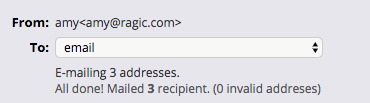
Below is a received e-mail sent with the mass e-mail feature that includes variables:
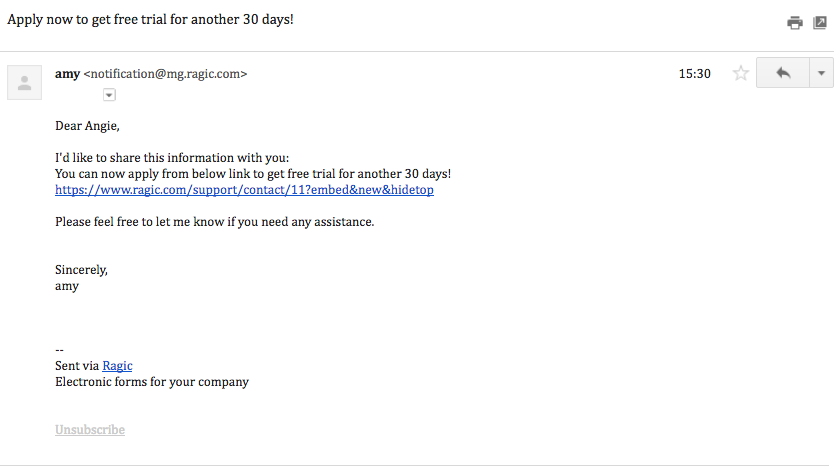
The sent e-mail will be stored with your entry in the database, which can be found on the entry's form page, accessible through the e-mail icon on the lower-right corner.
Similar to our E-mail Support Ticket System Template, you can reply to sent e-mails.
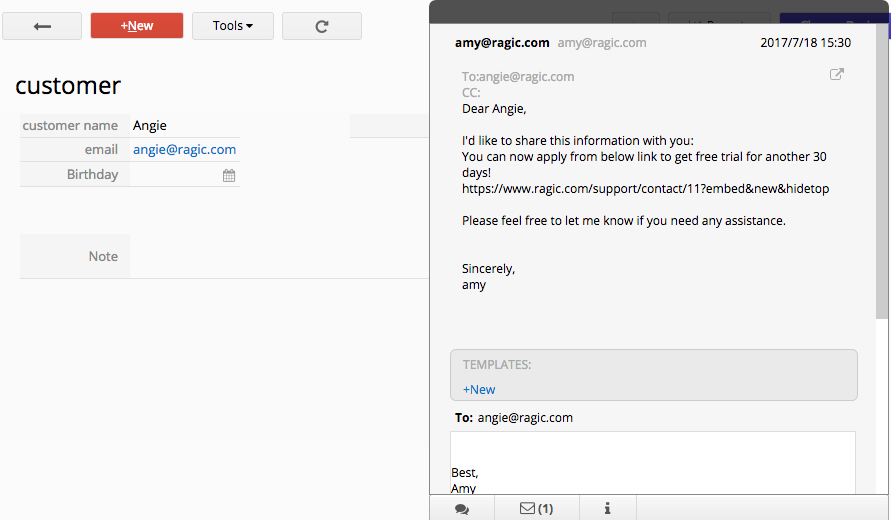
Once you find the installation directory, please copy the license in it and re-boot your NAS. Then, you can open the Ragic application.
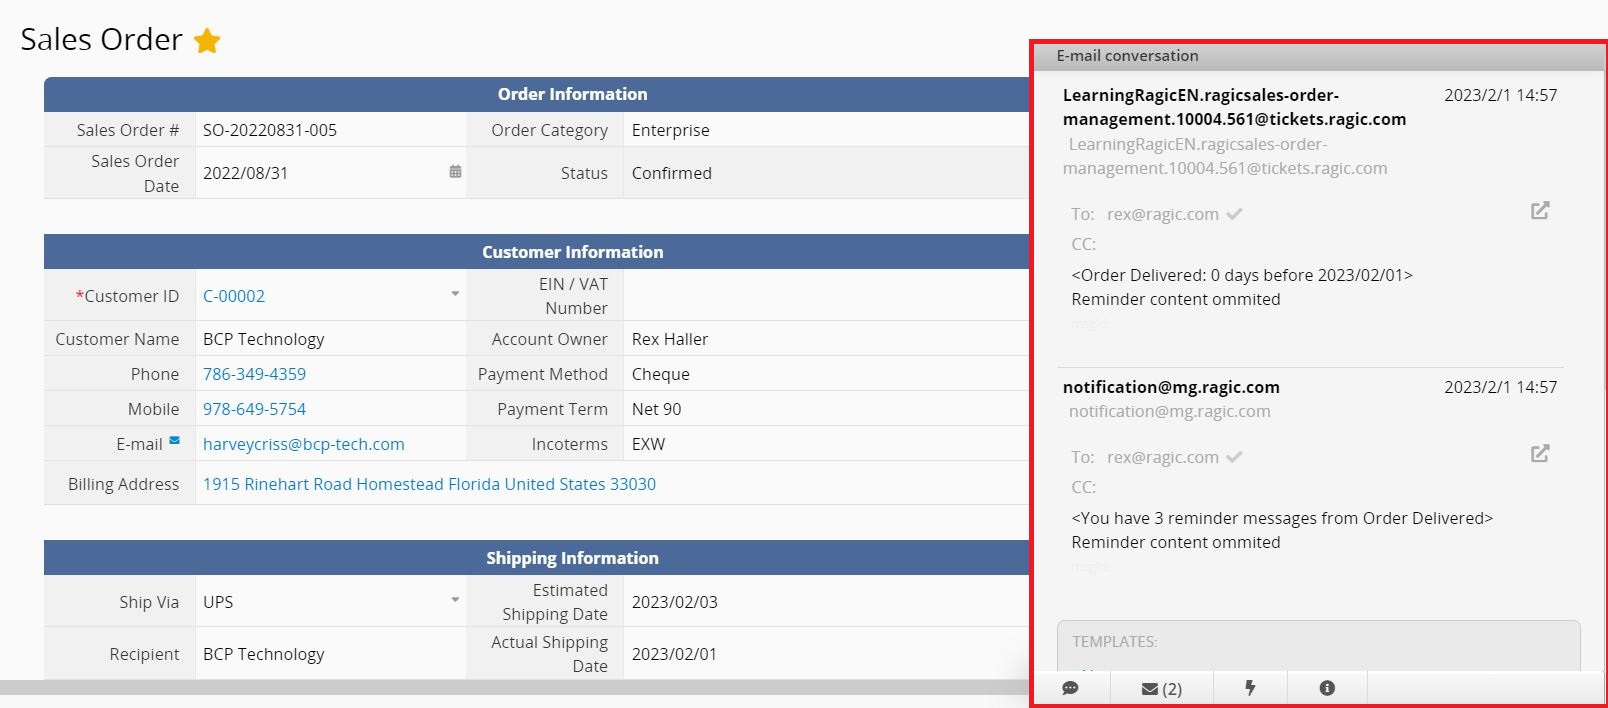
If you do not want this email history to be displayed, you can disable it from Form Settings > Form Settings > Hide e-mail history of this sheet under form design mode.
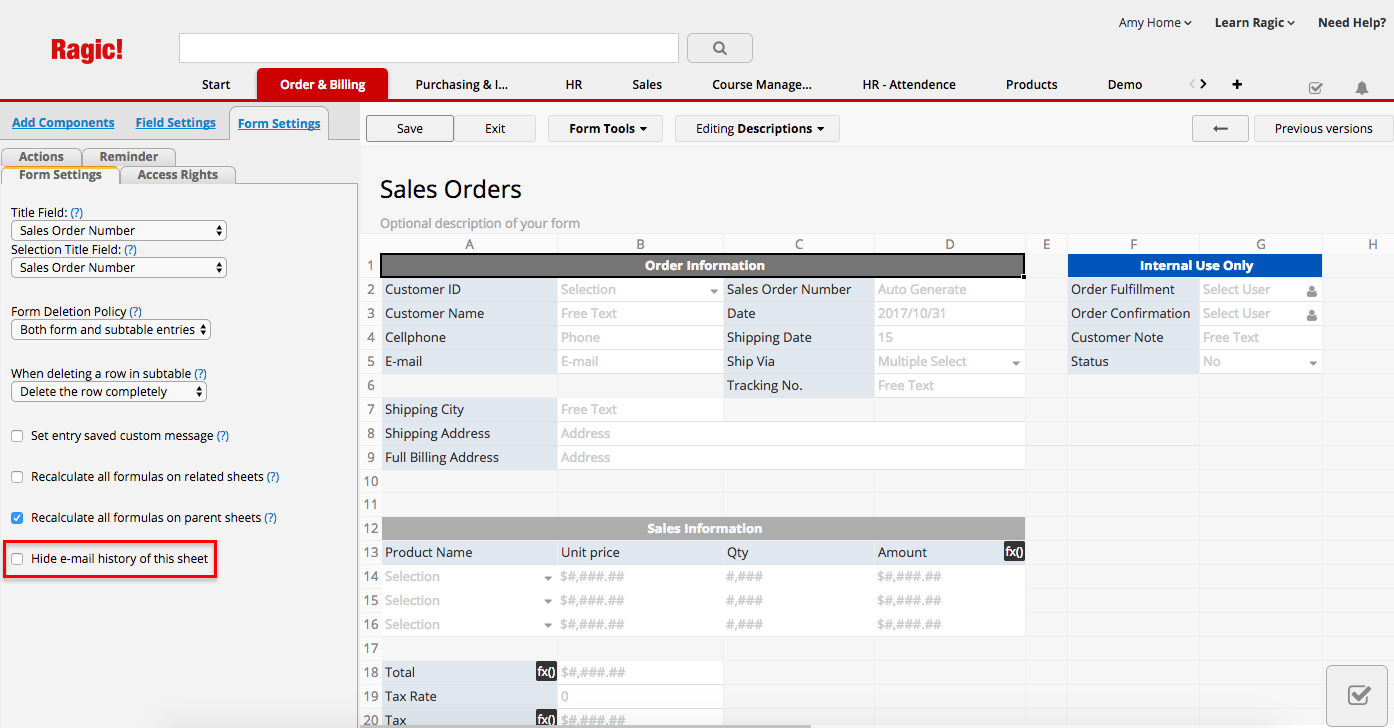
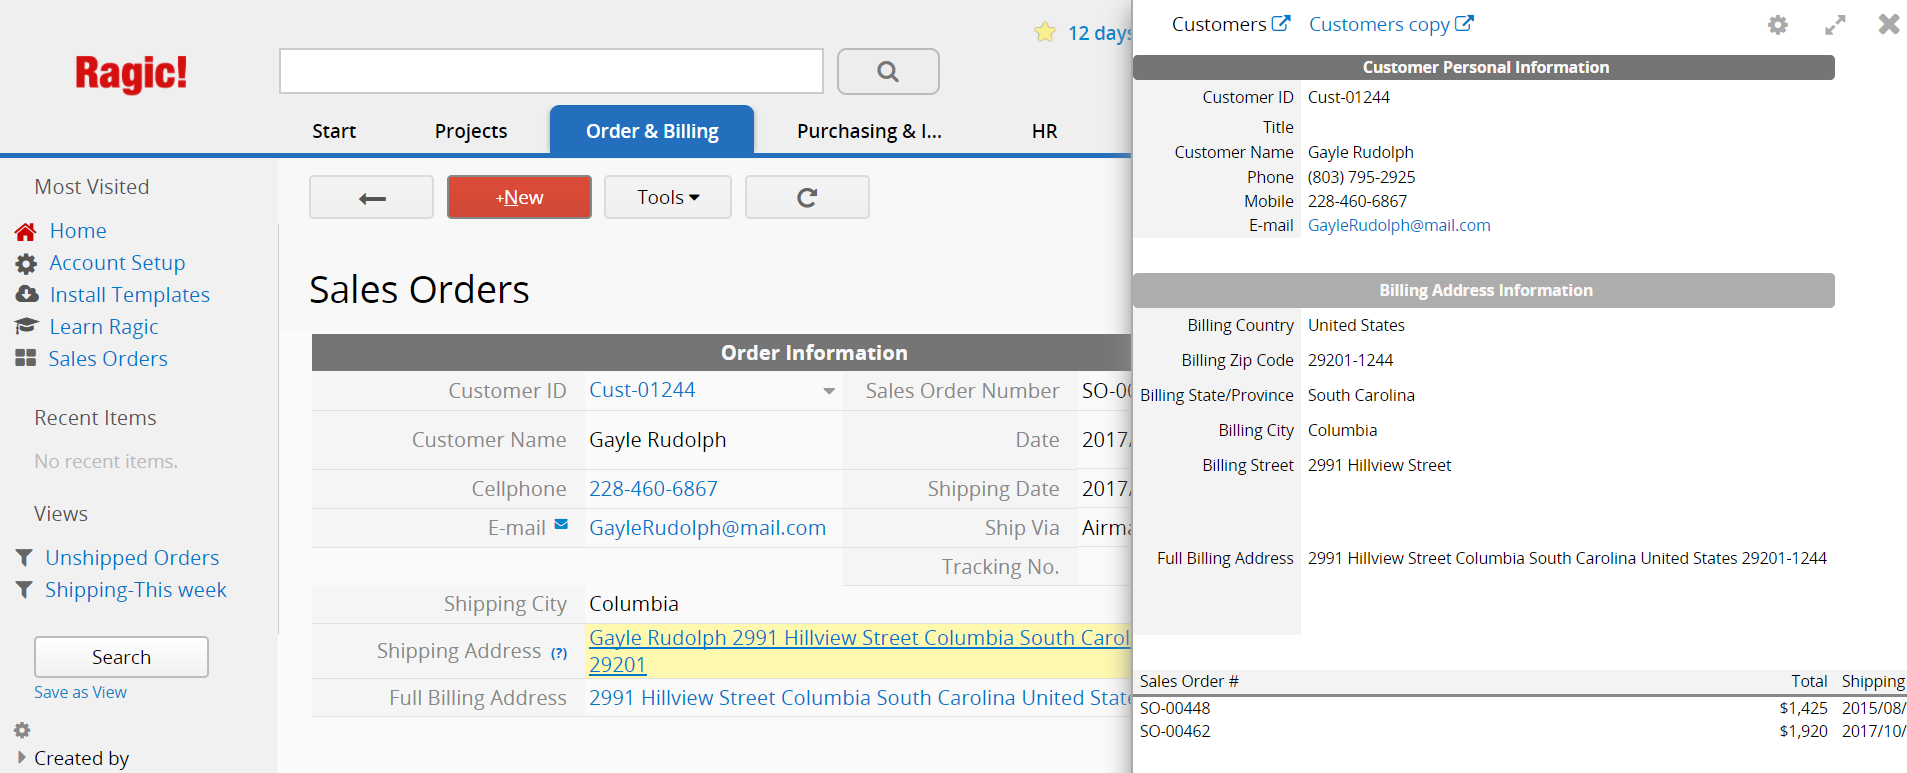
To disable this fly-in panel, you may navigate to the gear icon on the upper-right corner of the fly-in panel and click the Turn off fly in option.
After clicking Turn off fly in, this will disable all fly-in panels from the right side, regardless of the type of linked information Ragic normally displays. If you would like to configure settings separately to enable or disable different types of information available, please navigate to Preferences under your Personal Settings panel.
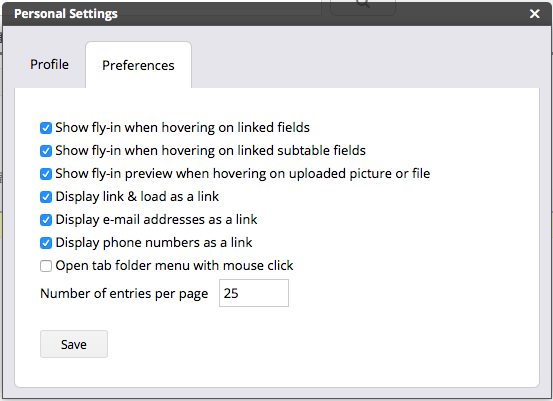
Please follow this guide to add your script:
Step 1: Open the Ragic workflow editor.
Right-click on the sheet name under the tab and select Javascript Workflow, which will take you to the Workflow Module.
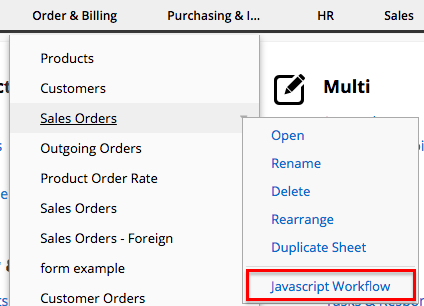
Step 2: Switch the page being edited to the "Installed sheet scope".
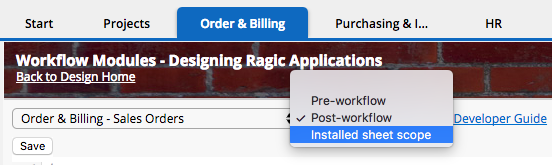
Step 3: Modify and add the following code to your installed sheet scope and save.
Remember to change the '/sales/3' in the example code below to your own sheet path.
Example If your sheet url is 'www.ragic.com/sample/sales/3', the code would be written as following:
function recalc(nodeId){
  var query=db.getAPIQuery('/sales/3');
  var entry=query.getAPIEntry(nodeId);
  entry.recalculateAllFormulas();
  entry.save();
}
If you would like to only do recalculate for a single field, let's say with field id 1000001. You can use this instead:
function recalc(nodeId){
  var query=db.getAPIQuery('/sales/3');
  var entry=query.getAPIEntry(nodeId);
  entry.recalculateFormula(1000001);//recalculate formula for only field id 1000001
  entry.save();
}
Step 4: Add the action button to your sheet.
Under the form page design mode of the sheet, navigate to Form Settings > Actions. Add a new action as following:
Action name: The name of the action button.
Action type: JS Workflow
Action: recalc({id});
Remember to click "Add Action" and save your design changes.
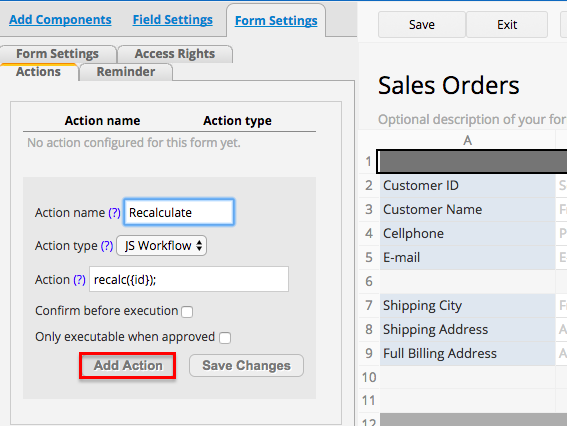
In case you would like to change the e-mail address of a user, as a SysAdmin you may click on the "Change E-mail" action button from the Actions panel within the corresponding user's page.
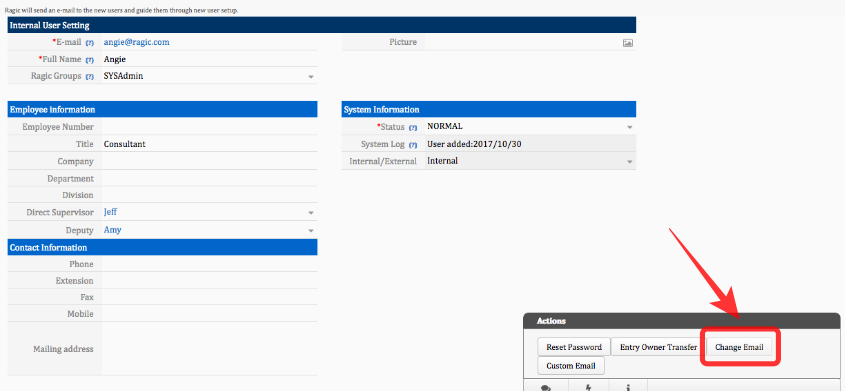
Input the updated e-mail address in the pop-up window. When the e-mail is confirmed, Ragic will automatically send an e-mail to the updated address containing the user's temporary password to log into the system. The user may then change their password when they log on to Ragic.
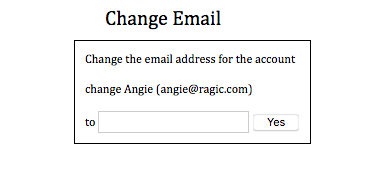
For example, if a field is a linked field in the source sheet used with Link & Load or Show References from Existing Sheets.
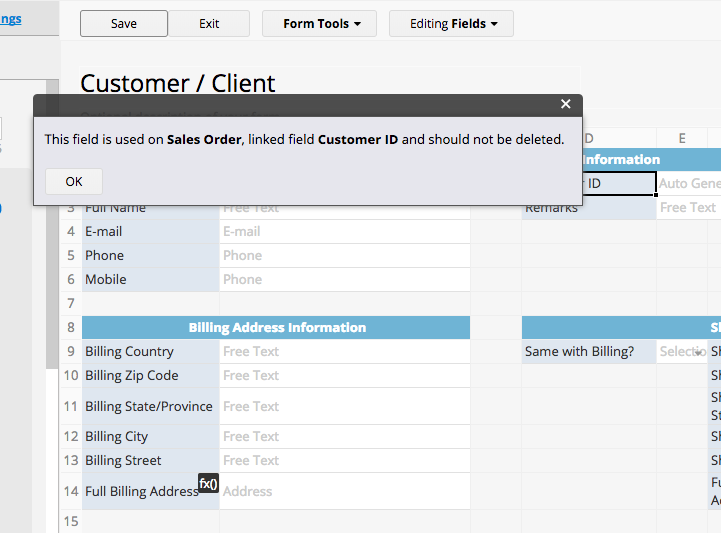
Similarly, when attempting to delete a sheet which contains a field referenced by other sheets, the Ragic system will stop you from doing so.
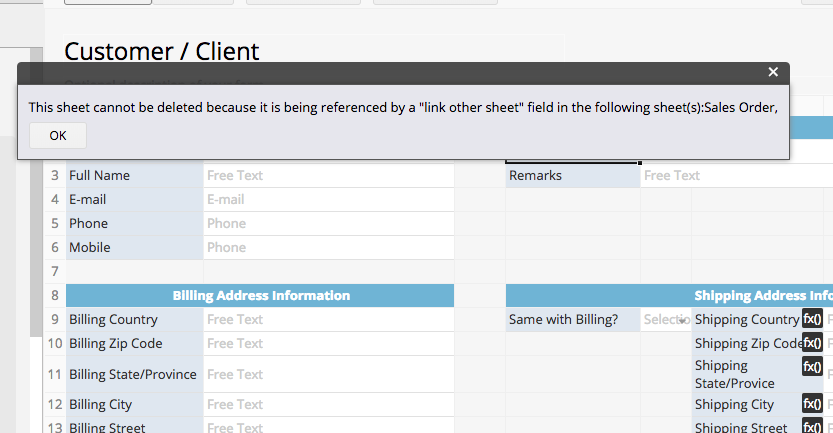
This is because, if you delete a field referenced by other sheets, one or more fields will lose their reference source. For example, if you link the “Customer” sheet from the “Sales Order” sheet, and set the “Customer ID” field as the linked field, when you select the “Customer ID” field in the “Sales Order” sheet, Ragic can automatically load the customer's information. If you delete the “Customer ID” field in the “Customer” sheets afterwards, the link and load feature will not work.
If you still want to delete this kind of field, we suggest you to unlink those fields before deleting.
1. Field background color (Background graphics)
2. Margins (Margins & Scale)
3. Headers and footers
4. Portrait or landscape (Layout)
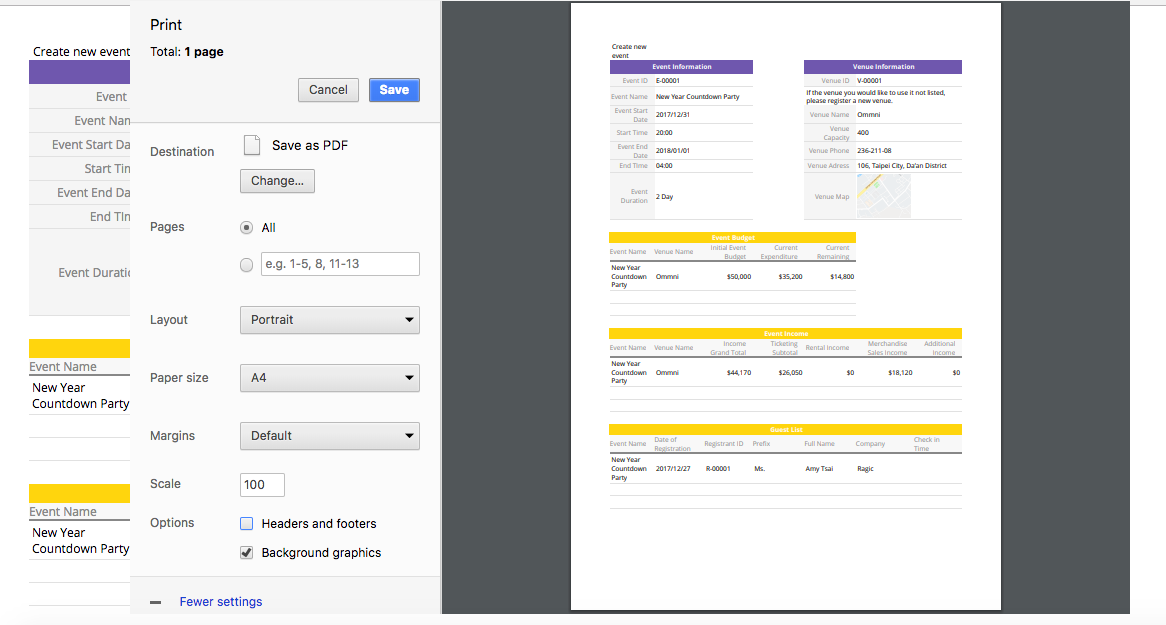
You can find this feature by clicking the arrow icon next to the tab name, or right-clicking the tab name and selecting Duplicate Tab.

Select the sheets you would like to duplicate. (By default, all sheets under your tab will be selected.)
Click Submit, and the tab with the selected sheets will be duplicated. The new duplicated sheets will link to each other instead of linking with the original sheets.
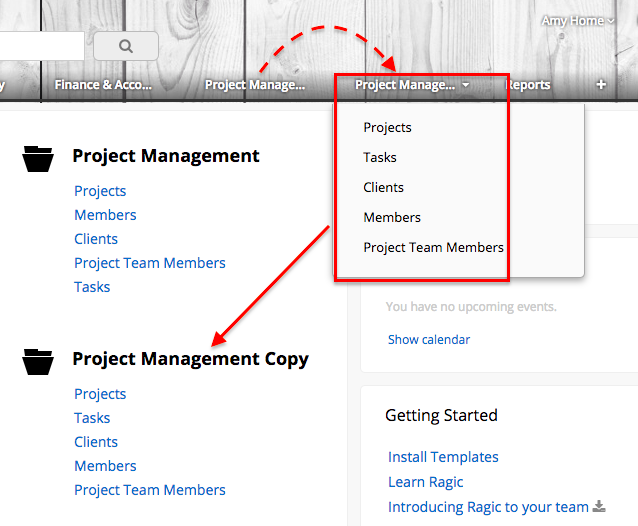
Note This feature is to duplicate the design of all sheets under a tab. It's not for creating multiple versions of the same sheet. The newly created sheets will not be multiple versions of the same sheets that share the data, but rather be new sheets created with the same design.
This way, when your browser window are closed accidentally, you can simply load the draft by creating a new record on the same sheet. When creating a new record, the system will first check if there is a draft available. If a draft is available, it will first ask you if you would like to load this draft. You can choose to create the new record using the last draft or clear the draft to create a new record from scratch.
Workarounds to archive data are:
Let's say you don't want to view orders that are older. You can click on the gear icon of the date field in the left side bar, choose "This Year", and then save it as the default view or fixed filter.
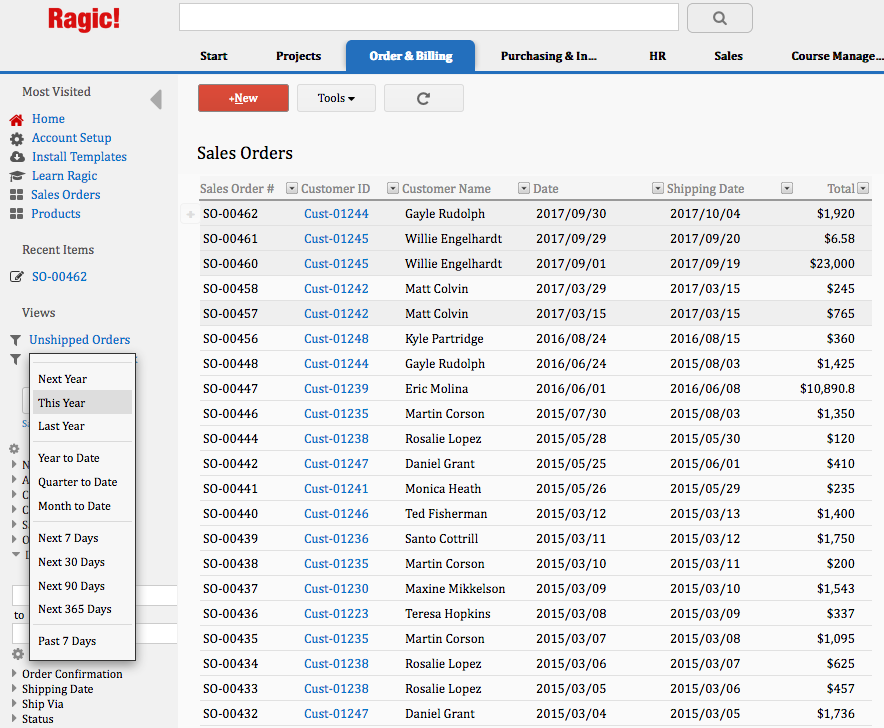
This way, users will see sales order of this year only upon entering the order sheet.
If the data that you want to archive cannot be filtered out by the left side bar, you can create a selection field named "Archive". You can then apply a default view or fixed filter based on the "Archive" field.
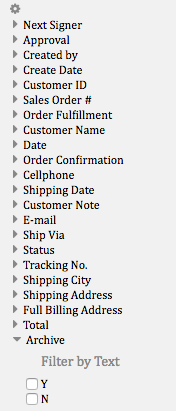
In the future, when you have entry that want to archive, you'll need to manually change the field value of "Archive" field so that it won't show up in the listing page. In case that you want to update several entries at once, you may filter out those entries and use mass update.
For example, the sheet URL is https://www.ragic.com/demo/sales/1
For a record, the URL would be like: https://www.ragic.com/demo/sales/1/18
So for the action button, you can put down the URL:
https://www.ragic.com/demo/sales/1/{id}.xhtml
For example, if you configure the access right for the "EVERYONE" user group as "VIEWER" to the sheet, guest users who are not logged in to the database would be able to view all records in the embedded sheet on your website. However, if you would like to allow guest users to search for data without setting your sheet as public, such as being able to search the delivery status of a package on-line upon entering the tracking number, this can be done by using Exact Mode in your embedding configuration.
The Exact Mode setting is available for Database Query and Database View & Query. With this setting, users would be able to search for data by entering the query that is exact matched even if your sheet is not set to public.
To enable this setting, in the embed configuration of Database Query or Database View & Query, check the box "Exact Mode" at the upper left corner. You can configure the query fields by clicking Set Default Query Field if necessary.
Note: When the Exact Mode is activated, users would need to enter an exact match query to all query fields to be able to find data in their search.
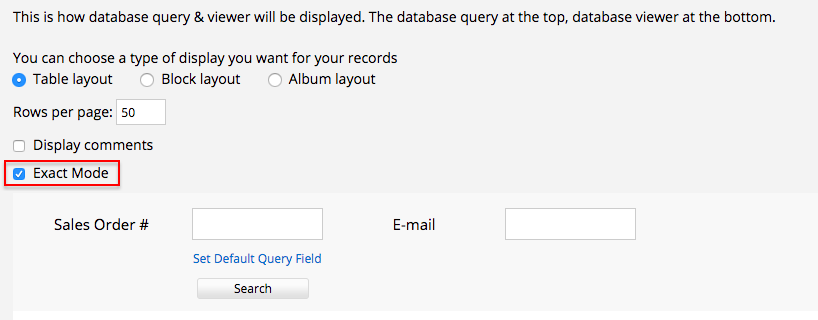
Users will now be able to search for data by entering exact matched data in all the query fields even if they don't have access rights to your Ragic sheet.
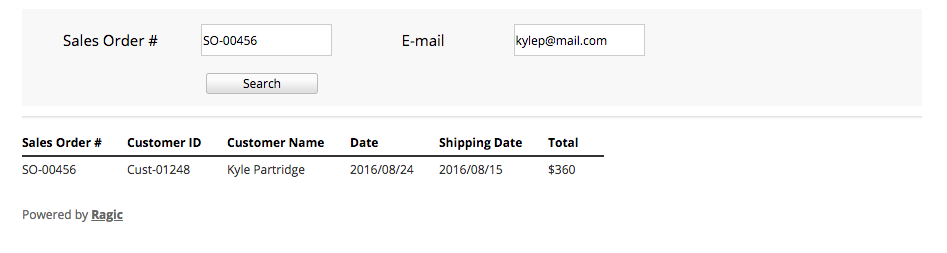
Clicking on the entry row will reveal detailed information of the entry.
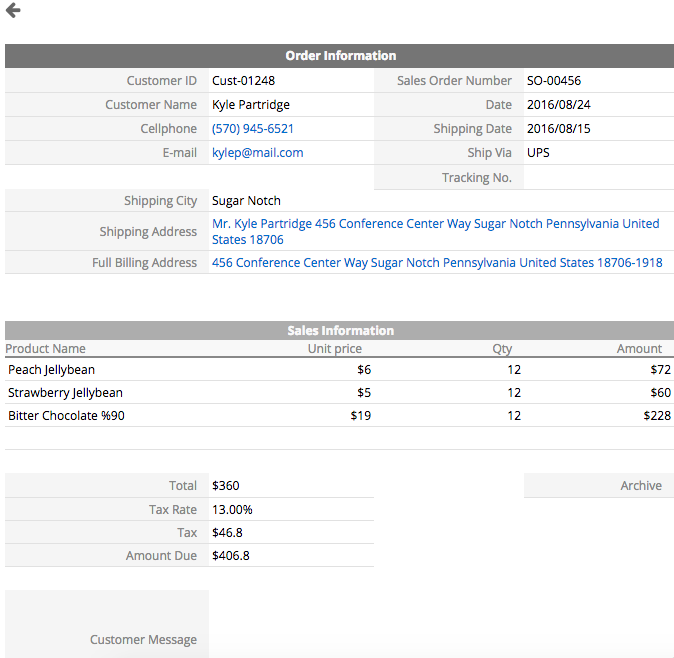
Reminder: The Exact Mode configuration is shared with Database Query and Database View & Query to a sheet. If you have configured Exact Mode for the embed tool Database Query of a sheet, it would apply to Database View & Query if you have one. If you have deactivated Exact Mode, it would apply to both embed tools as well.
The send mass SMS feature sends out SMS (text messages) that you compose, to selected recipients in a phone number field within your records. Your sheet will need to have at least one phone number field, and you will be able to select the phone number field to use for the recipients.
This is extremely useful for sending follow-up messages as an SMS, during promotional campaigns, or newsletters to certain groups of people.
Before you start using this feature, you will need to purchase SMS credits from your Account Billing. (Or click "Get SMS credits" from Send mass SMS configuration to navigate to this page.)
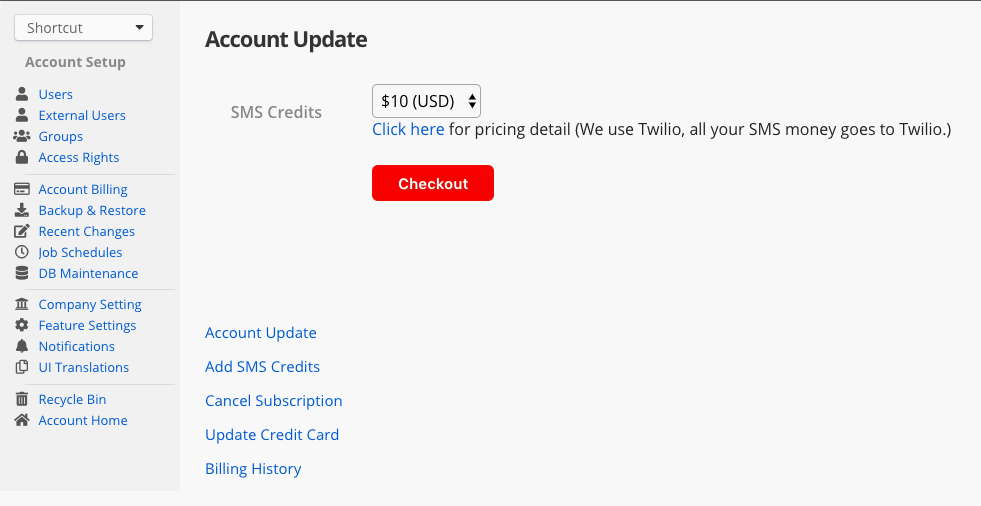
To send out mass SMS, you can first filter your records if necessary, and use the Send mass SMS function under the Tools menu.
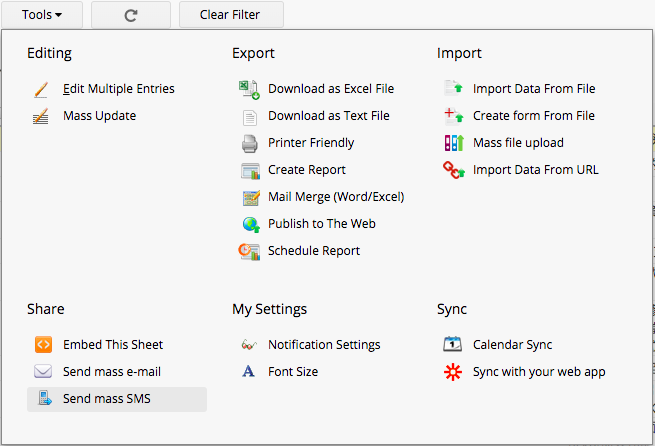
Not filtering records would mean that the mass e-mail will be sent to all contacts in your database sheet with the specified phone number field.
Select the phone number field that you would like to send an SMS to, and enter the body content of the SMS.
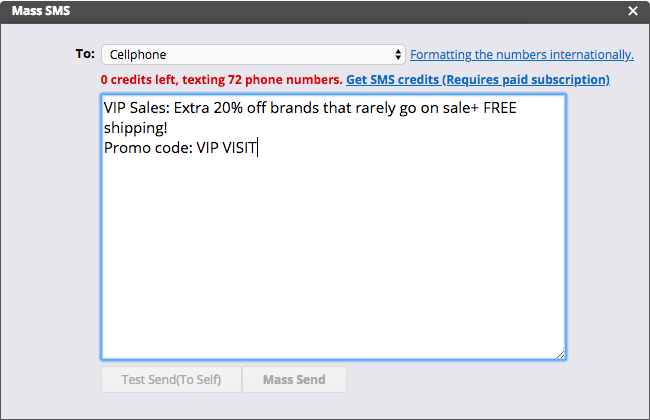
Ragic uses a third-party service named Twilio to send text messages. You can send text messages to phone numbers in almost any country in the world. If your recipients are outside the US or Canada, please format your mobile phone numbers in the international format E.164, which will include country codes, such as +18886668037. For detailed information regarding formatting phone numbers to send mass SMS through Ragic, please refer to this article.
Clicking on the option Test Send (To Self), will prompt you to enter your phone number to be used for testing in the pop-up window so you can test send an SMS to your phone number.
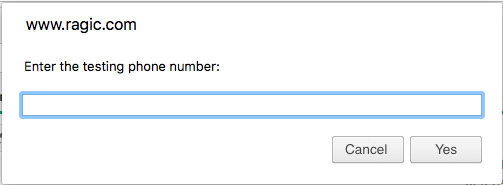
And you can refer to this article for SMS character limit information.
Another thing is that you will be able to refer to field values within the record that you're using to send out this SMS with variable syntax:
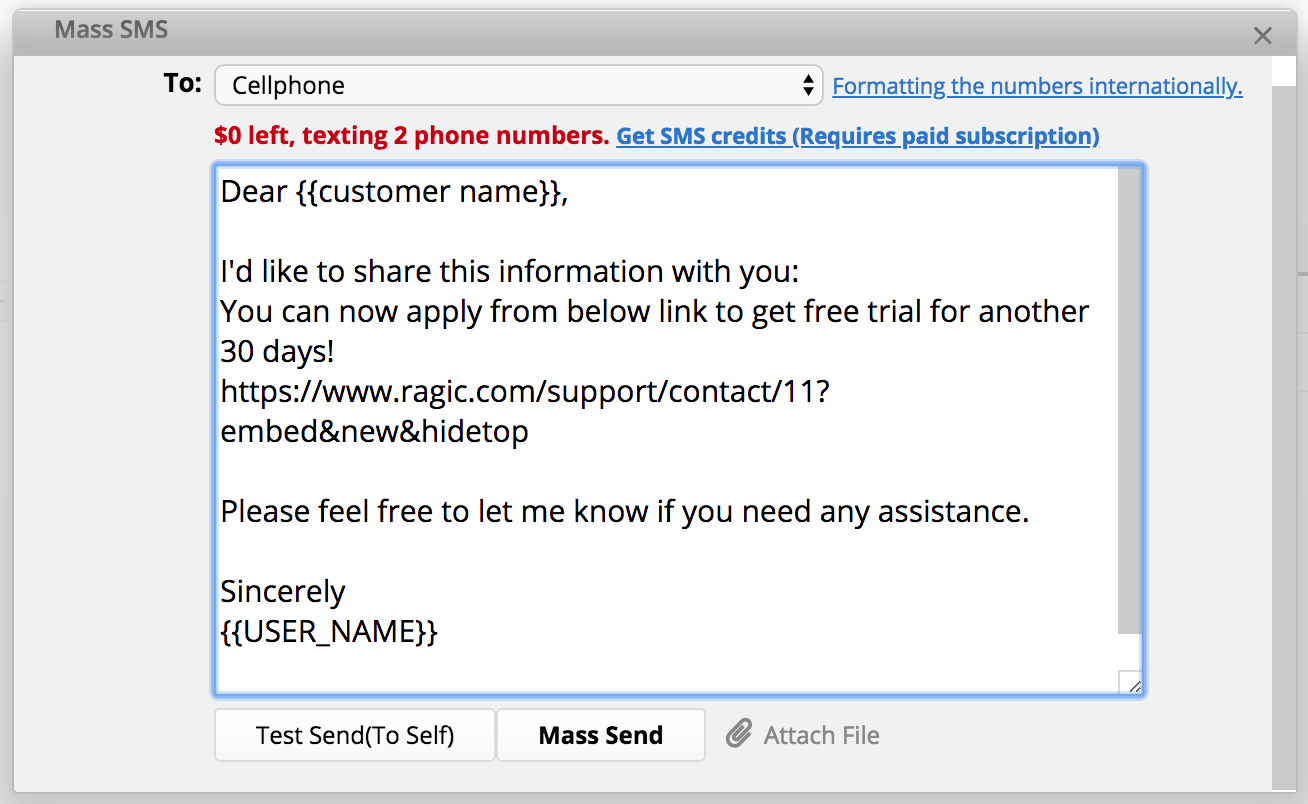
Below is the list of variables you can use in the SMS content:
| Variable | Description |
|---|---|
| {{AP_NAME}} | Your Ragic account name |
| {{USER_NAME}} | Name of sender |
| {{RECORD_LINK}} | Record URL |
| {{FIELD ID}} | Value of the field |
| {{FIELD NAME}} | Value of the field |
Note. If there are duplicated field names on the sheet, please use {{FIELD ID}} to retrieve the field value instead.
We recommend you check any mass messages in this tool before you send them out. It will flag any UCS-2 characters to avoid you being double charged for messages. Sending out SMS through Ragic, you can see whether a message was encoded as UCS-2 or GSM7 by viewing an individual message in your console logs.
When you send a SMS message over 160 characters the message will be split. Large messages are segmented into 153 character segements and sent individually then rebuilt by the recipients device. For example, a 161 character message will be sent as two messages, one with 153 characters and the second with 8 characters.
If you include non-GSM characters like eastern characters in SMS messages, those messages have to be sent via UCS-2 encoding. Messages containing any UCS-2 characters are limited to 67 characters and will be concatenated into 67 character message segments, even if the messages contain less than 160 characters.
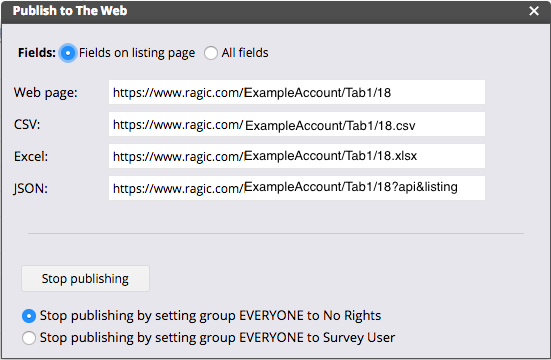
If you would like to further specify which fields you'd like to export, you can add the snippet "?f=cust&s=1000&order=["field_id",...]" to the URL generated from the publish to the web feature.
For example, below is the URL to download an excel file retrieved from publish to the web, which would only export data from the fields that are on the listing page:
https://www.ragic.com/ExampleAccount/Tab1/18.xlsx
To export the data from certain fields instead of the fields on the listing page, or all fields on the sheet, we use the parameter "?f=cust&s=1000&order=["field_id",...]" to specify fields. (The field ID can be found under the design mode from field settings.) the URL to Download an Excel file for only the field IDs "1000231" and "1000243" would be:
https://www.ragic.com/ExampleAccount/Tab1/18.xlsx?f=cust&s=1000&order=["1000231","1000243"]
You may enter the listing page and click on the filter icon:
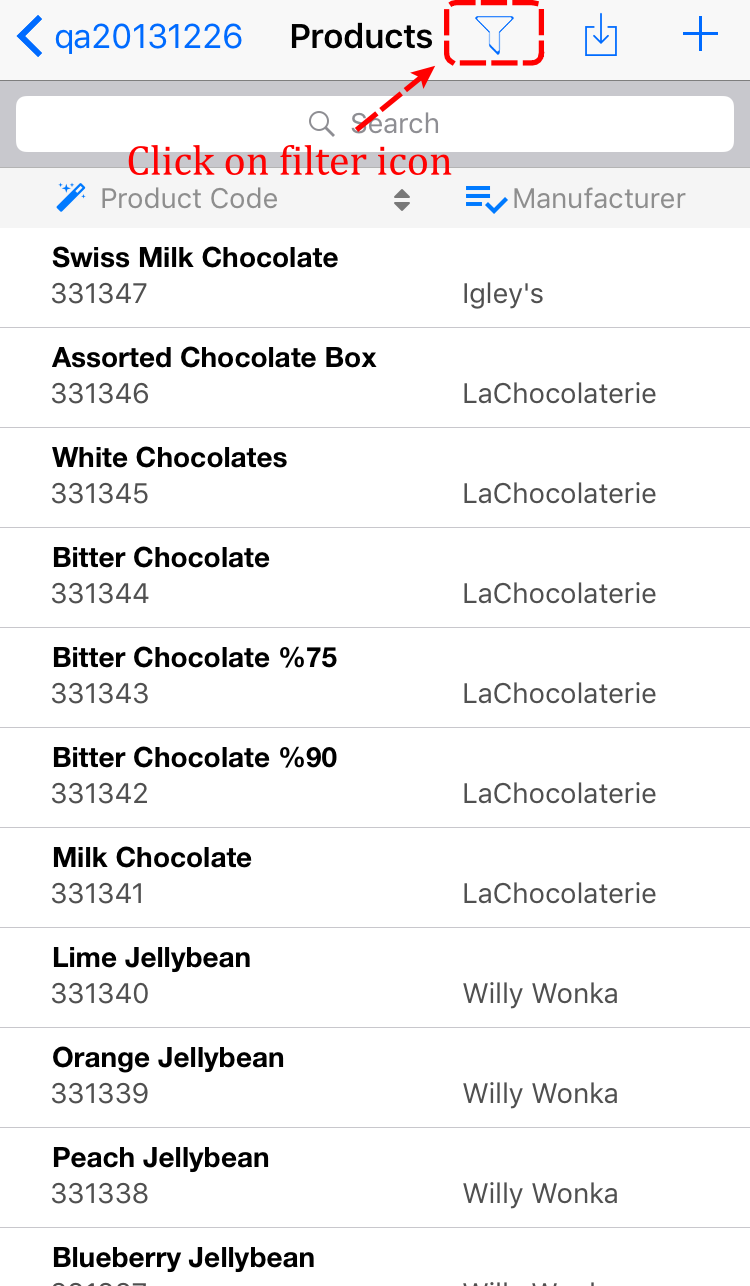
Click on the name of the saved view you'd like to filter with. Ragic will apply it automatically and toggle back to the listing page:
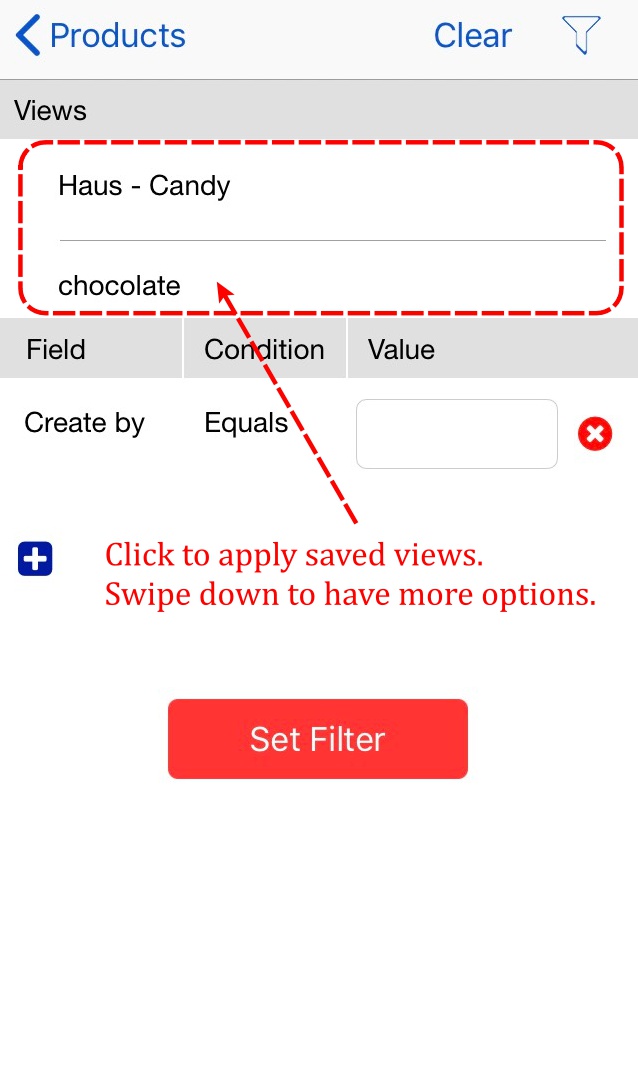
If you would like to clear the applied view, click on the filter icon again and select “Clear”. You'll be able to see all entries again.
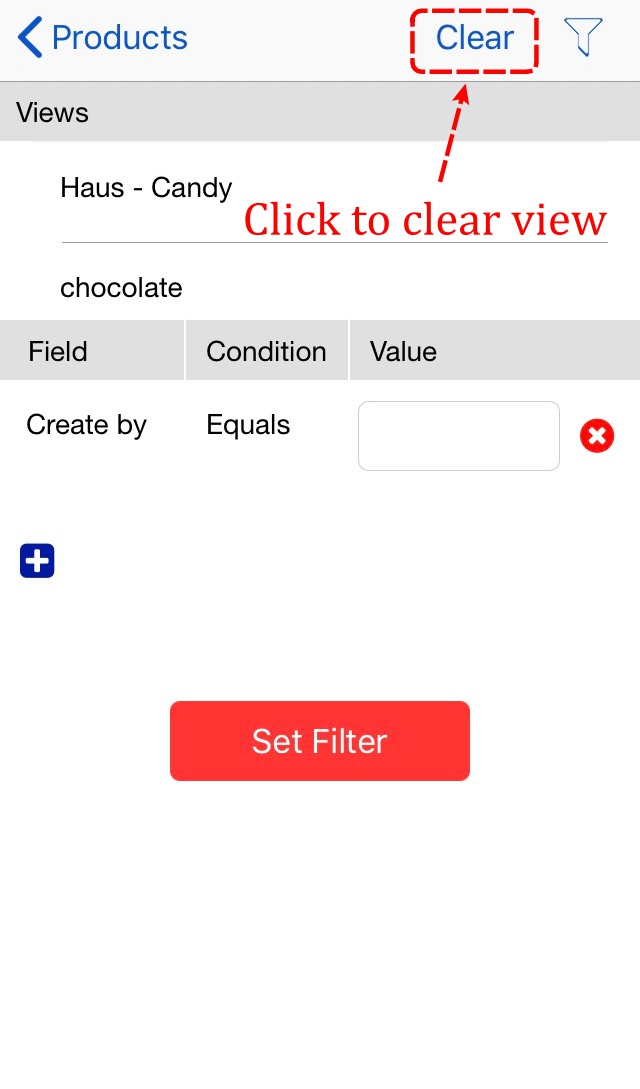
You may click on the filter icon from the listing page and enter the criteria below:
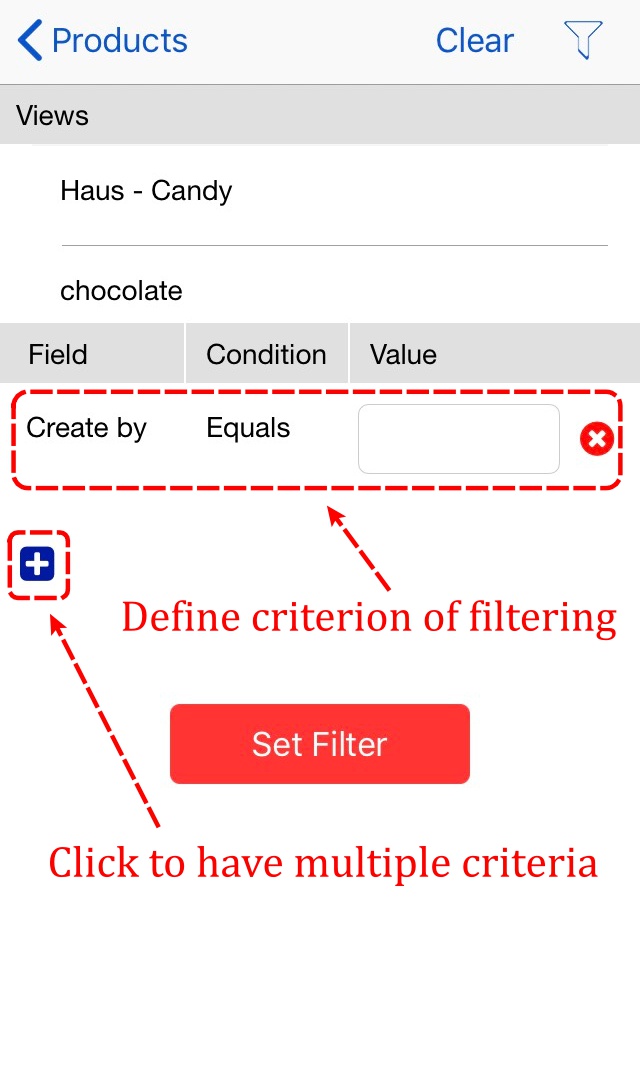
Click on ![]() to apply the new view.
to apply the new view.
If you want to clear the view, click on the filter icon again and click on “Clear”.
Notice
New views created on the Ragic iOS App cannot be saved yet. If you would like to save a view, please access Ragic from the web version.
Download Ragic's iOS App from the link below:

If you want to prevent your users from deleting subtable rows, you can navigate to Form Settings under Design Mode and choose the option no subtable deletion allowed.
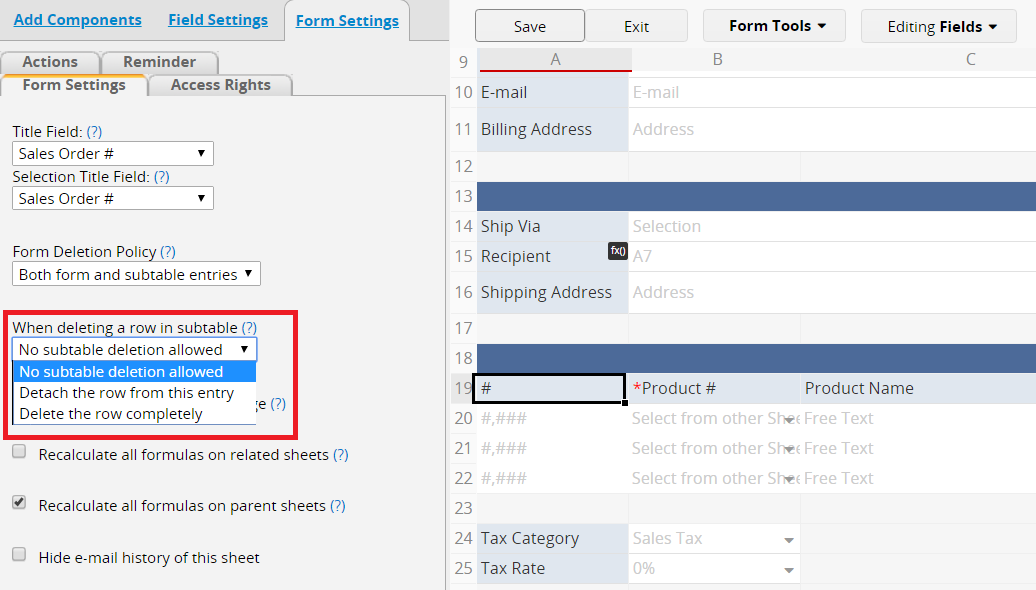
Please follow this guide to add your script:
Step 1: Open the Ragic workflow editor.
Right-click on the sheet name under the tab and select Javascript Workflow, which will take you to the Workflow Module.
Step 2: Switch the page being edited to the "Installed sheet scope".
Step 3: Modify and add the following code to your installed sheet scope and save.
Remember to change the '/sales/3' in the example code below to your own sheet path.
Example If your sheet url is 'www.ragic.com/sample/sales/3', the code would be written as following:
function recalc(){
var pageSize = 1000; //read 1000 entries at a time
var qMain = db.getAPIQuery('/sales/3');
qMain.setUpdateMode();
var mainAr = null, mainOffset = 0;
while(mainAr==null || mainAr.hasMore()){
qMain.resetData();
qMain.setLimitSize(pageSize);
qMain.setLimitFrom(mainOffset);
mainAr = qMain.getAPIResults();
var iterator = mainAr.iterator();
while(iterator.hasNext()){
var entry = iterator.next();
entry.recalculateAllFormulas();
entry.save();
}
mainOffset += mainAr.getData().size();
}
}
If you would like to only do recalculate for a single field, let's say with field id 1000001. You can use this instead:
function recalc(){
var pageSize = 1000; //read 1000 entries at a time
var qMain = db.getAPIQuery('/sales/3');
qMain.setUpdateMode();
var mainAr = null, mainOffset = 0;
while(mainAr==null || mainAr.hasMore()){
qMain.resetData();
qMain.setLimitSize(pageSize);
qMain.setLimitFrom(mainOffset);
mainAr = qMain.getAPIResults();
var iterator = mainAr.iterator();
while(iterator.hasNext()){
var entry = iterator.next();
entry.recalculateFormula(1000001);//recalculate formula for only field id 1000001
entry.save();
}
mainOffset += mainAr.getData().size();
}
}
Step 4: Add the action button to your sheet.
Under the form page design mode of the sheet, navigate to Form Settings > Actions. Add a new action as following:
Action name: The name of the action button.
Action type: JS Workflow
Action: recalc({id});
Remember to click "Add Action" and save your design changes.
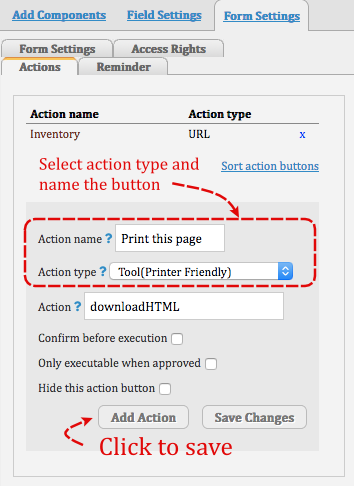
Simply click on the “Add Action” button, save the design, and exit Design Mode. Your custom button will show up in the lower-right corner of your database:
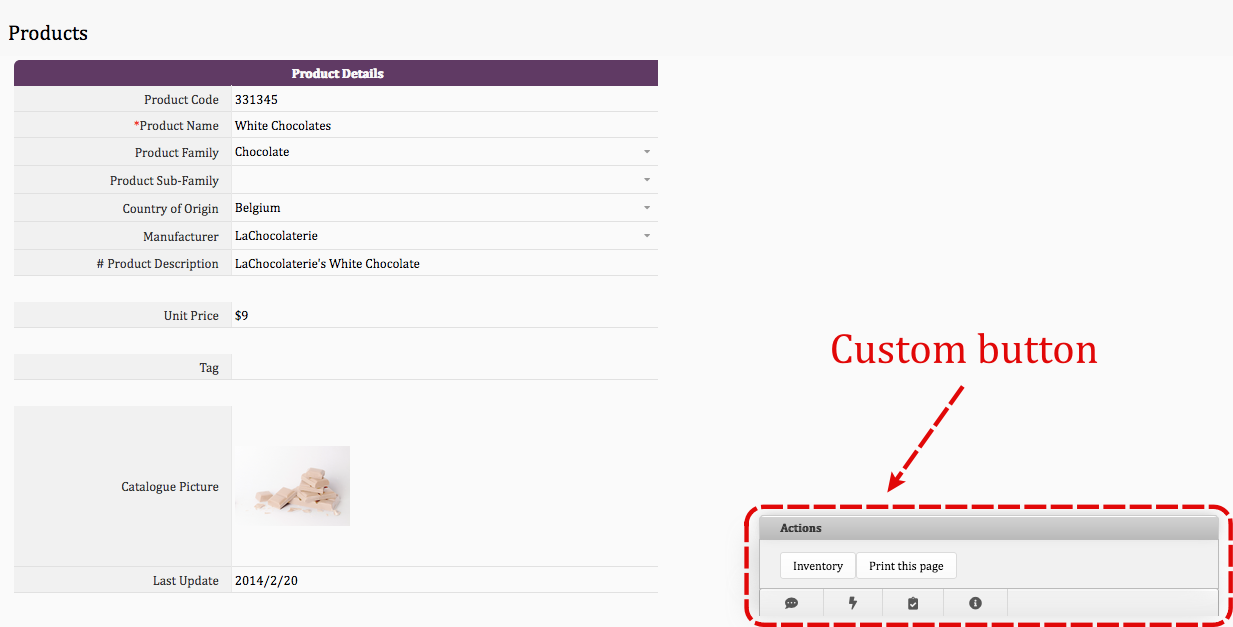
Here are the tools which can be added as custom buttons:
| Tools |
|---|
| Clone Entry |
| Download as Excel File |
| Printer Friendly |
| E-mail this entry |
| Apply all formulas to this record |
| Lock or unlock record |
Please Note: This function is only supported in form pages and cannot be added to the listing page.
Below are the URLs of data exporting options:
| File Format | URL |
|---|---|
| Excel File | www.ragic.com/account_name/tab_path/sheet_path.xlsx |
| CSV File | www.ragic.com/account_name/tab_path/sheet_path.csv |
| Printer Friendly | www.ragic.com/account_name/tab_path/sheet_path.xhtml |
To download the Excel file of the sheet
https://www.ragic.com/testaccount/practicetab/1.xlsx
Use the link
https://www.ragic.com/testaccount/practicetab/1.xlsx?pqv1000105=Taiwan
The part before "?" is your sheet path.
The parameter name is pqv (your field ID can be found with this method).
The value after "=" is the value you’d like to filter with, which is "Taiwan" in our example above. Please note that this value is case-sensitive.
For multiple queries, use the ampersand symbol &.
Comparison operators such as <, >, or >= is not supported in this method, for this kind of query, you (SYSAdmin) may consider saving the query as a shared view and retrieve shared view url for downloading the filtered records.
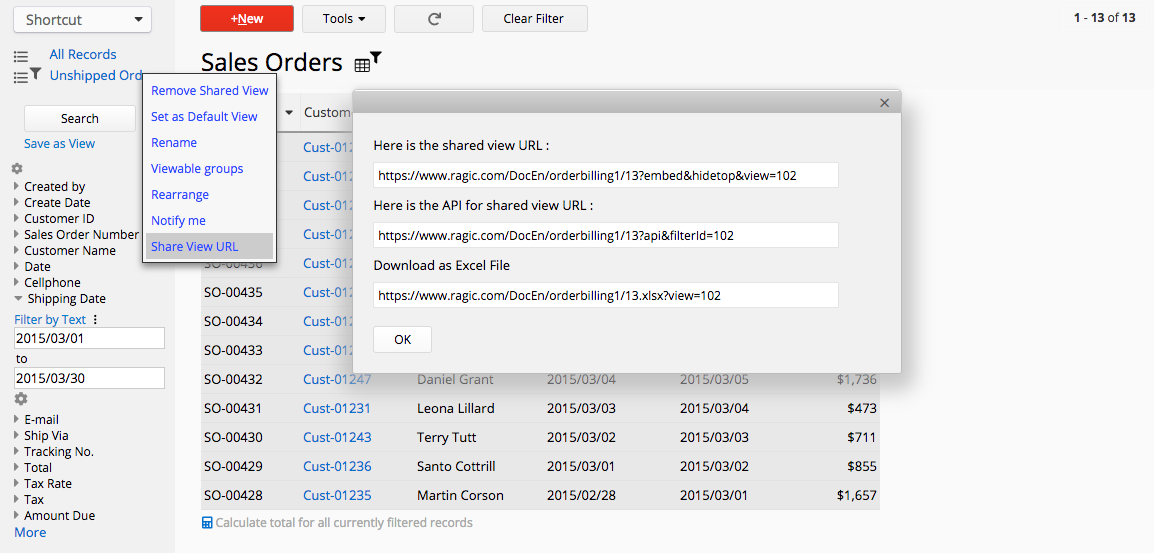
Note: only users with access right to the sheet may use the link to download the records.
To grant people with no access right to download the records, use Publish to Web with API Link instead. You can also add special pqv parameters to the link to allow download of filtered records.
To sign up, go to Ragic sign up page and click "Sign Up with Google" under the "Sign Up for free" button.
To sign in, simply go to Ragic sign in page and click “Sign in with Google”.

Here's an example:
Suppose your current data is as shown below.
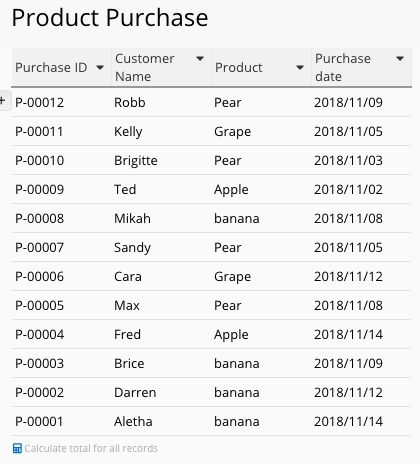
You want to change the selection "banana" into "Banana" and apply the change to the current data to uniform the selection value format in the field "Product" (capitalized first letter). To achieve that, you need to do the following:
1. Go to the design mode, add and save the new selection "Banana" to the selection field.
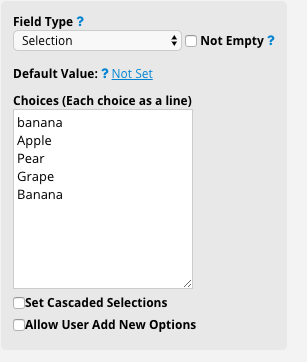
2. On the listing page, filter the records whose selection field values you'd like to update into "Banana" (in this example, filter all selection fields with the value "banana"),
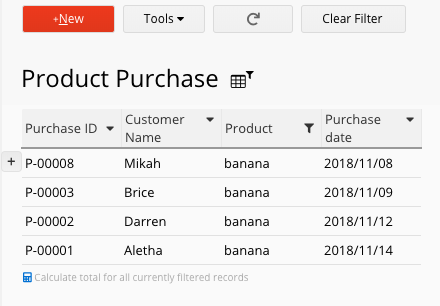
then Mass update the original value "banana" with "Banana"...
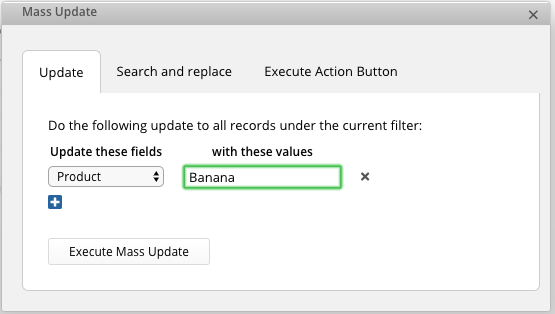
...So that your data will look like this.
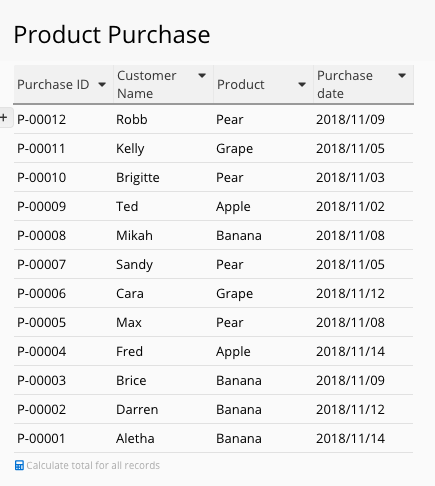
3. After completing the above two steps, you may delete the old selection "banana" from the Selection field on the design mode.
Note: If your account is downgraded from Professional to Lite or Free plan because you have ended your free trial or discontinued your subscription, the free templates you have redesigned will be reverted to their original designs.
To modify the design of a sheet in an installed template, you can click Change Design on the sheet's form page or listing page to enter the design mode.
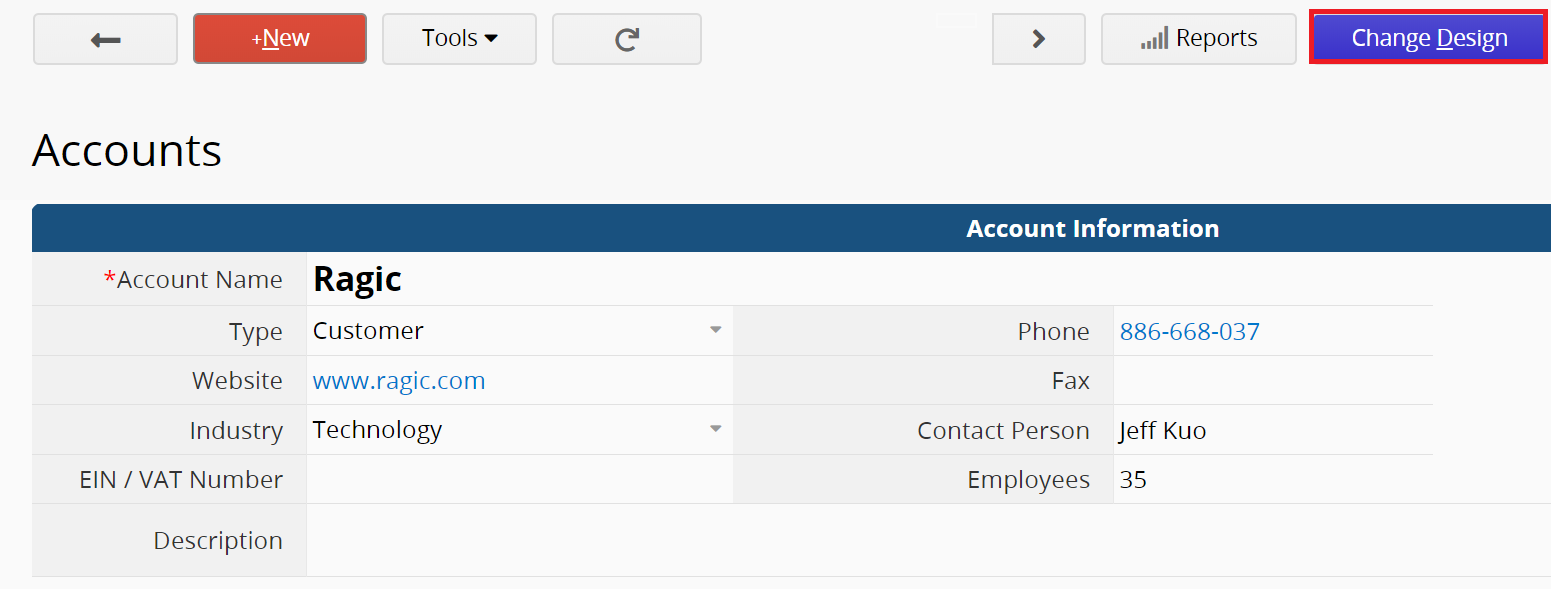
You can create a new field by clicking on any blank cell and typing the field name.
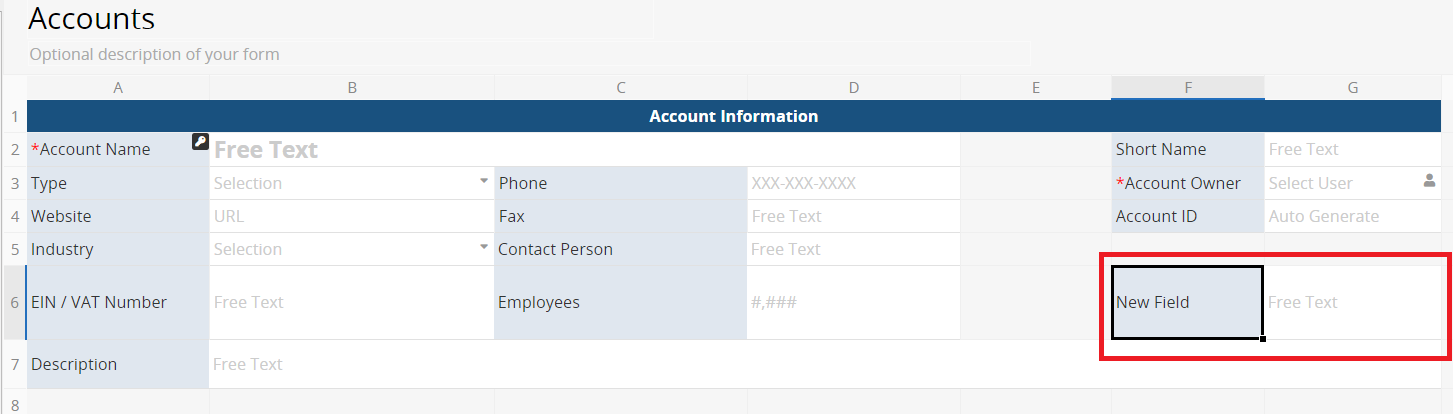
To delete fields, right-click > delete or press the Backspace or Delete button on your keyboard. Please note that a warning message will pop up if you delete fields that are referred to by formulas.
In addition, if a field is linked to other sheets, it can only be deleted after the link is removed.
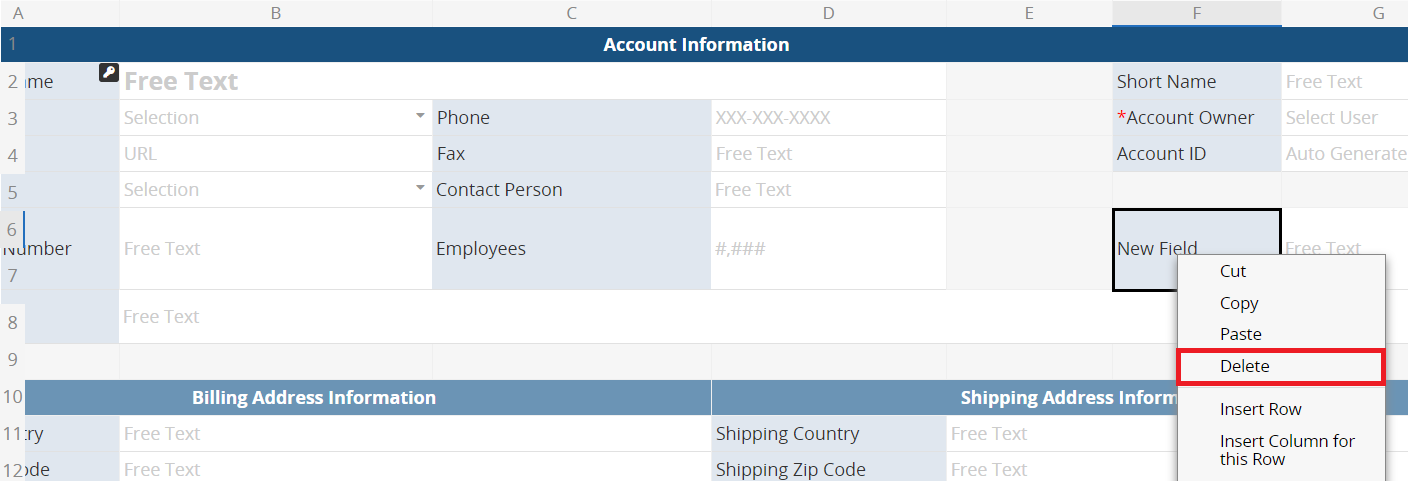
To change a field name, go to the left panel under the design mode.
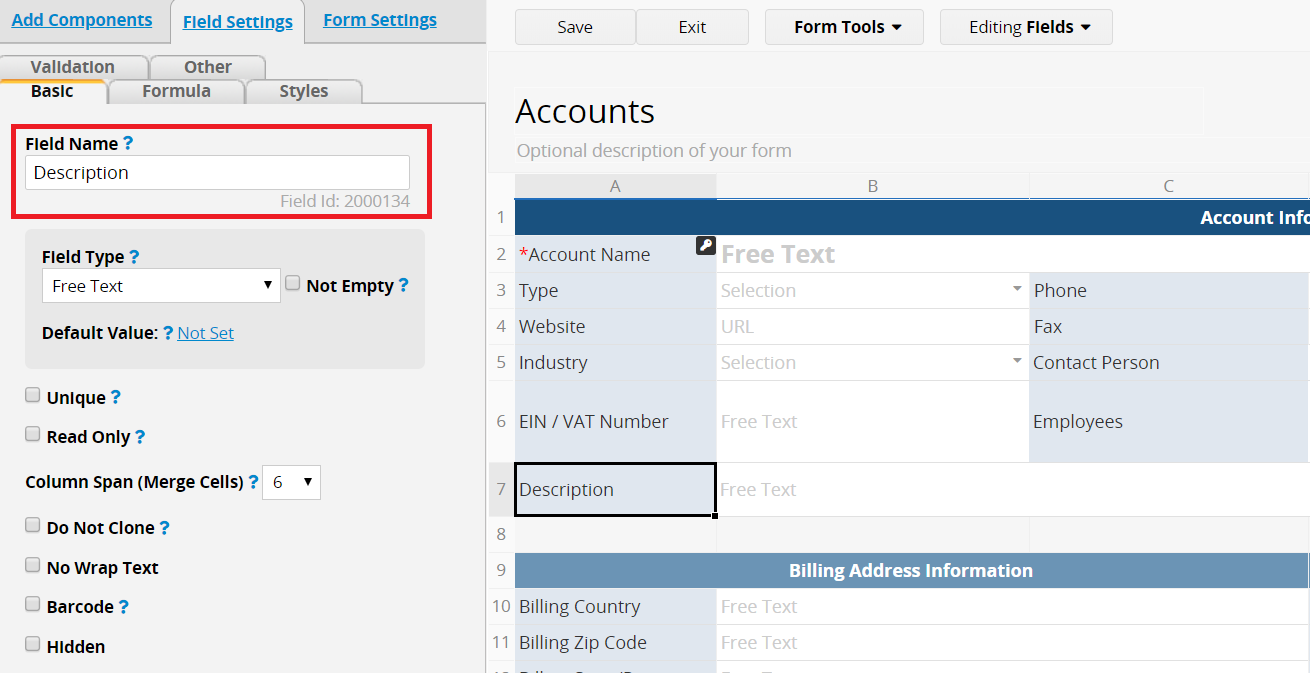
Field type can also be changed in the left panel of the design mode. However, changing field type may affect the saved field value and formula calculation. For example, changing a Free Text Field to a Numeric Field may clear out the field values; and changing a Numeric Field to a Free Text Field may affect its numeric calculation.
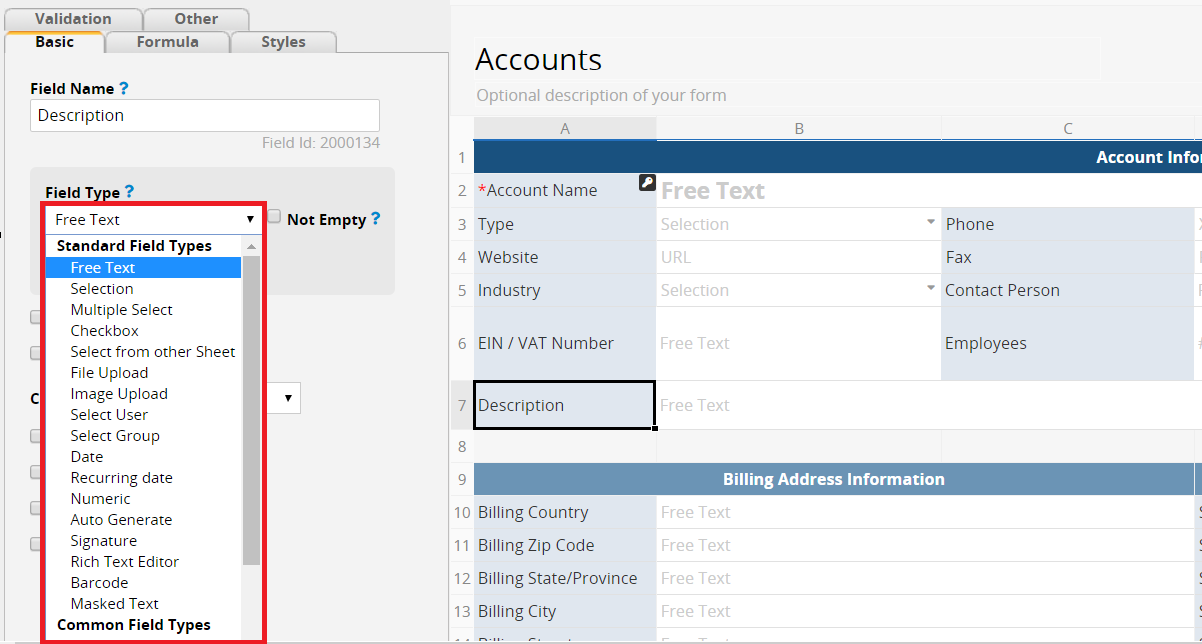
Please note that modifying relationships between sheets which are linked through Link & Load, Multiple Versions, New Sheet from Subtable and Show References from Existing Sheets will change the original structure of the template. For more information on Ragic linking tools, please refer to this page.
Please note that modifying custom action buttons Convert Records, Update Values, Update Value On Another Sheet and Send Custom E-mail will affect the original function or workflow of the template. For more information on custom action buttons, please refer to this page.
Note: Currently, template sheets can not be rearranged or moved to other tabs.
There are so many ‘John Doe’s in your customer database?...
...Or you can’t determine which product was purchased because the information of each product in your database looks exactly the same?
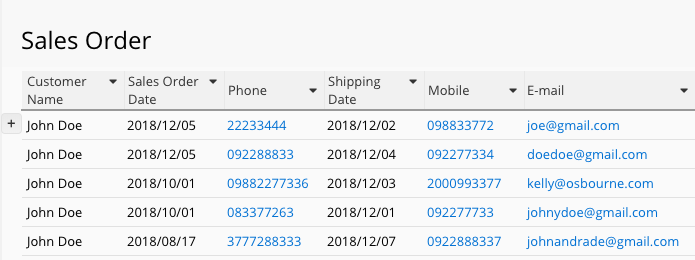
If you have problem differentiating entries in your sheet, you might be missing a component in your form design, that is, something each of your entry possesses yet is “unique” enough for the system to accurately distinguish them.
A unique value can be a serial number, or “identification” sequence consisting of letters and/ or numbers in each entry.
Since each sequence is one-of-a-kind, having a unique value field allows us and the system to detect a seemingly slight but distinctive feature of each entry. This unique feature holds your data together while at the same time allowing them to be identified at an individual level in data management and analysis. This identification method has been adopted in data management systems at large.
1. As a visual identification of an entry
With a quick look at the key value (Customer ID, for example), you'd be able to identify entries regardless of the overlapping information they carry.
E. g. Unique customer IDs for customers with the same name.
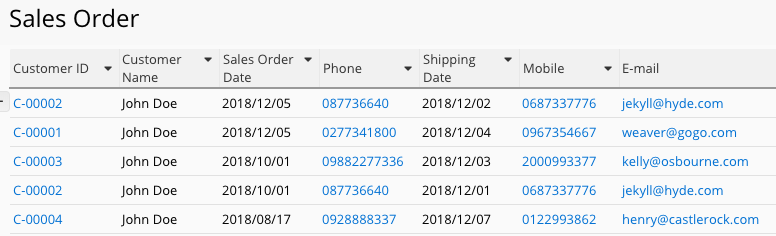
2. An identification property in file import.
For Ragic to map your information correctly to entries during file import, you will need to have a key field as entry identification, such as "Product Code" for products, or "Customer No."
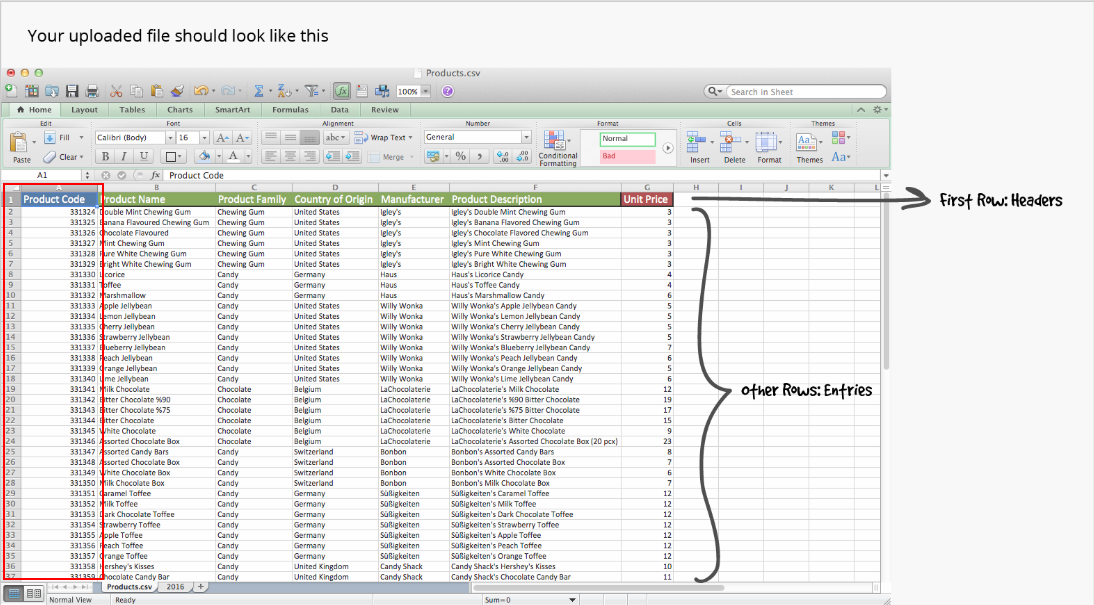
3. An identification property in data linking
Ragic has several data linking tools, and key fields enable the system to correctly map data during linking.
In a link and load example, linking Customer ID field to Sales Order sheet enables the system to more accurately load the customer information in the target sheet (compared to linking Customer Name field).
(If you've already used a non-unique value field to link data with link and load tool, you can use this method to switch it into unique value field without deleting anything or reorganizing your table format).
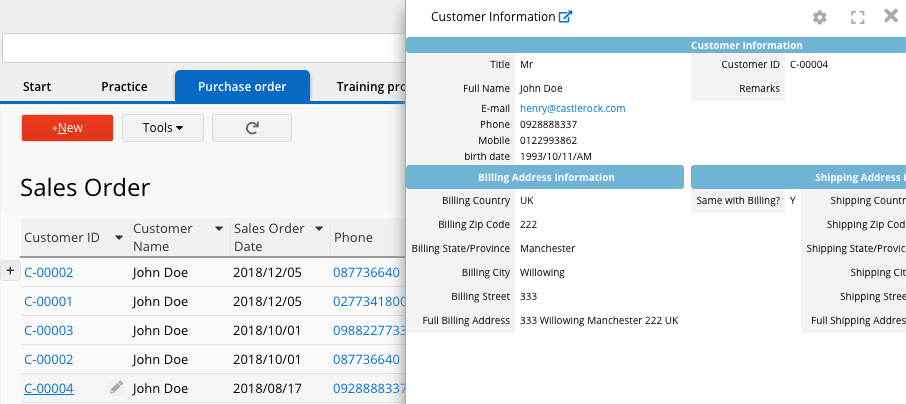
Any field containing a unique value can be a key field, but the most common one is ID number field.
For example, in customer information entries, email address or ID number can be the key field; in company information entries, company code or VAT number can be the key field; in sales order entries, sales order numbers can be the key field, etc.
In addition, you may also set a "Unique" attribute to your key field to prevent users from duplicating entries.
If you don't find any field with a unique value in your sheet design, a quick way to add one is by creating an auto-generated field. This type of field will automatically generate sequential, unique numbers for each entry you add to the sheet.
54.240.35.150
For example, configuring the execution time at 01:00 while you're located in UTC+8 will result in one day delay due to the 8-hour time difference.
The solution is to replace the referred TODAY() with TODAYTZ() so that the system will apply the time zone configured in your company settings when executing daily recalculation.
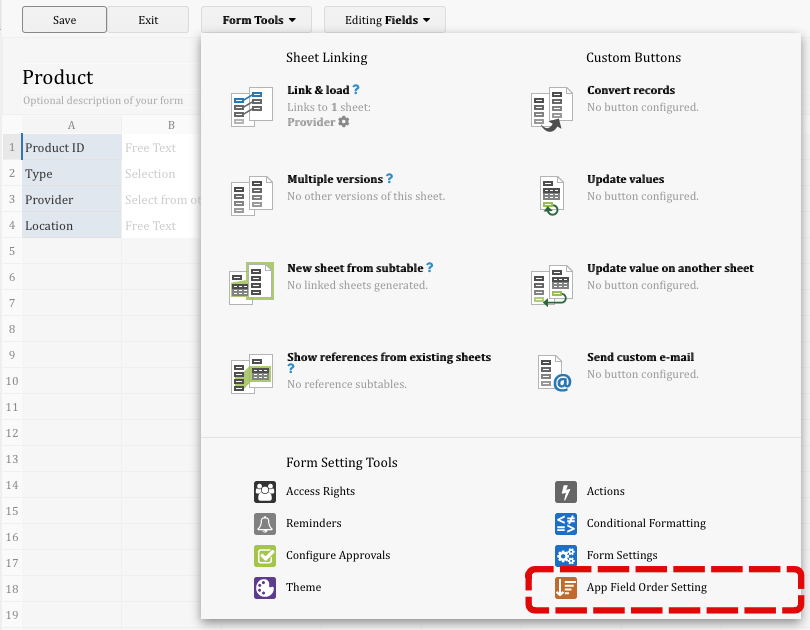
Then, click on the field name and use the arrow button to arrange the order:
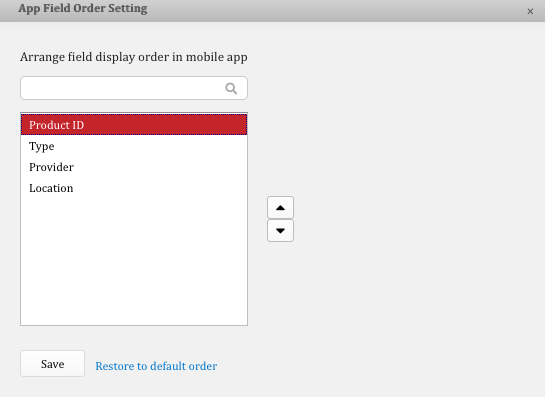
Note: To change the listing page field order in mobile app, you may refer to this document.
To be able to use "Import from URL", you need to first have a URL of your Excel file stored in the cloud, and this URL should directly link to the download .csv or .xlsx page.
If your Excel file is stored in OneDrive, you may follow below steps to get the direct download link of the file for import in Ragic.
Click Share at upper right corner, then copy the URL.
The URL you just copied is the direct path to your OneDrive:
https://org.sharepoint.com/personal/user_org/folder/filename.ext?d=oiuqjaweorihjlkj
Substitute everything after the "?" symbol in the URL with "download=1". In case there's no "?" in the URL, you can add "?download=1" at the end of it.
https://org.sharepoint.com/personal/user_org/folder/filename.ext?download=1
If you are importing from Google sheet, you can get the direct .xlsx/ .csv download link by using their "Publish to the web" feature. You can use this link for import in Ragic.
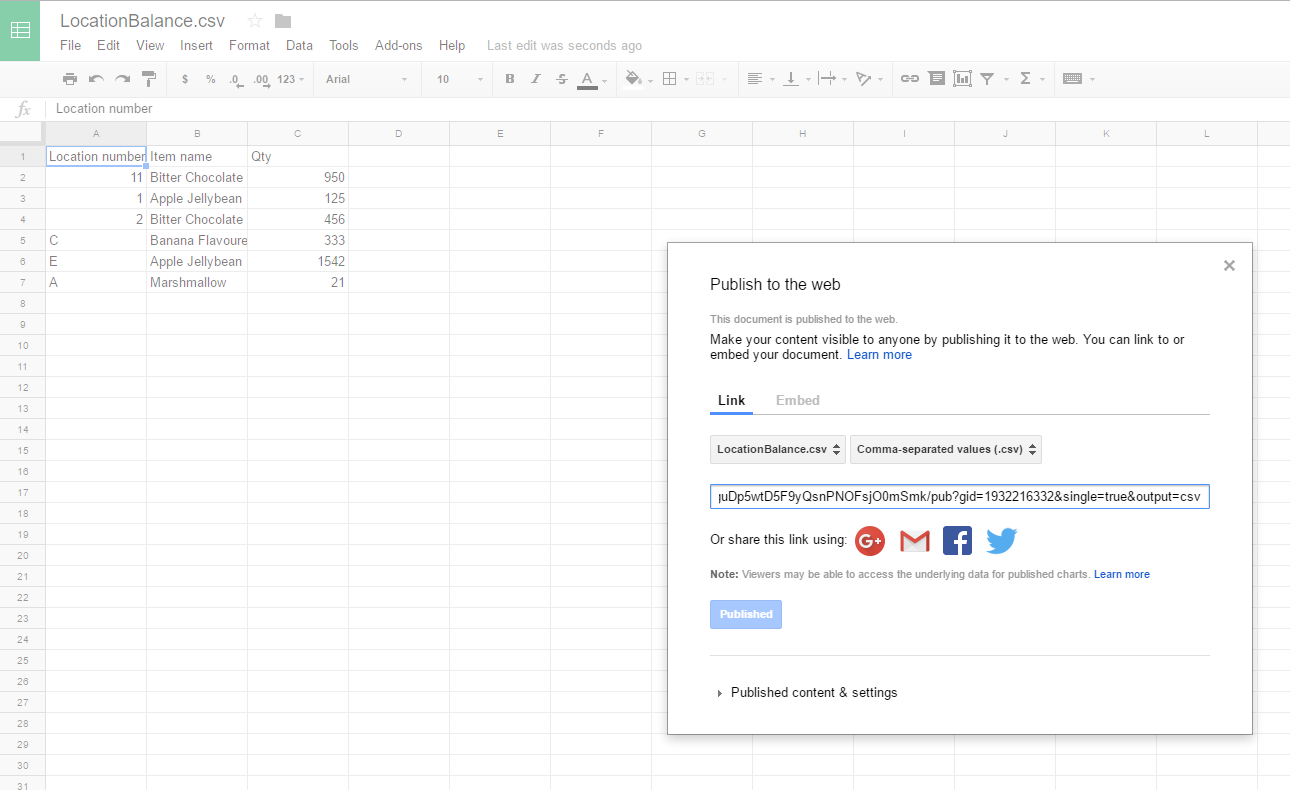
With Ragic's current available tools, we can set a minimum inventory requirement value with two methods.
Here, we use the "Inventory" sheet in "Inventory Management" template as an example.
Set "Min. Requirement" field type to Numeric, and
"Notify Date" field type to Date field with IF(A6>A5,TODAYTZ(),"") formula applied.
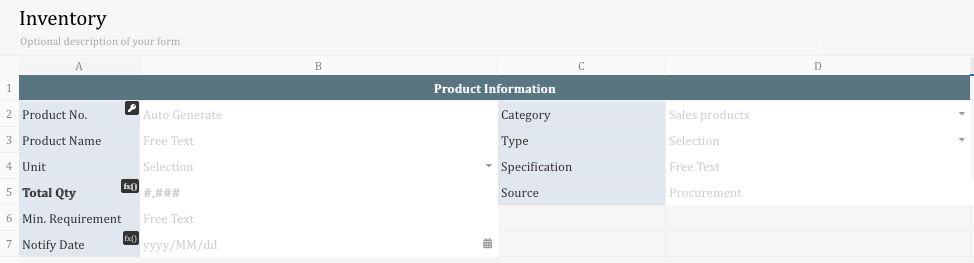
The formula will return today's date when the "Min. Requirement" field value is larger than that in "Total Qty" field. Otherwise, it will return an empty value.

Note: make sure that the execution time of daily workflow is earlier than the reminder.
With the above settings, the system will send reminders if the inventory is below the min. requirement value at the time configured in the job schedule.
Set the "Min. Requirement" field type to Numeric, and
"Check" field type to Selection field with IF(A6>A5,"Yes","No") formula applied.
The formula will return "Yes" if the "Min. Requirement" field value is larger than that in "Total Qty" field. Otherwise, it will return "No".
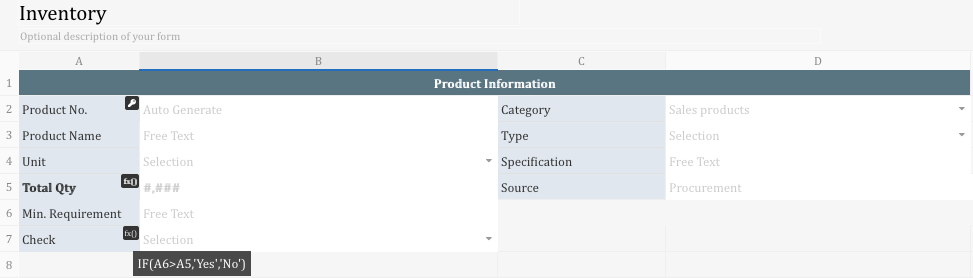
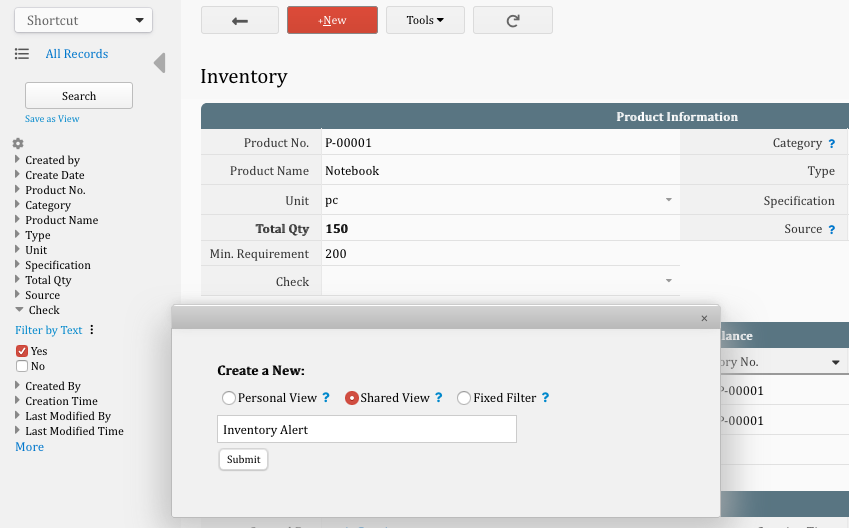
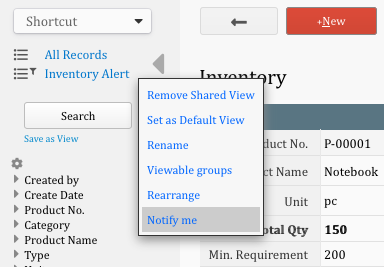
With the above configuration, you'll receive a notification email of:
1. New records that match the query conditions (either by creating a new entry or modifying an existing entry).
2. Records that formerly matched the queries but do not any longer.
To purchase SMS credits, go to Tools > Send Mass SMS. This will take you to the SMS Credits section of the Account Billing page. Please note that only paid Professional plan or above can purchase SMS credits.
For information on the fees charged for each SMS in Twilio, please visit Twilio's official website: https://www.twilio.com/sms/pricing/us
Below is the screenshot from Twilio's official website showing the cost of each message sent to Germany domestic telecommunications (in US$).
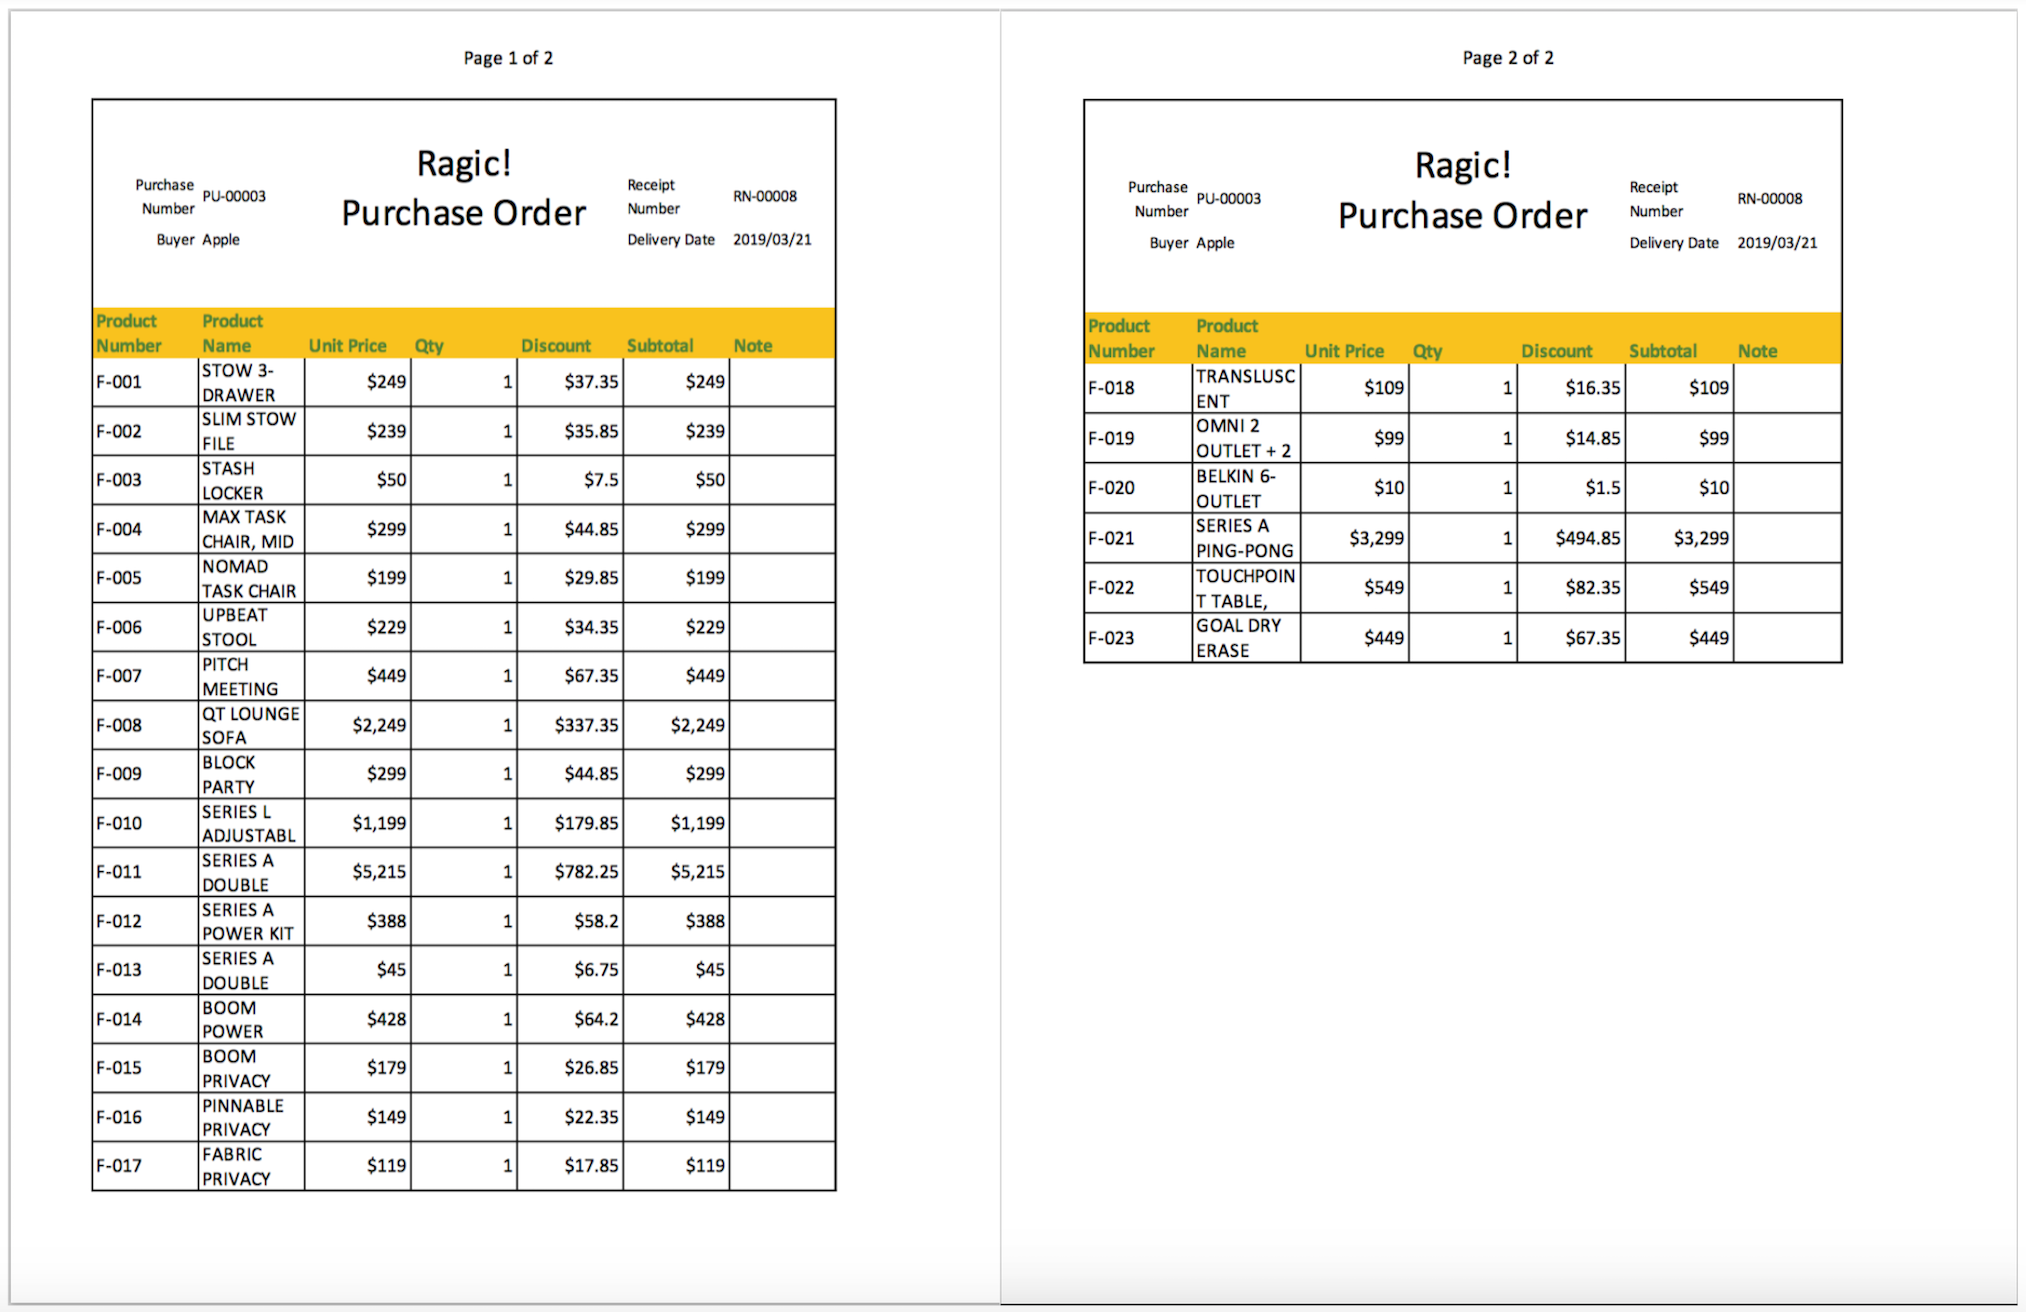
To print documents with fixed title and page numbers on each page as shown above, first download the record’s Mail Merge sample template in Excel. In the file, navigate to the “Page Layout” top bar option, choose “Page Setup” > “Sheet” > “Print Titles” to select the rows and columns you want to show on each page. After everything is set, upload the template back to Ragic.
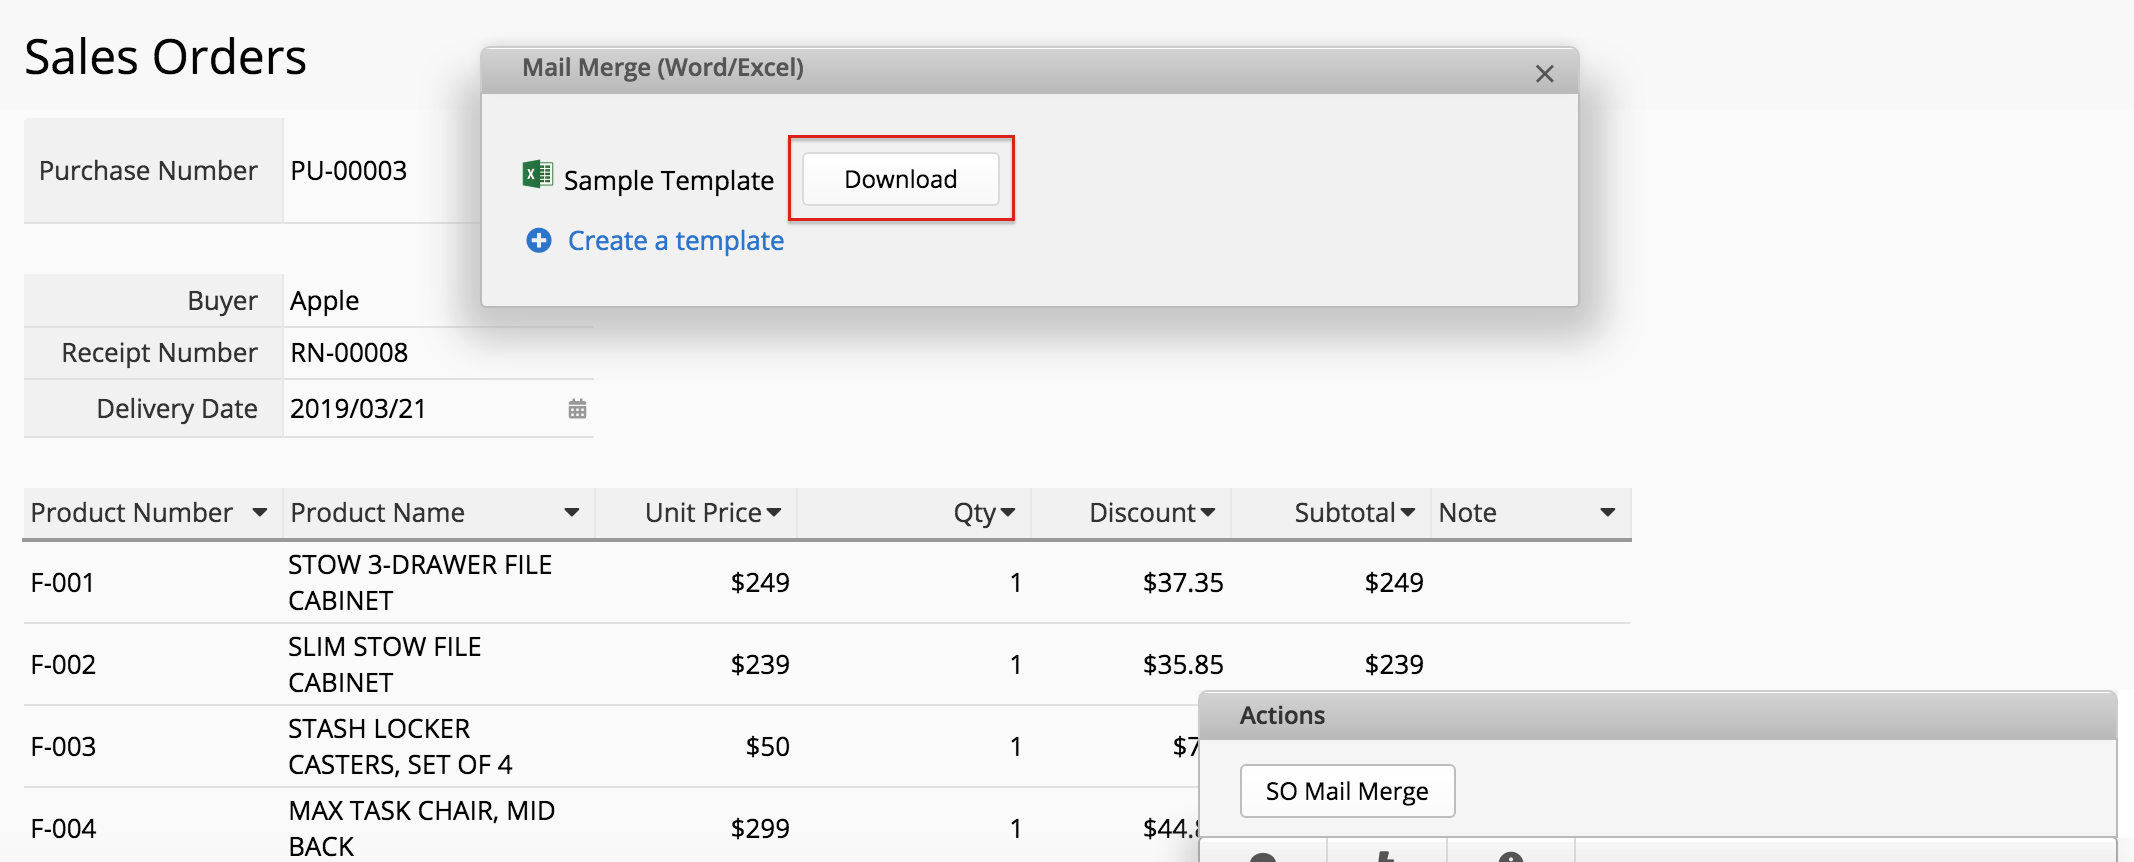
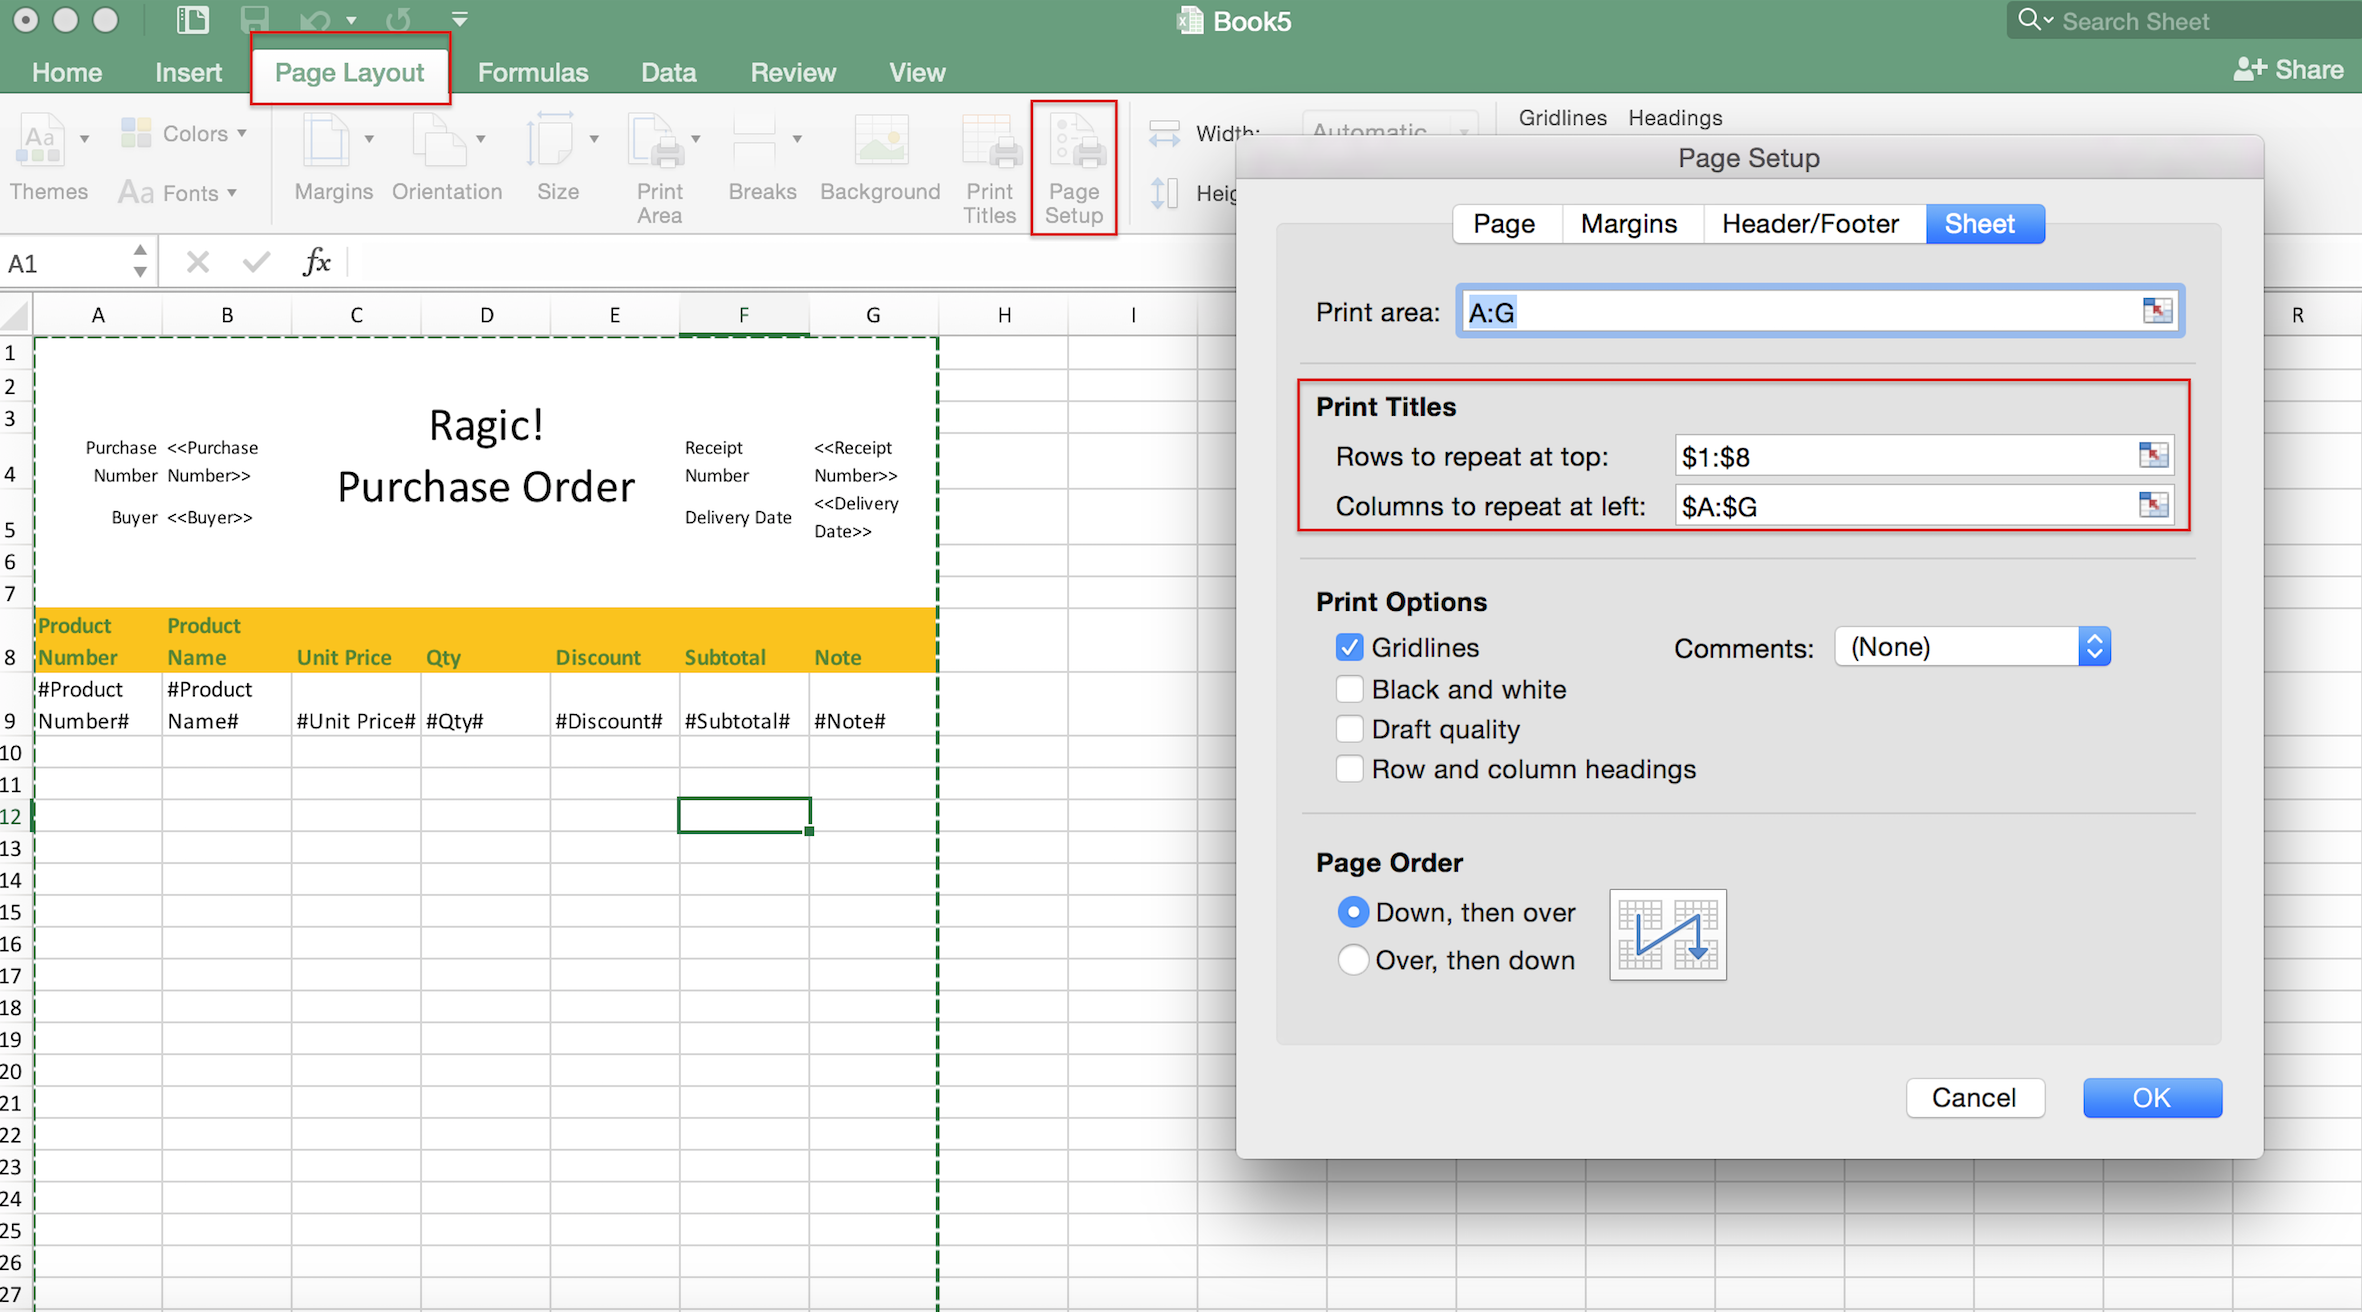
To set up page number on every page, go to “Page Layout” > “Page Setup” > “Header/Footer”, and select your preferred page number format.

Remember to upload the modified template back to Ragic and set it as a mail merge action button (shown in below image). By doing this, you will have the same template format the next time you export the records.
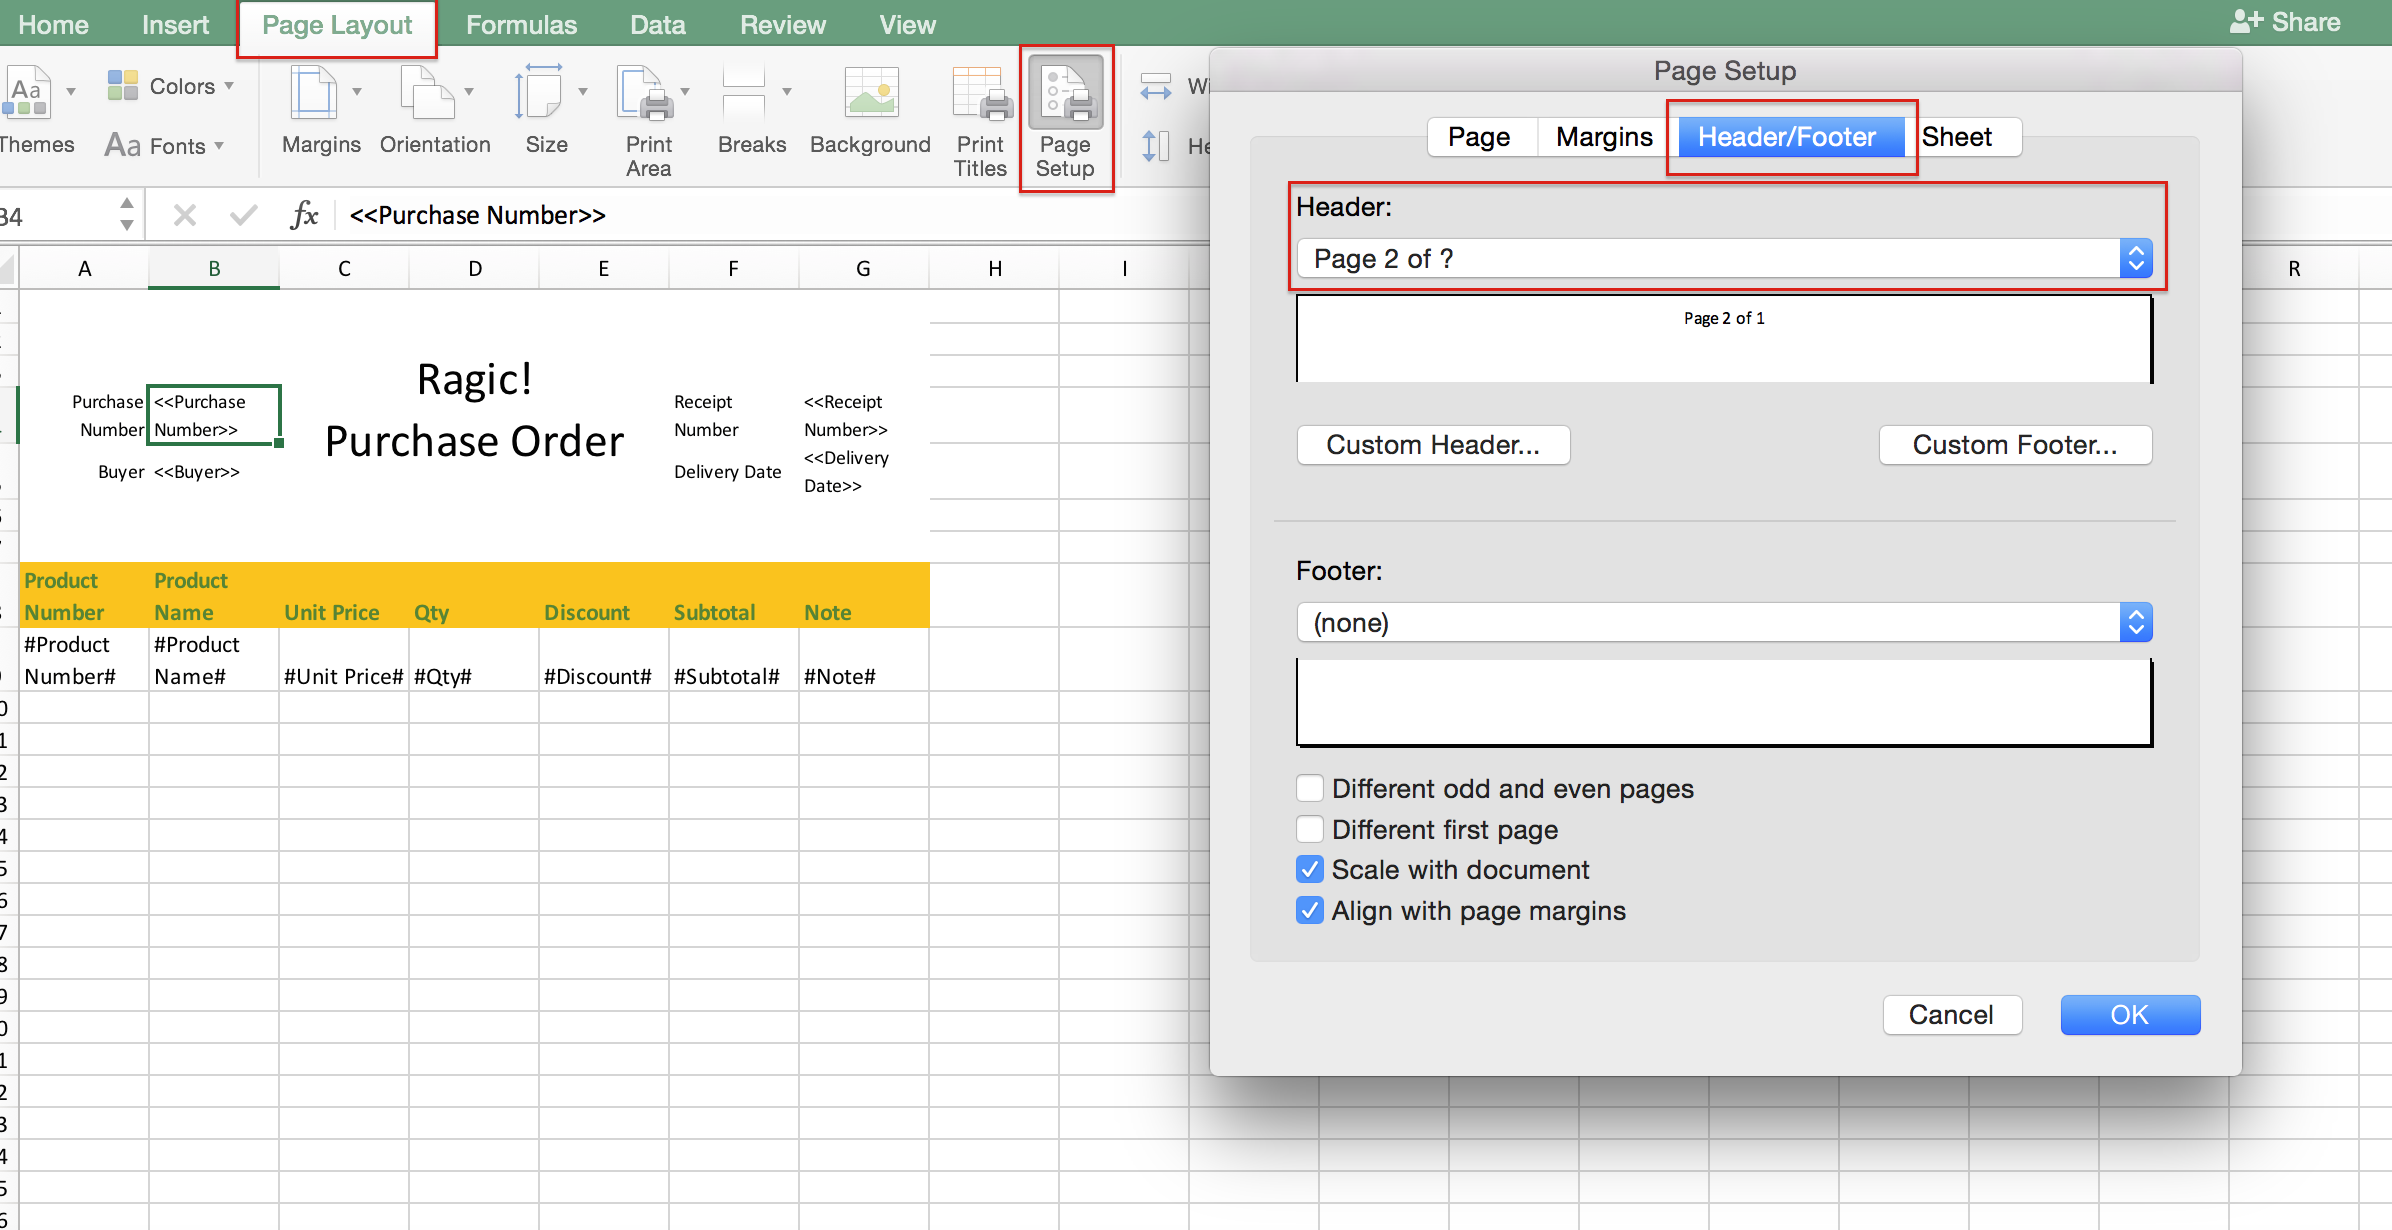
You can print it after you download the record through mail merge.
The page number and title are shown on every page as configured.
Alternatively, you may manually create fields and apply approval formulas to populate approval-related values. For example, if you would like to populate the status of the approval flow, you may create a free text field apply the following formula.
APPROVAL.STATUS()
After saving the sheet’s design, you will need to execute formula recalculation to populate the approval status of existing records.
Note: If you use this formula to populate the status of your approval flow, the system will populate their respective system values, such as “F” means approved and “REJ” means rejected. If you want to convert these system values to text, you may create another field applying conditional IF() formulas. For more information, you may refer to this document.
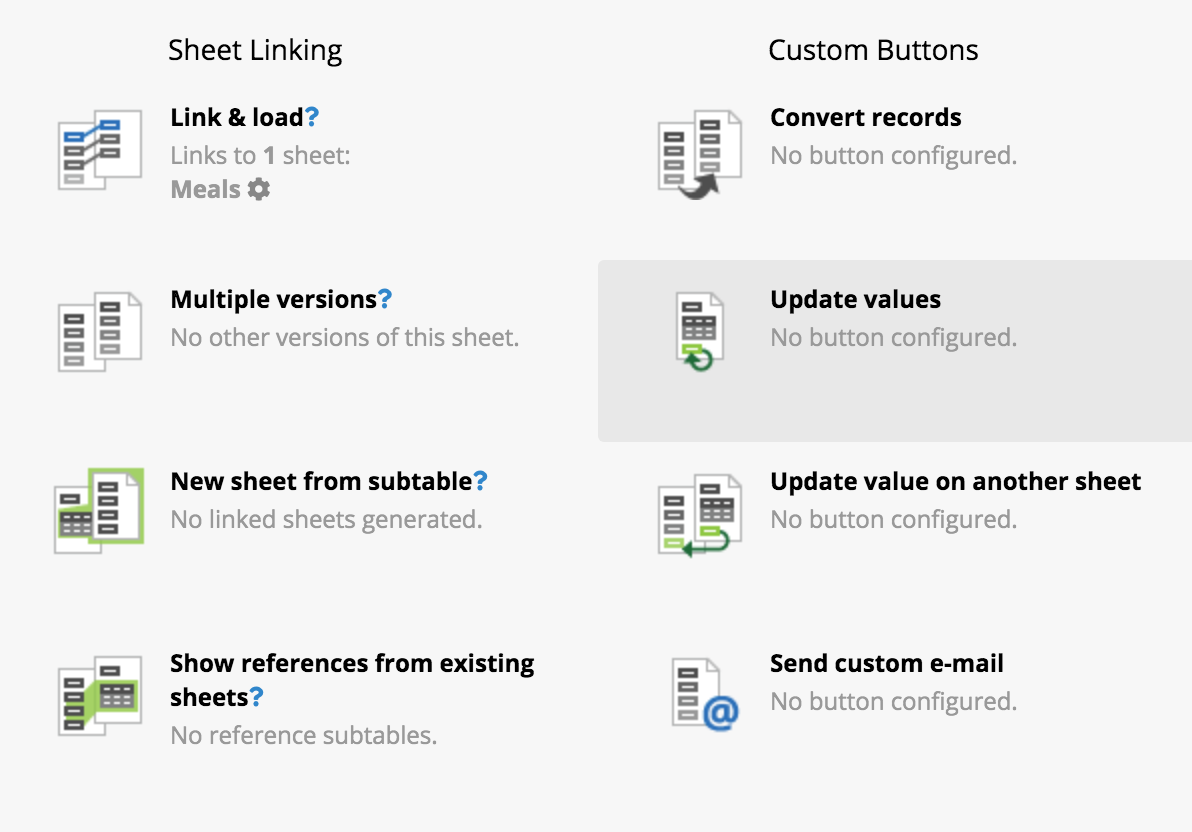
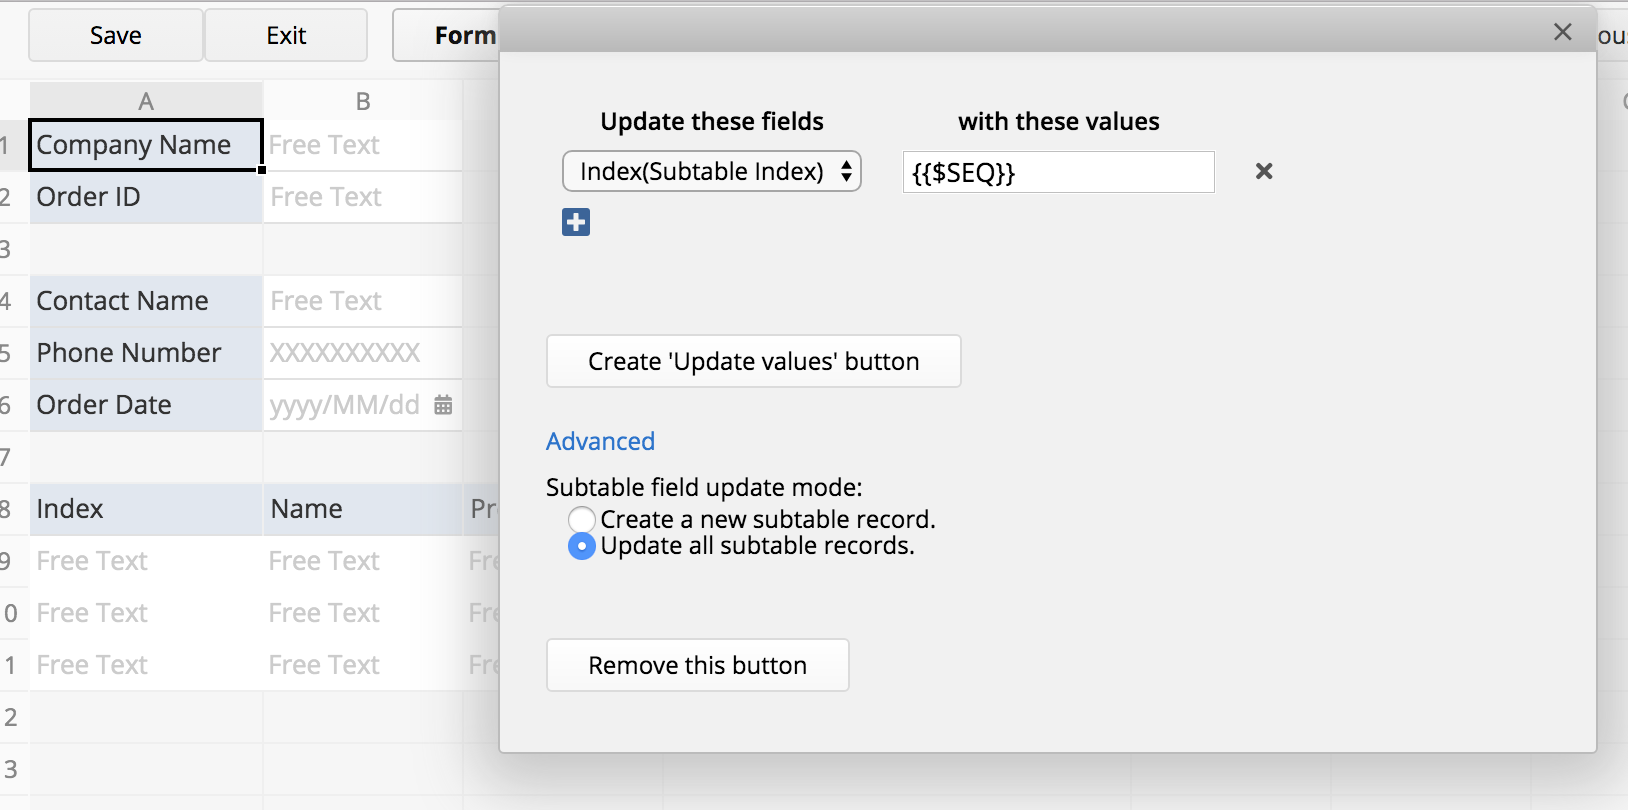
Save the design after you create the button.
Originally, the order of the sequence numbers was 1, 3, 4, 5.
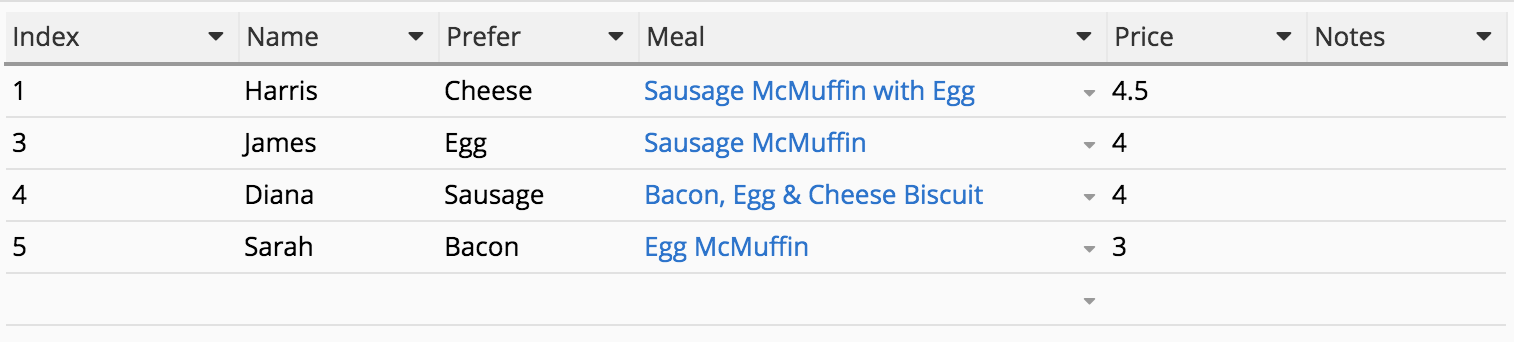
After the reset, the order became 1, 2, 3, 4.
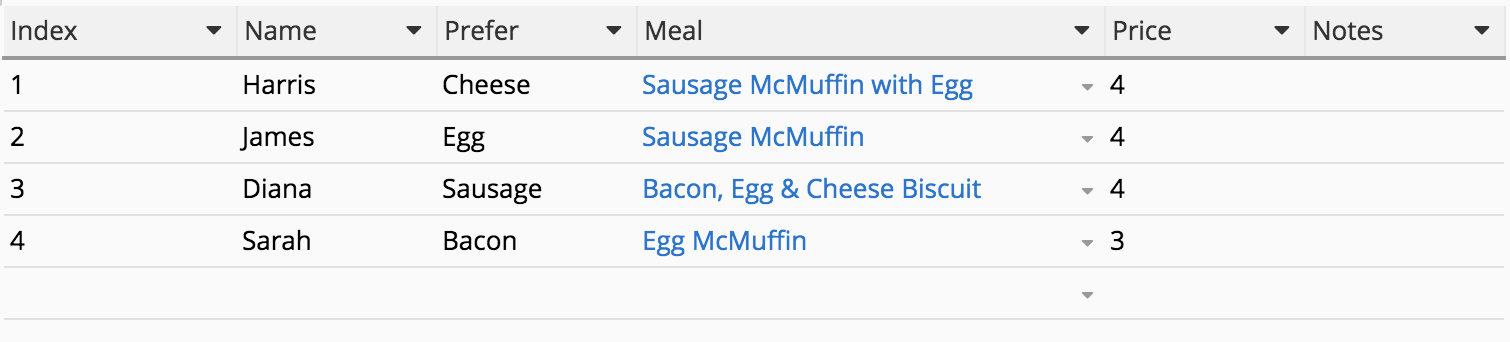
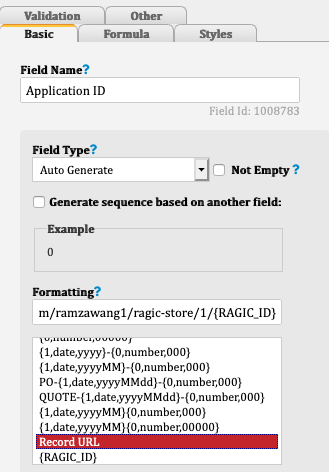
With this format, the system will auto-populate the field with the URL of each entry created in the sheet.
2. Copy the request bin endpoint (at top right), and then send the request that you would have sent to Ragic and send it to this URL instead. This way RequestBin will receive your request detail
3. You can use this to compare API calls, or to save into a URL and send the request detail to support@ragic.com for Ragic team to look into why some API calls are not working as expected.
Please follow this guide to add your script:
Right-click on any of the application tabs or sheets and select Javascript Workflow or Global Javascript Workflow, which will take you to the Workflow Module.
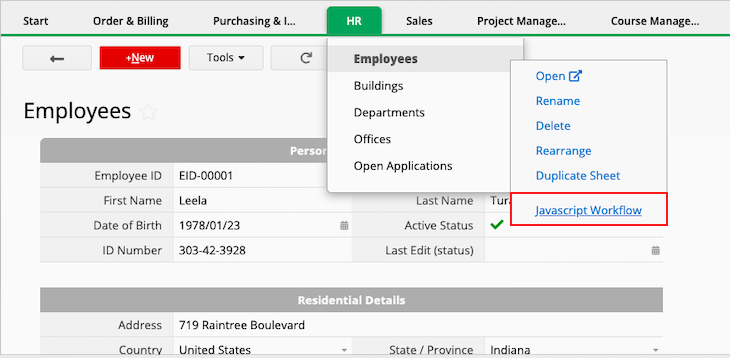
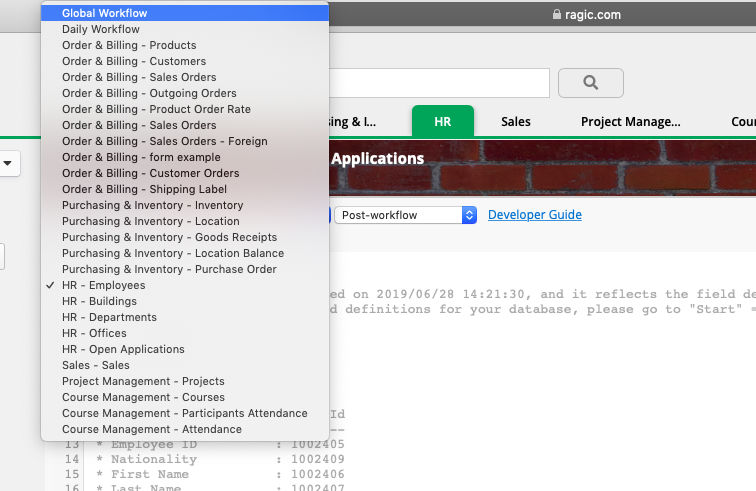
Independent fields :
function setLastModifiedOnField(pathSheet, observeField, recordField) {
    if (param.getOldValue(observeField) !== param.getNewValue(observeField) ||
        param.isCreateNew()) {
        var today = new Date(new Date().getTime() + account.getTimeZoneOffset());
        function pad2(n) { return n < 10 ? '0' + n : n }
        var fmtValue = today.getFullYear() + "/" +
            pad2(today.getMonth() + 1) + "/" +
            pad2(today.getDate()) + " " +
            pad2(today.getHours()) + ":" +
            pad2(today.getMinutes()) + ":" +
            pad2(today.getSeconds());

        var query = db.getAPIQuery(pathSheet);
    	query.addFetchDomains(recordField);
        var entry = query.getAPIEntry(response.getRootNodeId());
        entry.setFieldValue(recordField, fmtValue);
        entry.save();
    }
}
Subtable fields :
function setLastModifiedOnSubtableField(pathSheet,observeSubtableKeyField, observeSubtableField, recordField) {
    var list = param.getSubtableEntry(observeSubtableKeyField);
    var entry = param.getUpdatedEntry();
    var today = new Date(new Date().getTime() + account.getTimeZoneOffset());
    function pad2(n) { return n < 10 ? '0' + n : n }
    var fmtValue = today.getFullYear() + "/" +
        pad2(today.getMonth() + 1) + "/" +
        pad2(today.getDate()) + " " +
        pad2(today.getHours()) + ":" +
        pad2(today.getMinutes()) + ":" +
        pad2(today.getSeconds());
    for (var i = 0; i < list.length; i++) {
      if(list[i].getOldValue(observeSubtableField) != list[i].getNewValue(observeSubtableField) && (list[i].getOldValue(observeSubtableField) !== null || list[i].getNewValue(observeSubtableField) !== "" )){
          var subRootNodeId = list[i].getSubRootNodeId();
          entry.setSubtableFieldValue(recordField, subRootNodeId, fmtValue);
          entry.save();
      }
    }
}
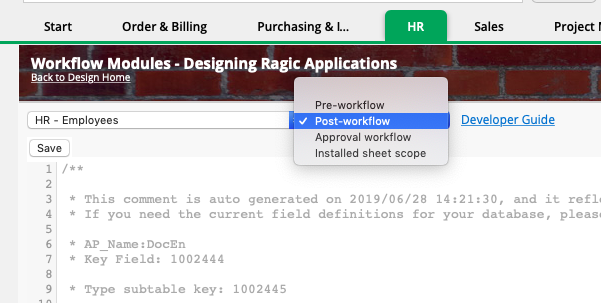
If your sheet URL is https://www.ragic.com/accountname/tabname/1
And
The field whose last modification date & time you’d like to generate is "Active Status" (field ID 1003114), and the field where you’d’ like to record last modification date & time of field "Active Status" is "Last Edit (status)" (field ID 1003115).
Add this to the Post-workflow:
Independent fields :
setLastModifiedOnField("/tabname/1", 1003114, 1003115);
To find out more about how to look up a field ID, click here.
*Please note that when creating a new entry, the last modification date & time will be auto-generated after saving even if the the specific field is not filled. If you wish to keep the last modification date & time empty in this case, you can replace with below script in your Post-workflow:
if(param.getOldValue(1003114) !== null || param.getNewValue(1003114) !== "" ){
       setLastModifiedOnField("/tabname/1",  1003114,  1003115);
}
Subtable fields :
setLastModifiedOnSubtableField("/tabname/1", subtablekeyField, 1003114, 1003115);
You can find Subtable key Field in Download Data Dictionary
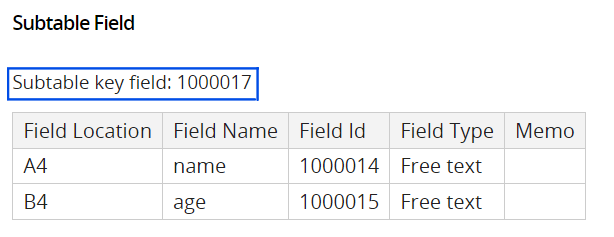
Don't forget to save your changes.
(The populated date & time value is based on the timezone set in your Company Setting.)
1. Download our full installation file (https://www.ragic.com/sims/download.jsp), and unzip it to another dir.
2. Stop the Ragic service.
3. Delete the "lib" and "web" folders in the Ragic installation folder. (Or move it to a temporary space, make sure the target dir is empty)
4. After unzipping the Ragic On-premises patch file, you’ll see four folders in the directory: "conf", "cust", "lib", and "web".
4.1. You should find "template.json" and "version.json" in the "conf" folder.
"template.json" is for your templates. Please add this if you do not have it in your on-premises database. You only need to update it when necessary.
"version.json" is the version information. Please manually update it every time you update your on-premises database or the version information will not be updated.
4.2 Under the path cust\def\app, you’ll find "standard" and "standardtw" folders that are for Ragic templates. You only need to update them when necessary.
4.3 Please copy the "lib" and "web" folders to your Ragic installation directory to replace the previous "lib" and "web".
5. Restart the Ragic service.
You can also put a parameter in the link address so you can go to different pages based on different parameters.
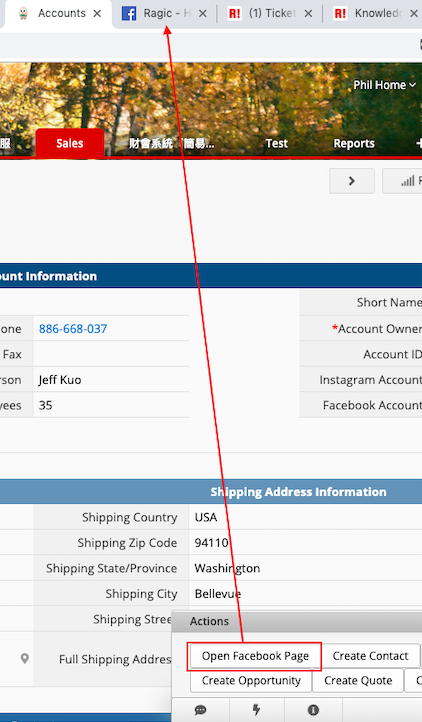
For example, you can save specific Facebook or Instagram account name in the field and click the button to go to specific Facebook page or Instagram page.
As you can see in the image below, the value in the "Facebook Account" field is the account name in the link address.
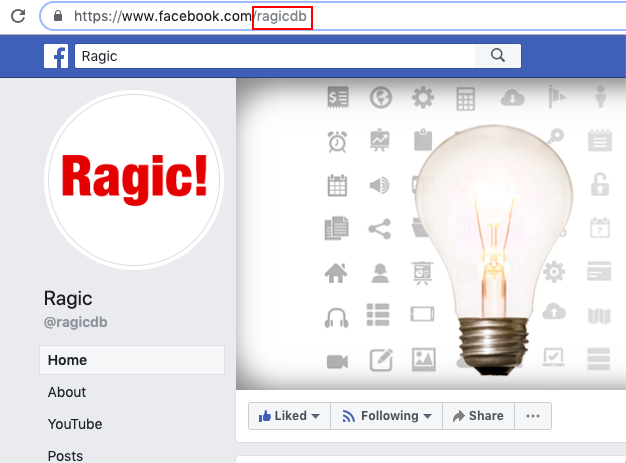
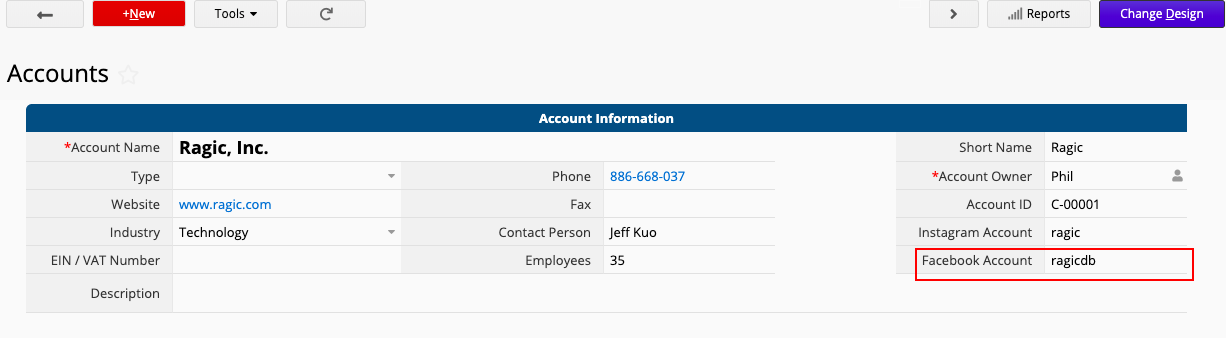
If you want to configure the action button, you can go to Change design > Form Settings > Actions to add an action button, select URL in action type, and paste the link address which you want to access and a field ID as parameter in that link address in action.
It's better to select a field which you save unique value in it. Remember to click add action and save after you configure the action. After you finish it you can click that button to go to different pages based on different values.
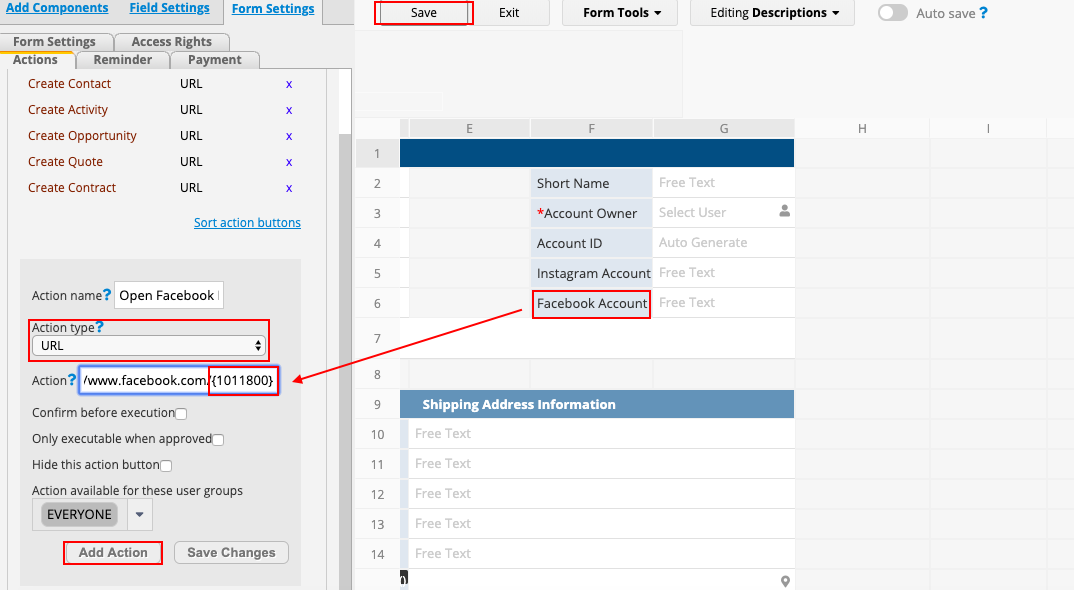
You can use other link address like Google search engine or Instagram link address. The link address in URL field will look like...
1.Google Search:https://www.google.com/search?q={field ID}
2.Instagram account:https://www.instagram.com/{field ID}
On a Linux server, you can use the following commands to find out which processes are listing on certain ports:
sudo lsof -i -P -n | grep LISTEN
sudo netstat -tulpn | grep LISTEN
sudo lsof -i:80 ## see a specific port such as 80 ##
sudo nmap -sTU -O IP-address-Here
On a Windows server, you can use the following command to find out all the ports being used by your applications on the server:
netstat -a -b
On Windows server, a service called "Web Deployment Agent Service" (MsDepSvc), which is part of IIS, may be the cause of this. Disabling the service will resolve the issue. This agent ran even after IIS was stopped/disabled.
sudo lsof -i -P -n | grep LISTEN
sudo netstat -tulpn | grep LISTEN
sudo lsof -i:80 ## see a specific port such as 80 ##
sudo nmap -sTU -O IP-address-Here
On a Windows server, you can use the following command to find out all the ports being used by your applications on the server:
netstat -a -b
Opt for a dedicated managed AWS/GCP instance for your Ragic service, allowing complete control over your schedule update. Please note that selecting a dedicated server means you must subscribe to Ragic enterprise plan with no option to downgrade.
This feature is only available for the Enterprise plan databases using the on-premises version and the cloud version. For detailed information, please refer to this document.
If you are not on the Enterprise Plan, you can use the LDAP protocol for AD integration. However, this is only supported on on-premise databases using the Professional plan or higher. For more information, you may refer to this document.
We will provide a test environment with the same license number as your production environment.
Guaranteed 99.99% uptime, 24/7 hotline to system administrator. We offer this option for enterprises with compliance requirements, and does not imply that other plans are managed with lower quality.
The Enterprise Plan is $55 per month per user. However, this plan requires a minimum of 10 users, meaning that it starts at $550 per month.
In addition, this plan is paid yearly, meaning that you have to use this plan for at least one year. You can switch to other plans after the subscription year if you wish to do so.
On-premises: You can choose to install Ragic on your own server. In this case, you will need to manage and update your database by yourself. So, we recommend you employ on-premises only when you have dedicated personnel who will manage your Ragic service.
Concurrent user option: Enterprise concurrent user plan also available for enterprises with a high number of users that does not log in at the same time. Plan starts at $1399 per month, which includes 10 concurrent users. $139.9 per month for each extra concurrent user. The number of concurrent users refers to the maximum number of users that can access your database account at the same time. For example, if you have license for 10 concurrent users and there are 10 users currently online accessing your account, the next user trying to log into your database would have to wait in line until one of the logged-in users has signed out of your database.
Discount: Enterprise plan also has volume discount and educational/non-profit pricing.
Pricing: https://www.ragic.com/intl/en/pricing
If you are interested in enterprise plan, feel free to e-mail to "sales@ragic.com".
In most cases, the error results from conflicts between rules, especially when you have a field listed in multiple rules.
When creating or editing entries, the system will execute those conditional formatting rules from top to bottom and display the result of the last rule. Hence, if there are conflicts between rules, the result may not work as expected.
For example, if you have payment log as below:

And you would like to set the rules as:
1. If the "Payment Type" field is "Cash," display the "Amount Received" field.
2. If the "Payment Type" field is "Wire Transfer," display the "Amount Received," and "Transaction Fee" fields.
3. If the "Payment Type" field is "Check," display the "Check Number" field.
Most of the users will set the conditional formatting like:
With this setting, the "Amount Received" field is listed in multiple rules and may result in an error. For example, let's say we have a payment that is paid with cash, the "Amount Received" field won't be displayed as expected:

Let's see how the system executes those rules when a payment is paid by cash:
1. Match the rule and display the "Amount Received" field.
2. Does not match the rule and thus hides the "Amount Received" and "Transaction Fee" fields.
3. Does not match the rule and thus hides the "Check Number" field.
As a result, the system will hide the "Amount Received" field after executing all those rules.
In the example mentioned above, the "Amount Received" field is listed in multiple rules.
For example, set up a rule that displays "Amount Received" field when "Payment Type" field is "Cash" or "Wire Transfer".
Then, the conditional formatting shall work as expected:

For example, if you have a product code “CODE1234”, you will not be able to find the record if you only enter ”1234” in the search engine since “1234” is a query term appearing in the middle section of "CODE1234".
You will only need to do this once for this core component upgrade. After this you will be able to patch your Ragic service as usual:
1. Make sure the Java version on your server is JDK 8 or later. If you're running on earlier Java versions, please install a new version. You can check your java version like this:
java -version
2. Make a backup of your Ragic directory so that you can roll back any changes made and start the Ragic version that you were previously running.
3. Upload the latest patch using the patch uploader, or unzip the patch file to replace directories of the same name in the Ragic installation directory.
4. Modify your setclasspath.sh (for Linux) or setclasspath.bat (for Windows) file, find the line at the bottom of the file that starts with "CLASSPATH=" (Linux) or "set CLASSPATH=" (Windows), and change it to the following:
# For setclasspath.sh
CLASSPATH=lib/db/je4/*:lib/jetty9.4/*:lib/jetty9.4/annotations/*:lib/jetty9.4/apache-jsp/*:lib/jetty9.4/http2/*:lib/jetty9.4/transactions/*:lib/jetty9.4/websocket/*:lib/*:lib/serviceSync/*:lib/ZXing/*:lib/poi/*:lib/jfree/*:lib/aws/*:lib/google-api-client/*:lib/stripe/*:lib/dropbox/*:.
# For setclasspath.bat
set CLASSPATH=lib/db/je4/*;lib/jetty9.4/*;lib/jetty9.4/annotations/*;lib/jetty9.4/apache-jsp/*;lib/jetty9.4/http2/*;lib/jetty9.4/transactions/*;lib/jetty9.4/websocket/*;lib/*;lib/serviceSync/*;lib/poi/*;lib/jfree/*;lib/google-api-client/*;lib/stripe/*;lib/ZXing/*;lib/aws/*;lib/dropbox/*;.
5. Modify your ragic.sh or the shell script file you are using to start your Ragic service. Find the keyword "com.ragic.s3.nui.RagicJettyServer" near the end of the file and change it to "com.ragic.s3.nui.RagicJetty9Server", this is the newer version of the application that you need to run.
6. Now you can restart your Ragic service. For any reason that you cannot start your service, please use the backup of your Ragic directory to run your previous version for now and contact support@ragic.com and let us know the error message that you see in ragic.out file of the log directory.
You can use SPELLNUMBER formula if you need to translate numbers to words in your sheets.
The formula should be written in the format below:
SPELLNUMBER(number, [lang])
[lang] is an optional element. It means the lauguage that you want to translate your numbers to, and will be in English if [lang] is empty.You can refer to the table below to know which languages are supported.
| Language | [lang] |
|---|---|
| Traditional Chinese | cht |
| Simplified Chinese | chs |
| English | en |
| French | fr |
For example, let's say G1 is a numeric field and the value in that field is 100,032.02. Below are the results when you apply the SPELLNUMBER formula in other fields regarding G1.
SPELLNUMBER(G1) -> one hundred thousand and thirty-two point zero two
SPELLNUMBER(G1,'cht') -> 壹拾萬零參拾貳點零貳
SPELLNUMBER(G1,'fr') -> un cents mille trente-deux point zéro deux
Step 1: Open the Ragic workflow editor.
Click on the arrow icon of the sheet from the tab and select Javascript Workflow, which will take you to the Workflow Module.
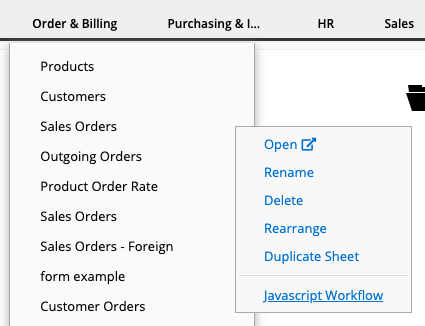
Step 2: Switch edit page to "Post-workflow".
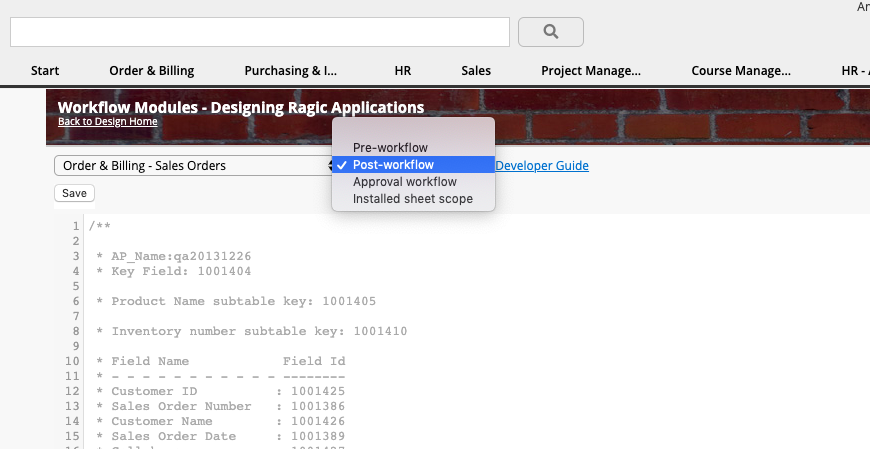
Step 3: Paste, edit the following code and save.
var nodeId = param.getNewNodeId(Key Field);
var path = '/tab_path/sheet_path';
var query = db.getAPIQuery(path);
var entry = query.getAPIEntry(nodeId);
entry.recalculateAllFormulas();
entry.setIfDoLnls(true);
entry.setCreateHistory(true);
entry.save();
Please replace the Key Field with the Key field id of your sheet, which you can find it in the workflow editor or you can look up in your data dictionary.
In this example, the line should be replaced to:
var nodeId = param.getNewNodeId(1001404);
And replace '/tab_path/sheet_path' with your own tab and sheet path.
Example If your sheet url is 'www.ragic.com/sample/sales/3', this line would be written as following:
var path = '/sales/3';
To recalculate the formulas of certain fields only, you can replace the line
entry.recalculateAllFormulas();
with
entry.recalculateFormula(field id);
For field id please replace it with the field id of the fields that you would like to recalculate. For example, if you would like to recalculate the fields of these field ids: 1000001,1000002,1000003, the result would look something like this:
entry.recalculateFormula(1000001);
entry.recalculateFormula(1000002);
entry.recalculateFormula(1000003);
AdBlock: Interferes with the display of Notification Settings.
uBlock Origin: Results in duplicated execution of action buttons.
Kaspersky password manager: Interferes with delete function of sheets and tabs.
ProWritingAid: Interferes with the display of text during data entry.
Talking Web: Interferes with the display of UI for the import data function
Black Mode - Dark theme for Facebook: Interferes with the display of UI for the import data function
The {{RECORD_ID}} parameter can be very useful if you need to send E-mails attaching the URL of a record in corresponding multiple versions because the record ID is the same in any multiple versions of the sheet.
For example, you have two multiple versions for "Job Application Management", where the first version is open for guest users (the applicants) to submit resumes, and the second contains applicant's resume with the HR's evaluative comments (which cannot be viewed by the guest users).
For internal management purposes, you can also create a Custom E-mail Button to confirm and send interview invitations with the URL of the applicant's resume attached.
Note: to prevent applicants from seeing their resume evaluations, the URL attached in the E-mail you are going to send them should be "the URL of the multiple version of the sheet without the action button/{{RECORD_ID}}".
| Displayed Status on Approval Field | Value Used in Formulas |
|---|---|
| Not started | N |
| Rejected | REJ |
| Approved | F |
| In process | P |
Therefore, if one of your fields would like to use a formula to reference the approval system field, the value would be "F" when this entry has completed the approval rather than "approved".
Furthermore, if you would like a field to display the approval status of the system field stating the status of the approval flow, you can additionally use the IF() formula. Let's say you've created a new field and applied the following formula.
IF(A1.RAW="N","Not started",IF(A1.RAW="P","In process",IF(A1.RAW="F","Approved",
IF(A1.RAW="REJ","Rejected",""))))
This means if the value on the approval status field located in cell A1 is "N", the new field's value will be "Not started"; if the approval status field's value is "P", the new field's value will be "In process"; if the approval status field's value is "F", the new field's value will be "Approved"; and if the approval status field's value is "REJ", the new field's value will be "Rejected".
You may refer to our pricing page to know more about the differences between different Ragic plans.
If you are not on the Enterprise Plan, you can use the LDAP protocol for AD integration. However, this is only supported on on-premise databases using the Professional plan or higher. For more information, you may refer to this document.
Your users may log on to Ragic using the Single Sign-on function integrated from Active Directory after finishing the following settings.
If you would like to Add Ragic as a Non-Gallery App in Azure Active Directory and Configure SAML SSO Login, please refer to this page.
Step 1. Fill in the ADFS server location In the field “ADFS Server Location” under company settings in Ragic.

Step 2. While creating new users in AD, make sure that every user has an E-mail. This E-mail will be used as the value to verify and distinguish users on your Ragic database (Name ID).
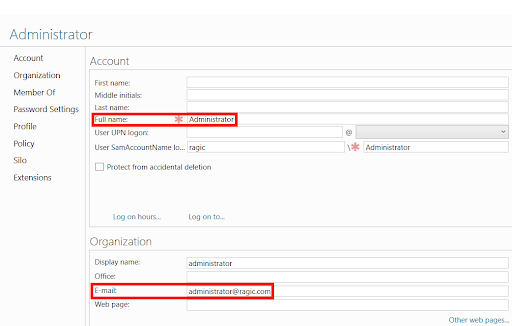
Note: The E-mails must not be an existing Ragic account in other Ragic databases.
Step 3. Add relying party trust on ADFS. Please follow the following instructions correctly to add successfully.
a. Select the default option "Claim Aware".
b. Select the third option "enter data about the relying party manually".
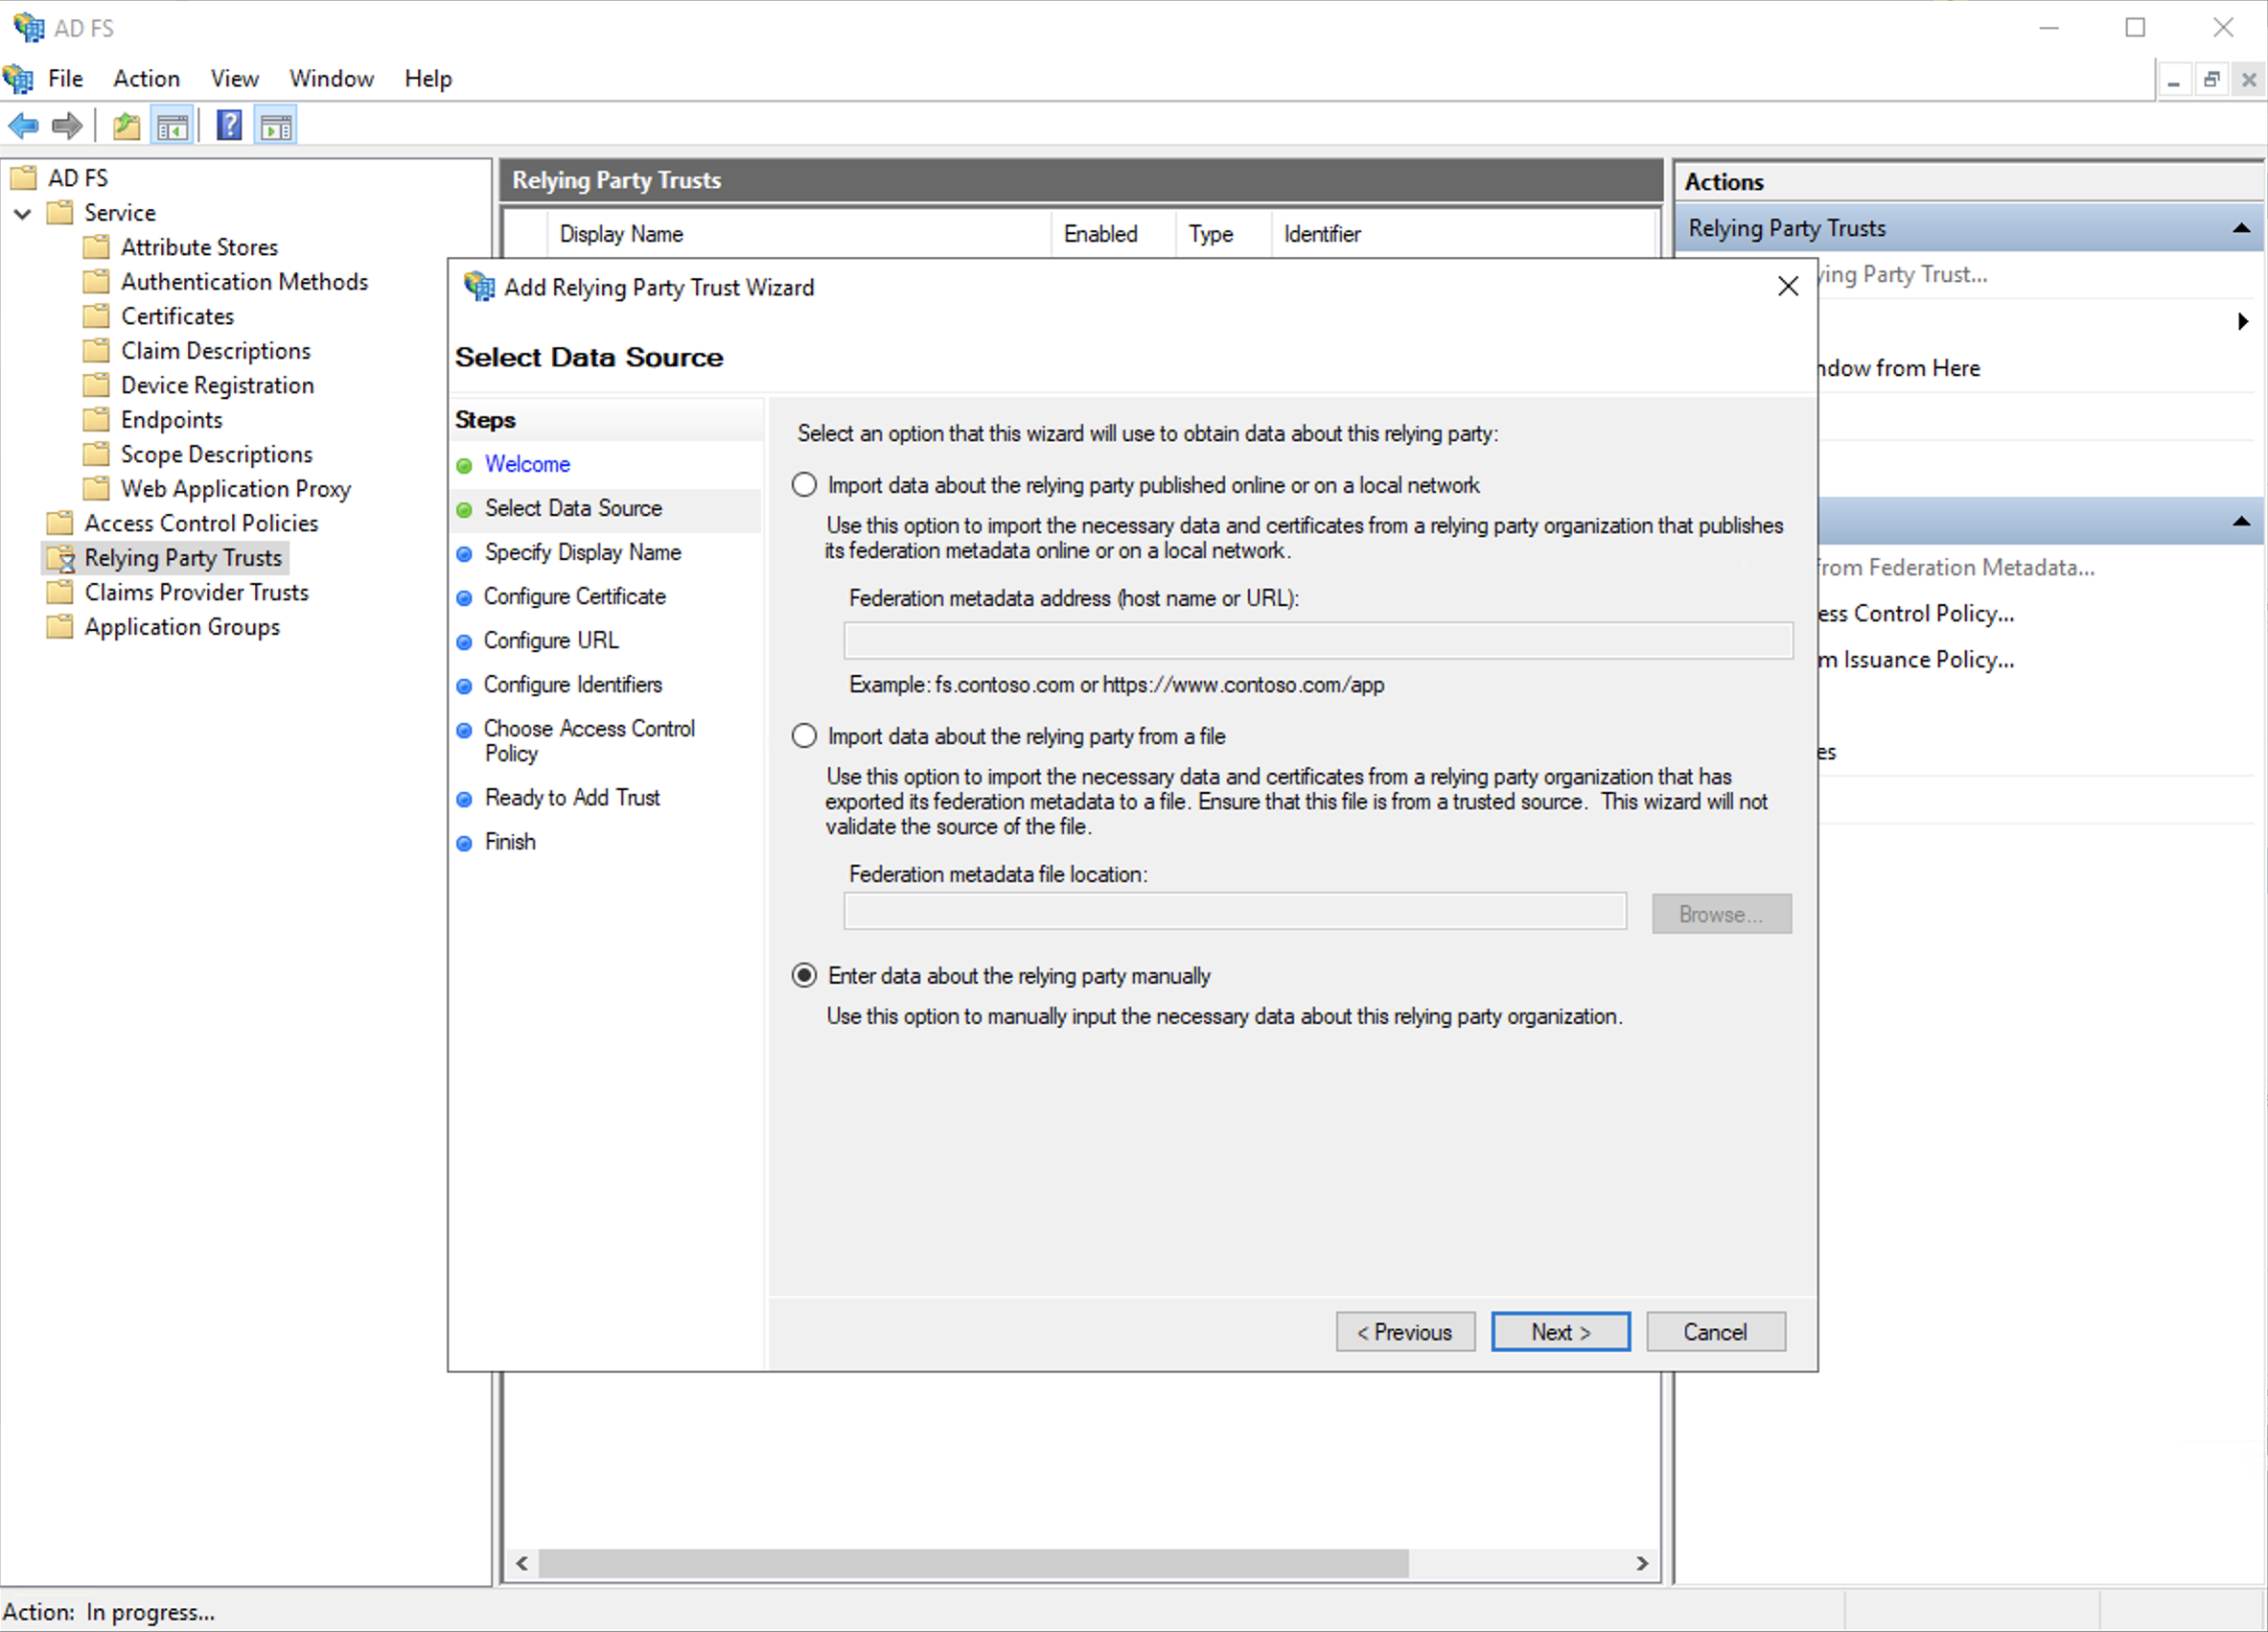
c. Enter the display name you wish to use.
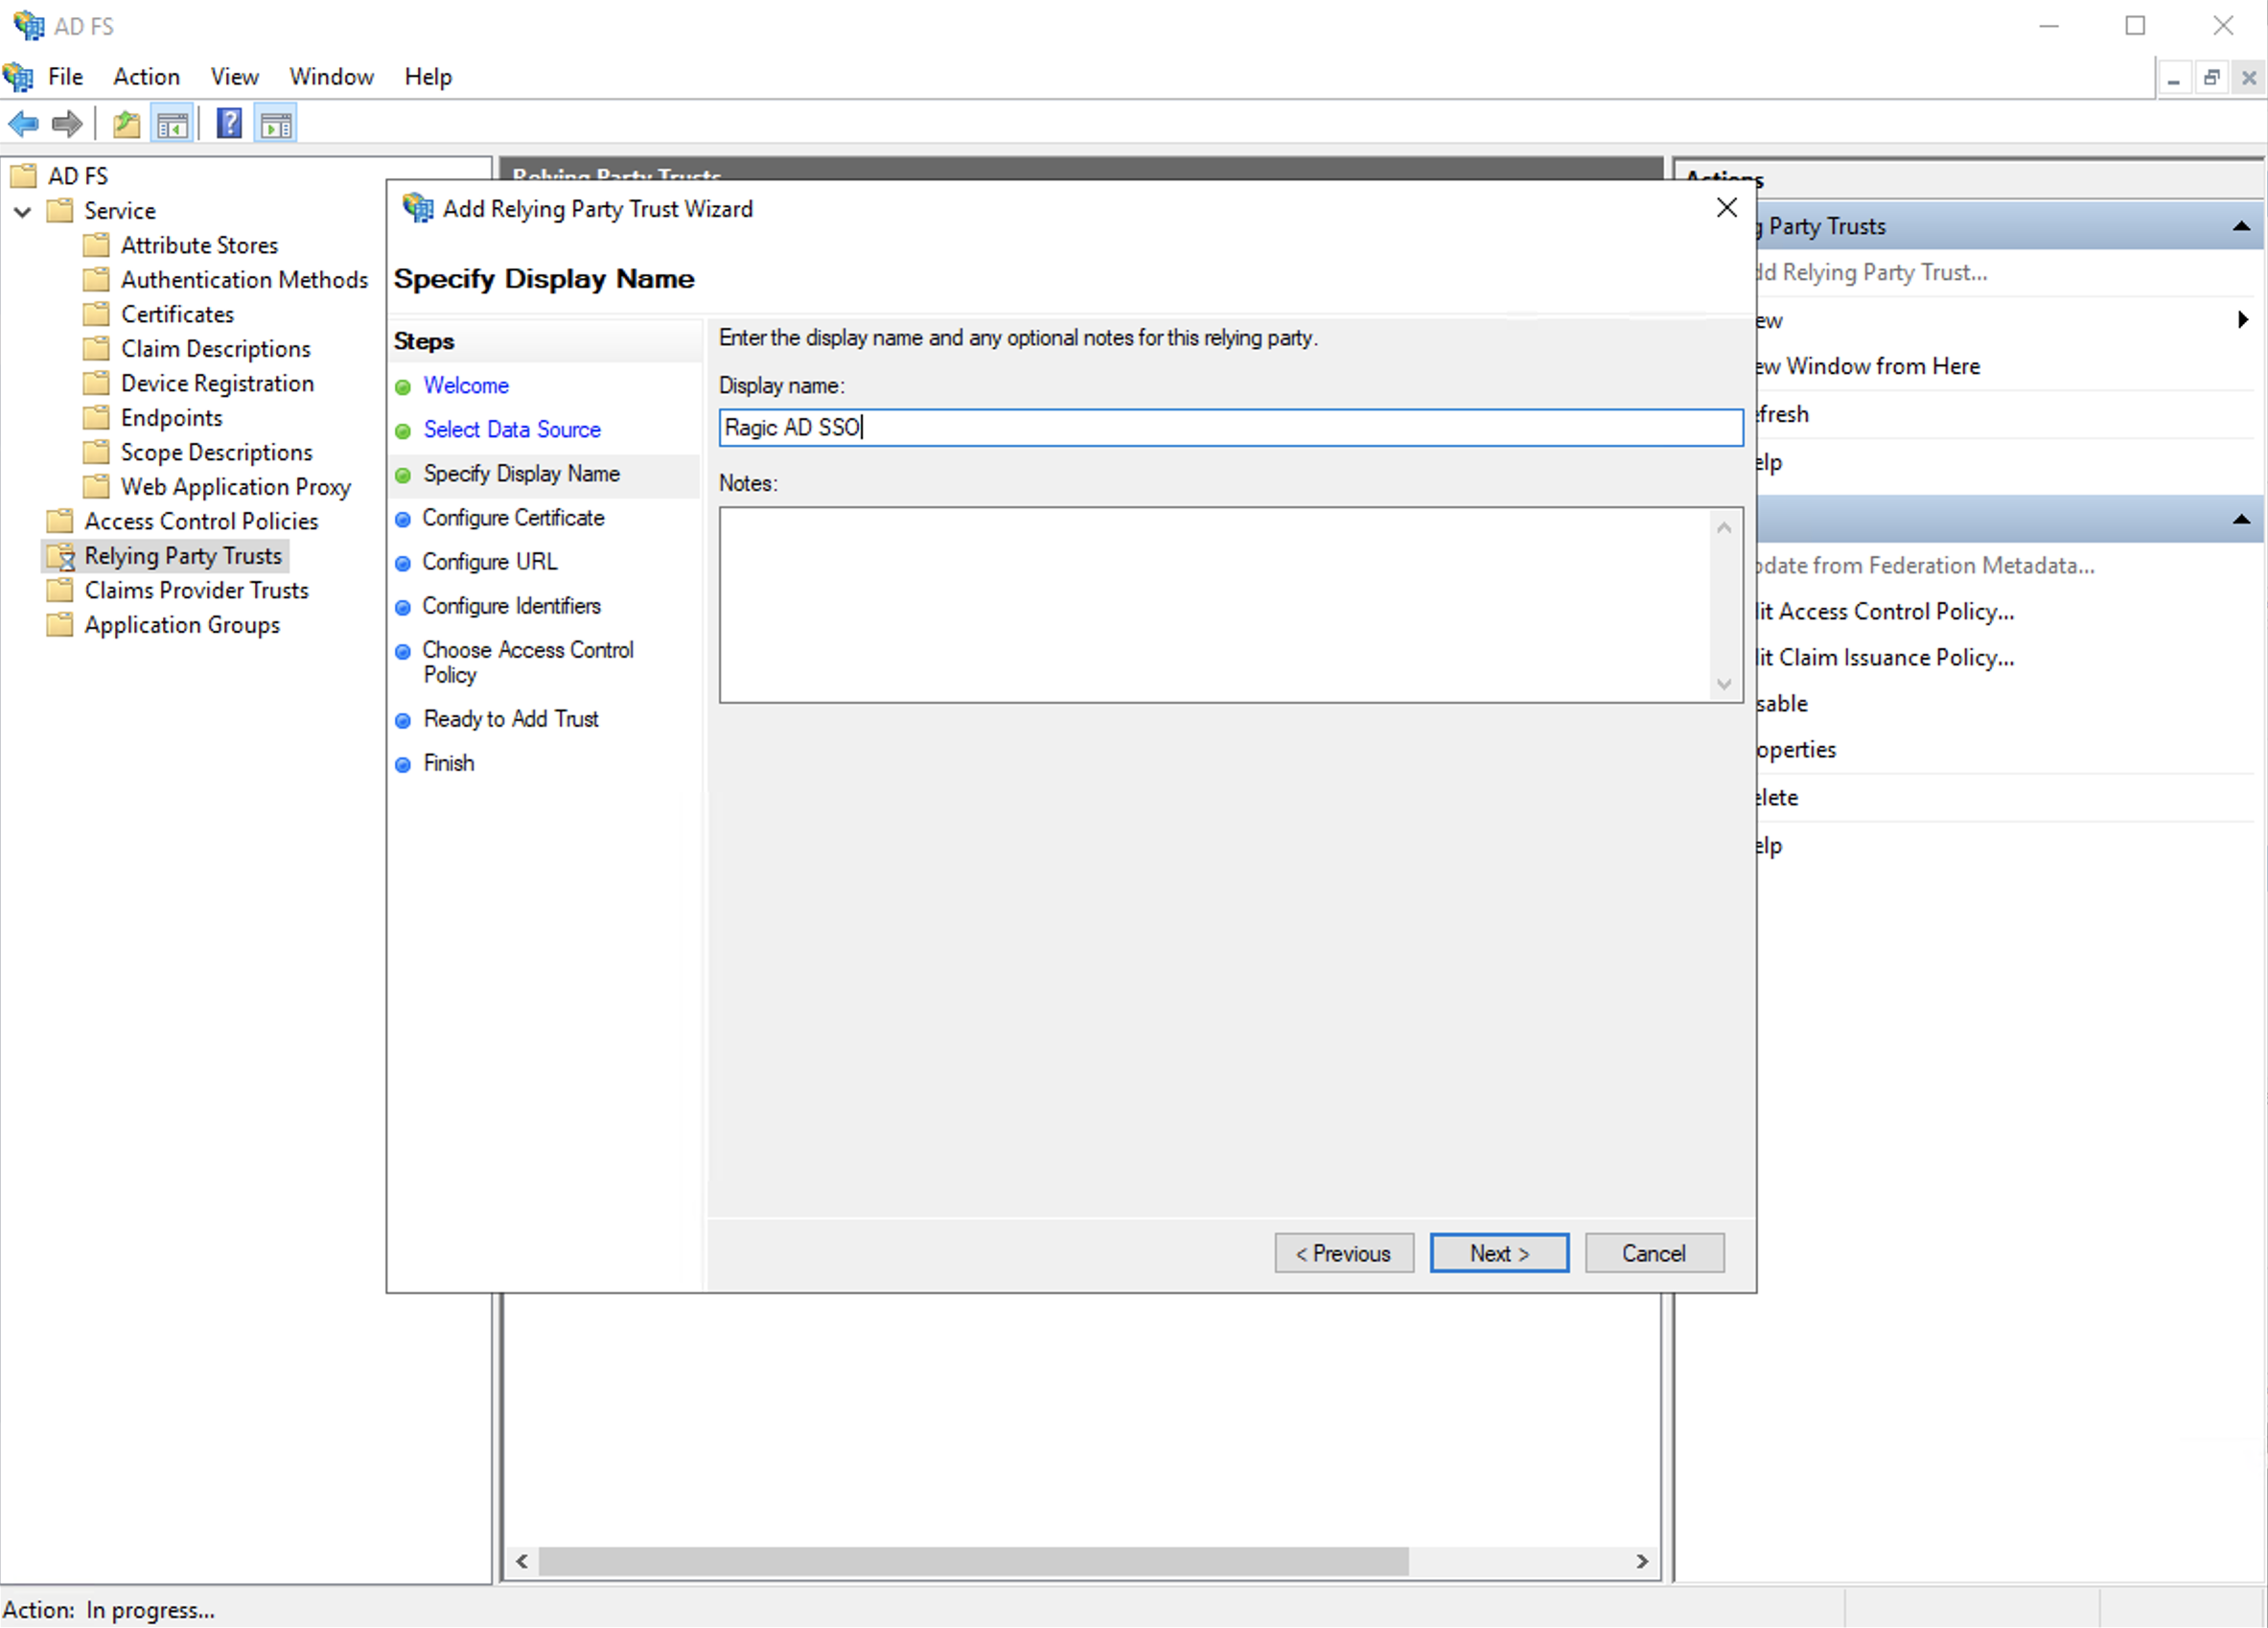
d. Skip the encryption configurations, just click next.
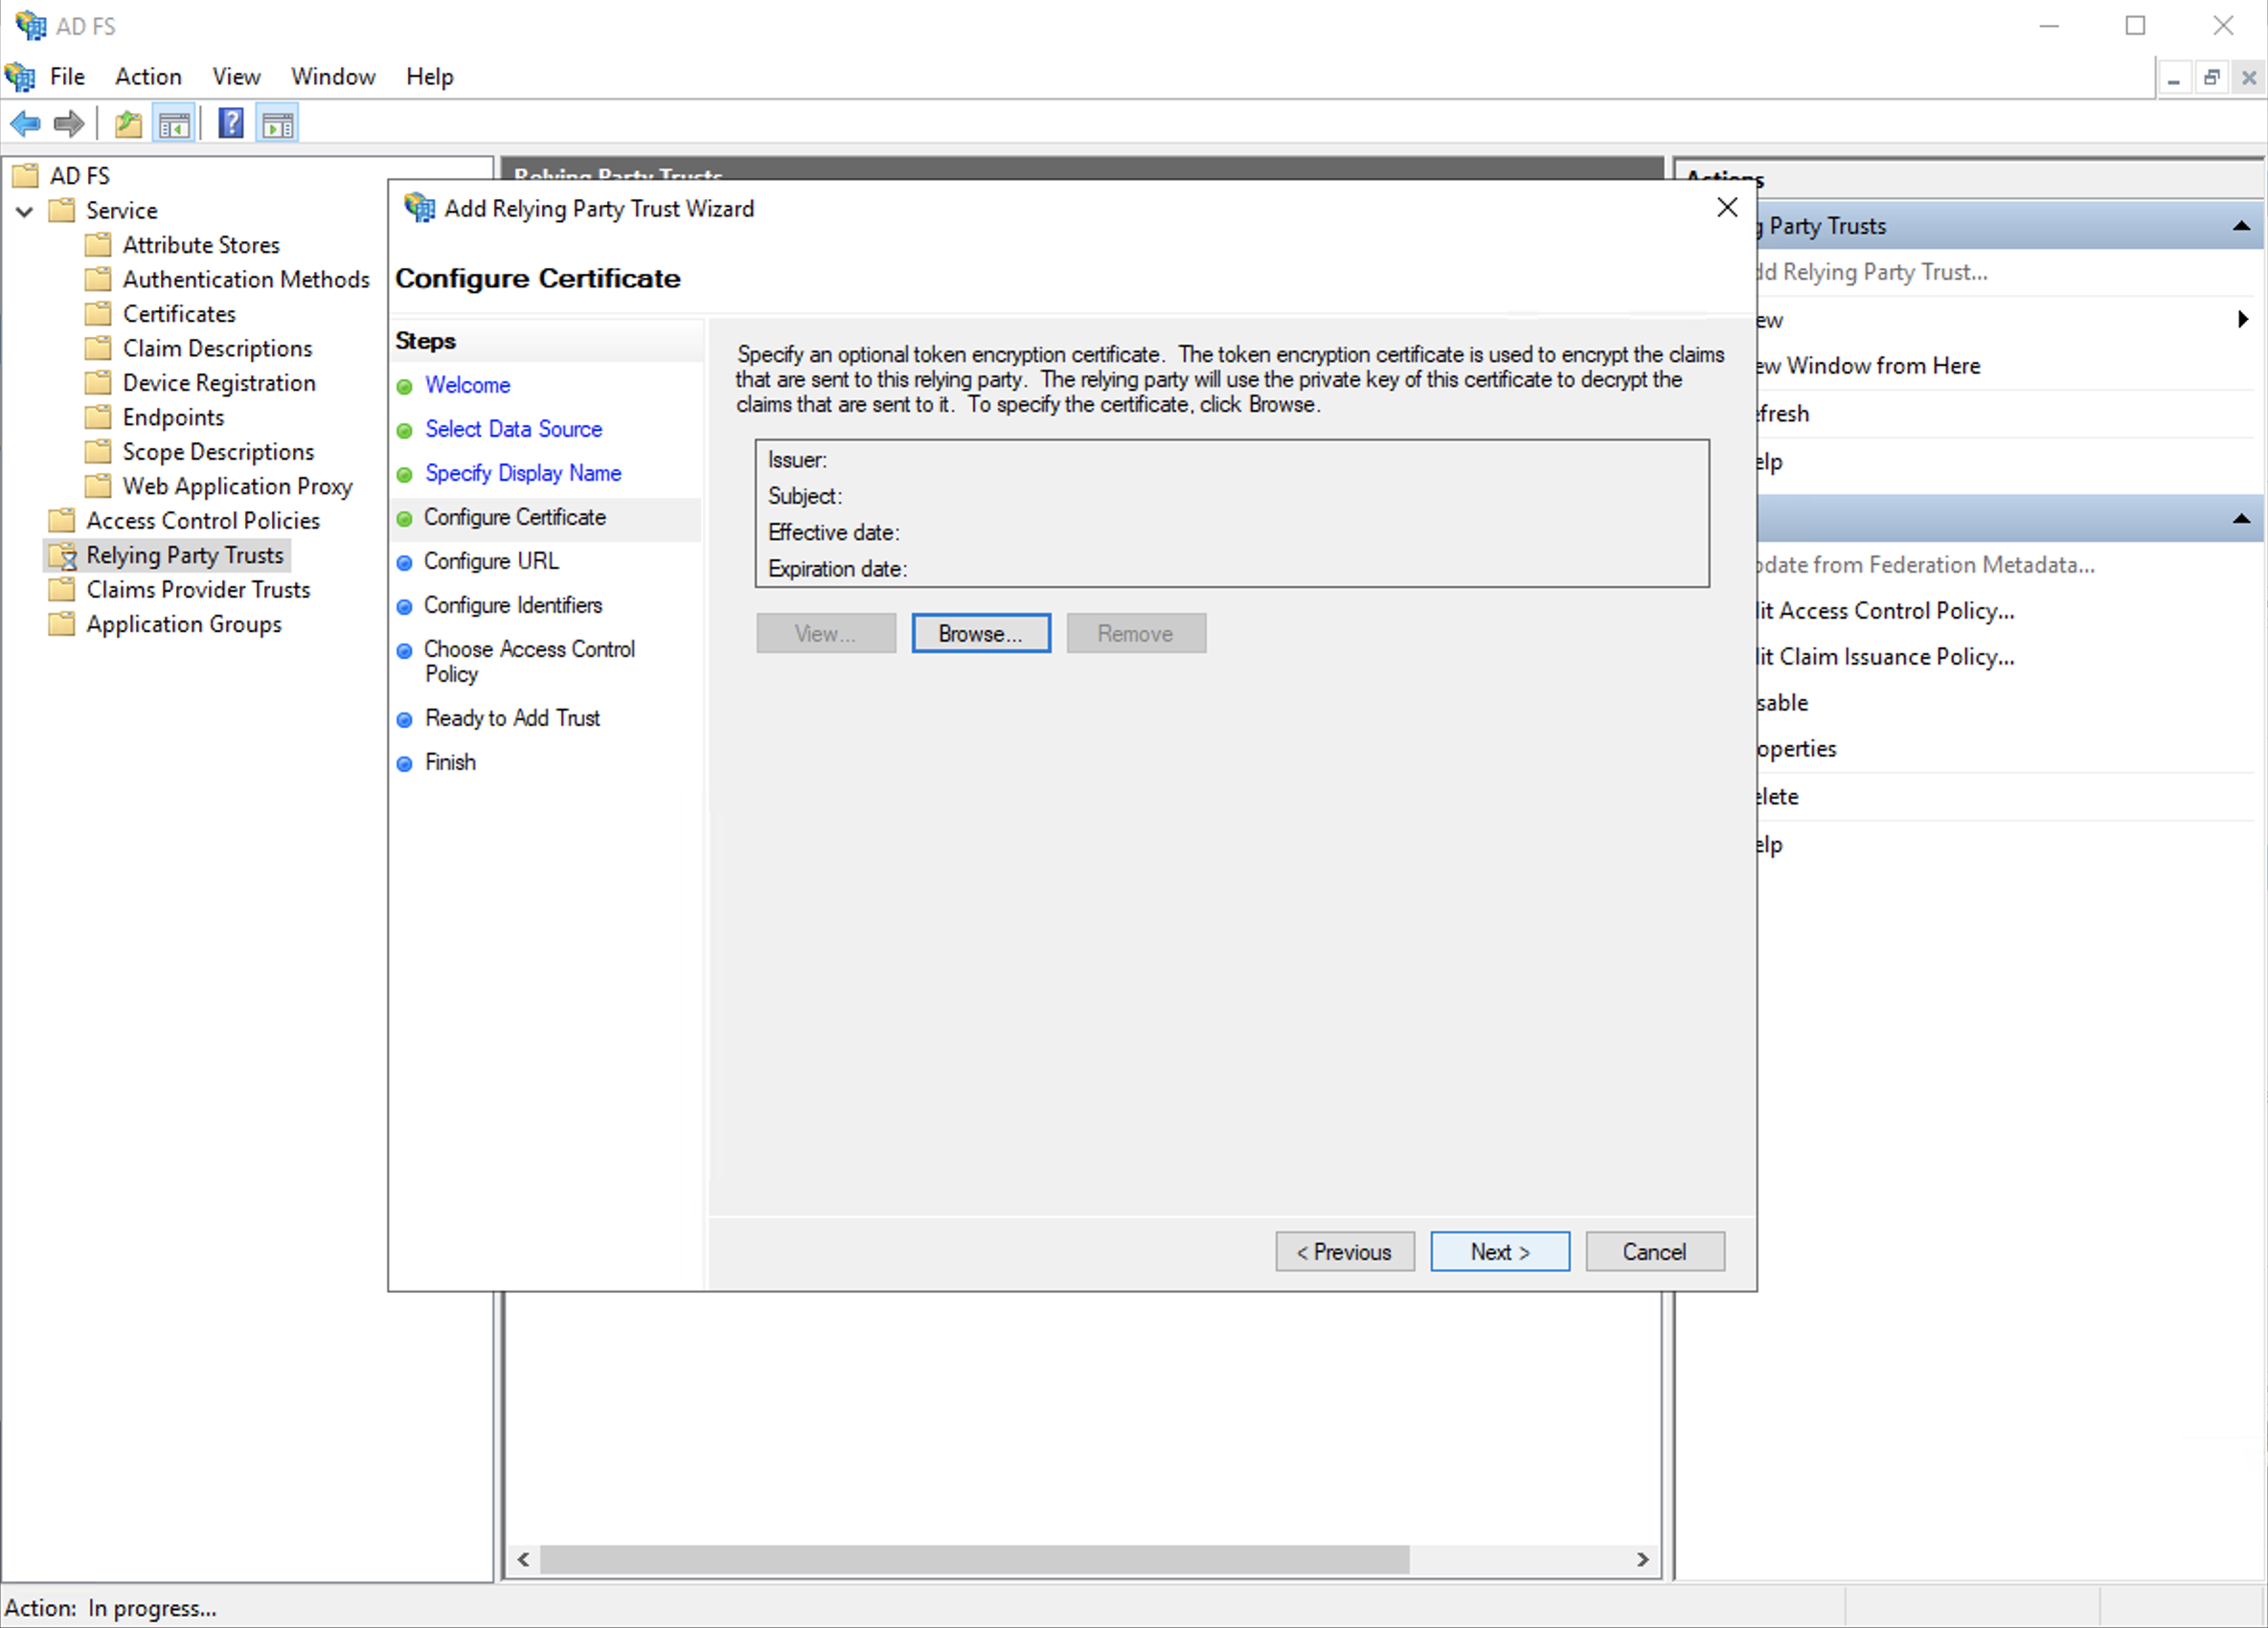
e. Skip the URL configurations, just click next as well.
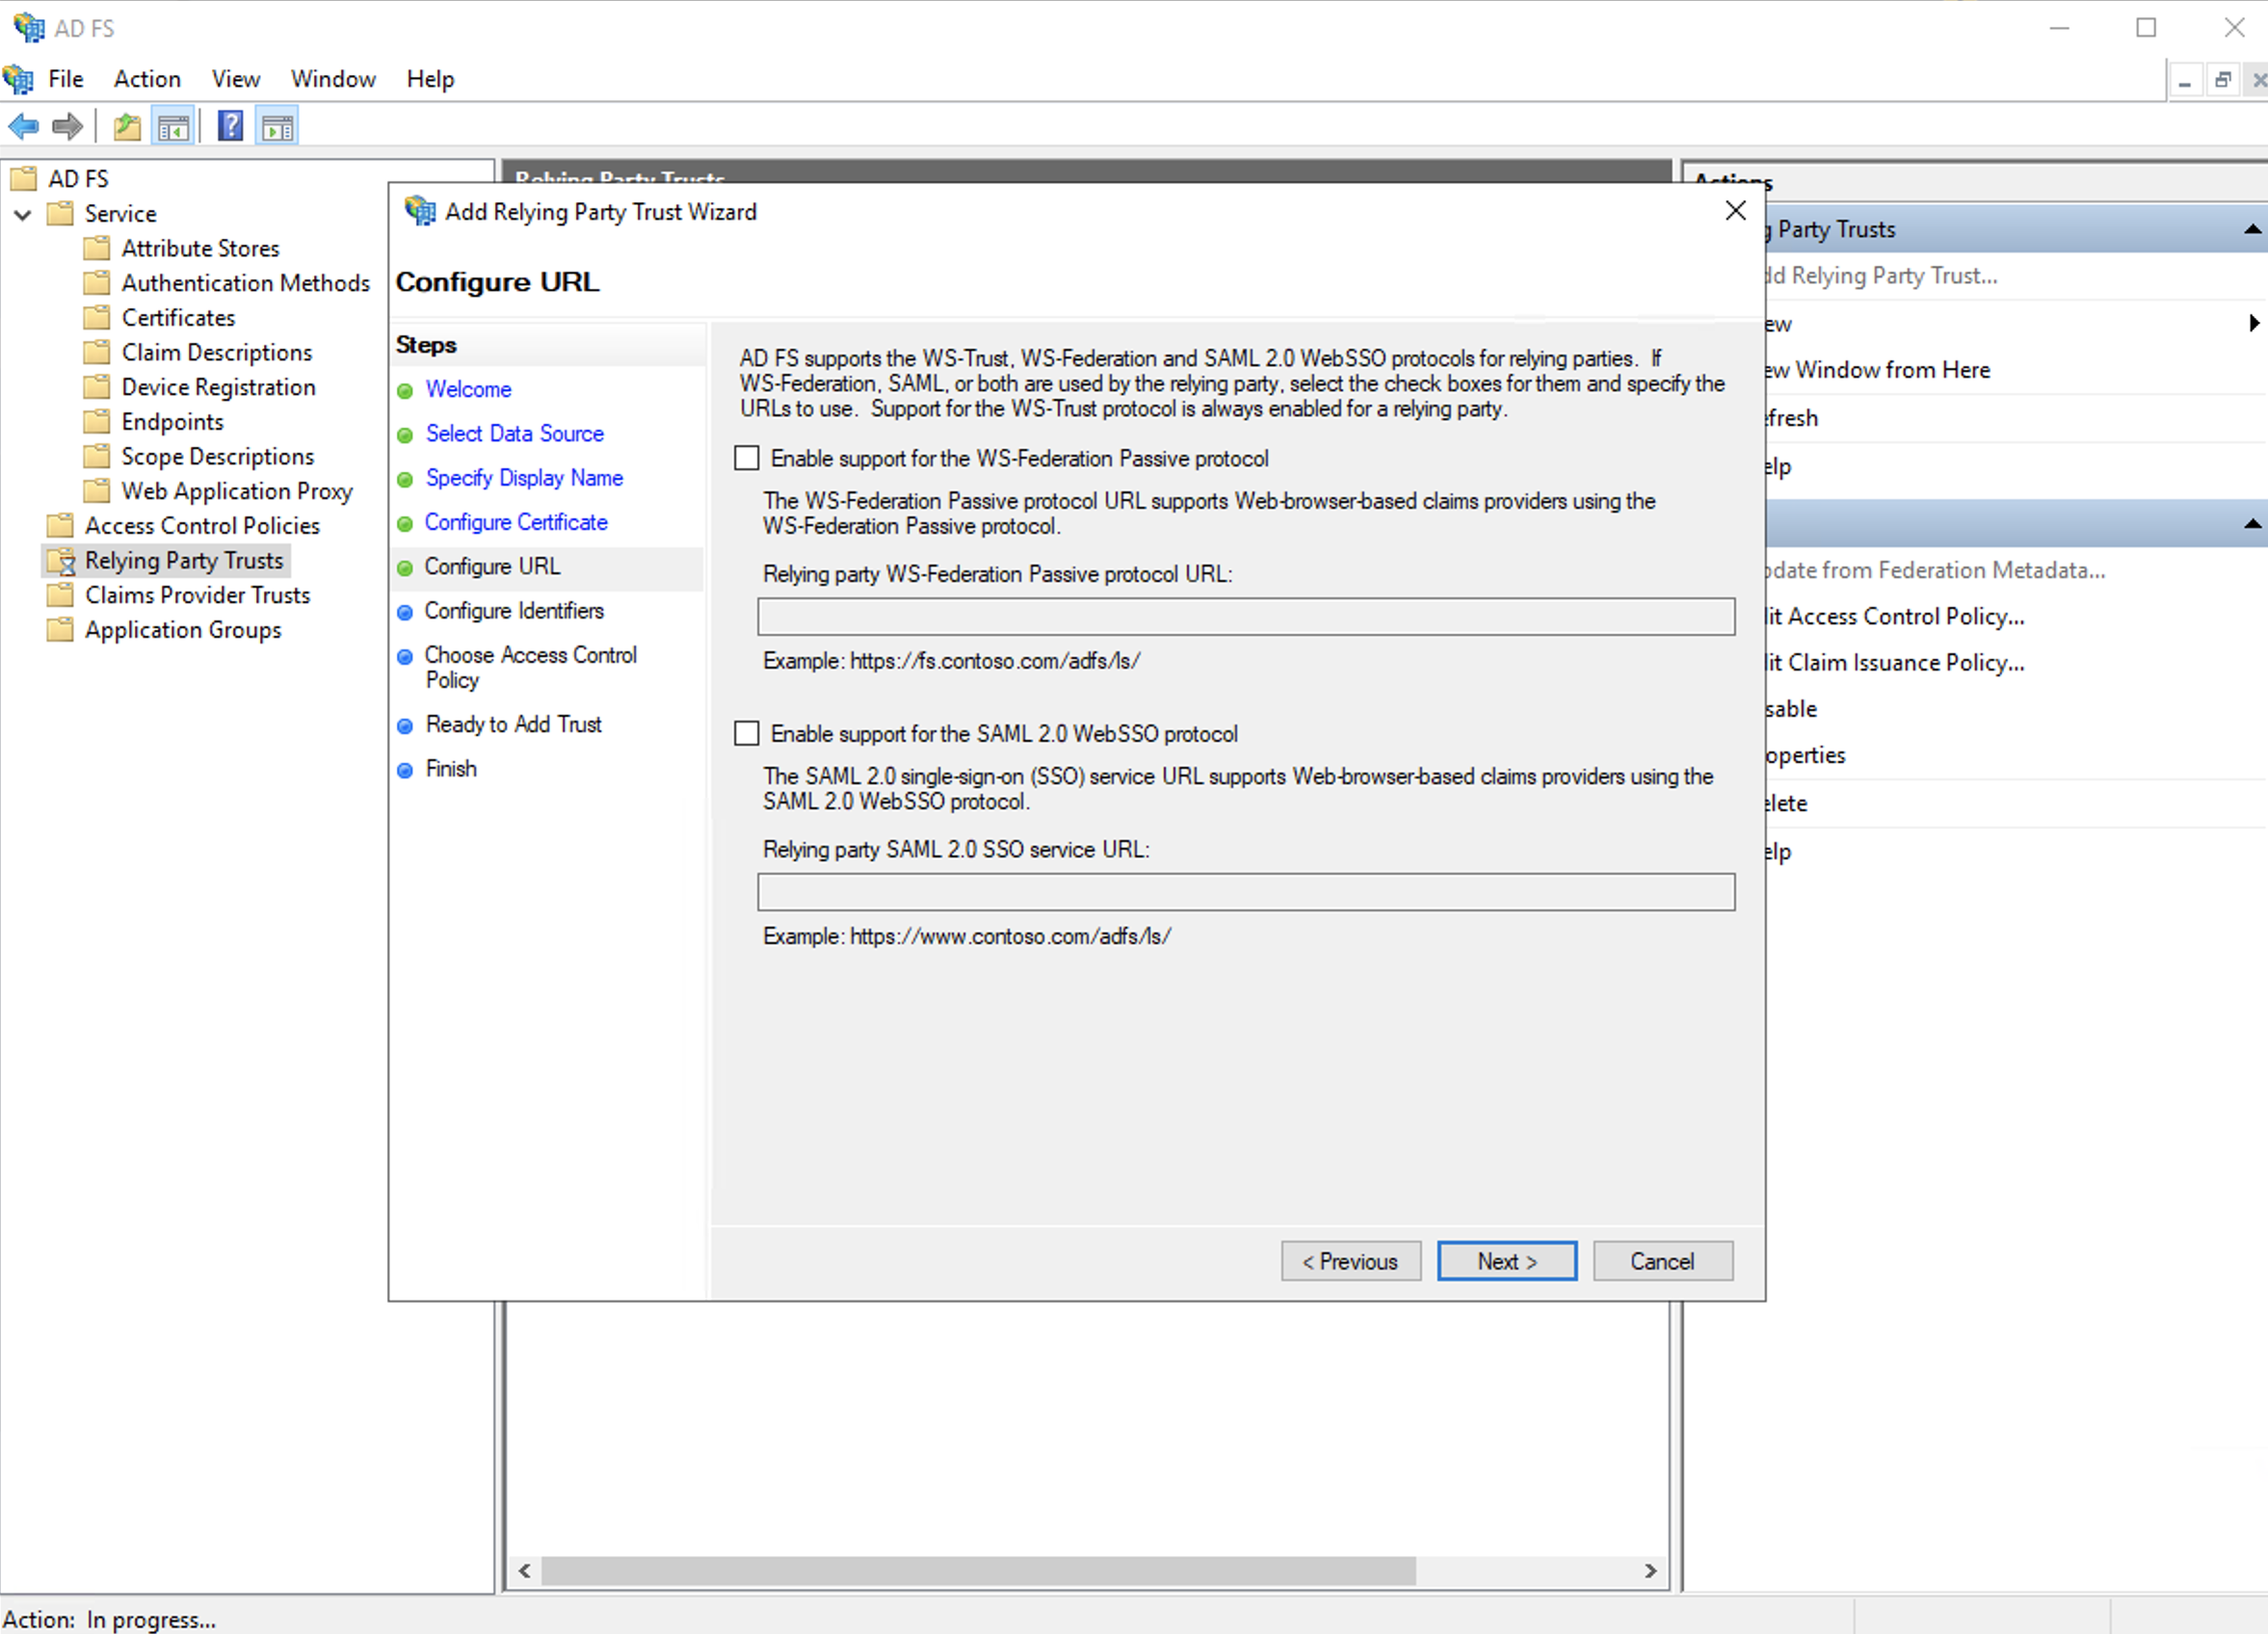
f. In the "Relying Party Trust Identifier", you will be setting the server’s URL right here, such as ap2.ragic.com or na3.ragic.com.
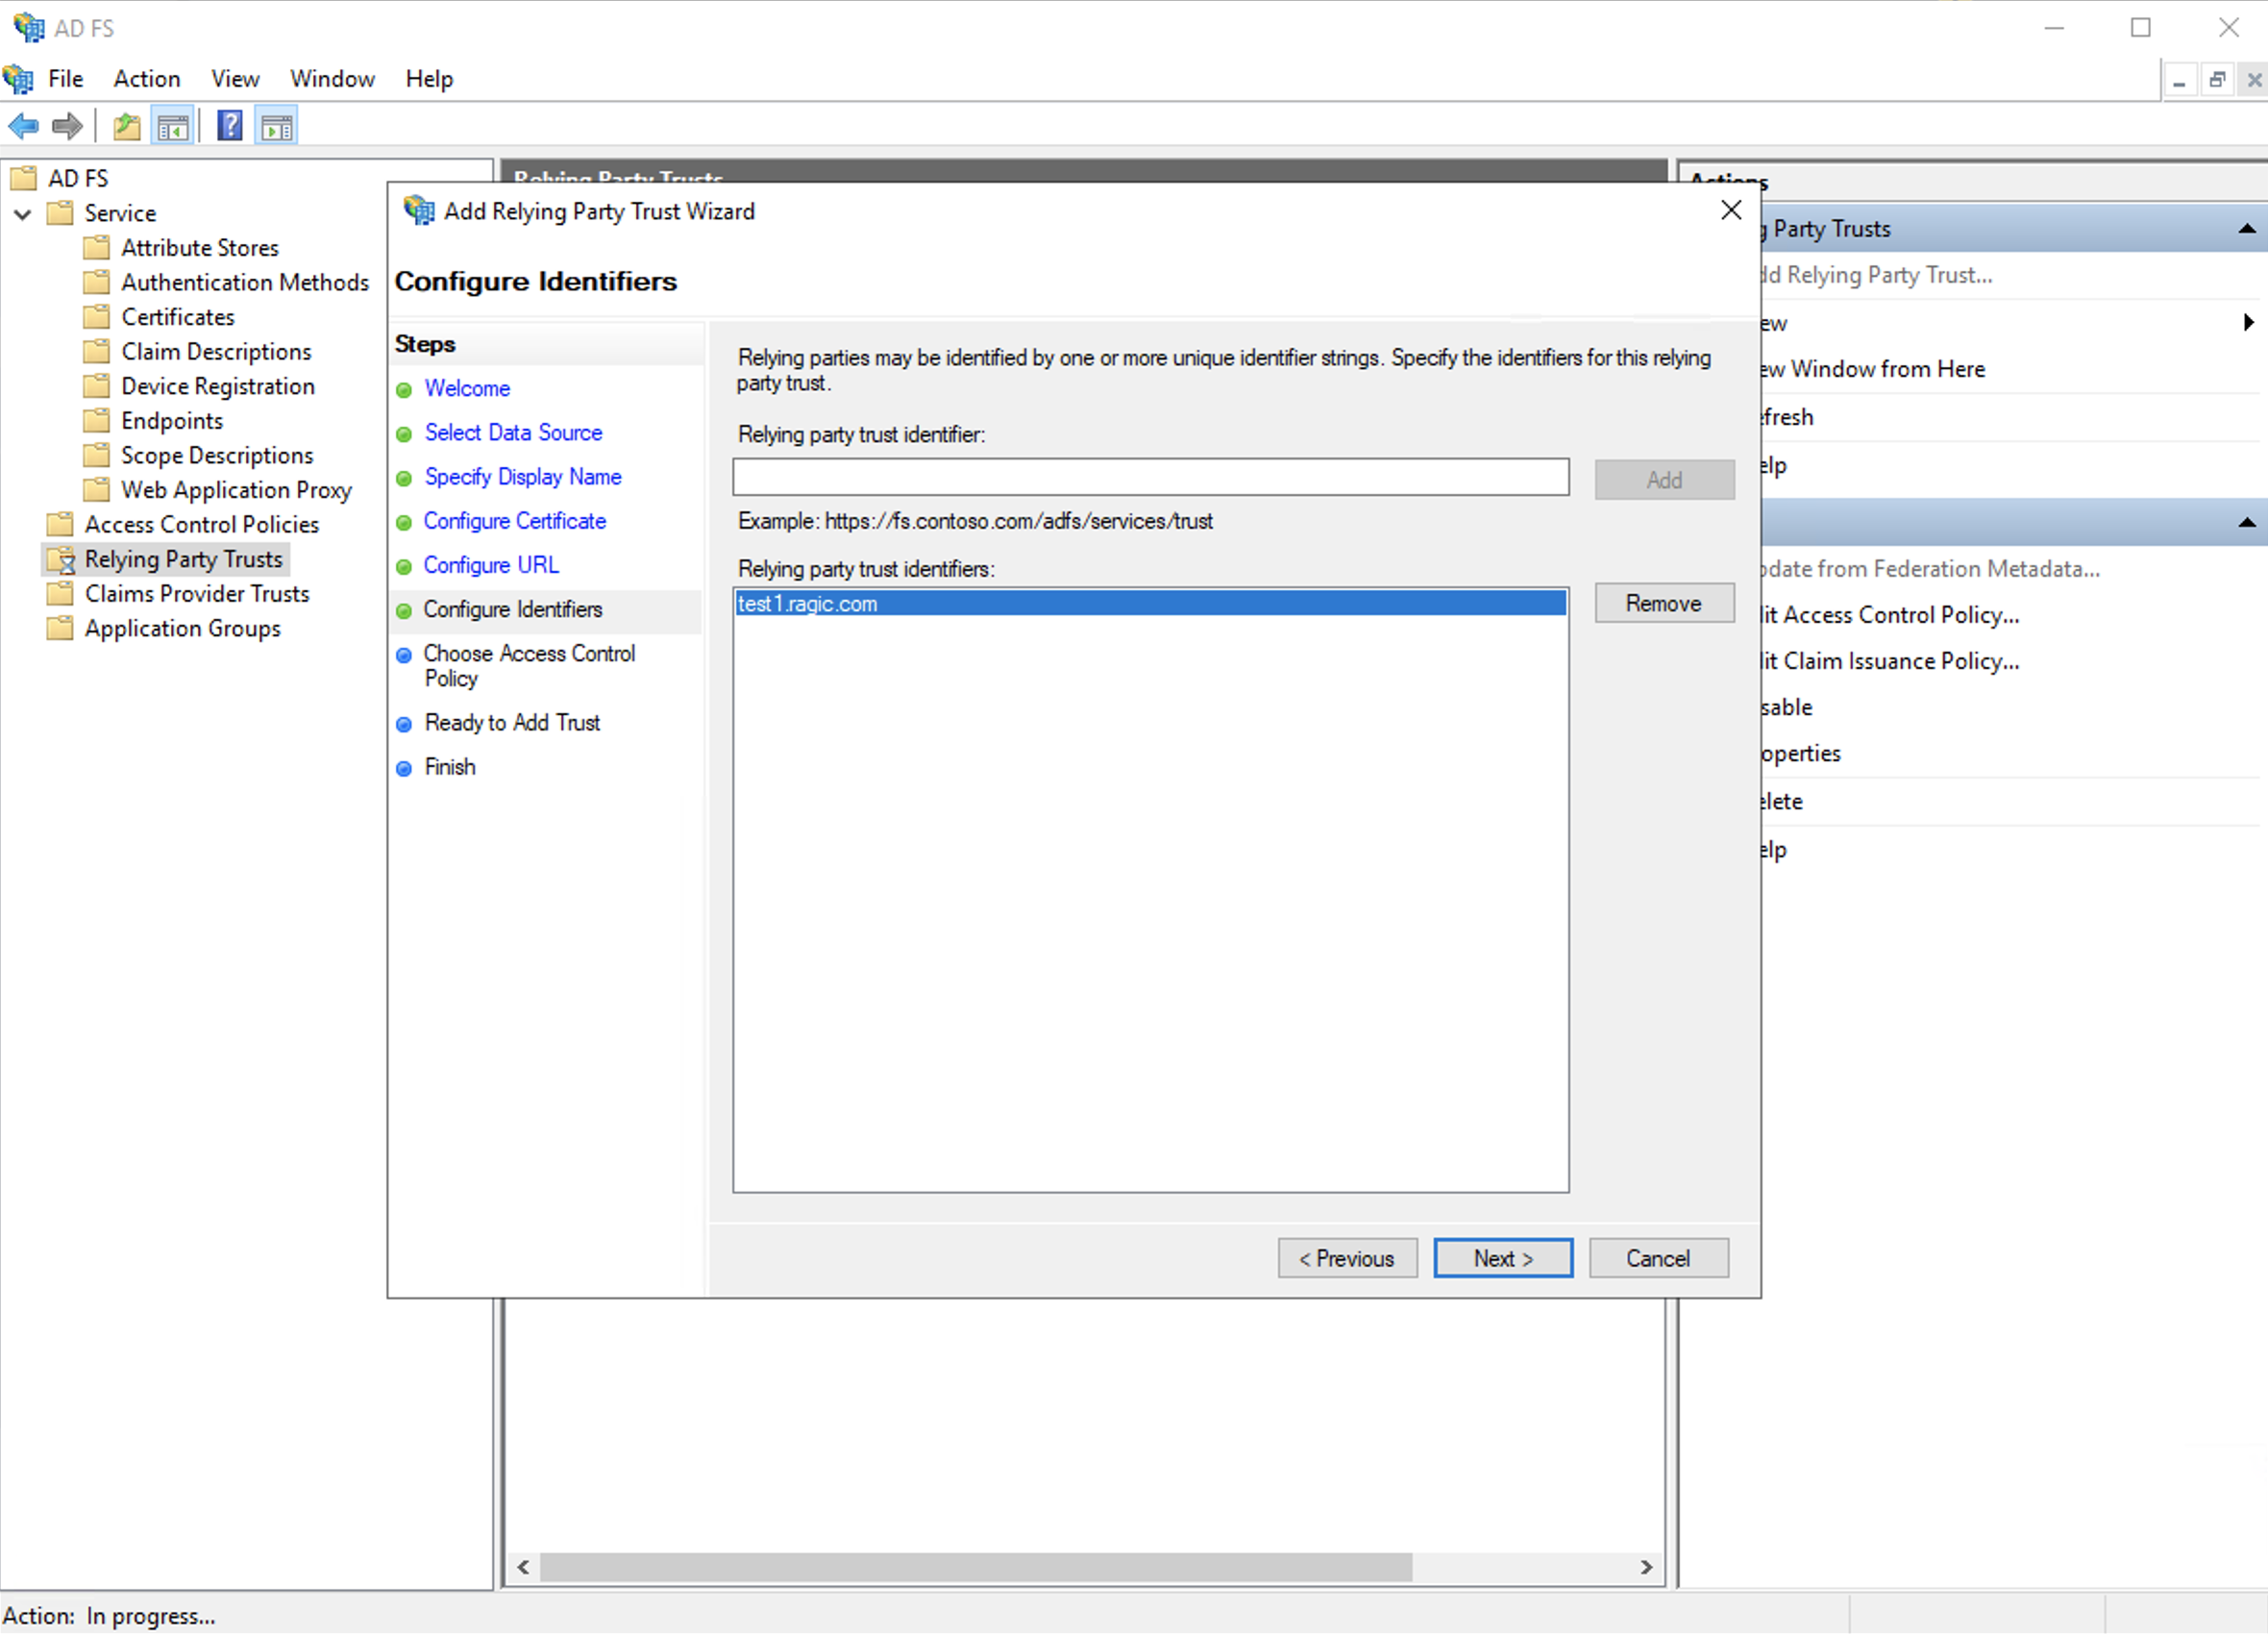
g. Skip the access policy control settings, click next.

h. Click next to finish adding the relying party trust.

Step 4. Select to edit claim issuance policy, and add a rule to make the LDAP Attribute E-mail Addresses’ outgoing claim type as the Name ID.
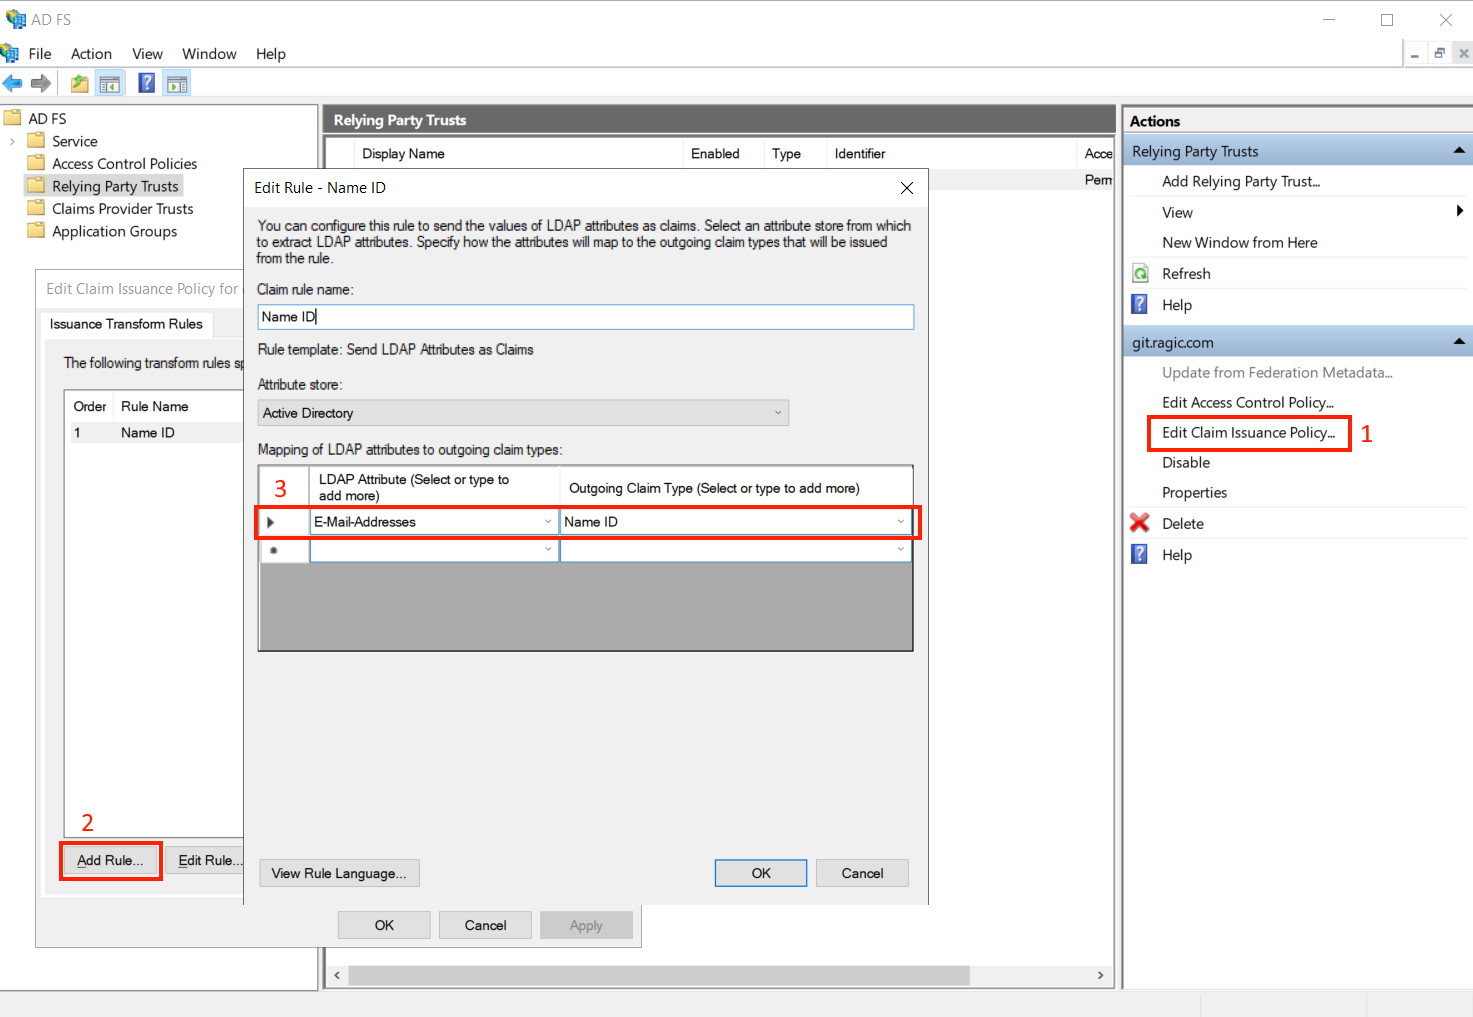
After all of the previous steps are completed, your users may log in to Ragic using the single sign-on feature with the following process.
Step 1. Enter your database with its link to then log in.
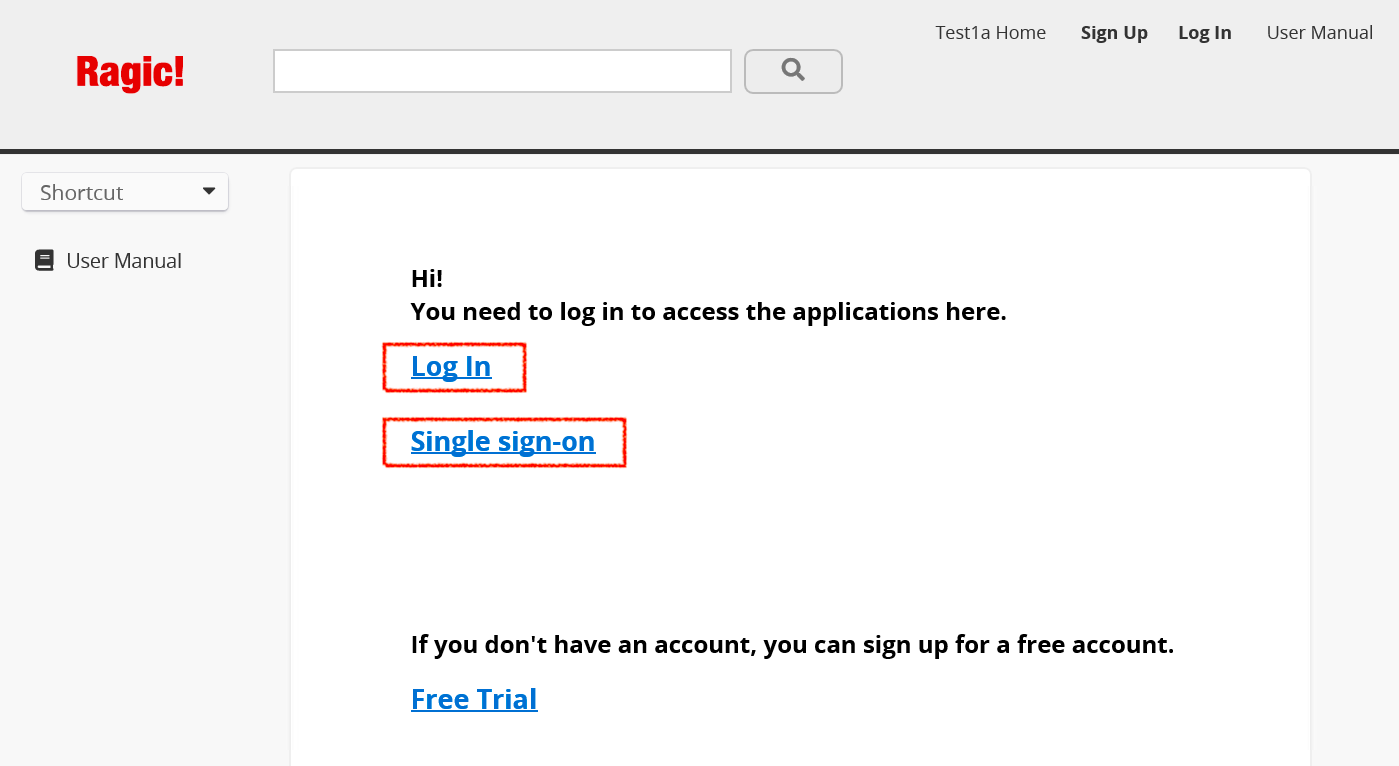
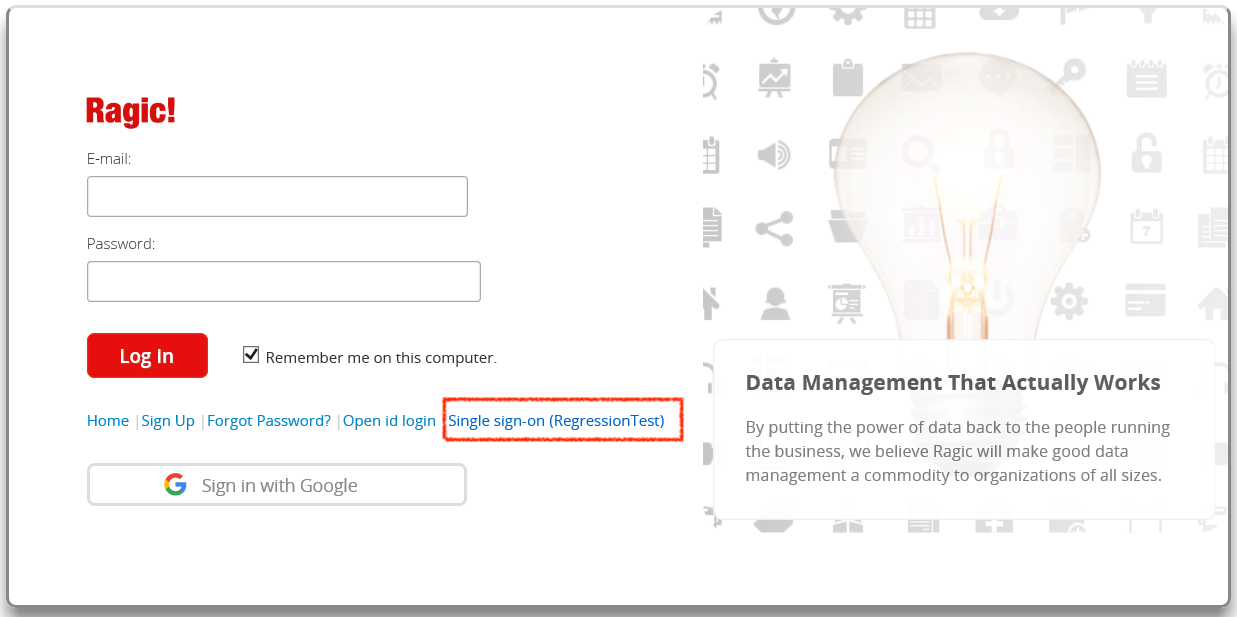
If you see this screen below, it means that there is not a public SSL certificate bought for your Active Directory account. You can simply click to proceed and continue with your login process.
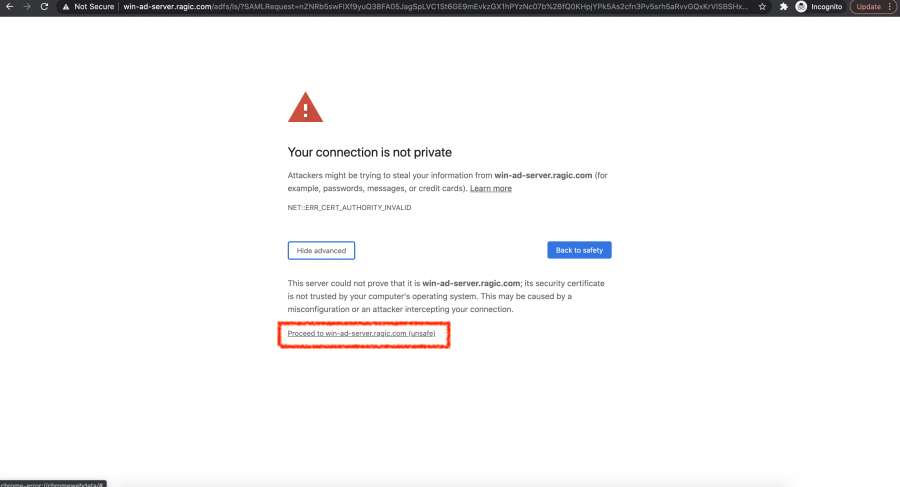
Step 2. Enter your username and password of your Active Directory server to log in, and then you can access the database.
For example:
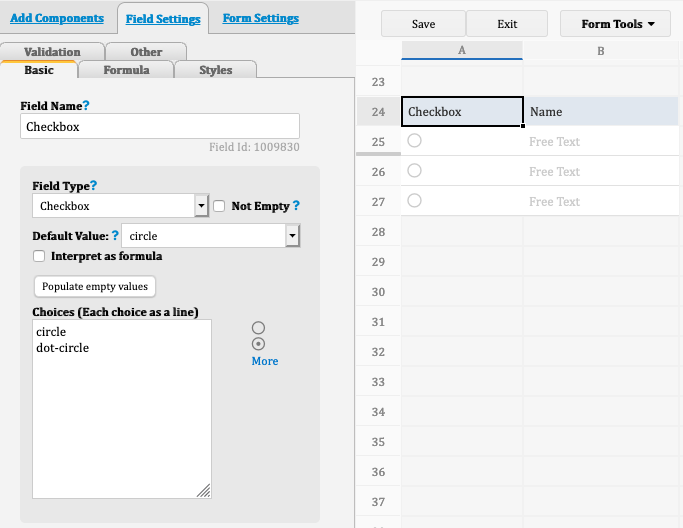
Once added, please set the "circle" as the default value."
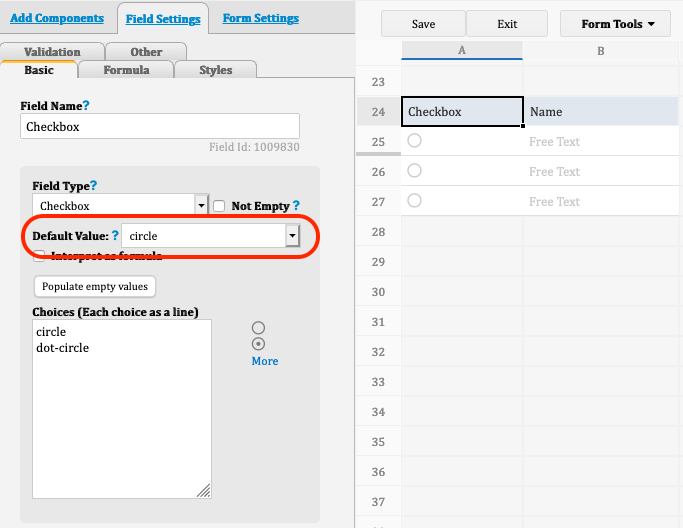
In case you only want to let users "check" one option in the subtable, you can create a regular free text field with COUNTIF() formulas to count how many "dot-circles" you have in the subtable.
For example:
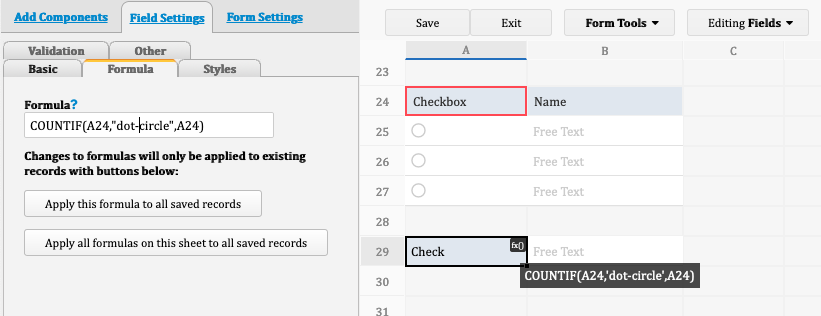
Note: you may hide this field if necessary.
Then, apply the validation as "1" so that the entry can be saved when users check only one option in the subtable:
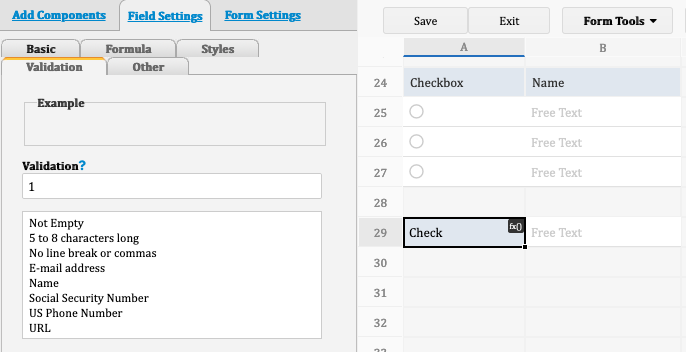
Note: you may add error message in this step if necessary.
In the future, when users check more than one option in the subtable, they will get the notification when they save the entry.
You can use this formula, WEEKNUM(Date,[return_type]), to calculate.
Date: Date field
Return_type: Optional. A number that determines on which day the week begins. The default is 1.
In the following table are all the return_types that you can use.
| Return_type | Week begins on |
|---|---|
| 1 or omitted | Sunday |
| 2 | Monday |
| 11 | Monday |
| 12 | Tuesday |
| 13 | Wednesday |
| 14 | Thursday |
| 15 | Friday |
| 16 | Saturday |
| 17 | Sunday |
| 21 | Monday |
Let's say we apply a formula that refers to A2, and the value in A2 is 2020/01/07. The result will be:
WEEKNUM(A2)  ->  2
WEEKNUM(A2, 13)  ->  1
The main difference between the new and old versions is the layout of columns. In the old version of Database Form, you can put more than one column in the same row, just like what you can do in a Ragic sheet. But the layout of a new version is more like a Ragic's mobile app form page, which only allows single-column in a row.
Other adjustments in the new version include: adding new theme colors and banner images, increasing default font size, and changing the aspect ratio of the banner.
After picking "Database Form" as your web embed type, you can preview and configure the layout of your new version form. After finishing all the settings, Ragic will give you an HTML code snippet, a URL for this form, and a WordPress shortcode.
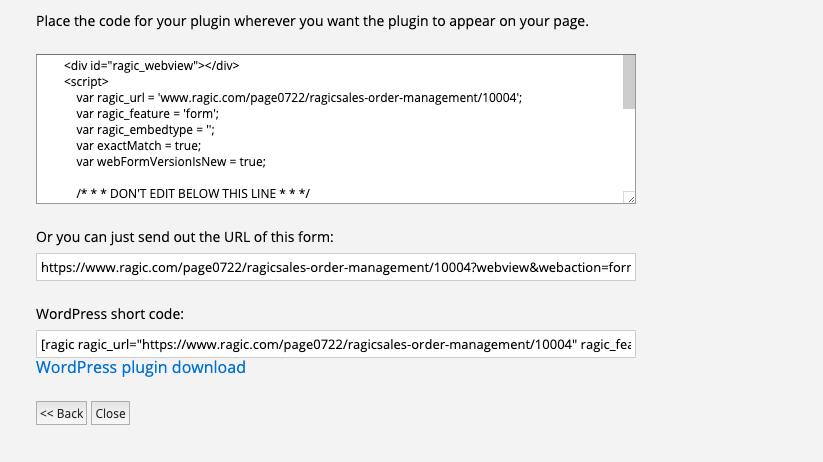
If you still need to use the old version, you'll need to click on the "switch to old version" button on the top. Ragic will take you to the old version configuration page and give you the URL and codes for the old version.
The URL/codes Ragic gives you in the new version will contain different parameters from those you get in the old version, even if they are embedded from the same sheet.
For example, if the URL of an old version embedded database form is "https://www.ragic.com/databaseaccount/tab/form?webview&webaction=form", the new version web form will be "https://www.ragic.com/databaseaccount/tab/form?webview&webaction=form&ver=new". The difference between the URLs is that the new version has an additional "&ver=new" at the end.
Another important thing you need to know is that although Ragic offers the option to "switch to old version", we will not continue maintaining the old version of embedded database form. We strongly recommend you to give our new version a try.
Step 1: Open the Ragic workflow editor.
Click on the arrow icon of the sheet from the tab and select Javascript Workflow, which will take you to the Workflow Module.
Step 2: Switch edit page to "Post-workflow".
Step 3: Paste, edit the following code and save.
var nodeId = param.getNewNodeId(Key Field);
var path = '/tab_path/sheet_path';
var query = db.getAPIQuery(path);
var entry = query.getAPIEntry(nodeId);
entry.loadAllLinkAndLoad();
entry.setCreateHistory(true);
entry.save();
Please replace the Key Field with the Key field id of your sheet, which you can find it in the workflow editor or you can look up in your data dictionary.
In this example, the line should be replaced to:
var nodeId = param.getNewNodeId(1001404);
And replace '/tab_path/sheet_path' with your own tab and sheet path.
Example If your sheet url is 'www.ragic.com/sample/sales/3', this line would be written as following:
var path = '/sales/3';
When your Ragic subscription has expired, you will see this message on your screen, and you may convert your account into a free version here or renew your subscription.
If you do not do anything on this page, your database will be locked. You may only access it after you have renewed your subscription or converted your account into a free version.
If you decided to convert your account into a free version, you will be guided to this page where you can select to keep which customized sheets on your database (maximum three sheets).
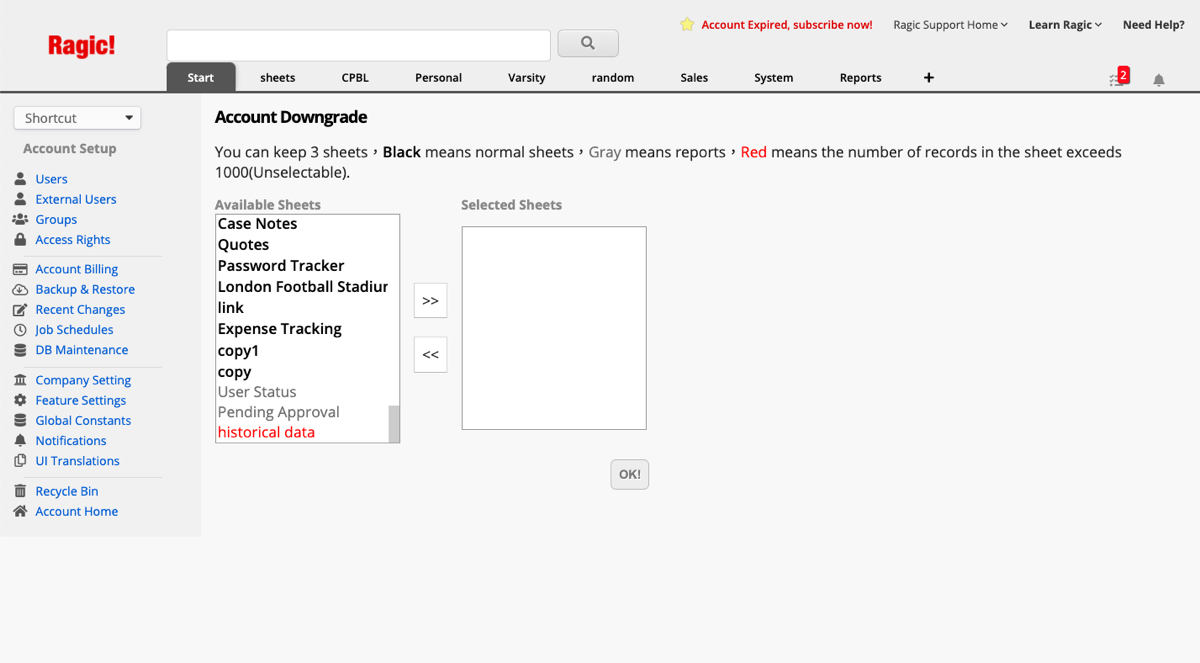
On the other hand, you may also downgrade your plan when your current subscription is about to expire by clicking on the “subscribe now” button located on the top of your screen.
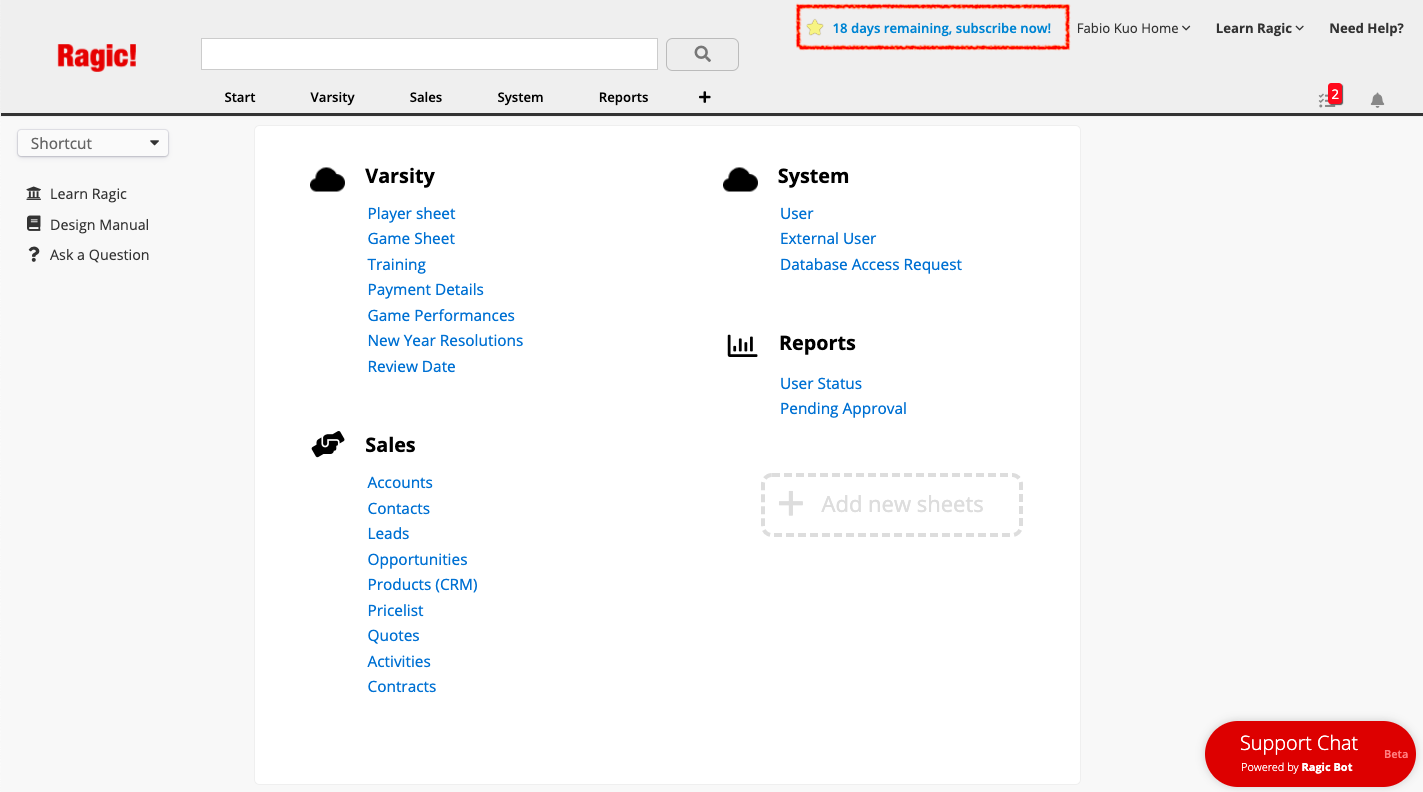
However, you may only select the downgraded plan if your database conforms to its limits (number of customized sheets, number of records per sheet).
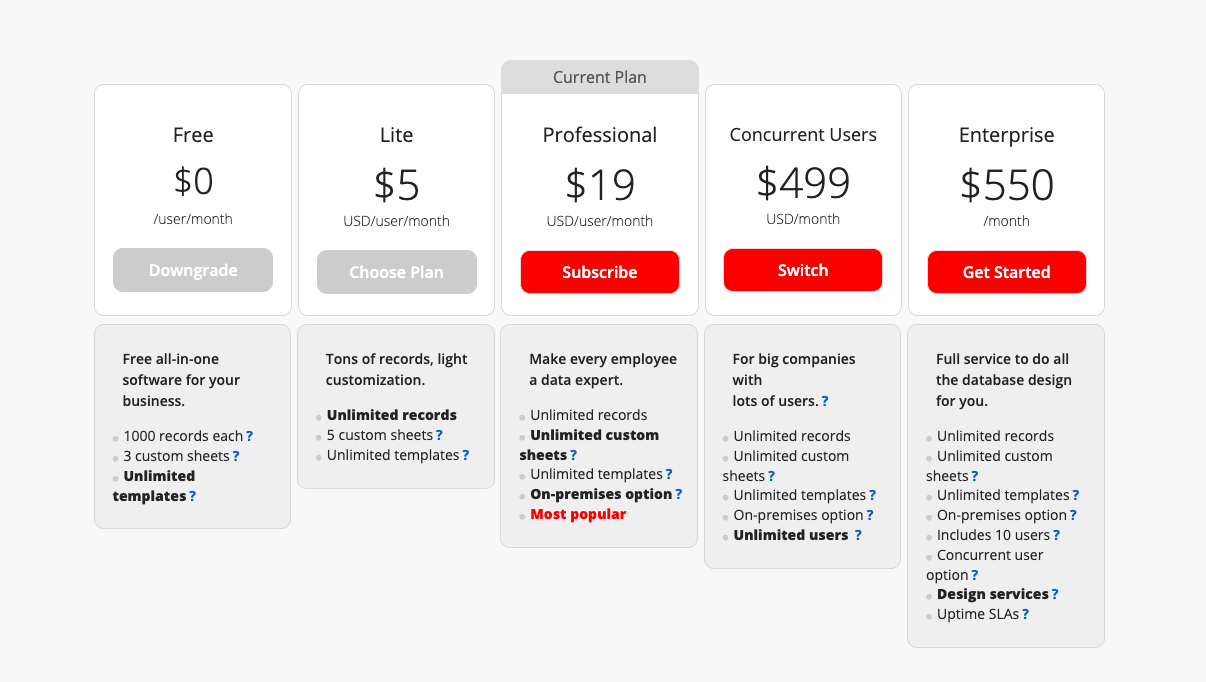
In addition, all the design changes on the templates will be reverted to default after you have selected to downgrade your plan.
An awesome and very useful update we've done for Ragic during this implementation is the ability to search the content of your uploaded files. No more sifting through folders to find that one file with the name that escapes you.
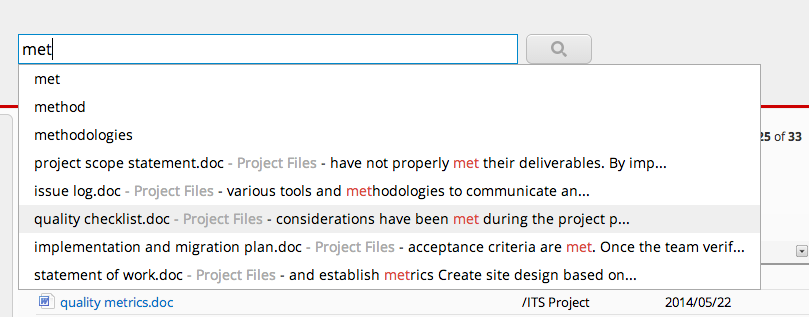
We've also adapted all the features you've come to know and love in Ragic, such as setting access rights to users and user groups, and included them as fine-tuned sharing options for your documents.
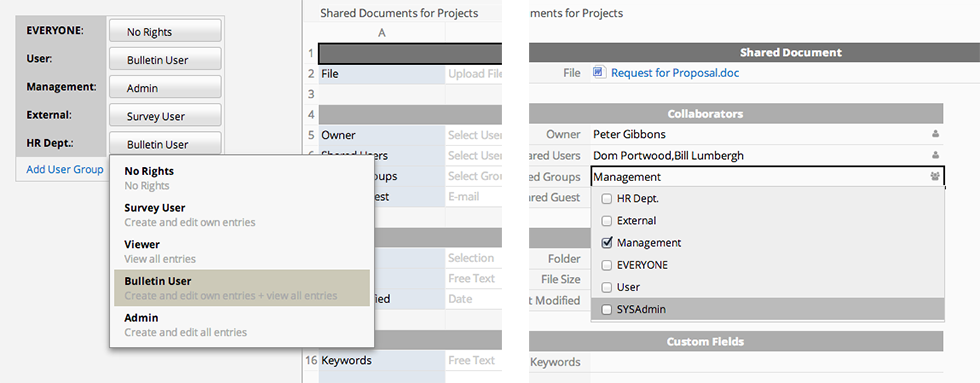
You're welcome to try RagicDocs out! For existing Ragic users, you can add RagicDocs to your account by navigating to your "Start" tab > "Install Templates" > RD > "RD Document Management - Dropbox".
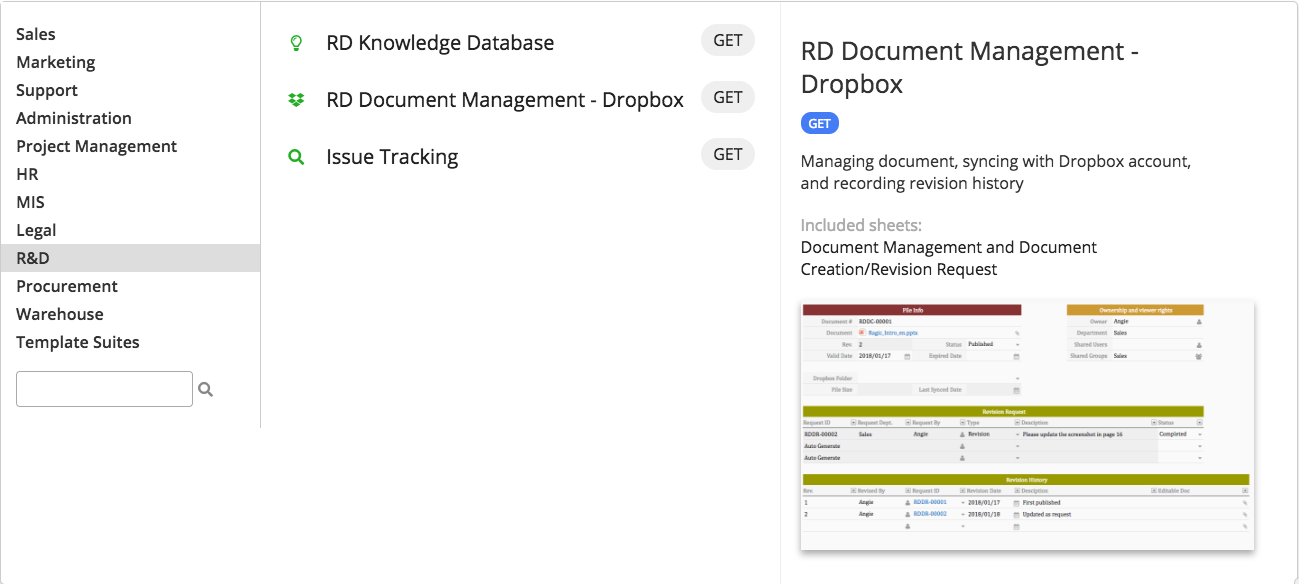
Take the "Purchase Requisition" sheet in our module as an example. It has a covert record action button as below:
If you wish to convert only one "Purchase Order" entry for each "Purchase Requisition" entry, you may follow the steps:
You'll need to find the unique key field from the listed fields in the action button settings. If you don't have such a field, consider updating your action button to include one. In the screenshot above, the action button's source sheet is the "Purchase Requisition" sheet. Furthermore, the unique key field is the "PR #" field.
In the screenshot above, the corresponding field of the "PR#" field on the destination sheet is the "From PR #" field. Hence, please apply the "Unique" attribute on it.
When users click on the covert record action button more than once, the system will reject the request and notify the users with the error message, which indicates the purchase order already exists:
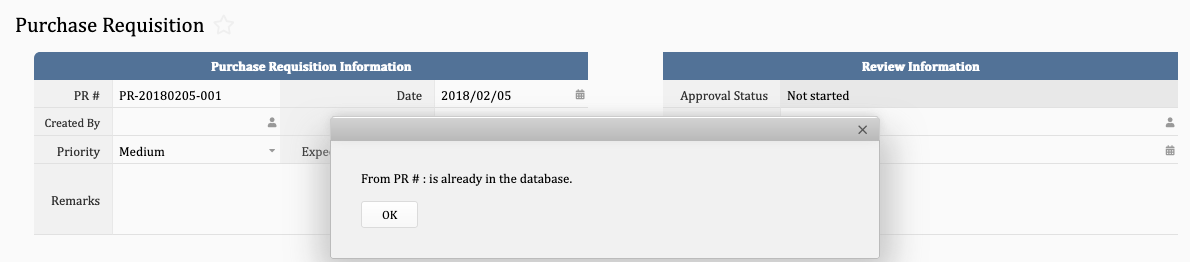
Right-click on the sheet name and select "JavaScript Workflow"
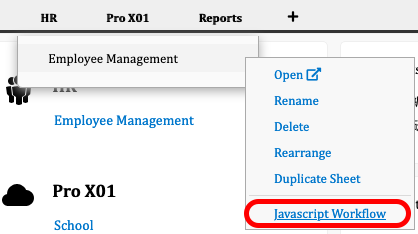
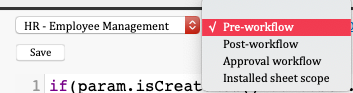
if(param.isCreateNew() && !user.isInGroup('SYSAdmin')){
  response.setStatus('INVALID');
  response.setMessage('None-SYSAdmin users are not allowed to create entries');
}
In above code, 'None-SYSAdmin users are not allowed to create entries' is the error message that users will see when trying to save new entries. You may customize the error message if necessary. Once completed, please save and then exit the JavaScript Workflow editor.
In the future, when "Admin" users try to save new entries, they'll see the error message you set.
Note: For "Survey User" or "Bulletin User" access rights, you may set this from the additional access rights settings.
Please note that Ragic is a database builder tool instead of a database software package. Therefore, you would need to know which currencies are needed in your system and apply the corresponding fields, formulas, and settings on your forms. This document will guide you through the key concepts of money fields, formulas, and exchange rate fields.
Basically, a money field is simply a numeric field that has a dollar sign ($) before the numeric value by default. Both field types will store the same numeric value if you disregard the symbol.
You may customize the format of the money field, such as changing the dollar sign to other currency symbols (Euros, British Pounds, etc).
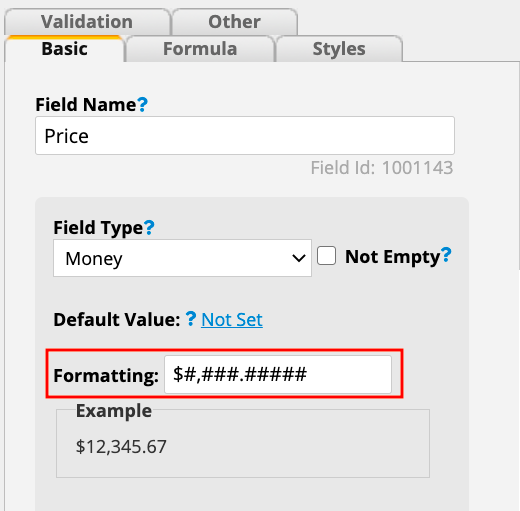
Since the money field works the same as a numeric field, you can also use a numeric field and state the currency in the field headers.
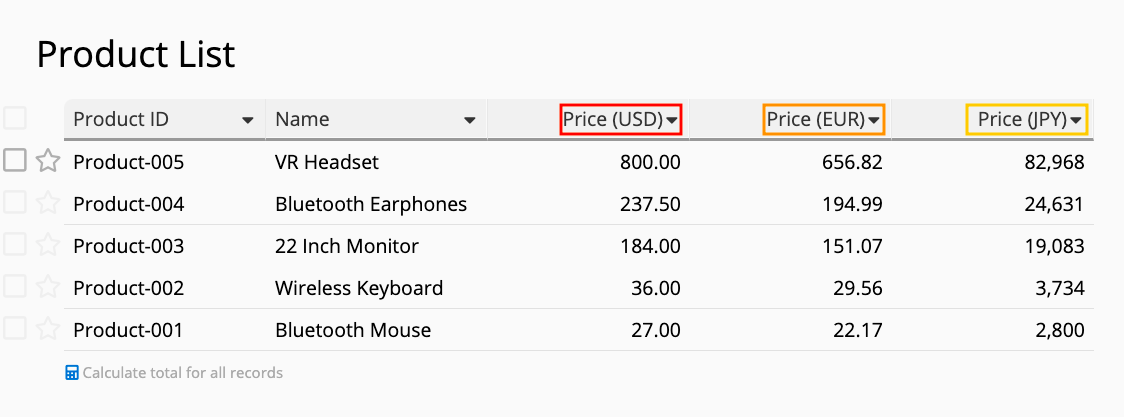
When you need to manage different currencies at once, you may create multiple fields to store the different prices of products in different currencies.
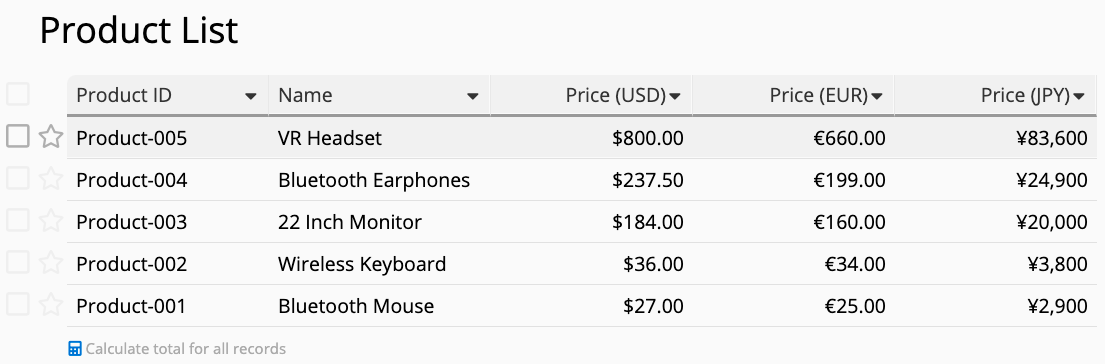
There are a lot of different situations that may require you to apply multiple currencies to a record. Let’s generalize them into five conditions.
For example, if a product can be priced differently with different currencies, all you need to do is to create the respective fields for the products’ prices in different currencies and manually enter the prices yourself.
You can create an exchange rate field and set the currencies to convert from and to on that field. When you are creating a new entry, the field will instantly populate the exchange rate at that time.
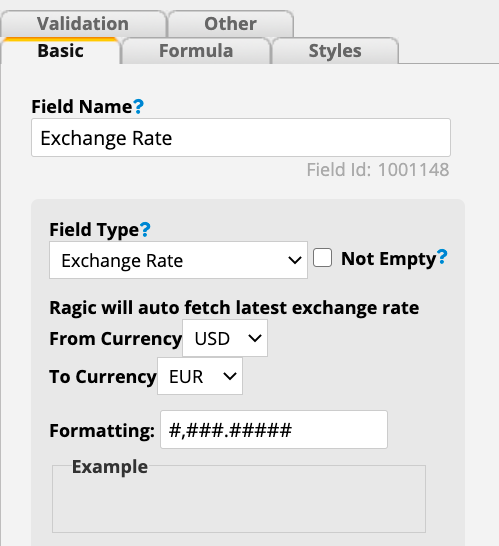
To convert currencies, you can create a new field and apply a formula referencing the exchange rate field. In the example below, the price in Euros is obtained by using a formula that multiplies the price in US Dollars with the exchange rate.
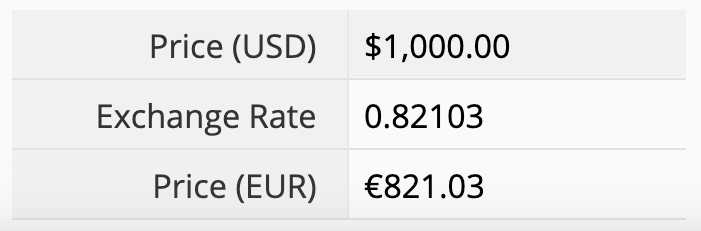
If you need to convert to multiple currencies, you would need multiple exchange rate fields and their new corresponding price fields in respective currencies.
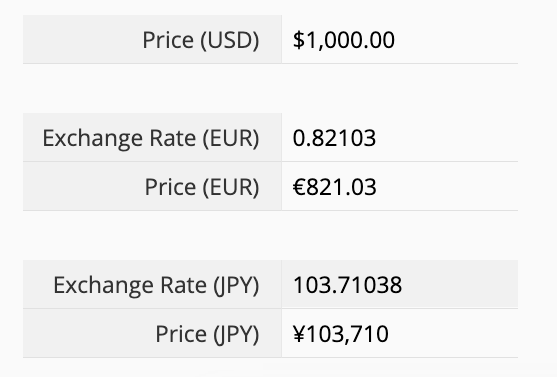
Sometimes you would need to manually enter the exchange rate, such as entering the exchange rate used in a previous transaction or provided by a certain bank. If that is the case, Ragic’s exchange rate field will not be suitable. Instead, you should create a new numeric field for you to enter the exchange rate manually. And just like the 2nd option, you will also need to create a new field and apply a formula that references the exchange rate field.
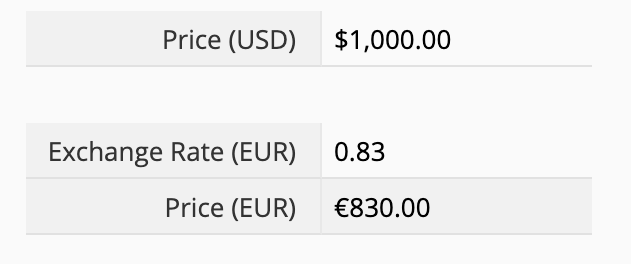
Also similar to the 2nd option, if you need to convert to multiple currencies, you would need multiple numeric fields for you to manually enter the exchange rates and their new corresponding price fields in different currencies.
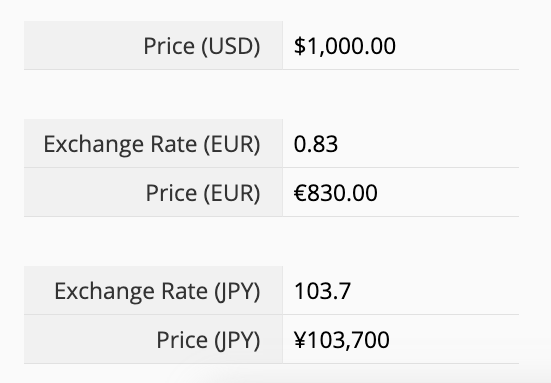
You can create a selection field that allows users to select and determine which currency to convert from. On the sheet, you’ll still need to create a field for the price in the original currency, a field for manually entering the exchange rate, and a field for the final price in the currency converted to (with the correct formula applied).
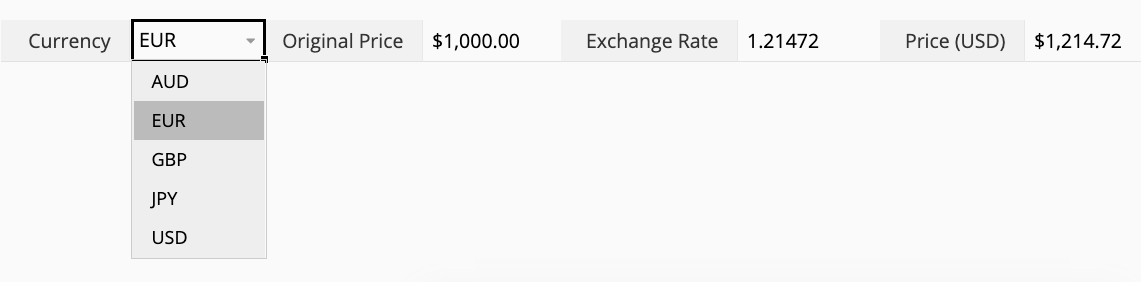
If there is a list of currencies you could be using and would like to automatically populate the exchange rate after selecting a certain currency, you can create another sheet to manage all currencies and exchange rates needed and set up link & load relationships on the sheets needed.
First of all, please create a new sheet to record all the currencies needed and their respective exchange rates.
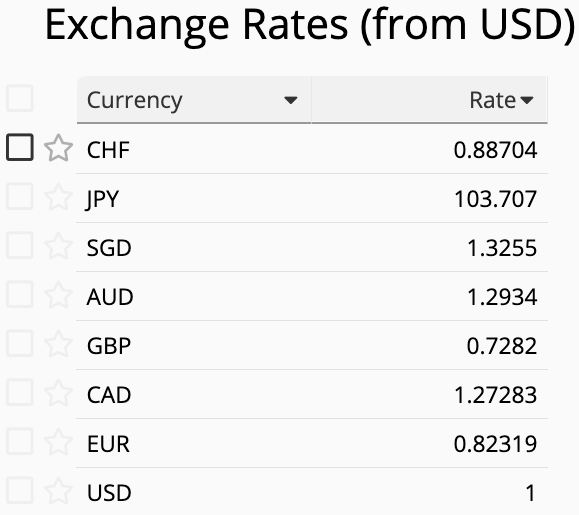
Next, please set up the link and load relationships on any sheet that needs currency conversion. The sheet with all currencies recorded will be the linked source.

With the link and load relationship set up, when selecting a currency, the corresponding exchange rate will also be loaded, and you can then apply formulas referencing that loaded field (exchange rate) on the fields needed.
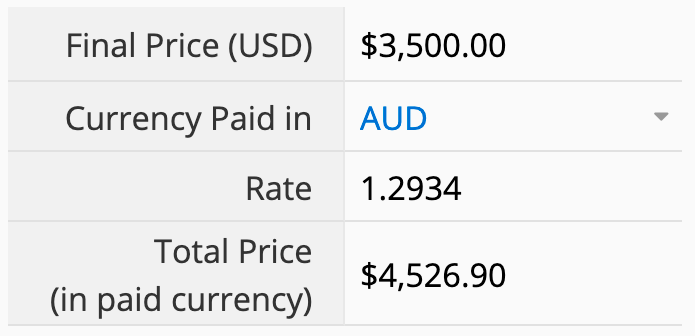
The simplest way would be to first download an Excel or CSV version of the Google sheet and import it manually
If you would like to do a periodic import, you can find the CSV feed URL of the sheet in this format:
https://docs.google.com/spreadsheets/d/DOCID/export?format=csv
Remember to replace DOCID with the actual document id, which you can find on the URL of your Google Sheet.
LDAP_AUTH_SERVER=ldaps://your.server.name
LDAP_AUTH_DOMAIN=your.active.directory.domain
LDAP_AUTH_EMAIL_DOMAIN=your.email.domain
LDAP_AUTH_SERVER is the domain name or IP address of the LDAP service like Active Directory that you're connecting to. LDAP_AUTH_DOMAIN is the domain name for the principal on the LDAP server, and LDAP_AUTH_EMAIL_DOMAIN is the domain name part of the email addresses that the users will be used to log in to Ragic.
When setting up formulas in Ragic, you can use the special character "\" with other text for certain situations. For example, "\t" will act as your keyboard’s tab key and "\n" will act as the enter key to move to a new line.
And because "\" is a character with special functions, if you would like to populate it on your fields using formulas, you would need to reference it by "\\" in your formulas. For example, if the field value on A1 is “a/b/c” and you would like to replace all "/" with "\" to make it into "a\b\c", your formula would need to be set as SUBSTITUTE(A1,"/","\\").
For example: the user’s browser is in the US time zone. A1 and A2 in the form are all date fields in the format yyyy/MM/dd, the value of A1 is 2020/10/31, and the value of A2 is 2020/11/02. Applying the formula "A2-A1" to A3, you will find that A3’s result is "2.0416667" instead of the expected "2". This is because 2020/10/31 is the daylight saving time in the United States whereas 2020/11 /02 is no longer daylight saving time, so there will be a difference of 0.0416667 days (equal to 1 hour). At this time, the formula should be changed to ROUND(A2-A1) to obtain an integer result.
For example, if you have a "Sales Orders" sheet that selects items from the "Products" sheet:
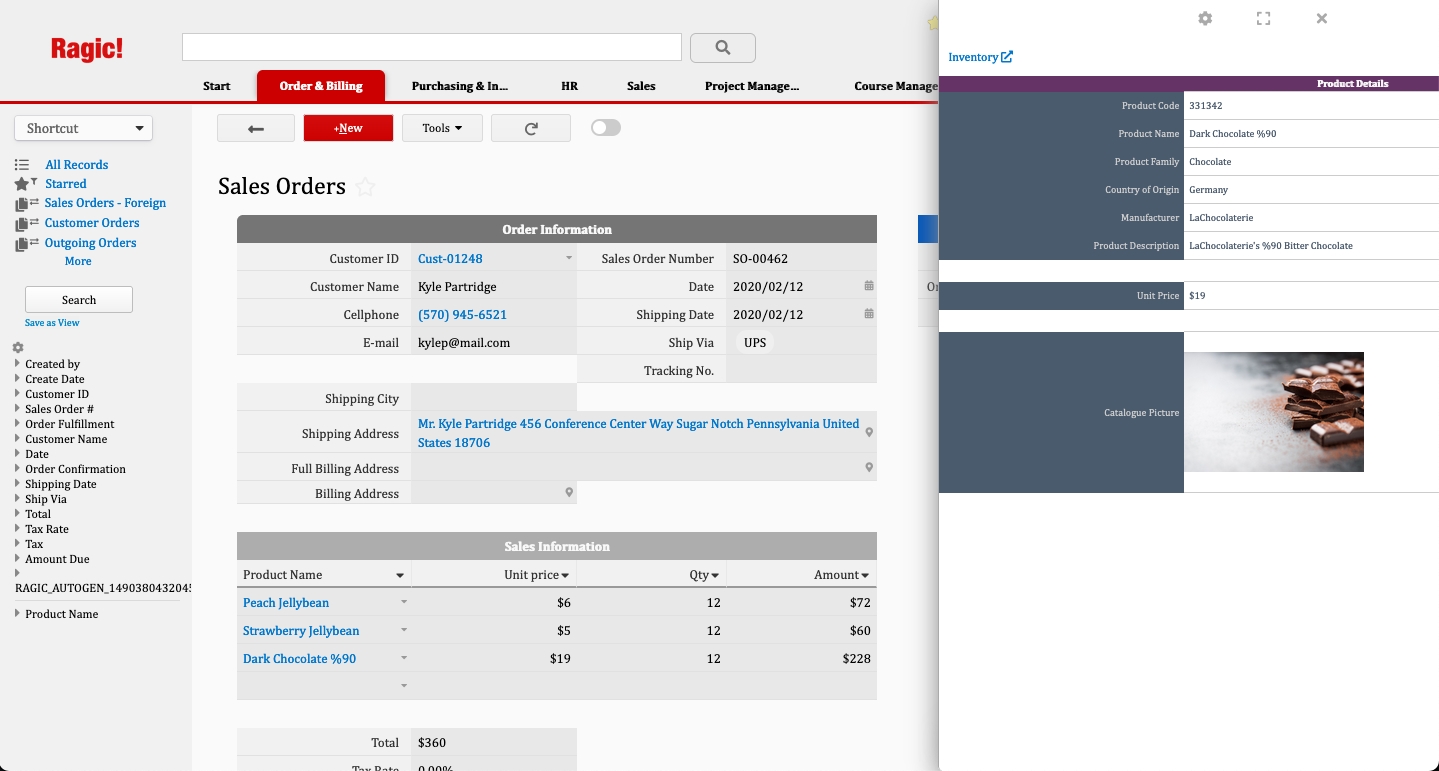
When you try to reference the "Sales Order" sheet in the "Products" sheet via show references from existing sheets, you'll get the message that indicates "The sheet Sales Order has no field linked to this form.":
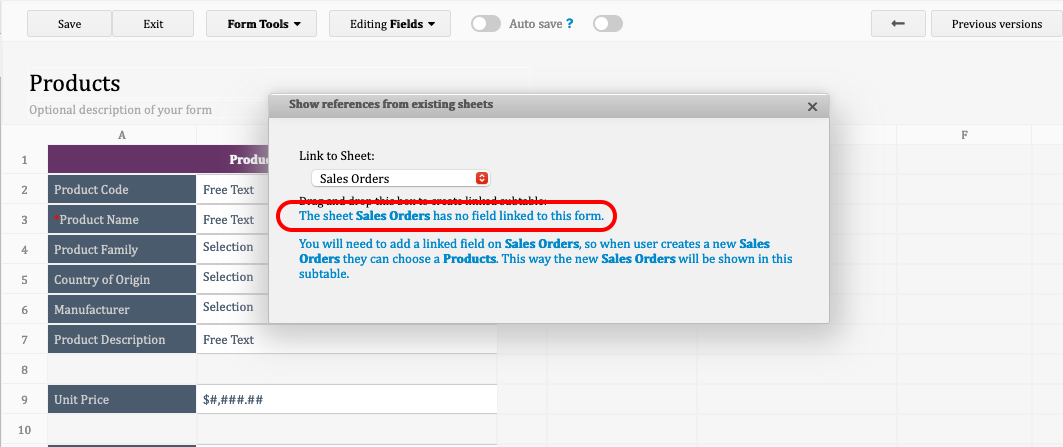
The reason is that the link between the "Sales Order" sheet and the "Products" sheet is created on a subtable field, "Product Name".
In this case, you'll need to combine the other linking tool "new sheet from subtable" to achieve the same result.
Let's take the "Sales Orders" and "Products" sheet as an example, you may follow the steps below:
Step 1. In the "Sales Orders" sheet, use new sheet from subtable to create a "Sales Information" sheet:
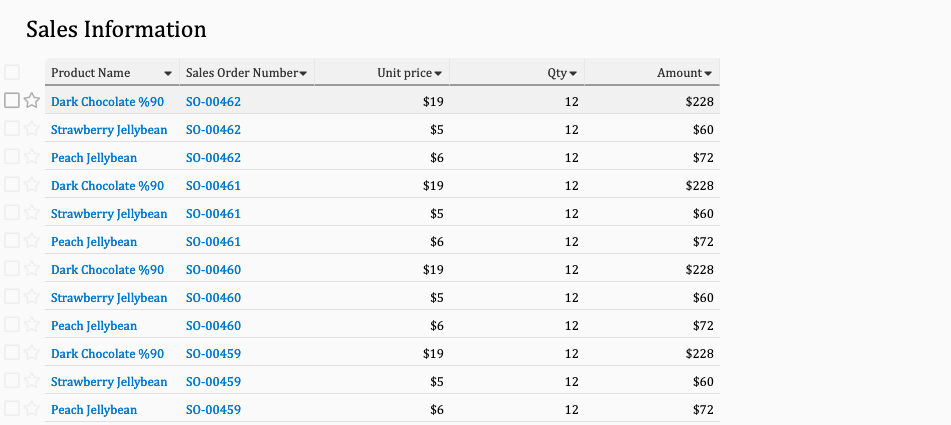
Step 2. If you need more fields from the "Sales Orders" sheet, you may use link fields from parent sheets to insert.
Step 3. In the "Products" sheet, use show references from existing sheets and select the "Sales Information" as the referenced sheet:
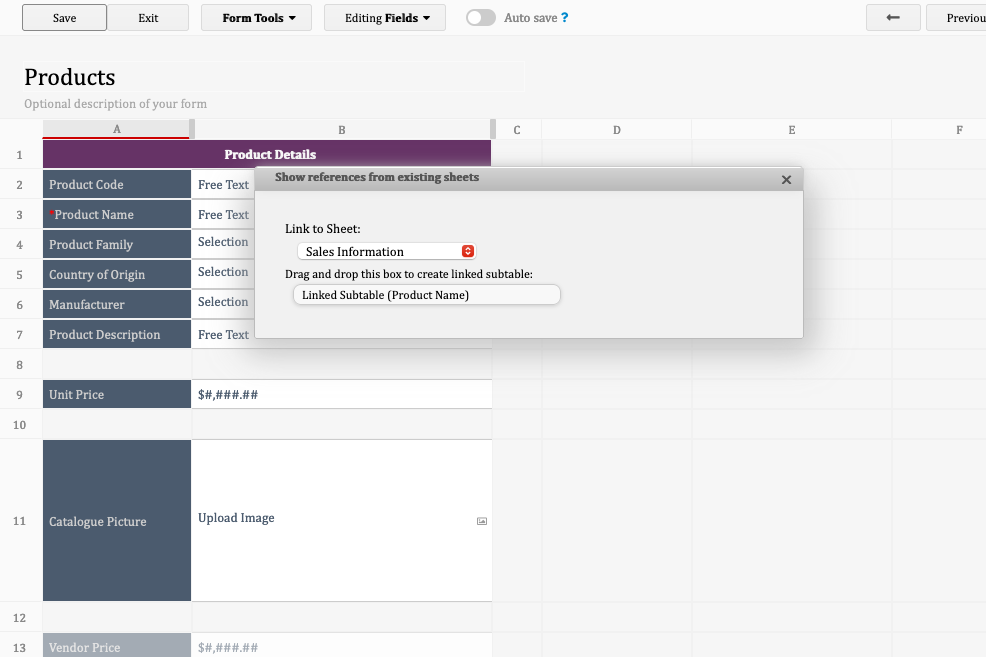
In the future, you'll be able to see all relevant orders when you access a specific product entry.
In Design Mode, you can click and drag or press the Shift key plus the arrow keys to select multiple fields.
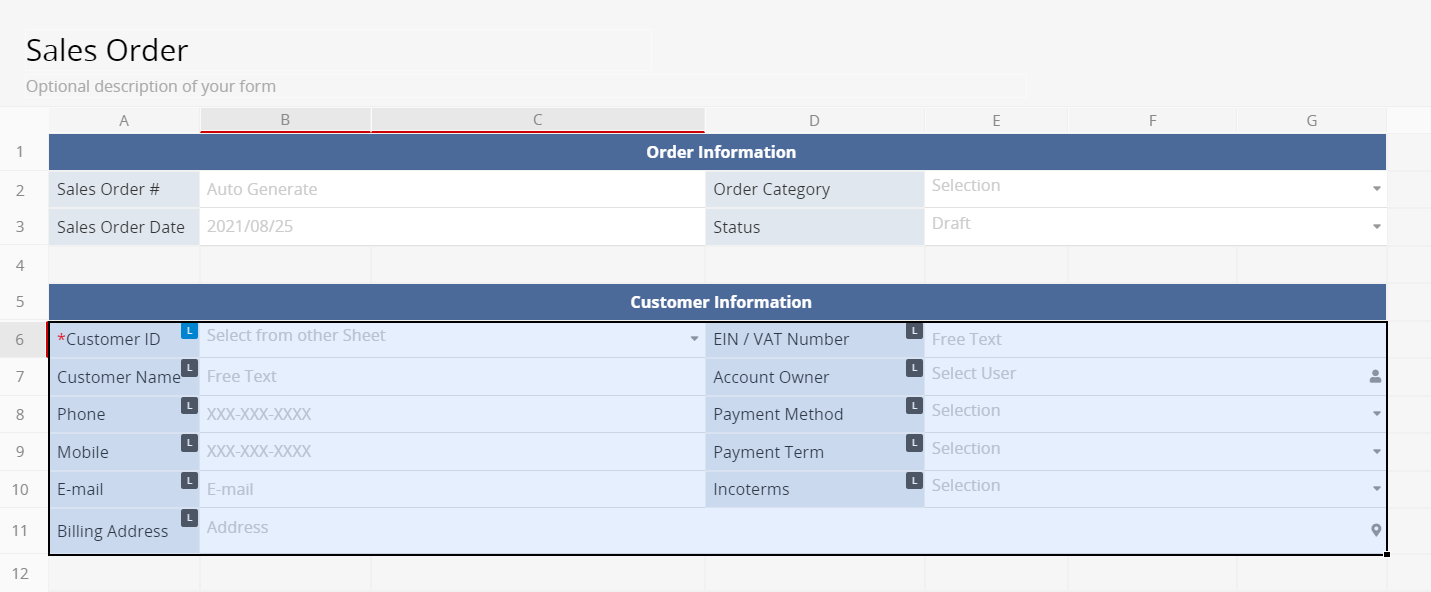
After selecting the fields, you may use the supported actions below:
1. Press Delete/Backspace to delete selected fields.
2. Apply styles to selected fields.
3. Copy and paste to create a new set of selected fields.
In Edit Mode, you can click and drag or press the Shift key plus the arrow keys to select multiple fields.
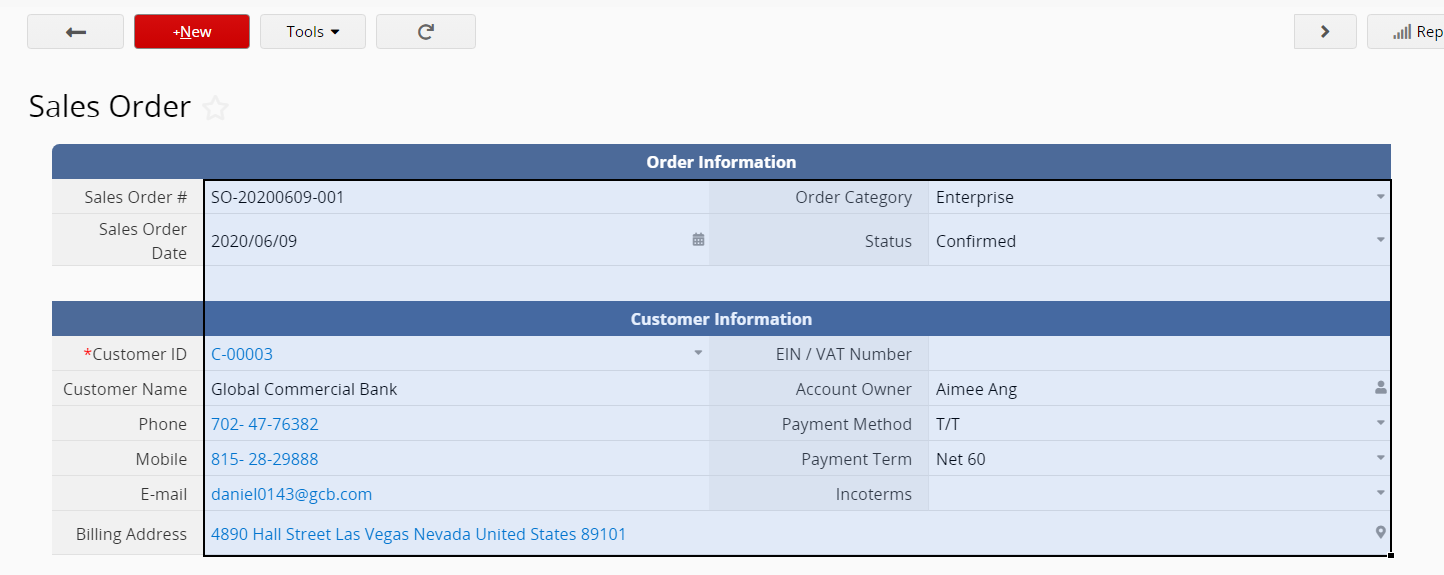
After selecting the fields, you may use the supported actions below:
1. Press Delete/Backspace to delete selected field values.
2. Drag the lower-right corner of selected fields to copy the first field value to the other selected fields.
3. Copy and paste selected field values to or from Ragic and Excel.
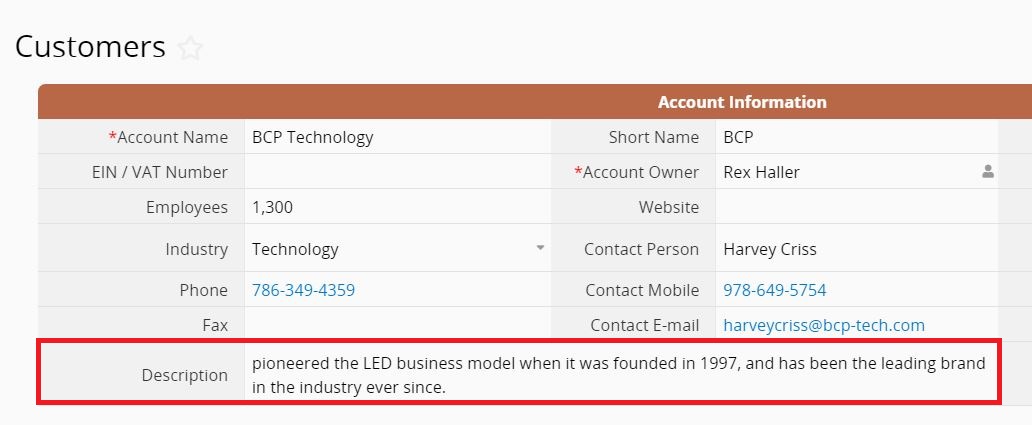
What you need to do is to create a new field and apply this formula:
TOUPPERCASE(LEFT(A8, 1)) + TOLOWERCASE(RIGHT(A8, LEN(A8)-1))
You can replace A8 with the field you would like to reference.
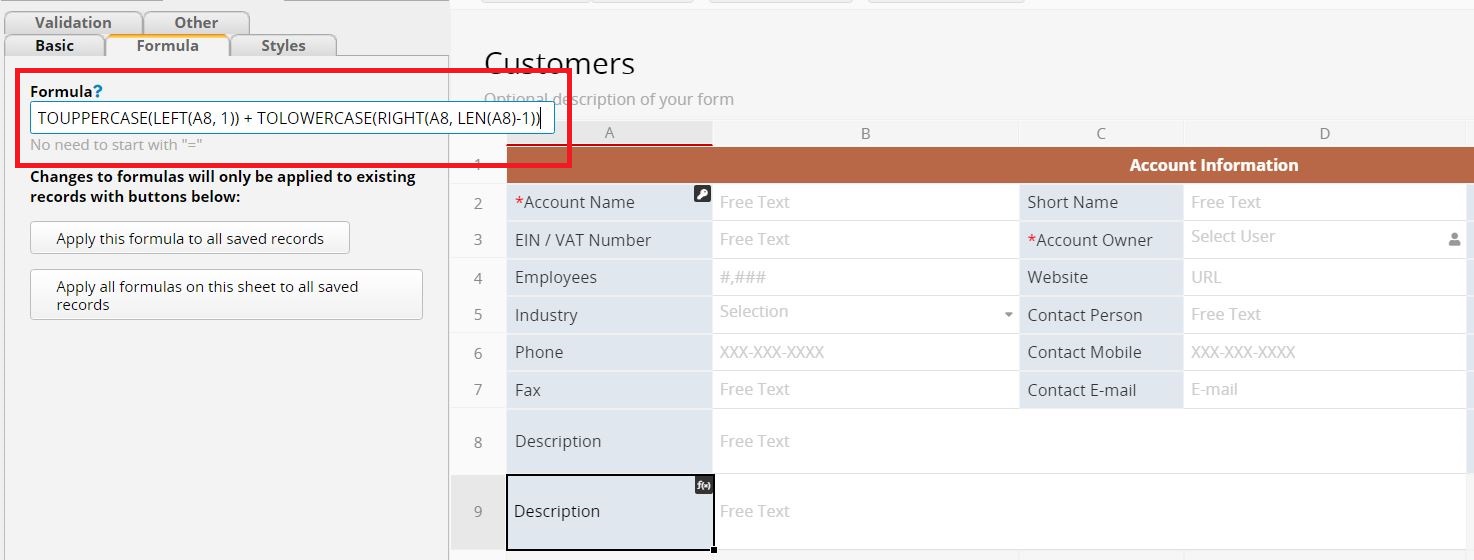
After applying that formula, your new field will populate the sentence on the "Description" field on A8 with the first letter capitalized.
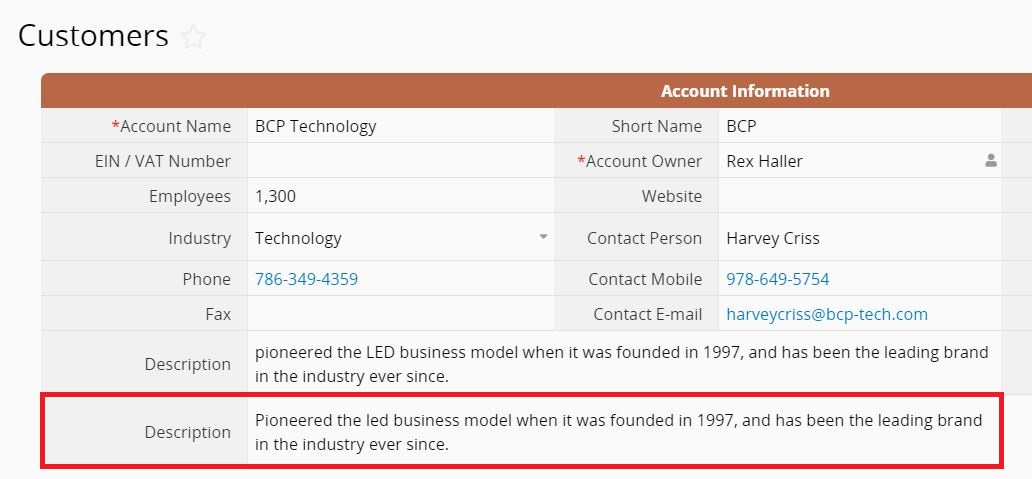
In access rights, we understand that there are 4 different levels of access rights. But how exactly does it work? Here are common organizational structures for your references.
1. In the "Sales Order" sheet, agents can only view orders created by themselves.
2. In "Job Assignment" sheet, works can only view jobs assign to them.
3. In public sheet, students, clients, or vendors can only view entries created by themselves.
Take the "Sales Order" as an example, agents can only view orders that are created by themselves. Entries created by other agents are invisible to them.
You may follow the steps below:
Step 1. Create a "Sales" user group and assign all agents to that group.
Step 2. In the global access rights panel, grant the "Sales" user group with the "Survey User" access rights in the "Sales Order" sheet.
In the future, when agents access the "Sales Order" sheet, they'll be able to view entries created by themselves, but no entries created by other agents.
Take the "Job Assignment" as an example, entries on the sheet might be logged by the clients or support team instead of each worker. Furthermore, workers should only view jobs that are assigned to them.
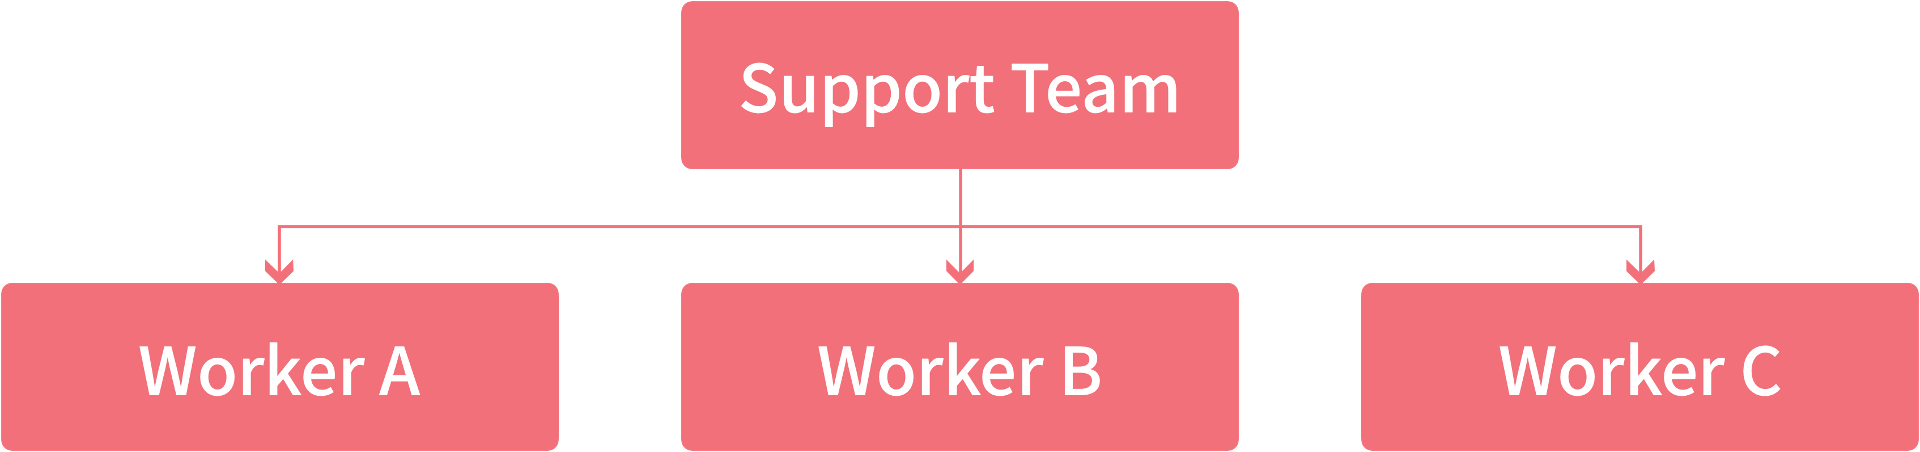
In this scenario, settings of "Survey User" access right won't work since entries are not created by the workers. Hence, you'll need to combine with assign feature as below:
Step 1. Create a "Workers" user group and assign all workers to that group.
Step 2. In the global access rights panel, grant the "Workers" user group with the "Survey User" access rights in the "Job Assignment" sheet.
Step 3. In the "Job Assignment" sheet, create a "Select User" field with assign feature.
With the above settings, you can assign a job entry to a specific worker by filling in the field you created in step 3. Workers can only view jobs that are assigned to them.
1. Sales team is divided into several groups. Agents can only view their own clients. Furthermore, group managers can view all clients within their groups.
2. Job assignment works as a tree structure. Jobs will be assigned to the group manager first, and then assigned to individual worker by the group manager.
Take the "Sales Order" sheet as an example. Further to let agents view their own orders, you would like to let team managers view orders within their teams but not the orders created by other teams:

You may follow the steps below:
Step 1. Create a "Sales" user group and assign all agents to that group.
Step 2. In the user page, fill in the "Department" field for each agent such as "Team A" or "Team B".
Step 3. Create a user group for each team such as "Team A" and "Team B". Then, assign team managers to the proper user group.
Step 4. In the global access rights panel, grant the "Sales", "Group Team A", and "Group Team B" user groups with the "Survey User" access rights in the "Sales Order" sheet.
Step 5. In the "Sales Order" sheet, create a "Select User" field with the "Default to current user" attribute. Then, set the "Department" field as the loaded field in the link manager.
Step 6. In the "Sales Order" sheet, create a "Select User Group" field with assign feature. Then, apply formulas to reference the value in the "Department" field you created in the step 5:
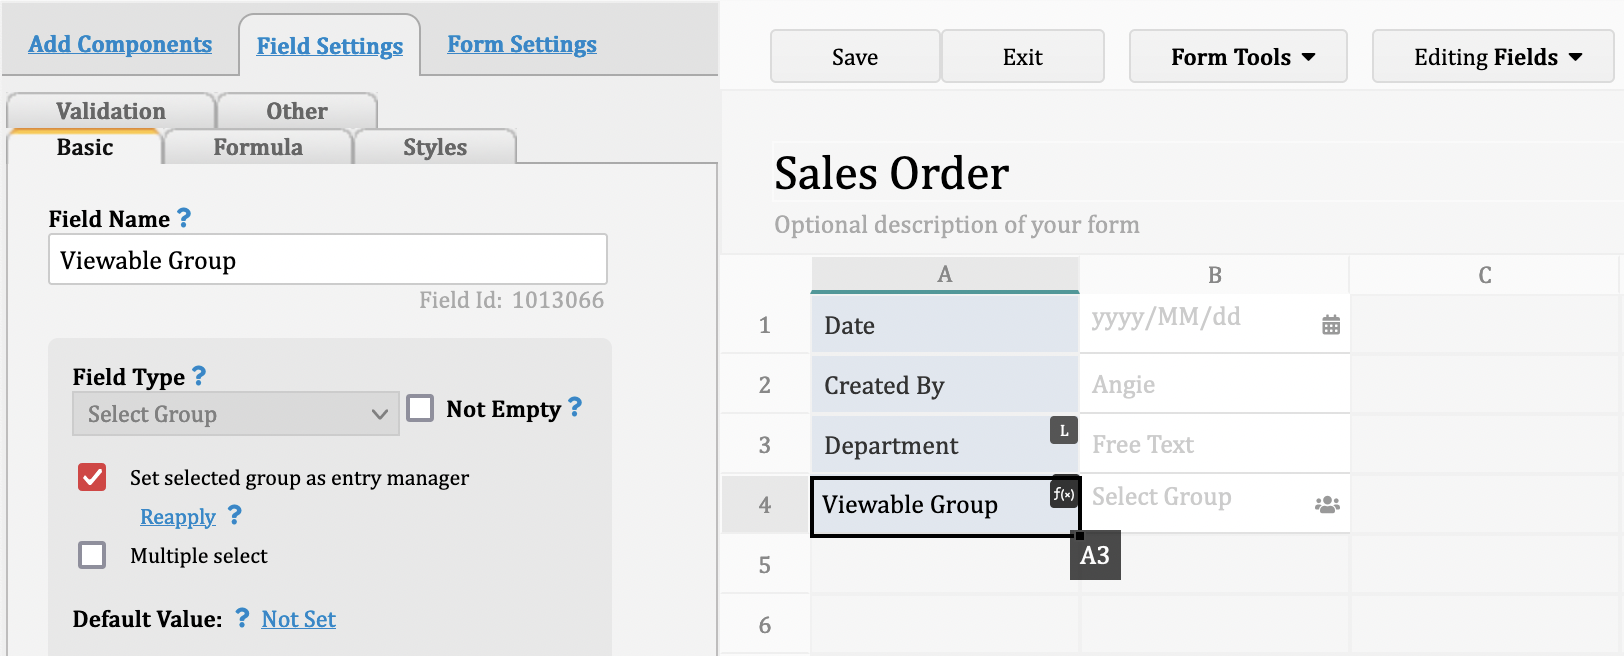
With the above settings, when agents create new orders and save them, the system will run the assign settings so that team managers will be able to view the orders.
Take the "Job Assignment" sheet as an example, once the a job is created, it will be assigned to the team manager. Then, further assign to each worker by the team manager.
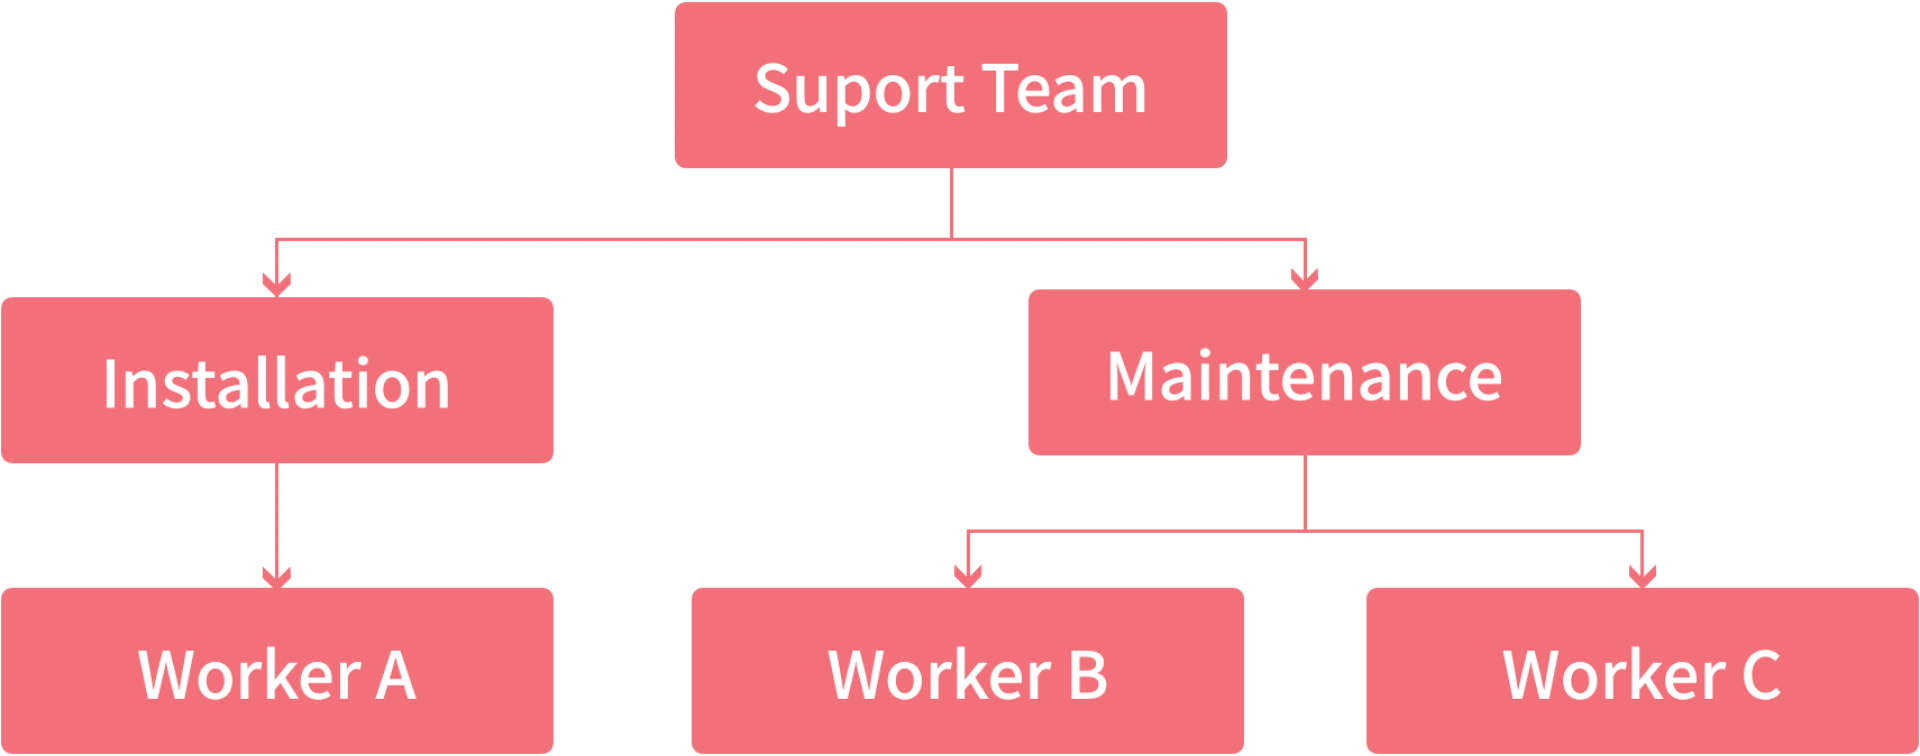
You may follow the steps below:
Step 1. Create user groups for the "Team Manager", "Installation", and "Maintenance". Then, assign team managers to the "Team Manager" group. Also, workers to the "Installation" or "Maintenance" user group.
Step 2. Assign team managers to their teams' user groups. For example, assign the maintenance team manager to the "Maintenance" user group.
Once completed, team managers will be in two users groups, one is the "Team Manager" and the other is their own team group.
Step 3. In the global access rights panel, grant the "Team Manager", "Installation", and the "Maintenance" user groups with "Survey User" access right in the "Job Assignment" sheet.
Step 4. In the "Job Assignment" sheet, create a "Responsible Team Manager" field with assign feature, limiting to "Team Manager" only from drop-down menu:
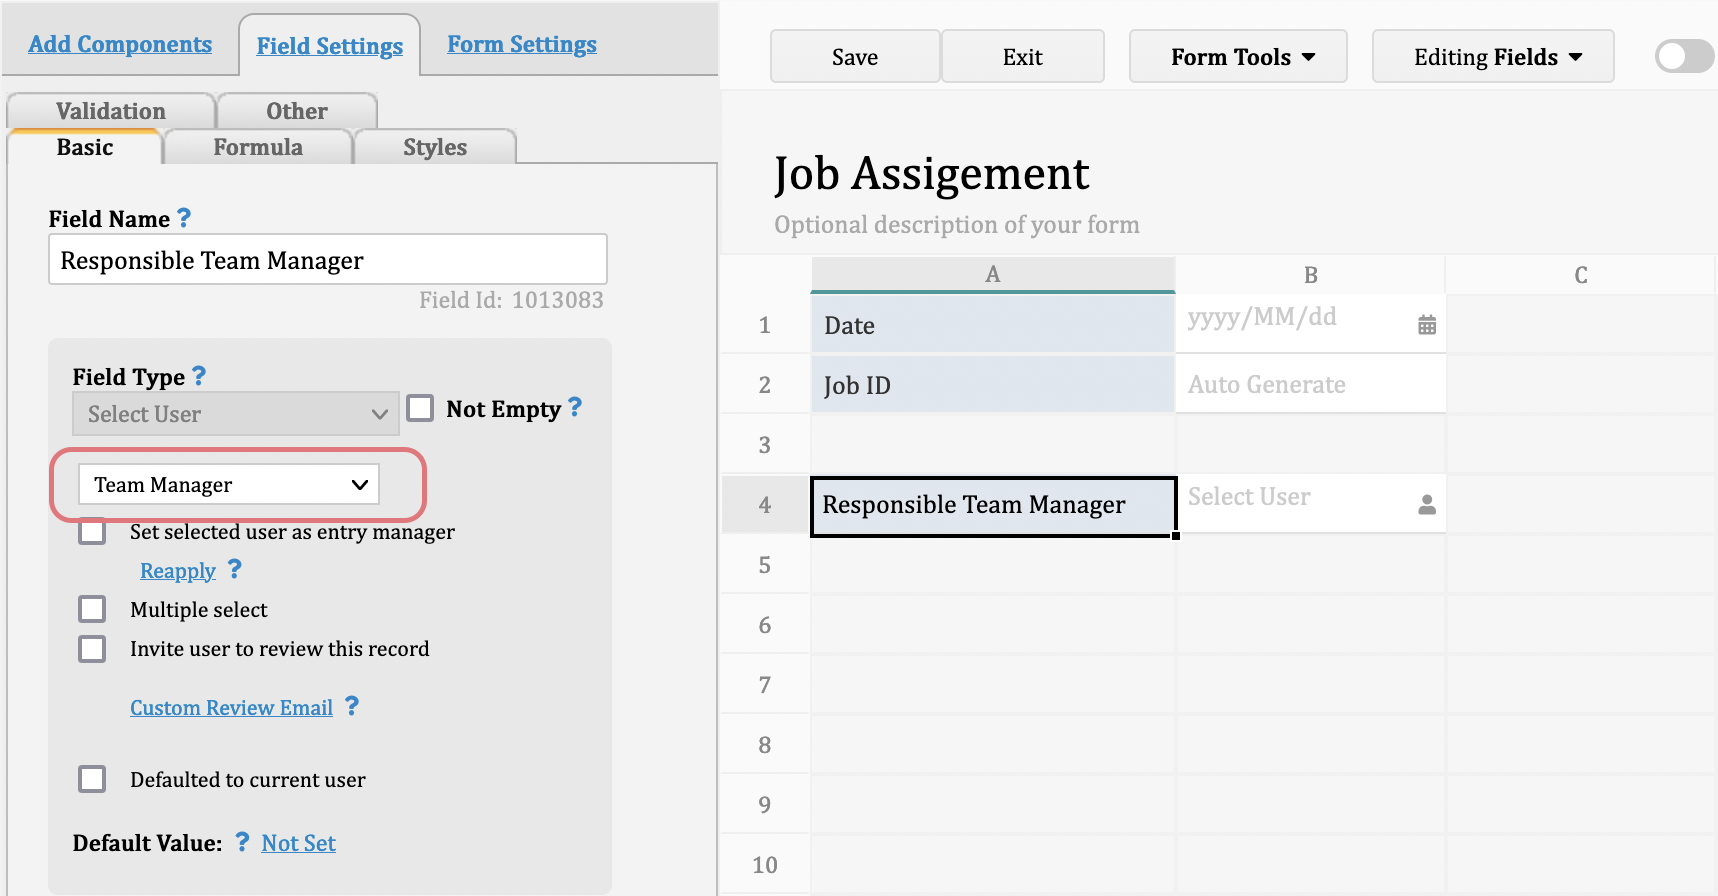
Step 5. In the "Job Assignment" sheet, create a "Assign to Worker" field with assign feature, limiting to "Same group as submitter" only from drop-down menu:
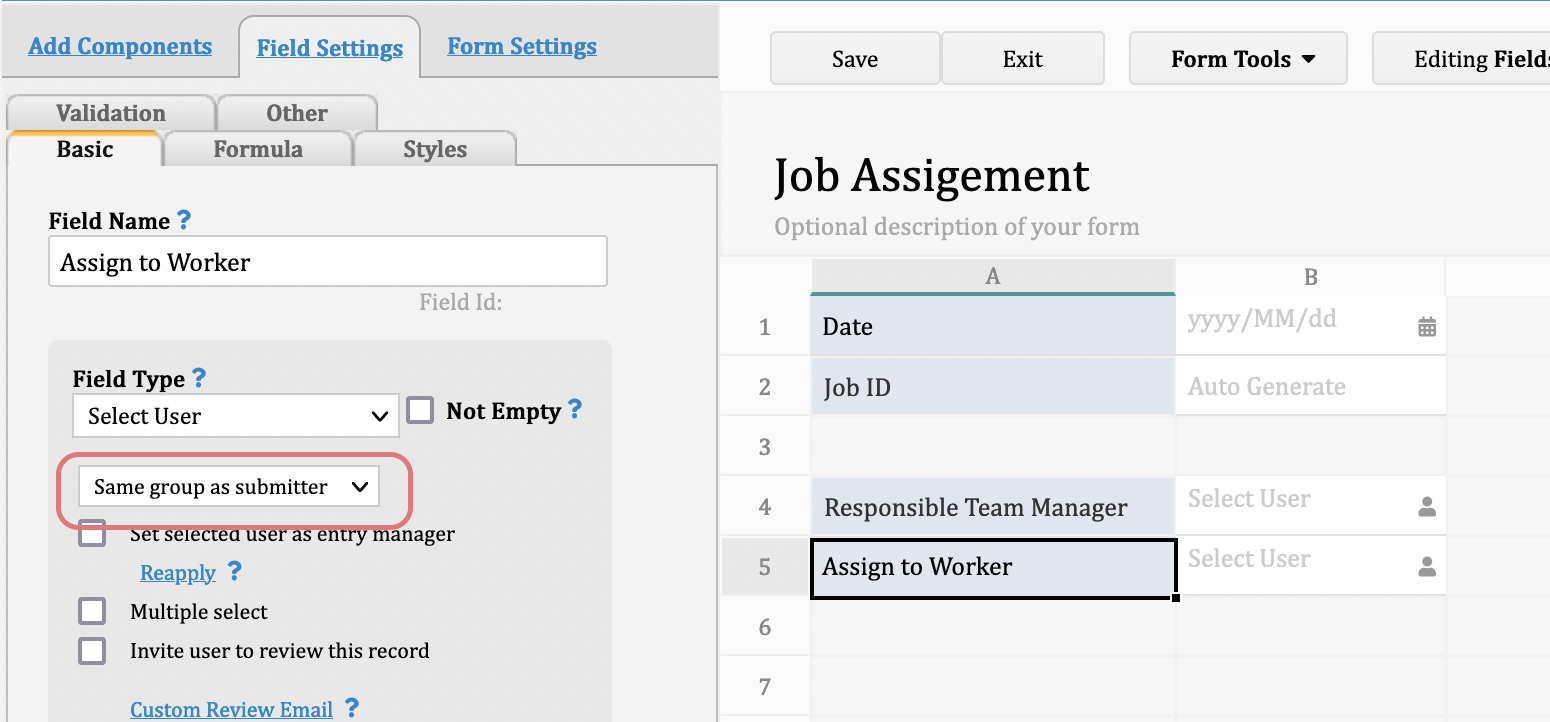
With the above settings, when a new job is created, it could be assigned to a specific team by filling the "Responsible Team Manager" field. Then, the team manager can assign it to workers within the same team.
An entry will be viewed by multiple departments. However, part of the fields is visible to certain departments only. For example, when agents access the "Product" sheet, you would like to hide the cost. Or, when workers access the "Product" sheet, you would like to hide the sales price.
Take the "Product" sheet as an example. Let's say we wish to hide the "Cost" field from the agents:
Since the access right settings in Ragic are based on sheet level, you won't be able to set it up as field level. As workaround, you'll need to achieve this with multiple versions. You may follow the steps below:
Step 1. Create a multiple version based on the "Product" sheet. For example, the "Product for Agent" sheet.
Step 2. In the "Product for Agent" sheet, hide the "Cost" field.
Step 3. In the global access rights panel, set up proper access rights so that the "Sales" user group can only see the "Product for Agent" sheet but not the "Product" sheet.
Above examples would be common settings of the access rights. If your structure is not listed above, feel free to contact us at support@ragic.com to discuss the proper settings.
1. Go to the User sheet in the hamburger menu on the upper left corner > User Access > Manage Users. Confirm whether the Manage Users sheet contains the info you want to load into another sheet.
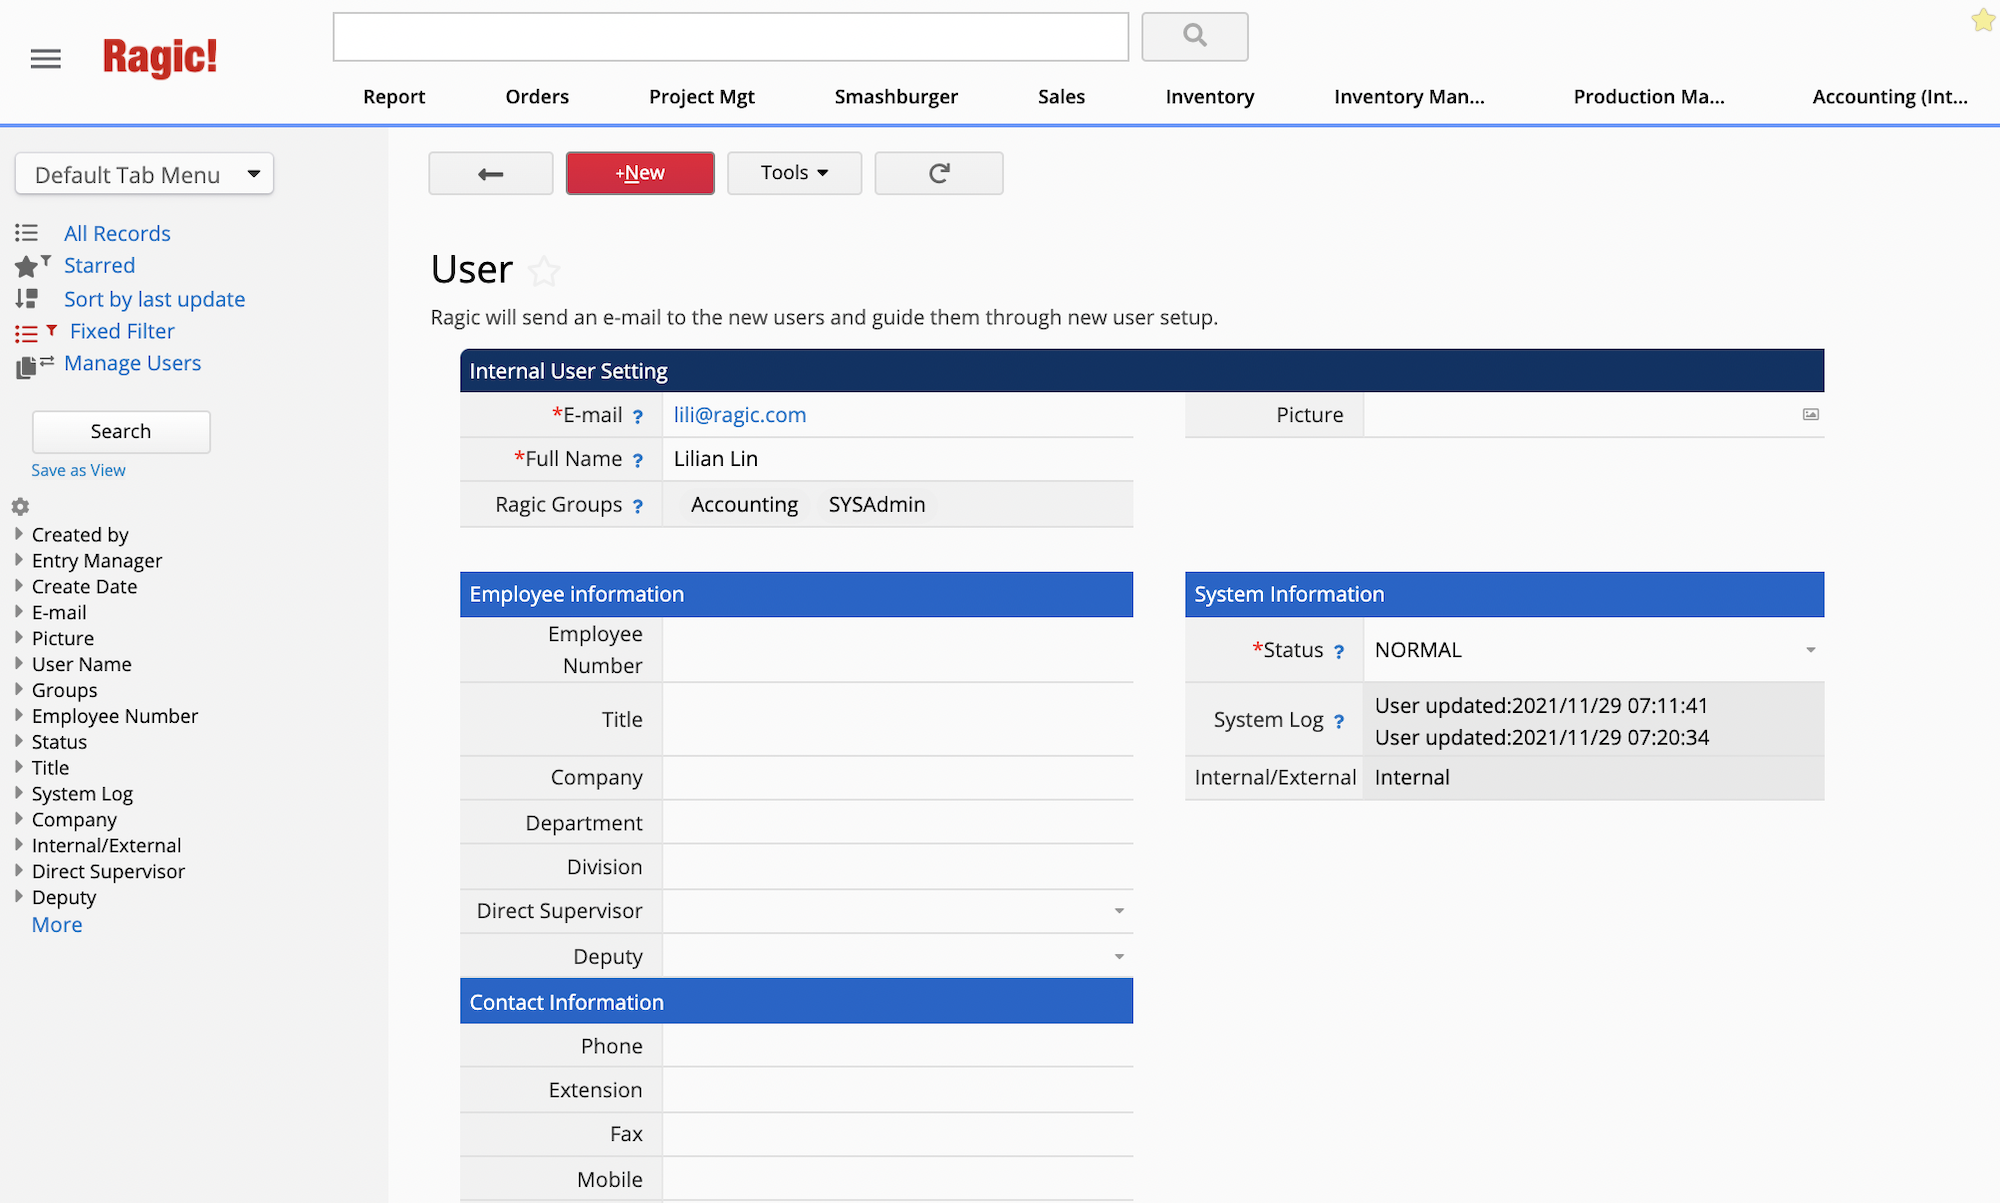
If not, you can add fields to the User sheet, but please do not delete any default fields. It might affect system functionality
2. Go back to the sheet you want to load information into, under Design Mode. Add a field and set Field Type as Select User.

3. Click on Form Tool > Link & load to open Link Manager.
Select Ragic System Config > Manage Users on the lower right corner.
You'll see that the User Name field has already been set as the linked field.

You then can set up the loaded fields.
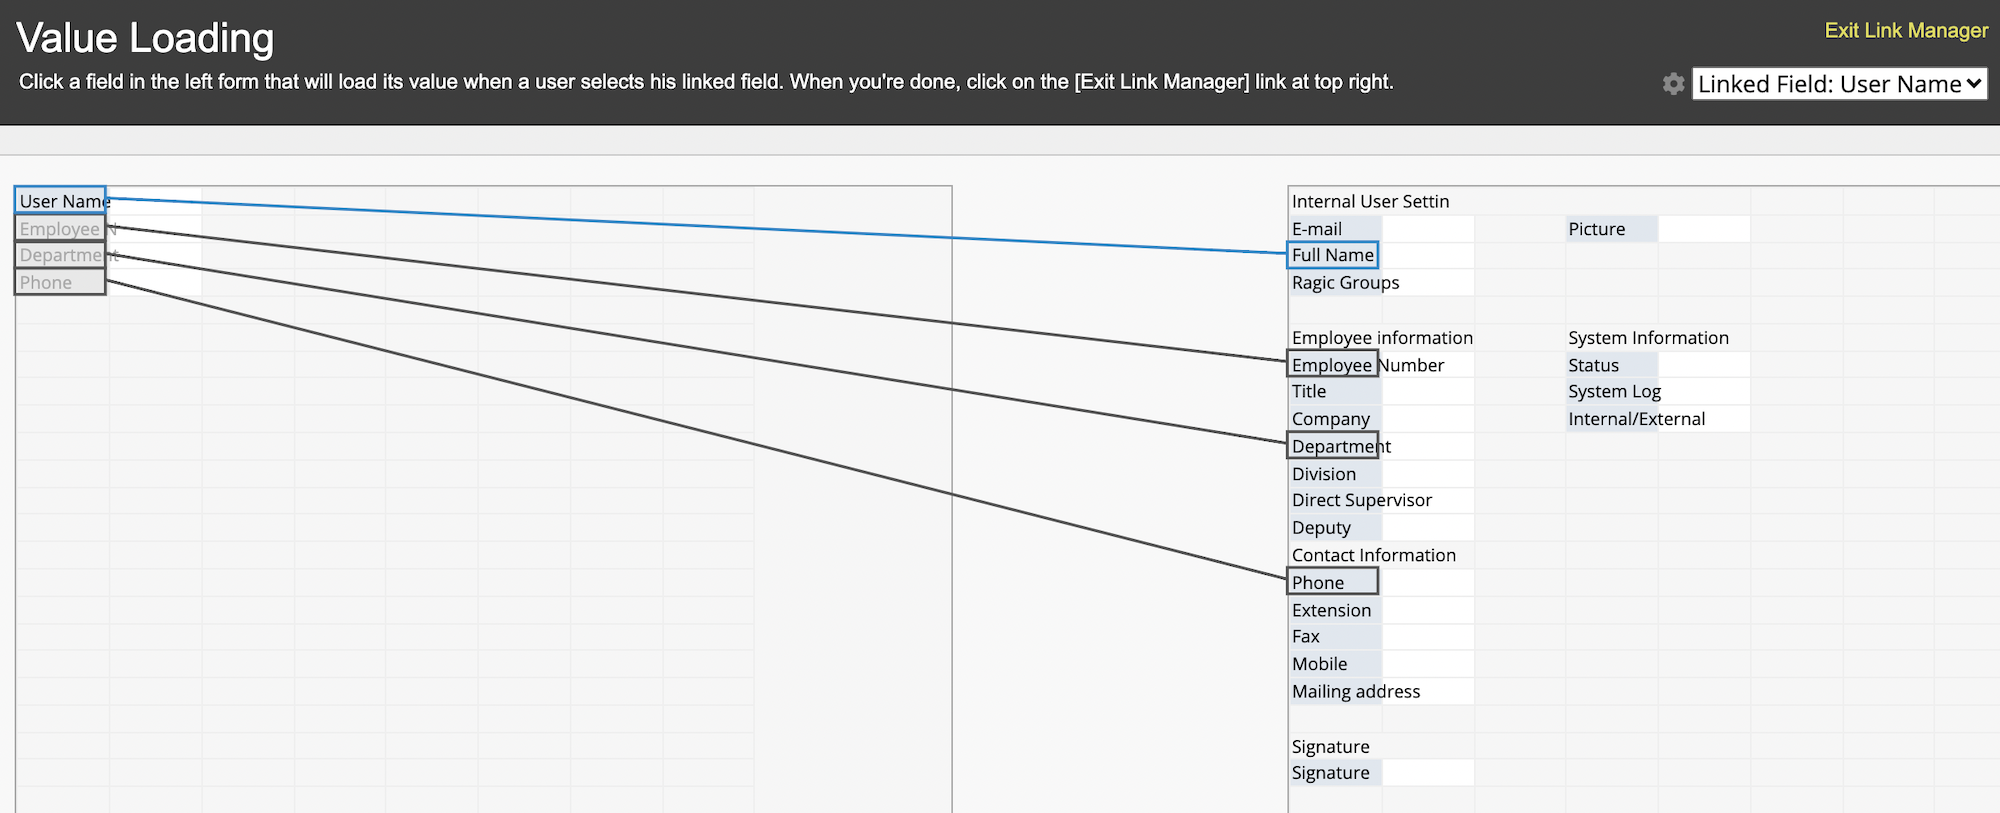
Click on Exit Link Manager on the upper right corner when you're done.

User info will be loaded into related fields automatically once the User Name field is filled.
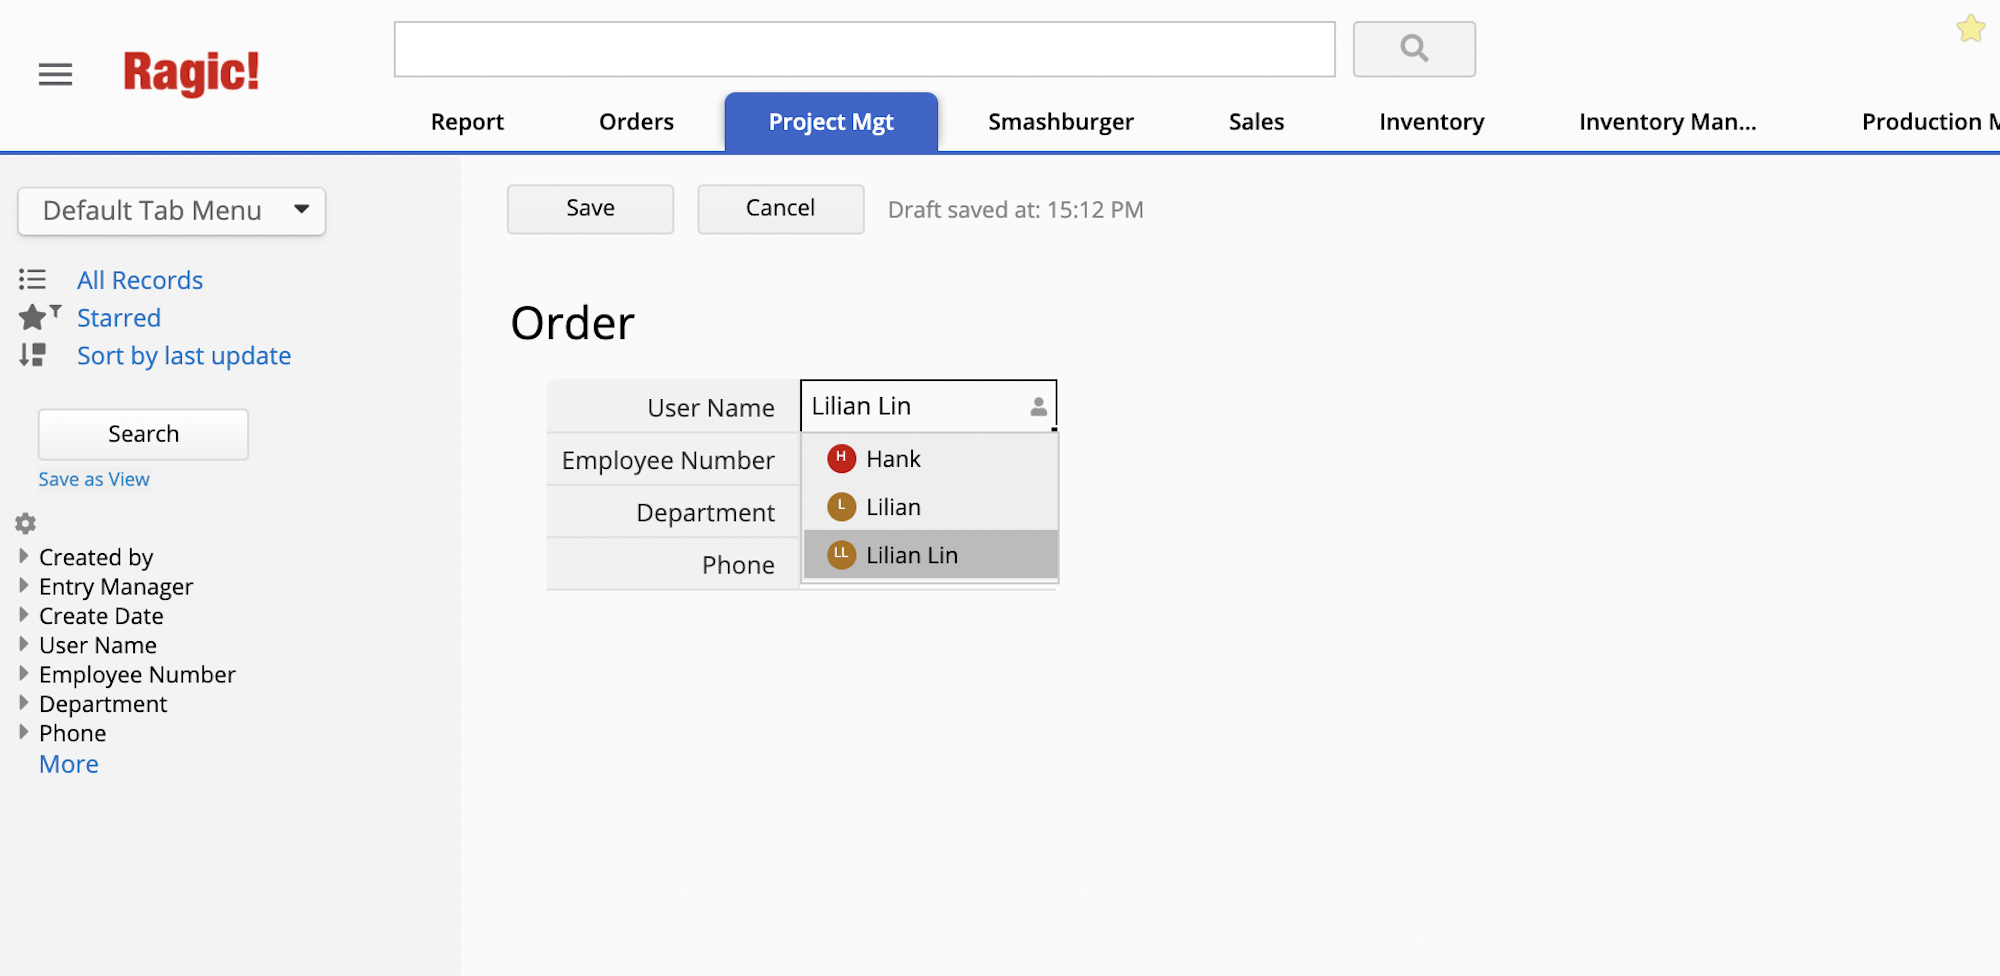
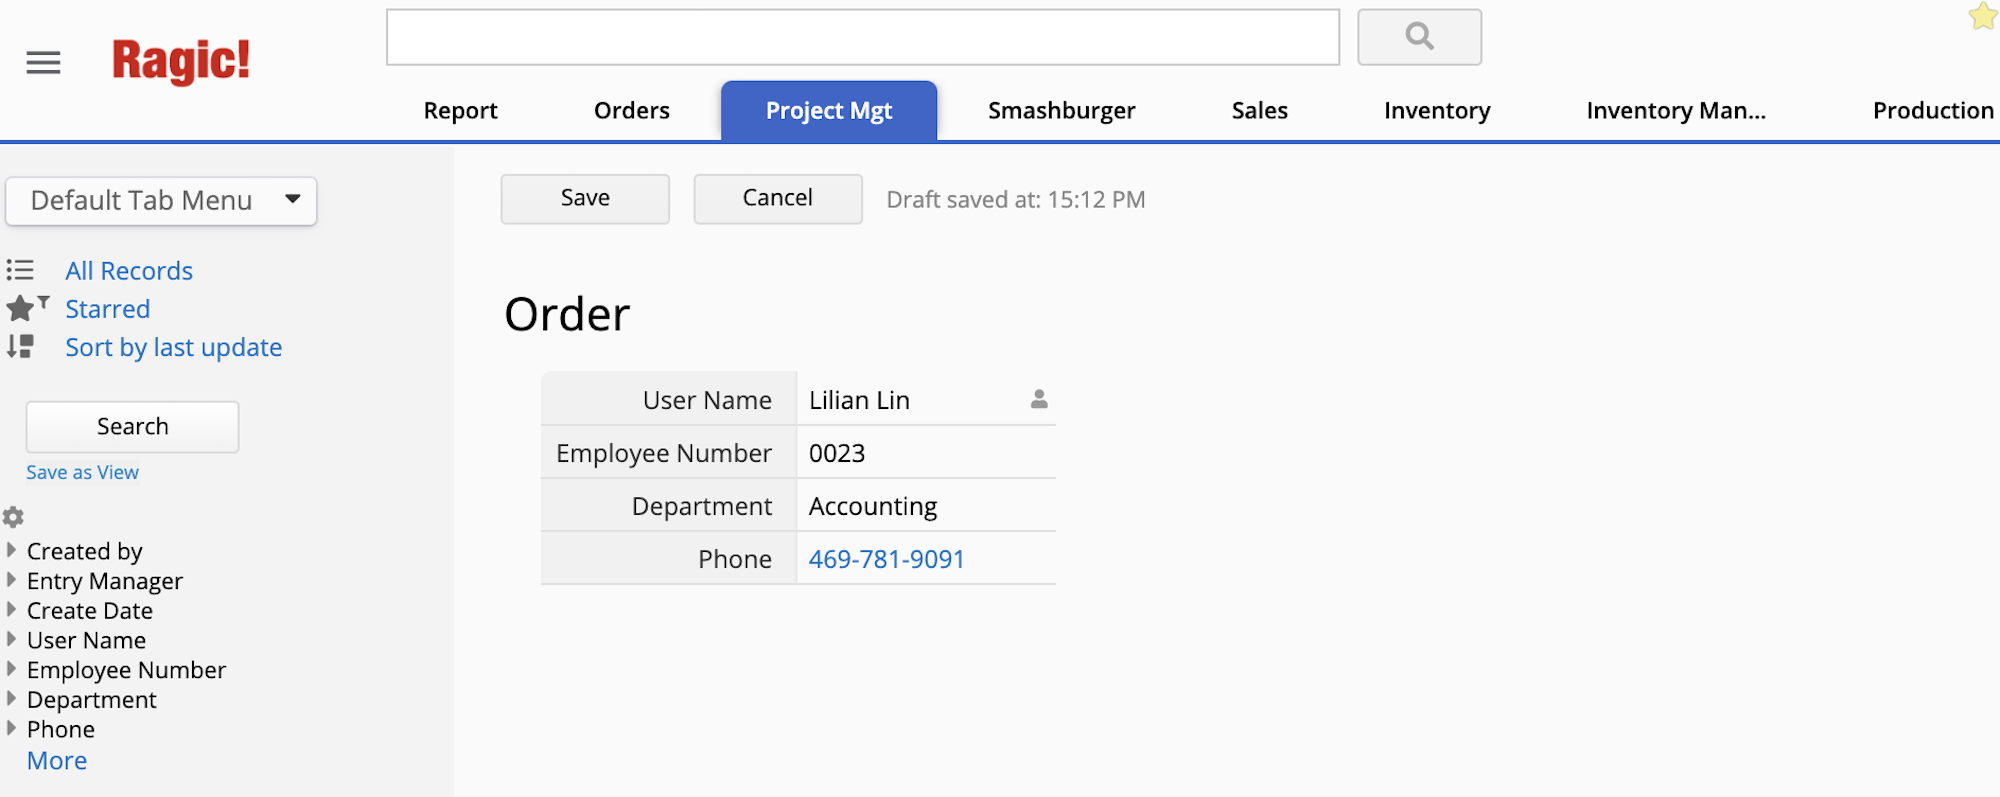
You can also set the default user as the entry creator by checking the "Defaulted to current user" box. User related info will be loaded automatically upon entry creation.

Ragic has a variety of features that allow you to create relations between sheets and automate workflows. Each feature operates differently; some are synced automatically; others can only be “triggered” manually. See table summary below.
| Auto-synced | Triggered | |
| Definition | Changes made in sheet a will be reflected in sheet b automatically | Changes made in sheet a will not be reflected in sheet b without “triggering” |
| Ragic features | Multiple Versions, New sheet from subtable, Show references from existing sheets | Link & load, Formulas, Auto generated field values, Default values |
Ragic provides 4 features to link sheets together: Link & Load, Multiple versions, New sheet from subtable, Show references from existing sheets .
Except for Link & Load, the other 3 features support auto-sync. In principle, these features create links between sheets by allowing 2 sheets to share fields with the same Field ID. That is, whenever you modify a field value in sheet a, the same field in linked sheets will also be synced because they are exactly the same fields.
Note: Not every field in sheets created by Multiple versions or New sheet from subtable shares the same Filed ID with the source sheet (e.g., fields unique to one of the Multiple version sheets, or new fields created in the New sheets from subtable ). Fields that do not share the same Field ID will not be auto-synced.
Link & Load is different. Loaded fields will only be populated when triggered by entering data into linked fields
Knowing the difference between “auto-synced” and “triggered” is crucial to choosing the right design feature for your database.
Multiple versions and New sheet from subtable are the perfect features to establish links between “Employee Information” sheet and the “Contacts” sheet, or link the “contact info” subtable in the “Customer Info” sheet to the “Customer Contacts” sheet, because you want the info to be in sync at all times
But you probably wouldn’t want to auto-sync the “Sales Information” subtable in the “Sales Order” sheet to the “Pricelist” sheet, because you want product prices in “Sales Orders” to reflect the current prices at the time of sale, impervious to subsequent changes in “Pricelist”.
Besides Link & Load, these features also require triggering: Formulas, Auto generated field values and Default values
In general, these features can only be triggered in the sheets to which the features are applied, i.e., in a sheet where you apply Default Value, Auto generated field values (such as sequential numbers), and formulas, corresponding fields will be populated in the sheet when you create new entries or modify existing entries.
If a field value is modified/populated by other means, e.g., Update Value On Another Sheet, or execution of Link & Load when importing files, then in most cases, additional steps are required to trigger value syncing. For example, by checking the “Automatically execute when saving“ box in Advanced Setting, changes made and saved to sheet a will trigger automatic modification to the field value in sheet b.
Additionally, Action Buttons also require manual triggering (by pressing the Action Button or using the Mass Update function in the listing page). You don’t have to worry about accidentally triggering the Action Button when updating field values.
For more detailed information, please refer to corresponding documents in Ragic Design Manual.
You can copy the design of a sheet (without the data) using Duplicate Sheet, or create a new sheet that share the same data source using the Multiple Version. But if you want to copy both the design and data in a specific sheet without sharing its data source, we suggest the methods below.
First, duplicate a sheet following the instructions here. Remember to uncheck the “Use same data source on new sheet” box.
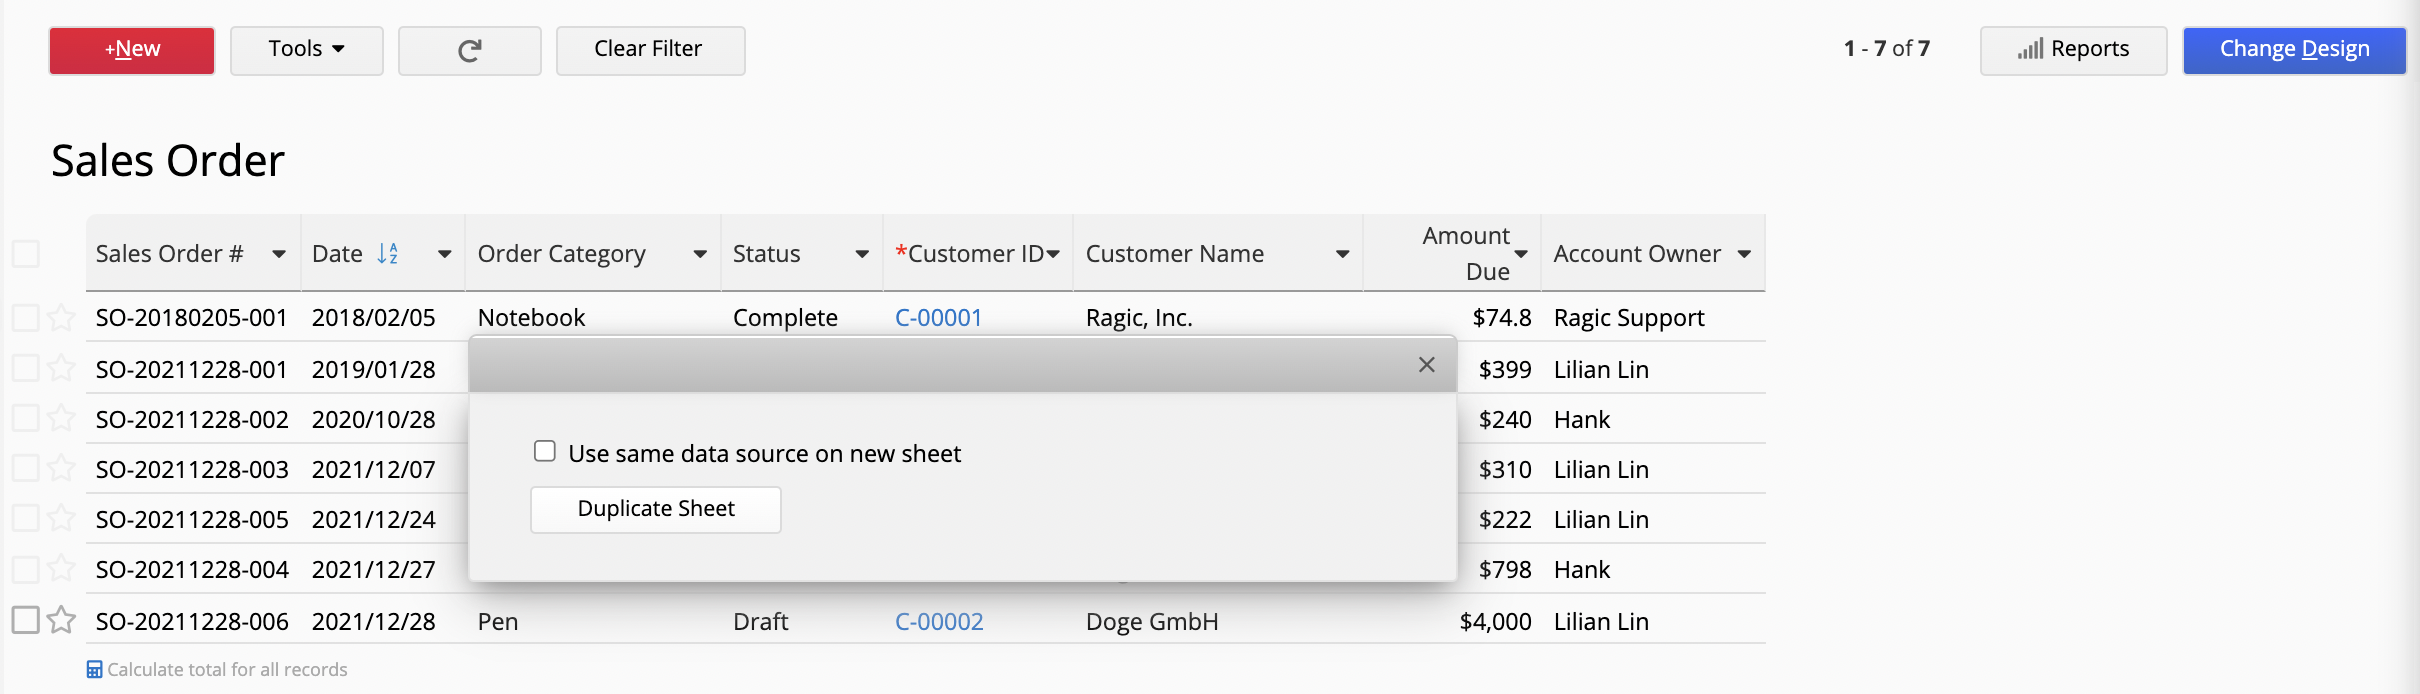
You will get a blank sheet with the same design.


To duplicate data from the source sheet to the new sheet, use the methods below:
Go back to the source sheet. Under Design Mode, set up a convert records button to convert data from the source sheet to the new sheet. Click on “Auto mapping fields” to speed up the mapping process (As the new sheet is a duplicate of the source sheet, the field names should be exactly the same. Auto mapping will quickly match all fields in both sheets, so you don’t have to do it manually.)
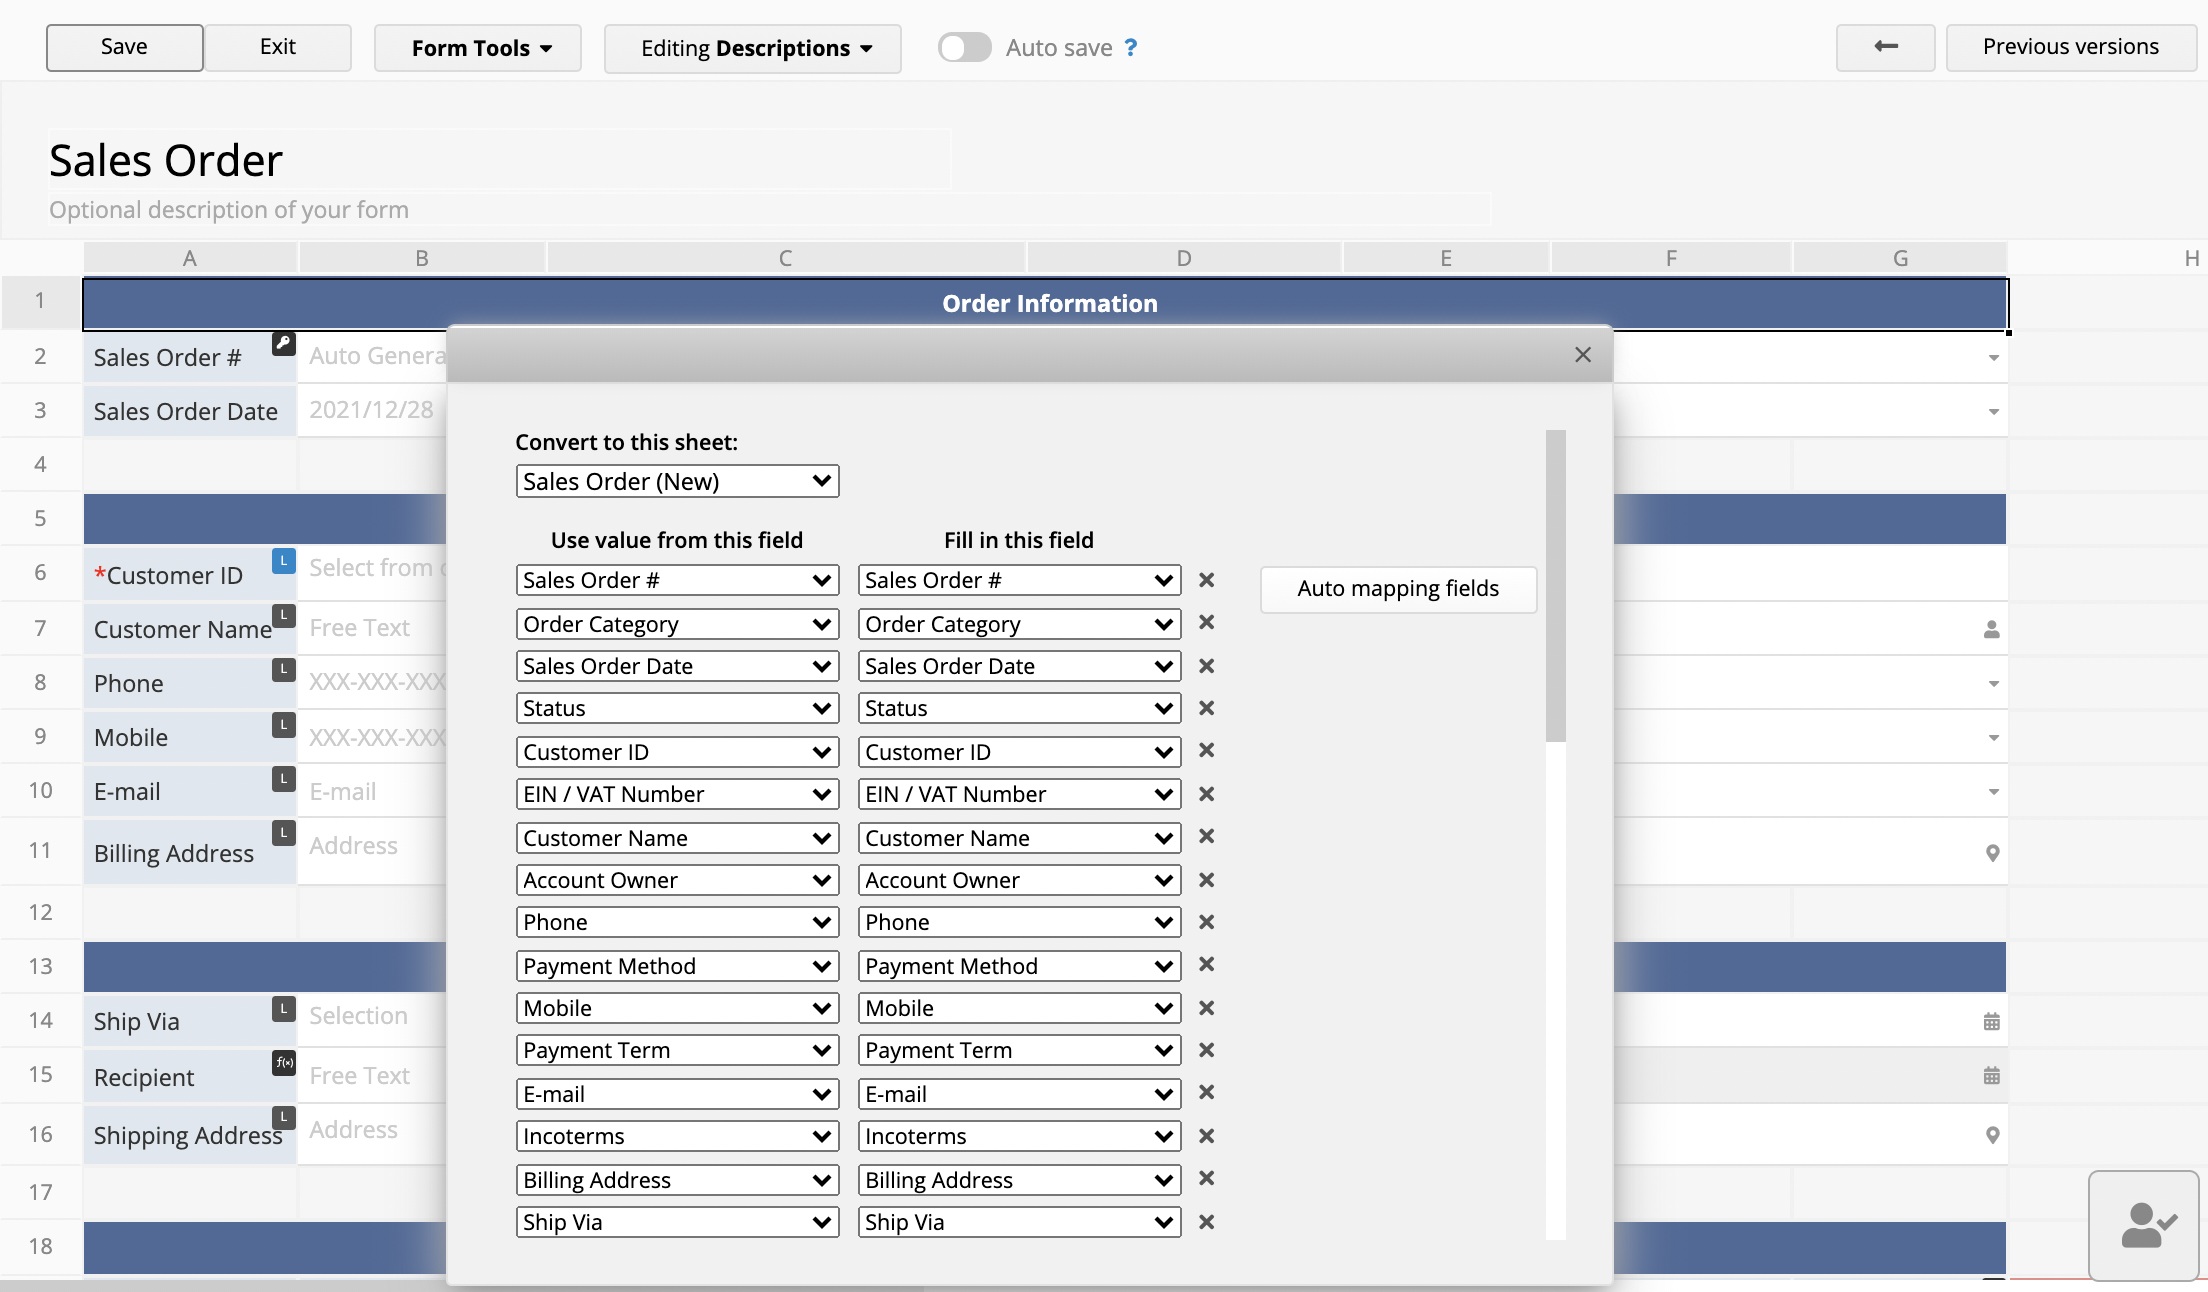
Now, go to the Listing Page of the source sheet. Click on Tools>Batch Execute>Execute Action Button to convert all/selected data to the new sheet.
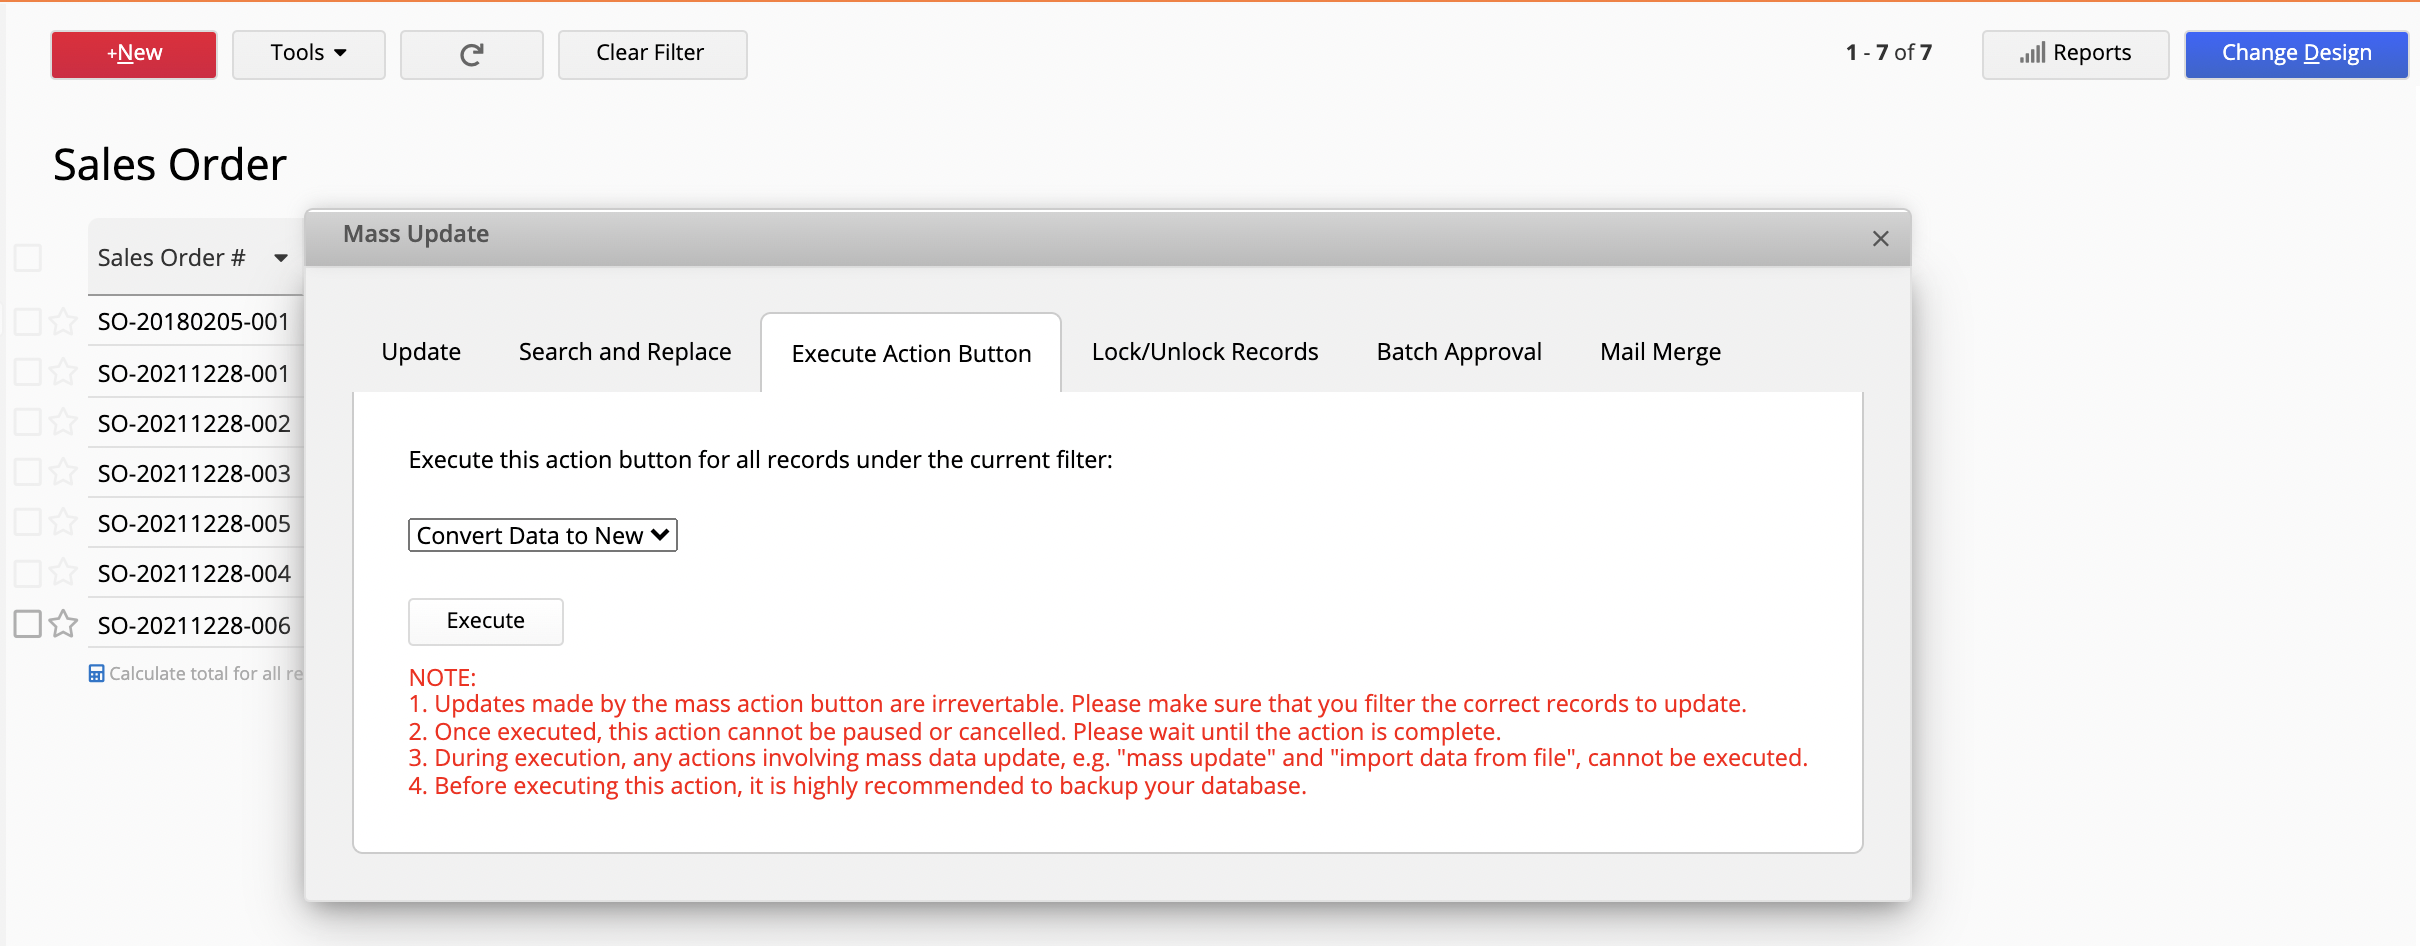
Go to the new sheet. And voila! All the data is in place.

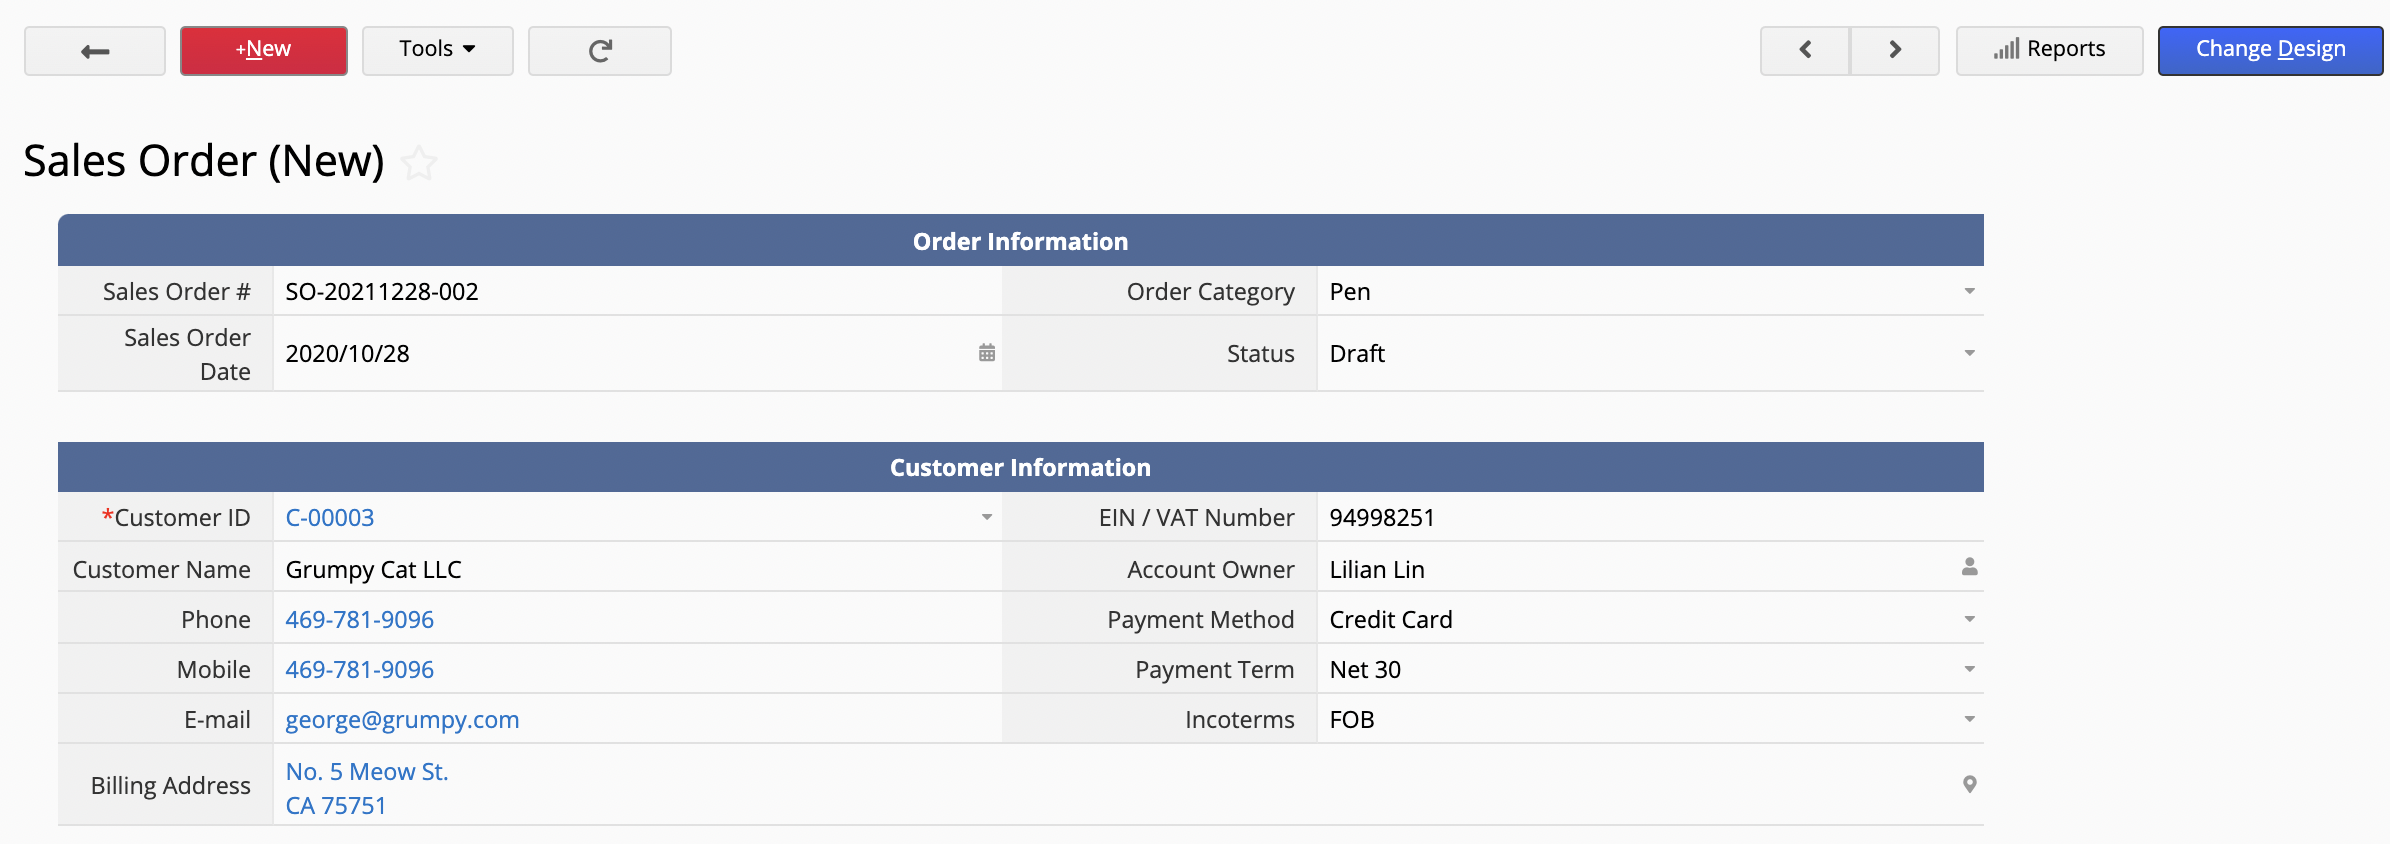
As importing data into subtables is a complicated process, if you are dealing with subtables, we would recommend method 1. However, if there is no subtable in your sheet, you can easily convert data from the source sheet to the new sheet using Importing and Exporting functions.
Again as the new sheet is a duplicate of the source sheet, the field names should be exactly the same. Ragic will auto-map corresponding fields in both sheets. (Double check to avoid mis-matches due to duplicate or edited field names!)
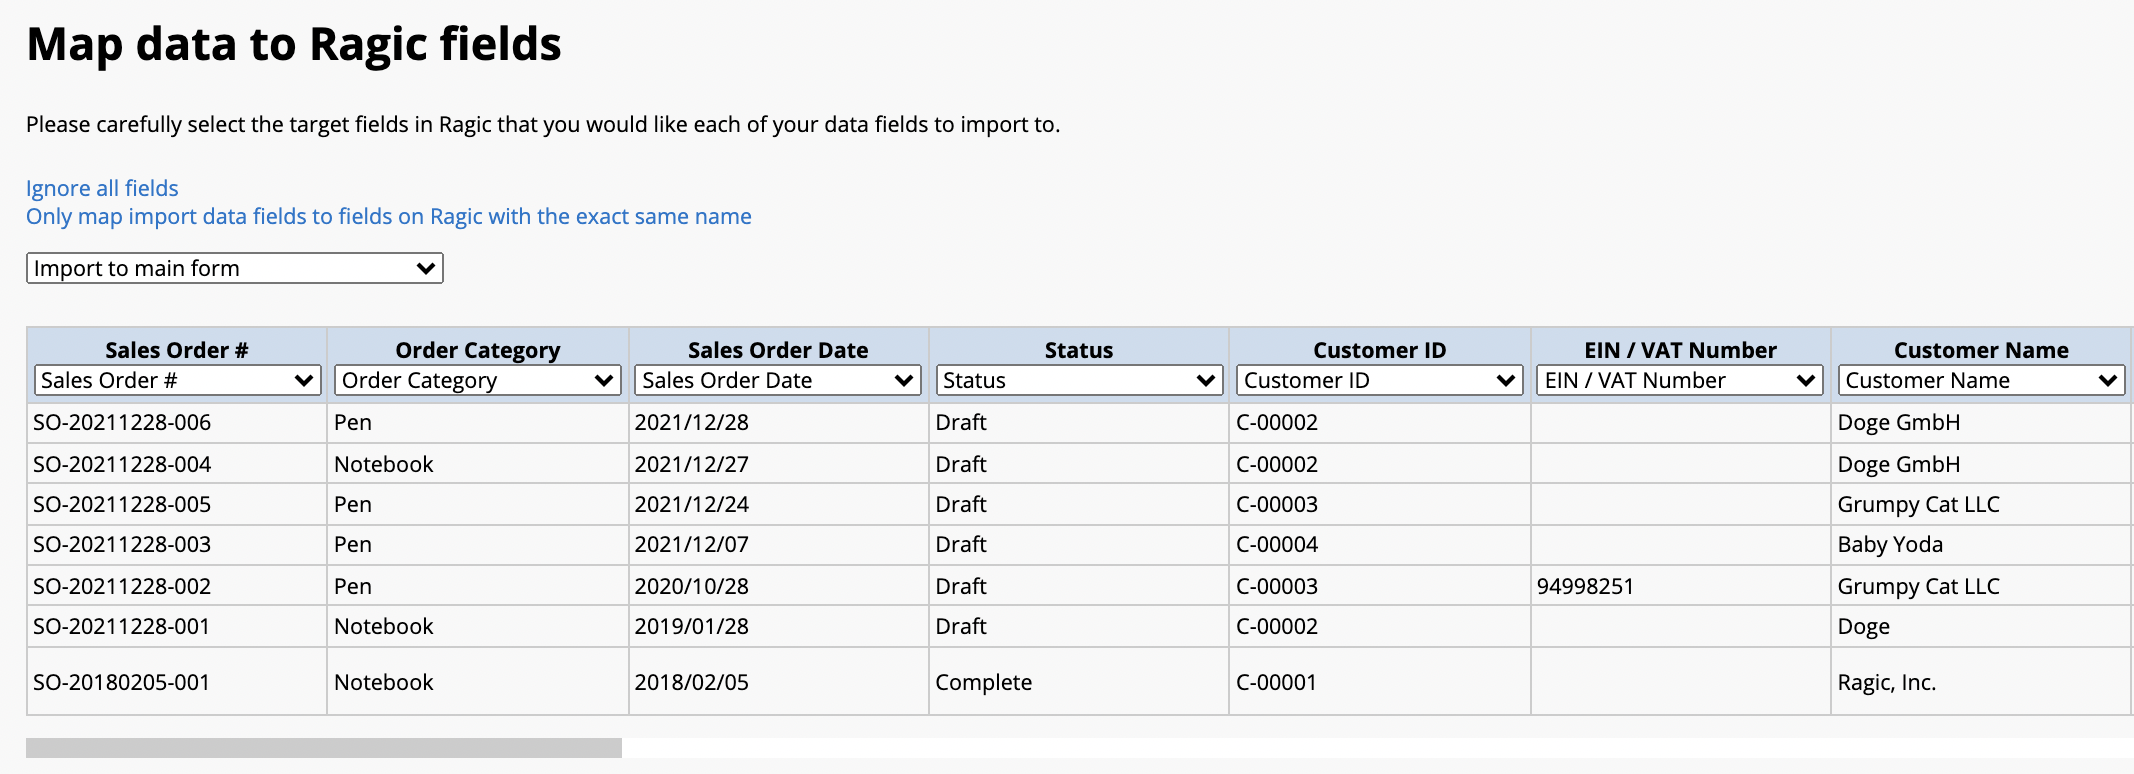
Before the feature is released, you can apply scripting as below:
Step 1. Create a free text field type with conditional formulas to check if the entry matches your criteria. Please return "Yes" when it matches.
Note: you may hide this field if necessary.
Step 2. Check the field ID of the free text field.
Step 3. Right-click on the sheet to access the JavaScript Workflow engine. Then, navigate to the "Post-Workflow":
Copy and paste the scripting:
var ENTRYLOCK_KEY = field ID;
var entry=param.getUpdatedEntry();
var entrylockValue = entry.getFieldValue(ENTRYLOCK_KEY);
if (entrylockValue == "Yes"){
	entry.lock();
}
Please replace the field ID with the ID you get in step 2. For example, 1000925.
Take the "Sales Order" as an example, if you wish to lock entry when the "Status" field is "Complete" or "Cancelled", you may follow the steps below:
Step 1. Create a "Entry Lock Check" field with conditional formulas to check if "Status" field is "Complete" or "Cancelled":
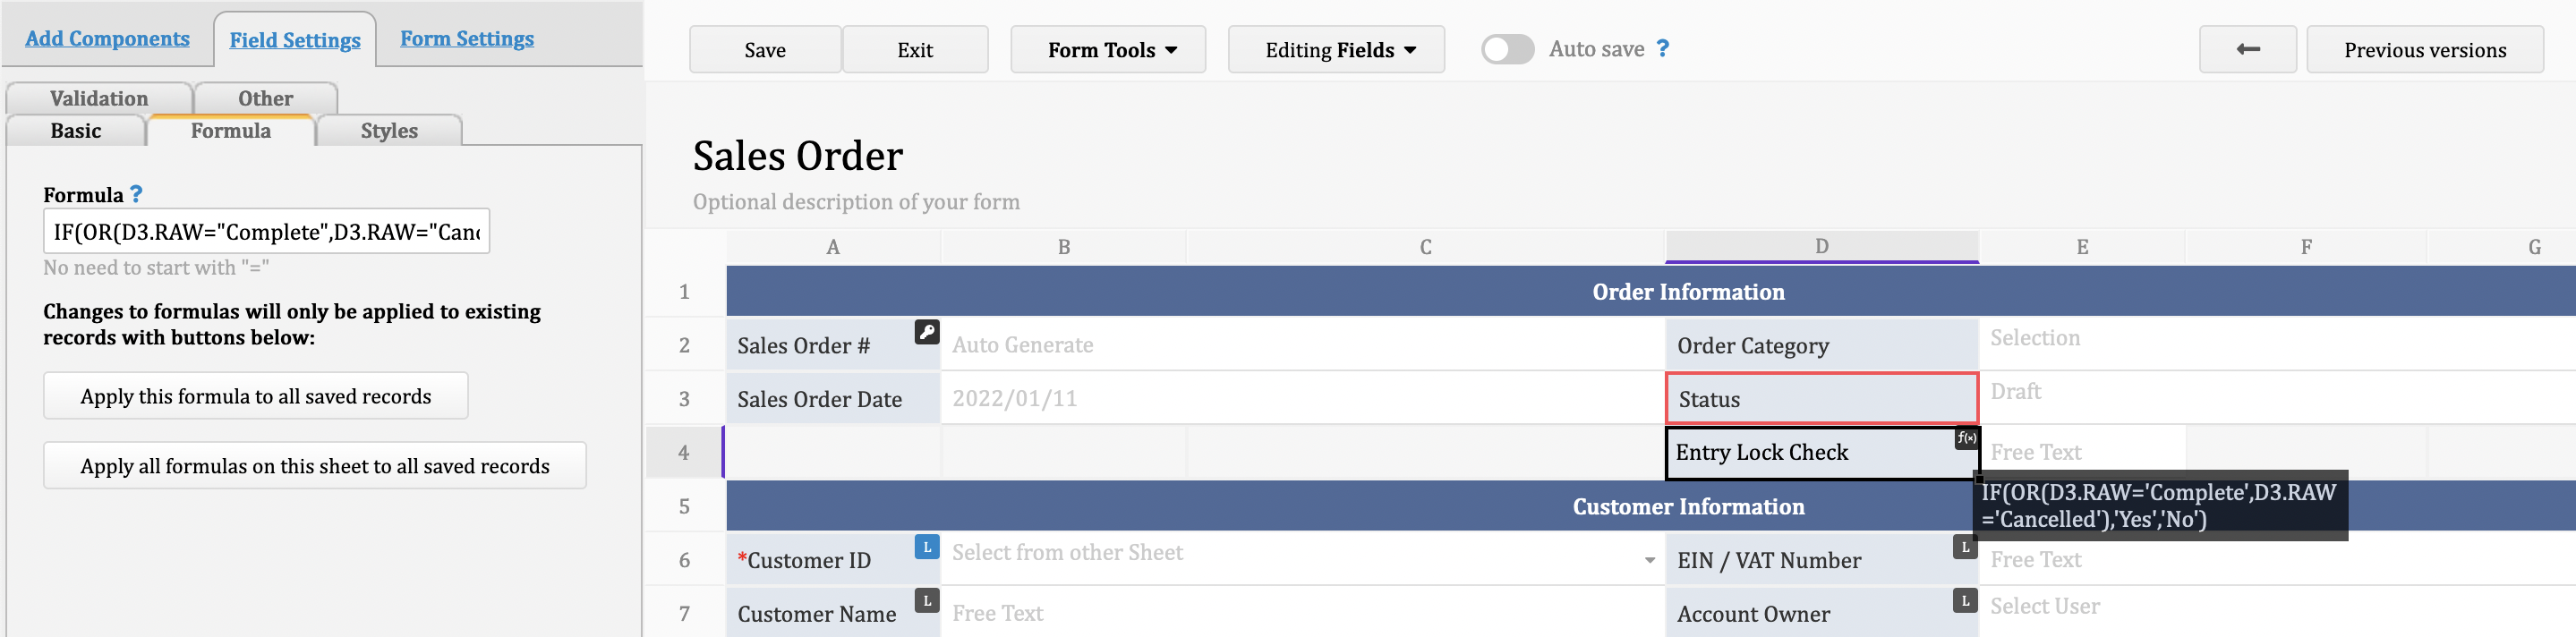
Step 2. Get the field ID of the "Entry Lock Check" field:
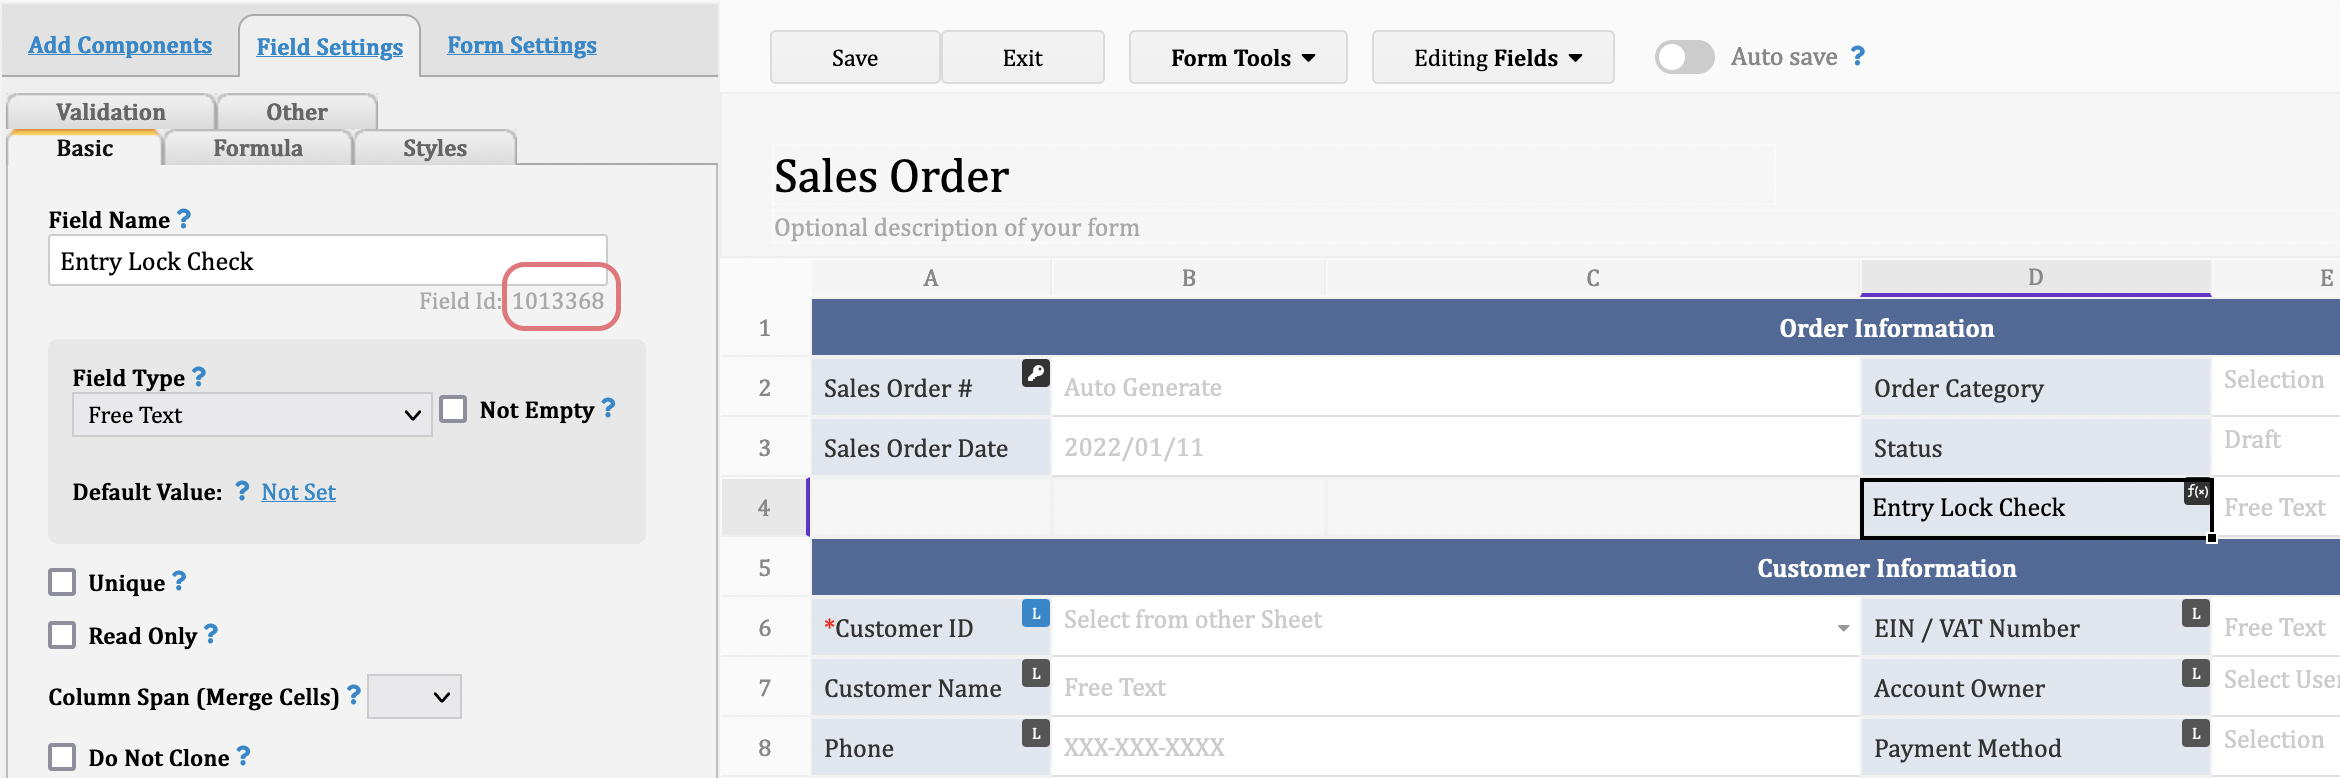
Step 3. Access the "Post-Workflow" and paste the scripting:
var ENTRYLOCK_KEY = 1013368;
var entry=param.getUpdatedEntry();
var entrylockValue = entry.getFieldValue(ENTRYLOCK_KEY);
if (entrylockValue == "Yes"){
	entry.lock();
}
In the future, when users update the "Status" field to "Complete" or "Cancelled" manually, the system will lock the entry upon saving. SYSAdmin can unlock it for editing if needed.
Note:
1. The workflow will only be triggered by manual edit. Edits that are made by action button, formulas recalculation, or from listing page will not trigger the post workflow.
2. Entry lock via this scripting won't show up in the edit history.
If you are registering from a European IP, automatically your account will be hosted on a European server, with a domain name that starts with eu.
Sometimes, we would like the system to pop up a warning but still allow saves when users input duplicate values. For example, we want to prevent users from creating duplicated entries for the same customer in the "Contacts" sheet. However, there are cases where clients might have the same names. Hence, we would like to be notified before we save the entry and check if the entry is duplicated.
You may follow the steps below:
Step 1. In the "Accounts" sheet, create a link and load field and link to the "Contact Name" field:
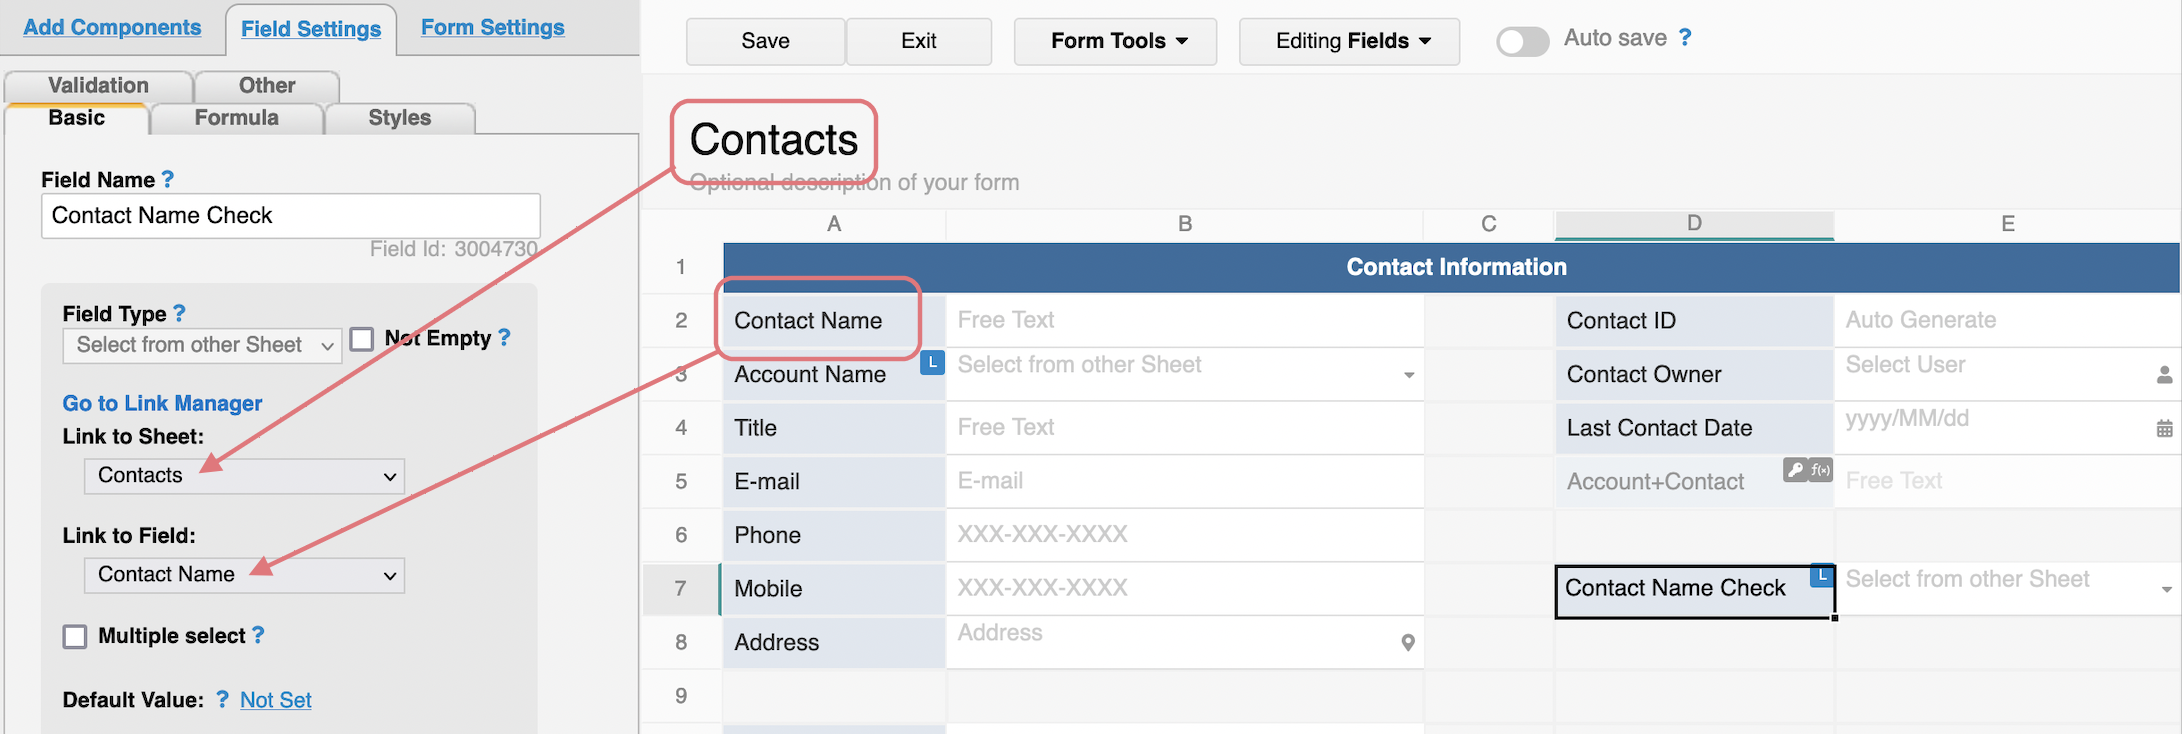
Step 2. On the field you created in step 1, apply formulas to reference the "Contact Name" field:
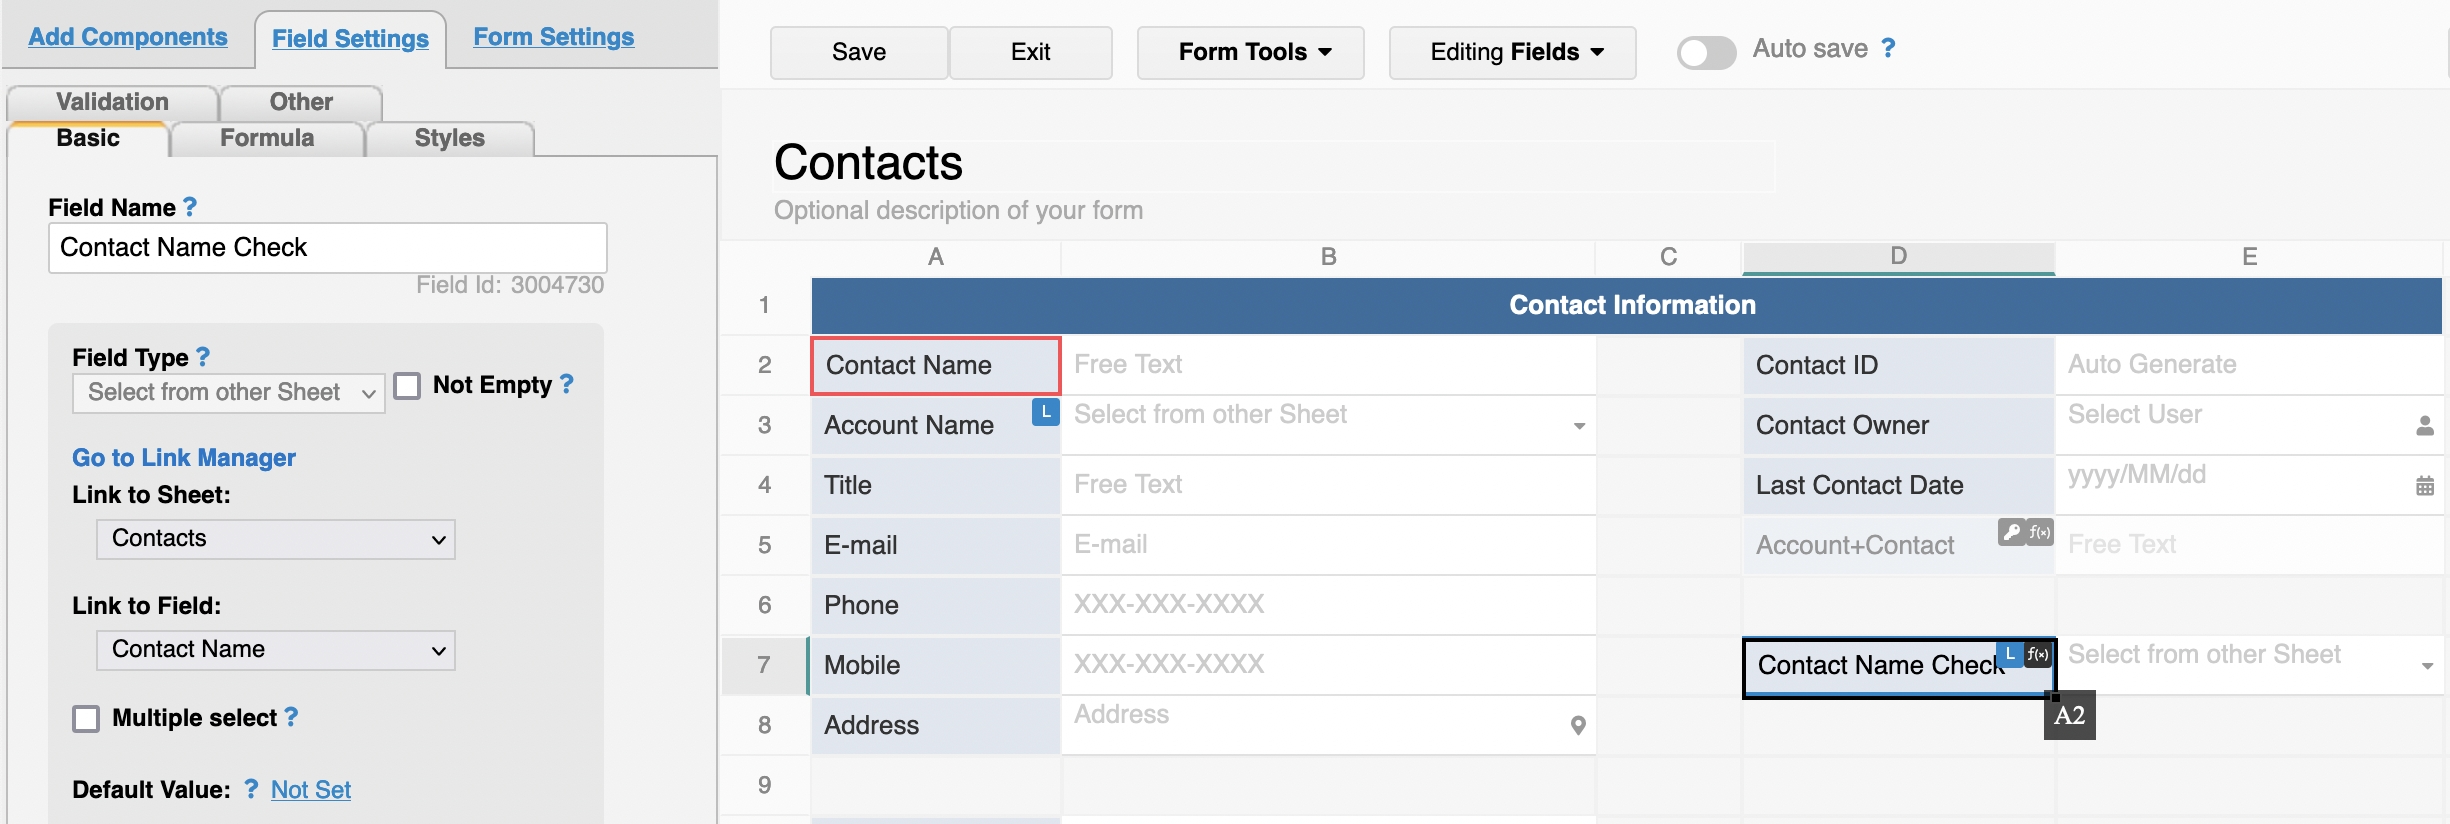
Step 3. Save the design and trigger the formulas recalculation.
Step 4. Set up conditional formatting based on the field so it will pop up warning when there are duplicated values:
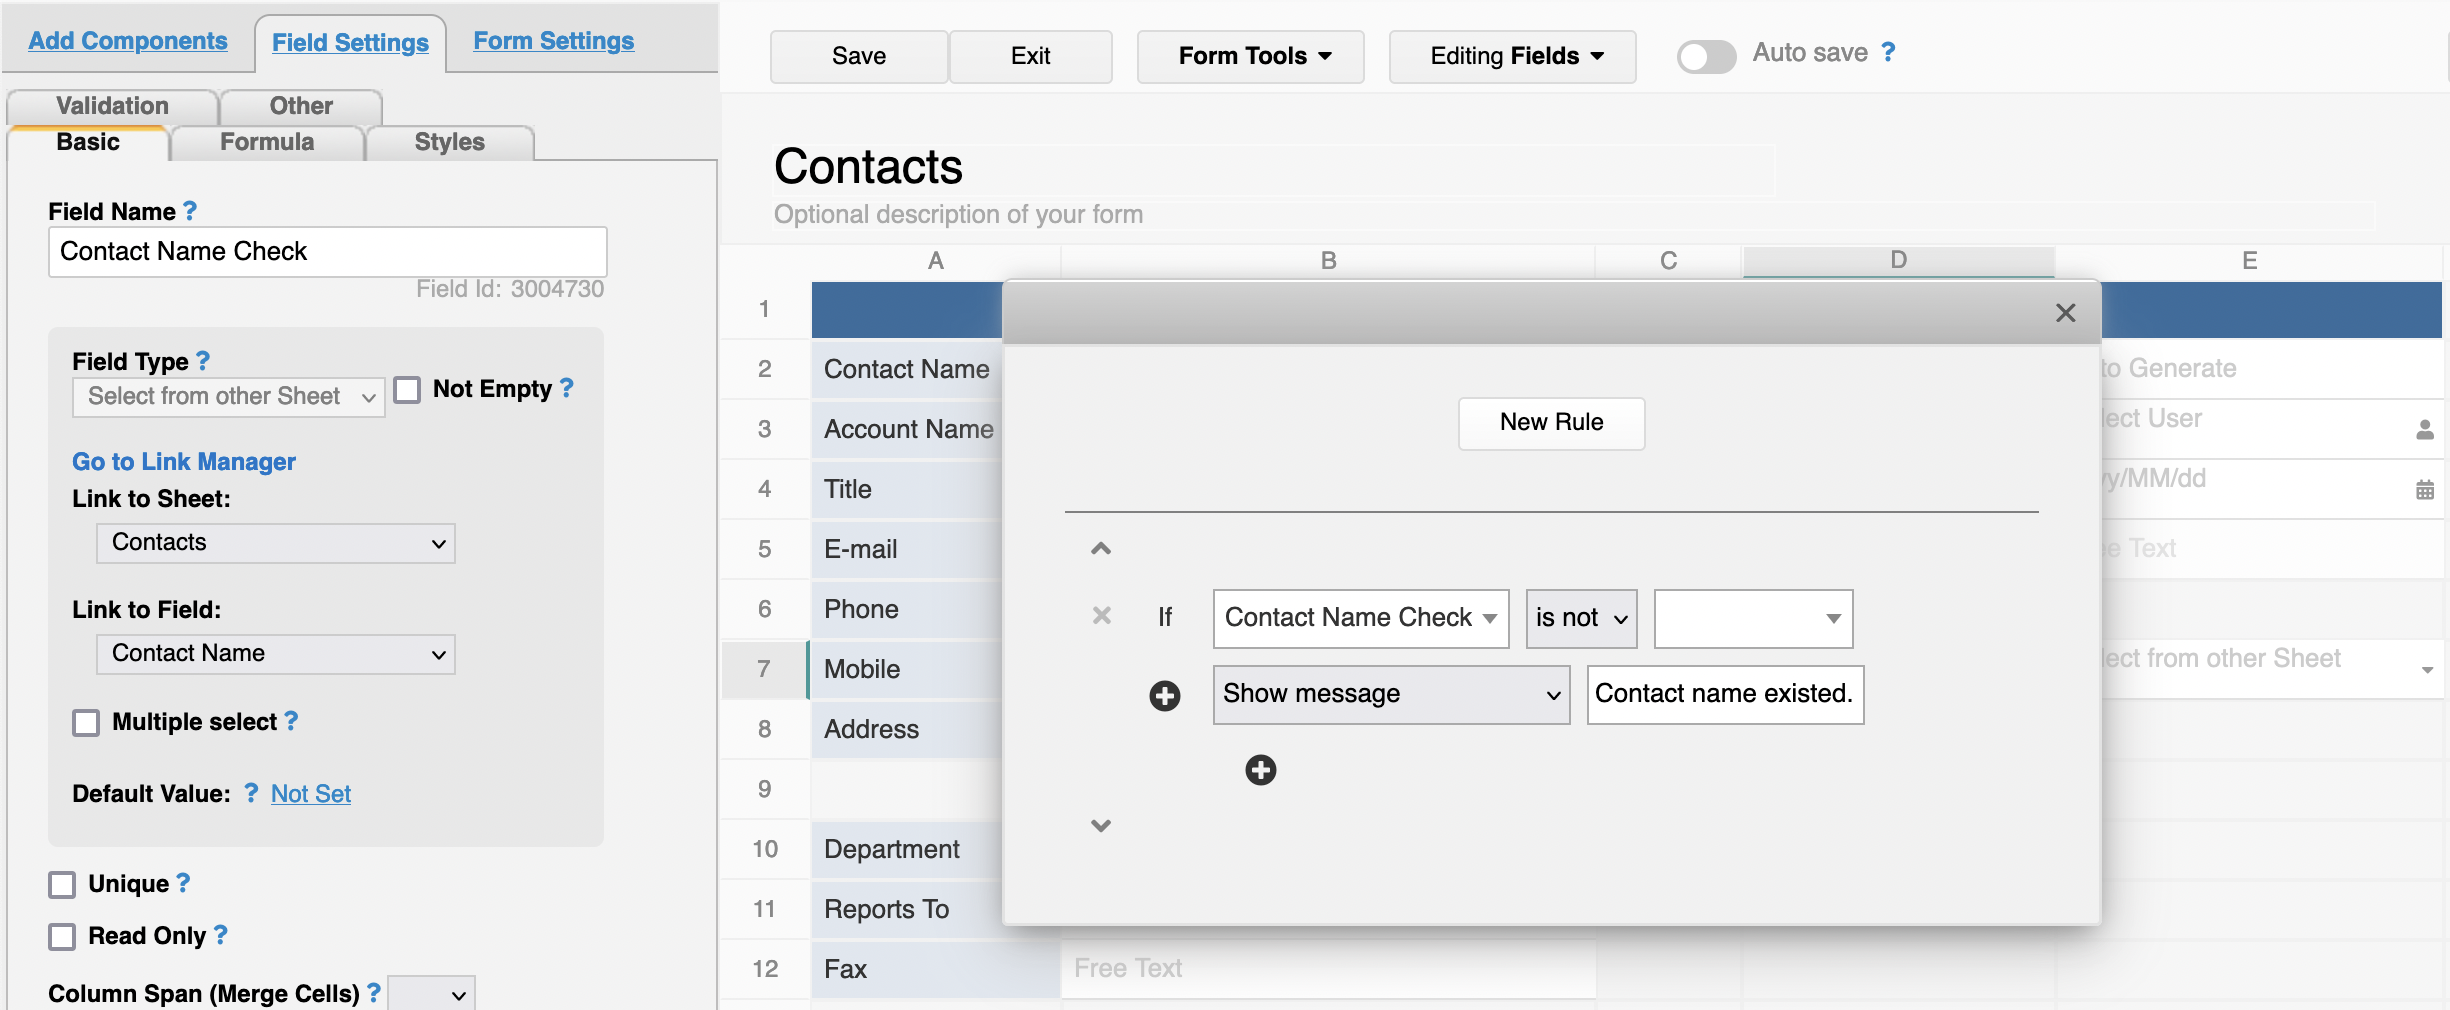
In the future, when users input duplilcated values, the system will pop up the message:
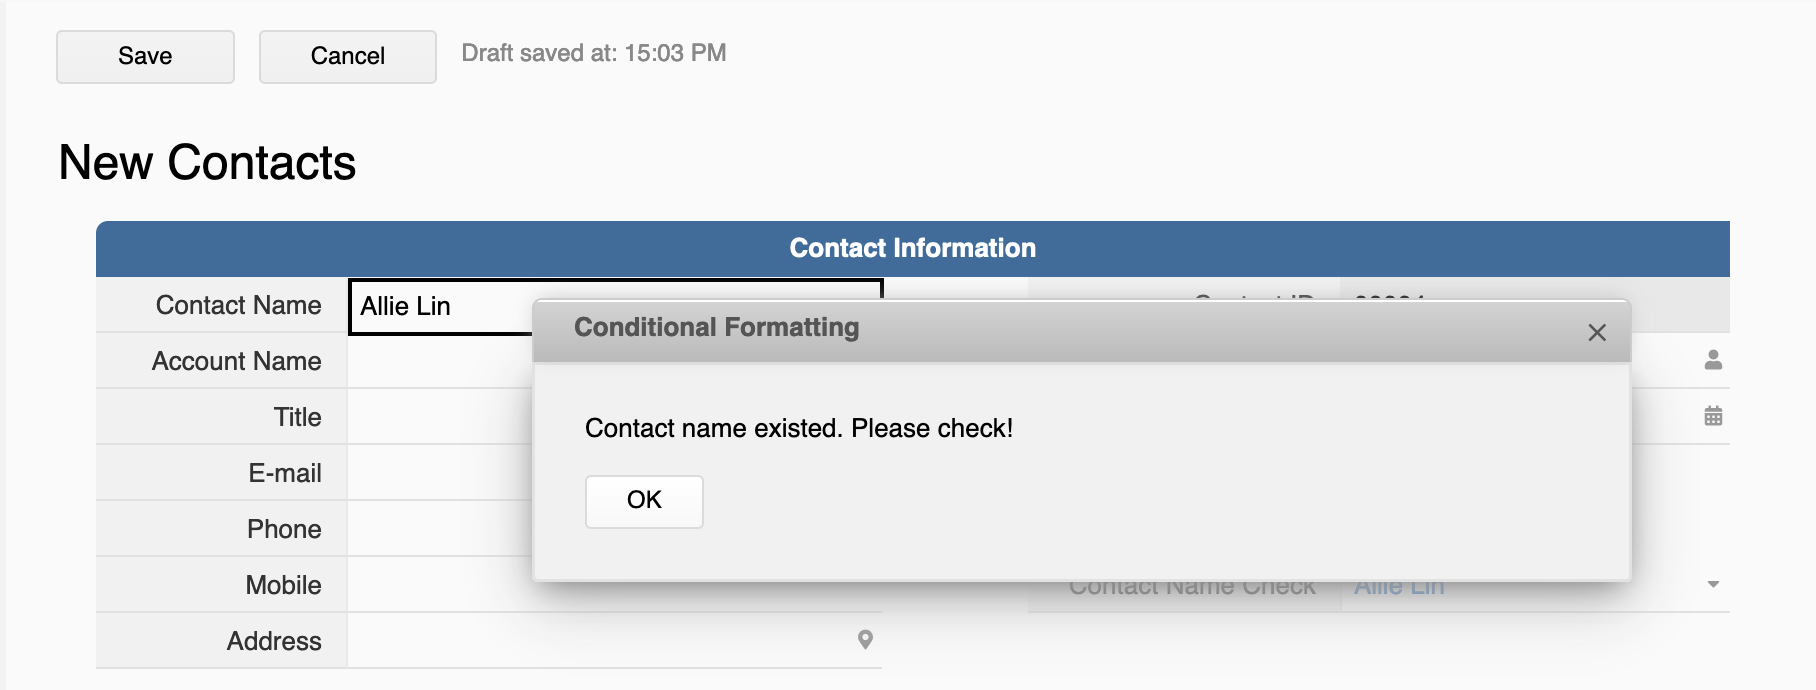
You may click the "Ok" and then save the entry still.

You may follow the steps below:
With above example, you can apply conditional formulas to chech if the values are within 1~99:
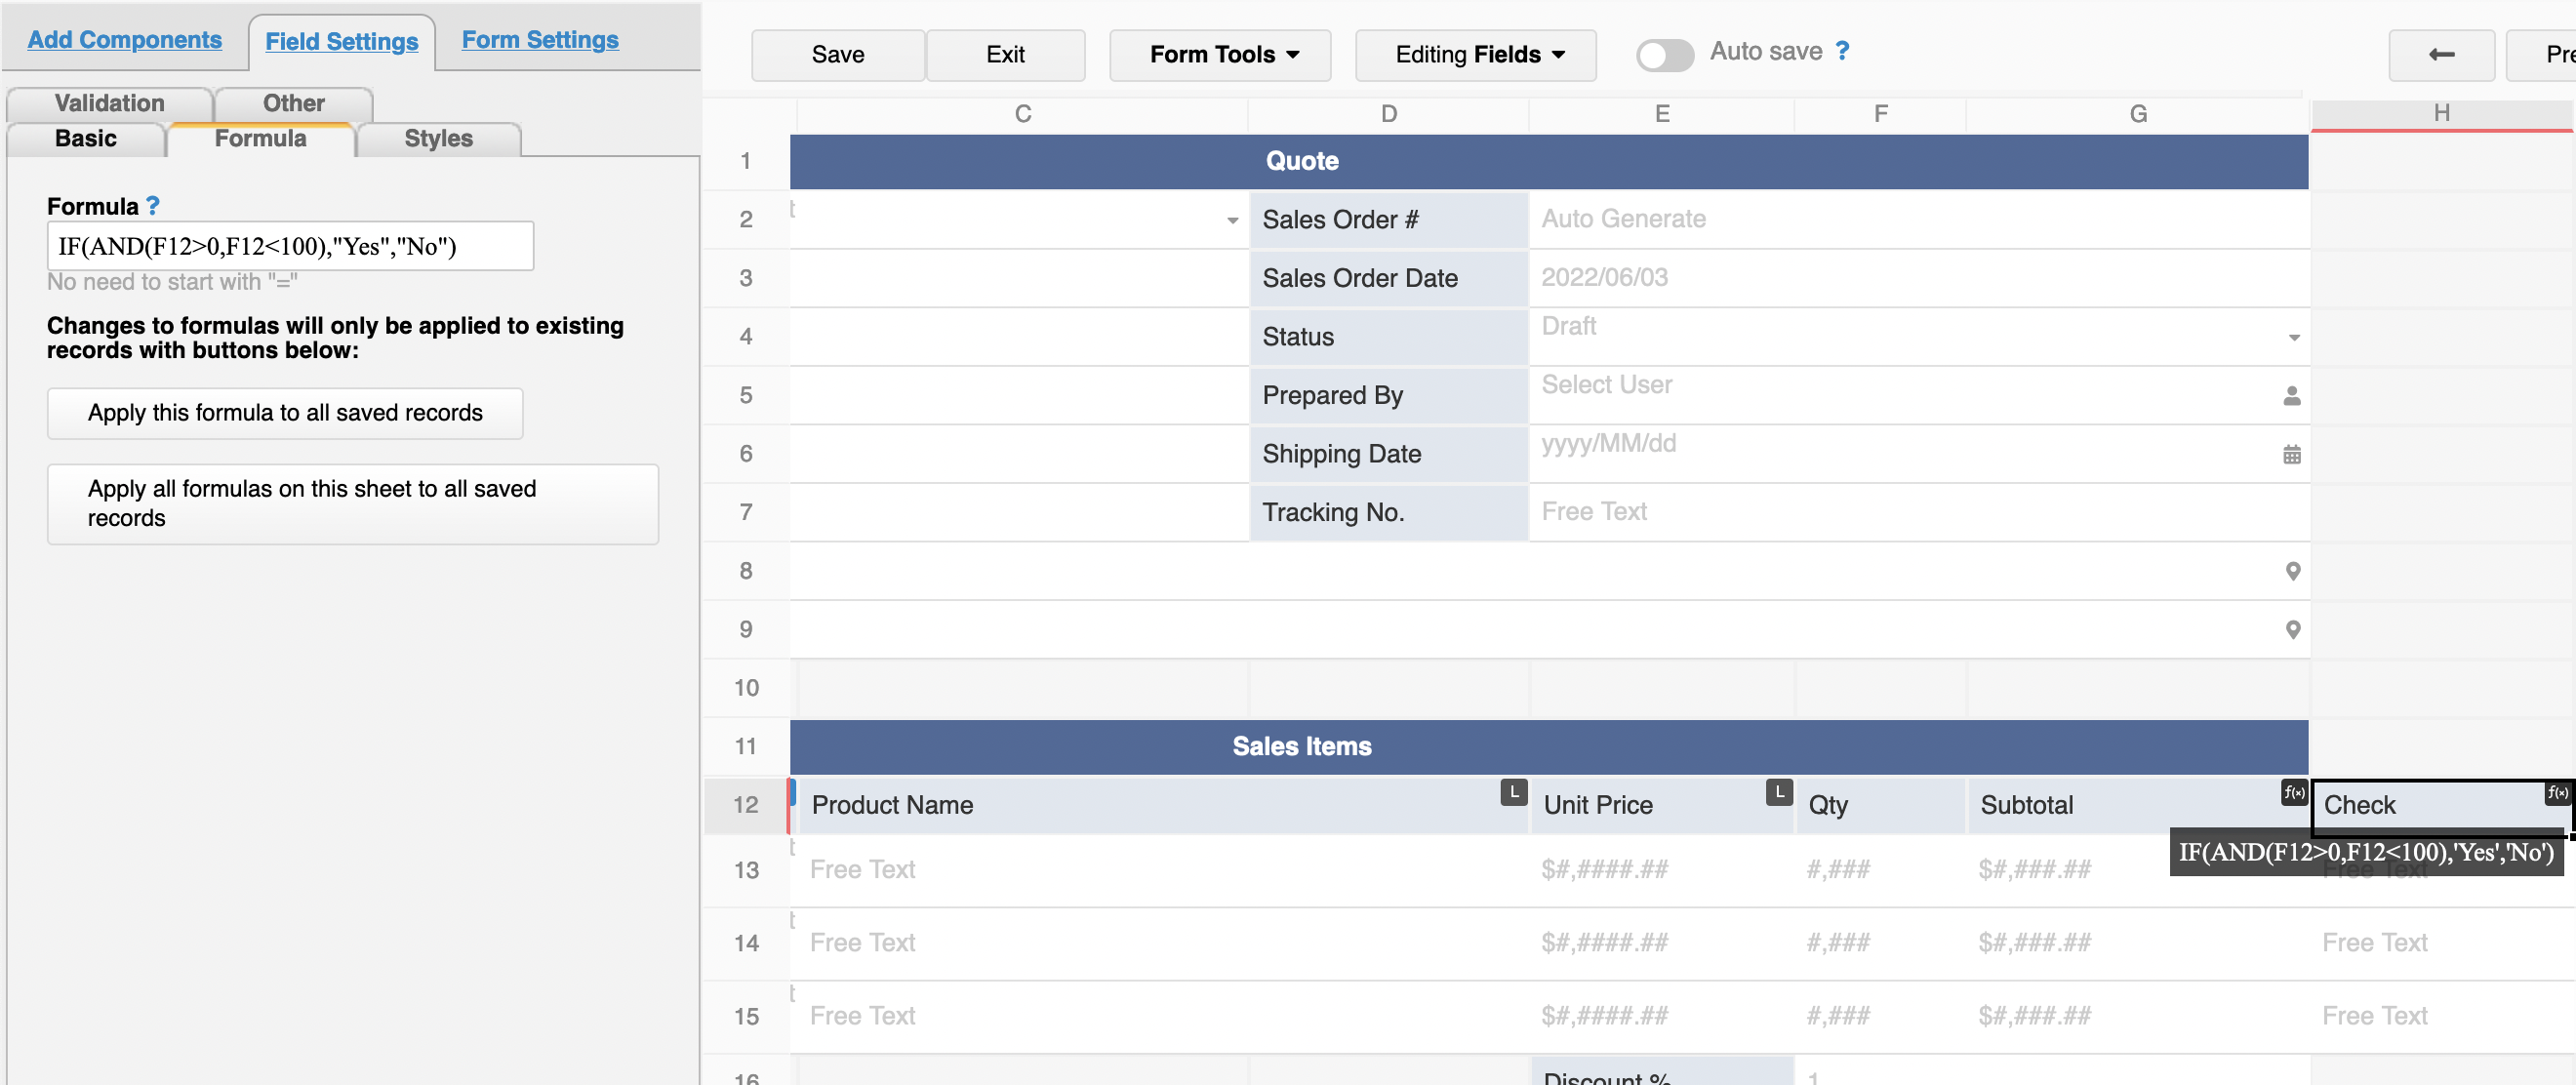
The formula means when the values are within 1~99, return "Yes". Otherwise, return "No".
Apply validation "Yes" and add error message if necessary:
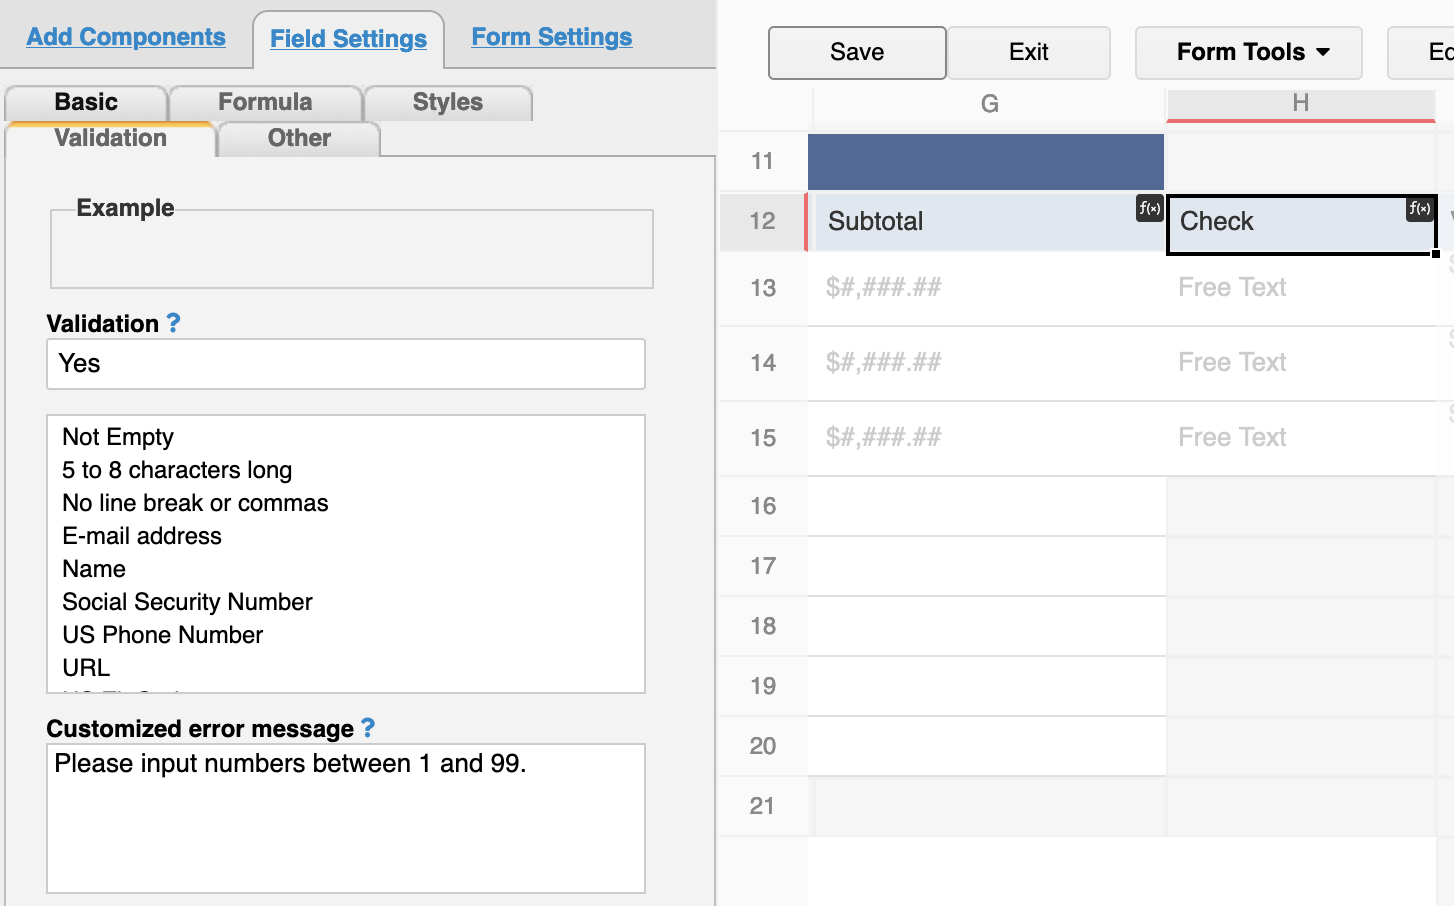
In the future, when users input numbers that don't match the criteria, the system will pop-up the error message upon saving:

1. Downlond "Ragic On-premises account setup forms patch(including all system default sheets)" in System Sheet in this page. If you only want to update specific sheet, you can also download corresponding patch.
2. Locate the “RagicDef.zip” file you just downloaded and then decompress it. You can see the files ending with the extension of .nui as shown.

3. Back up the existing nui files from your Ragic Home folder. In this example, the store is located at "C:\Ragic\RagicBuilder\cust\def\app\default\ragic-setup"
4. Copy the nui files mentioned in item two to override the old nui files.
5. Restart Ragic Service, and you’re all done.
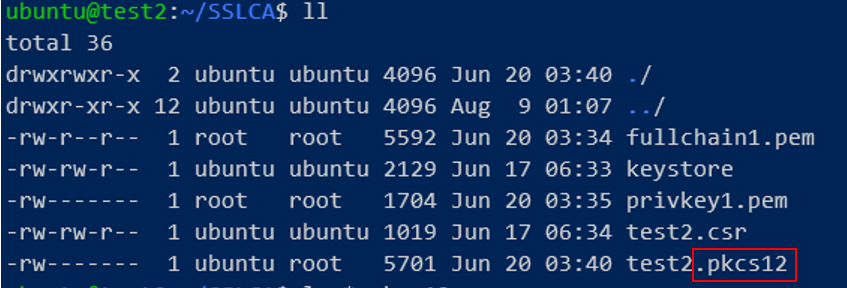
2. Locate the “keystore” file. By default, it is stored Your Ragic Home Folder like this:

3. Add the prepared CA certificate to the keystore so that it is recognized as a valid certificate. Run the following command, making sure to replace YourCA.pkcs12 with your own certs.

4. In the Password text field, enter the password for the certificate file.
5. Restart Ragic Service, and you’re all done.
You may go to the private server config to download lowMemoryDump.log to check if there is a high memory usage situation.
For Enterprise Plan databases, we provide a free test environment, feel free to contact us if needed. For other databases on other plans, you can register the other account using the free trial period for testing purposes or purchasing at least one user account for long-term use.
Method 1: When creating a test environment, if you want to apply the same design as your production environment, you can download the backup database definition file of your production environment and restore it to your test environment. After restoring, you would need to manually add testing data to the restored database.
Method 2: If you have lots of sheets and don't want to re-create testing data in all of them, you can first restore the entire database to your test environment. But you need to keep an eye on reminders and remember to delete them after restoring. Otherwise, both your production and test environment will send reminders. In addition, don't forget to suspend the users that don't need to access the test environment, or they might receive notifications and see the test environment when switching accounts.
In the future, if you would like to change the design of your database and sheets, we strongly recommend modifying the design on your test environment and making sure everything works well before restoring it to your production environment. Please don't change the design on both sides simultaneously as it might cause unexpected problems as described below.
When restoring the entire database, it will completely overwrite your original one. However, when restoring the database definition file, you will need to pay attention to the following.
When creating fields, the system will assign a unique field ID to each field and will not have duplicated IDs in each database account. But for two independent database accounts, the IDs might be duplicated sometimes. For example, the "0000001" field could be "Customer Name" in one database, but the "0000001" field is "Product Name" in another database. If the same ID fields in two databases exist in different sheets as different field types or for different purposes, restoring one database definition to the other might cause unexpected issues.

Step 2. Choose "Enterprise applications"

Step 3. Create New application: New application > Create your own application
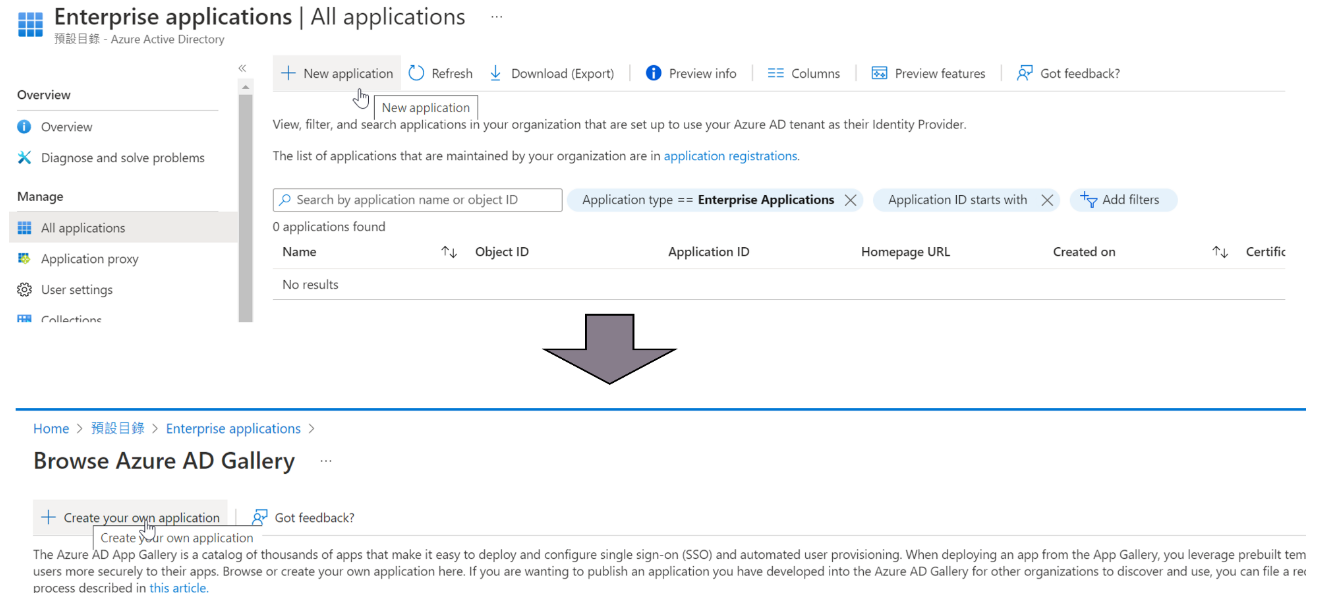
Step 4. Application Config
1. You may customize the application name
2. Please select Non-Gallery App for the application
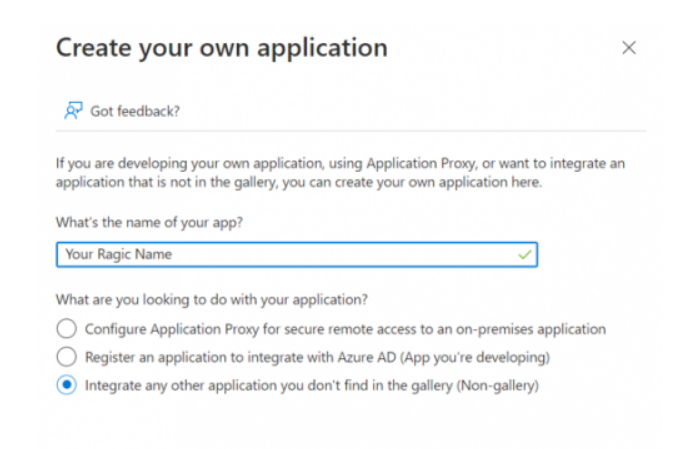
3. After creating the application, please fill in the application ID in the properties into the "Application ID" field on your Ragic Company Setting page
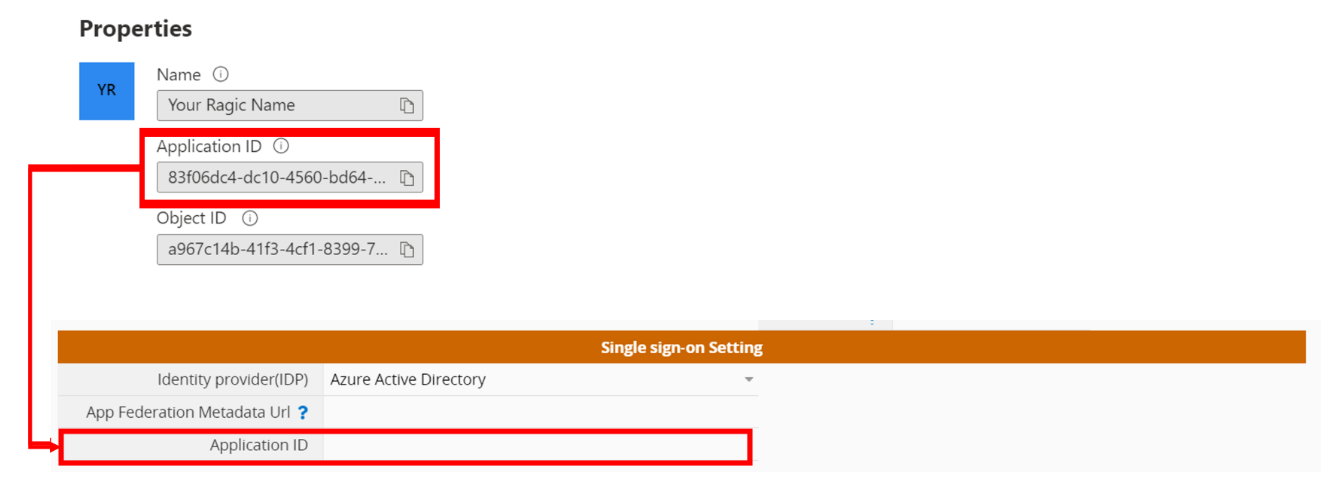
Step 5. Add Users to the Application
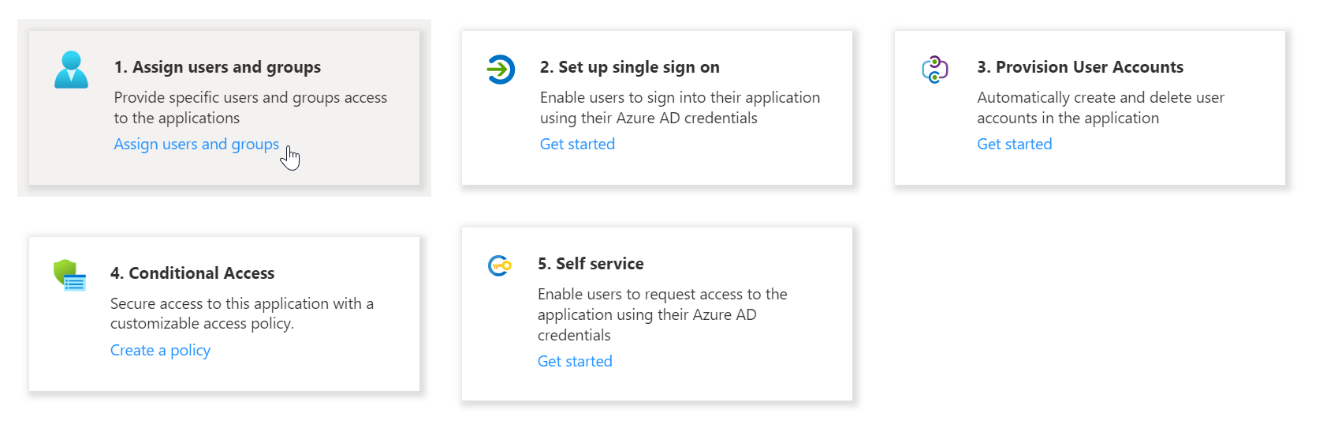
Step 6. Configure Application Single-Sign-On (SSO)
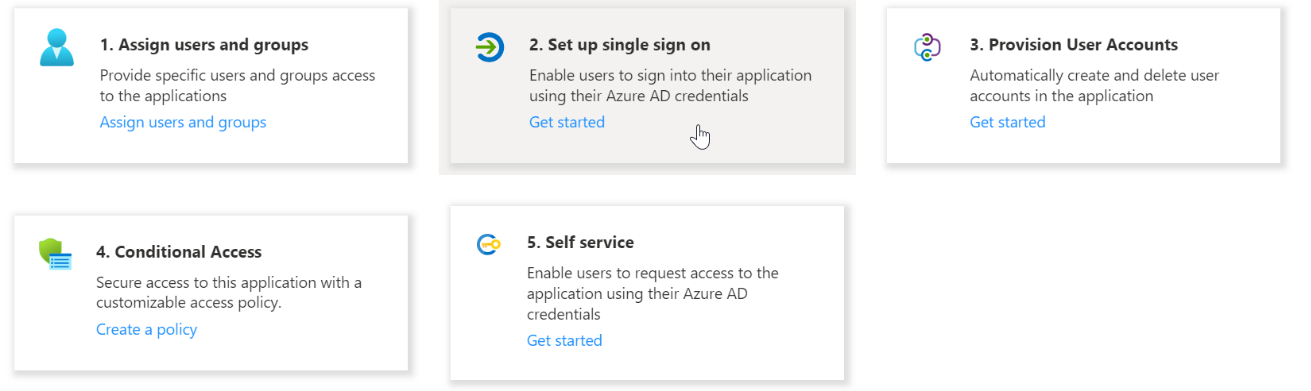
Step 7. Select SAML
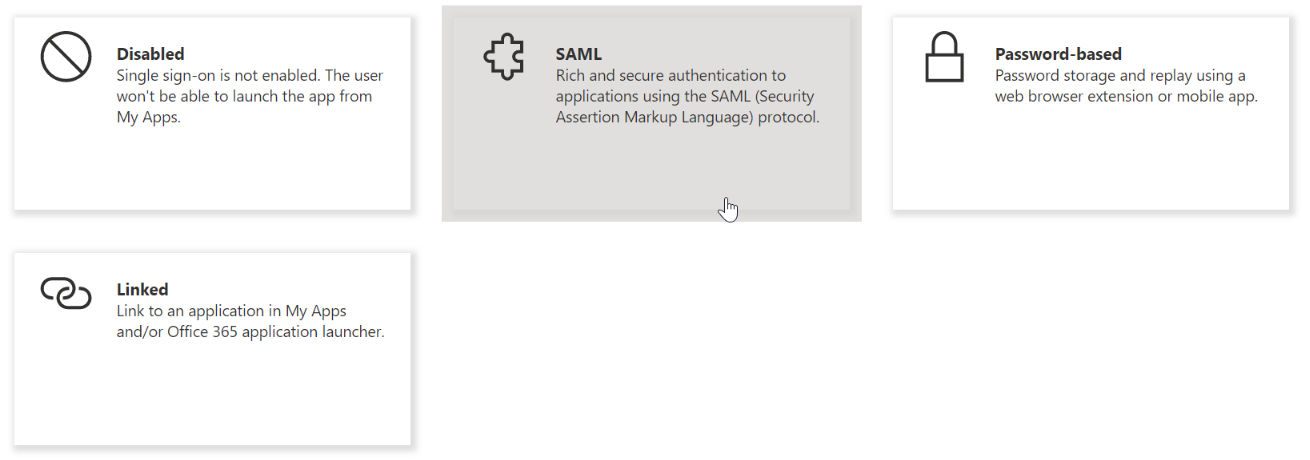
Step 8. Setting Parameters
1. In the Identifier (Entity ID) and the Reply URL (Assertion Consumer Service URL) in basic settings, please fill in the URL of the server where your Ragic is located (for example: https://test1.ragic.com)
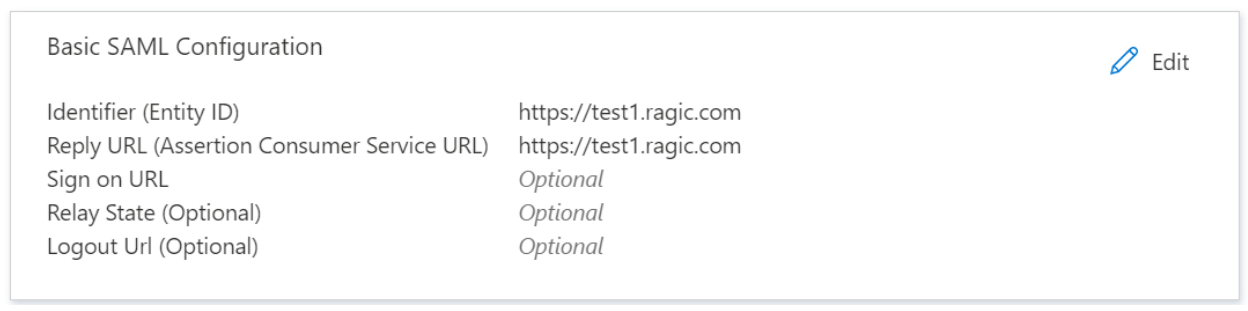
2. In Attributes & Claims, please change the unique user ID to the user mailbox

3. Please fill in the App Federation Metadata URL in the SAML Signing Certificate into your Ragic company setting page


Step 2. Create a new application (Add application)

Step 3. Choose Add custom SAML 2.O application
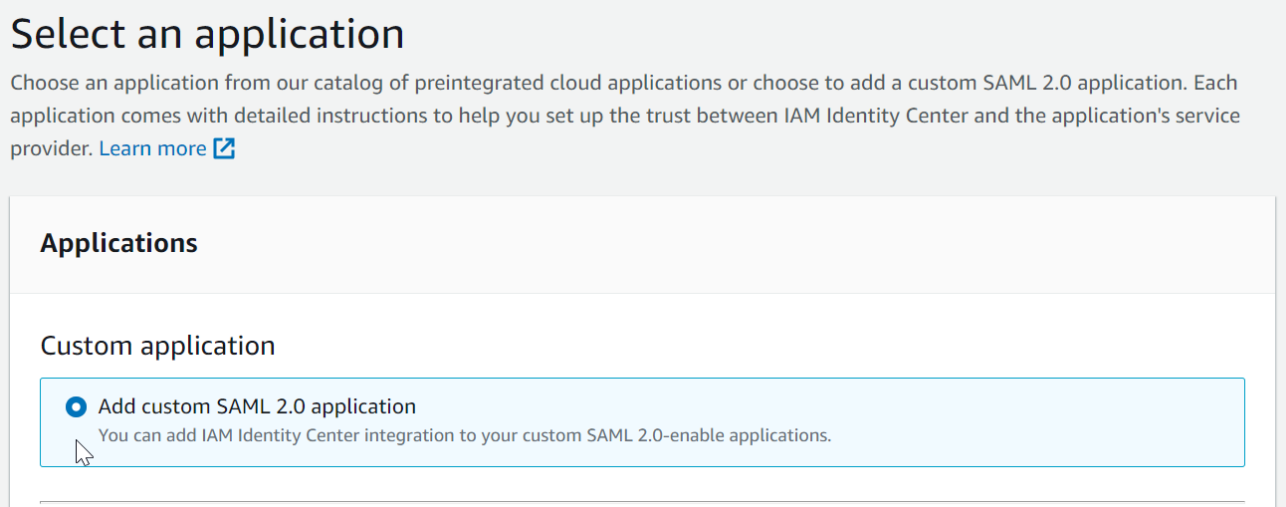
Step 4. Set application parameters
1. Display name and “description” can be customized by user
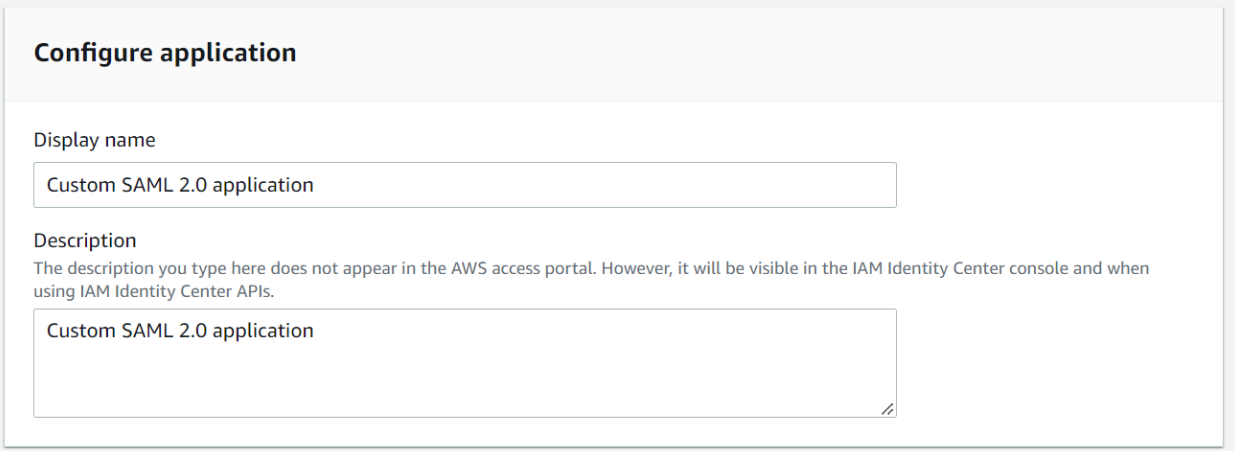
2. Please fill “App Alliance Metadata URL” field in the Ragic company setting with the link of the IAM Identity Center SAML metadata file
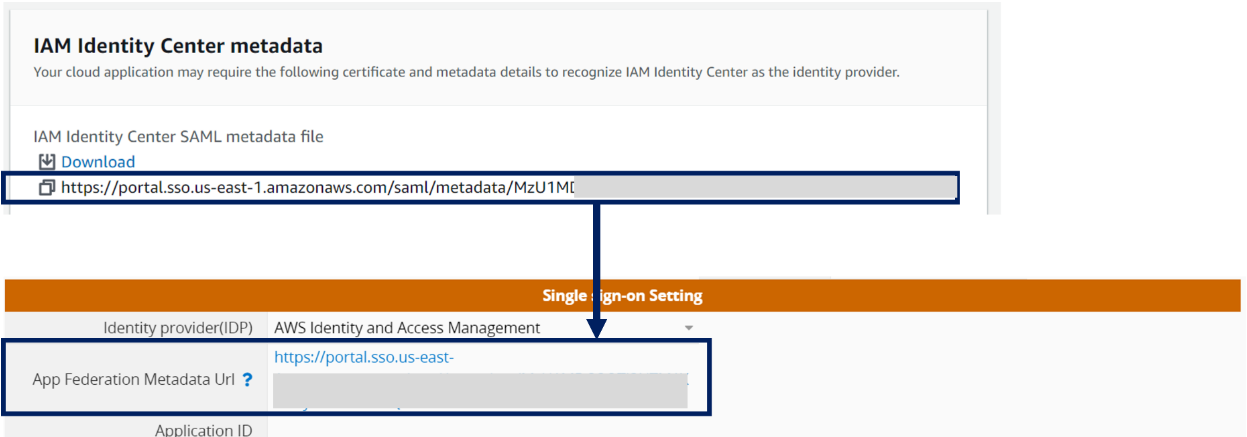
3. Please fill “Application ACS URL” with the URL of the server where your Ragic is located and add “/api/external/saml/acs.jsp” to the end (For example your Ragic url is https://test2.ragic.com, please fill in “https://test2.ragic.com/api/external/saml/acs.jsp”), the “Application SAML audience” attribute can be customized by the user, and its value is filled in the “Application ID” field in Ragic company setting
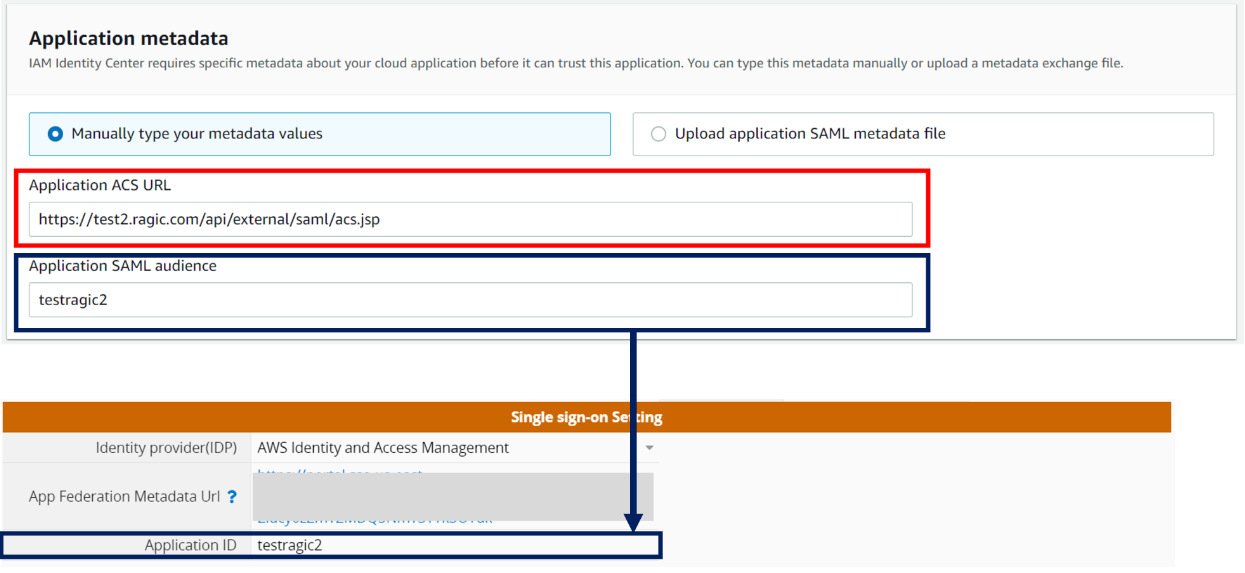
Step 5. In "Attribute mappings", set the attribute mapped by Subject to "${user:email}", format to "transient", refer to the following Figure
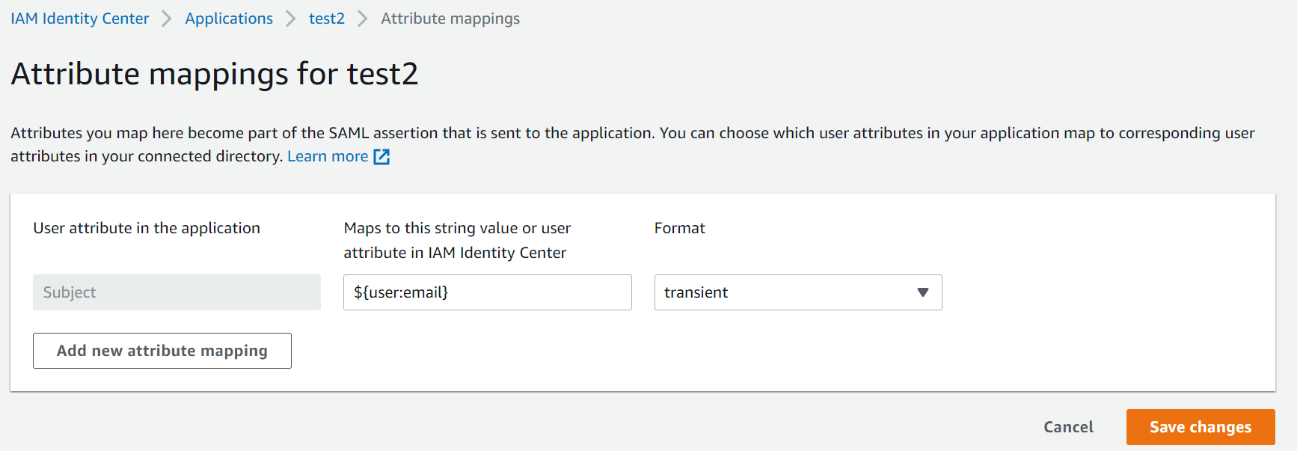
Step 6. Add users to the application

Path: Hamburger Menu > Database Management > Recent Changes
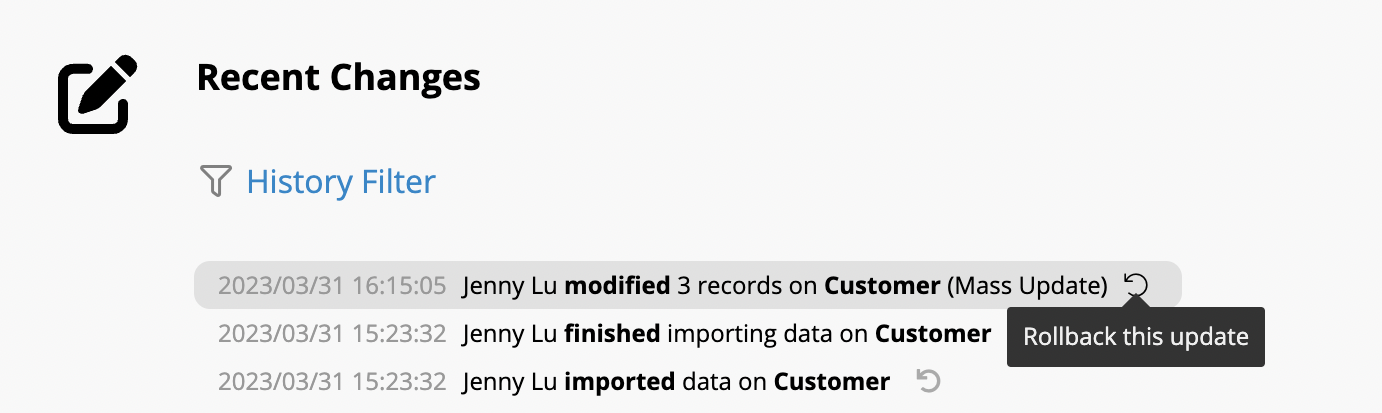
On the other hand, if you would like to revert an import, there are a few restrictions:
1. This operation cannot be undone once executed.
2. Field values updated by link and load, formula recalculation, and workflow will not be reverted.
3. Reverting an import will not trigger link and load, formula recalculation, and workflow.
Please also note that it is not suggested to revert mass update if:
1. The design on related field(s) has been changed.
2. The Mass Update was made a long time ago.
Some actions cannot be directly restored from the Recent Changes (e.g. Batch Execute Action Button). In such cases, you can refer to this article: "How to Recover Lost Field Values?"
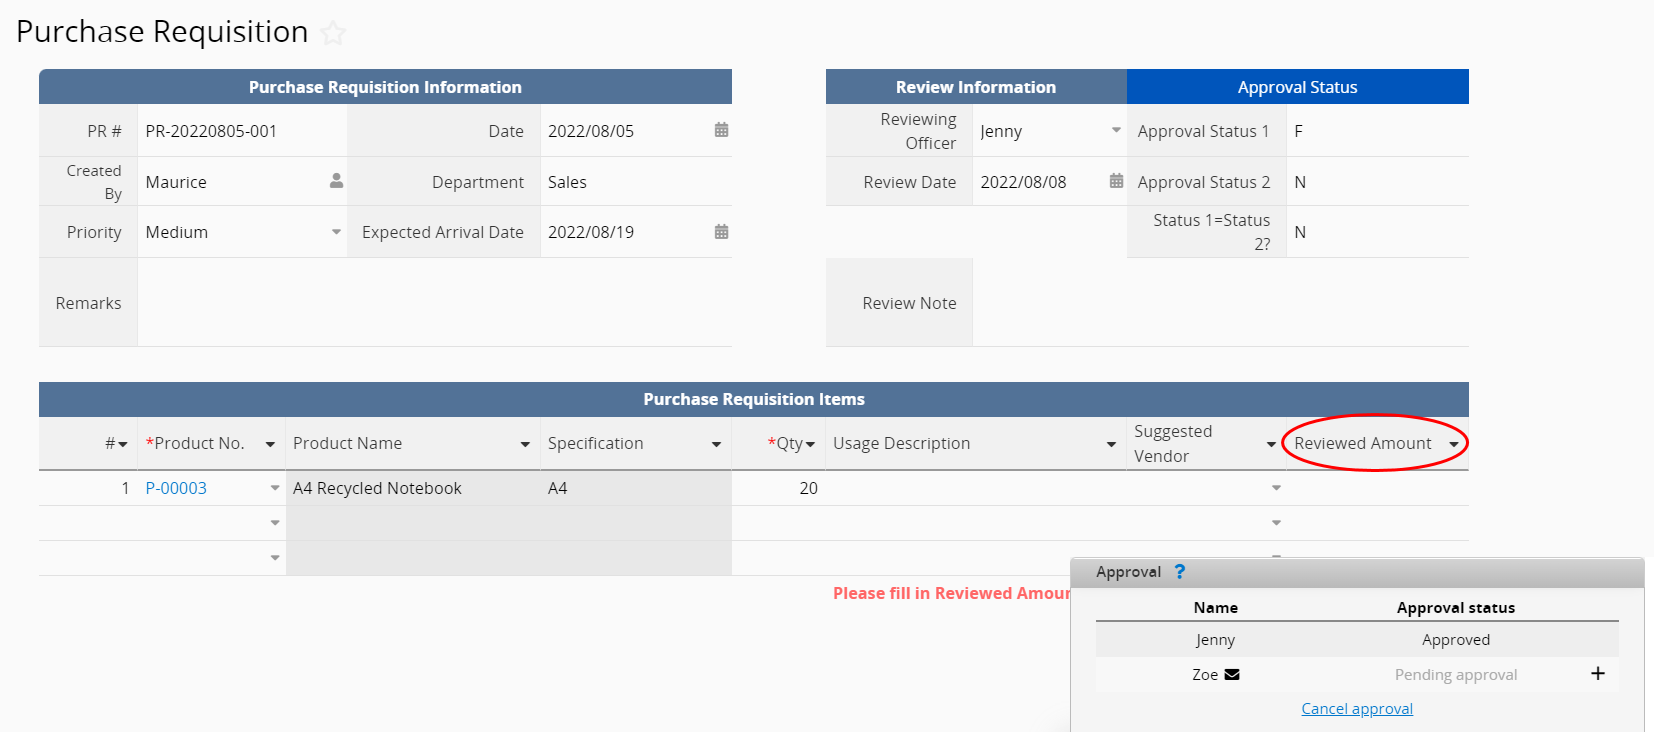
In most cases, an entry should not be modified once the approval flow has been started, so the system will automatically lock the record when approval starts. If you would like to make a field editable (let’s say field J8) in the following steps, you would have to check “ignore record lock” in the field setting, and make it read-only under certain conditions in Conditional Formating.
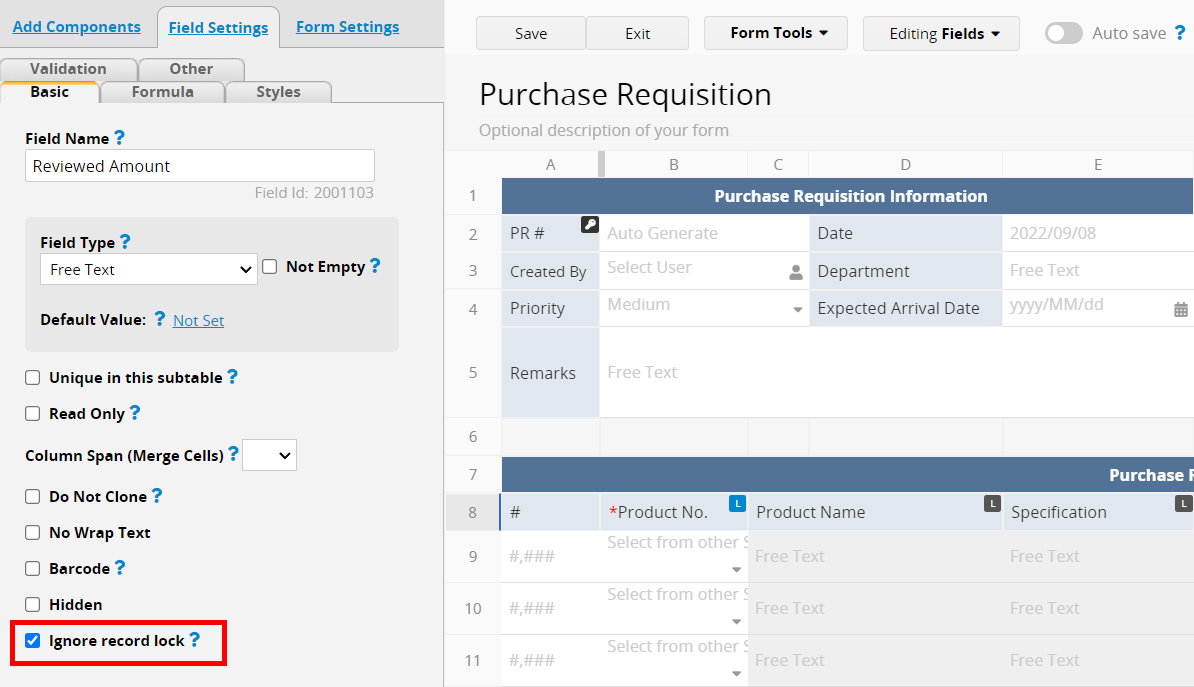
To help the system distinguish which step of the approval process we are in, we will need to add two fields and apply the approval formula to display the approval status.
For example, if the approval process consists of two approval steps, we can add field I2 and I3, and apply “APPROVAL.STEP(1).STATUS()” in the formula setting in I2 and “APPROVAL.STEP(2).STATUS()” in I3 to display the status of first and second approval steps. The approval formulas will return N when the step is not finished, and F when it is finished.
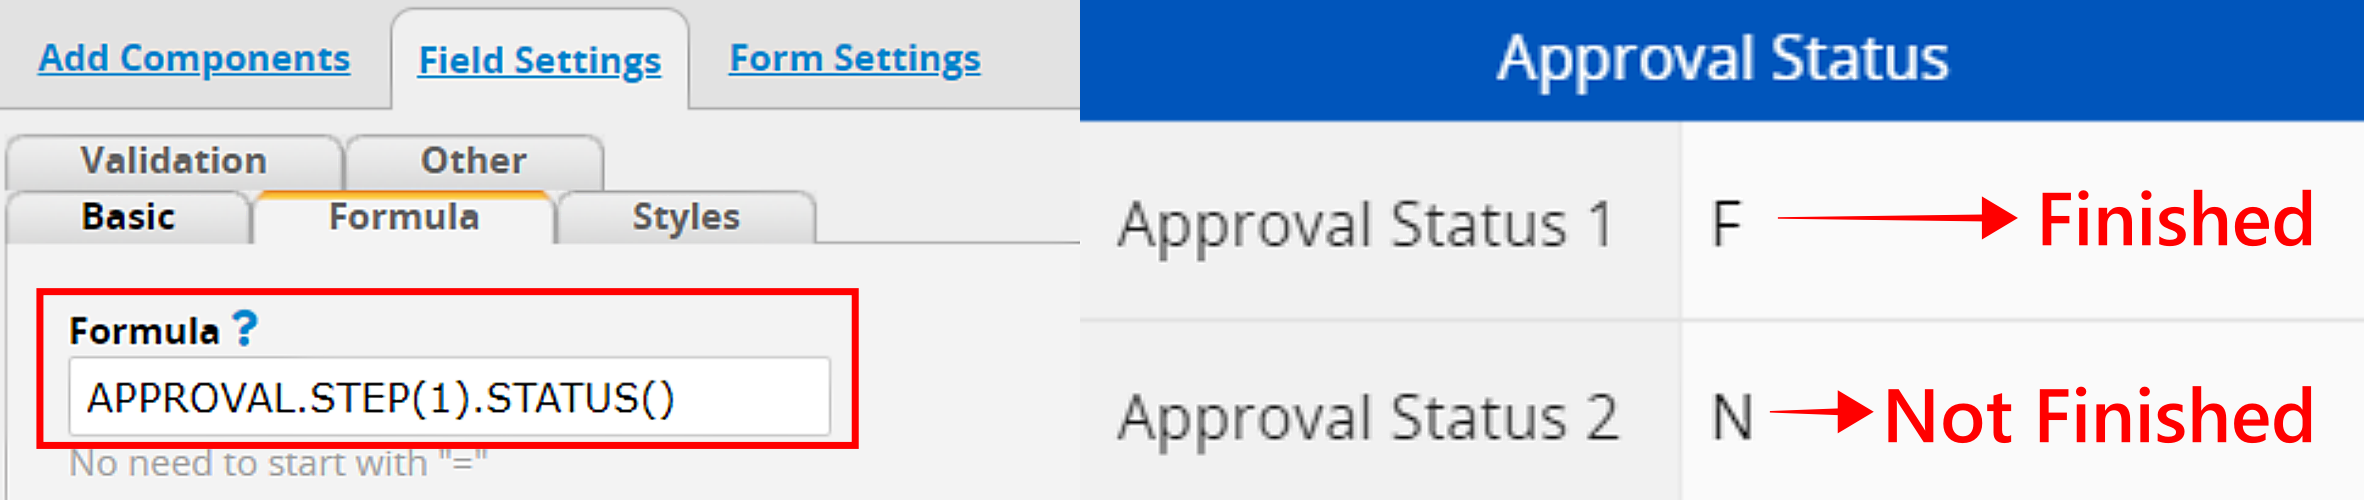
After adding two fields from the previous step to display the approval status, you will need to add another field to determine if the status of the first and second steps are the same.
For example, you can add a new field I4, and apply a conditional formula “IF(I2.RAW=I3.RAW, ‘Y’,’N’)” to it. If the field value of I2 and I3 are both Ns or Fs, which means the first and second steps are both unfinished or finished, it will return Y. If one of them is F and the other is N, then it will return N.

You can set a new rule in conditional formatting to make the specific field read-only when the approval status of the fields are the same, and remove the read-only status when they are not.
For instance, you can set the rule as: If “Status 1= Status 2? ” (in our example, it’s the field in I4 cell) is not “N”, it will make the field “Reviewed Amount” (J8) read-only. Once the design is saved, the rule will be activated, and you will be able to edit the field J8 when the second approval step is reached.
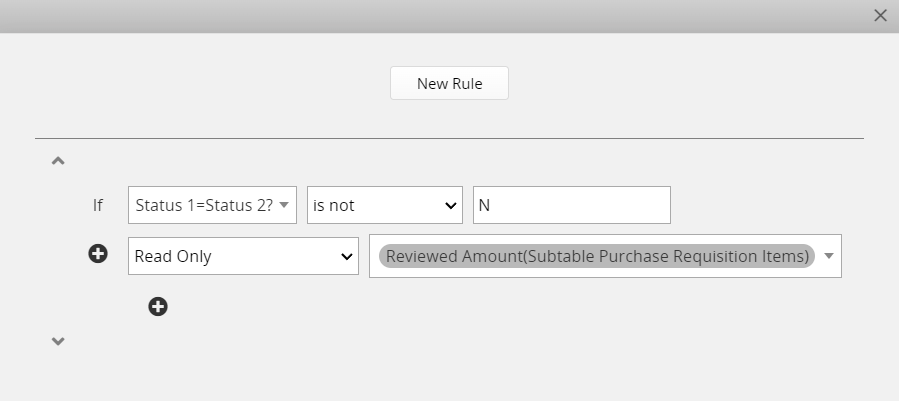
Once the rule is activated, if the approval process hasn’t been started, the “Reviewed Amount” field will be set read-only.
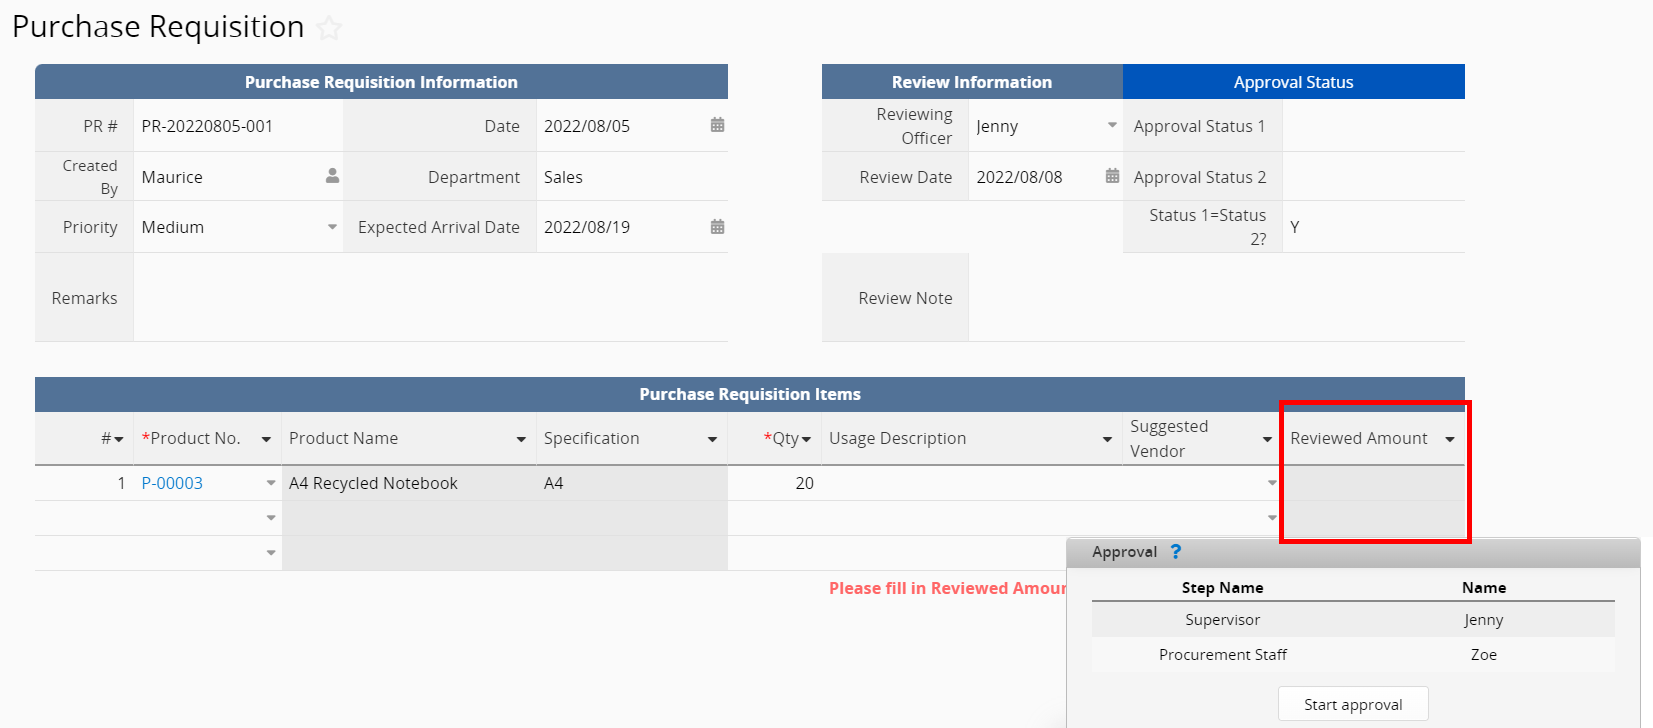
If the first approver has approved and the second approver hasn’t, the read-only attribute will be removed from the “Reviewed Amount” field and it will be editable.
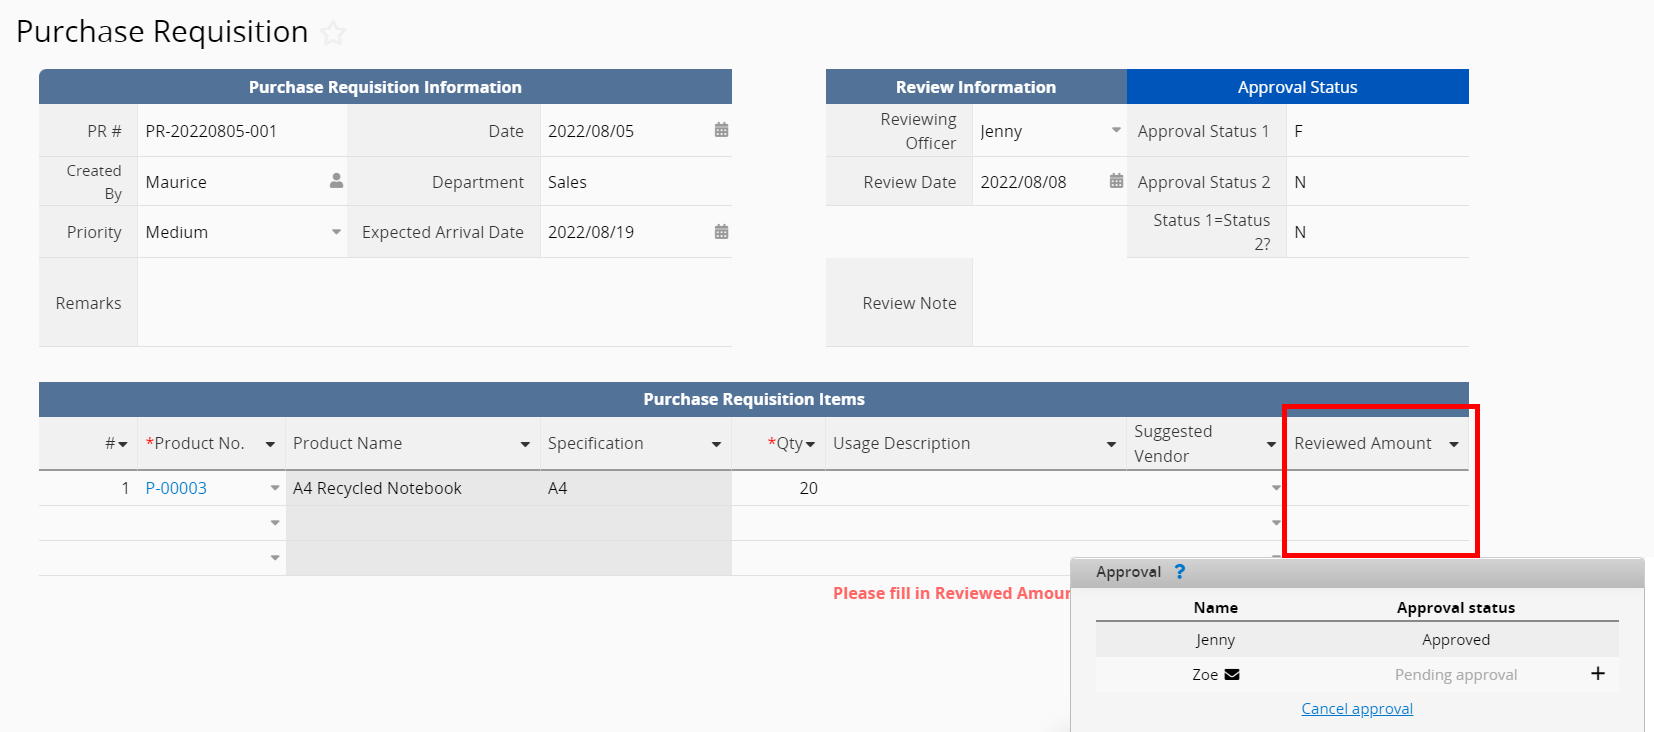
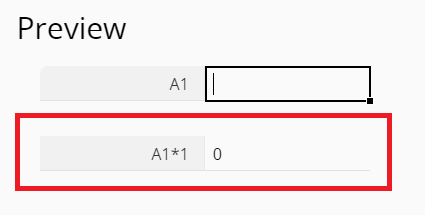
If you want to make a formula return empty value when there's no value in the referred field. You can use ISBLANK function to check if the field is null. Afterwards, use IF function to return the value on the results of ISBLANK function. For example, you could use IF(ISBLANK(A1),"",A1*1) to make it return empty value if A1 is empty, if not, calculate A1*1.

If the calculation might refer to more than one field, for example, to calculate A1*A2 only when both fields are not empty, and keep the output null if at least one of the fields has no value, you'll need to first use OR function with ISBLANK function to check if every referenced field is empty, and use IF function to return the value. The formula IF(OR(ISBLANK(A1),ISBLANK(A2)),"",A1*A2) would make sure that if at least one of the fields is empty, returns empty value, if not, calculate A1*A2.
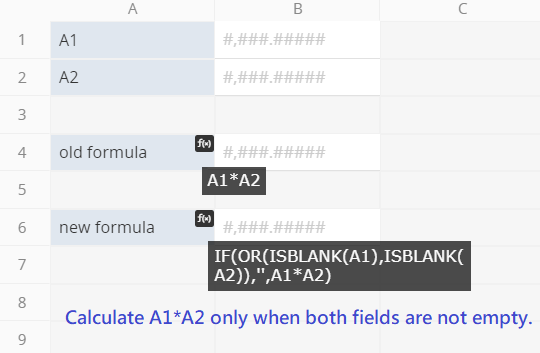
By using OR function, you can combine different conditions in your formulas, if you want to make "0" turns into empty value as well, you can add the condition "original formula=0" to the new formula. For example, using formula IF(OR(ISBLANK(A1),ISBLANK(A2),A1*A2=0),"",A1*A2) to make the output null if at least one of the referenced fields is empty or A1*A2=0. If none of the conditions above are met, returns the calculation result of A1*A2.
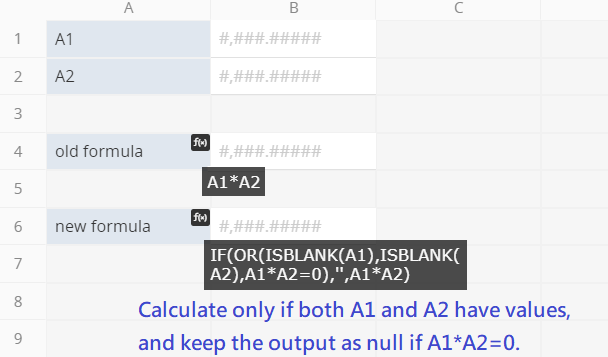
Before the feature released, you may combine conditional formulas and validation to get the similar workflow. For example, in the sheet below, we would like to set the "Manufacturer" field as "Not Empty" when the "Product Family" field is "Chocolate":

You may follow the steps below:
With our example, the target field is the "Manufacturer" field while the rule is "when the "Product Family" field is "Chocolate." The formulas would be:
IF(A4.RAW="Chocolate",IF(A6.RAW="","No","Yes"),"Yes")
That means:
When the "Product Family" field is "Chocolate," check if the "Manufacturer" field is blank. If it's blank, returns "No". Otherwise, returns "Yes".
When the "Product Family" field is not "Chocolate", returns "Yes" directly.

This step is optional.
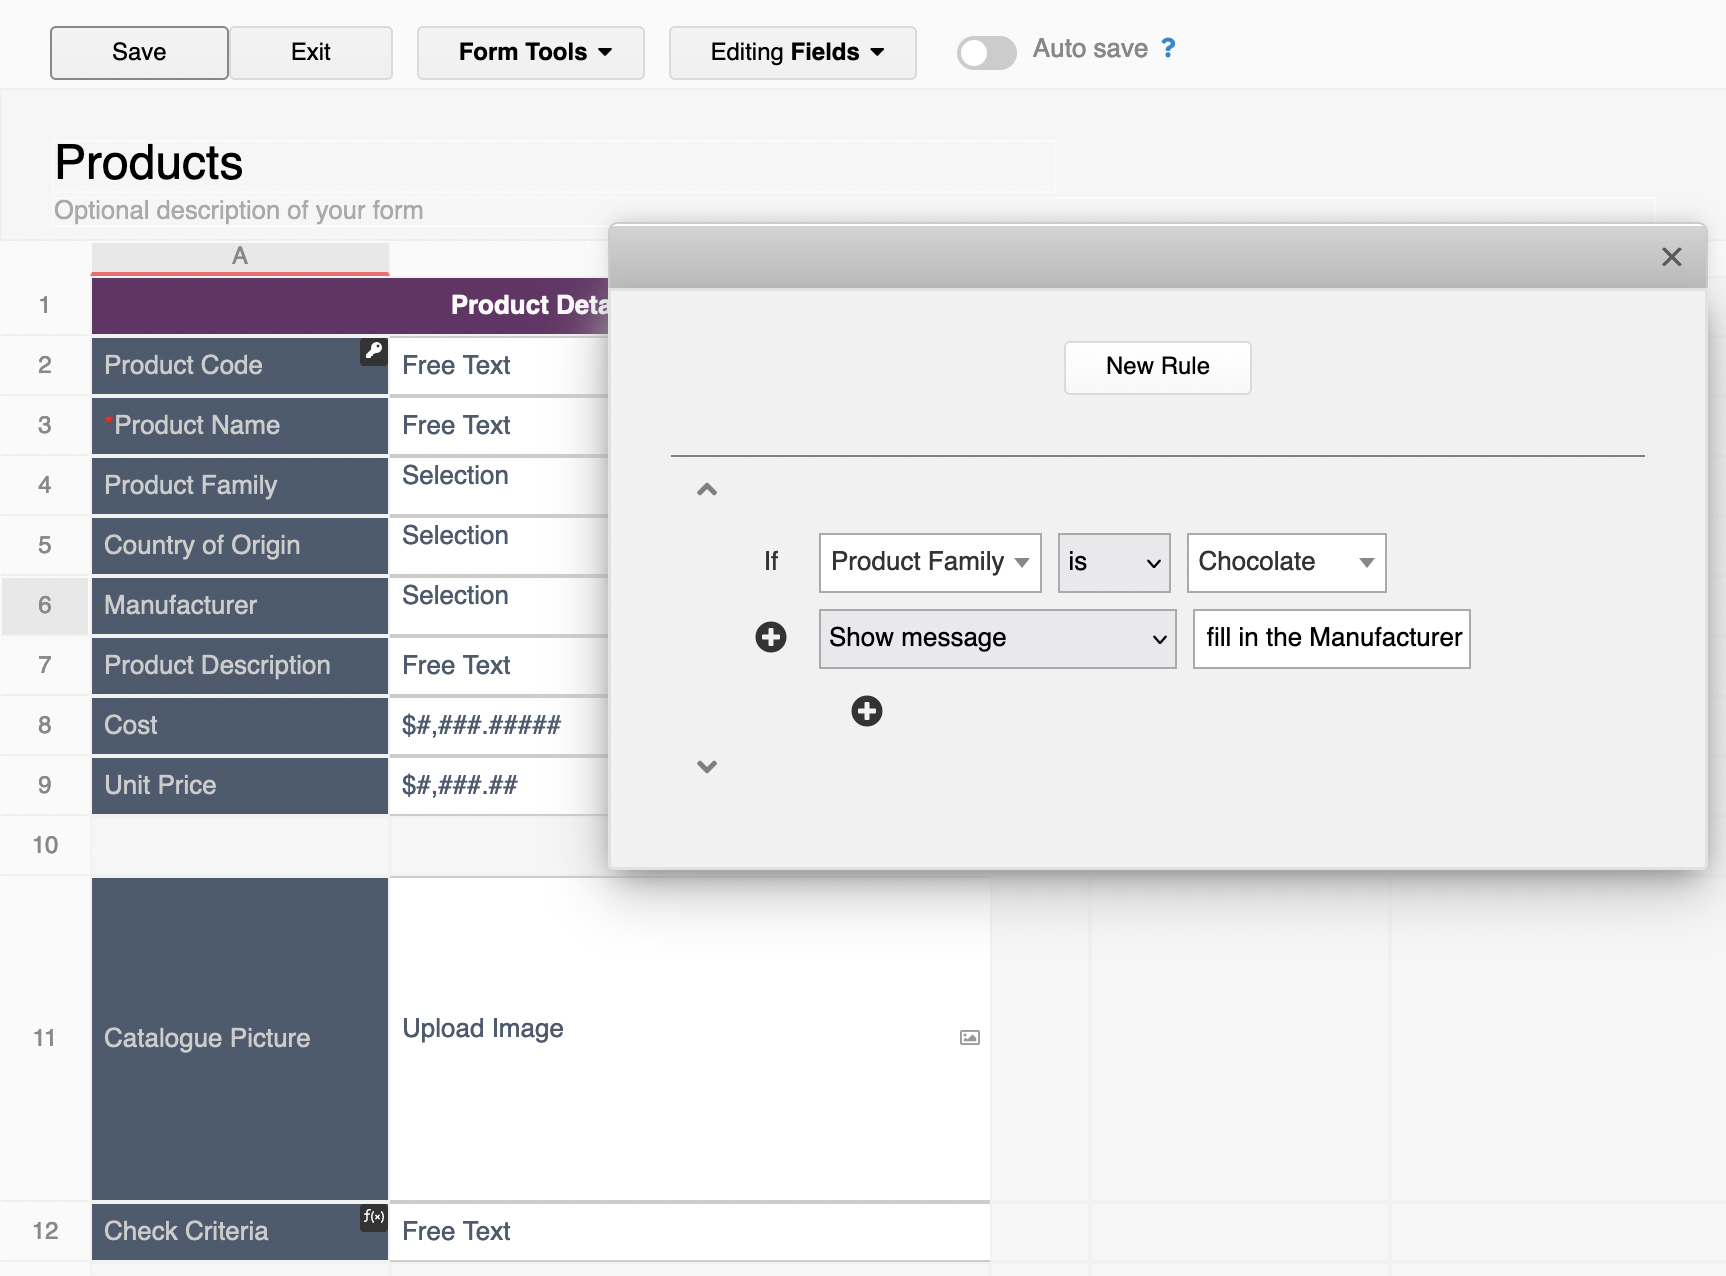
You may also apply an error message if needed:
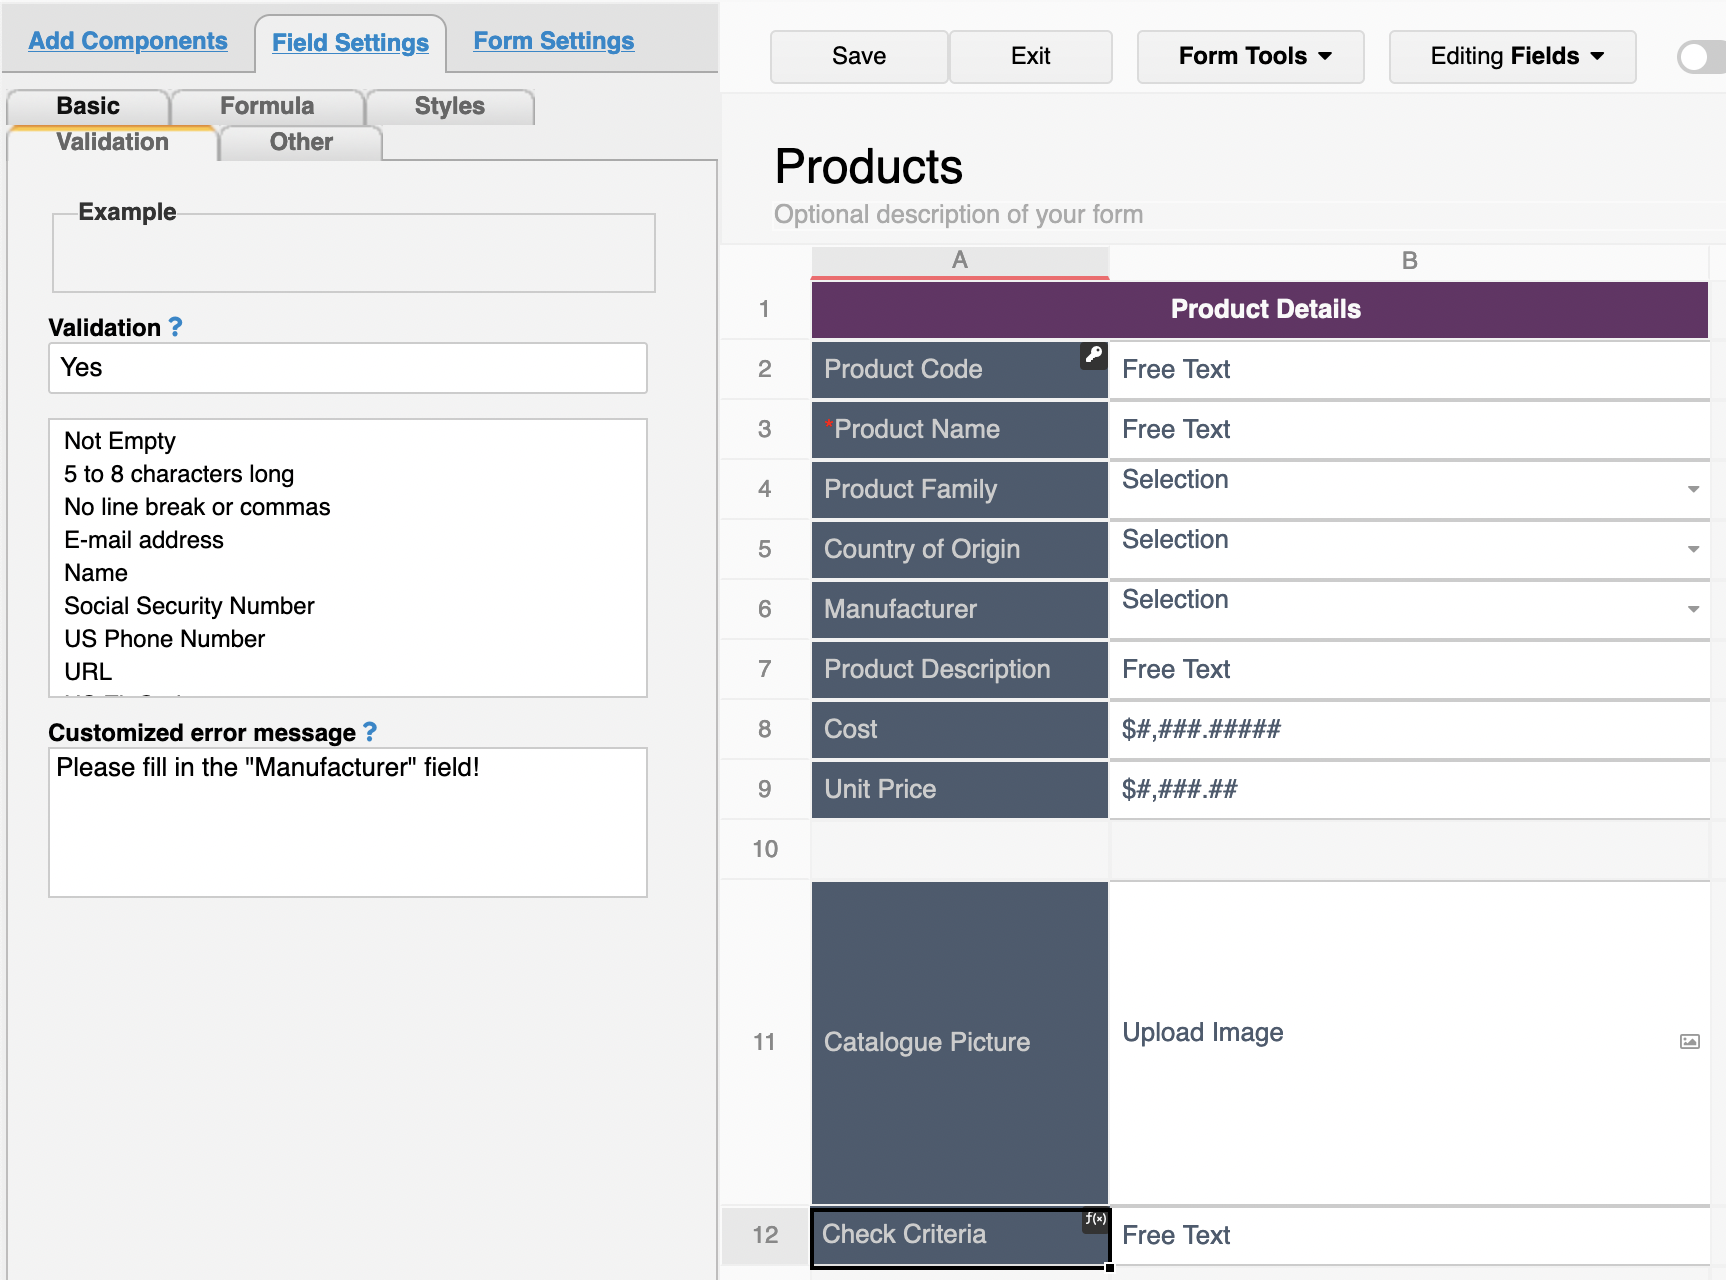
With the above settings, when users select the "Chocolate" option in the "Product Family" field and leave the "Manufacturer" field blank, the system will pop up an error message upon saving:
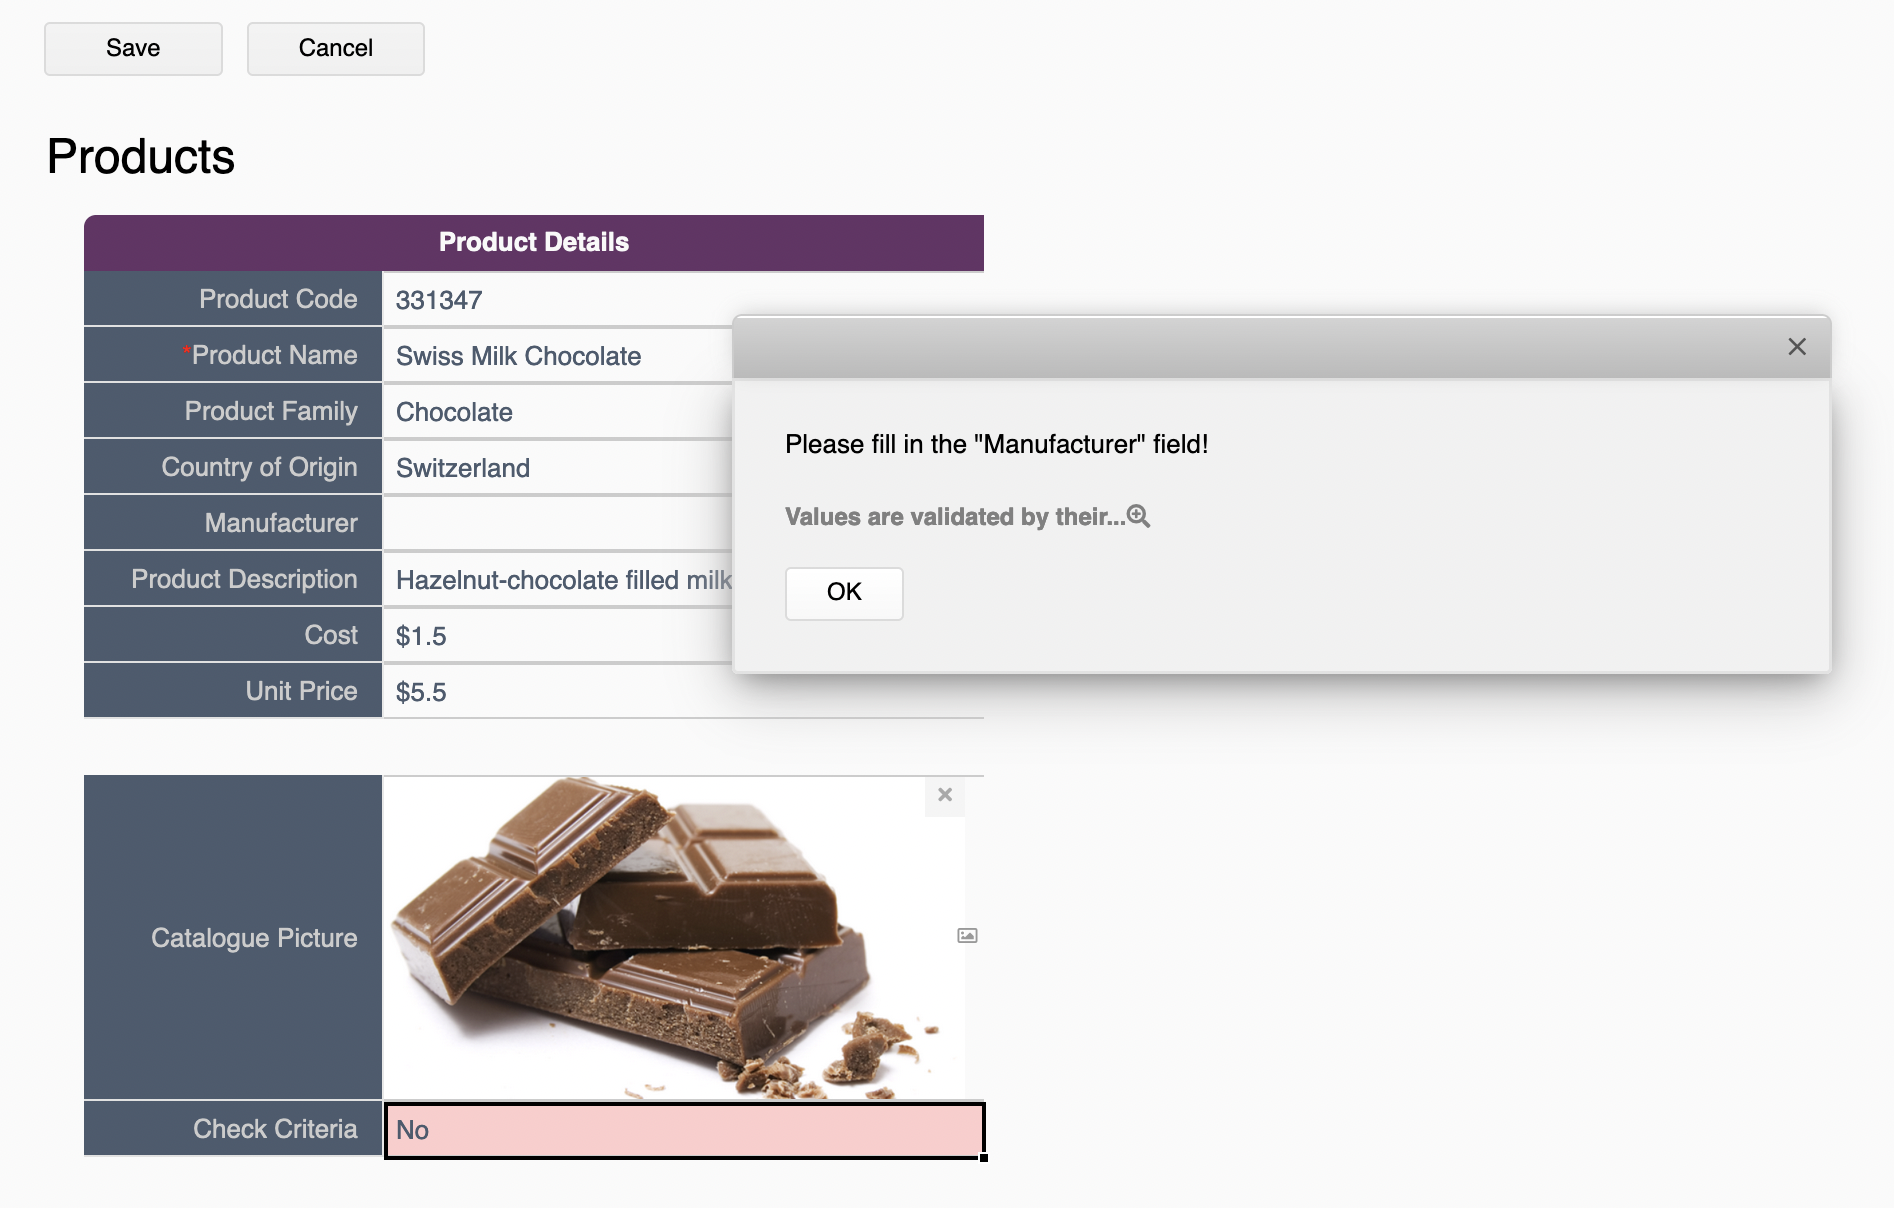
You can add a new attribute "Ragic_User_Name" in SAML Response. By doing so, if the login user account does not exist in Ragic, the system will automatically create a user account and its default email and user name will be the same as SSO's email. The password will be autogenerated as well. It's helpful if your plan is Concurrent Users.
If you want to let the identity provider (IdP) initiate SSO, you can add a new attribute in SAML Response:
Attribute Name: Ragic_Account_Name
Attribute Content: Account Name (If your database URL is https://www.ragic.com/support, then your account name would be "support")
You can refer to the setting process below:
Azure AD:
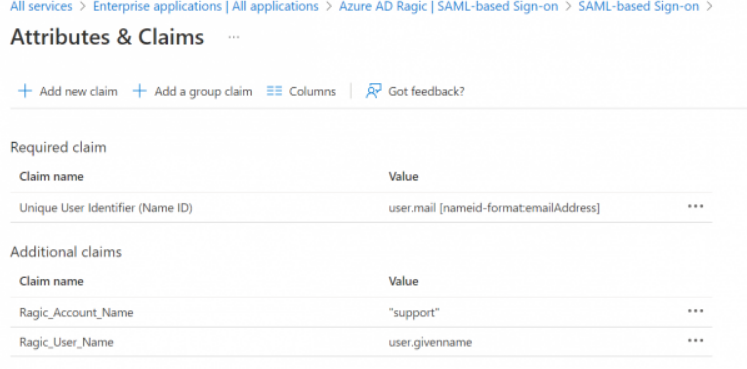
AWS:
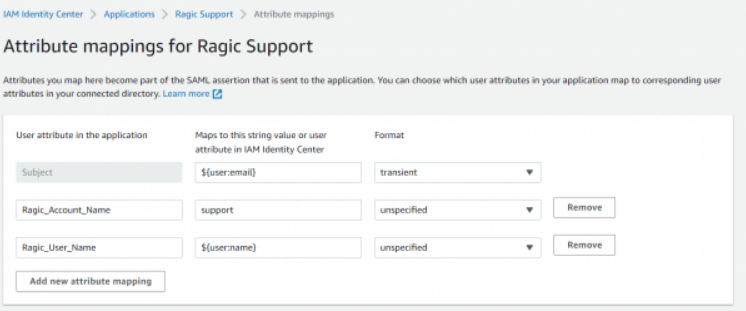
OKTA:

If a user exists in multiple Ragic accounts (databases) and wishes to log in to Ragic through SAML SSO, the following conditions must be met:
1. Consistent Single Sign-On Configuration: In the company settings form of each Ragic account, the field values for "Identity Provider (IDP)," "Application Alliance Metadata URL," and "Application Identifier" must be consistent.
2. Allow SAML SSO Login: Users in each Ragic account must be able to log in through SAML SSO.
If the Ragic database accounts are on different servers, you need to ensure that the Identity Provider (IDP) allows configuring multiple Assertion Consumer Service (ACS) URLs. Currently, only Azure Active Directory (AAD) supports this feature.
Administrators need to find the Reply URL in the AAD application's SAML SSO settings and append "/api/external/saml/acs.jsp" to it for all user accounts belonging to different servers.
For example, if the Ragic accounts are located at "https://ap5.ragic.com" and "https://ap9.ragic.com," please add "https://ap5.ragic.com/api/external/saml/acs.jsp" and "https://ap9.ragic.com/api/external/saml/acs.jsp" to the Reply URL.
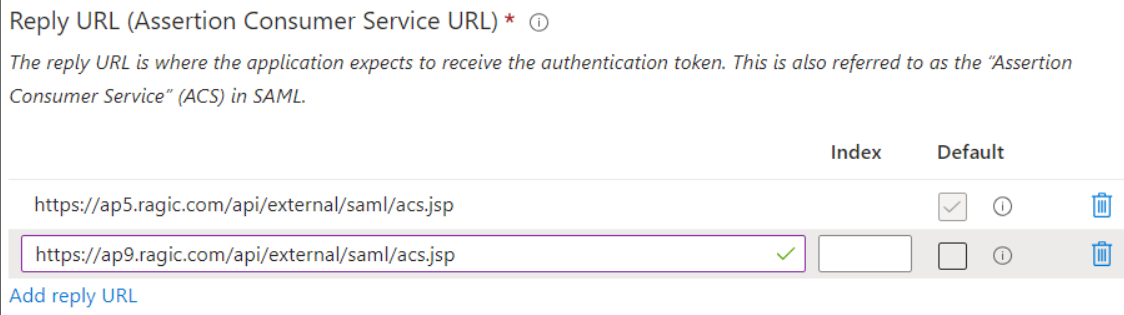

Step 2. Select SAML 2.O
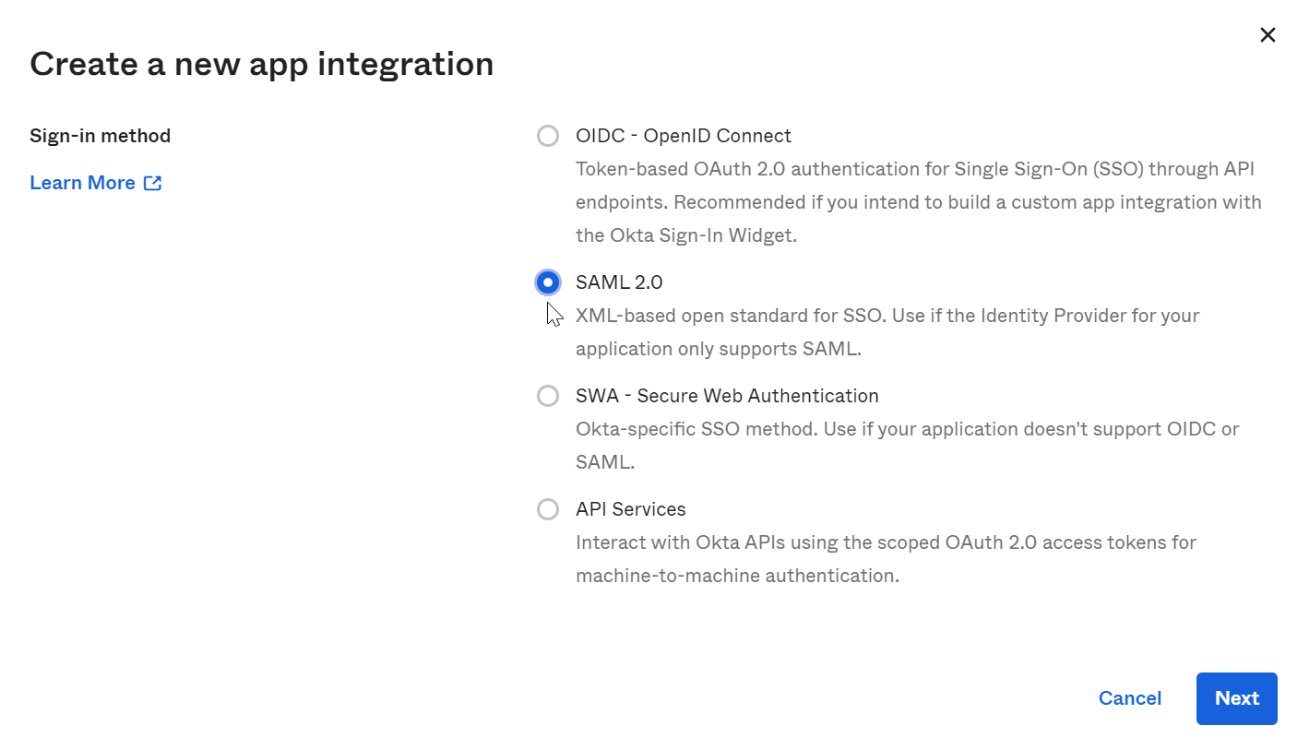
Step 3. General settings can be customized by user.
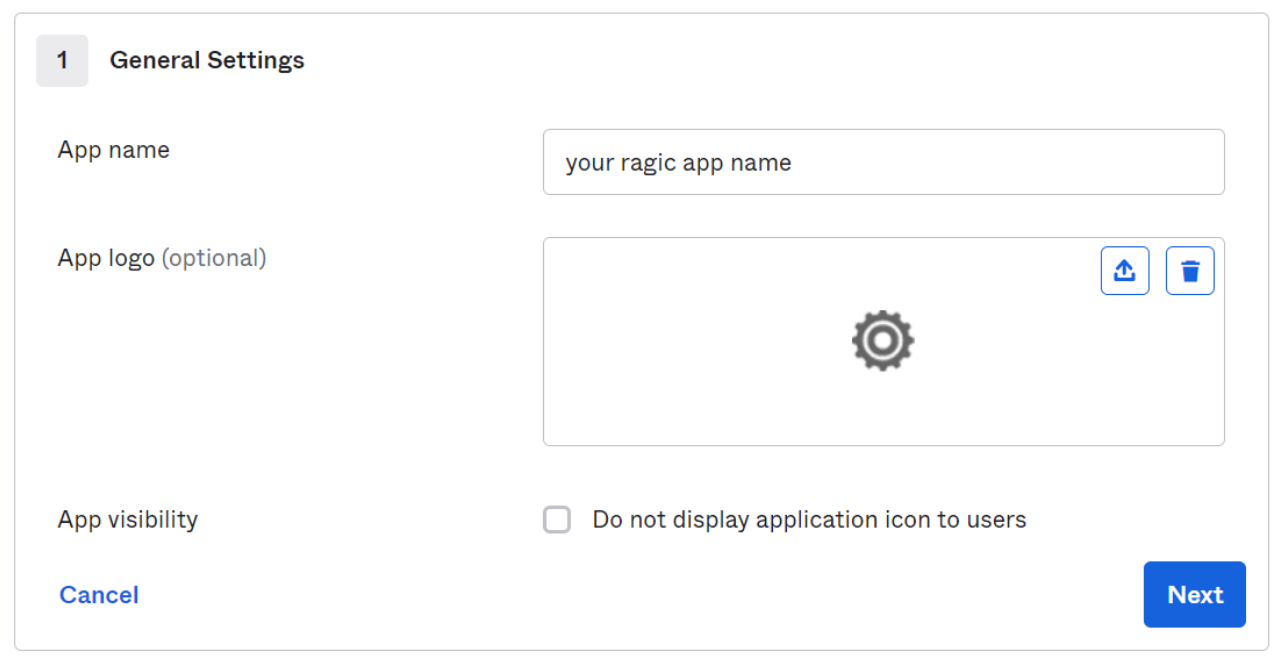
Step 4. Set application parameters
1. “Single sign on URL”, please fill in the URL of the server where your Ragic is located and add “/api/external/saml/acs.jsp” to the end (For example your Ragic url is https://test2.ragic.com, please fill in “https://test2.ragic.com/api/external/saml/acs.jsp”).
2. “Audence URI” attribute can be customized by the user, and fill the value in the “Application ID” field in the Ragic company settings.
3. “Application username”, please choose the parameter which fill in the email as a Ragic user in your Okta user settings.
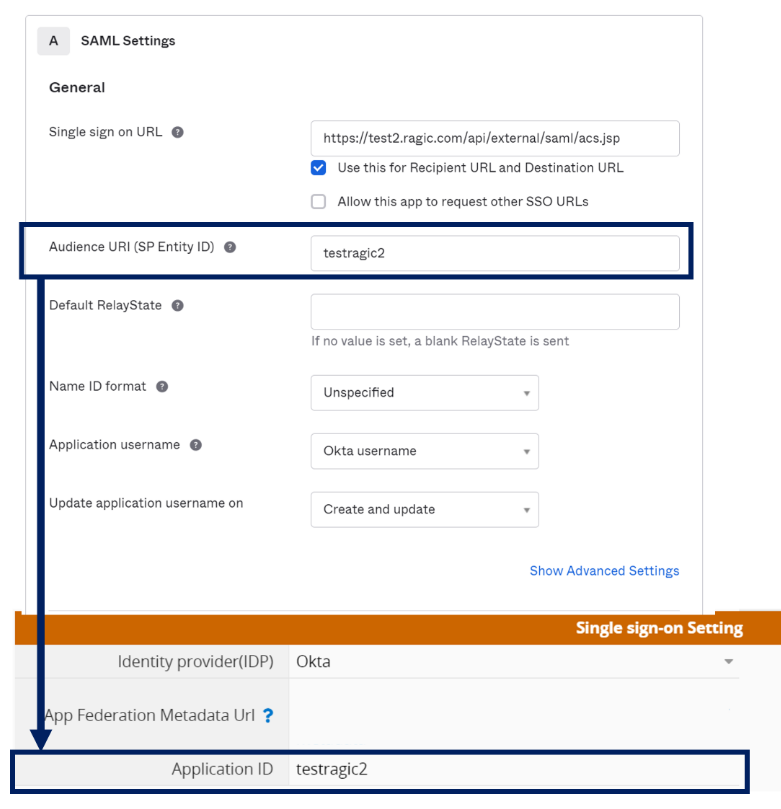
Step 5. Please select the certificate you have enabled in SAML Signing Certificates, and fill in the link of the URL (view IdP metadata) of the metadata in the "Application Alliance Metadata URL" in the Ragic company settings " in the field.
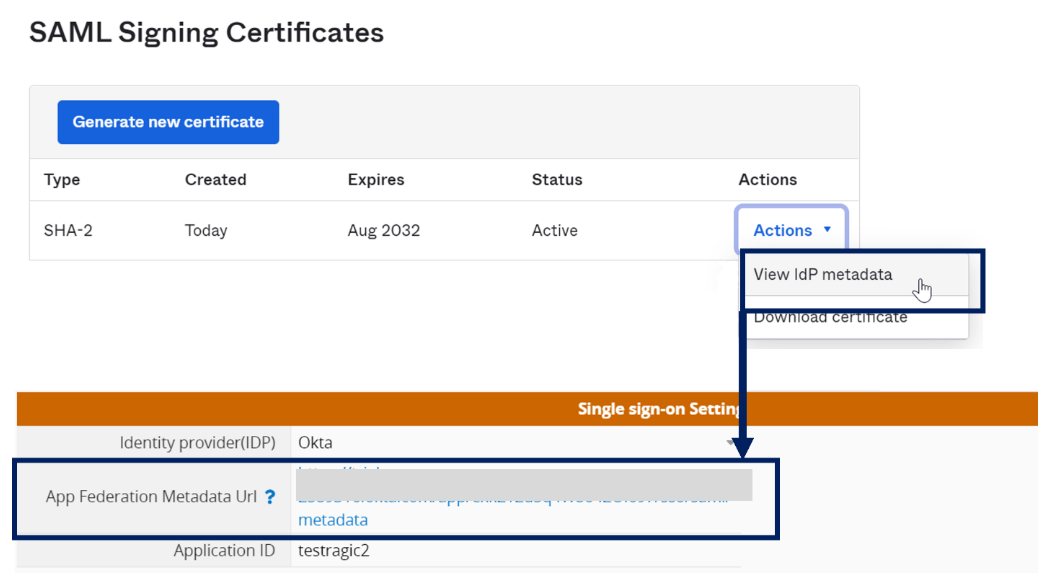
Step 6. Add users to the application
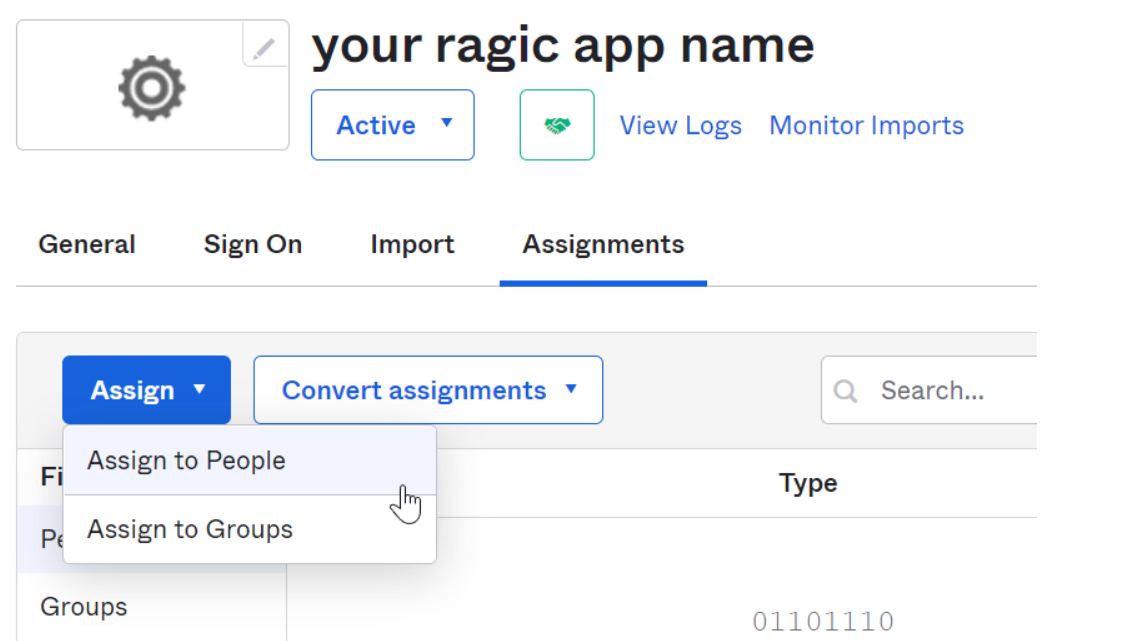
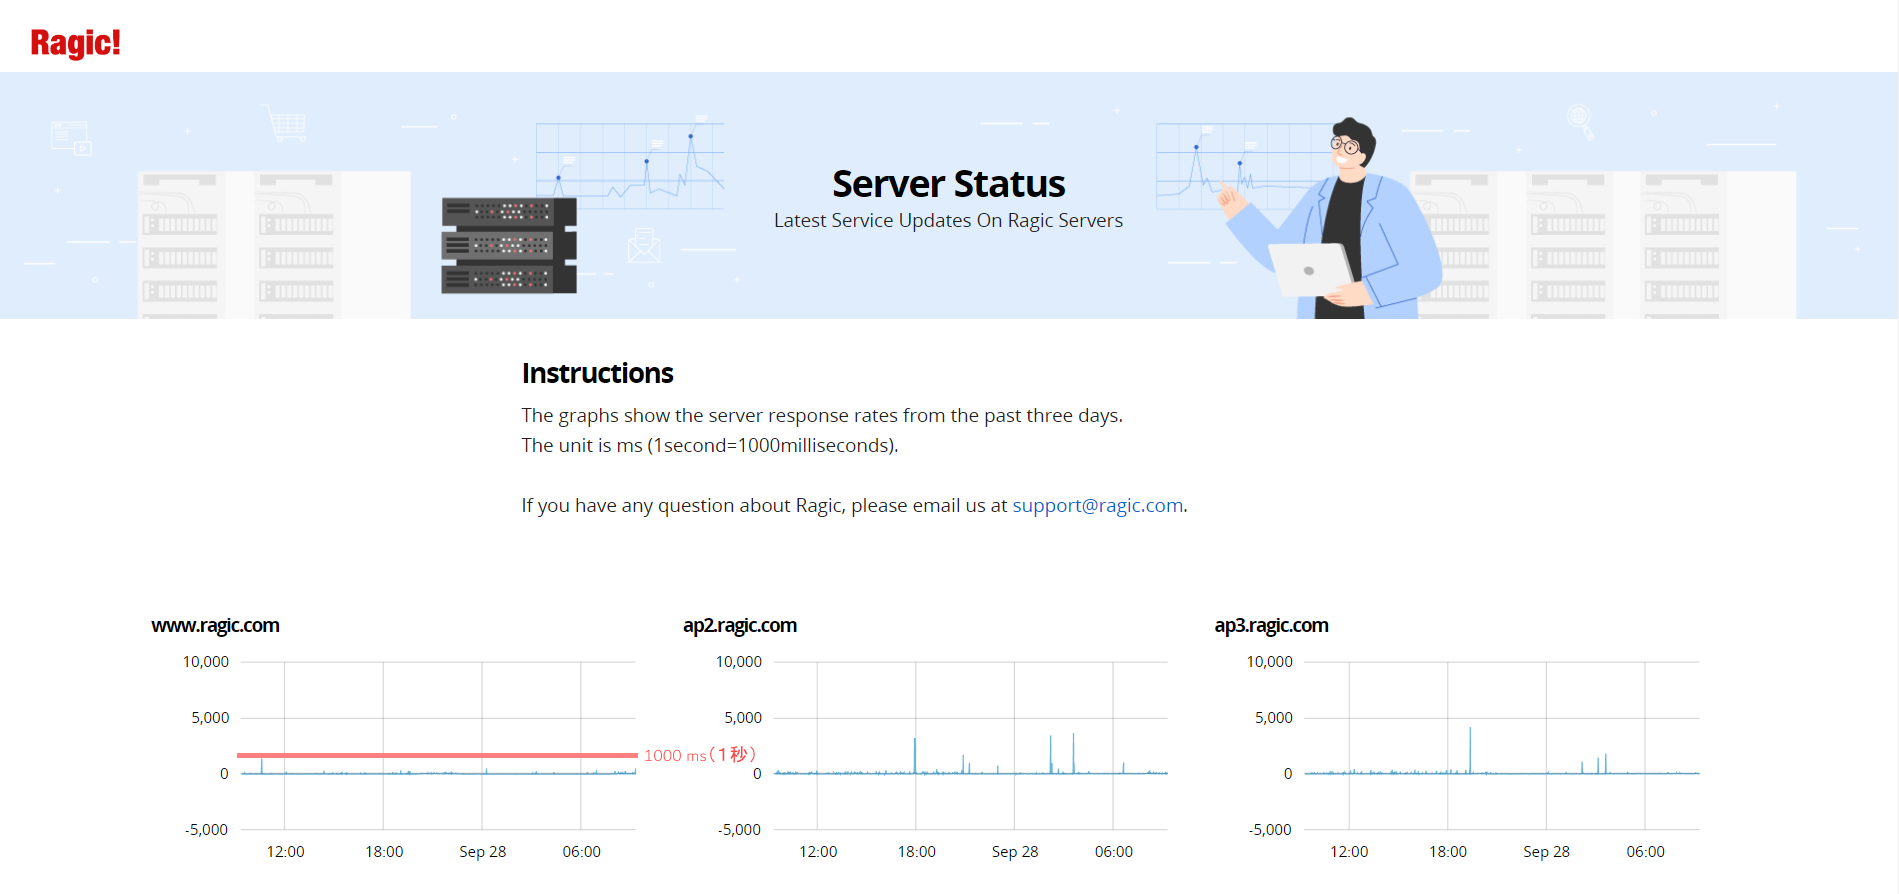
The Server Status page shows the server response time of every server within 24 hours in the form of baseline charts. Server response time is measured with ms (millisecond). By reading the chart, you will get to understand the operating condition of the servers, and the most recent condition of servers is displayed on the right side of the charts.
If the server response time exceeds 1000 ms (1 second) and continues for a while, it means that the server speed is slower than usual. If it goes up and down once and soon goes back to normal, the reason would be that the server is restarting or freeing up RAM, and soon it will be normal in a short period of time. If the fluctuation continues, it means that the server is currently busy.
If you are not sure which server your sheets are located at, you can check the URL prefix of your sheets. For example, if the URL of your account is ap2.ragic.com/demo, the URL of your server will be ap2.ragic.com, and you can check the current operating condition of your server by reading the chart of ap2.ragic.com.
Ragic monitors server status in real time. Normally even before you find out that the server response time is slower than usual, we have already applied fixes to the problems, and the information about the abnormal conditions and the repair status happening in 7 days will be shown in the Past Incidents section on the bottom of the Server Status page. You will be able to know the current repair progress and feel more relieved once you have encountered any problems.
In this article, we will explain how to apply formulas to create clickable links on your Ragic sheets to open messaging apps like WhatsApp, Facebook Messenger, Skype, Telegram, and LINE. Without further ado, let’s get into it.

Creating a click-to-chat link to WhatsApp requires clients’ mobile phone numbers to be saved in your sheets in advance. Take our Sales Order Management template for example. If you already have clients’ mobile phone numbers saved in field A9, you can create a URL field in A12 and apply one of the following formulas:
'https://wa.me/'+A9
'https://api.whatsapp.com/send?phone='+A9
* The phone numbers should be in international format. Please refer to this article for more information about the format.
Once the changes are saved, you will be able to generate a click-to-chat link in A12 and it will lead to a WhatsApp chat:
If you want to create clickable links to chat with your customers, It is necessary to have their Facebook usernames saved in your sheet. If you have their usernames in field A9, then you can create a link in A12 using the formula below:
'https://www.messenger.com/t/'+A9
To look up your customers’ Facebook usernames, you can refer to this article.
If you have your client’s LINE ID saved in A9, you can apply the formula below to create links to contact your customer:
‘https://line.me/ti/p/’+A9
* It’s worth noting that it’s impossible to look up someone’s LINE ID on their profiles to prevent people with bad intentions to spread people’s LINE IDs. The only way to know someone’s LINE ID is by asking them. If your client is not sure about how to look up their LINE IDs, you can share this article with them.
If you would like to share a sales order entry with your client through LINE, you can simply click on Share this Entry With LINE on the Tools menu.
You can create click-to-chat or click-to-call links to Skype. You will need clients’ phone numbers or Skype IDs to be saved in your sheets, and apply one of the following formulas in a new field:
Click to chat:
‘Skype:’+A9+'?chat’
Click to call:
'Skype:'+A9+'?call'
* Phone numbers should be in E.164 format. For example, for a mobile number 05 12 34 56 78 in France, you will have to type in +33512345678.
To look up someone’s Skype ID, you can refer to this article.
You will also need clients’ phone numbers or usernames to set up links to open Telegram. The formula will be as follows:
‘https://t.me/’+A1
* Phone numbers should also be formatted in E.164 format. If you want to look up someone’s username, simply click on the person’s Telegram profile to see it.
Here are the Ragic records with phone numbers you try to export to a CSV file. The phone numbers are displayed completely and correctly.
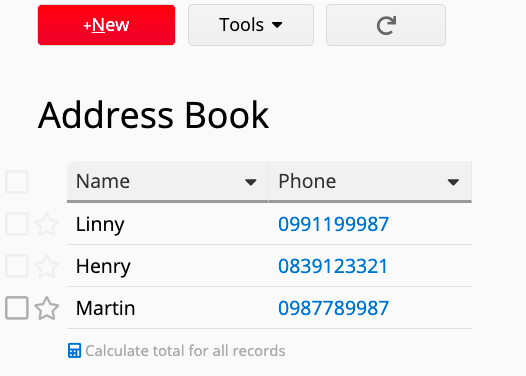
But when you open the file directly using Excel, the first zeroes of the phone numbers are gone.
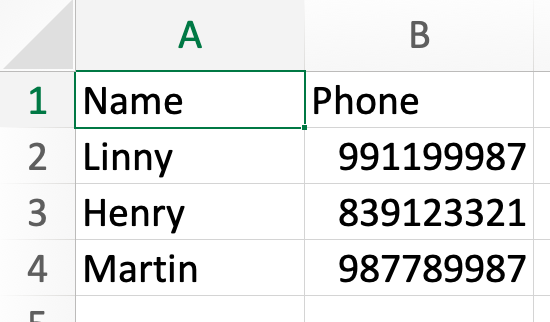
This is not a Ragic bug, but because Excel and CSV manage different types of data and data formats differently; CSV files save your data as plain text only, whilst Excel can organize your data as numbers, dates, text, etc.
If you use Notepad or TextEdit to open the CSV file, you’ll find that the first zeroes of the phone fields are correctly exported.
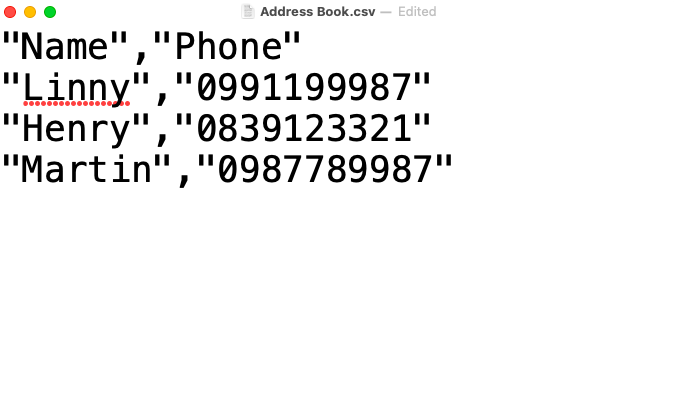
This means when opening this CSV file in Excel, the phone numbers or other text strings containing only consecutive numbers are considered as numerical values, so the first zero will be removed.
In this case, to display the first zeroes of your phone numbers using Excel, please follow the steps below:
Please open the file in Excel instead of directly opening the file using Excel.
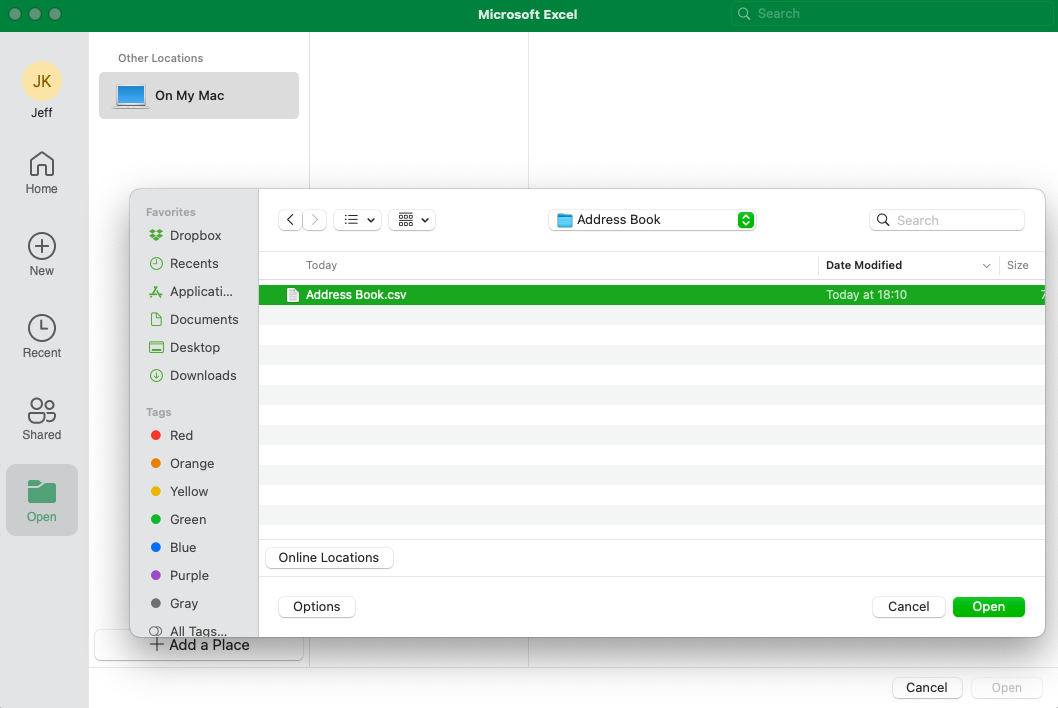
When Excel detects that you are opening a CSV file, you will be guided to a Text Import Wizard window.
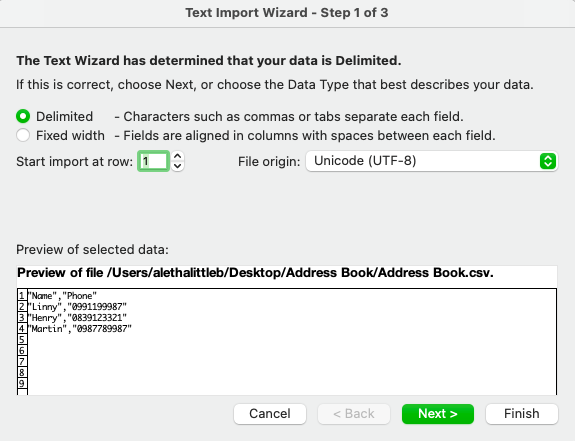
Ragic uses delimiters to distinguish every field, so you can click next without changing anything in this step.
In this step, you will need to select the delimiters according to the separator settings applied when exporting your Ragic data. The default separator on Ragic is a comma, but if you use other separators, you can modify the delimiter settings and preview the result.

If you see a solid vertical line, it means that the delimiters have successfully distinguished your fields. If your fields are distinguished correctly, you can click “Next” to proceed.
After distinguishing your fields, the text import wizard will ask for the format of every field. As mentioned earlier, the first zeroes are removed by Excel because it was considered as a number, and numeric values should not start with a zero.
To prevent this situation, please click the “Phone” column and then set its format as Text. This will allow Excel to keep the whole string.
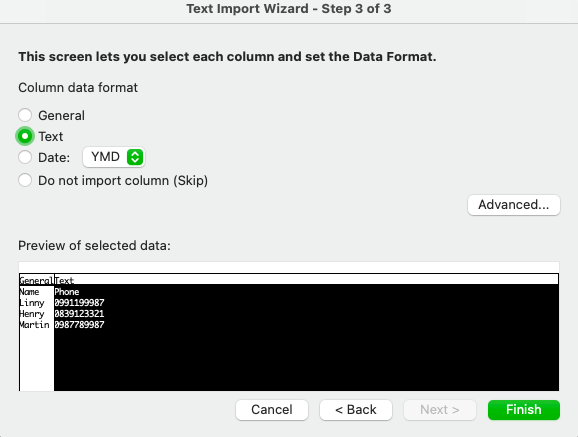
Click “Finish” when you’re done, and Excel will open the CSV file without removing the first zeroes of phone numbers.
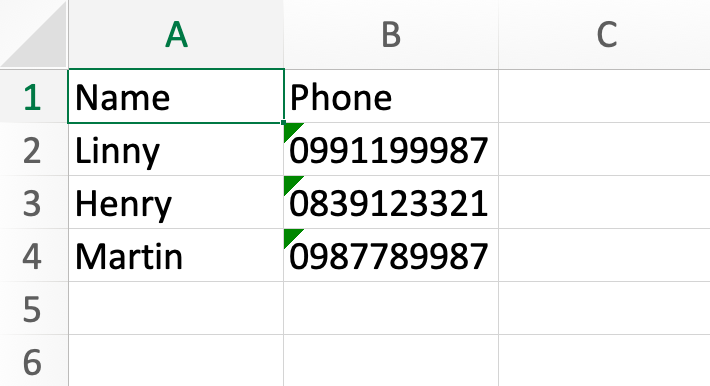
The iframe embed tool or using iframe BBCode in the text tool allows you to embed content on your homepage. However, instead of directly pasting the iframe embed code generated by commonly used websites, you will have to enter the embed URL for each website into the iframe embed tool or use it with iframe BBcode in the text tool. In this article, you will learn to get the embed URL for some commonly used websites and configure the settings to display the embedded content.
Tips: If the iframe content embedded in Ragic is blocked, please go to Company Settings → Account Settings and adjust the value of the "iframe sources" field.
If you would like to embed a Google Calendar on your homepage, you could enter the URL below into the iframe embed tool, or use iframe BBCode with the URL in the text tool:
https://calendar.google.com/calendar/embed?src=$USERID
The URL includes a variable user ID ($USERID), which will automatically be replaced with the Google account you log in to Ragic with. It is worth noting that you will have to make your calendar public to display it on your homepage correctly.
If you would like to embed a YouTube video on your homepage, you could follow the steps below:
1. Click the Share button under a YouTube video.
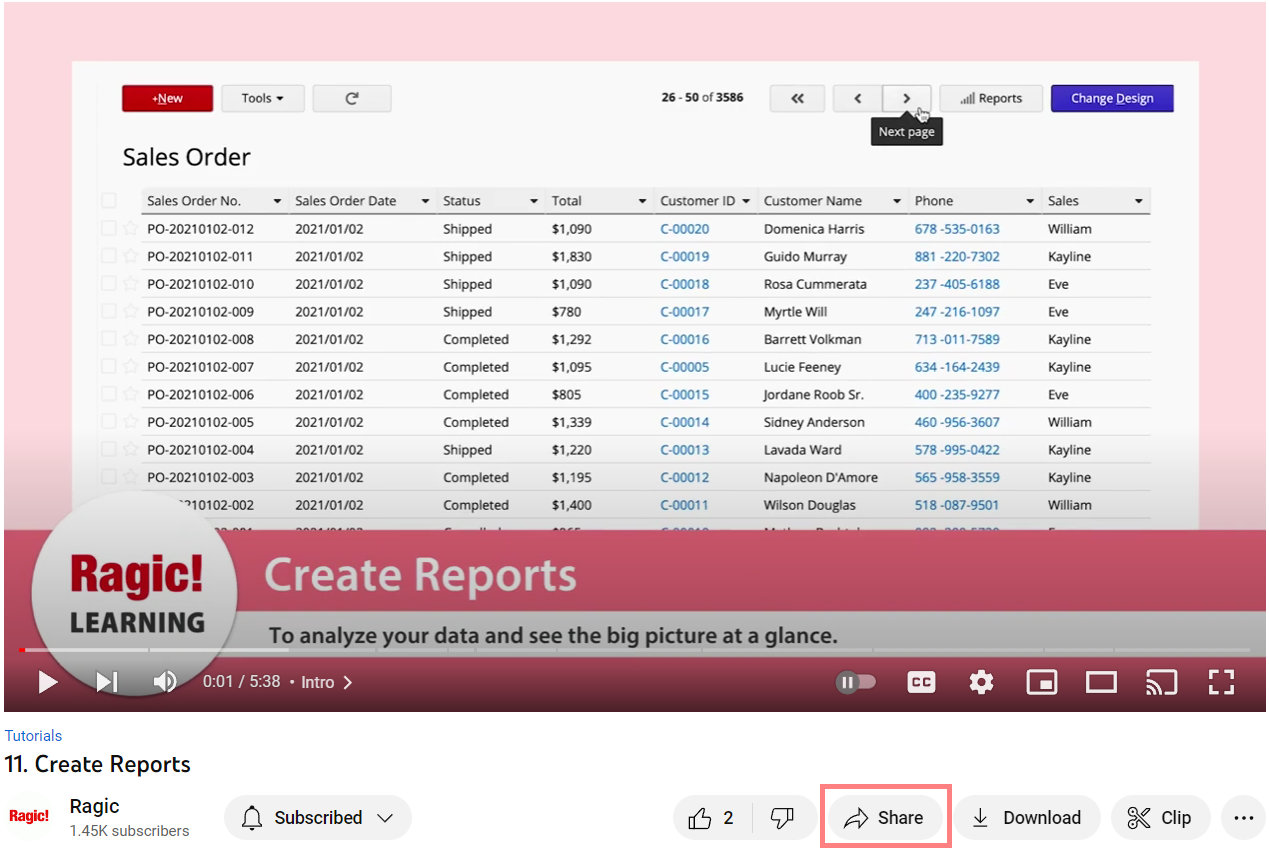
2. Click “Embed” on the pop-up window.
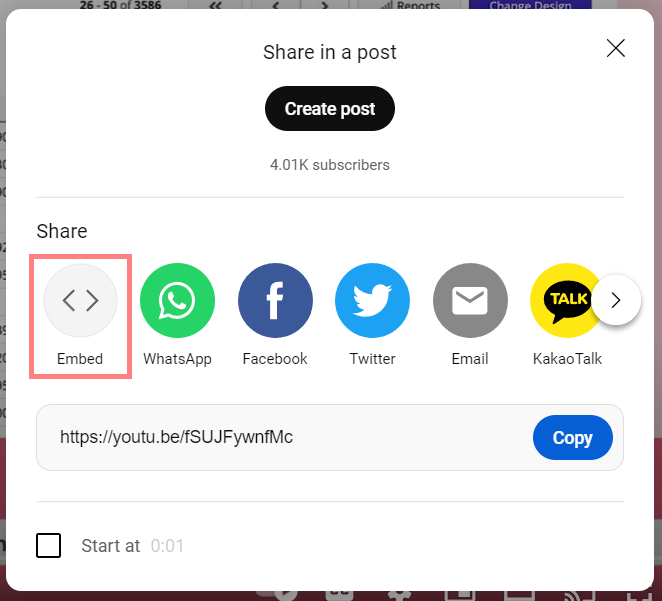
3. Copy the URL in the src attribute and paste it into the iframe embed tool on the user Hompage, or use iframe BBCode with the URL in the text tool. The video will be displayed on your homepage.
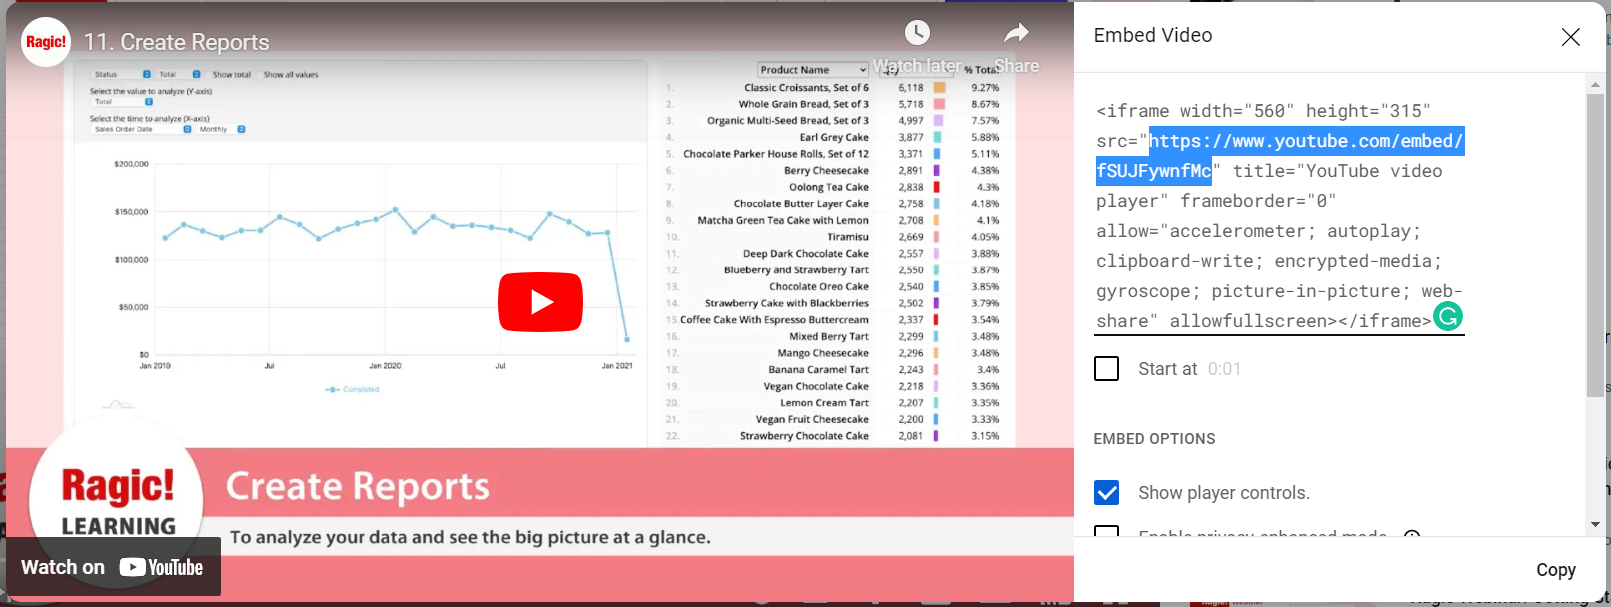
To embed a Google Map on your account homepage, you can follow the steps below:
1. Search for a location and click the Share button on the information window.
2. Click “Embed a map”, and you will get an iframe embed code. Copy the URL in the src attribute and paste it into the iframe embed tool on your homepage, or use iframe BBCode with the URL in the text tool. The map will be displayed on your homepage.
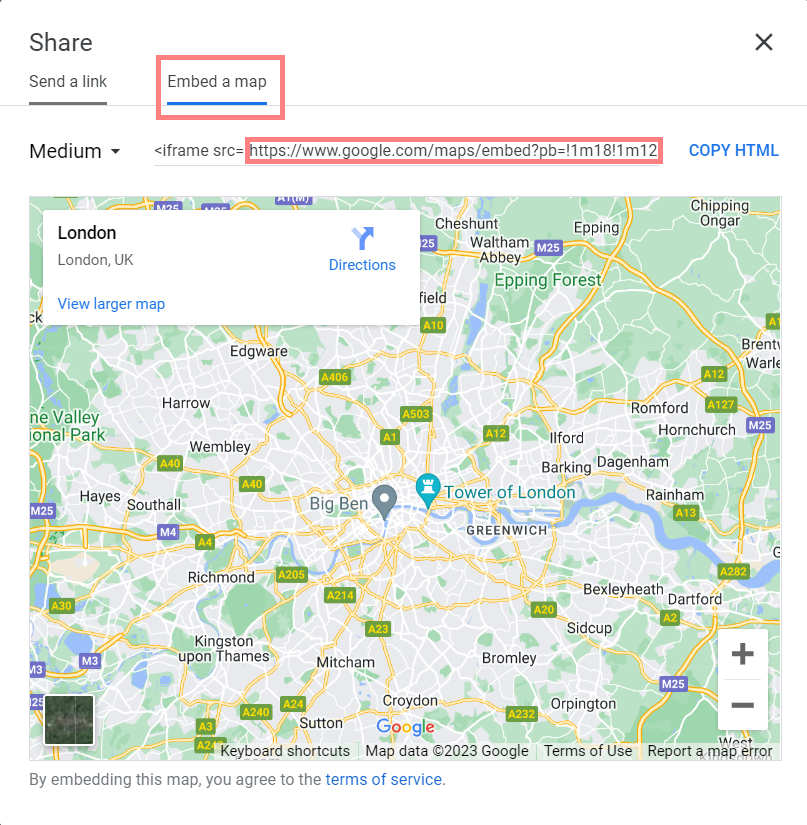
If you would like to embed a Facebook Page, you could follow the steps below:
1. Enter the Facebook Page URL you would like to embed on the Facebook Page Plugin and click the Get Code button.
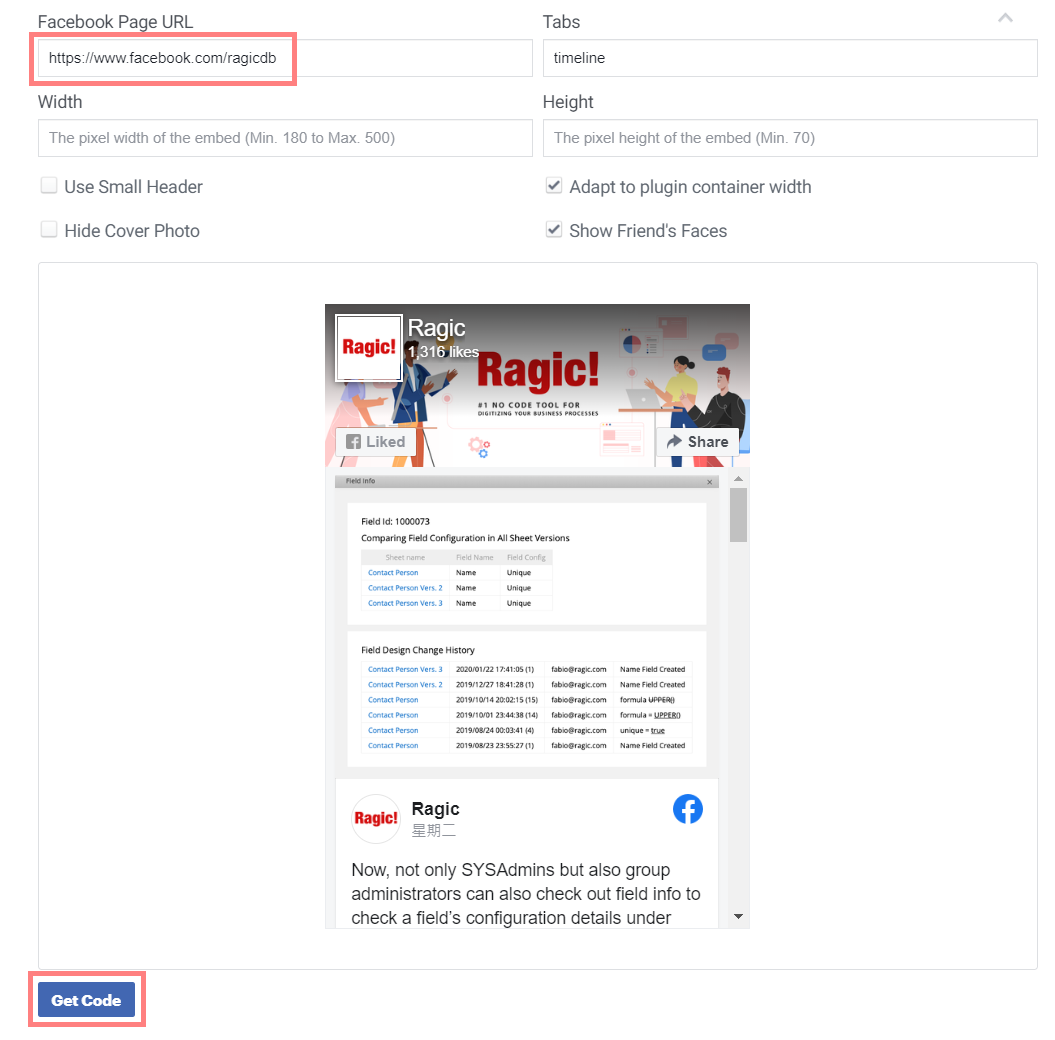
2. Click “IFrame” in the pop-up window, copy the URL in the src attribute, and paste it into the iframe embed tool on your homepage, or use iframe BBCode with the URL in the text tool.
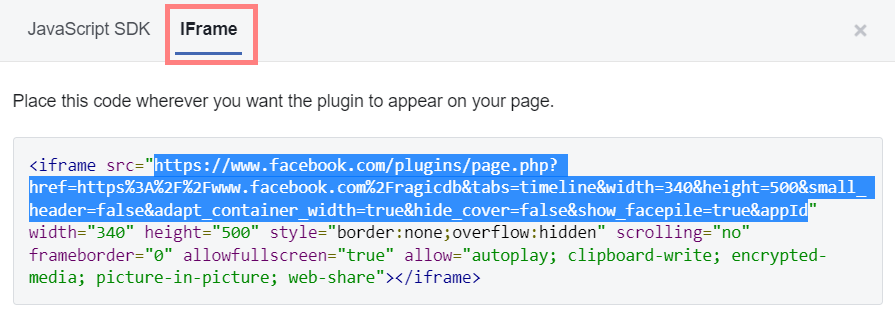
If you would like to embed a SlideShare presentation on your homepage, you can follow the steps below:
1. Click on the Share button below the title.
2. Copy the URL in the src attribute, add the “http:” prefix to the URL, and paste it into the iframe embed tool, or use iframe BBCode with the URL in the text tool.

As the URL in the src attribute is missing the "https:" protocol, you will need to add it before using the URL. For example, if the URL is
//www.slideshare.net/slideshow/embed_code/key/GRG8bIq4Kw2r8L
you would need to add "https:" to the beginning:
https://www.slideshare.net/slideshow/embed_code/key/GRG8bIq4Kw2r8L
Then you can use this modified URL in the iframe embed tool on your account homepage, or use iframe BBCode with the URL in the text tool.
To embed a Looker dashboard on your homepage, you can follow the steps below:
1. Open a report in Looker Studio, click on the triangle icon beside the Share button to open the drop-down menu, and then click “Embed Report”.
2. Click “Embed URL” in the pop-up window, copy the URL and paste it into the iframe embed tool, or use iframe BBCode with the URL in the text tool.
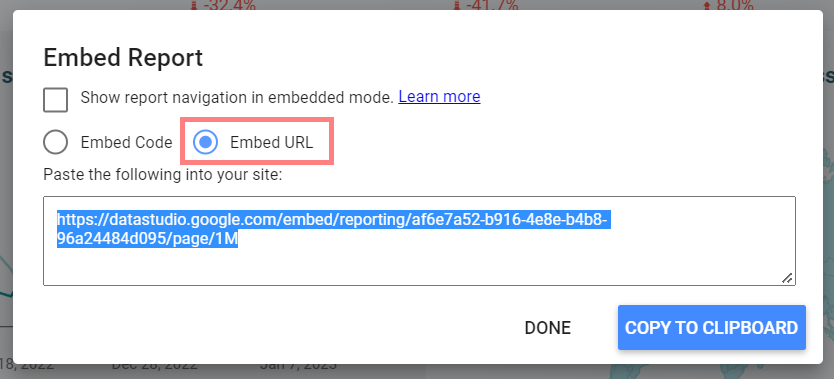
If a video or a presentation file is only for internal use, you can upload it to the File Upload field on your Ragic sheet, and embed it into the iframe embed tool or the text tool on your homepage. The detailed methods are as follows:
1. Upload a video to the File Upload field and save it.
2. Click the “open file location in a new window” button, copy the URL in the new window, and paste it into the iframe embed tool, or use iframe BBCode with the URL in the text tool.
1. Save the presentation file as a PDF and upload it to your sheet.
2. Click the file in the File Upload field, and the PDF file will open in a new window.
3. Copy the URL in the new window and paste it into the iframe embed tool, or use iframe BBCode with the URL in the text tool.
1. Enter your Google Account’s management page, such as clicking your profile picture on the top right corner of your Gmail page and then click "Manage your Google Account".
2. Enter the security settings page, and click to enter the 2-step verification settings page.

3. Turn on your Google account’s 2-step verification.
4. After turning 2-step verification on, click to enter the 2-step verification page again and scroll to the bottom to click and enter the “App passwords” settings page.
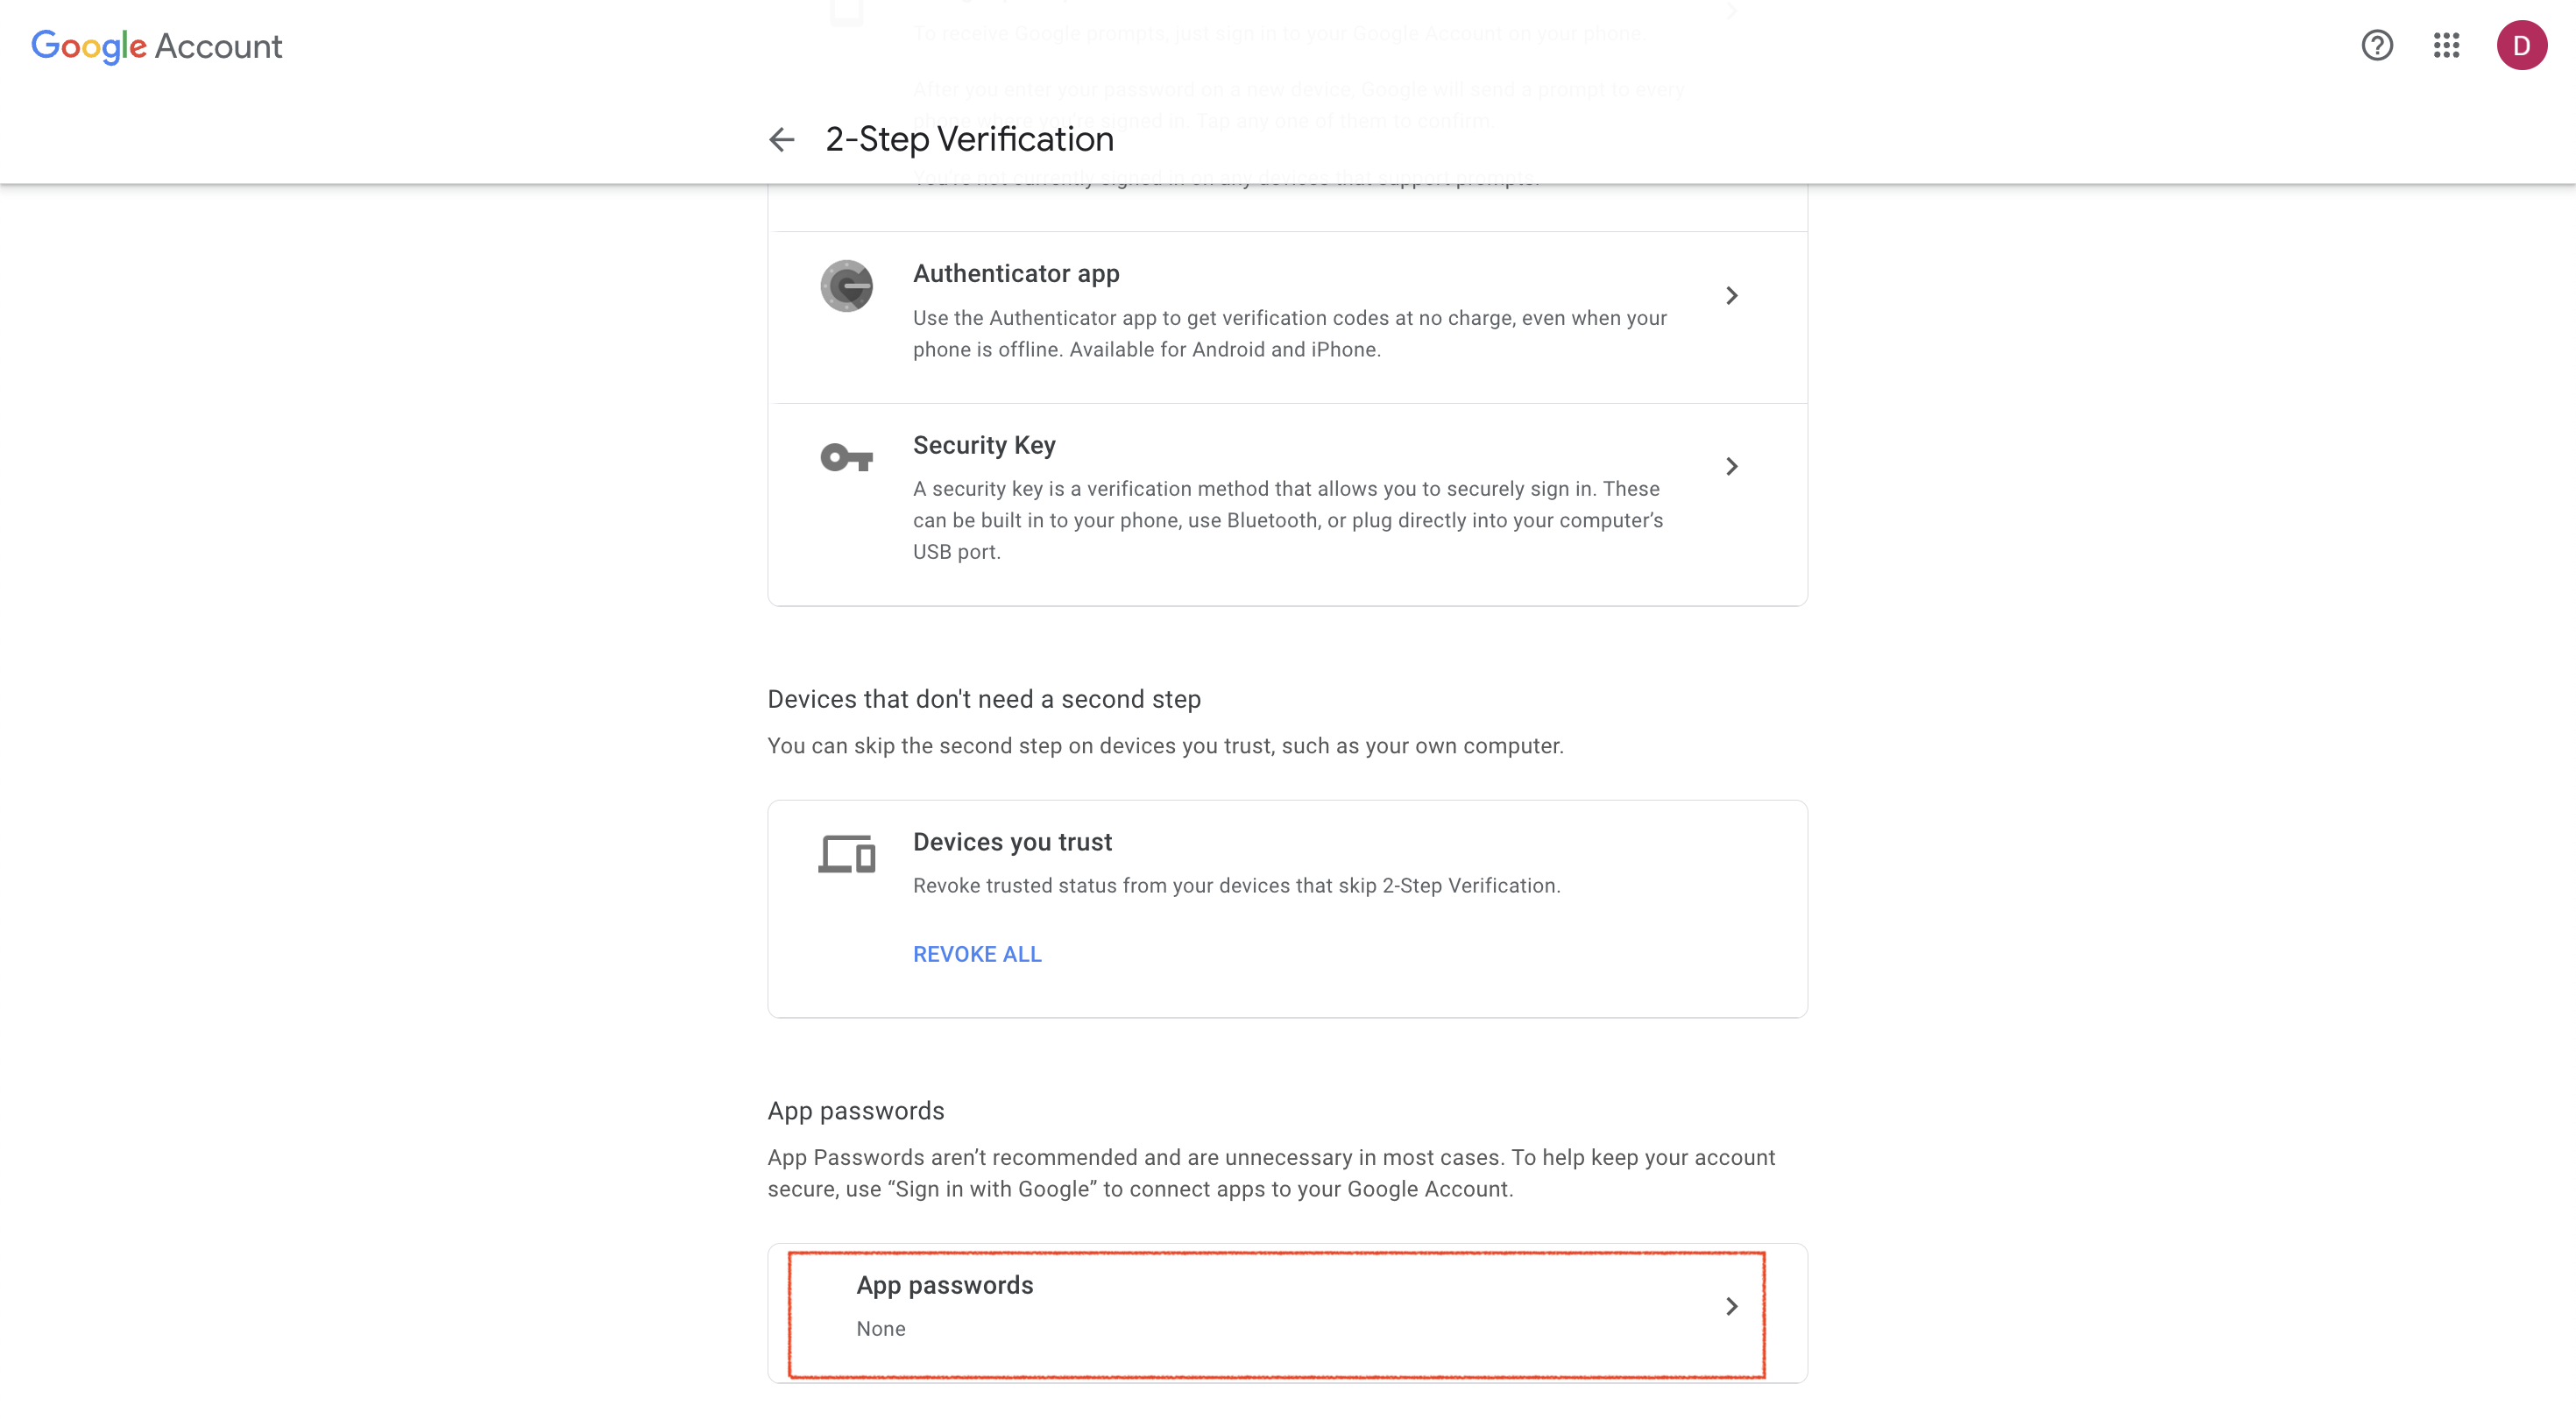
5. When selecting the app to generate the app password, please select "Other (Custom name)"and enter a custom name such as “Ragic” and then click "generate" to generate the app password.
6. Apply SMTP settings to your database.
Please go to your Ragic database’s company settings page and enter your SMTP information:
Enable Customization SMTP Settings: Yes
SMTP Address: smtp.gmail.com
SMTP Port: 587
SMTP Account: Your Google account
SMTP Password: The app password generated in step 5
The other SMTP settings fields are optional.
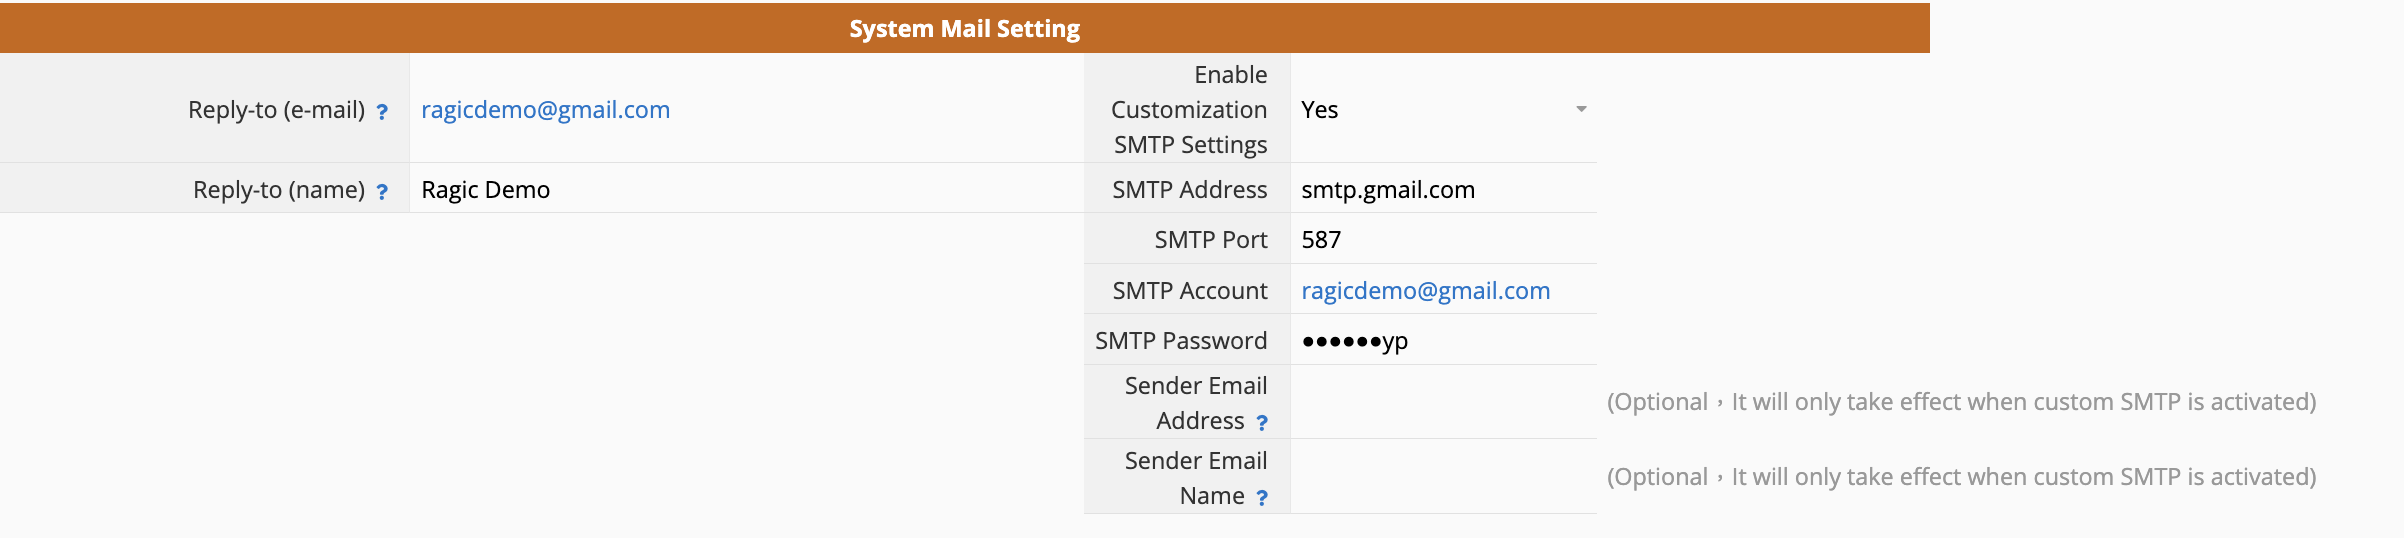
If your database is on-premises, please enter the following parameters in private server config:
SMTP_SERVER=smtp.gmail.com
SMTP_SENDER_AUTH_USER=Your Google Account
SMTP_SENDER_AUTH_PWD=The app password you generated in step 5
SMTP_SSL_ENABLE=true
SMTP_SSL_PORT=587
SMTP_SENDER_PERSONAL=Sender Email Name
SMTP_SENDER_EMAL=Sender Email Address
Remember to restart your on-premises service after modifying parameters in private server config.
Under certain circumstances, such as:
1. Manually entering field values into fields that are loaded fields or have formulas applied, but inadvertently triggering Link and Load sync or formulaic recalculation.
2. Setting Link and Load in fields that already have values, but the linked fields do not exist or have different loaded field values.
3. Batch Execute Action Button
These actions may result in the field values being updated or cleared. In such cases, the Downloading the Backup Data of a Single Sheet function can retrieve the previous field values.
Go to Tools > Download as Excel or Text > From Backup. You will see the following file options available for download: Daily Backup, Weekly Backup, Bi-weekly Backup, and Download from History.
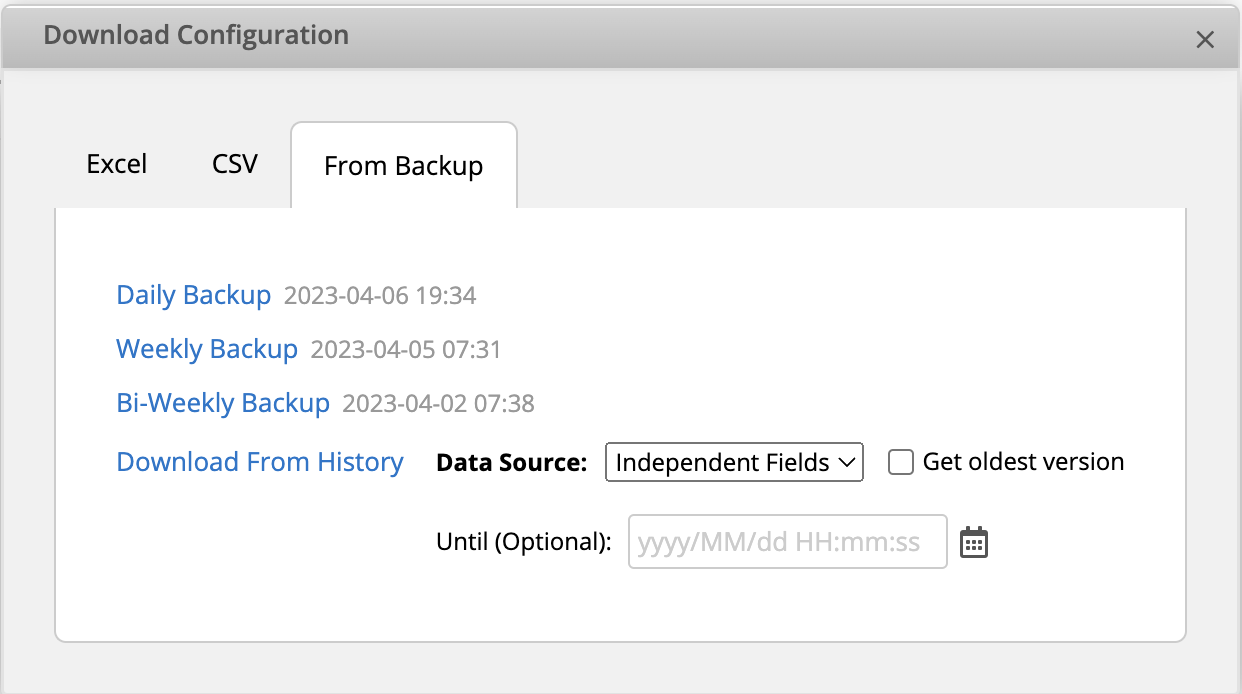
Select the option corresponding to a time before the error was made and download the backup form data. Please note that data beyond the corresponding listed time of each backup type will not be included in the file.
For example, if the error was made at 2023/3/30 18:00, and the system's automatic backup times were at 2023/3/30 19:48 for Daily Backup, 2023/3/28 07:44 for Weekly Backup, and 2023/3/16 07:55 for Biweekly Backup. You should select to export "Weekly Backup" and retrieve the previous values, and any data added or modified after 2023/3/28 07:44 will not be included in this file.
You can also select "Download from History." This option is only available if the field's detailed change content is listed in the entry’s bottom right-hand corner's history of record. For example, if the value of Field A was changed by a user from 800 to 1000 at a specific time, the "Downloaded from History" will be able to capture the 1000 value.
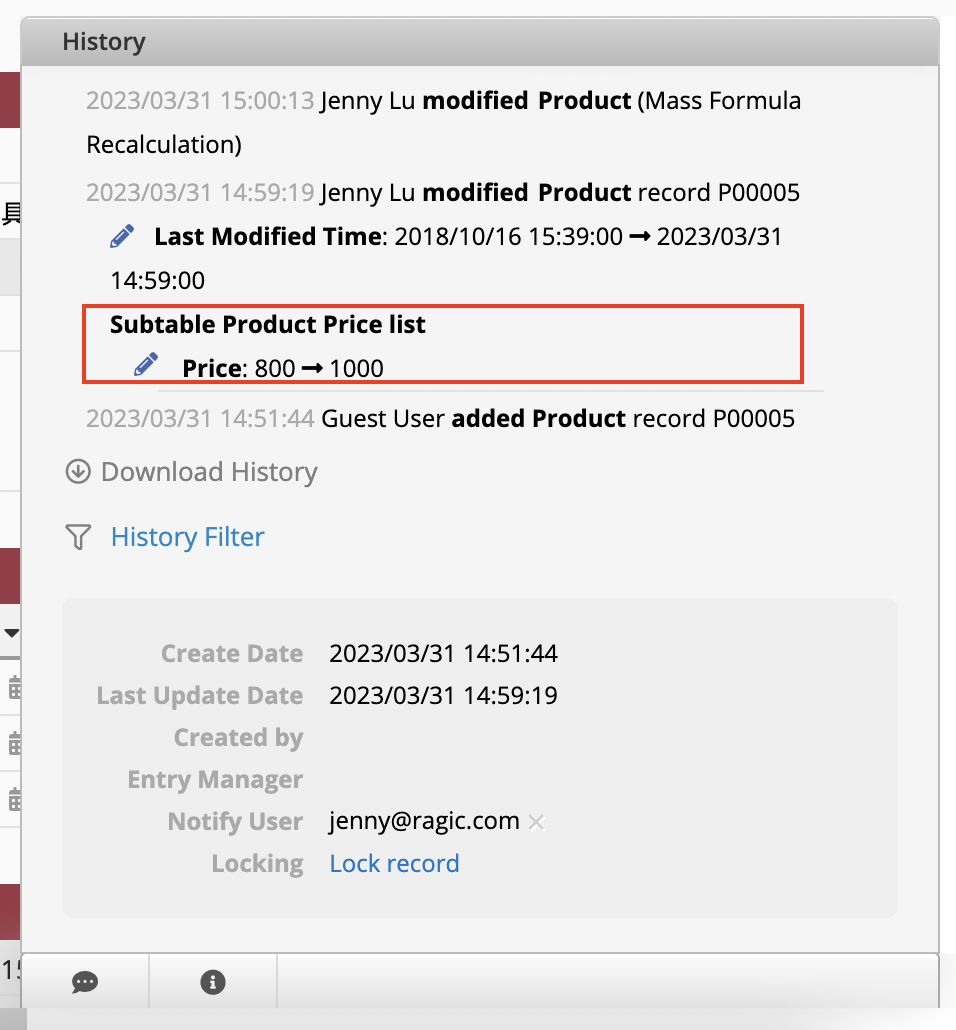
If "Formula Recalculation" and "Link and Load Sync" are executed in design mode, no detailed changes will be recorded in the history, making it impossible to obtain accurate information about the changes made:
1. After executing "Formula Recalculation", the modification history of the data will only record as "Mass Formula Recalculation".
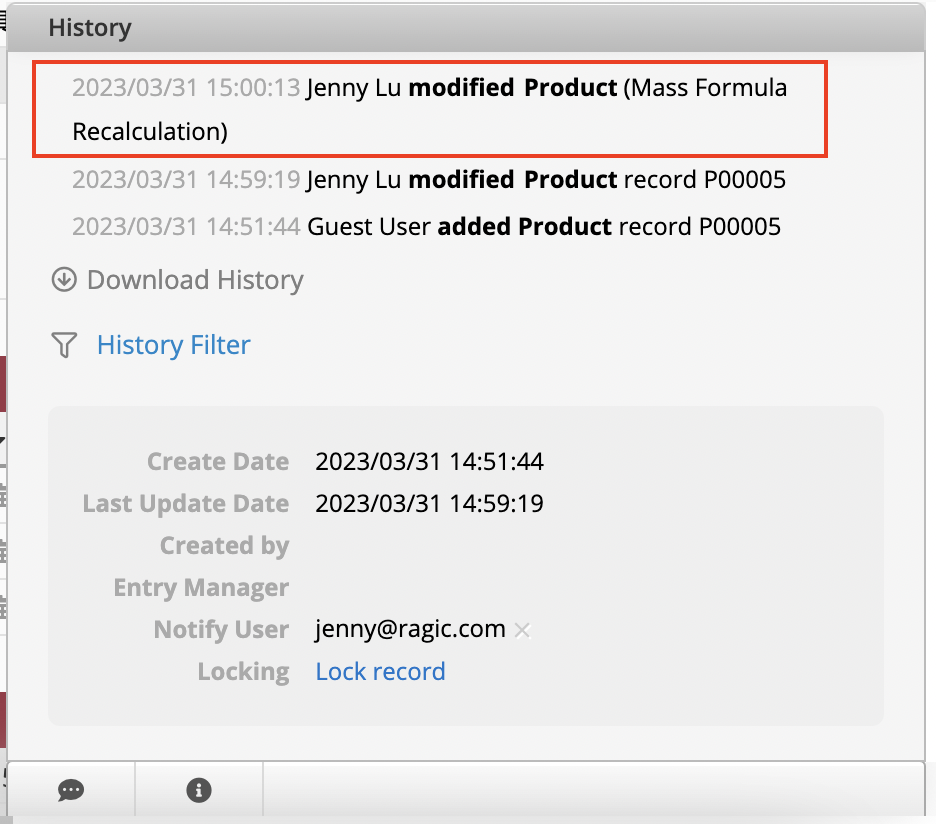
2. Currently, there are no execution records after executing "Link and Load Sync".
Before downloading from history, you can check the time point of the incorrect modification in the history. If this operation cannot be found or there is no detailed record in the history, it may have been triggered in design mode and will not be included. In this case, you need to use daily backups, weekly backups, or bi-weekly backups to download the files instead.
You can download the backups before the modification time from the history records:

After exporting the backup file, you can then correct your data by importing this backup file back to the sheet.
When importing a file, you need to choose "Renew data" or "Update without creating new data" in the import policy, and each record must have a unique value (key value) to map the information on the import file correctly to each entry.
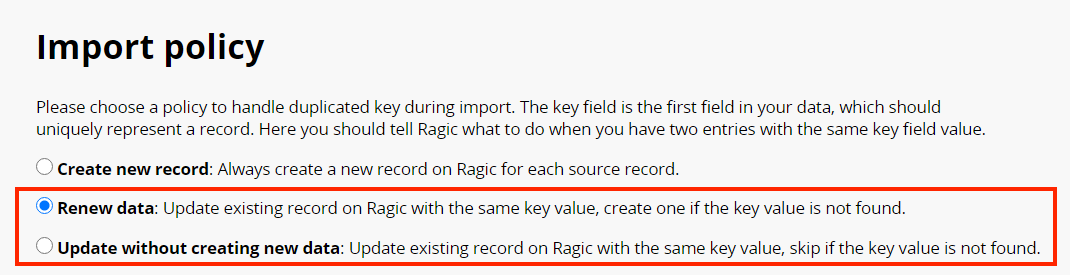
If your sheet does not have a unique value field, you can consider using RAGIC ID as the unique value for importing or exporting data, and the downloaded Excel backup file of the sheet will also include the RAGIC ID.
To use RAGIC ID as the unique key, you must add a field to the sheet with the field type "Auto generated field values" and select RAGIC ID as the format first. This way, when importing the data, the system can correctly correspond to each record.
Lastly, it is important to note that if fields have already been configured with Link and Load (such as loaded fields) or have been calculated with formulas, it is not recommended to manually modify the field value.
If a loaded field or a field with formula applied requires manual input at times, adding another field for manual input is recommended. For example, update the field's value to the manually entered value when manually entered, and return the formula calculation when the manual input is empty. There are two methods to achieve this:
1. There are three fields in total: A1 is the formula calculation field, A2 is the manual input field, and A3 is the returned field.
2. Set the formula calculation in A1, assuming the condition is C1+C2.
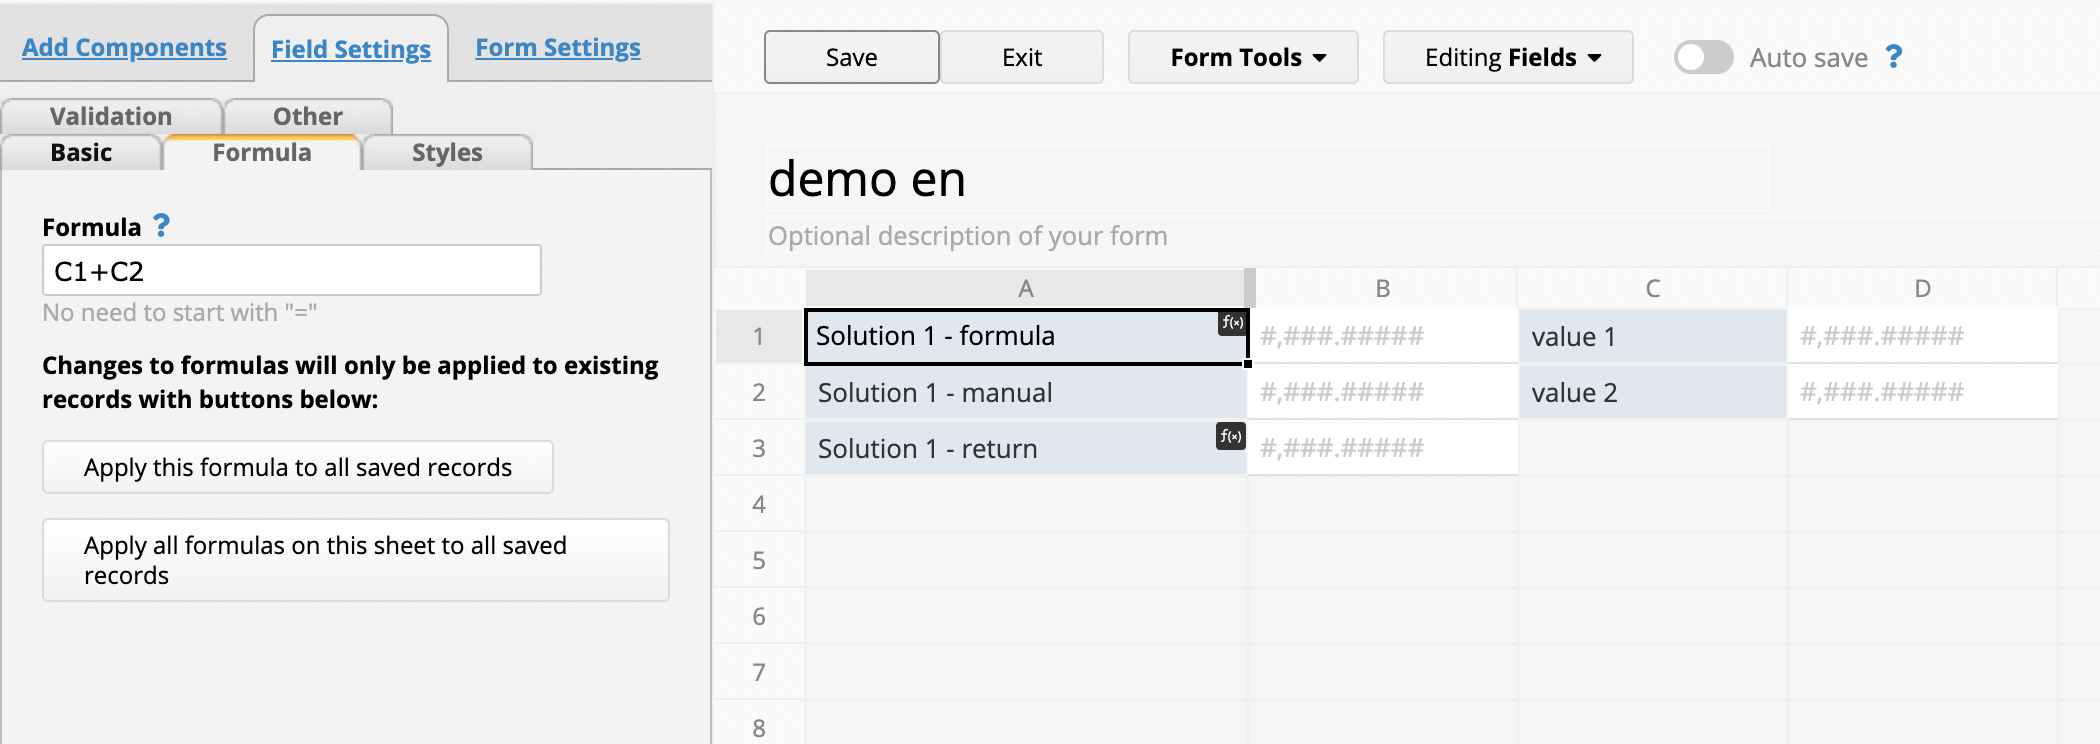
3. Set the formula in A3: IF(ISBLANK(A2), A1, A2). This means when A2 is blank, return A1, if otherwise, return A2.
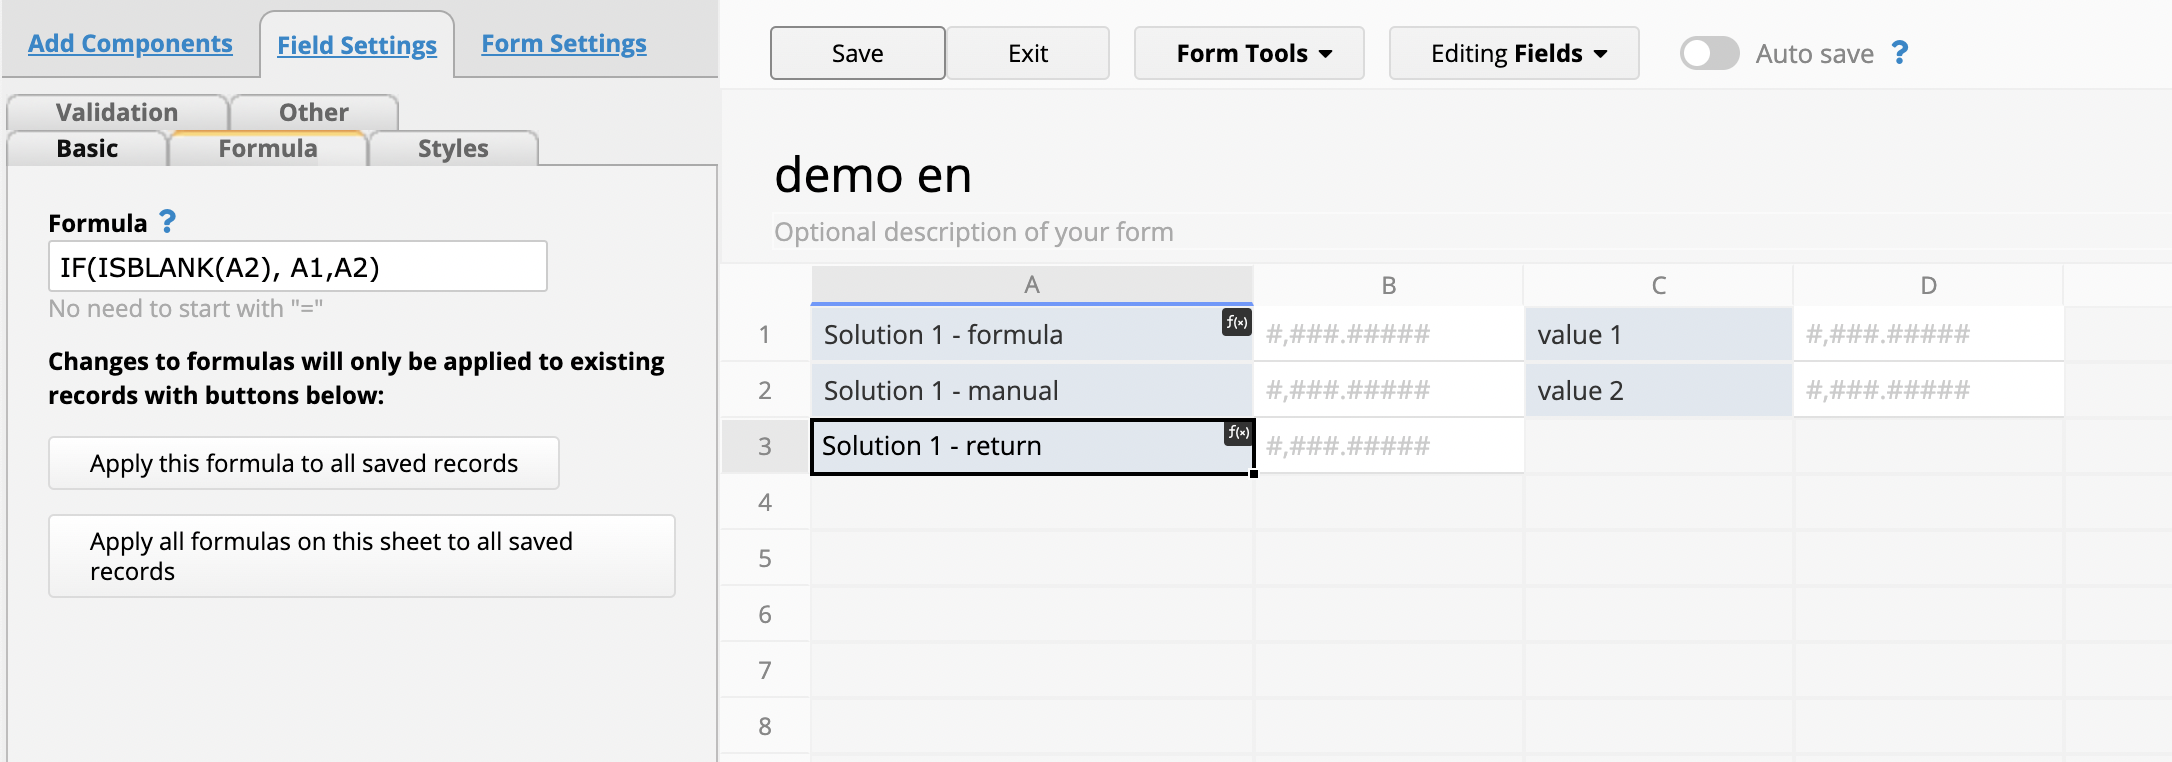
So when A2 has a value, A2 will be returned automatically. When A2 is blank, the value of A1 with the formula calculation will be returned. The execution results are shown below.
(1) When A2 is blank, return the value of the A1 field with the formula calculation:
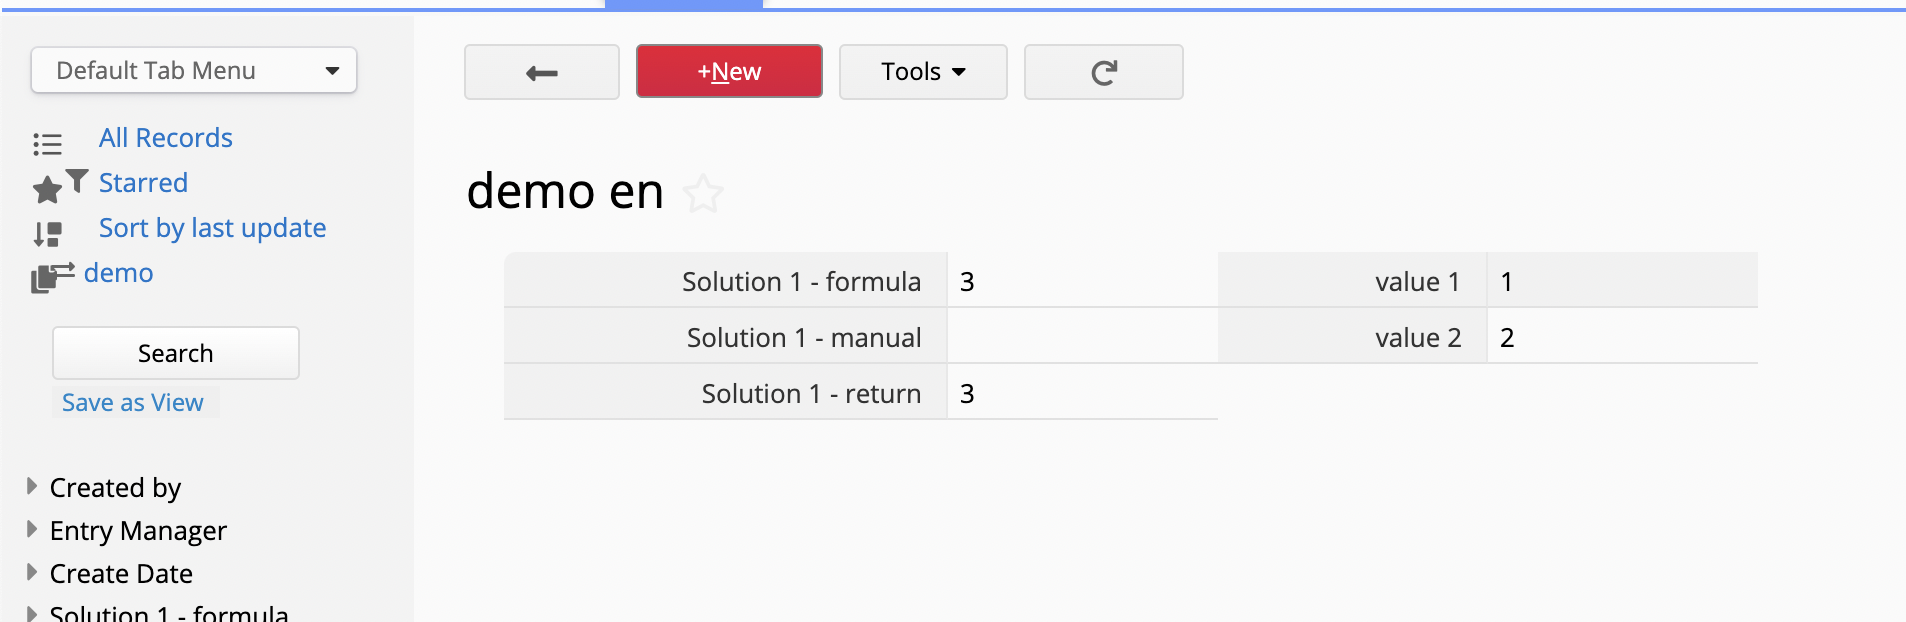
(2) When A2 has a value, return the value of the A2 field:
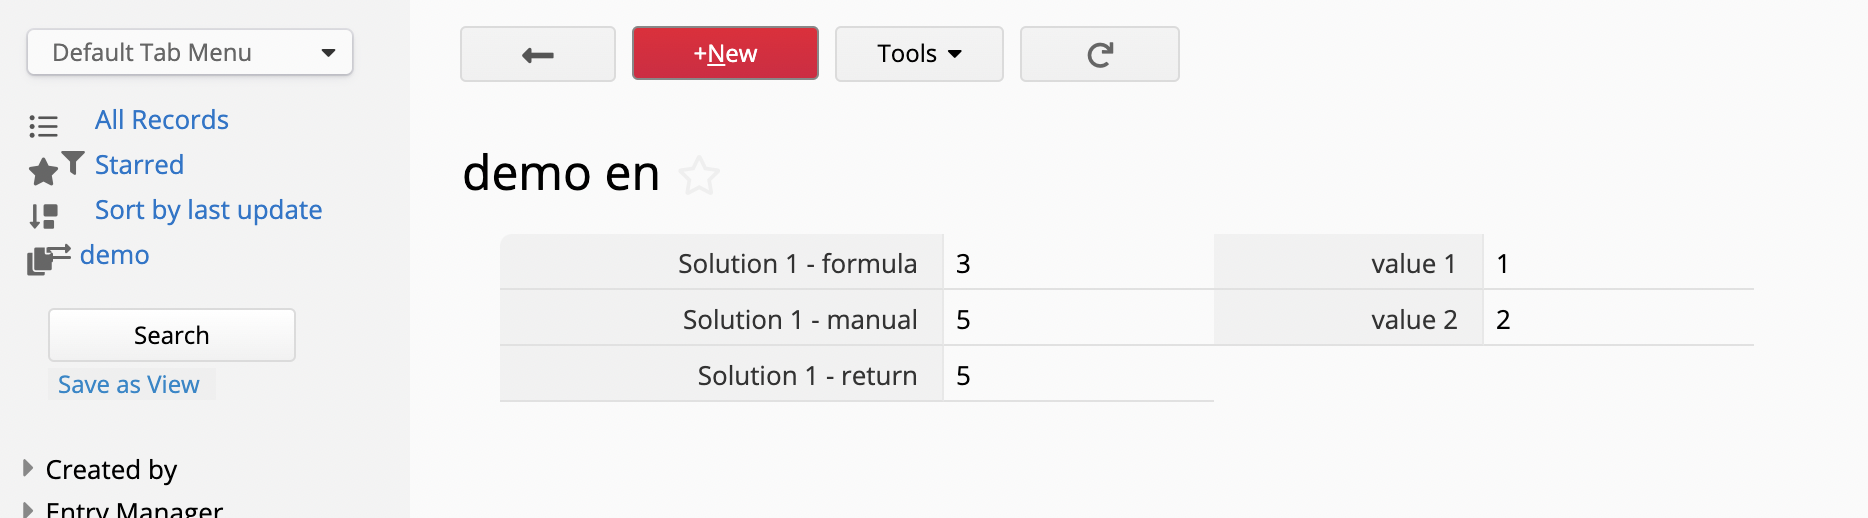
1. If you want to directly determine conditions and return the value in field A1, you only need two fields: A1 is the field with the applied formula, and A2 is the manual input field. Assuming the original calculation formula is C1+C2.
2. Set the formula in A1: IF(ISBLANK(A2), C1+C2, A2). This means when A2 is blank, return C1+C2, if otherwise, return A2.
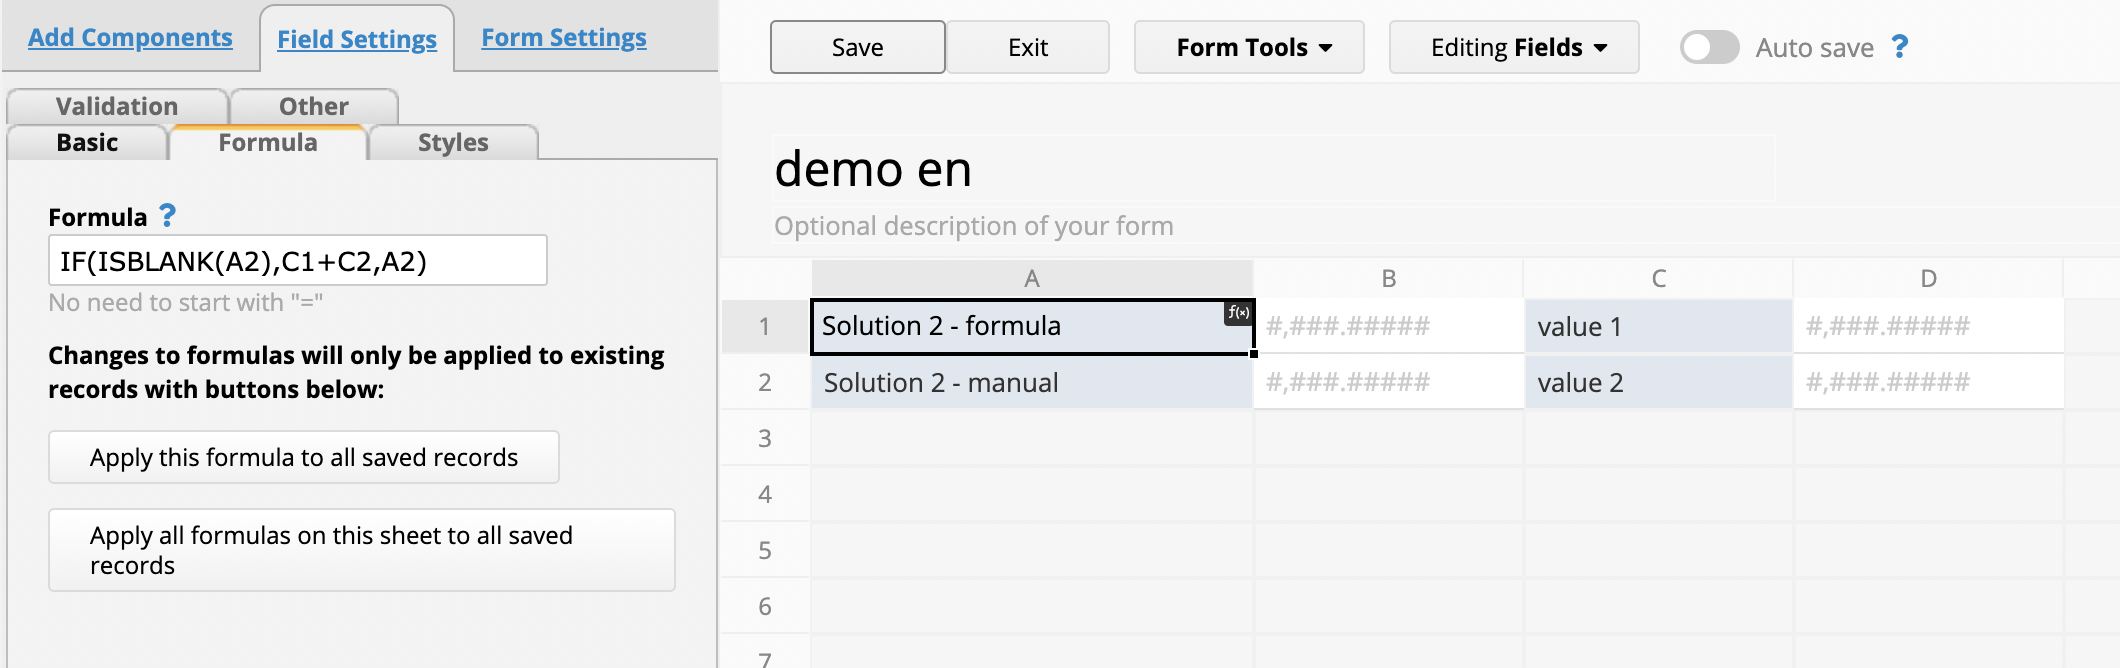
So when A2 has a value, A1 will return A2’s value automatically. When A2 is blank, the resulted value of the formula will be returned. The execution results are shown below.
(1) When A2 is blank, return the value of the A1 field using the formula calculation:
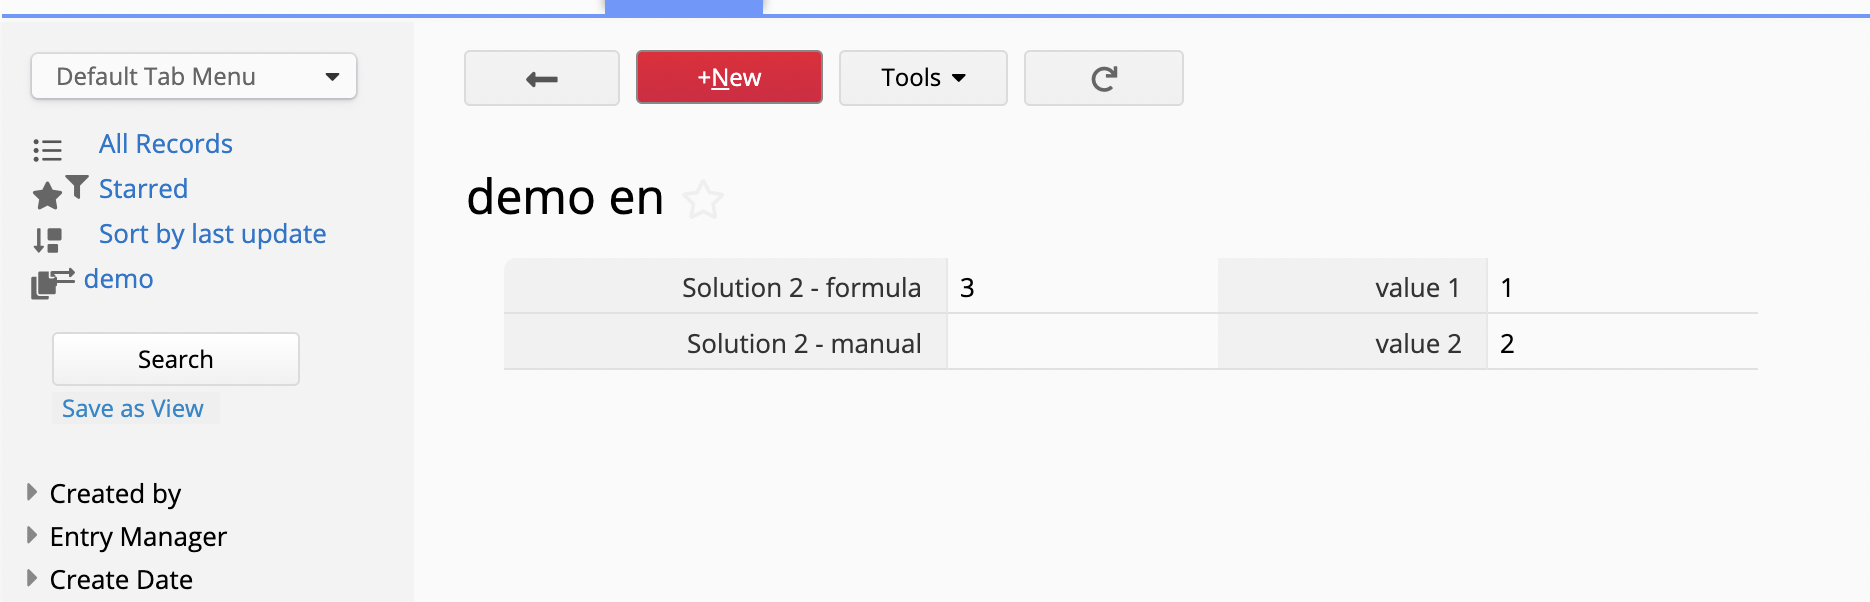
(2) When A2 has a value, return the value of the A2 field:
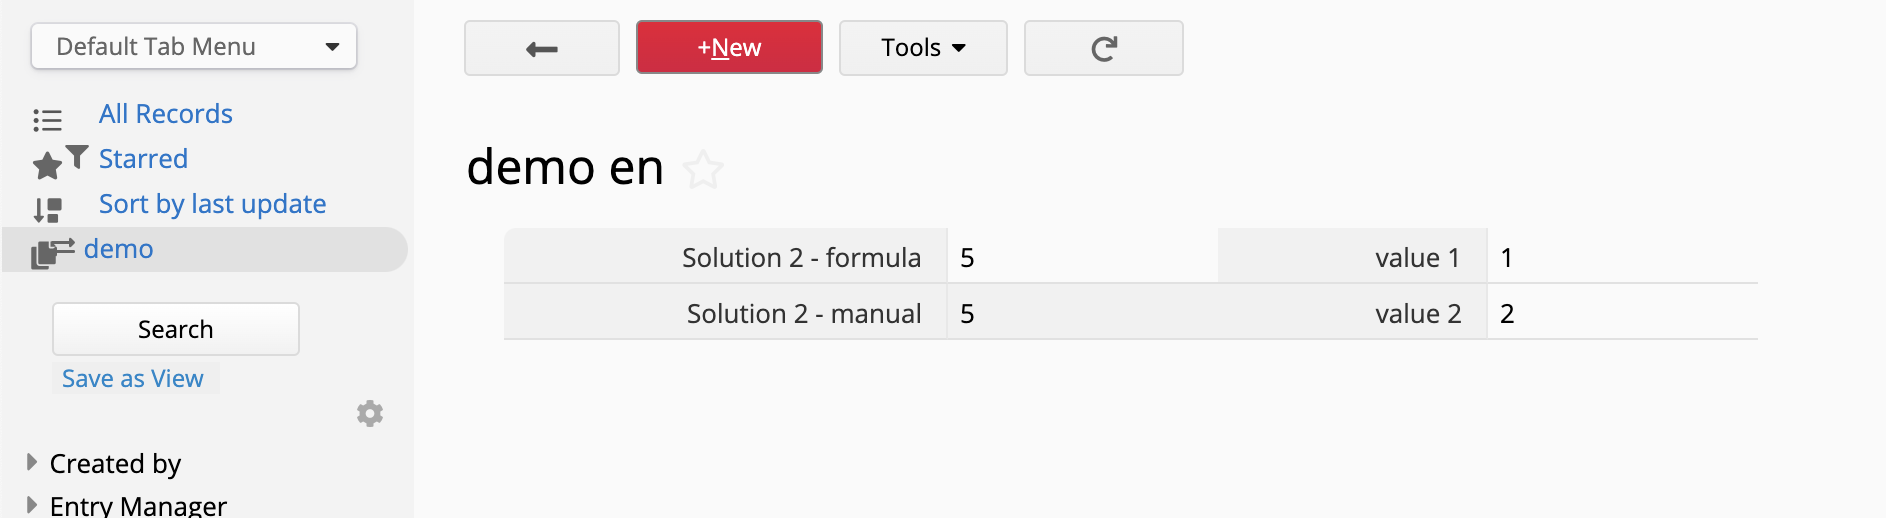
However, Method 2 will not be applicable for loaded fields, you will need to use Method 1 instead.
If your computer is a Windows system, you can refer to this webpage (or search for other solutions online) to set up Excel to support the ROC date format: https://it-help.tips/windows-10-excel-install-microsoft-windows-internationalfeatures-taiwan-package
If you are using WPS Excel or Mac version of Microsoft Excel, both do not currently support the ROC date format.
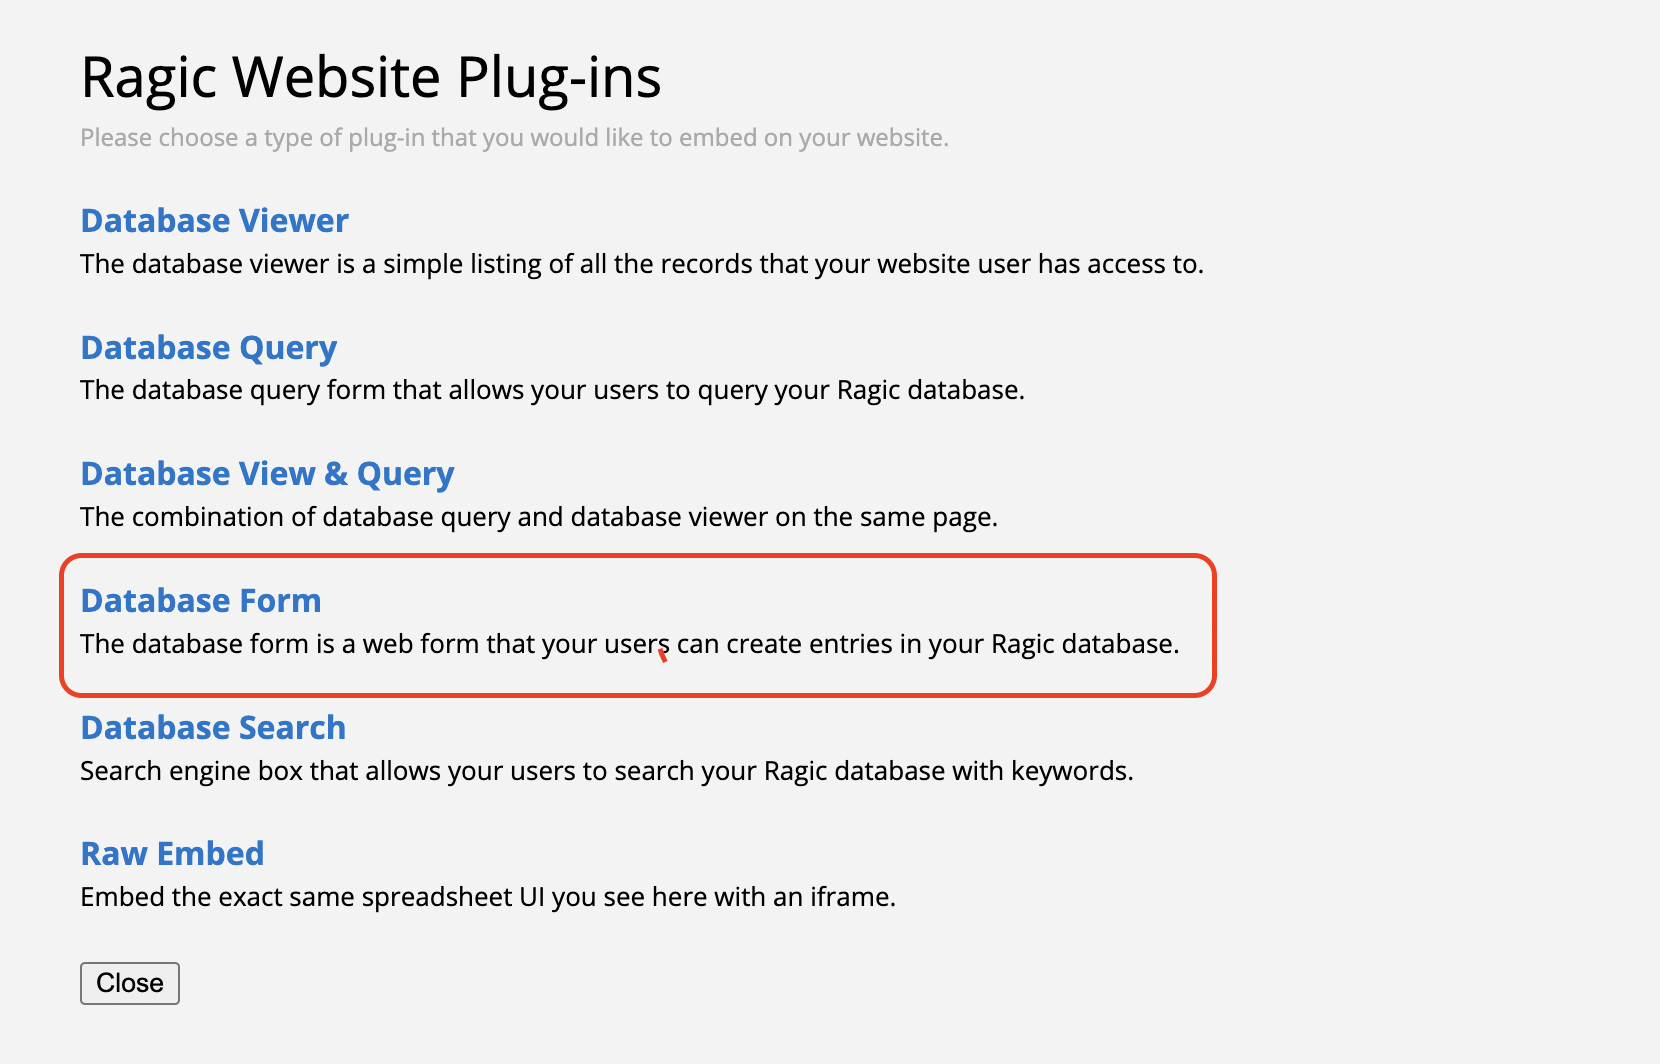
For example, you can create an embedded database form from a sales order sheet, adjust the access rights, and then everyone can access and fill out this form.
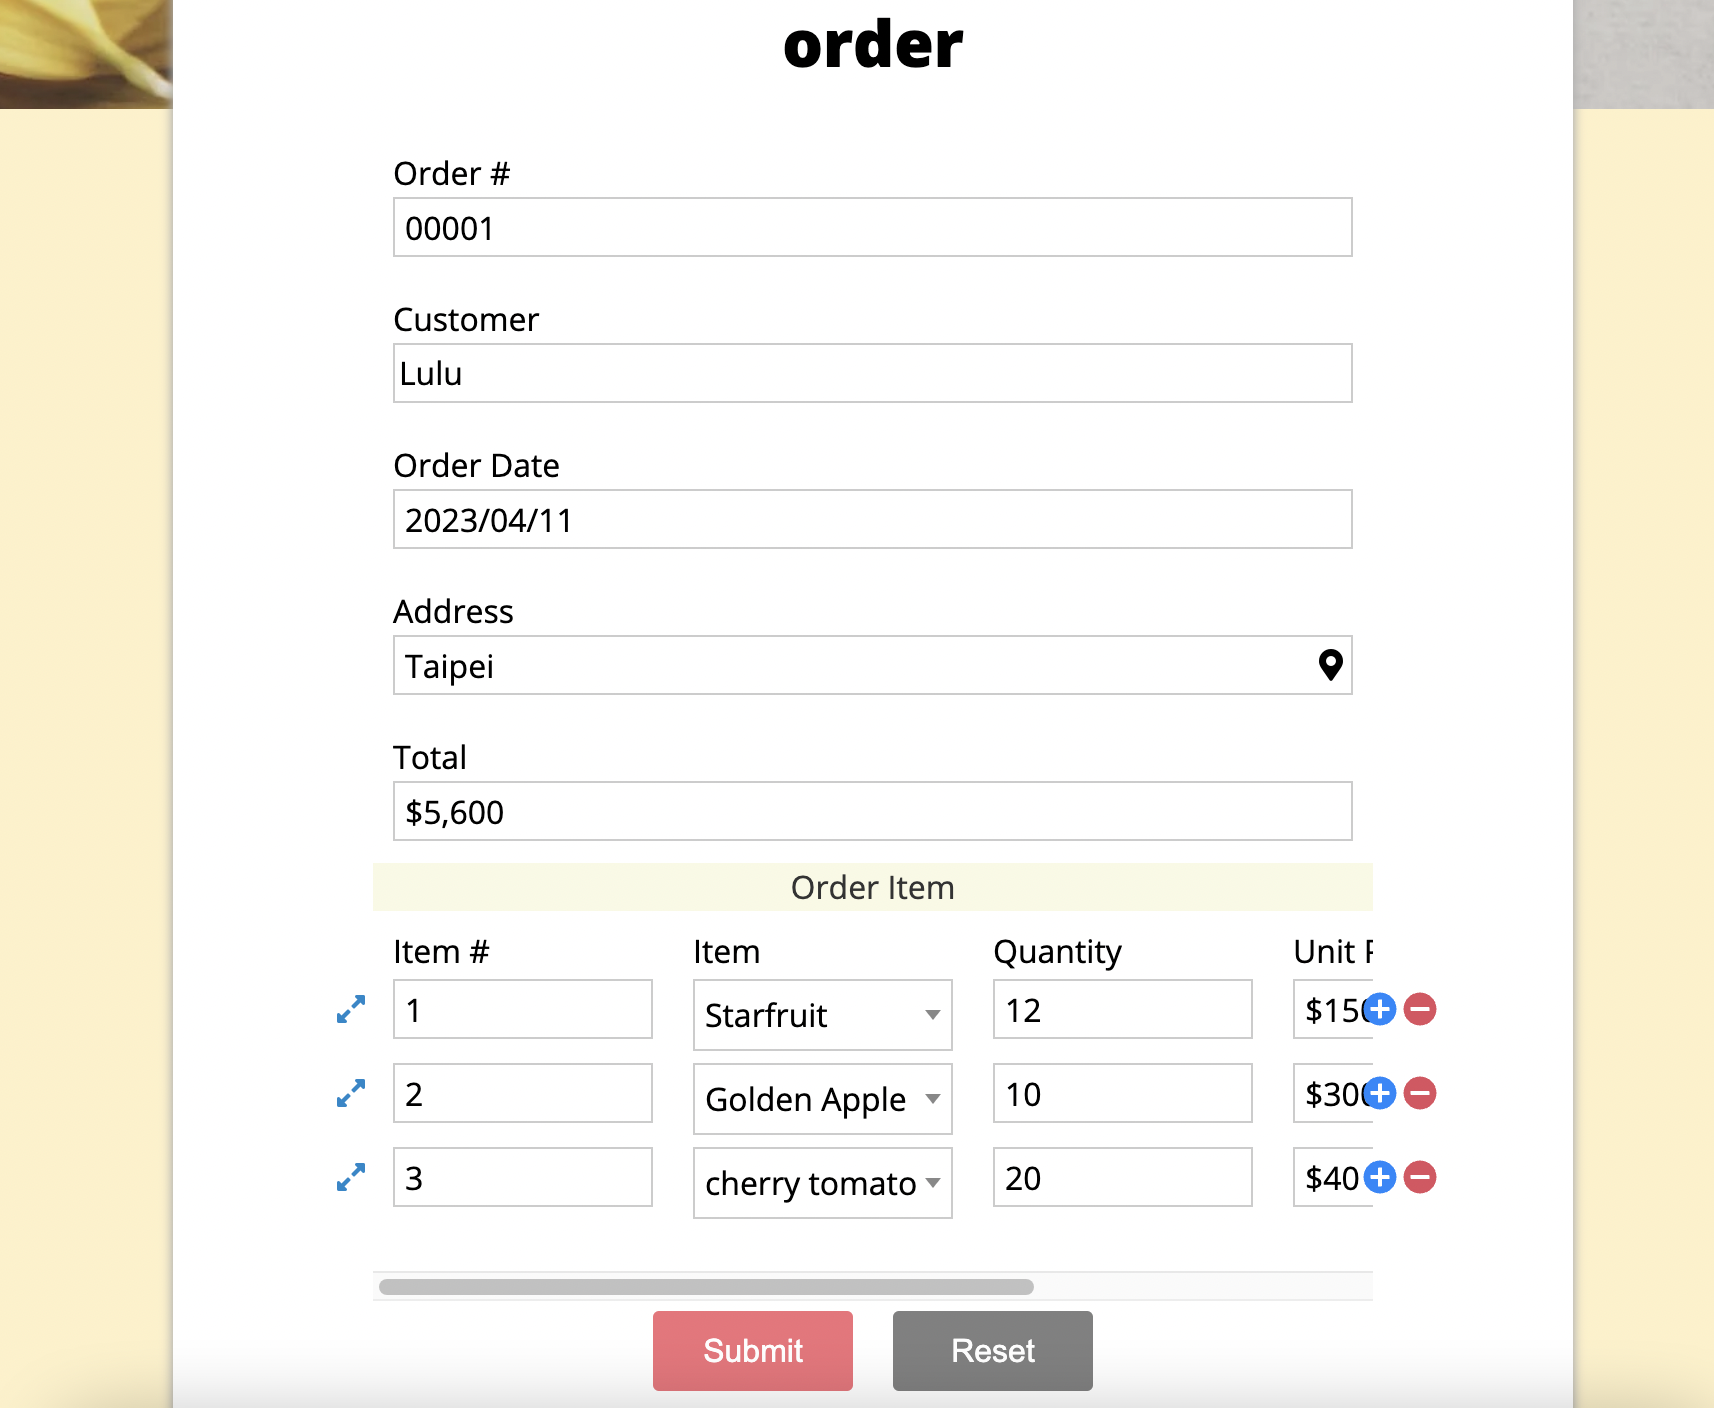
After the user submits an entry from the embedded database form, the system will also populate the entry and its details on the respective sheet on Ragic.
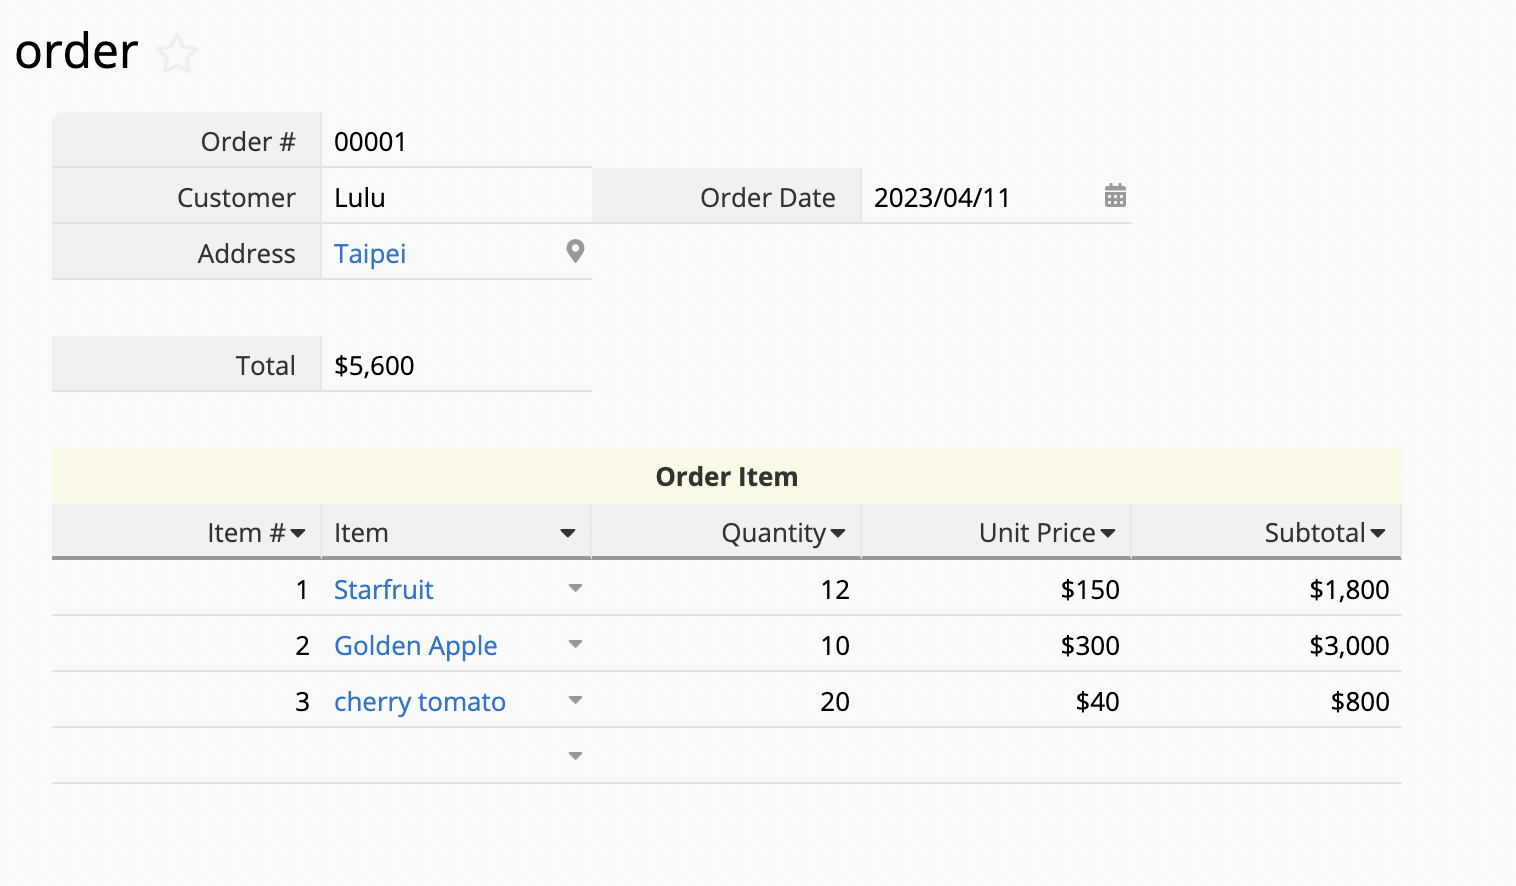
Our database is designed to store your data in the back end and can be used for internal data management purposes. Unlike e-commerce websites, Ragic does not offer a front-end interface for users to browse, add products to shopping carts, and place orders.
If you still want to build a membership system or shopping cart interface, you will need to build your own website and use APIs to integrate the data. For more details about API integration, you may refer to this document.
Therefore, with Mail Merge, a user can not set up additional settings that are available to Action Buttons. A user also can not use the function Combine Buttons with Mail Merge.
Mail Merge in fact is not an Action Button.
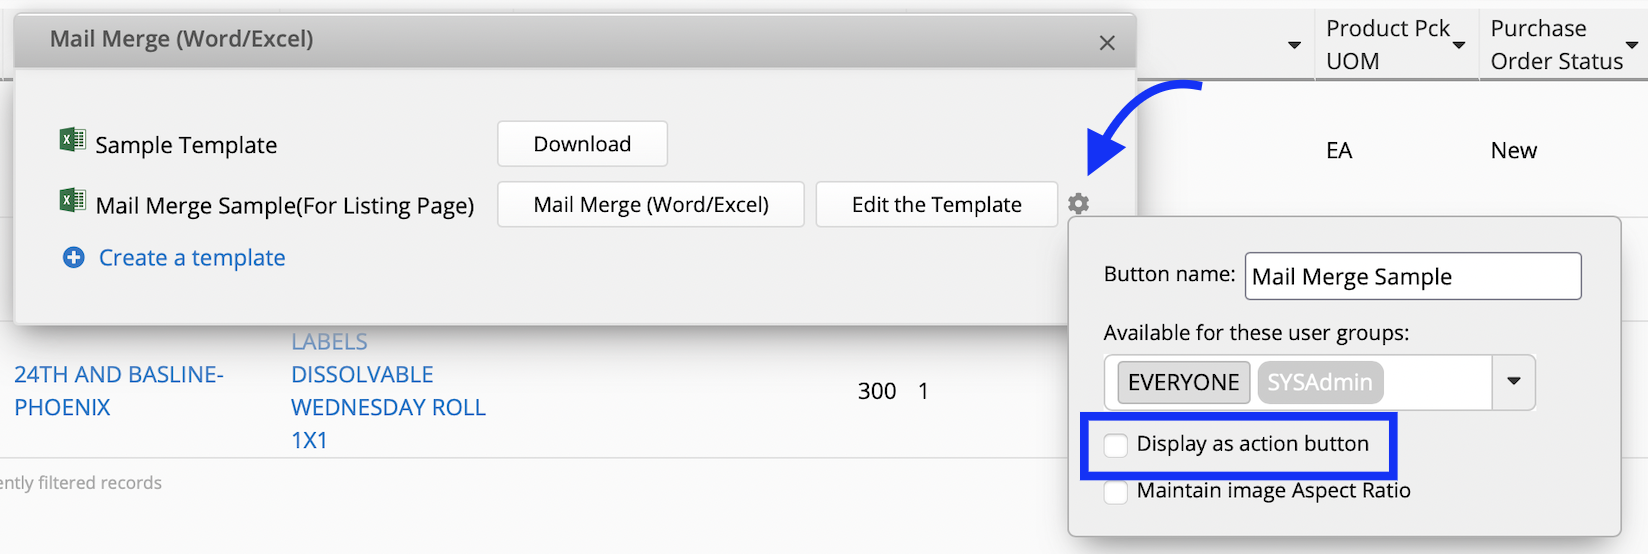
With the field ID, the system can distinguish fields even if your fields have the same names. In Ragic, action buttons, email templates, mail merge, and many other tools support using field ID as the parameter.
Only SYSAdmins can view the Field ID of fields. There are two methods:
Method 1: Right-click on a field to enter its Field Info page, and you’ll find its field ID in the first row.
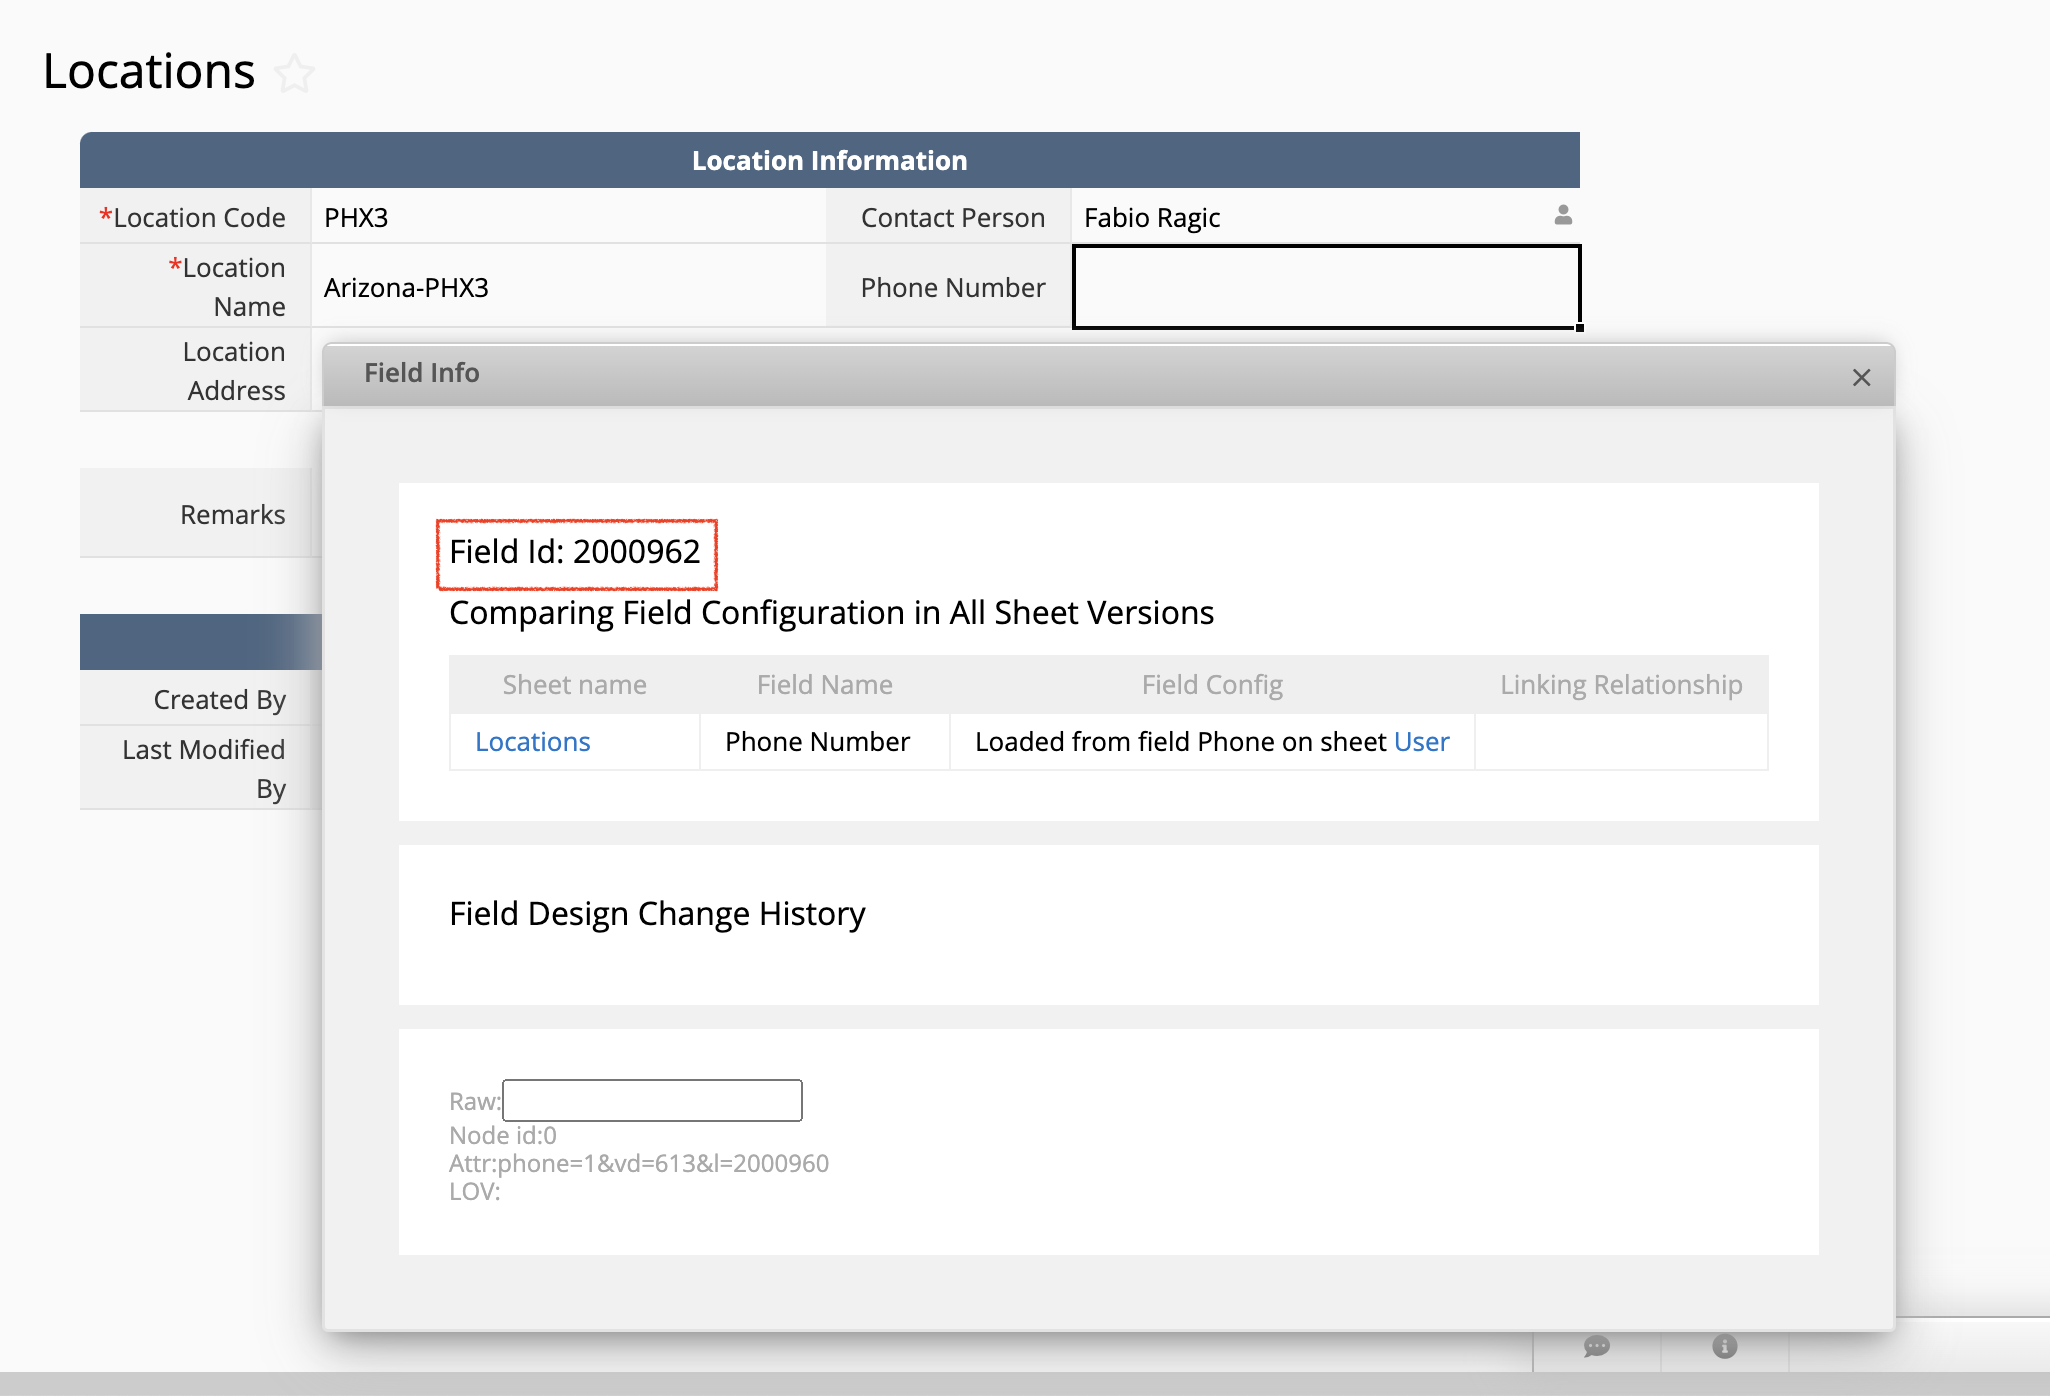
Method 2: Enter the design mode, click a field, and you’ll find its field ID under its field name.
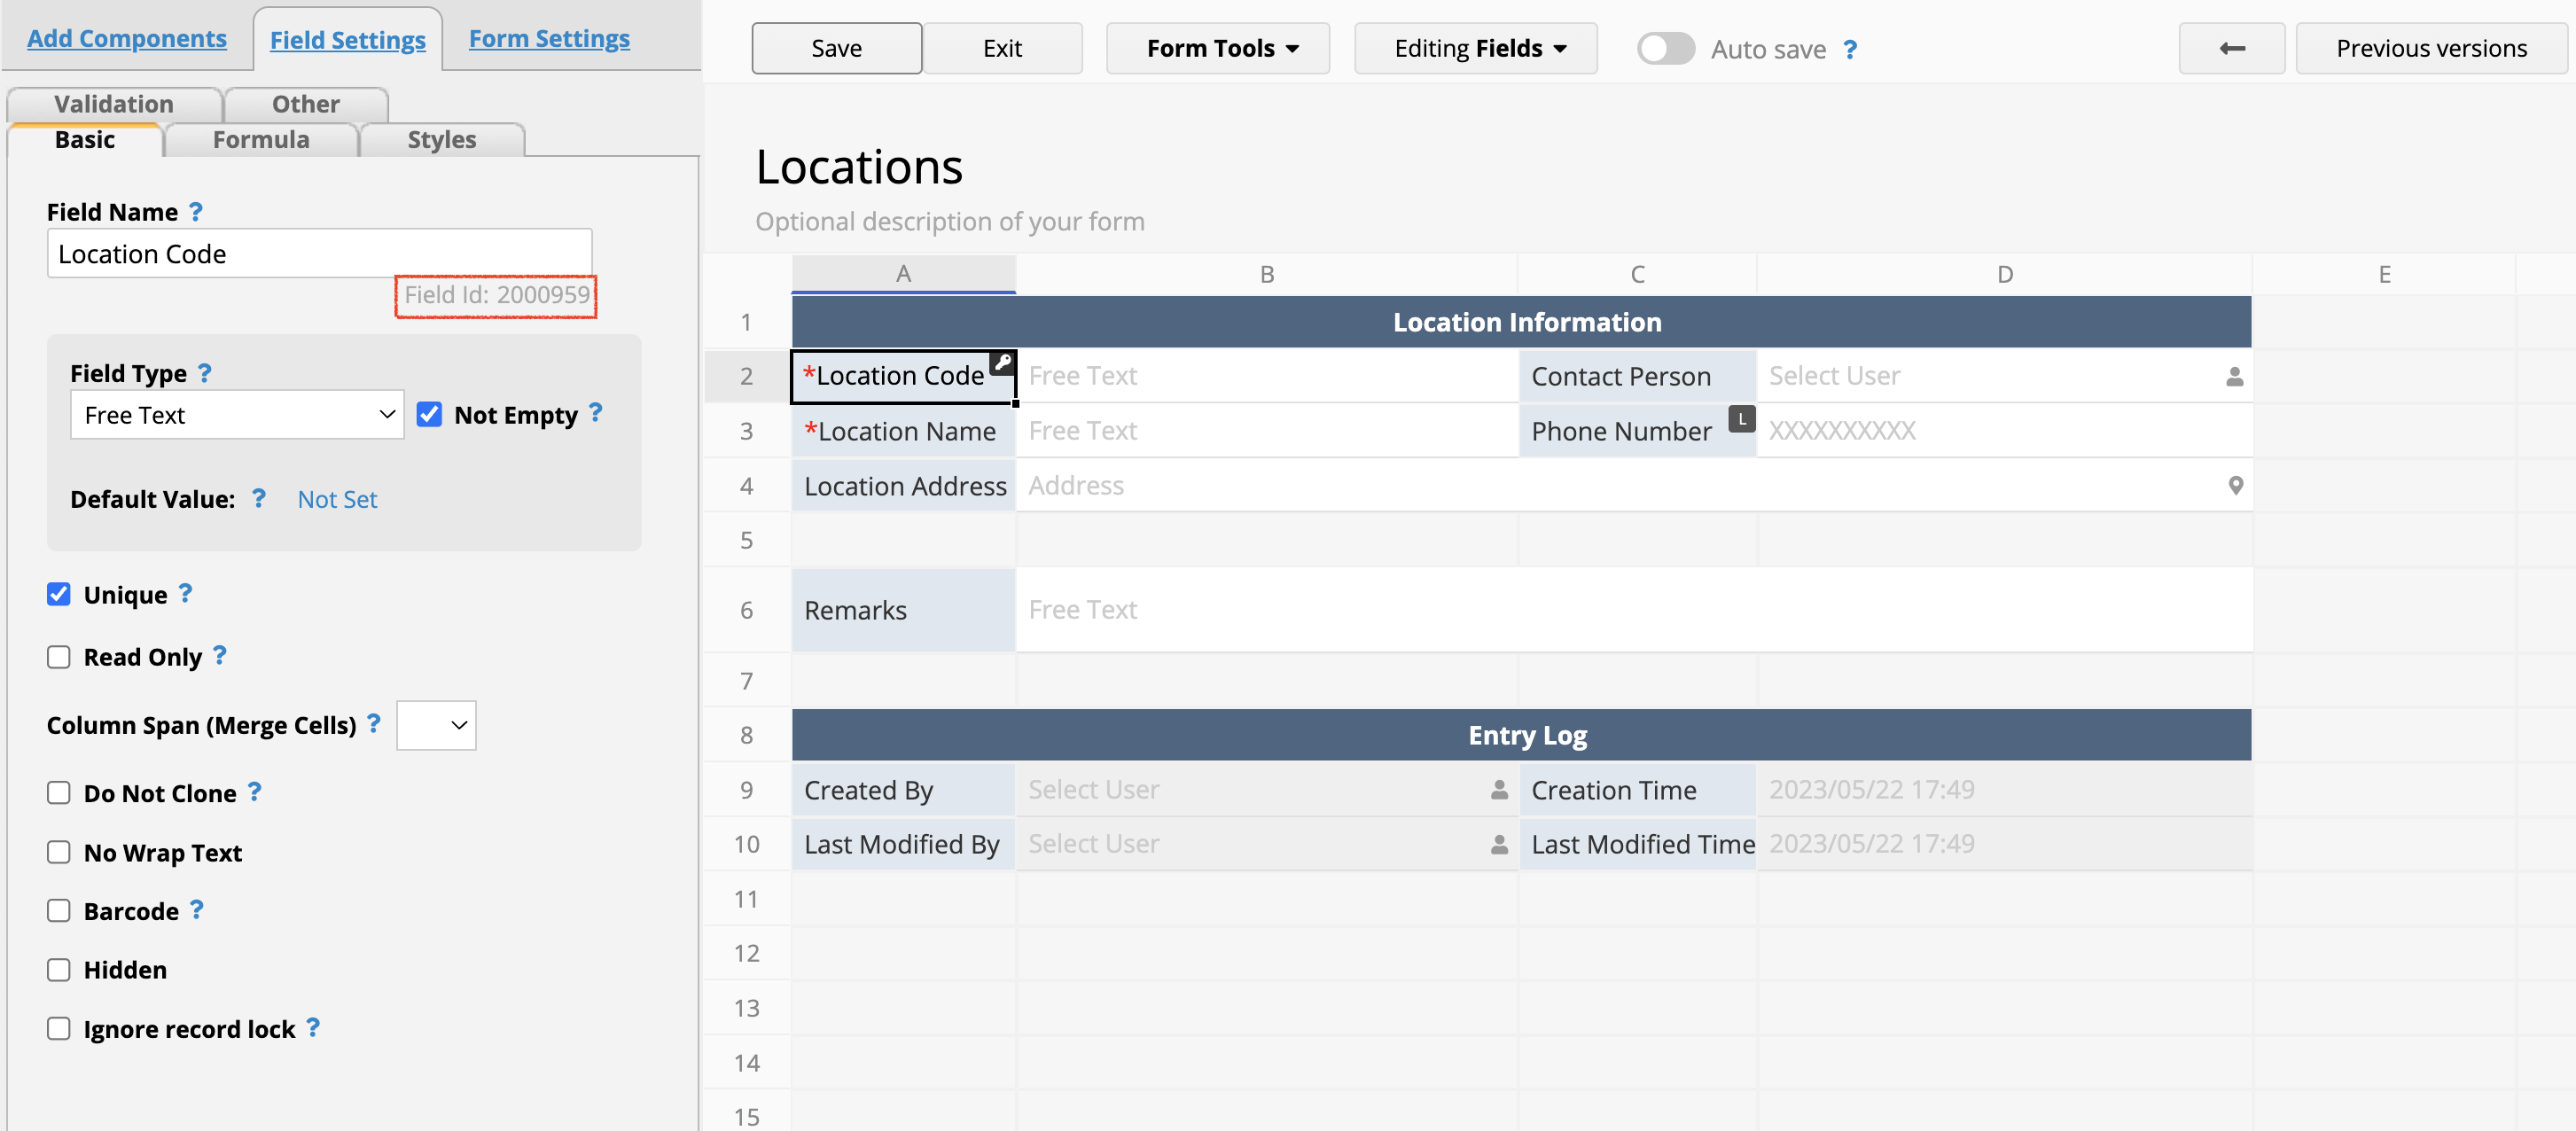
In some cases, different fields on different sheets may share the same field ID. For example, when you build sheet relationships using multiple versions or new sheet from subtable, some fields will be in sync because they share the same field ID. In this situation, when you update a field on one sheet, it will also reflect on the respective field on the other related sheet or multiple versions sheet.
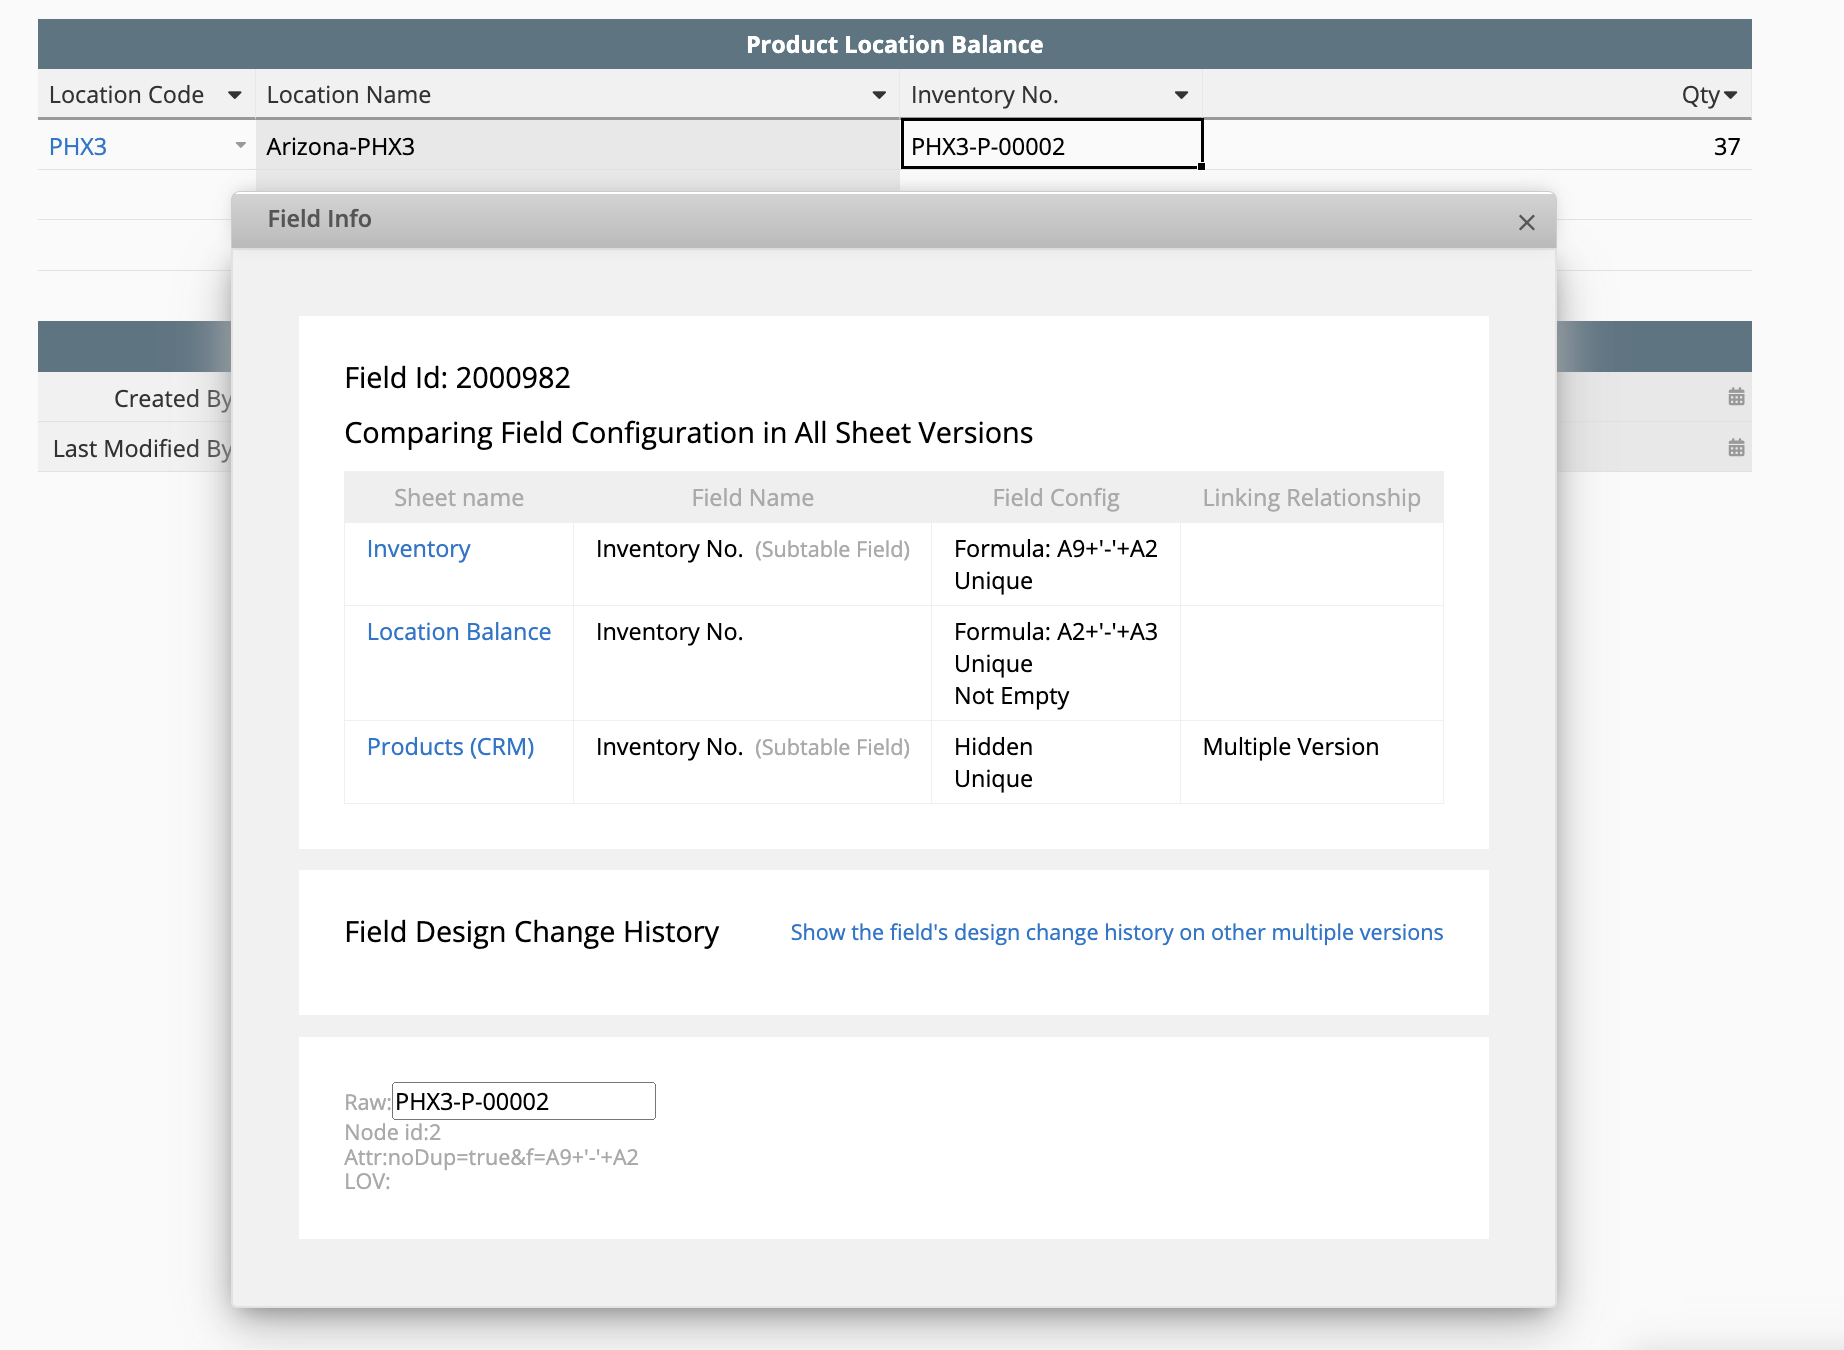
Generally, the field ID of fields added by users would start with 1000. For fields in template sheets, the field ID would start with 2000 for English templates or 3000 for Chinese templates.
In the design mode, you can double-click on the grey “field ID” text to change a field’s field ID. However, unless there is a very special reason, the field ID should not be modified because it is an important reference tool. On the other hand, fields should not share the same field ID unless they are the same field on different related sheets or multiple versions sheets. To prevent unexpected errors in your database, we suggest not modifying the field ID unless under the guidance of Ragic Support or Ragic documents.
Therefore, in the design mode, you will find the advanced settings of the approval workflow have the "Lock record when approval starts" option checked by default.
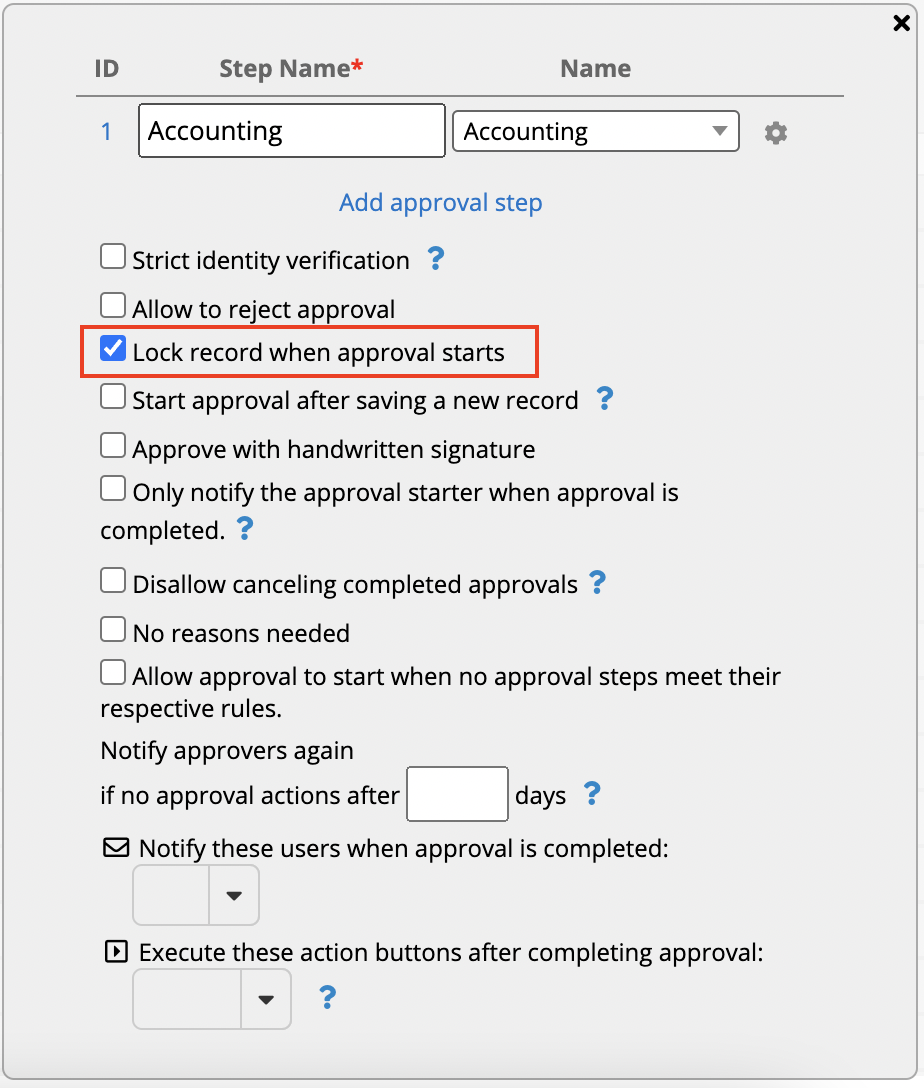
Normal Process:
If there is a need to modify the record during the approval process or after it has been approved, the user who has sufficient access rights should click Cancel Approval. If "Lock record when approval starts" is checked, the record will be automatically unlocked when canceling the approval process. After completing the modification of the record, it can be resubmitted for approval.
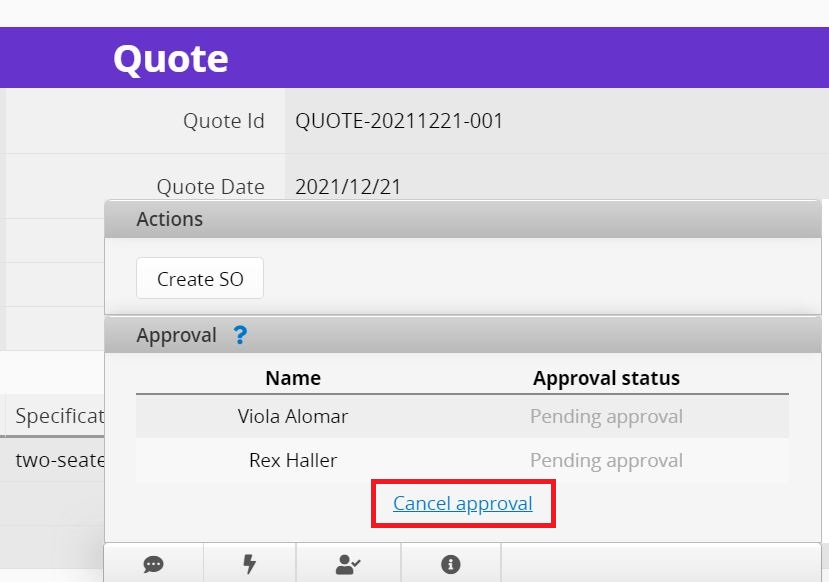
Special Scenario:
If there are other factors preventing the cancellation of the approval and triggering the unlocking, the only option would be to manually unlock the record directly through the lower right corner.
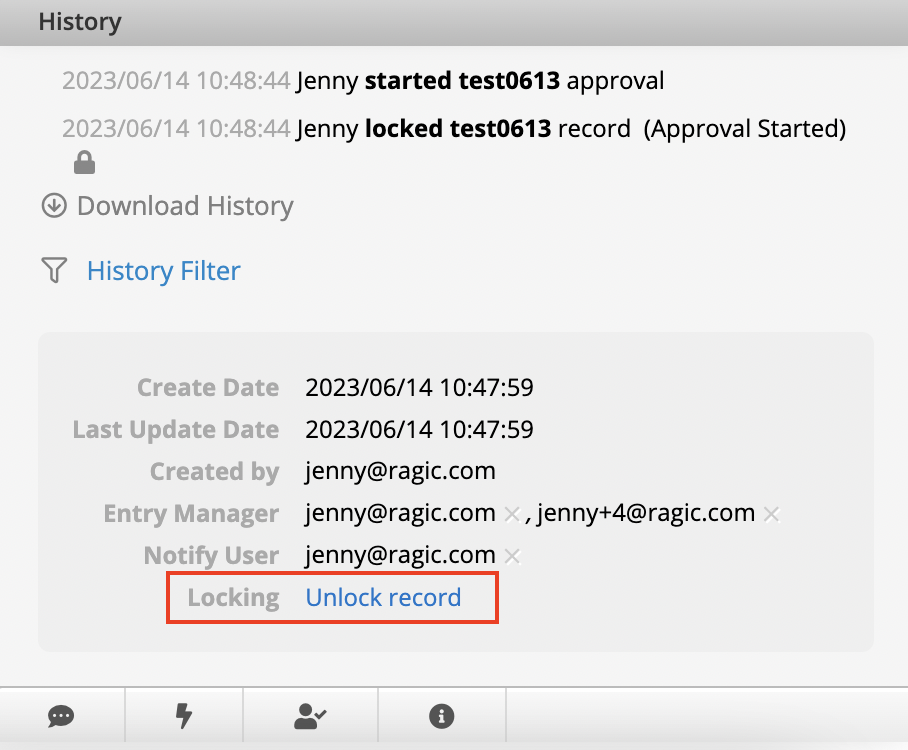
Currently, after making a payment using the default credit card, you can view the details of your payment on the following:
1. Receipt sent by the payment service provider, Stripe
2. Invoice provided by Ragic
After each successful payment for a billing period (monthly or yearly) with automatic credit card payment, you will receive a receipt sent by our payment service provider, Stripe. The format of these receipts cannot be adjusted manually, and the "Bill to" field will be "Database Name + Billing Contact Email."
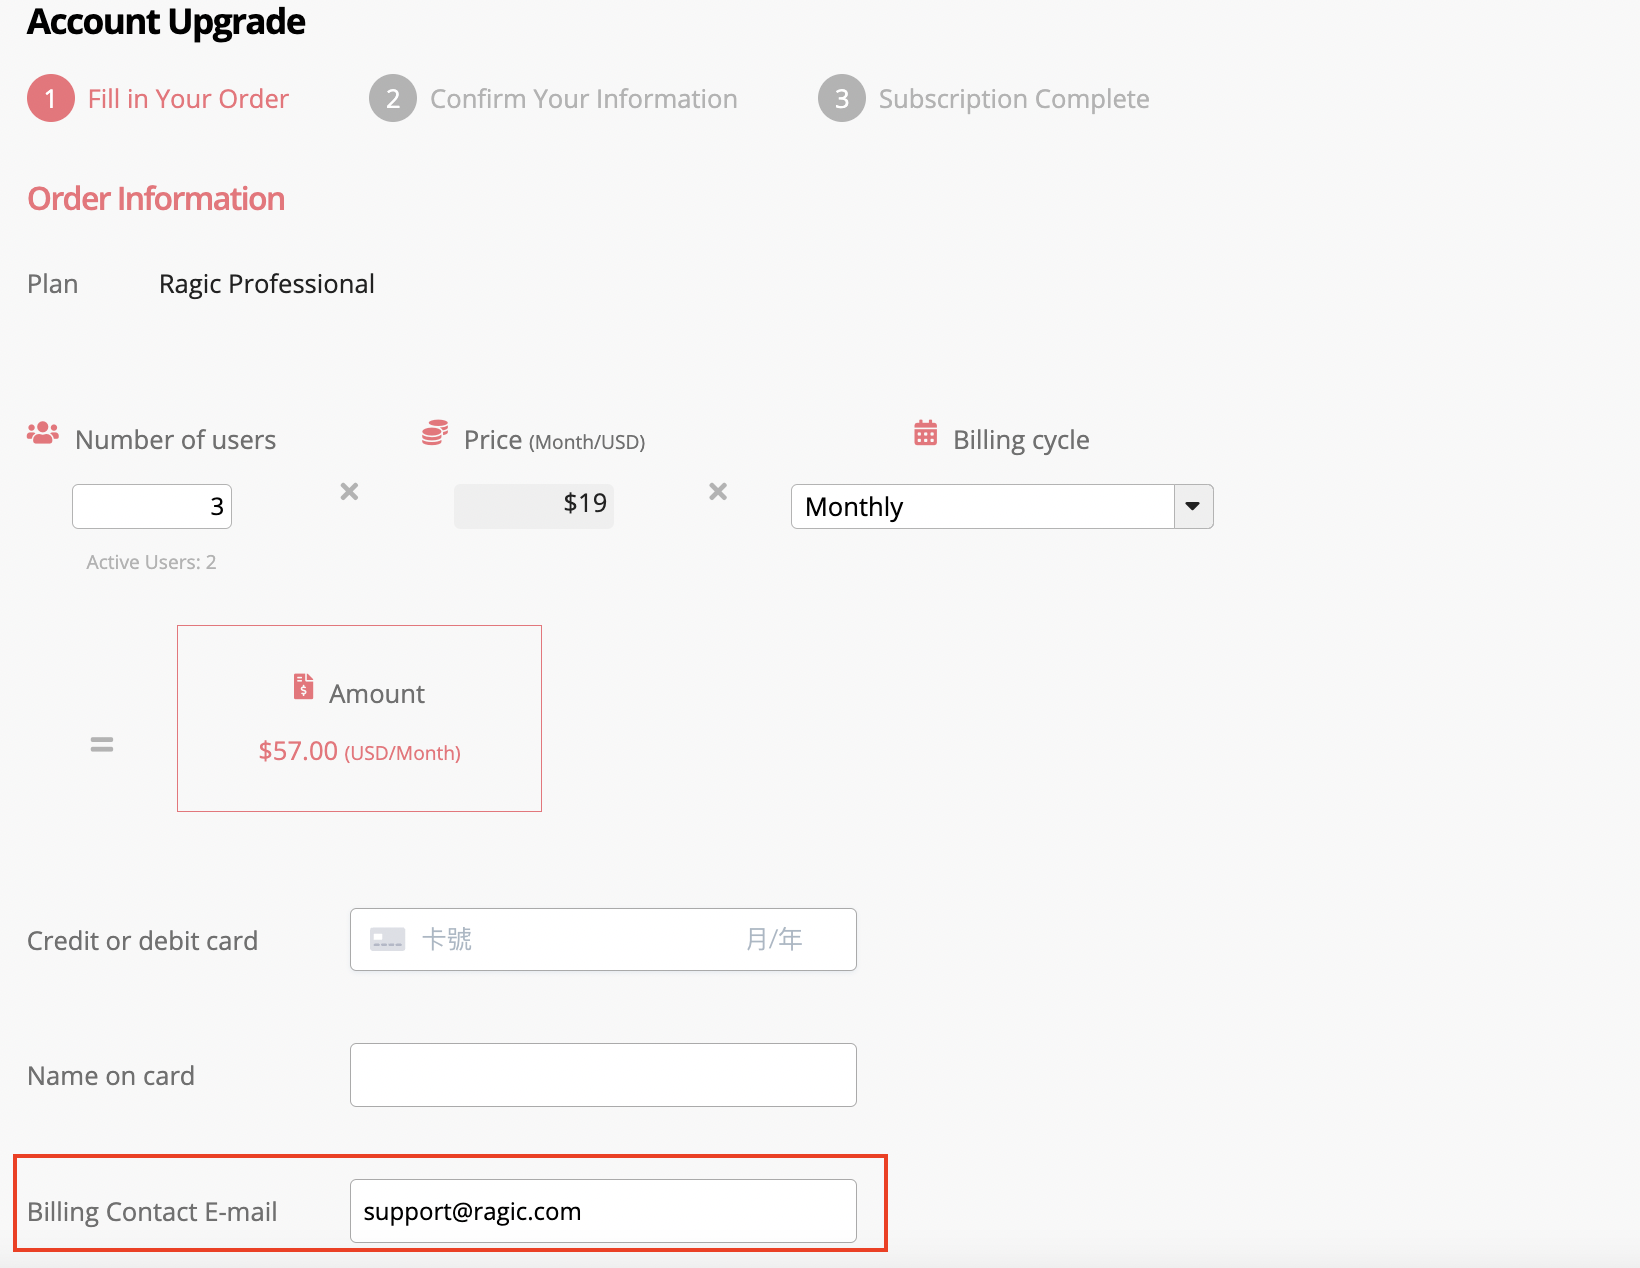
Receipt Example:
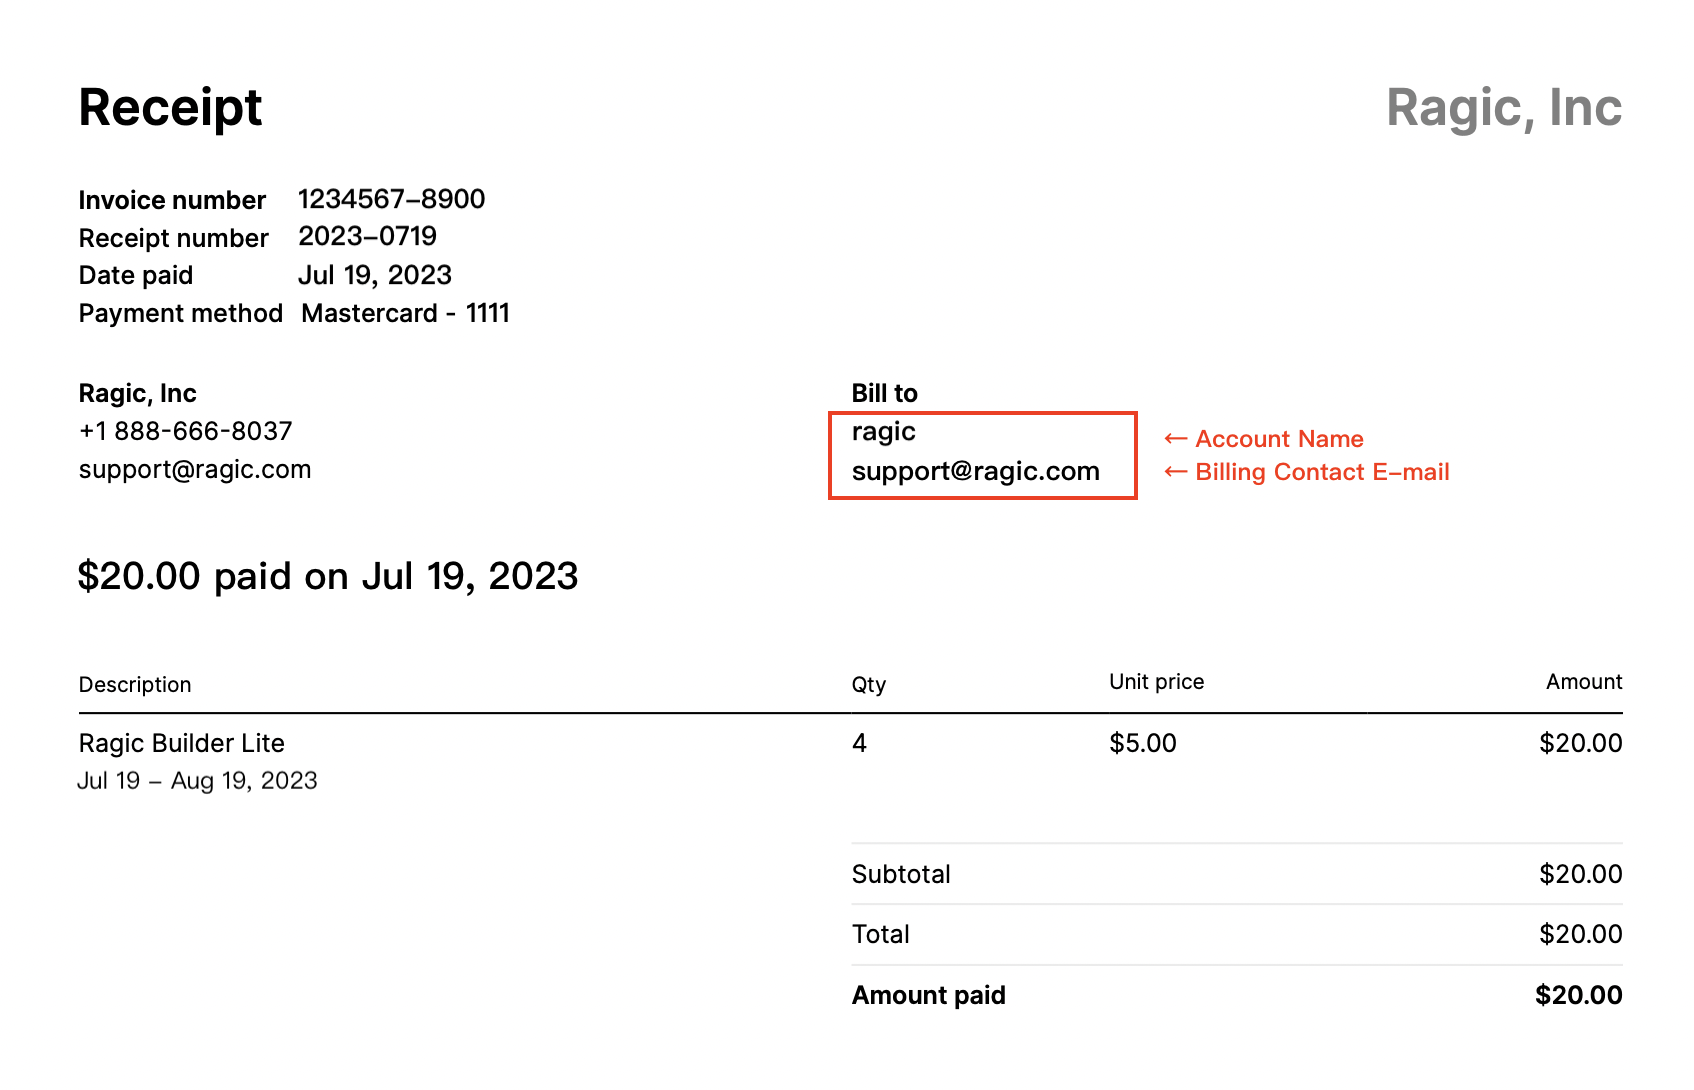
You can view your invoices by navigating to Start tab > Account Setup > Account Billing. This page will display all previous invoices (along with their payment status). The information displayed on these invoices can be customized, and you can refer to the instructions to adjust the content of the "Bill To" section.
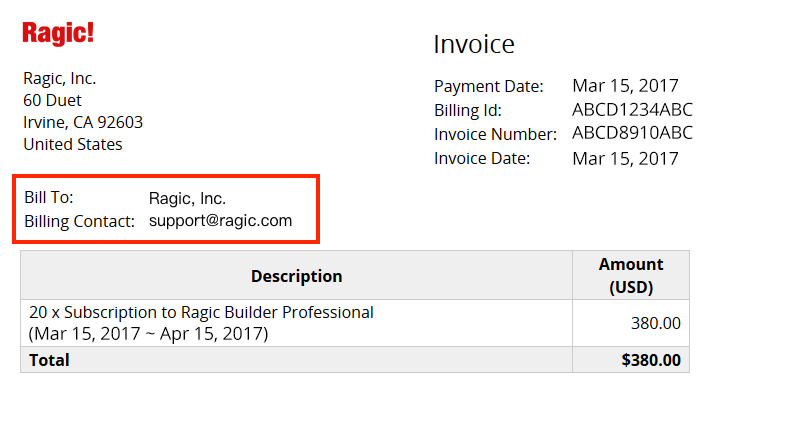
For payment by wire transfer, your invoice will not be automatically generated by Stripe or Ragic System. Instead, we will manually send the invoice to you.
Normal Layout Example:
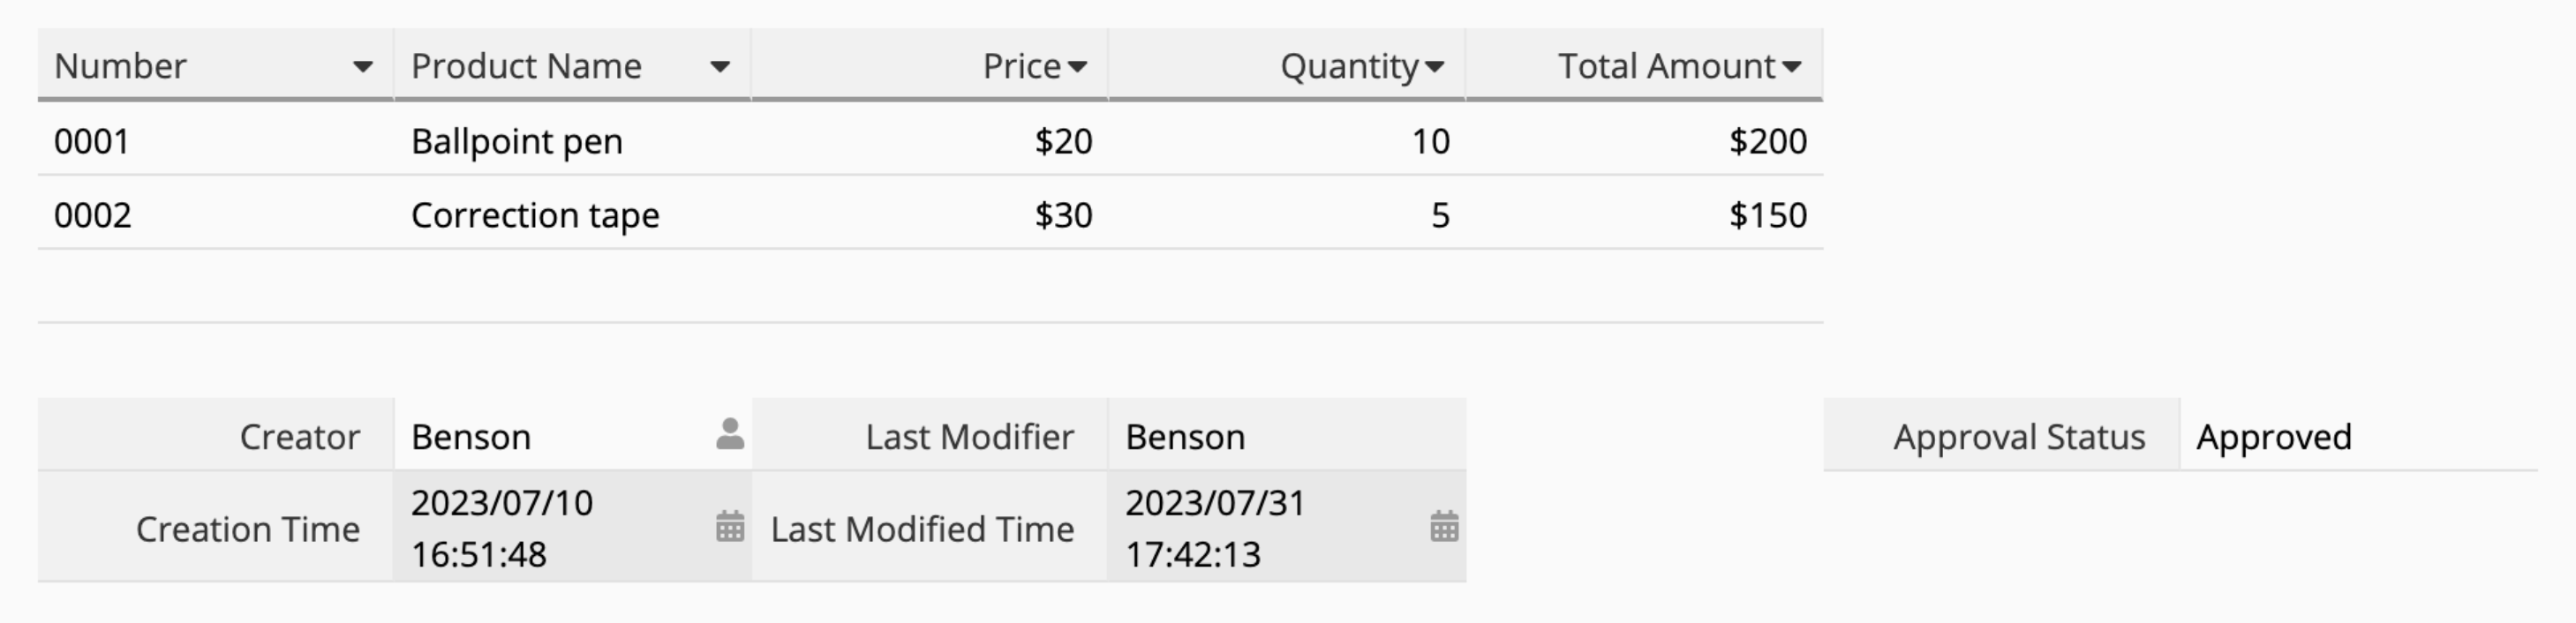
Disrupted Layout Example:
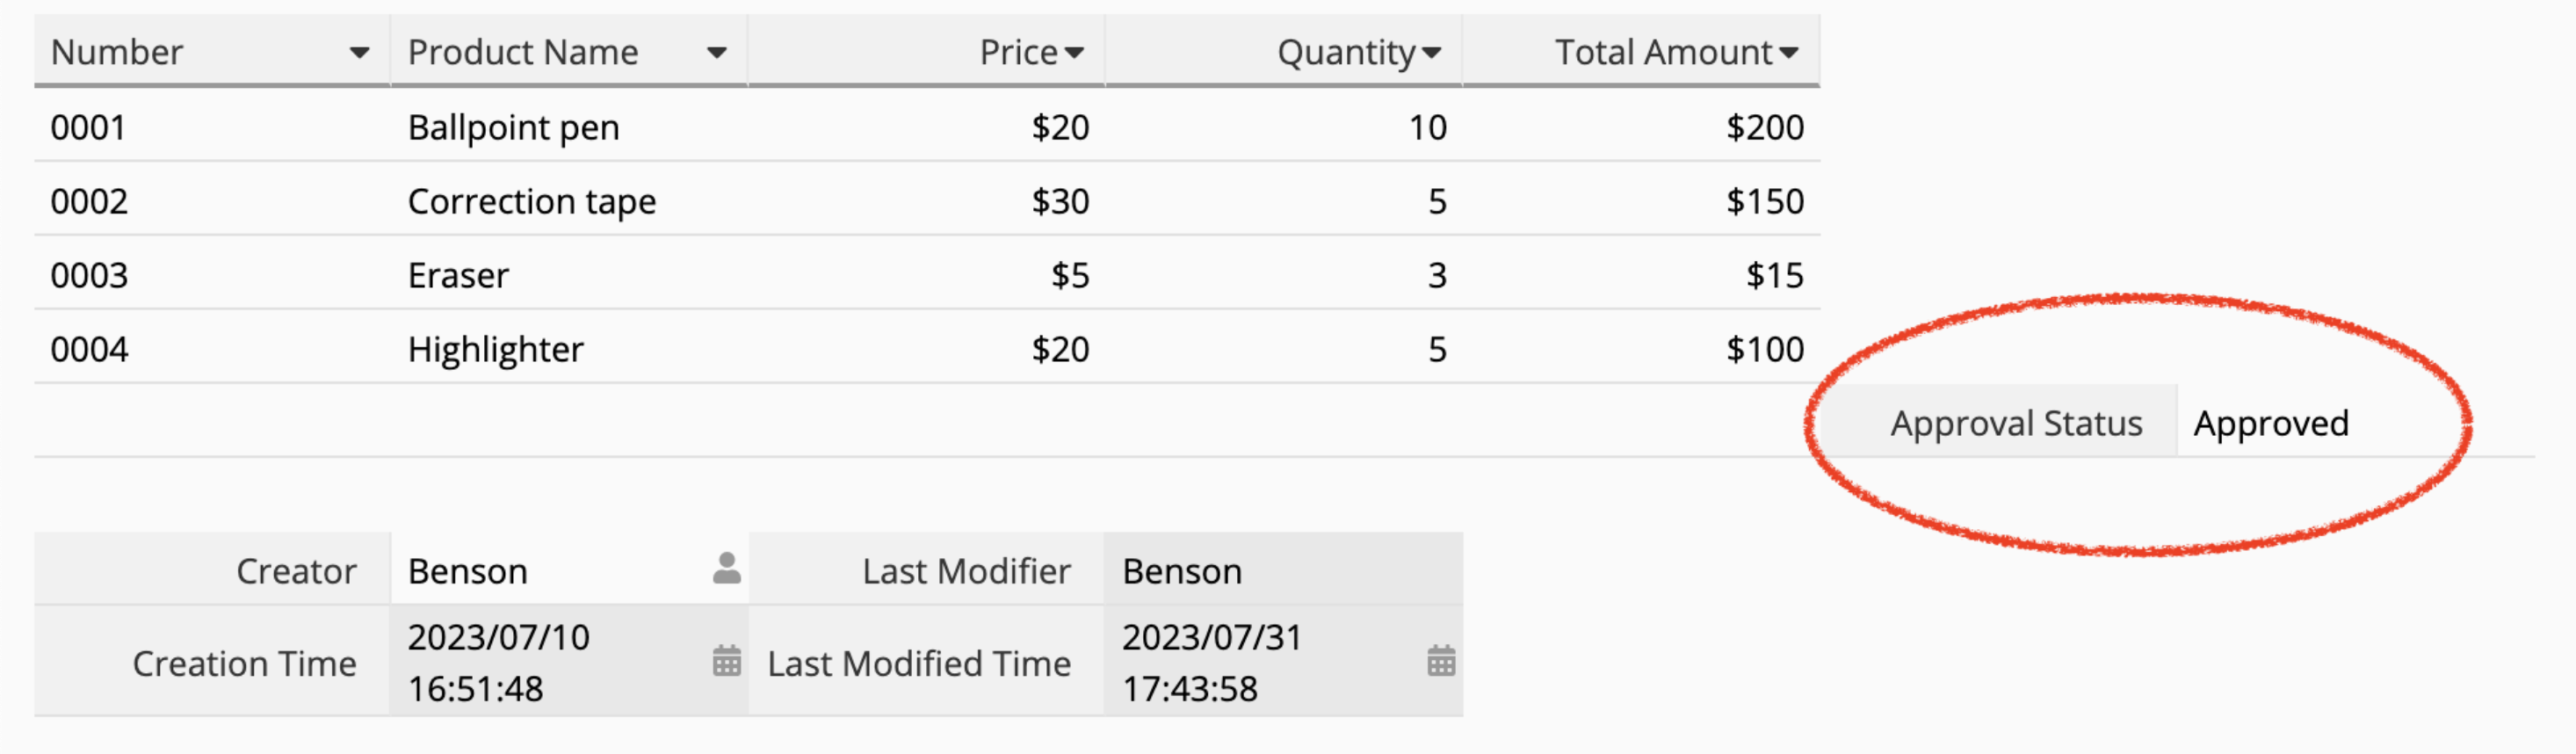
To resolve this issue, you can add a blank description field right below the subtable and set the merged cell for this description field to the maximum width of the form's design. For example, if the subtable's width is from column A to E, then the merged cell for this blank description field can be set from column A to H (assuming column H reaches the maximum width of the form).
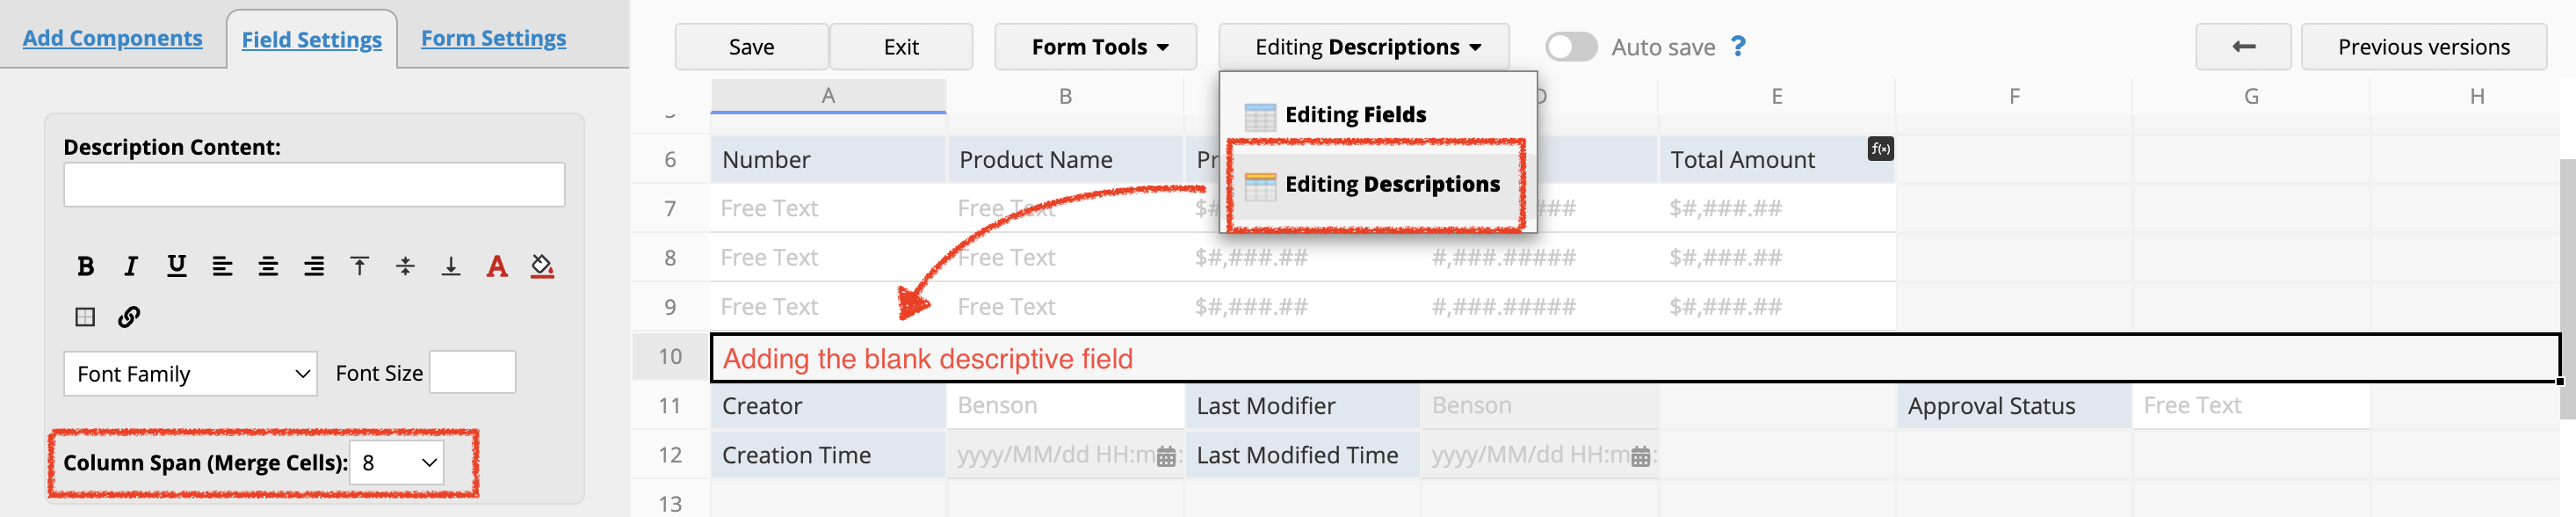
After adding this blank description field, when adding more subtable entries, the layout will extend downward based on the maximum width of this blank description field, avoiding any layout disruptions.
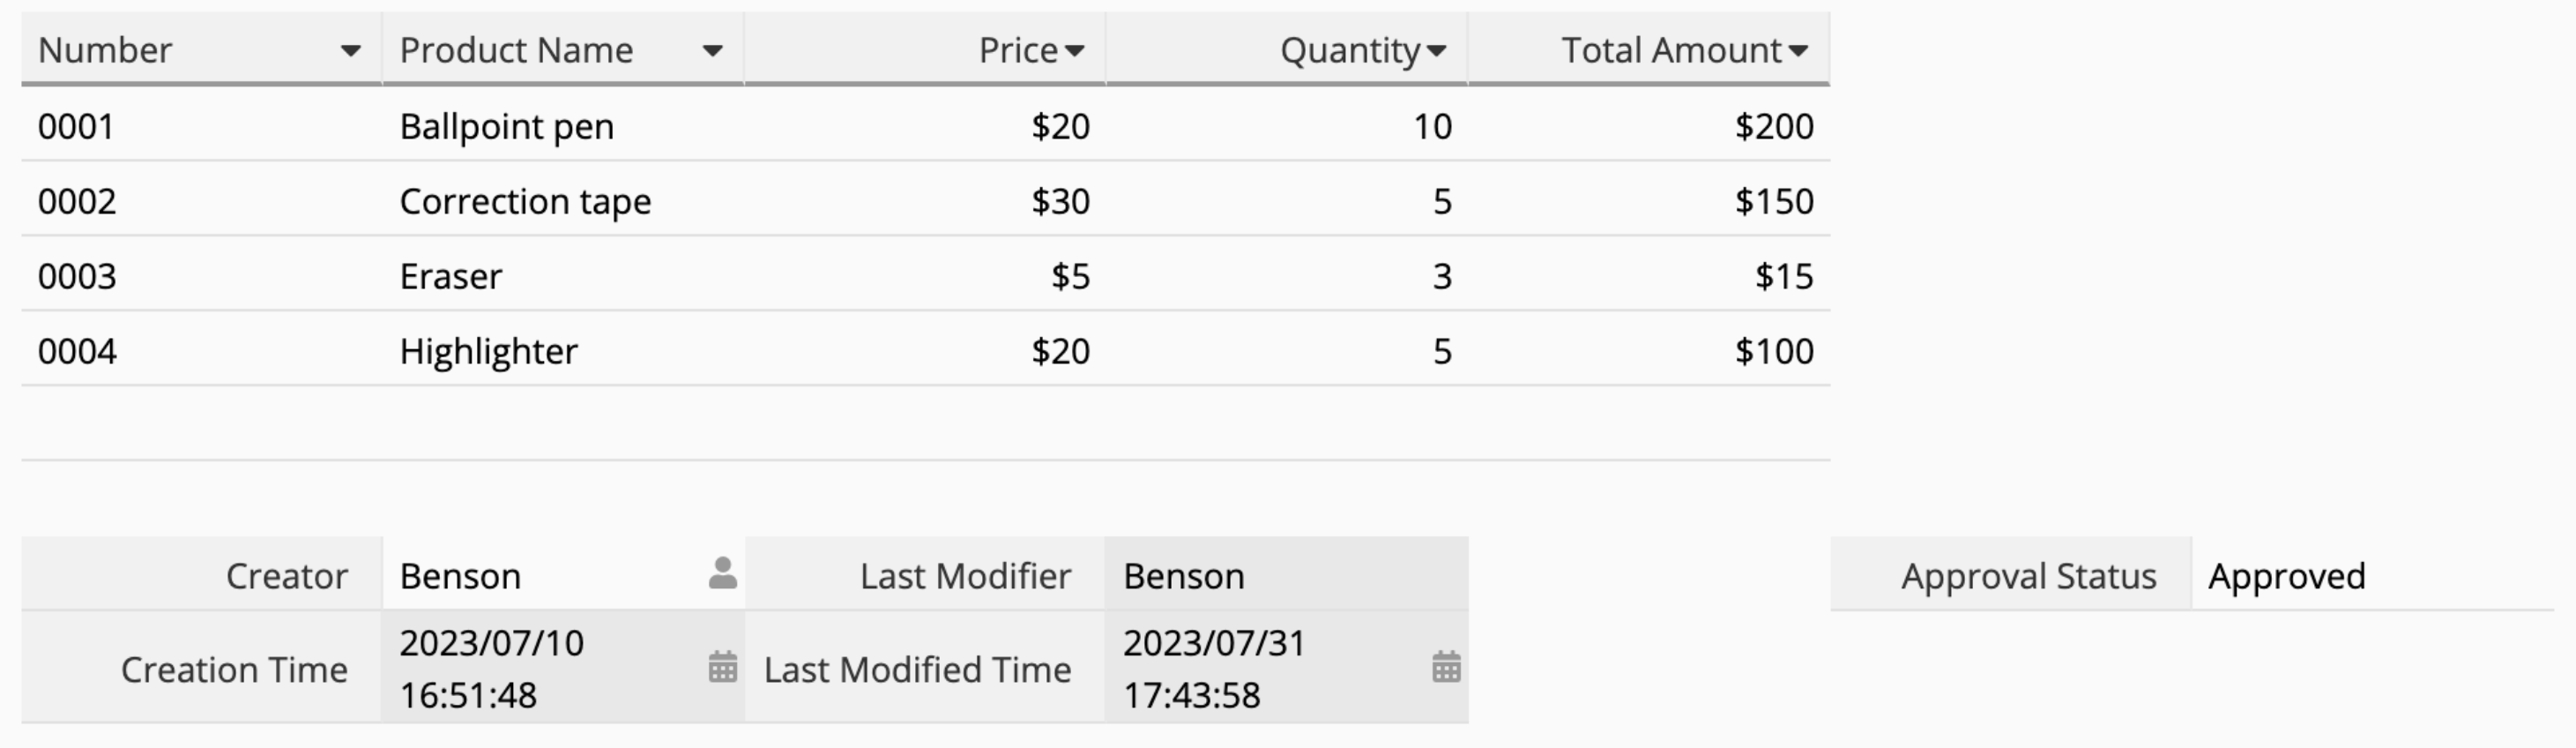
The Ragic sheet URL is composed of the following components: Server Name/Account Name/Tab Path Parameter/Sheet Path Parameter
For instance: www.ragic.com/ragicdemo/demo/1
Let's delve into each of these components individually.
The server name is predefined and varies based on your registration region and time. It's automatically assigned upon completing the registration process.
Examples: www.ragic.com, ap10.ragic.com, na3.ragic.com.
This segment typically remains unaltered unless there's a specific reason to relocate the database.
To change the domain of the server name, there are two available methods:
1. Domain Forwarding: You can Customize Your Domain in the Company Settings.
Please be reminded that this company domain does not change your original Ragic database URL but merely redirects you to it.
2. Direct Domain Change: If you would like to change the domain completely, you can opt for the On-premises version to use your domain. Refer to On-premises Installation and Ragic Pricing for details.
The account name is set on your own during registration.
Modifying the database account name will require assistance from Ragic Support. To do so, kindly send an email to support@ragic.com from the database SYSAdmin email, and provide the original and desired database names in the mail.
Noted: The account name must be composed of English letters or numbers, and cannot contain special symbols or spaces.
Tab path parameters are associated with tab naming during creation. Even if the tab name is changed later, the tab path parameter remains constant.
Rules differ based on whether the tab name is in English or a non-English language:
When naming a tab in English, the tab path parameter matches the name. If the named tab path parameter exists, a number is appended.
For example, if "demo" is a new tab name and the corresponding tab path parameter doesn't exist, it's named "demo". If the "demo" tab path parameter exists, the next becomes "demo2", and so on.
Special symbols in non-English names are ignored for the tab path parameter, and the system will also verify whether the tab path parameter already exists.
For example, naming a tab "démo" yields "dmo" as the tab path parameter. If the "dmo" tab path exists, the subsequent path becomes "dmo2", and so on.
Naming a tab with non-English language or only special symbols, the tab path parameter will automatically assign the "forms" tab, and the system will also verify whether the tab path parameter already exists.
For example, naming a tab "範例" leads to a "forms" tab path parameter. If "forms" already exists, the next becomes "forms1", and so on.
Sheet path parameters are auto-generated based on sheet creation order in the tab. They're unique and unmodifiable. Deleting or reordering sheets won't change these parameters. The first sheet created under a tab is labeled "1," the second is "2," and so forth. If a sheet is moved from another tab, it will be assigned a new number.
The URL of the Ragic template sheets downloaded from the install template is fixed and cannot be modified.
The quickest way to identify a Ragic template sheet is by examining the sheet path parameter. Typically, the sheet parameters of template sheets are five digits starting with "1" or "2" (e.g., 1XXXX or 2XXXX). For example: ap10.ragic.com/ragicdemo/ragicsales/20001
Based on the aforementioned rule explanation, in cases where the server name and account name remain unchanged, the only adjustable component within the Ragic sheet URL is the tab path parameter. If you directly create a tab using non-English characters, the tab path parameter will commence with "forms," accompanied by a numerical value.
To customize the tab path, create the tab with an English name initially. Subsequently, you can modify the name after its creation. Please note that altering the name at a later point will not impact the tab path.
For altering the tab path of an existing sheet, you can refer to the following example:
Original sheet URL: www.ragic.com/ragicdemo/forms1/1
Desired URL: www.ragic.com/ragicdemo/demo/1
Adjustment Steps:
1. Create a tab named "demo" in English.
2. Rename the tab to the required name.
3. Transfer the original sheet under this tab.
On the sheet where you set up the action button, please add a "Converted?" checkbox field to mark whether the entry is converted.
When setting up the update values action button, please update the "Converted?" field with "Yes."
Please use combine button to merge the button you created in Step 2. with the original convert record button. Besides, You can hide the original one so users won't accidentally execute it.
With the above steps, when the users press the merged button, the system will convert the entry and update the "Converted?" field to "Yes." Hence, you'll be able to recognize the convert status via the "Converted?" field. You may also apply conditional formatting to highlight if necessary.
Sometimes, we would like the system to pop up a warning but still allow saves when users input duplicate values. For example, we want to prevent users from creating duplicated entries for the same customer in the "Contacts" sheet. However, there are cases where clients might have the same names. Hence, we would like to be notified before we save the entry and check if the entry is duplicated.
You may follow the steps below:
Right-click on any of the Tabs and select Global JavaScript Workflow.
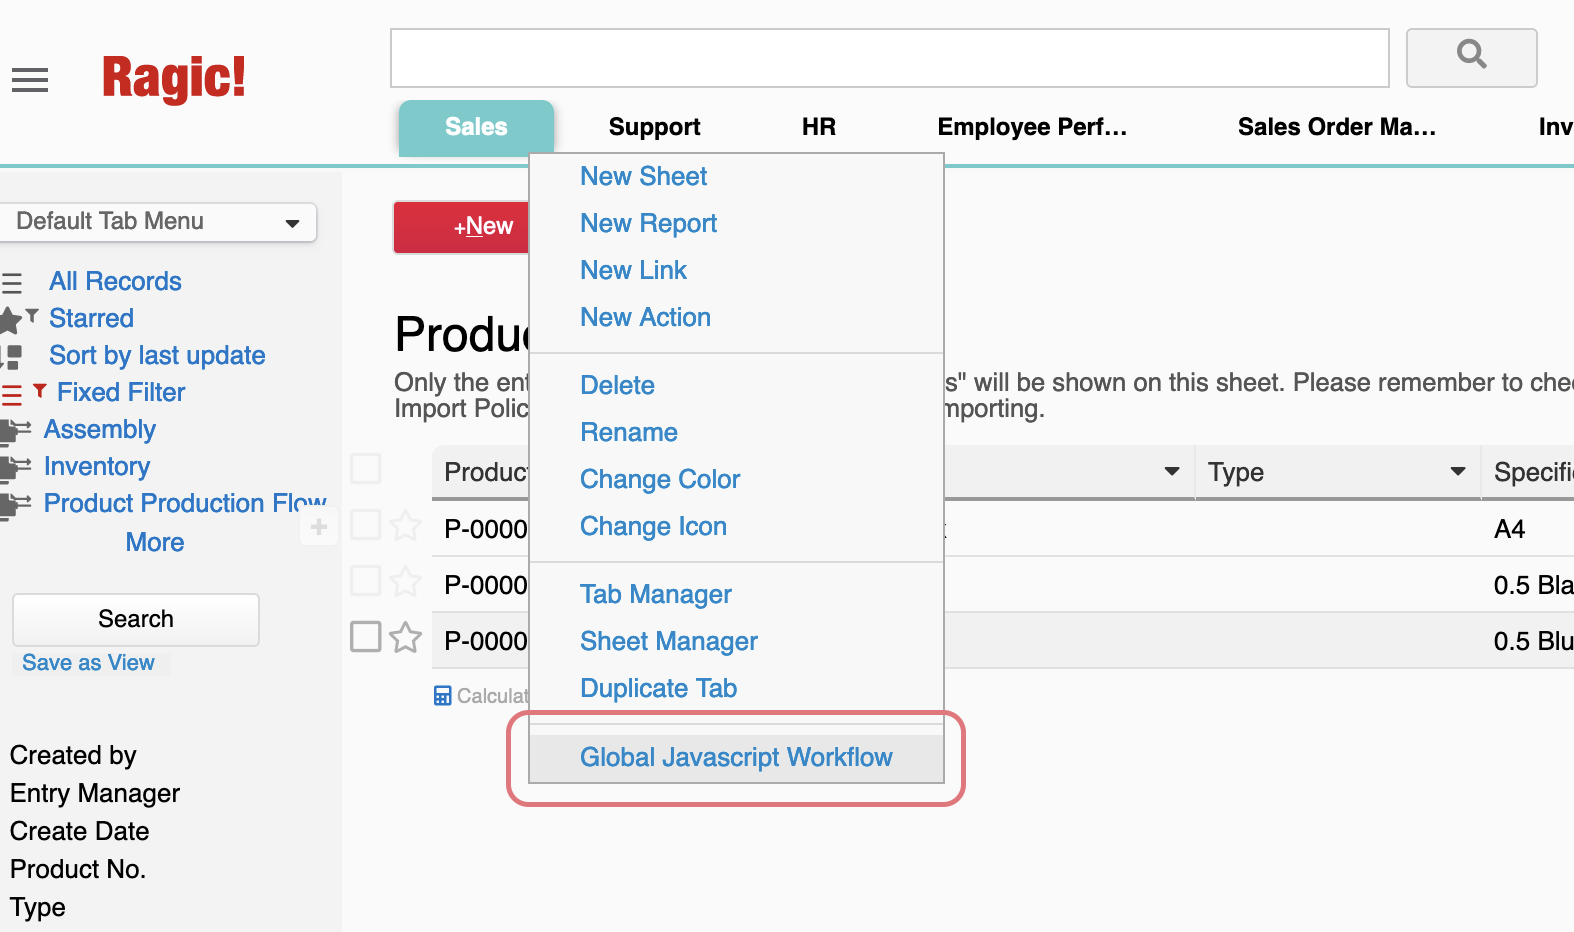
function checkIfUniqueFieldValue(fieldId, path){
   var value = param.getNewValue(fieldId);
   var query = db.getAPIQuery(path);
   query.addFilter(fieldId,"=",value);
   var result = query.getAPIResultList();
   if(result.length > 1){
   response.setMessage("The "+ value +" already exists. Please check for duplicates.");
}
}
Let's say the URL link of the sheet you want to do check for duplicates is "https://www.ragic.com/accountname/tabname/1" and field ID is 1000038.
Then, add this line to the Post-workflow:
checkIfUniqueFieldValue(1000038, "/tabname/1");
Don't forget to save your changes before exit the workflow editor.
In our example, the destination sheet is the "Accounts" while the source sheet you trigger the button is "Leads." Hence, please create a link & load field on the "Accounts" sheet and link it to the unique value on the "Leads" sheet. The field marks the source "Leads" entry of the account.
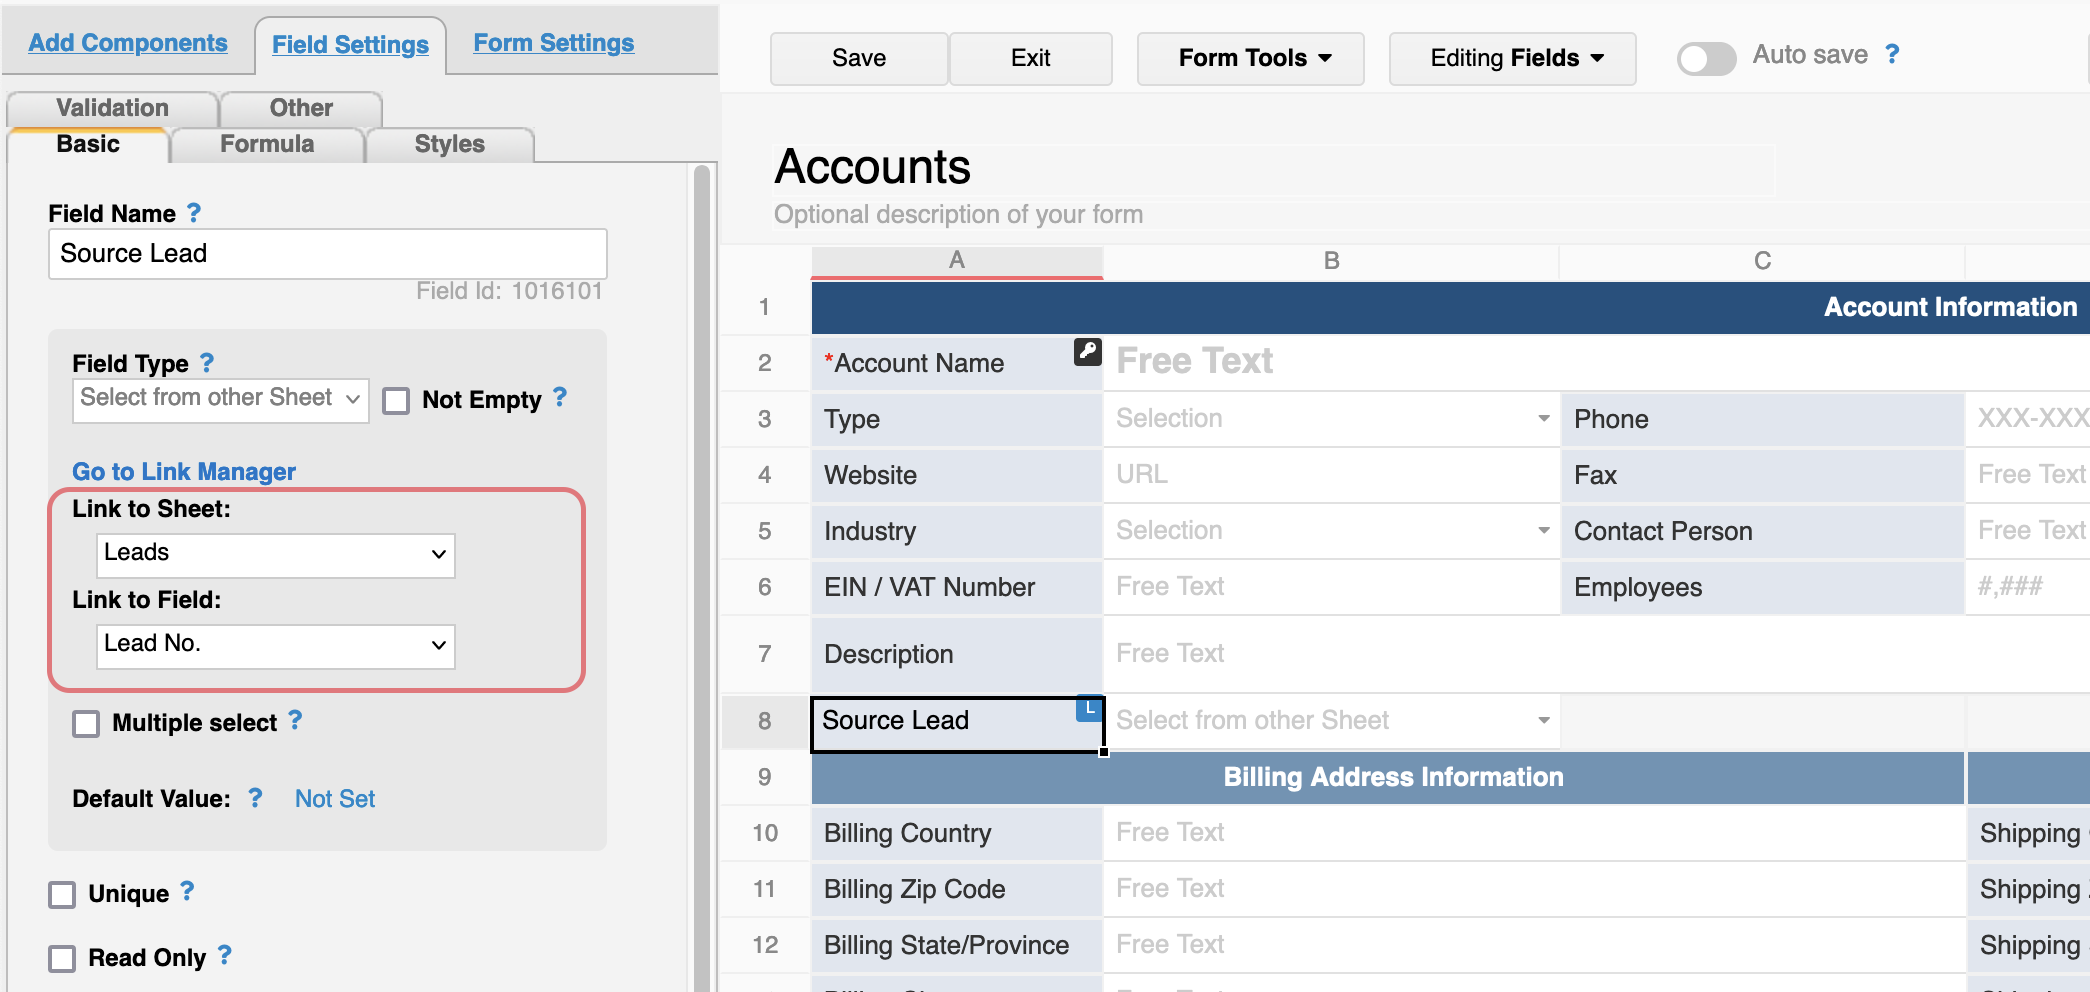
Similar to step 1., please create a link & load field on the "Leads" sheet and link it to the unique value on the "Accounts" sheet. The field marks the corresponding "Accounts" entry.
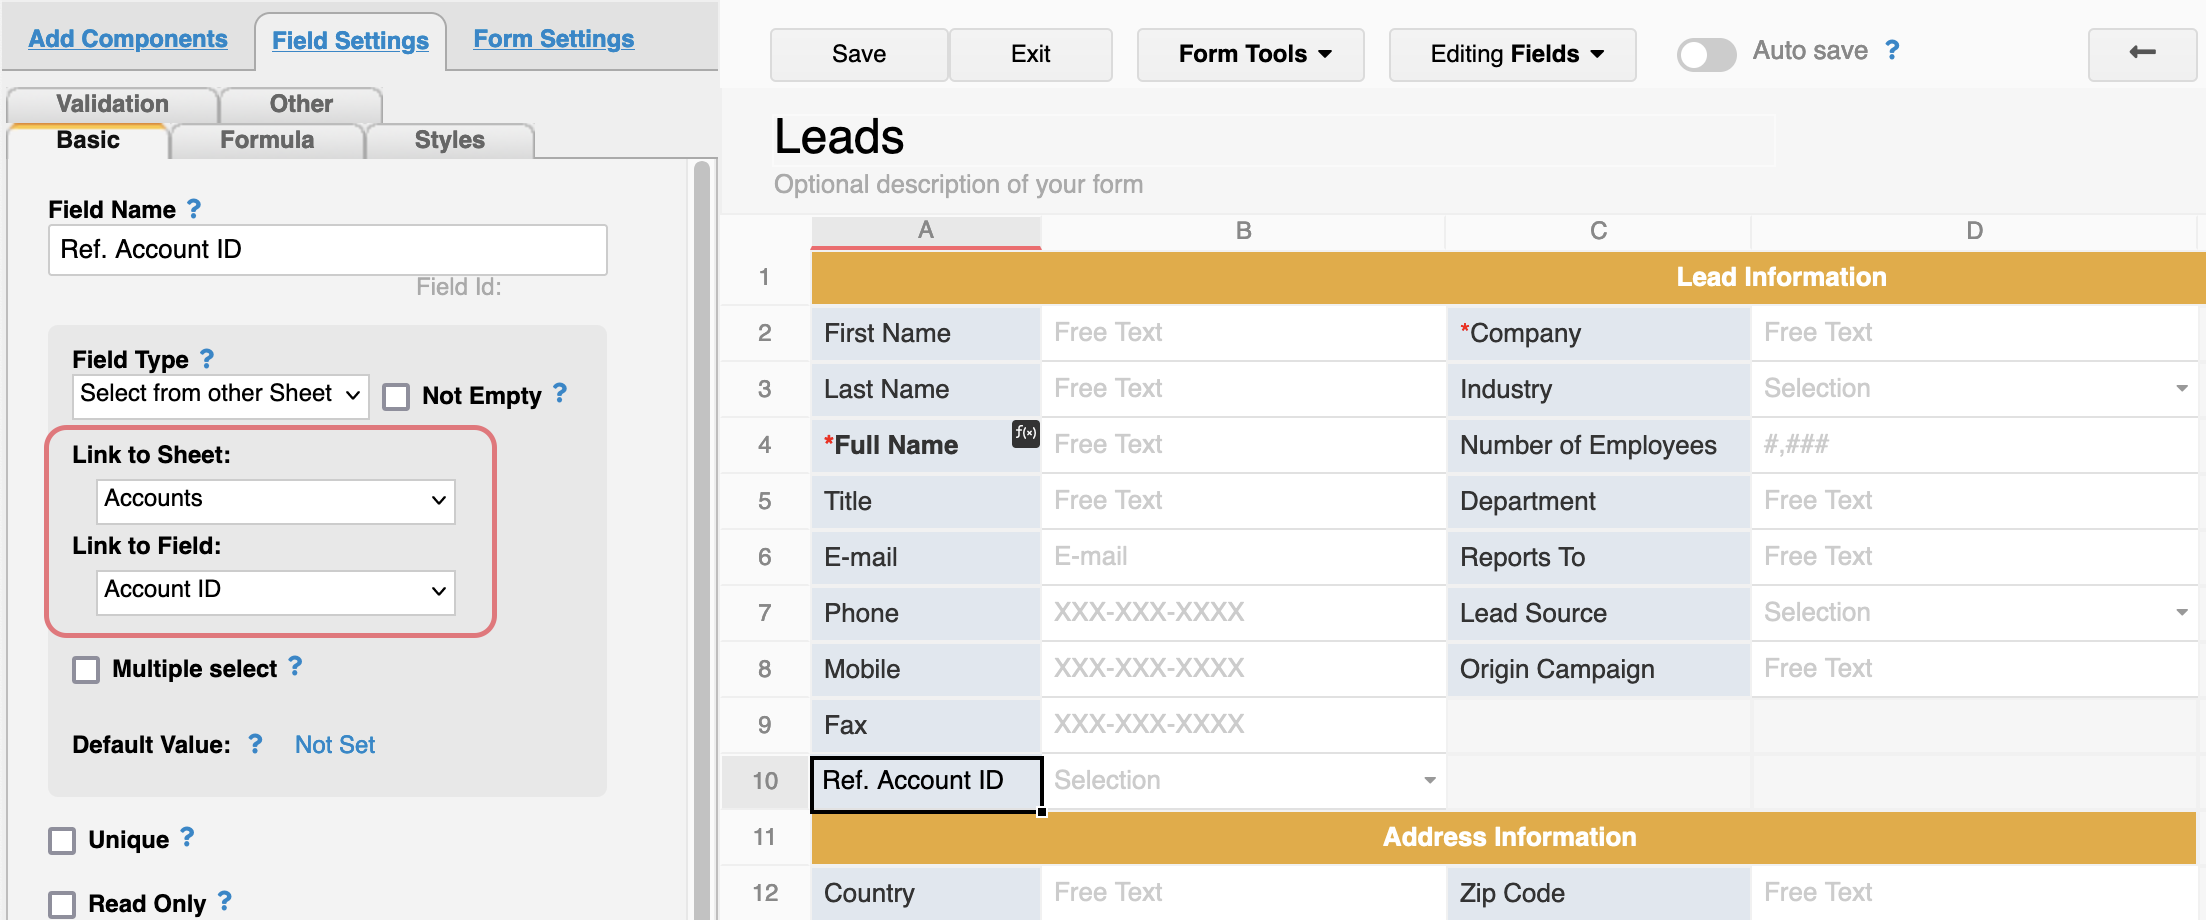
For the convert record action button, please add the mapping of the unique field:
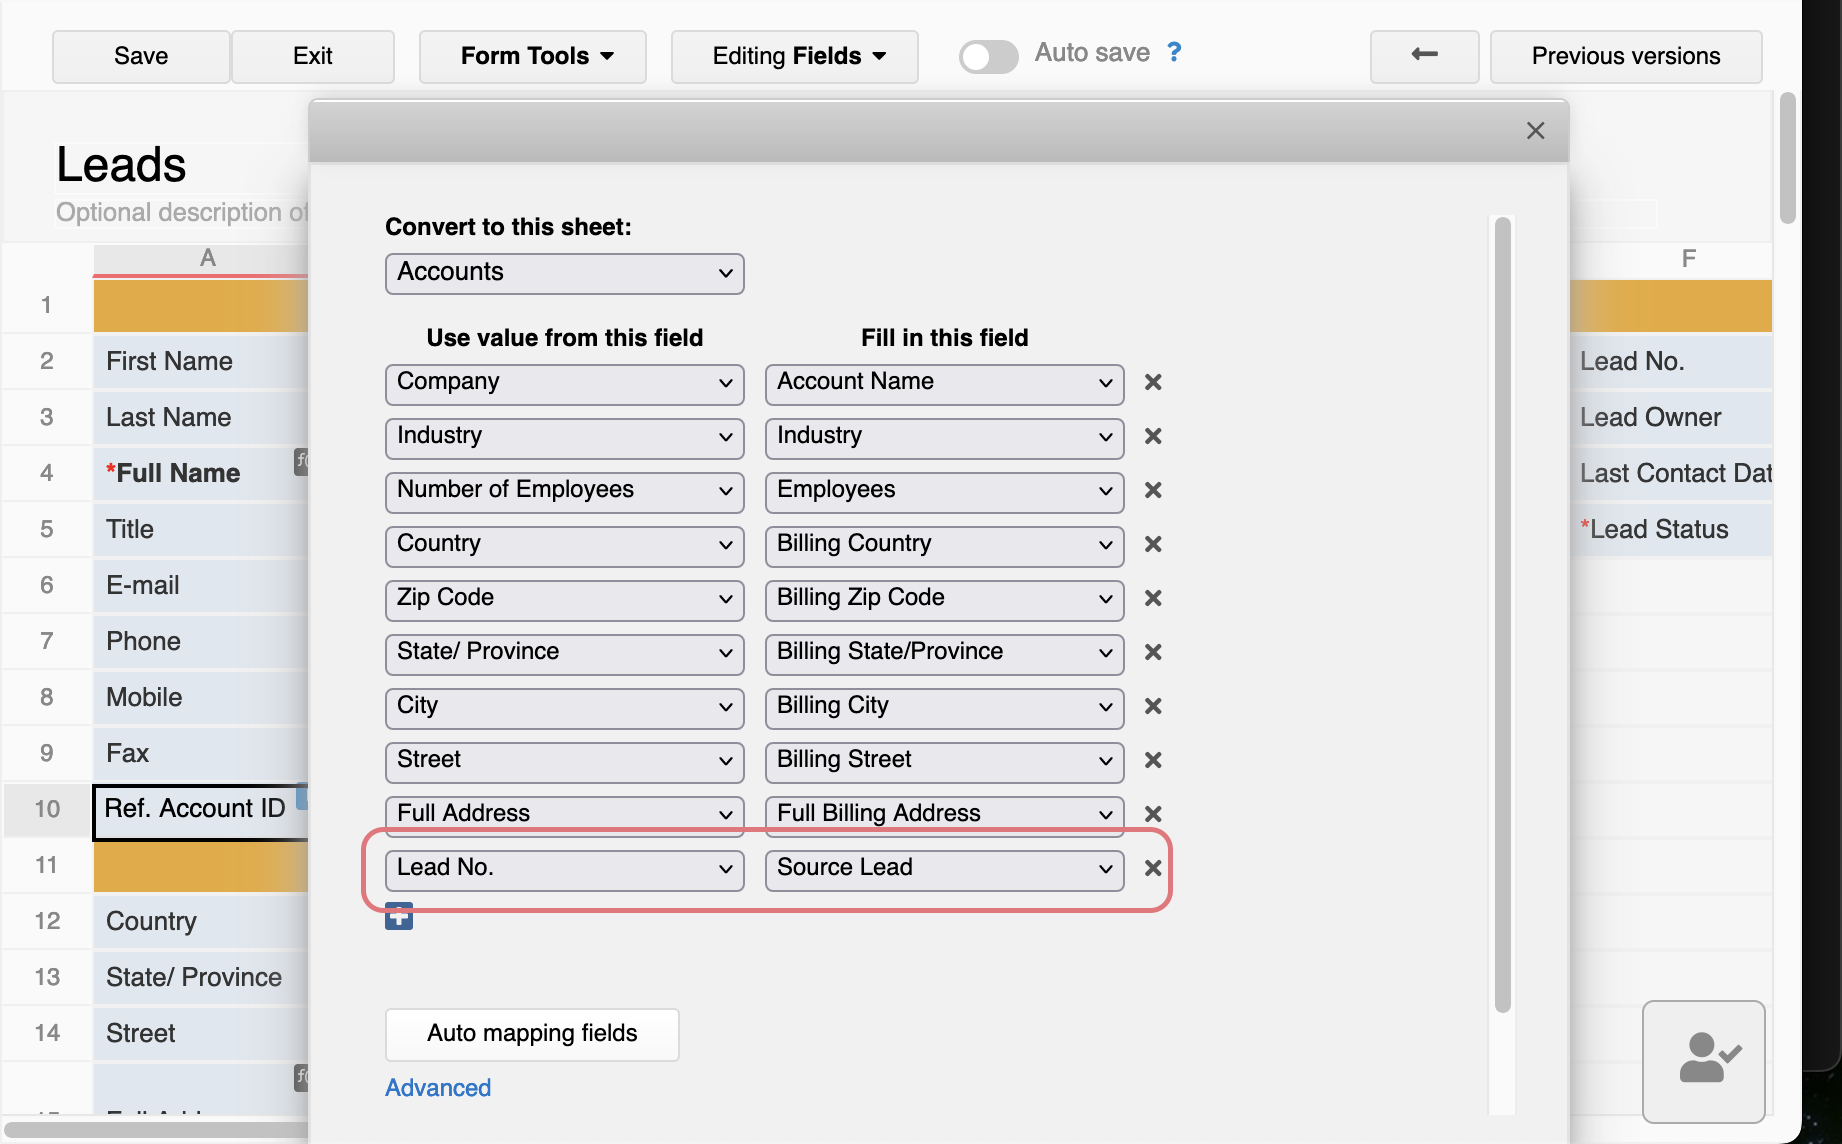
In our example, the destination sheet is "Accounts". Hence, please create an update value on another sheet action button so the system will find the source lead in the "Leads" sheet according to the value in the "Source Lead" field. Then, update the "Ref. Account ID" field with the "Account ID" value:
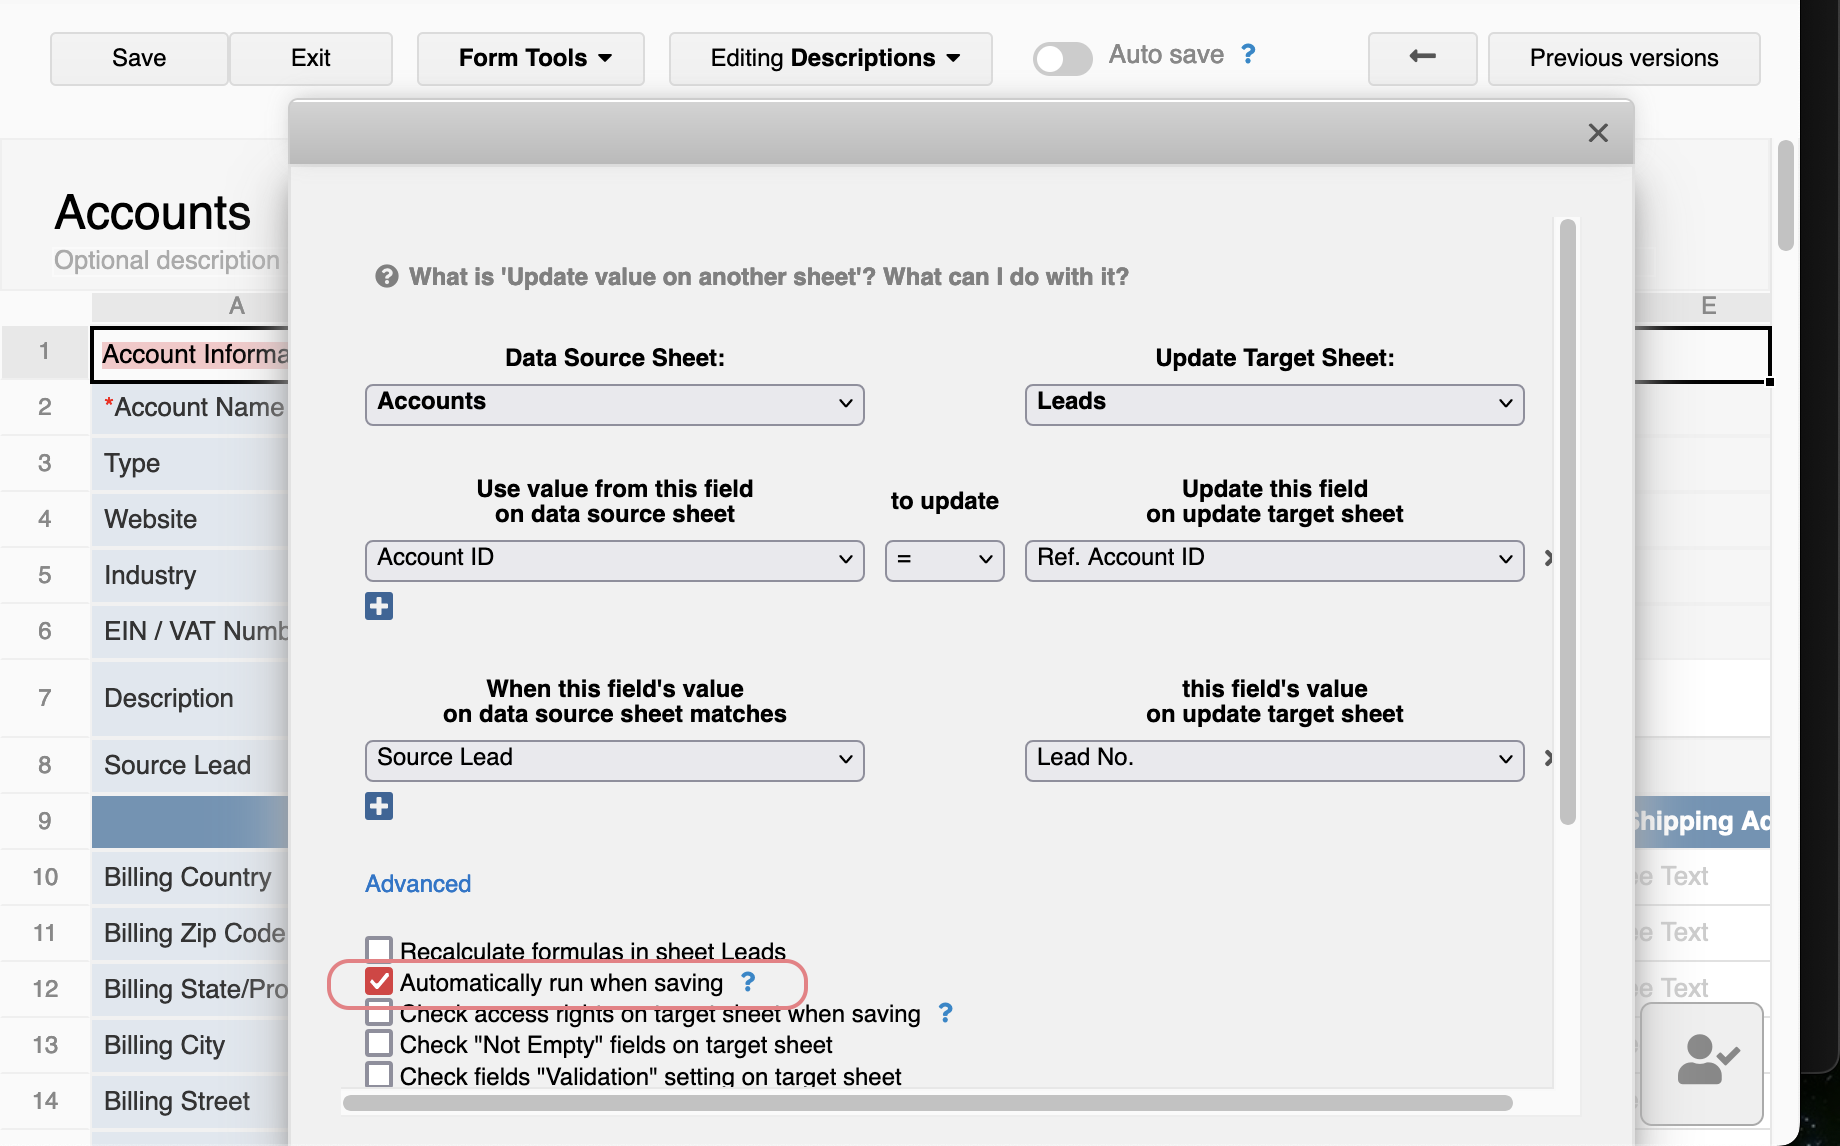
Once button created, you may tick "Automatically run when saving" so the button will be triggered automatically when an entry is converted.
An independent/regular field on a Ragic form is a field where the field header and field content are horizontally aligned. For example, the following five fields are all independent/regular fields:
When presented on a form page, independent fields represent a one-to-one data point, meaning that an independent field in a single data record can only store one field content value.
For example, if a customer's contact information is stored as one Ragic record, and a customer has only one company name, one tax ID, etc., representing a one-to-one data point, then the company name and tax ID should be set as independent/regular fields:
On the other hand, a subtable in Ragic forms has field headers and field content vertically aligned, which means that the field headers are horizontally aligned. For example, the following four fields are all subtable fields:

When presented on a form page, subtable fields represent a one-to-many data point, meaning that under a single Ragic record, a subtable field header can store multiple field content values.
Continuing with the example above, if a customer's information is stored as one piece of data record, and that customer has multiple contact persons, it is suitable to use a subtable to record multiple contact persons for one customer:
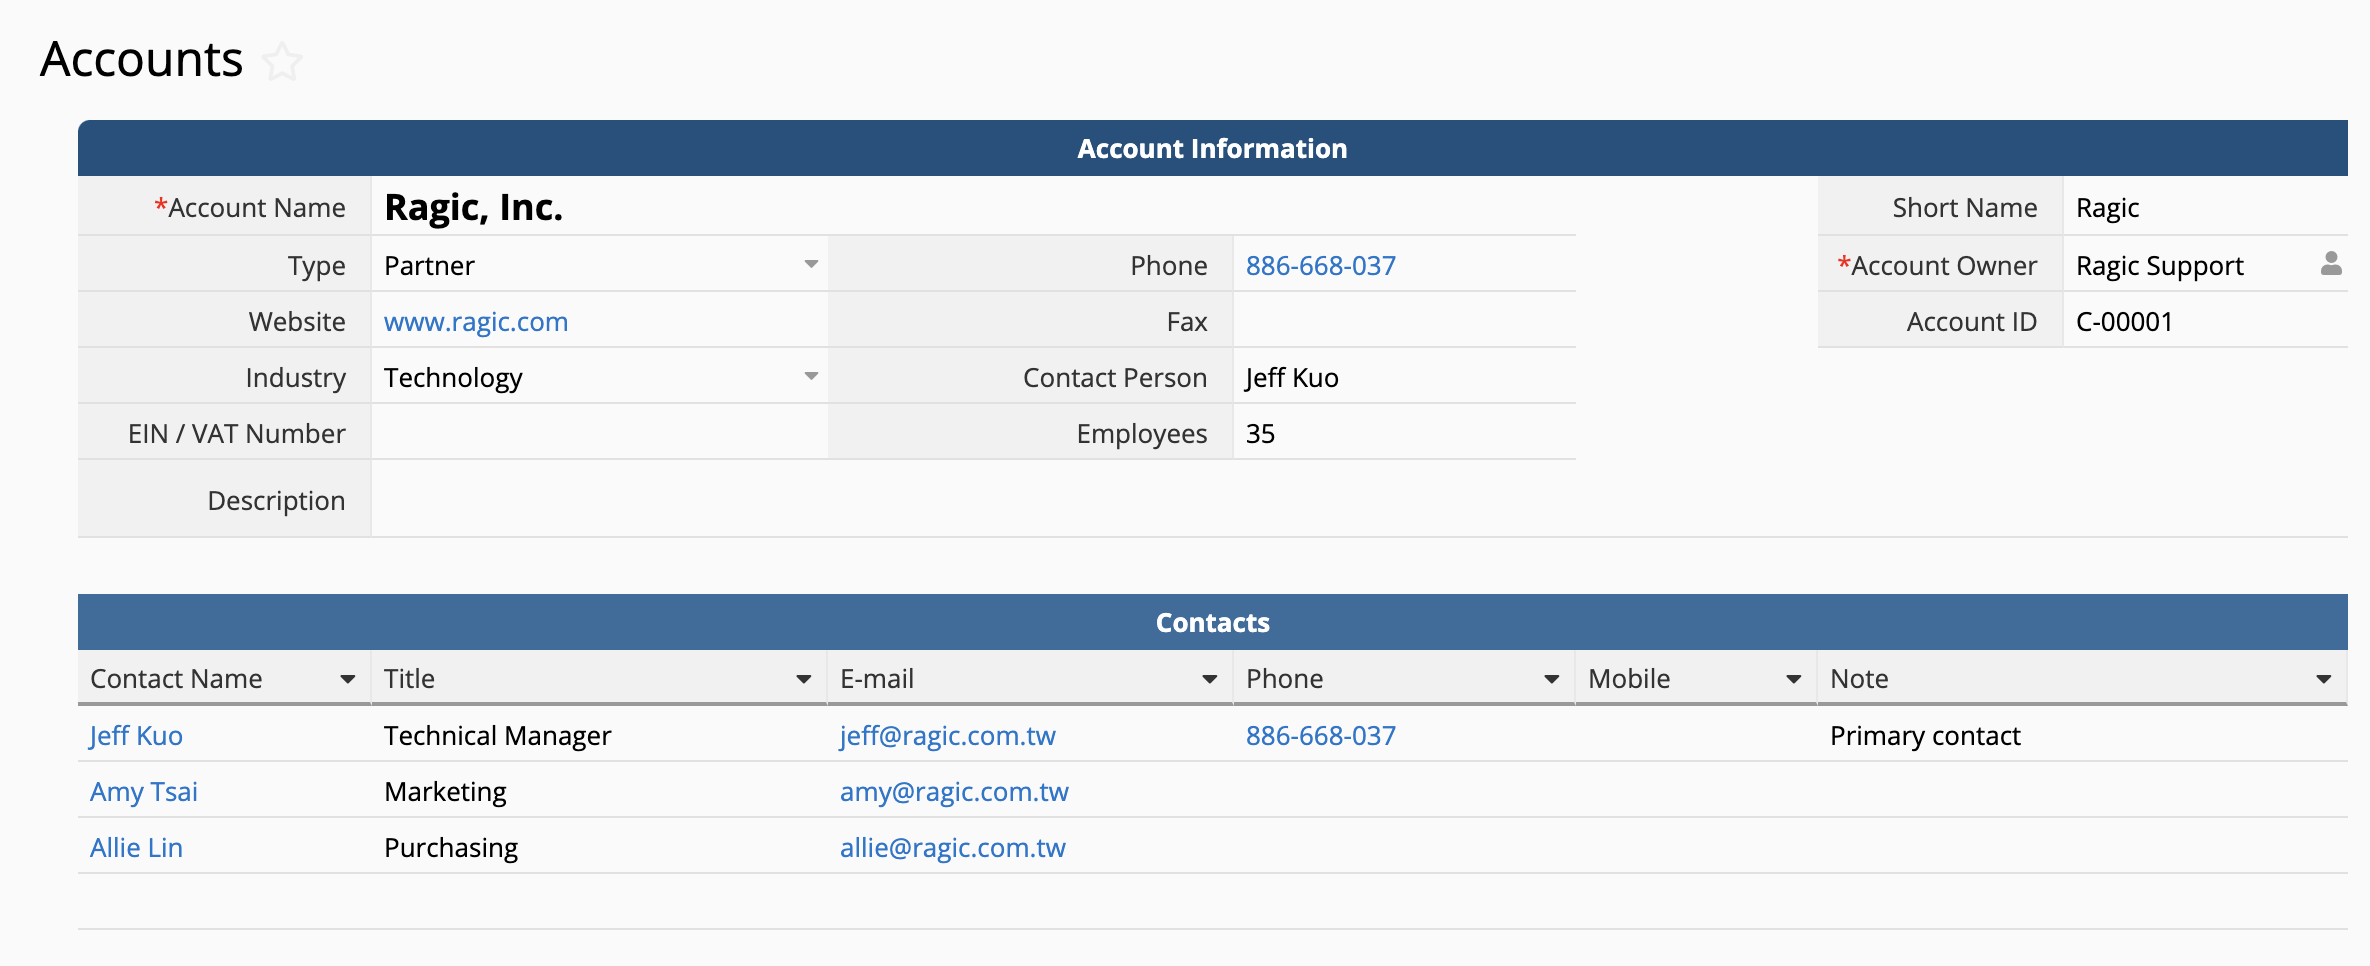
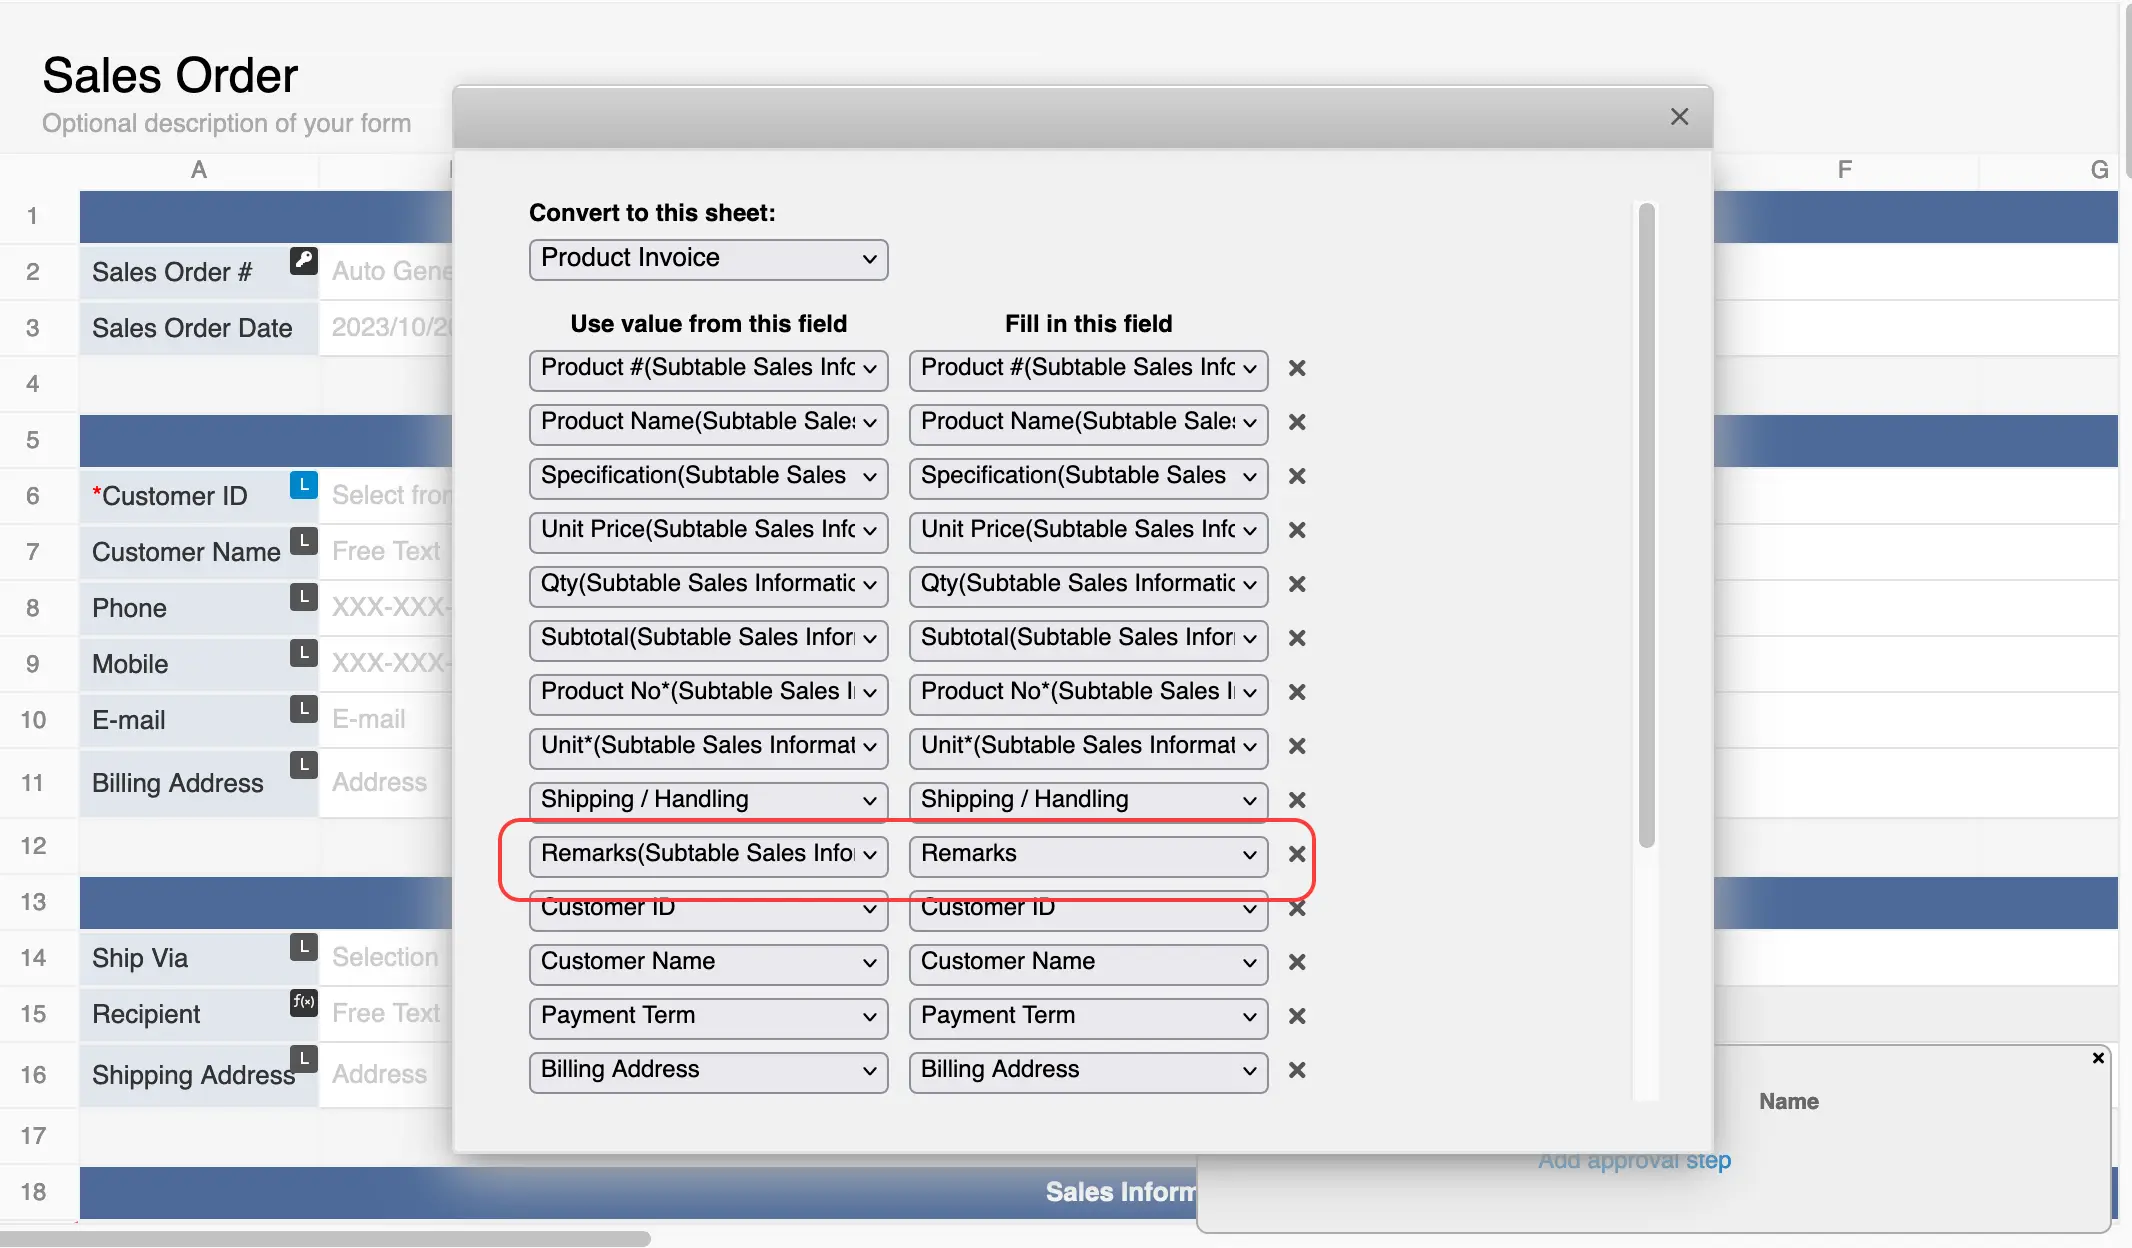
The above setting means you want to create entries in the "Product Invoice" sheet with the "Remarks" value from each subtable row. Hence, if you have three subtable rows in the "Sales Order" entry, the system will convert it into three separate entries in the "Product Invoice" sheet by pressing the action button.
To fix this issue, please add a “Remarks” subtable field on the "Product Invoice" sheet and update the field mapping of the action button:
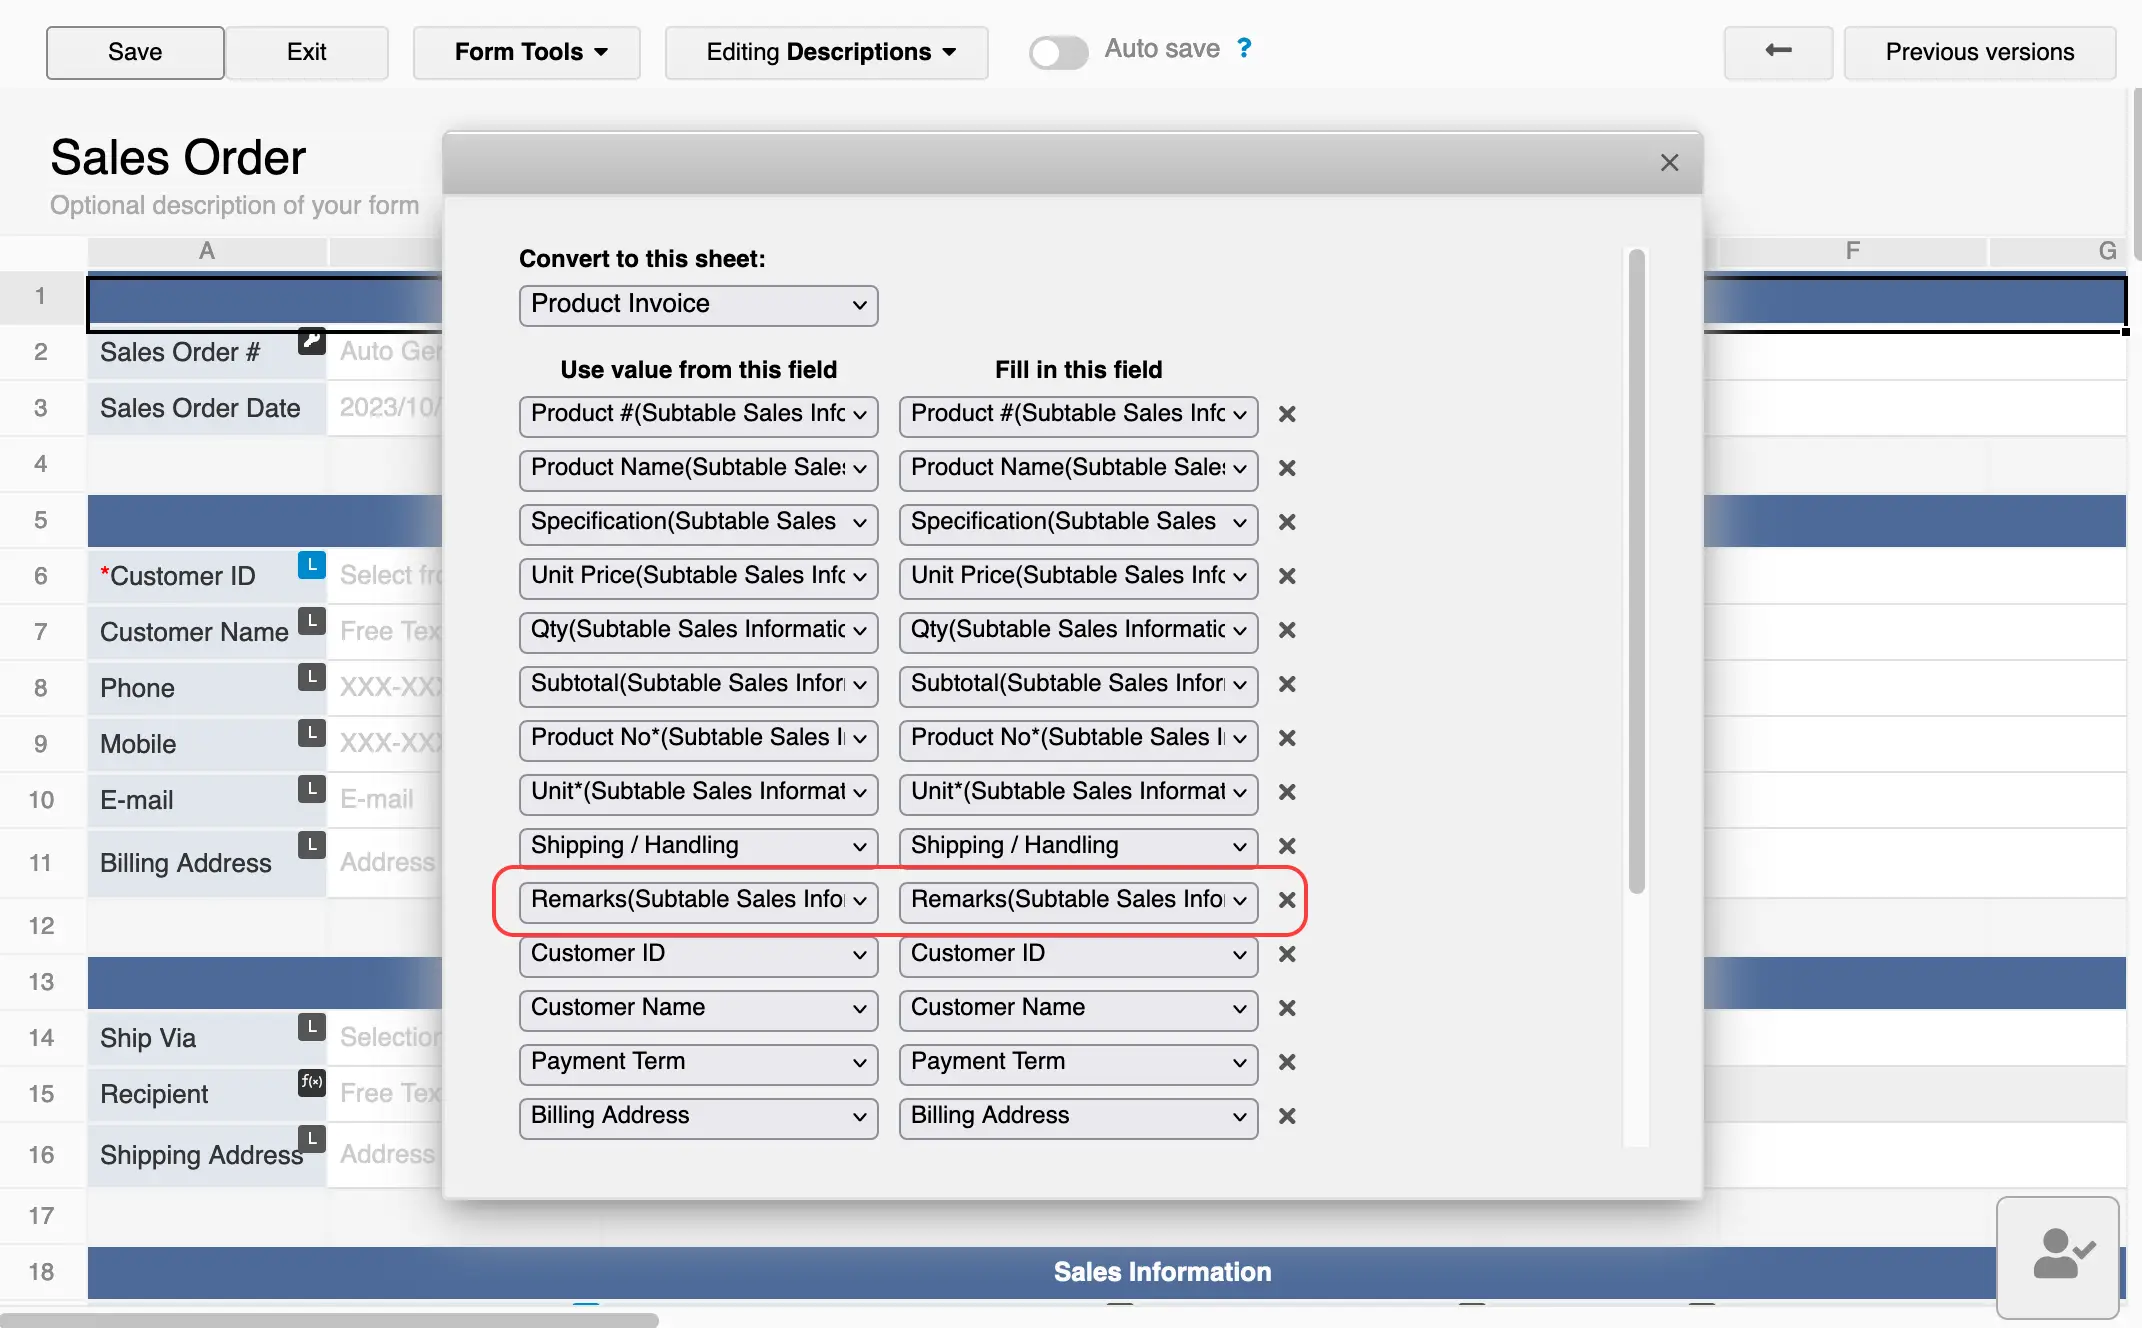
For example, if you want to delete records that are 28 or more days old automatically, please follow the steps below:
Right-click on any application tabs and select Global Javascript Workflow, which will take you to the workflow module panel.
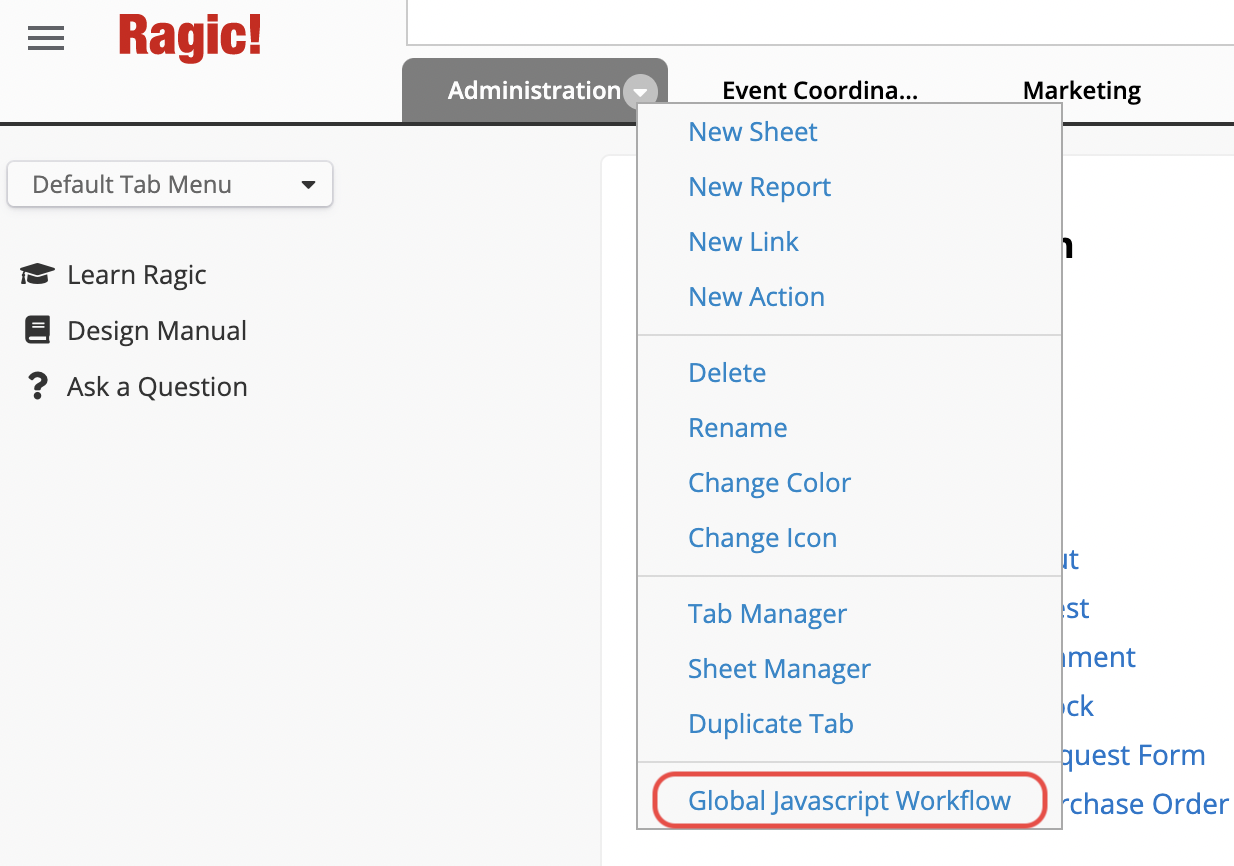
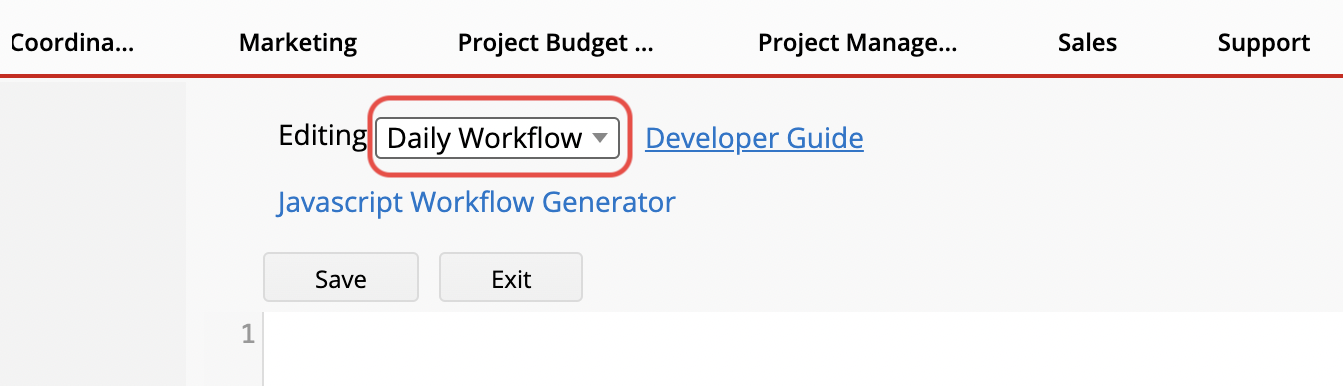
If the URL of the respective sheet for your workflow is: https://www.ragic.com/accountname/tabname/1
Then, please fill in the following:
db.deleteOldRecords("/tabname/1",28);
Be sure to save your changes before exiting.
If you want to change the number of days in the setting, modify the number after "db.deleteOldRecords('/tabname/1')". For example, if you want a record deleted if it is 20 or more days old, you should enter:
db.deleteOldRecords("/tabname/1",20);
Please note:
1. This workflow is only for deleted records from a single sheet. It does not delete records from the entire database.
2. To ensure the record is indeed deleted, the script will permanently remove the record. It will not be moved to the Recycle Bin, which means it cannot be recovered. Please make sure you absolutely need this feature before writing the related script.
Logging into the account with SYSAdmin in the database where templates are hosted, you can access Generate License Code page at the bottom left of the Partner Center. On this page, select the template ID, extension days, and the quantity, and proceed to generate license codes.

After completion, you can see the overview below. Clicking on the "Batch Number hyperlink" will download a CSV file.
You can then provide the codes in the file to your clients.
Note: Only users with Professional or higher plans are able to install paid templates that are provided by partners.
In the database, navigate to the install templates and find the paid template you would like to install.
Access any record and click on the Icon in the bottom right corner to see licensing information, which defaults to a 30 days free trial.
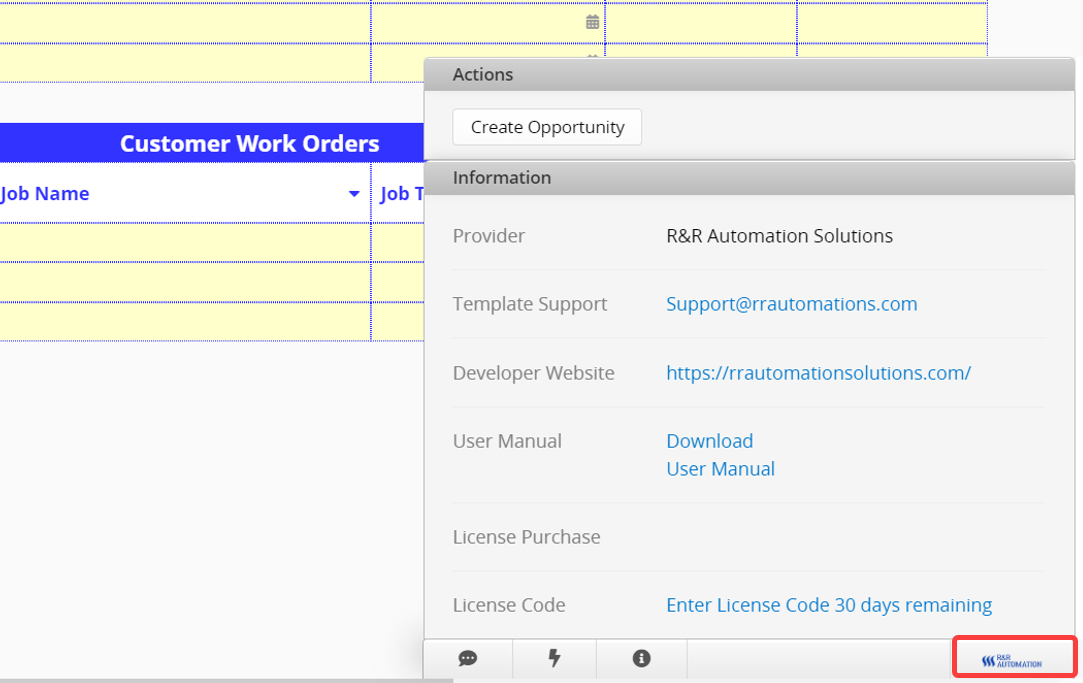
If you wish to purchase the template after the trial period expires, you can contact the partner directly through the licensing information. The payment process involves buying an license code. You can inquire about the payment methods. Once payment is made, the partner will provide the code. The specific payment methods will be determined by the partner.
After obtaining the code, click on Enter License Code and input it in the window to extend the licensing.
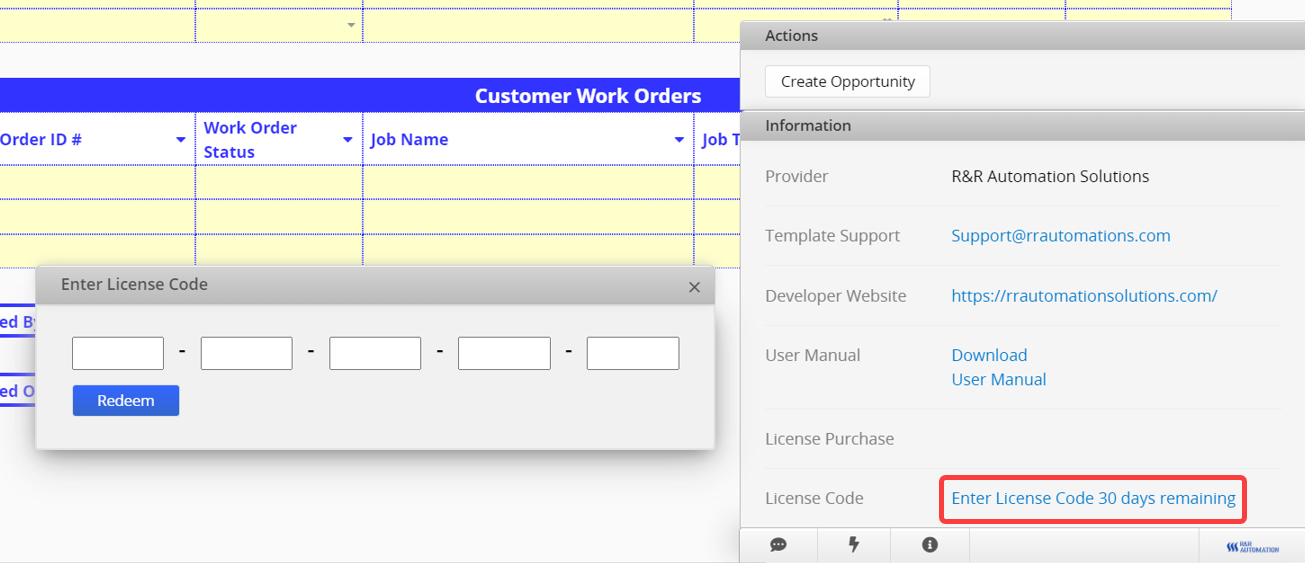
Xero is a premium Zapier app that requires a subscription to Zapier's paid plan. Please refer to this page for Zapier’s pricing plan.
If your company primarily uses Xero for financial management but seeks to record additional operational data, such as sales, stocks, and shipments in Ragic, you can seamlessly integrate both systems using Zapier to eliminate repetitive data entry. This integration synchronizes operational data in Ragic with financial data in Xero. For instance, after creating a Sales Order in Ragic, as shown below:
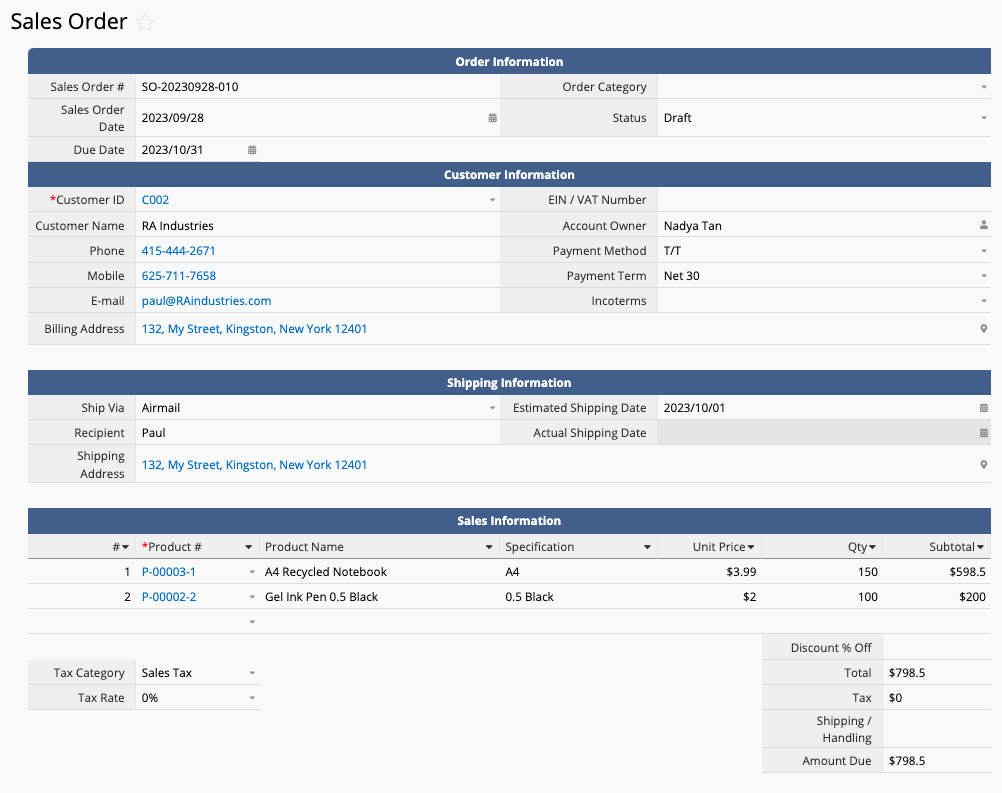
This Zapier integration will send the information on the Sales Order Sheet to issue a corresponding invoice in Xero:
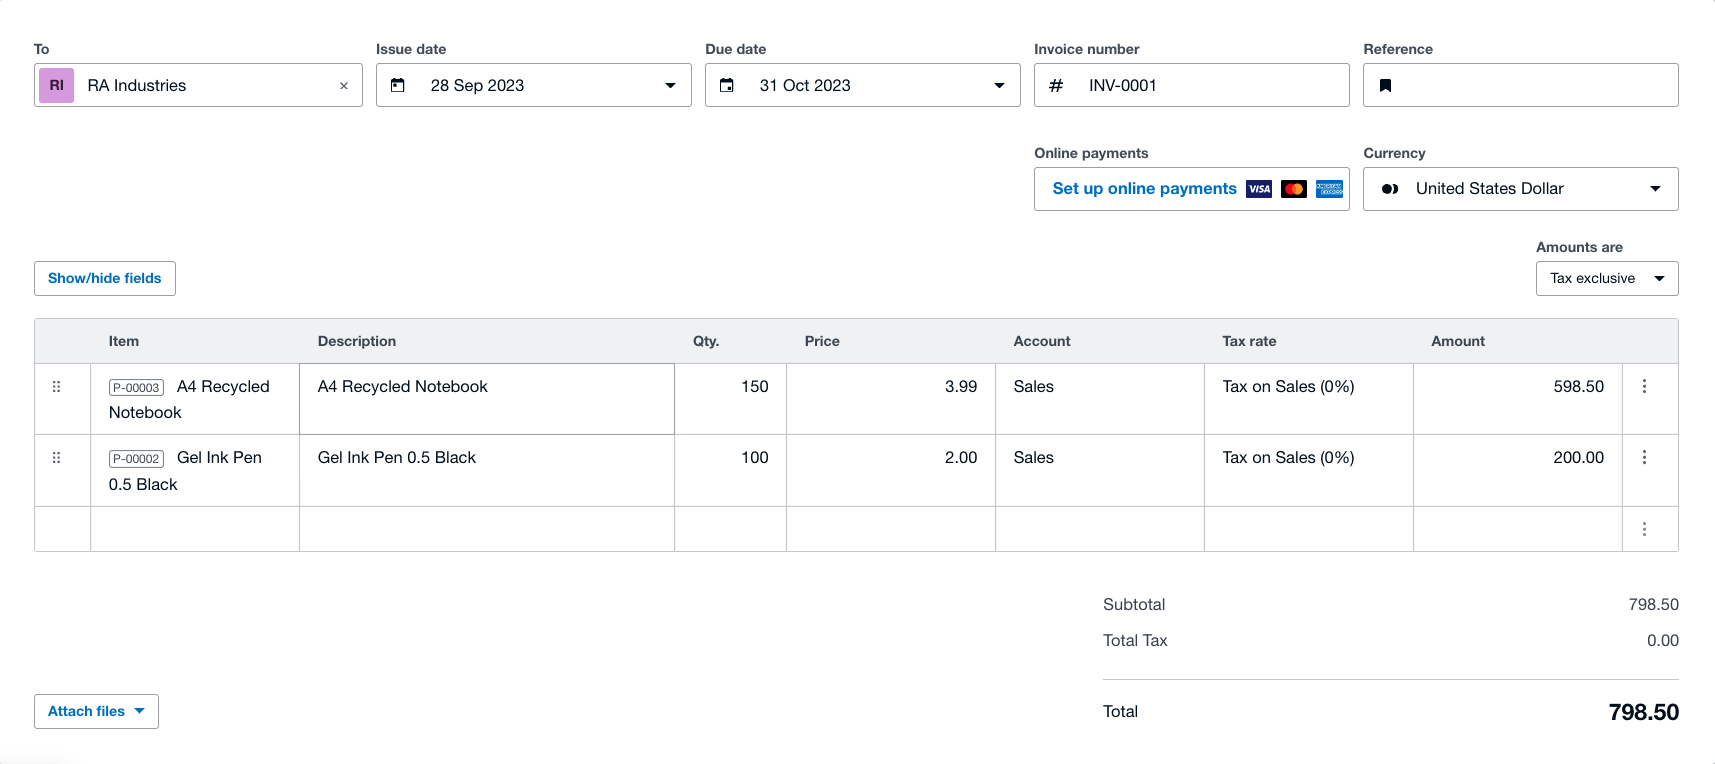
Before setting up the integration in Zapier, please ensure that your Ragic sheet matches the required fields for Xero invoices:
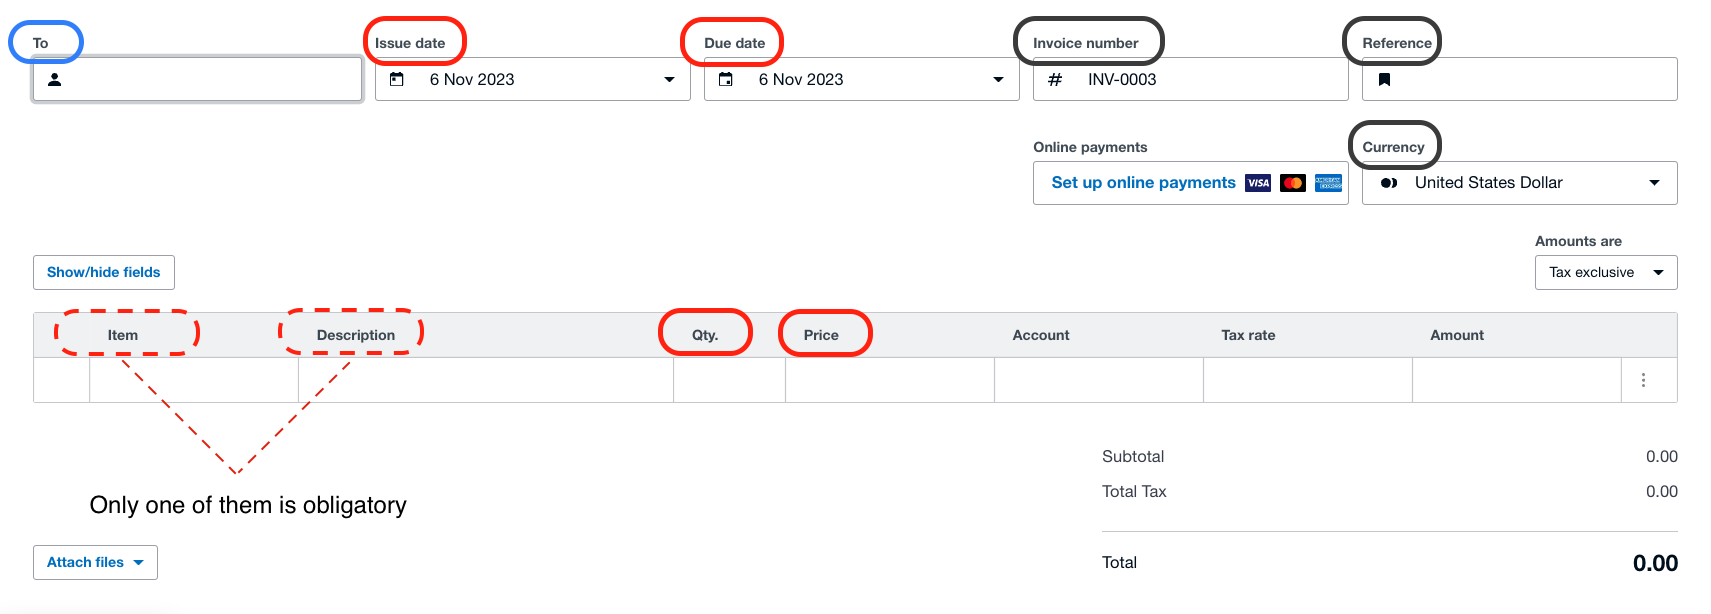
Tips:
1. Fields marked in bright red must correspond to a field in your Ragic sheet.
2. Fields marked in gray can remain blank, allowing Xero to generate values.
3. Fields marked in blue may require additional settings.
Create a Sales Order Sheet that includes all the information required by Xero’s invoice in Ragic:
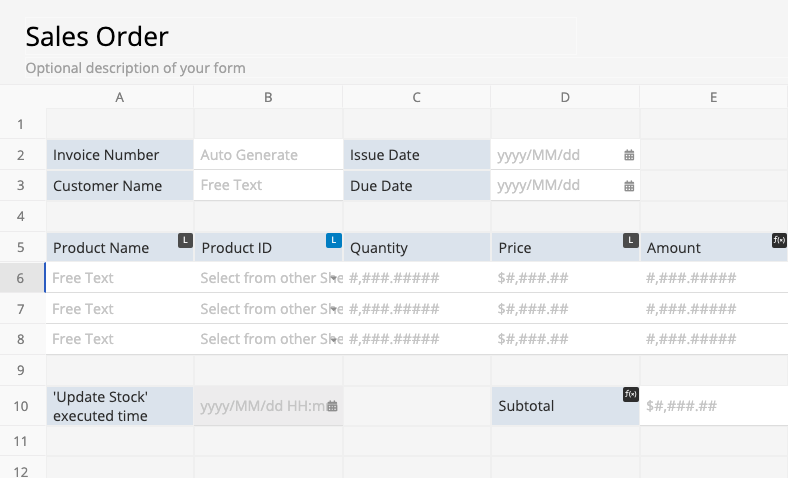
You can also use the Ragic Sales Order Template and customize it, adding fields like the Due Date to meet Xero's requirements.
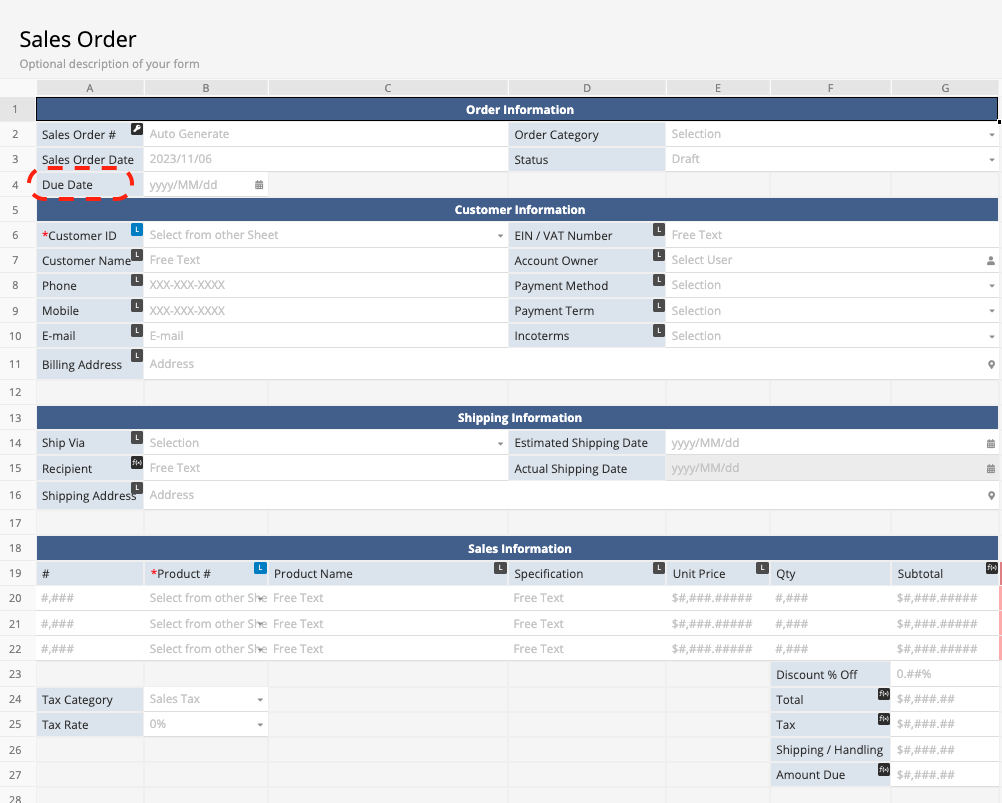
P.S.: When setting up the workflow automation in Zapier, the system will need an entry to run the test. It is highly advised to create a test entry after designing the sheet for this purpose.
As Xero specializes in accounting, it comes with built-in features like a customer management system, stock management, and tax calculation. To ensure a seamless integration between Xero and Ragic, some preliminary setup is required. Here are several setup options based on the type of integration you need, either basic or advanced integration:
In Xero, every invoice will require at least the customer's name as a unique value.
Basic Integration: Xero will create customer contact information when issuing invoices as long as it finds a customer name in Ragic that hasn't been created in Xero yet. No additional setup is needed.
Advanced Integration: If you require more comprehensive customer information in Xero, you can refer to this page for managing contacts in Xero.
When issuing an invoice in Xero, you can choose to fill in only the "item" or "both description and unit price". By choosing to fill in the item, you can perform inventory management and sales analysis in Xero.
Basic Integration: For a simple integration and invoice issuance, just fill in the description and unit price.
Advanced Integration: If you wish to integrate the Ragic product ID with the Xero item field, you'll need to set up your product information. This ensures that the product ID in Ragic can match the corresponding product ID in Xero. To do so, you can either add an inventory item or import inventory items in Xero.
Xero has a built-in account information field to select tax categories and tax rates under each account.
Basic Integration: To generate an invoice based on an order, set the account to "Sales". Xero will automatically populate the Tax Category as "Tax on Sales" when issuing an invoice.
Advanced Integration: If you need to specify tax categories and rates, prior setup in Xero is necessary. You can refer to this page for more information about tax rate set-up in Xero.
Once you've aligned your Ragic sheet with Xero's requirements, proceed with setting up the integration (referred to as a "Zap" in Zapier). You can use this Zap Template to speed up your set-up process.
You need to connect your Ragic account first so Zapier can obtain your sheet information and set up the integration.
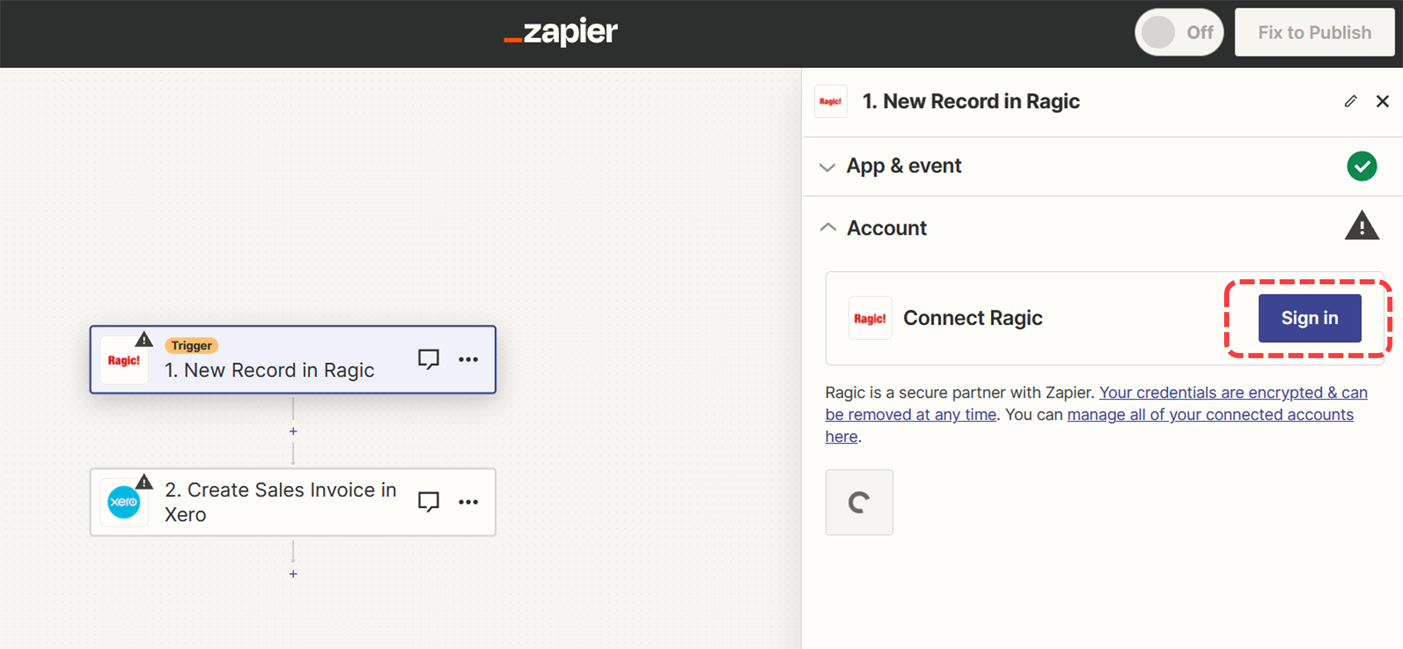
Connect your Ragic account in Zapier using your Ragic API key and server information.
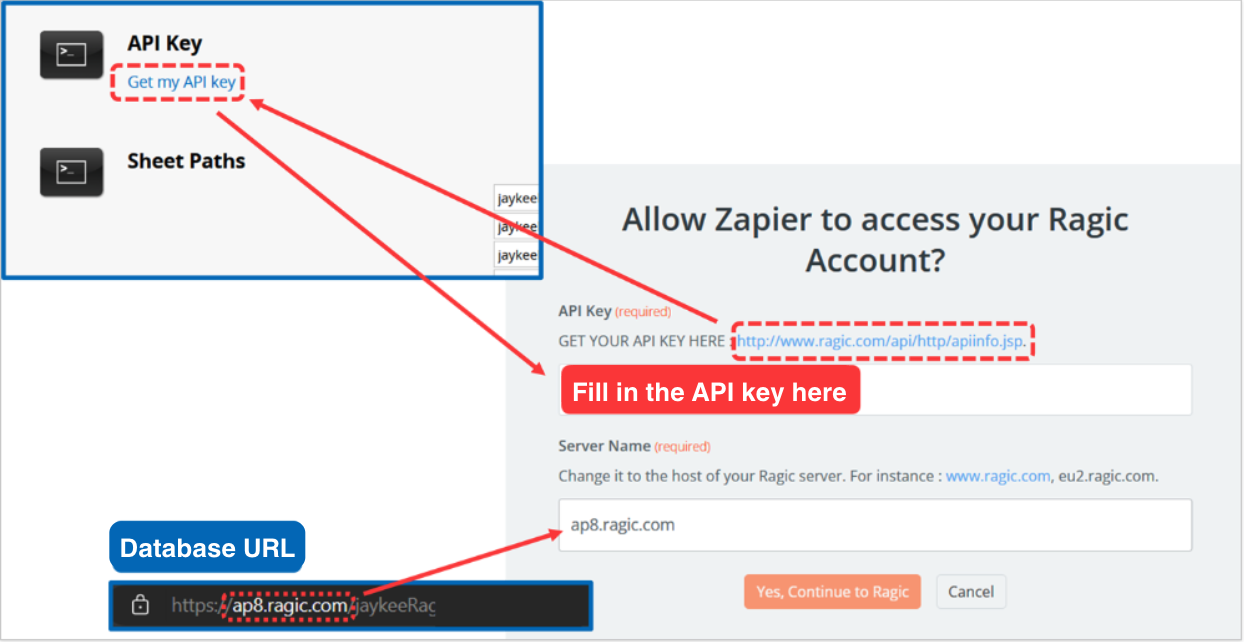
After completing this step, you can click "Yes, Continue to Ragic" to complete the Ragic account integration. The next step is to select the sheet to be integrated.

After choosing the sheet, Zapier will fetch the three latest entries in this sheet. You can choose one entry as the 'test entry' for this process.
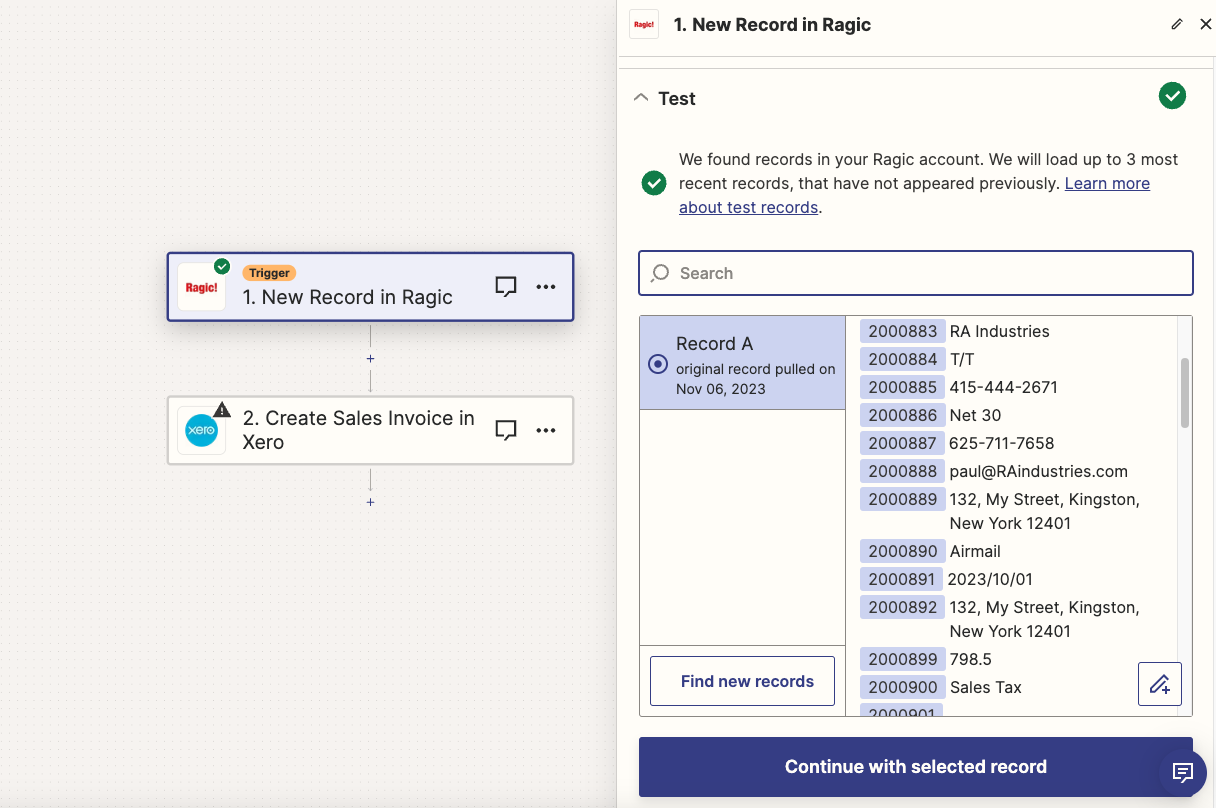
As Xero serves as the action, it will receive information from Ragic and populate its invoices. After logging in and connecting your Xero account to Zapier, you'll need to specify the content in your Ragic sheet that should be transferred to each corresponding field in Xero's invoice.
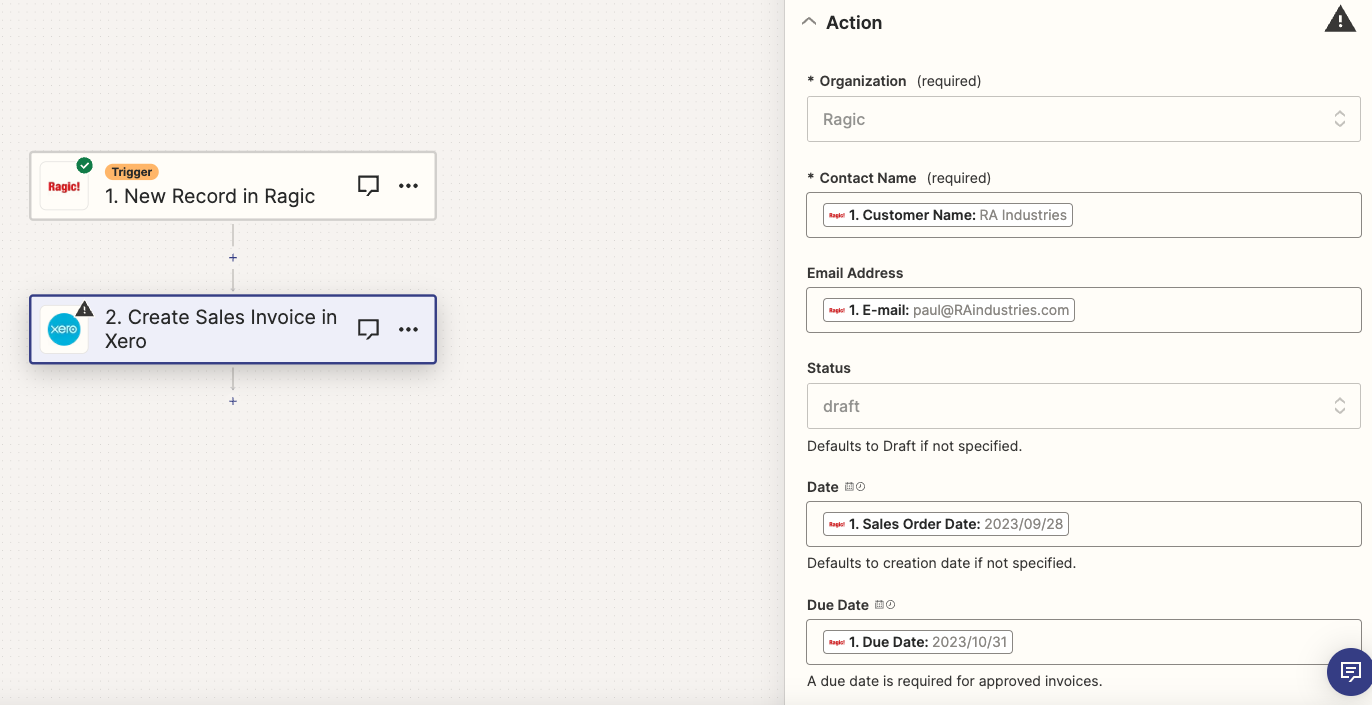
Following this, Zapier will display a list of the fields in Xero that require input, along with the corresponding field values you intend to import from Ragic. You can then initiate a 'Test Step' to ensure that your integration setup functions as anticipated.
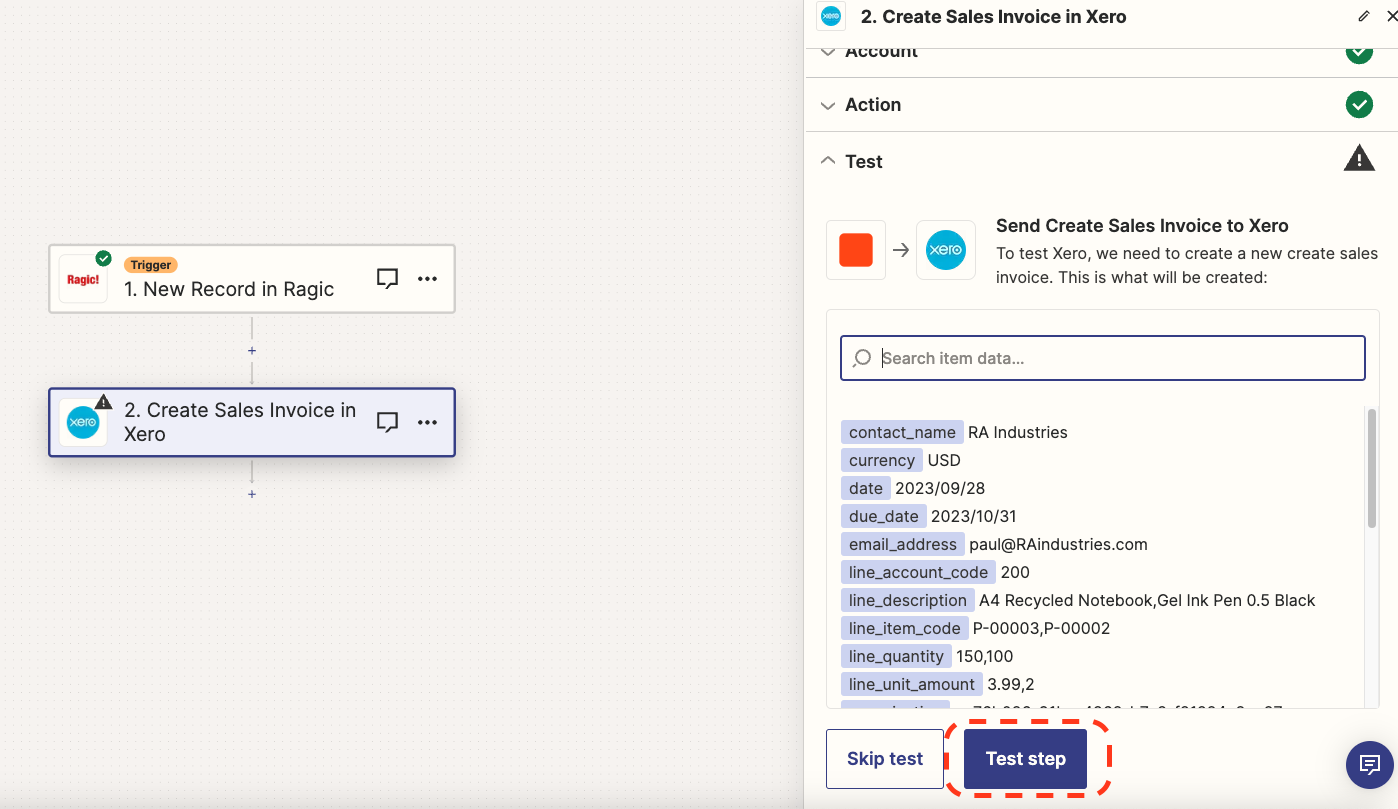
If the test is successful, Zapier will confirm the successful creation of the invoice with a notification. You can also see the entry you used for the test appeared as an invoice in Xero.
Next, just press "Publish" on Zapier, and your Zap will be officially completed and activated. In the future, when there is new data in the specified sheet, a corresponding invoice will be generated in Xero.
Ragic’s Reservation System is, in essence, a report generated from a particular sheet: When someone reserves a time slot using the report, the system will automatically generate a corresponding entry of reservation record using the information entered. So, it’s possible to expand the capability of the reservation system by altering the design of the source sheet. Some examples are shown below.
If you want the system to automatically send a reservation confirmation E-mail, you can set up an action button to send a custom email in the source sheet and configure the button to “automatically run when saving”, as shown in the figure below.
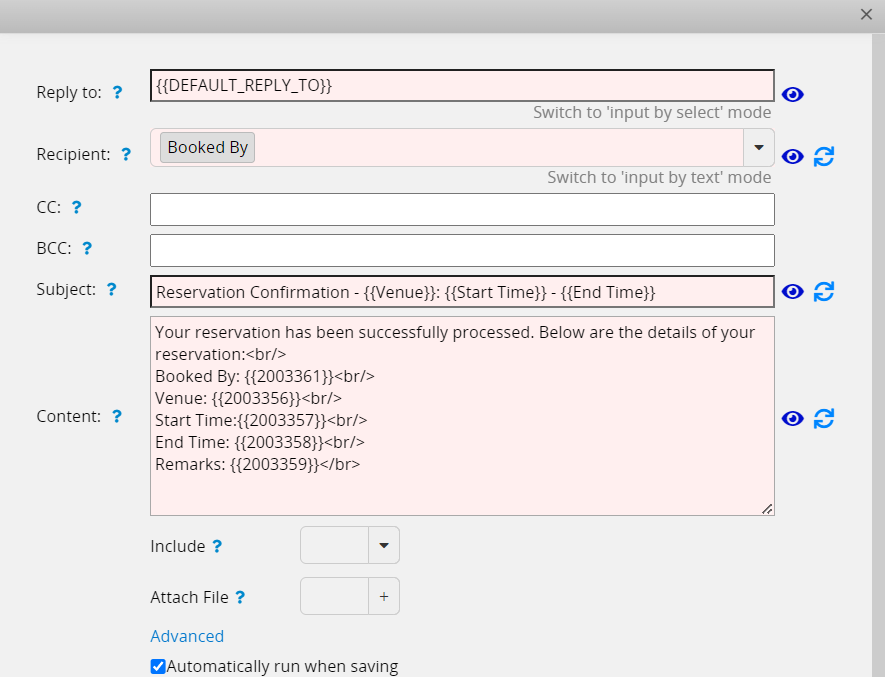
Once someone reserves a timeslot, the system will automatically create an entry in the source sheet, which in turn would trigger the action button set up to “automatically run when saving”. So once a booking is made, the button executes and sends an E-mail to the address specified by the “booked by” field (which needs to be set up with the field type E-mail or Select User).
An example of such a reservation confirmation email is shown below.
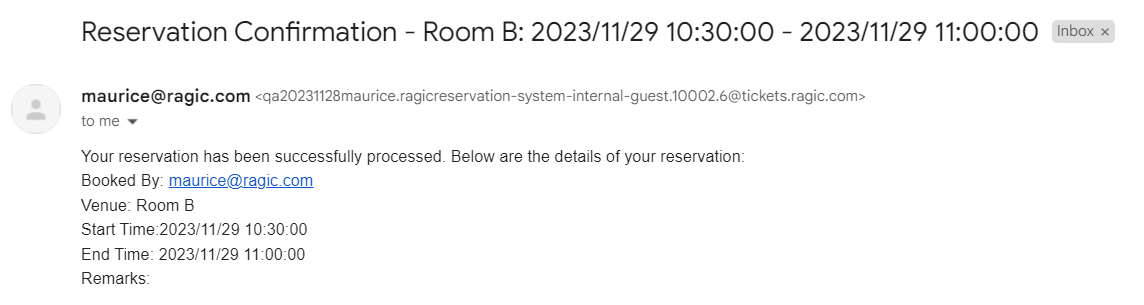
If you want the system to automatically send an E-mail reminder to the “booked by” address or user ahead of an upcoming reservation, you can set up Reminders, as shown below.
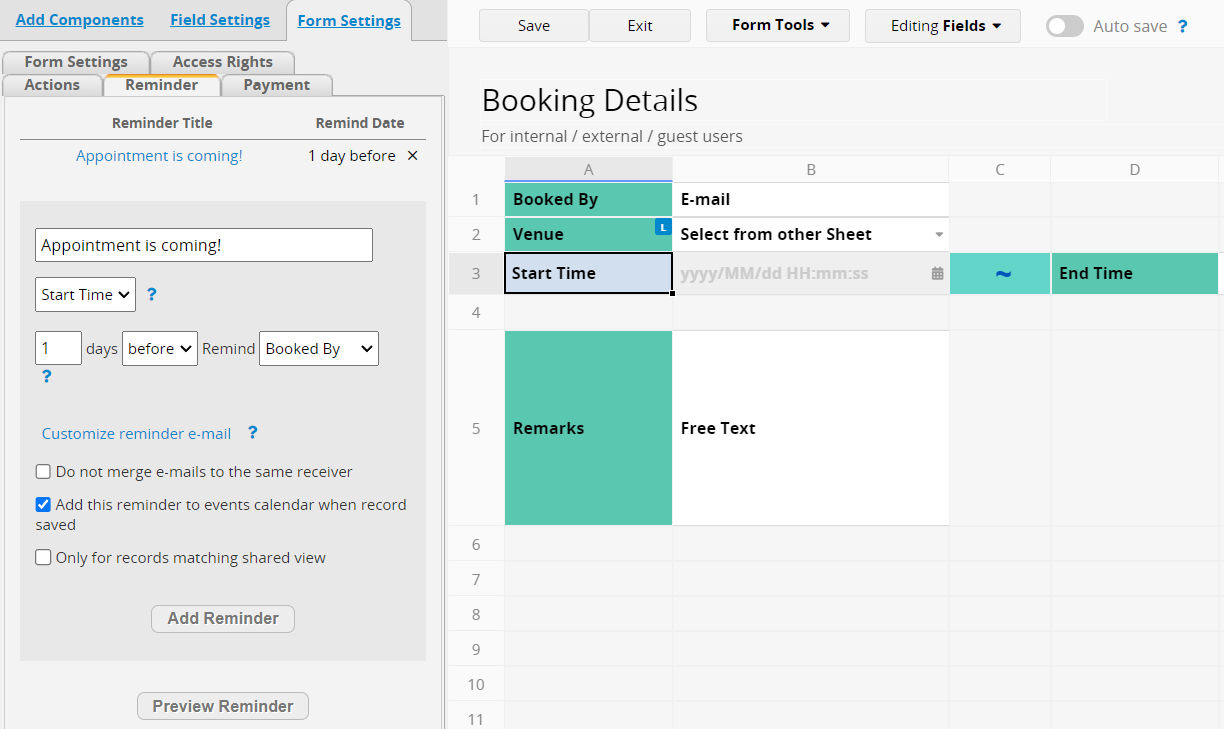
For the date field, you can choose “start time” or “end time” (Ragic currently does not support a single reservation across different dates, so start and end times normally are on the same day). Then, you can choose to send the reminder on the day of or any number of days before the actual reservation.
Note here that the “Booked by” field must be set up with the field type Select User or E-mail to successfully send a reminder. If the recipient of the reminder is not the “booked by” E-mail address or user, you can also set up a separate reminder recipient field in the sheet.
In addition, you can also configure the system to send a reminder through the Ragic app or website push notification if the recipient allows. (See Notifications for details).
An example of the reminder E-mail is shown below. (The content of the reminder can be customized)
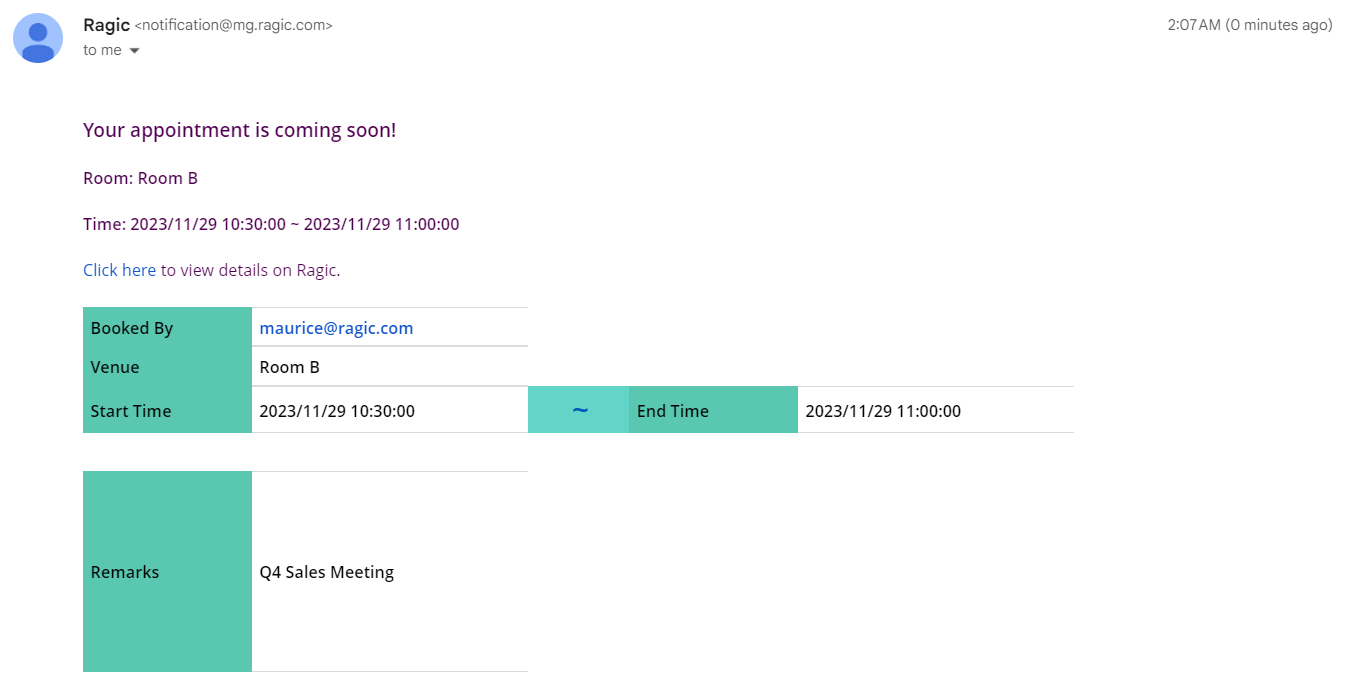
Reservations are sometimes best viewed in a calendar. If that’s the case for you, just use the report function in the source sheet to generate a Calendar Report, as shown below.
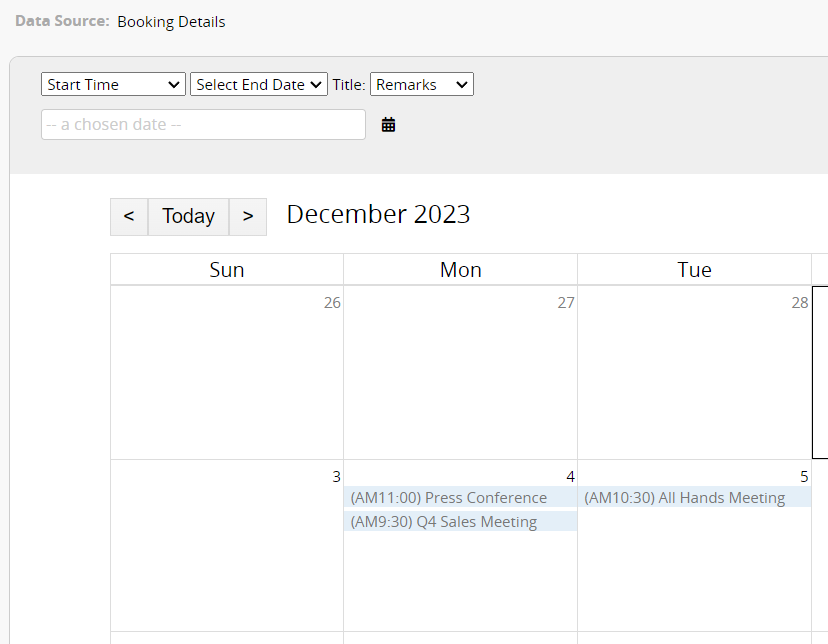
You can click on the short description of individual events on the calendar report to see the details. If you want the short description to display more than the booking remark and include, for example, “booked by” plus “meeting room”, then you can create a dedicated field for the calendar text in the sheet and use a string formula to create the value you want.
If you want the reservation to be viewable in an external calendar (e.g. Google Calendar or Outlook), you can use the Calendar Sync function. Take note though that the date format supported by external calendars generally separates date (yyyy/MM/dd) and time (HH:mm), which is different from the combined date + time (yyyy/MM/dd HH:mm) format that the reservation system and calendar report supports. The solution is to create additional fields used for syncing external calendars with string formulae and the string-to-date (DATEVALUE) formula to extract and separate the date (yyyy/MM/dd) and time (HH:mm) values.
When it comes to booking management, it’s not just about managing schedules and availability, it’s also about tracking whether the reservation is actually fulfilled (i.e. the person shows up / participates in the event / uses equipment). When using Ragic’s reservation system, all reservation records will be stored automatically in the source sheet. Simply add a status field in the sheet to track the status of all reservations. You can even link it with other sheets to implement functions such as tracking remaining sessions and calculating fees.
Take, for example, class reservation for a one-on-one class on a point system where a point is deducted for every class attended. By adding one single element, both attendance management and points management can be implemented in one go: On the class reservation sheet, an “Attendance” field can be added and an action button configured to update value on another sheet, subtracting a point from the original points order when executed.
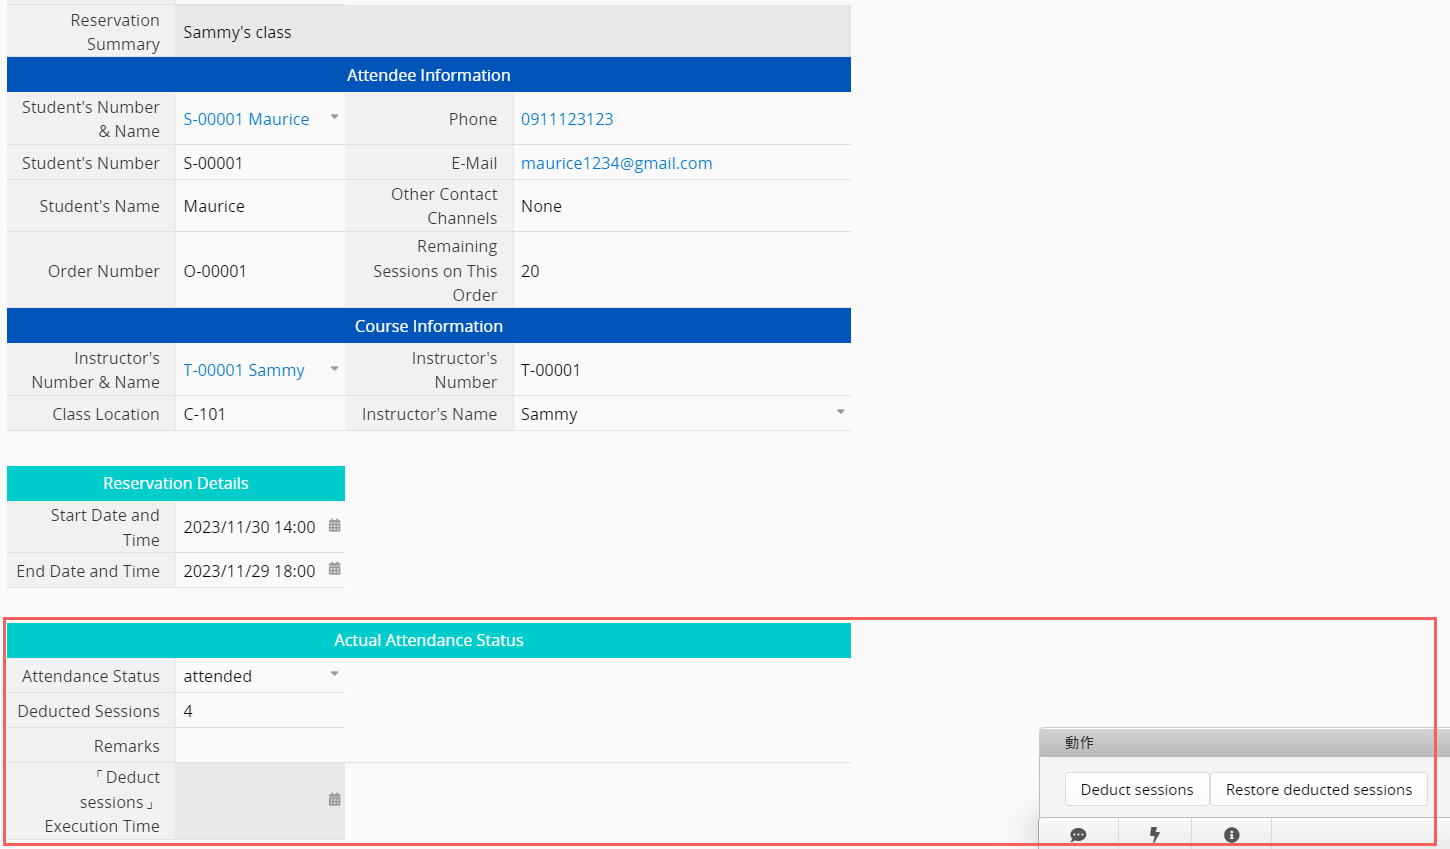
You can also use Ragic’s other report functions to generate various figures for data analysis from the reservation system source sheet.
For example, you can use a line graph to analyze meeting room usage statistics:
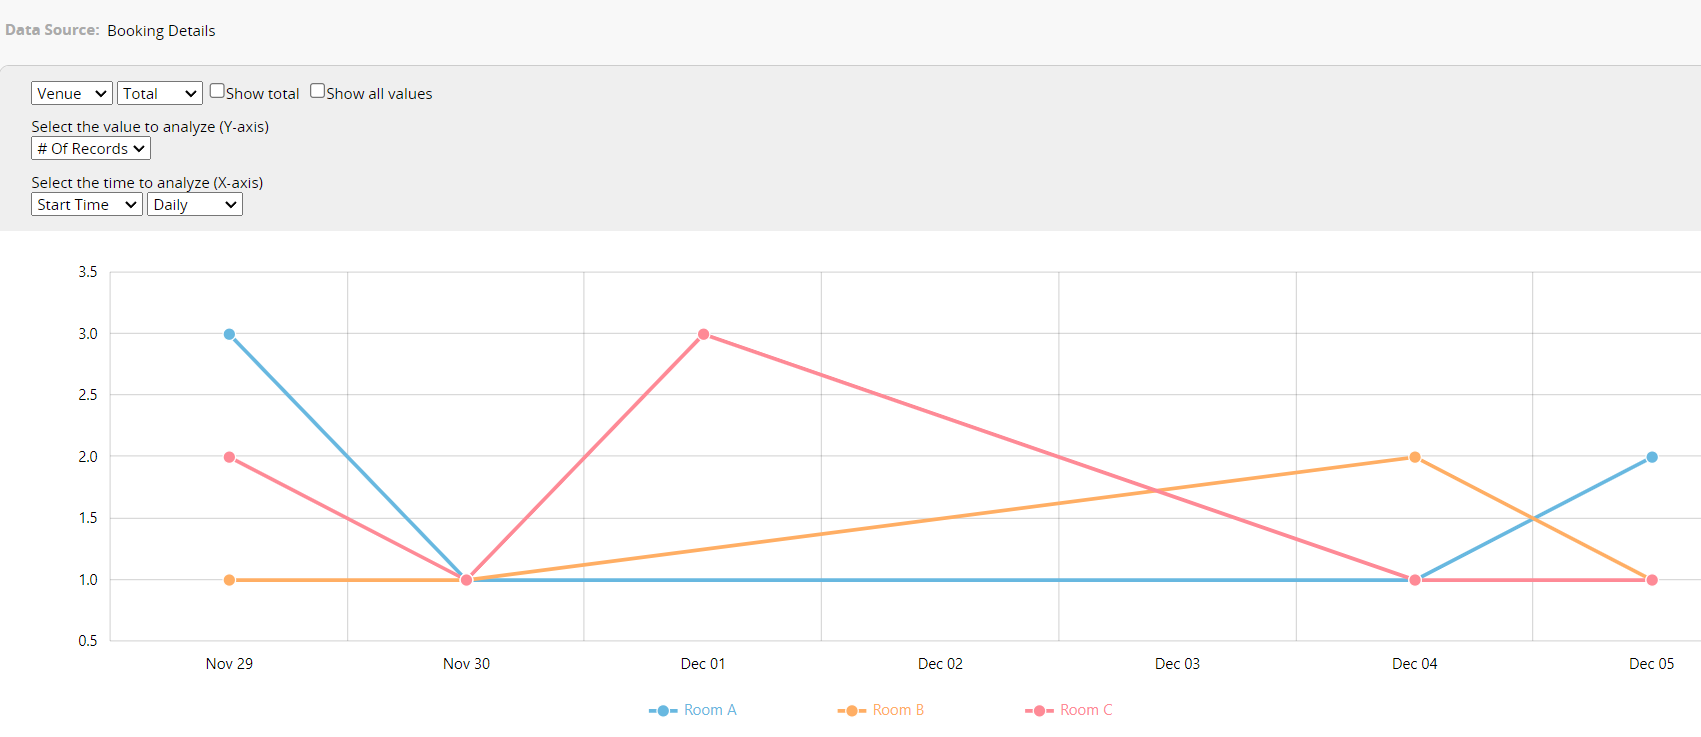
Or pivot table to analyze the booking data for different instructors:
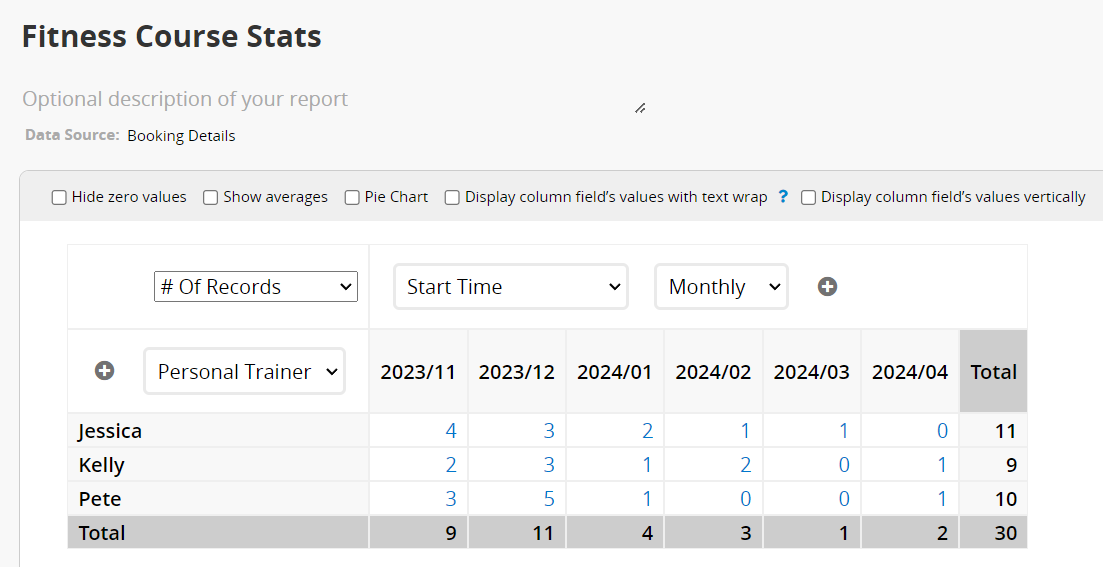
Or ranking report to see who had the most reservations.
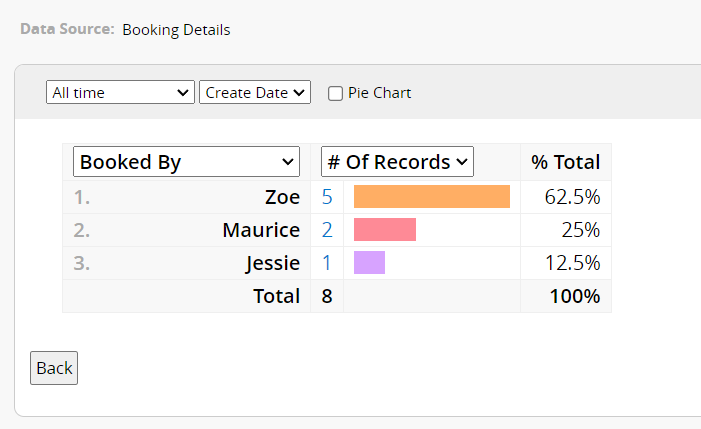
Whether automatic line-breaking occurs depends on the 'type of characters composing the field value.' The line-breaking rules for field values with different character types are below:
| Composition of Field Value Characters | Line-breaking Rules |
|---|---|
| Composed of numbers, English letters, or half-width symbols | If there are no spaces, line breaks will not occur based on the field width; if there are spaces within the string, and the space position exceeds the field width, a line break will occur at the space. |
| Composed of numbers, English letters, or half-width symbols + full-width symbols | Line breaks will occur at spaces; if there are no spaces in the string and the position of full-width symbols exceeds the field width, a line break will occur at the full-width symbols. |
| Composed of full-width symbols | Line breaks will occur based on the field width. |
Please refer to the image below for a preview of the default line-breaking.
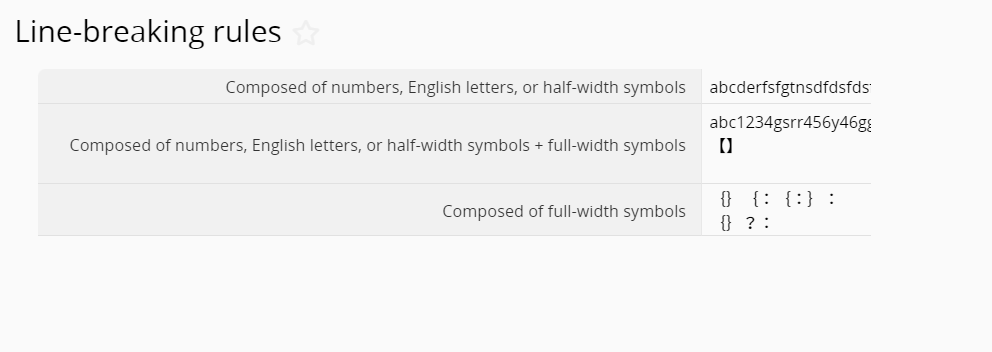
The line-breaking mechanism mentioned above is determined by the browser, not by Ragic.
If a user sees this message when logging in, this means SAML SSO login is disallowed in your database, and the user is not in the user group included in ignore denied login method for user group. If you would like to allow that user to log in to your database via SAML SSO, please go to company settings and select that user’s respective user group in the “ignore denied login method for user group” field.
Please go to the attribute settings in your identity provider to make sure that your identity provider returns email addresses to Ragic using the correct format.
This means the user passed the IDP verification without using a password. If you would like to allow this method, please select “Yes” in the “Skip authentication method check” field in company settings.
Ragic offers various free and paid plans, and you can find detailed explanations and comparisons on the pricing page.
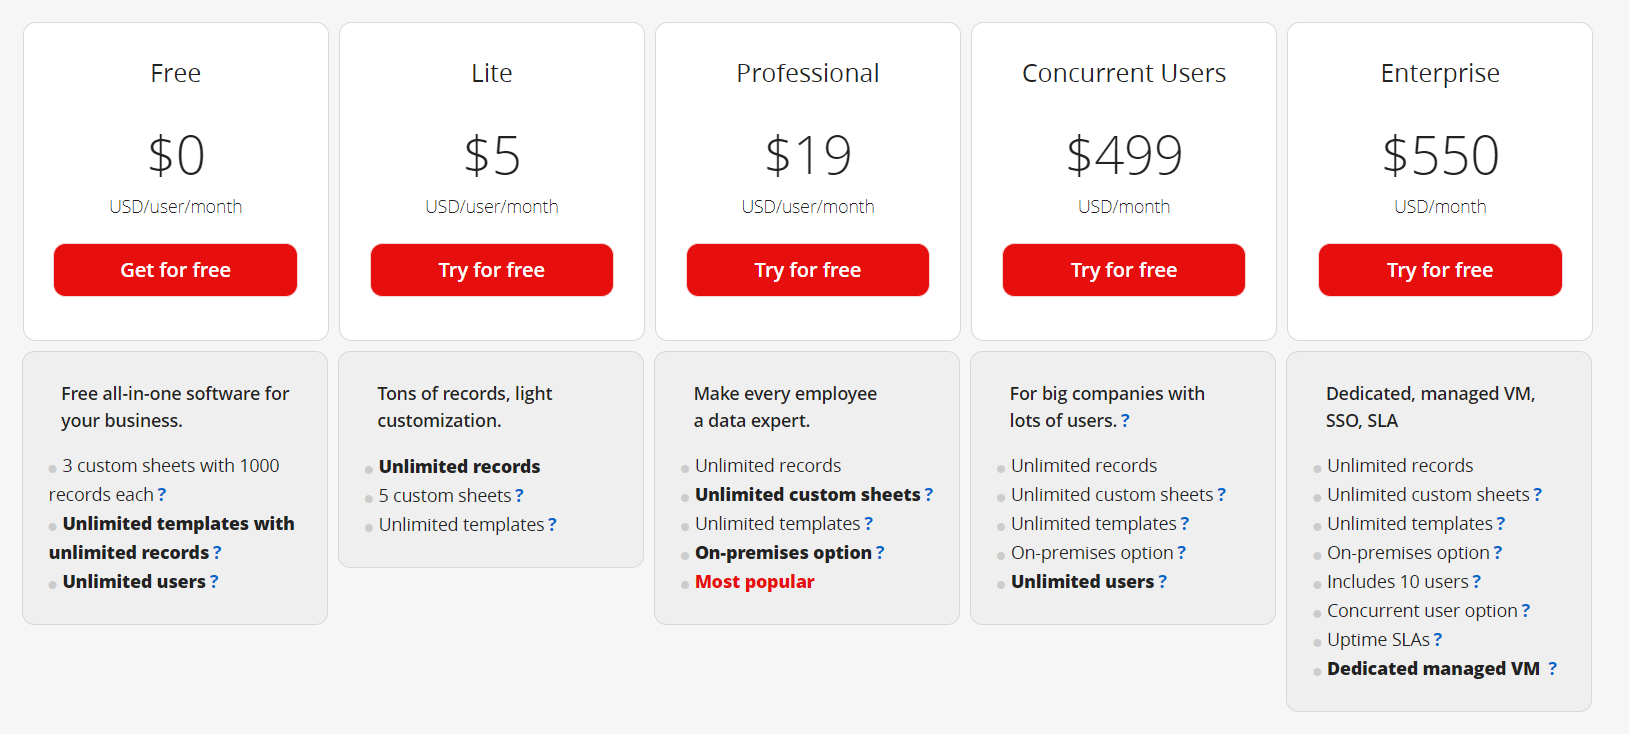
This article will outline Ragic's various free plans and the trial options available for its paid plans.
After registering on Ragic without any additional payment, you can permanently access the majority of the database features and add an unlimited number of users.
The limitation of the Free Plan is the quantity of "sheets and records". Customized sheets (sheets that are created entirely from scratch or installed from the templates store, with modifications considered as custom sheets) are limited to a maximum of 3 sheets, and each sheet can have up to 1,000 records. If this limit is exceeded, the system will prompt you to either delete them, or upgrade to a paid plan to continue usage.
If you are not familiar with the definition of "sheet", please refer to this page.
Who is suitable for this Permanent Free Account? The limitation of it lies in the quantity of customized sheets and records. Therefore, we believe it is suitable for those who want to create straightforward applications, have low usage, or simply need to use the free templates.
If you are considering using paid plans, it is better to thoroughly test the features with the free trial period before making a payment. Ragic offers a one-time 30-day trial for every new database account. For eligible users, when you access the account billing page, you will see the "30-Day Free Trial" button on the pricing plans. Clicking on it will activate your free trial period (no need to enter credit card information). We recommend directly trying the Professional Plan that includes all features.
If the trial period expires, but you haven't completed your testing, we also offer an extension. Simply share information about Ragic on social media, and then apply for an extension through this link. Once your application is approved, the trial period will be extended.
After the trial period expires, your data will not be deleted. You just need to choose between downgrading to the Free Plan or subscribing to paid plans. You can subscribe in account billing page. If you choose to pay before the trial period expires, the remaining days of the free trial will not be lost.
This feature is primarily designed to allow users to fully experience Ragic without limitations on the number of forms and with the freedom to modify templates before purchasing. We do not encourage attempting to exploit free trials to save money. Once in formal use, we do not accept requests for extending trial periods.
Community Version caters charitable purposes. In the internet age, there's a demand for platforms facilitating information exchange. This could be for practical purposes such as exchanging items, sharing salary information, or for compiling beneficial information for public, such as a list of foods identified with safety issues or sharing experiences in applying to schools. We offer a free plan for these public-benefit applications.
As long as your platform is completely accessible for public (you cannot set certain records to be visible only to specific users), you can apply for the Community Version. Similar to the Free Plan, the Community Version is a permanently free account. However, unlike the Free Plan, it does not have limitations on the number of sheets and records. To apply for Community Version, click here.
Note that when using the Community Version, we will not allow you to set permissions restricting access to specific users. Additionally, clicking on the homepage will redirect to the Ragic homepage. Therefore, this version may not be well-suited for internal data management for business.
In order to encourage the use of Ragic for teaching, we provide free Learning Account licenses for students in any course that utilizes Ragic as material. As long as the instructor provides necessary information such as the start and end dates of the semester, student email domains, etc., we offer free licenses for students throughout the course. This enables students to directly utilize the Professional Plan features of Ragic, providing them with comprehensive resources for learning. For more details, please refer to this article.
It's important to note that this is free only during the semester – it is not a permanent free account. Additionally, this option is applicable only when using Ragic as lecture material. For educational organizations managing student data and performing administrative tasks using Ragic, please choose a suitable plan based on your usage. We offer 30% discount for NGO and educational organizations for Professional Plan and above.
If you have any other questions, feel free to email support@ragic.com.
Here's a guide to help you choose the paid plan that suits you best.
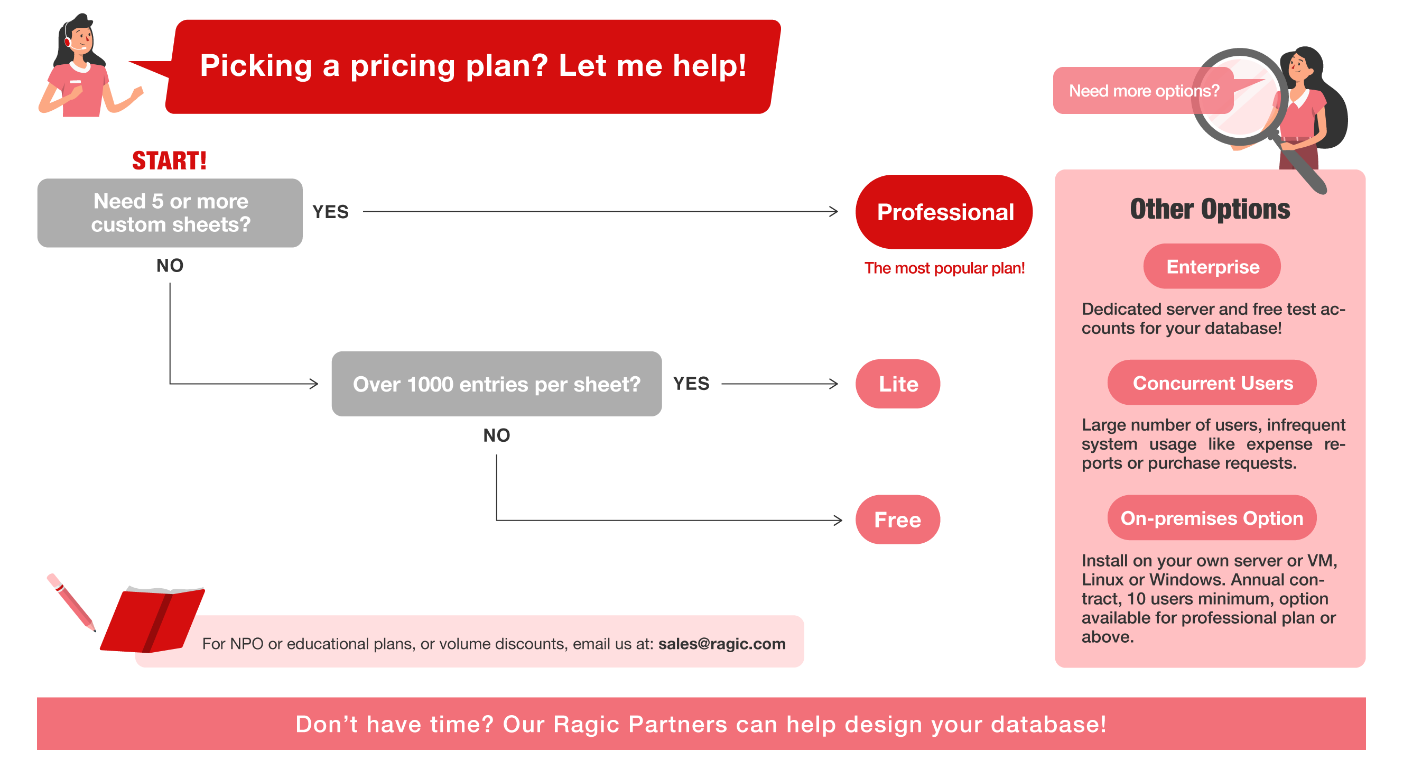
When you swipe to the right in a subtable row, icons for view and delete will appear. Clicking on them allows you to view the record or delete it.
Clicking on a subtable field to directly edit the content.
Android interface:
iOS interface:

