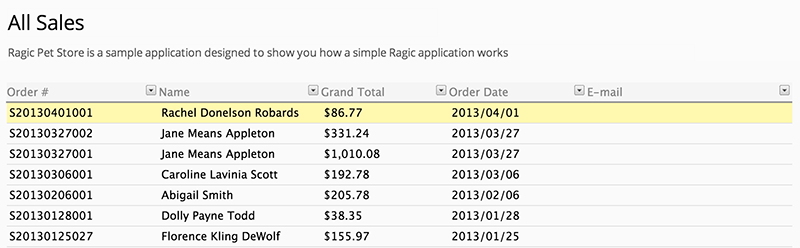
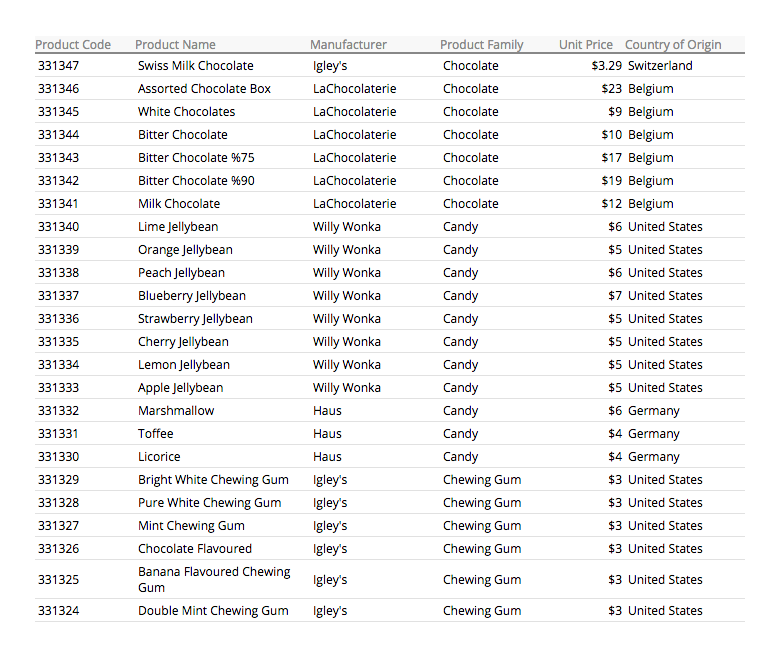
A Listing Page is a table that contains the summary of many entries.
Clicking on an entry row in the listing page will take you to the form page of that particular entry.
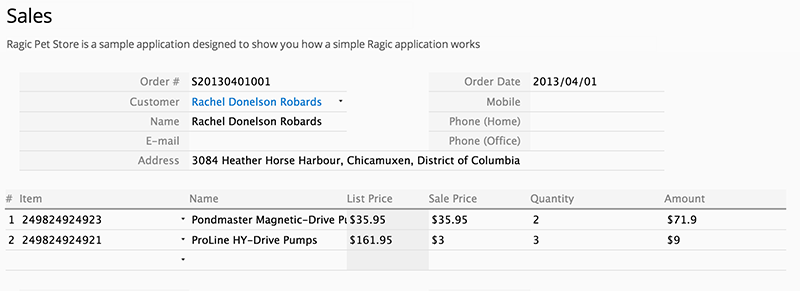
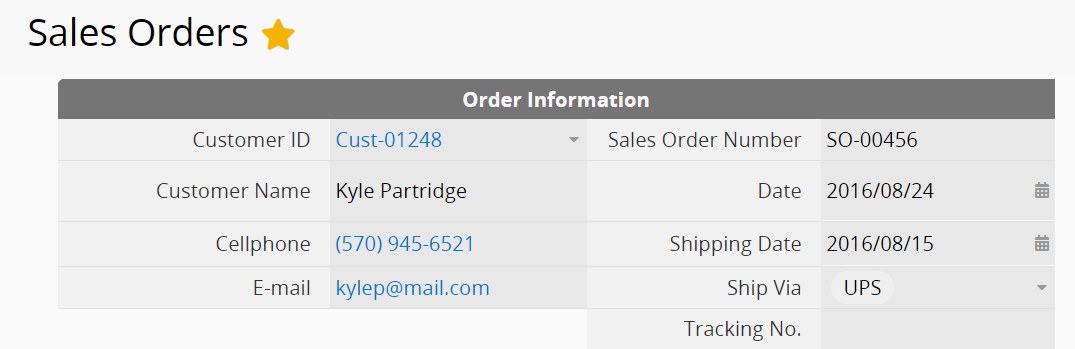
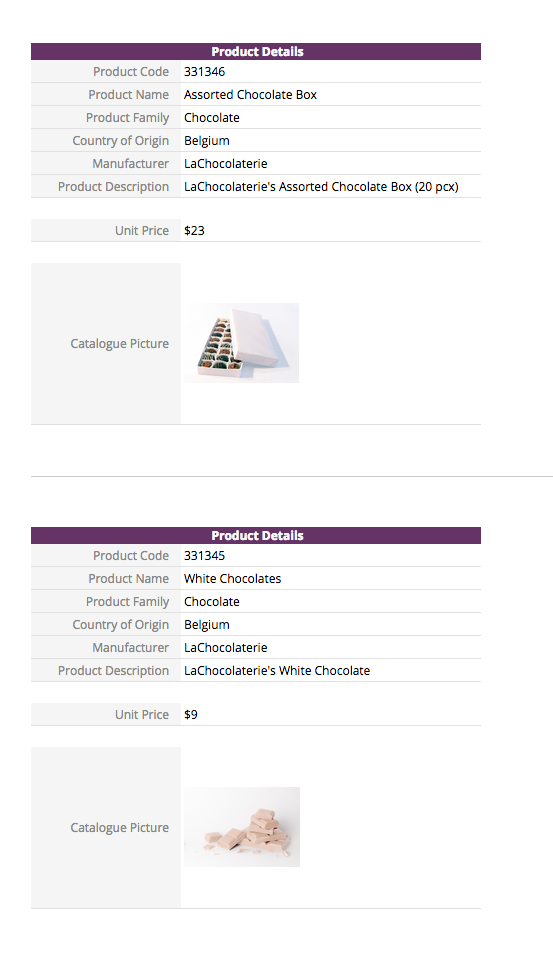
A Form Page is the full detail of a single entry as a page.
You can easily go back to the listing page by clicking the arrow icon on the upper left.
Entries that are made in form pages will be displayed as rows on the listing page, and the fields that are set for the entries are shown as the column headers, with the values of these entries listed in the correlating row of the entry. Clicking on an entry on the listing page will take you to the form page of this entry, where you can see the full detail.

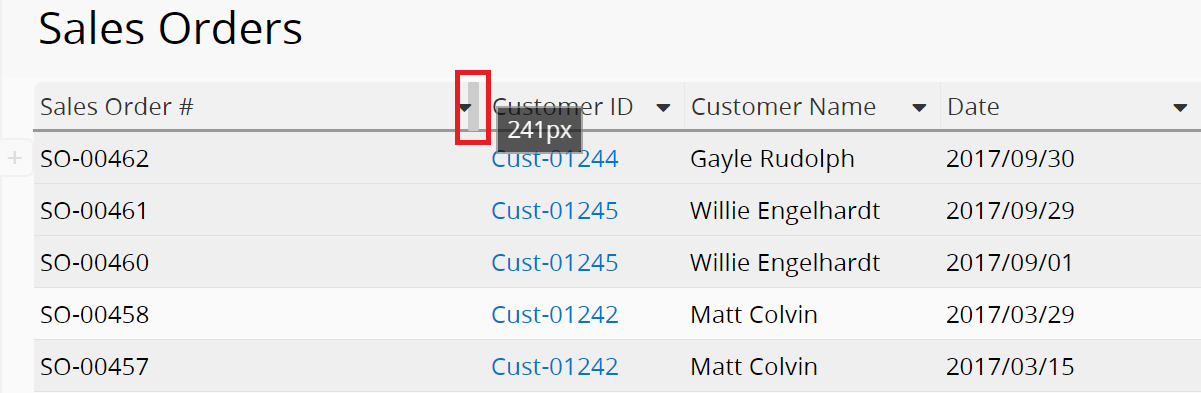
On Listing Page, you can adjust the width and height of the field.
To adjust the field width, drag the vertical border of the field header to the left or right.
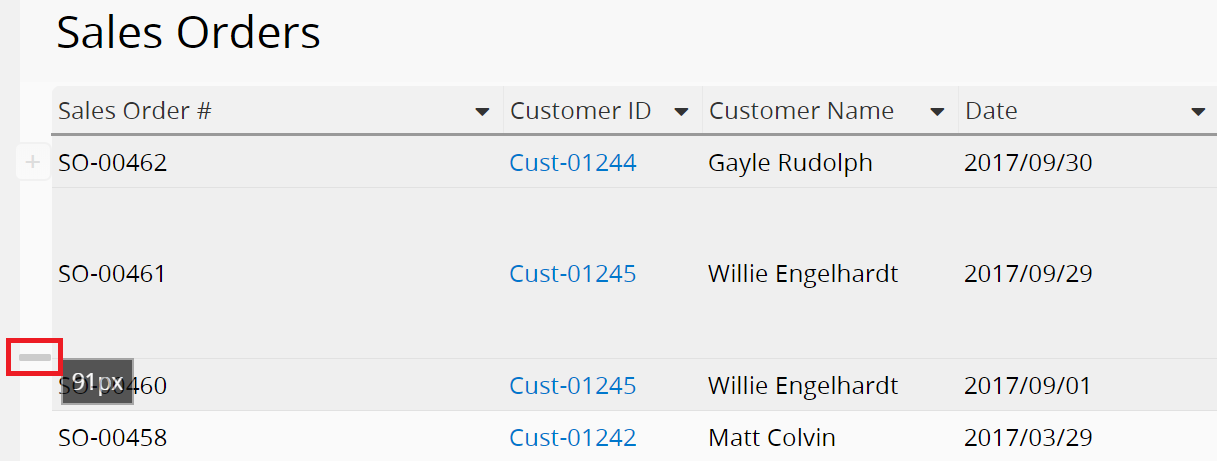
To adjust the field height, drag the horizontal border of the leftmost field of the table upwards or downwards:
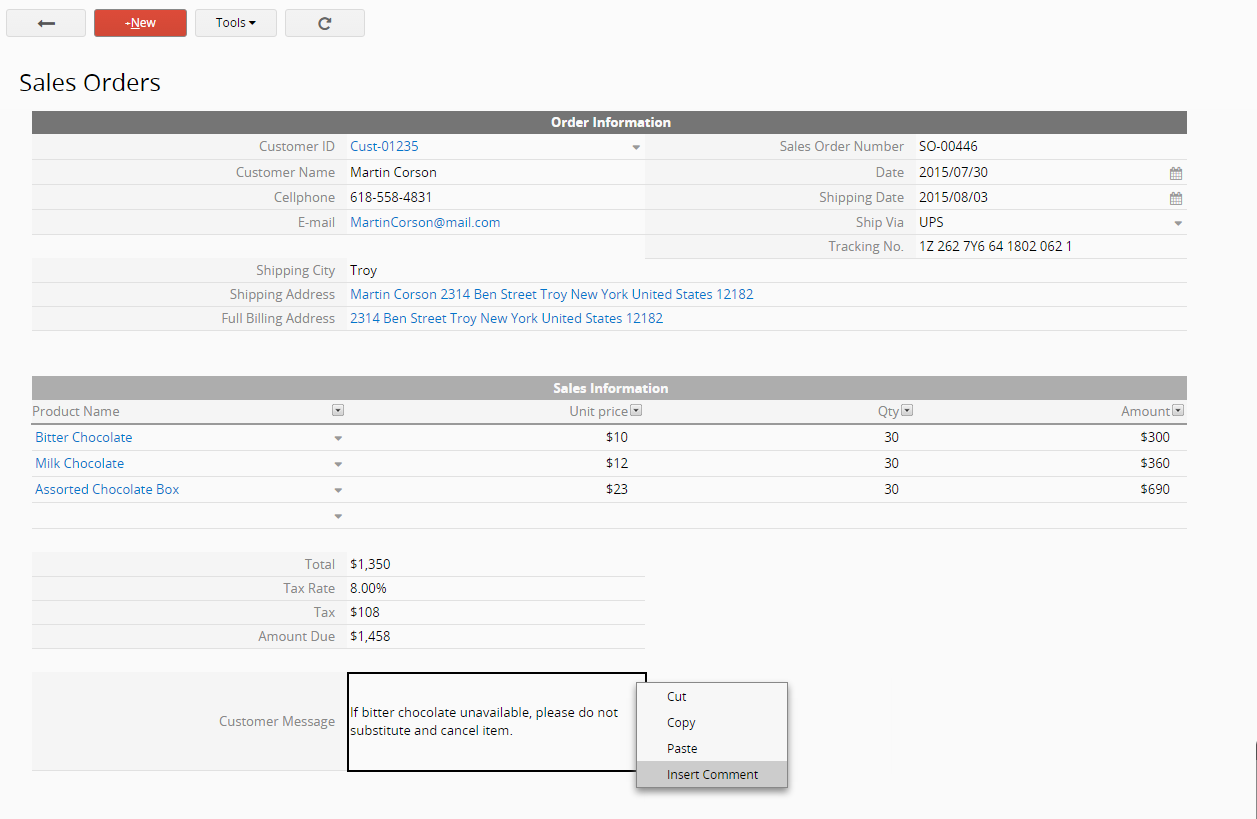
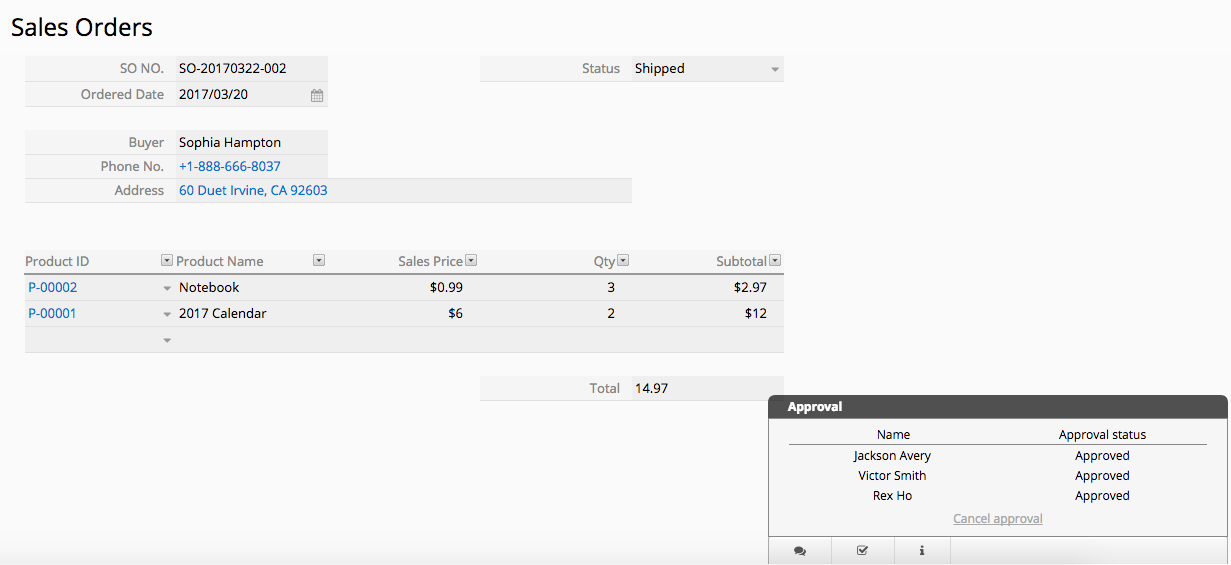
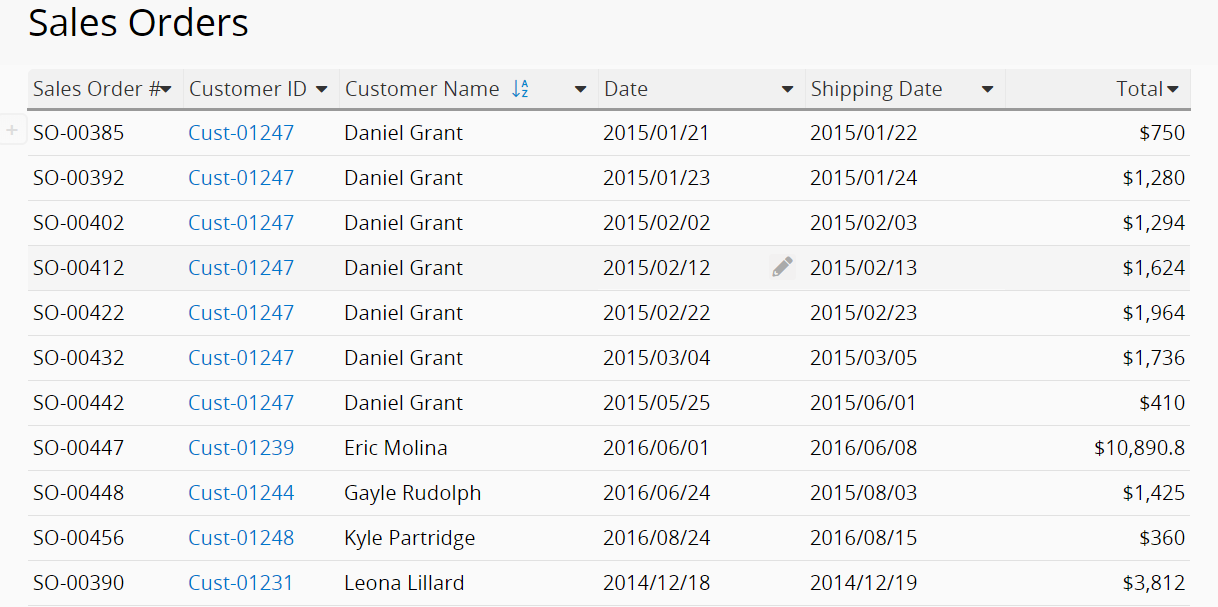
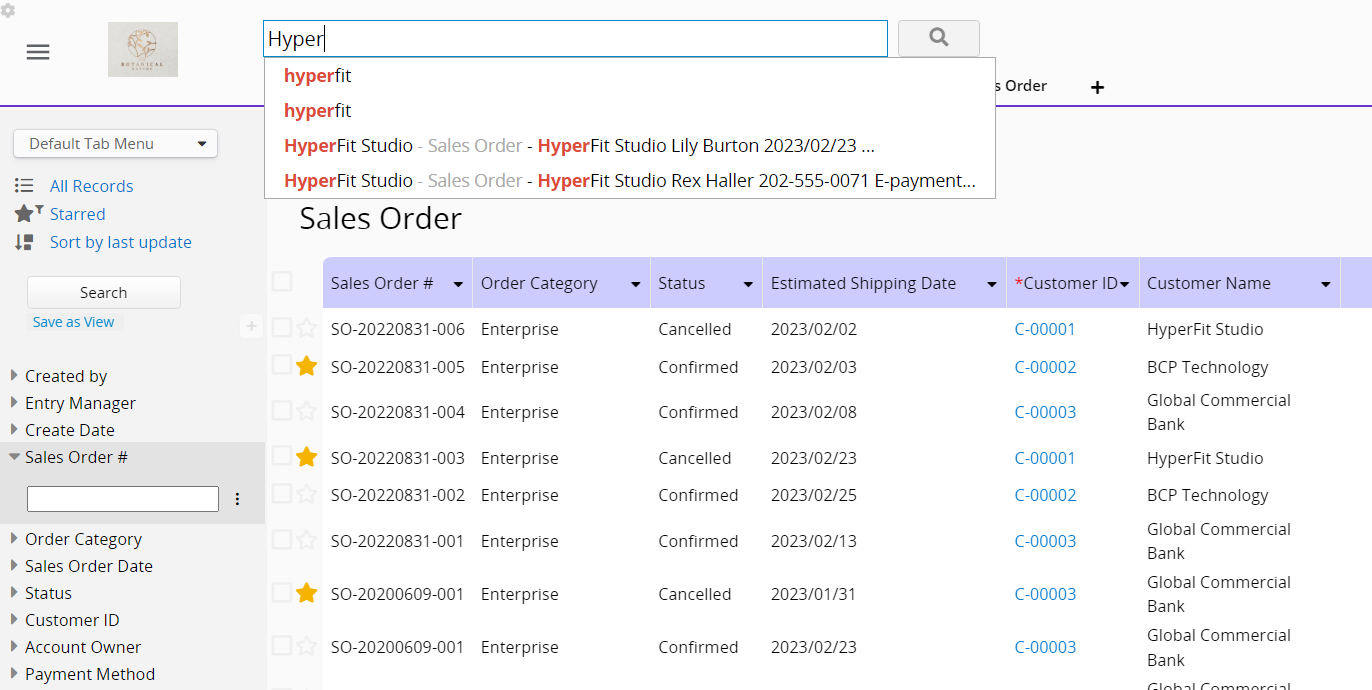
In the example below, clicking on the sales order entry in the listing page takes us to the form page of that particular sales order, where the ordering customer and a detailed breakdown of the ordered products can be seen.
If you don't see "+New" button on your sheet, it may be related to the access rights you are granted. If you have any questions about your access rights or not being able to add entries on a sheet, please contact your SYSAdmin of the database to check for the proper access rights configurations.
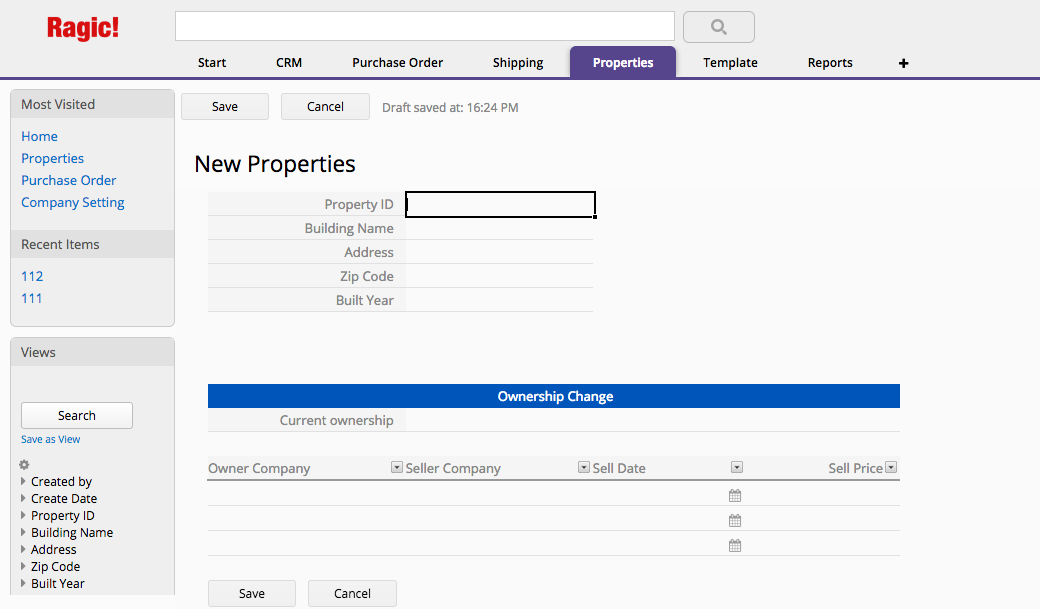
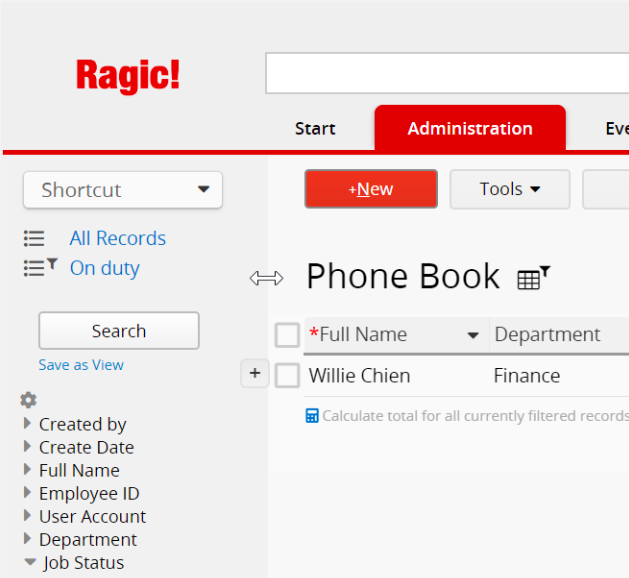
To add a new entry to a sheet, you can click on the +New button on either the listing page or form page.
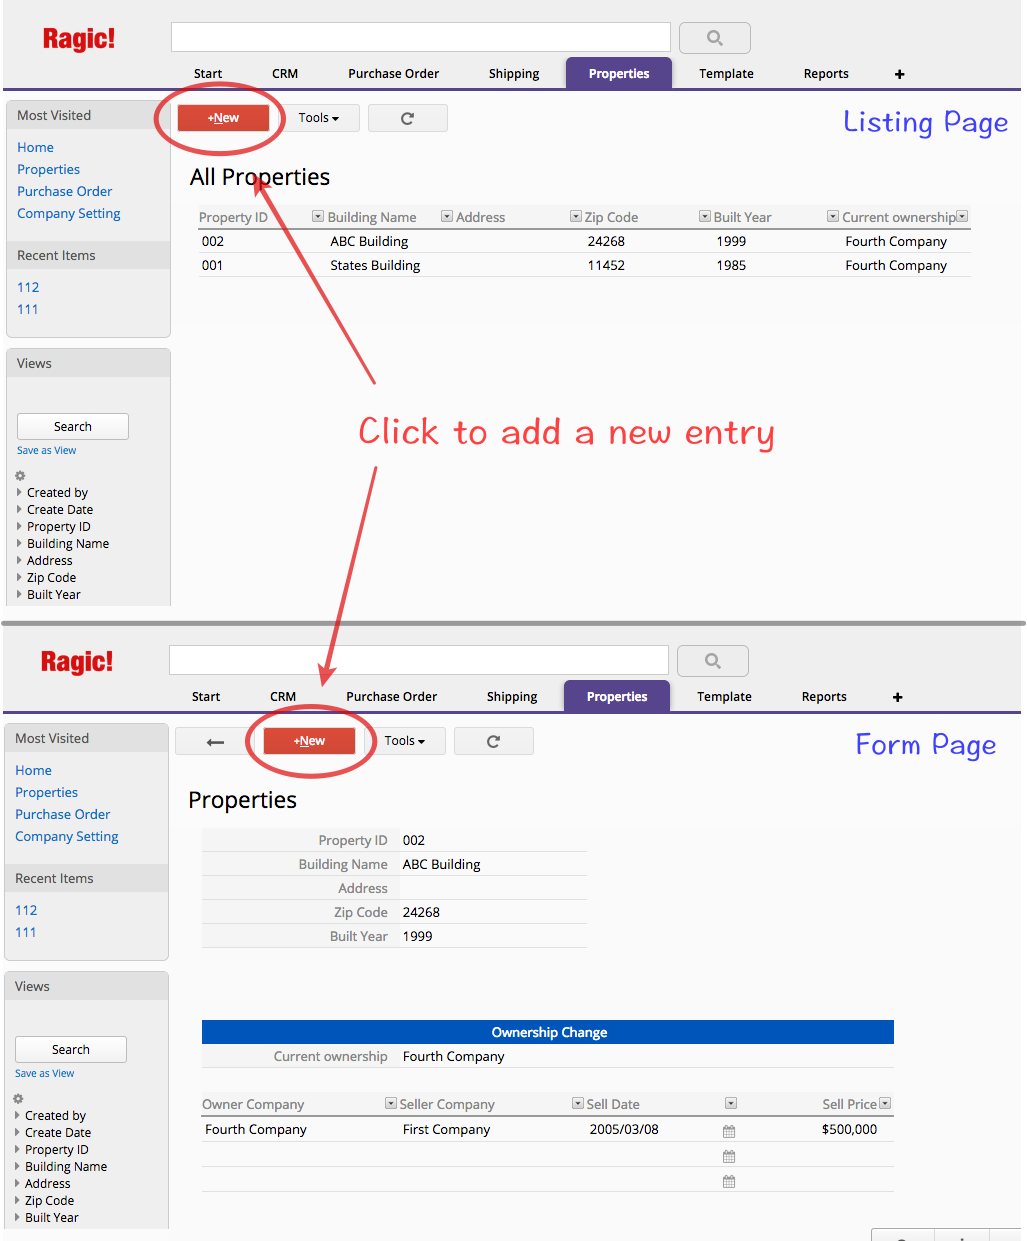
This will take you to a new blank form page, in which you can input data.
You can directly paste a clipboard image into Free Text and Rich Text Editor fields. (It's extremely convenient that you can paste your screenshot directly when it's saved in your clipboard.)
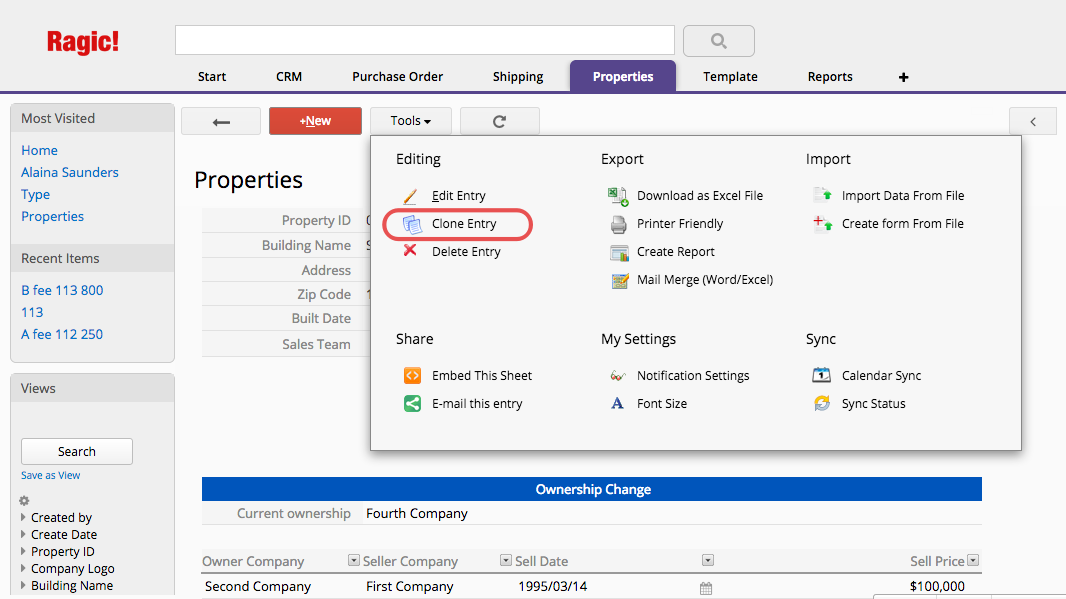
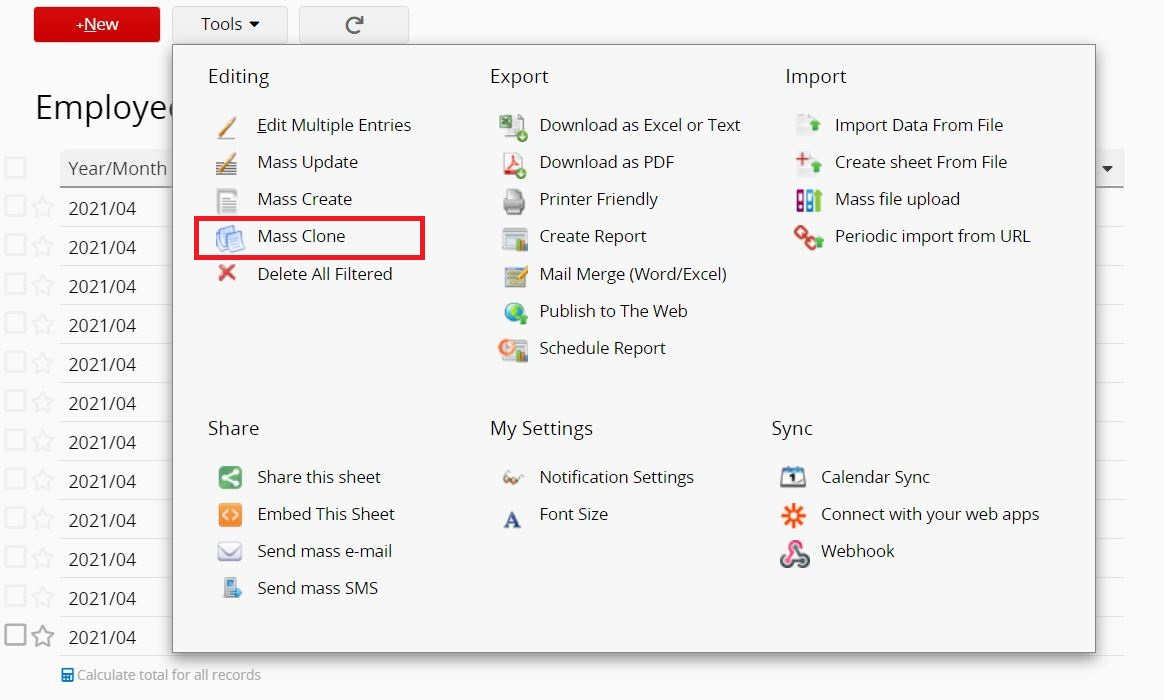
If you would like to create a new entry based on an existing entry, in order to save time for duplicated information, click on the Clone Entry under the Tools menu to copy an entire entry. (Some restrictions might apply, depending on how your feature access right on the sheet was set up by your SYSAdmin.)
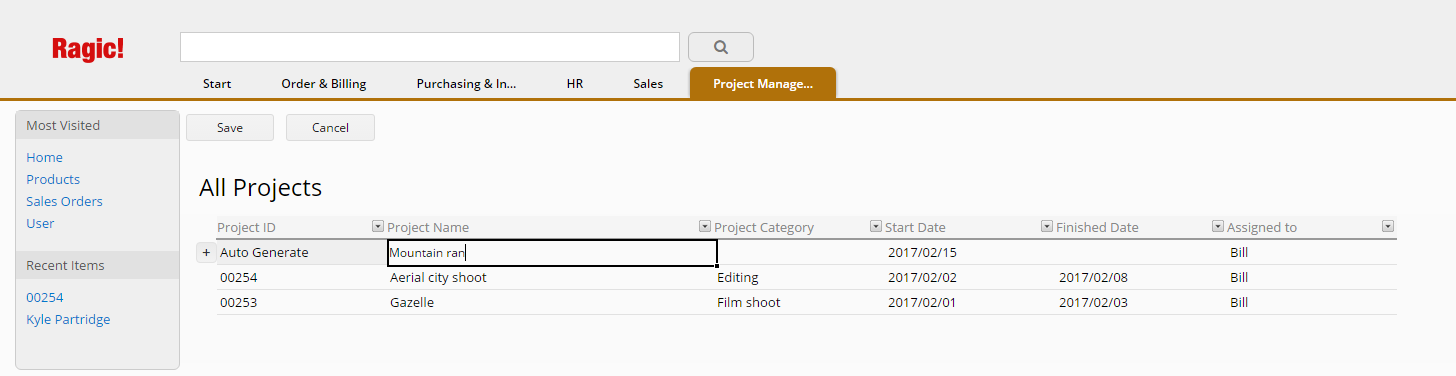
You can click the + icon on the left side of your top row to add a new entry to your database sheet through your listing page.
![]()
This will create a new empty row at the top of your listing page, where you can type in values, or select values according to the field types.
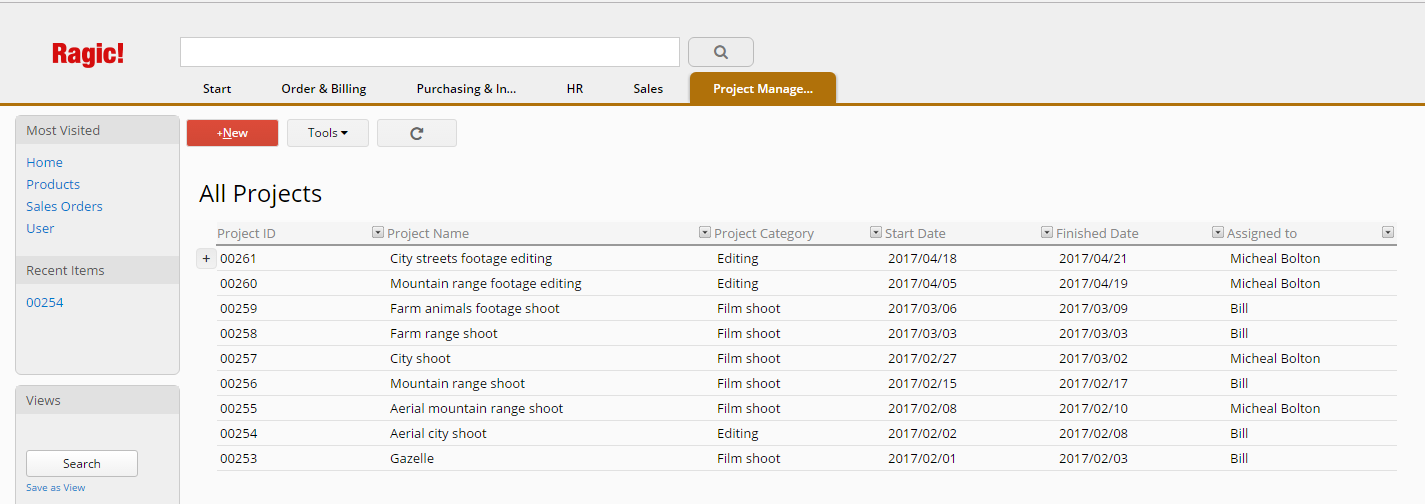
Don't forget to click Save button on the top of your listing page in order to save your new entry.
Note: If you have autogenerated fields, default values on your fields, or fields that have a formula on your form that are displayed on your listing page, these fields will be populated by Ragic.

On the other hand, if you do not want to display these fields on your listing page, restrictions might apply. See Exceptions below.
To add multiple rows at the same time, click the + icon as many times as you need without saving your previous entries.
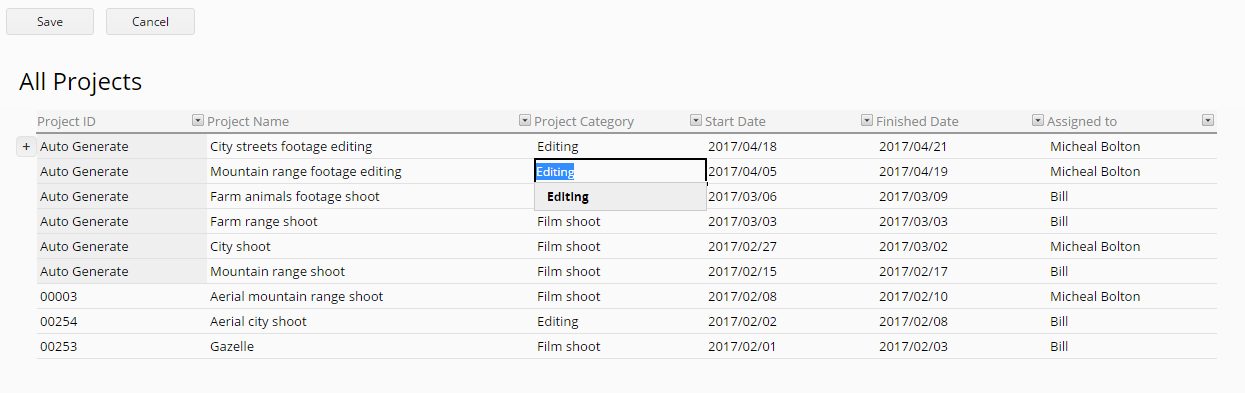
Don't forget to click Save in order to save your new entries.
Some restrictions apply for forms that require certain actions to be done through the form page instead of the listing page, and will not allow you to use the Quick Add function by disabling the + button. In the following cases, you will be asked to do data entry on the form page instead.
• The form page has a field with the Not Empty attribute set.
• The form page has a field with the hidden attribute set that's not in the listing page.
• The form page has a field with the default value set that's not in the listing page.
• The form page has a field with an autogenerated field value field type that's not in the listing page.
• The form page has a field with a formula, that's not in the listing page.
• The sheet has a pre-workflow or post-workflow action that has been set in the back end with the server-side Javascript workflow engine.
• Accessing the sheet as Bulletin User or Viewer.
Ragic gives you several options to add new entries by importing your data, provided you have the necessary access rights.
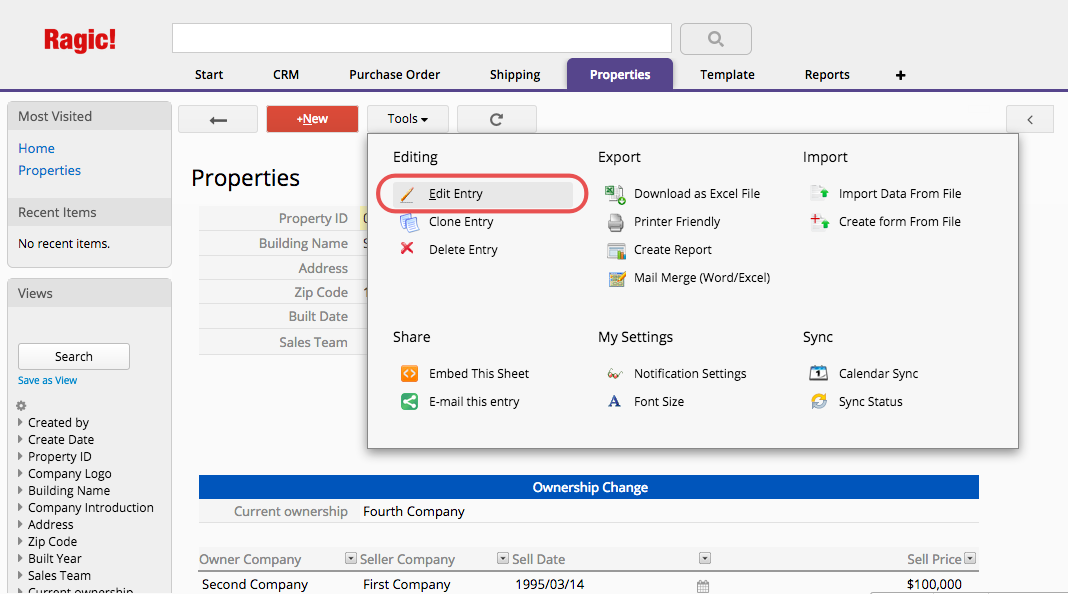
When you are on the form page of an entry, and you would like to edit this entry, either double clicking on the field value, or pressing F2 will take you to the editing mode. You can also navigate from Tools > Edit Entry.
You may update the field values just like the way you would with other forms. If you would like to clear a field value while editing, including text or uploaded files, you can click on that field and press delete or backspace. In addition, Autocomplete (popping-up related selections in the drop down menu when typing characters in the field) is supported in Selection, Multiple Select or Select from other sheet field types.
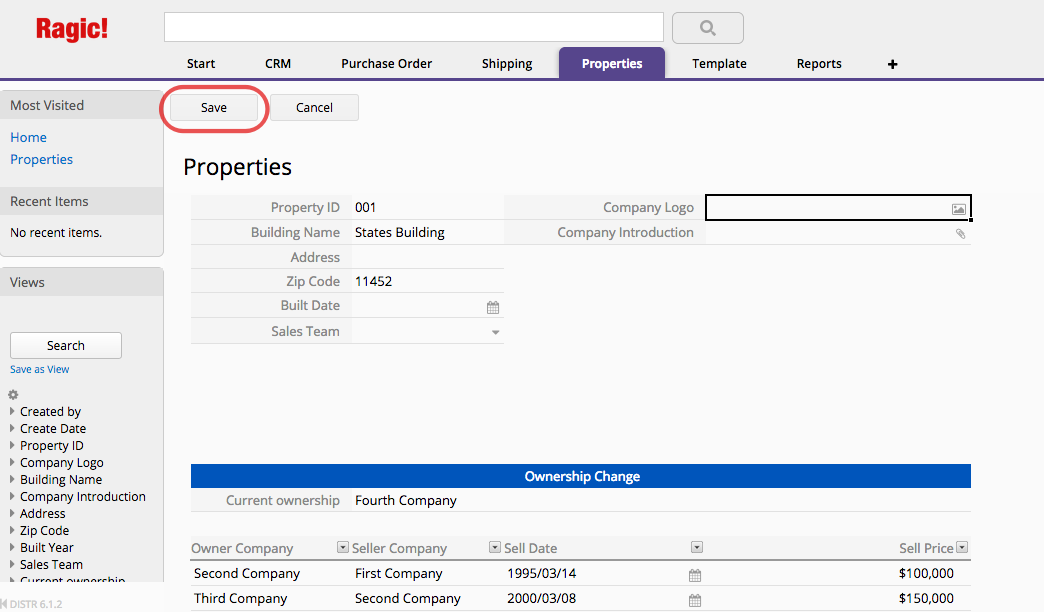
Remember to save all changes before you leave the editing mode via the Save button at the upper-left corner.
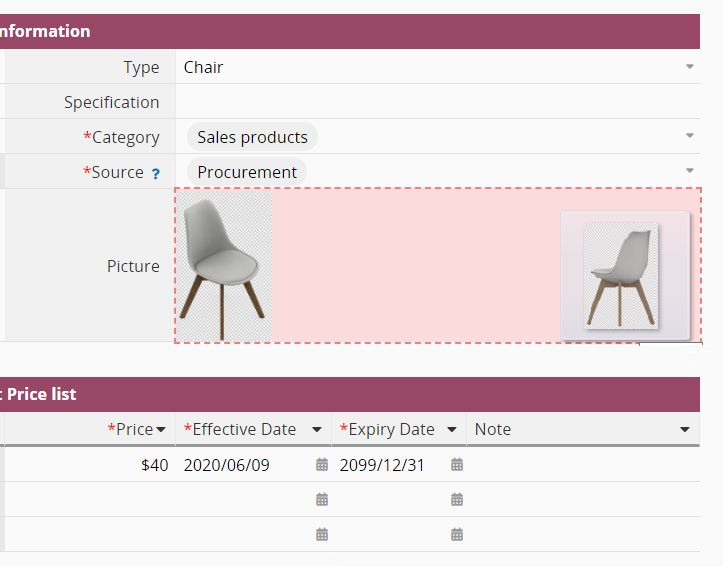
To upload a file, you can find and select it from your computer or drag and drop it into the field.
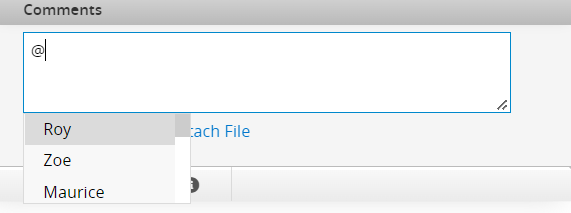
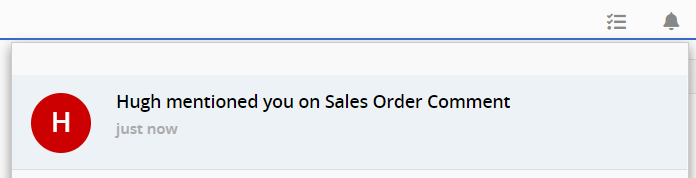
When the entry is saved, the user you mention will receive a notification and an E-mail notifying that they are mentioned in an entry by someone. If the user clicks the notification or the link in the E-mail, it will navigate to the entry, allowing the user to confirm the data, comment, and communicate with teammates. Users will be notified multiple times if they are repeatedly mentioned.
It is also worth mentioning that if a user does not have access rights to a sheet, you can still mention them in the entry, but they would not receive the system notification and the notification E-mail. Therefore, please make sure that the user has access rights to the sheet before using @mention.
If you don't see any options featured below on your database sheets, it may be related to the access rights you are granted. If you have any questions about your access rights or not being able to modify entries on a sheet, please contact your SYSAdmin of the database to check for the proper access rights configurations.
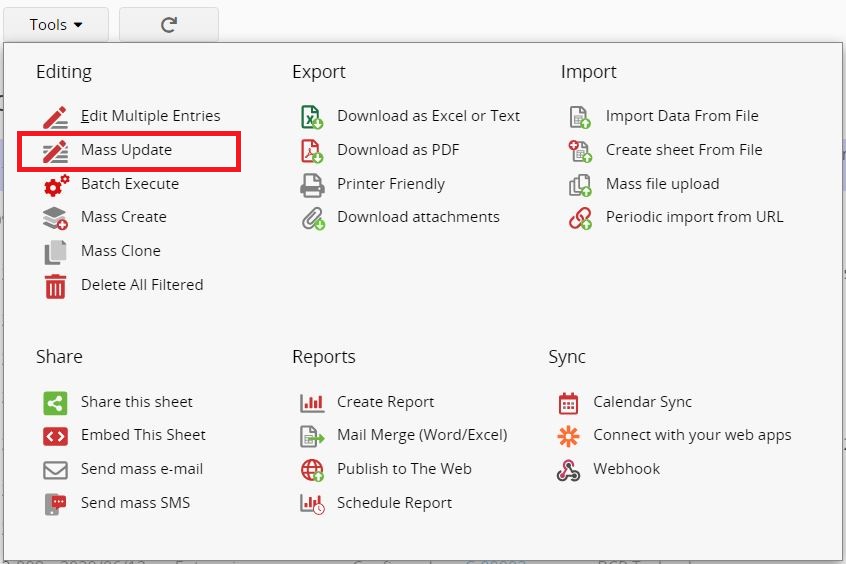
If you have Admin or survey user access right on the sheet and would like to mass update your records for updating a field with same values, replacing a certain string with other string to all filtered entries, you may use Mass Update.
Update can help you update all records with certain values, and only filtered records will be edited.
After clicking the Mass Update option under the Tools menu, you will be presented with a pop-up window where you can choose a field to be updated and enter a new value for the field.

During this step, if your field is a selection field, please make sure that you're using the same spelling as your value options in your database design. If you are updating more than one field value for the same filter, you can add new options with the + sign.
After confirming, your mass update will start. The database will update in the background. During this time, you may proceed to use the database.
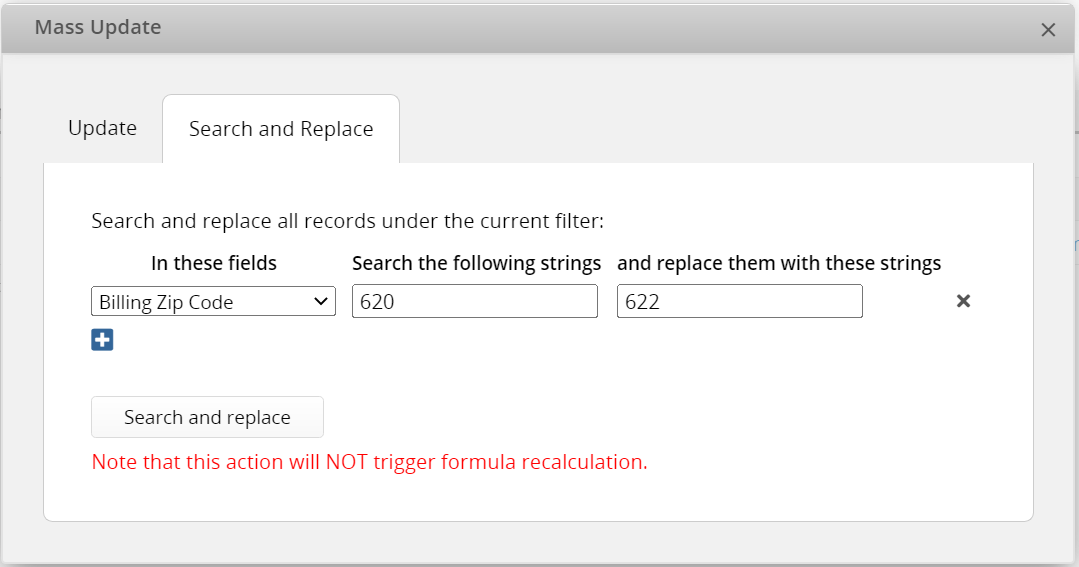
Search and replace helps you search for certain strings in a Free Text Field and replace them with other strings. Please note that if filter is applied to the field, only the filtered records will be edited.
Click the Mass Update option under the Tools menu and select Search and replace. You will be presented with a window where you can choose a field to be updated. Then, enter the strings you want to search and the strings you'd like to replace them with.
If you are updating more than one field value for the same filter, you can add new options with the + sign.
After confirming, your mass update will start. The database will update in the background. During this time, you may proceed to use the database.
Note: Please keep in mind that the detailed history of the data modification done by this feature won't be recorded into entry information.
If you don't see any options featured below on your database sheets, it may be related to the access rights you are granted. If you have any questions about your access rights or not being able to modify entries on a sheet, please contact your SYSAdmin of the database to check for the proper access rights configurations.
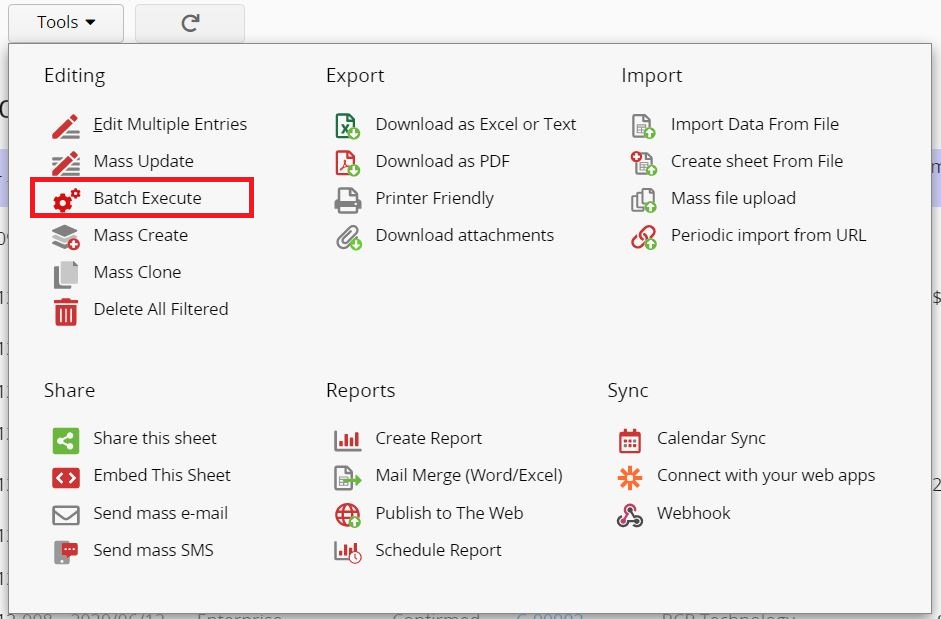
If you have Admin or survey user access right, you will be able to execute action button, lock/unlock, approval or mail merge to all filtered entries, by using Batch execute.
You can execute action button to multiple records through this feature, for example converting multiple sales orders to delivery notes. Please note that if filter is applied to the field, only the filtered records will be edited.
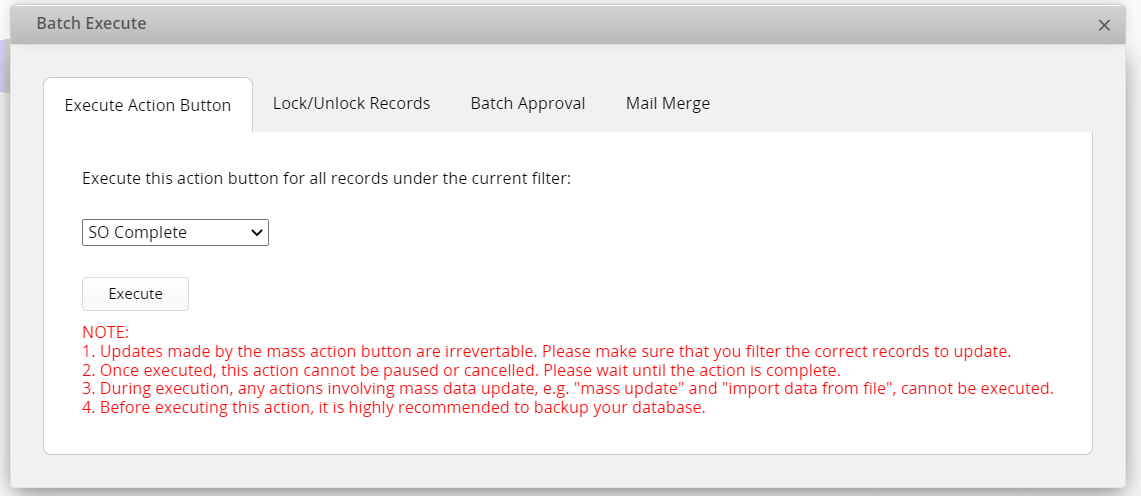
Select Execute action button. You will be presented with a window where you can choose the action button to execute. Before executing the action button, please note that:
1. Updates made by the mass action button are irrevertable. Please make sure that you filter the correct records before updating.
2. Once executed, this action cannot be paused or cancelled. Please wait until the action is complete.
3. During execution, any actions involving mass data update, e.g. "mass update" and "import data from file", cannot be executed.
4. Before executing this action, it is highly recommended to backup your database.
After confirming, your mass update will start. The database will update in the background. During this time, you may proceed to use the database.
Once the update is completed, you'll see a notification at the lower-left corner.
You can lock or unlock multiple records through this feature. Please note that if filter is applied to the field, only the filtered records will be edited.
Select Lock/Unlock Records.
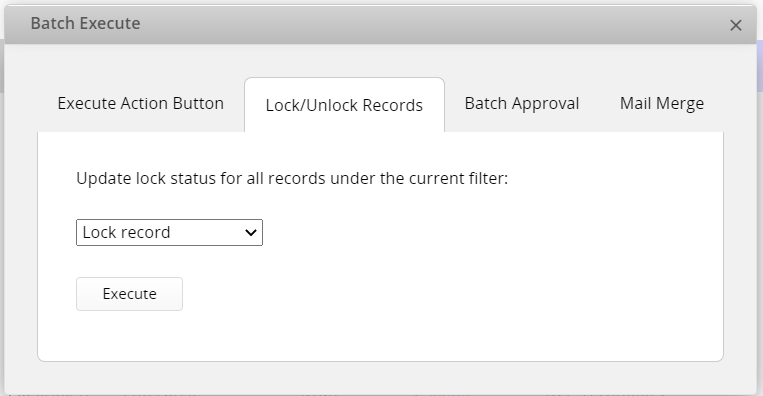
After confirming, your mass update will start. The update will run in the background so you may proceed to use the database.
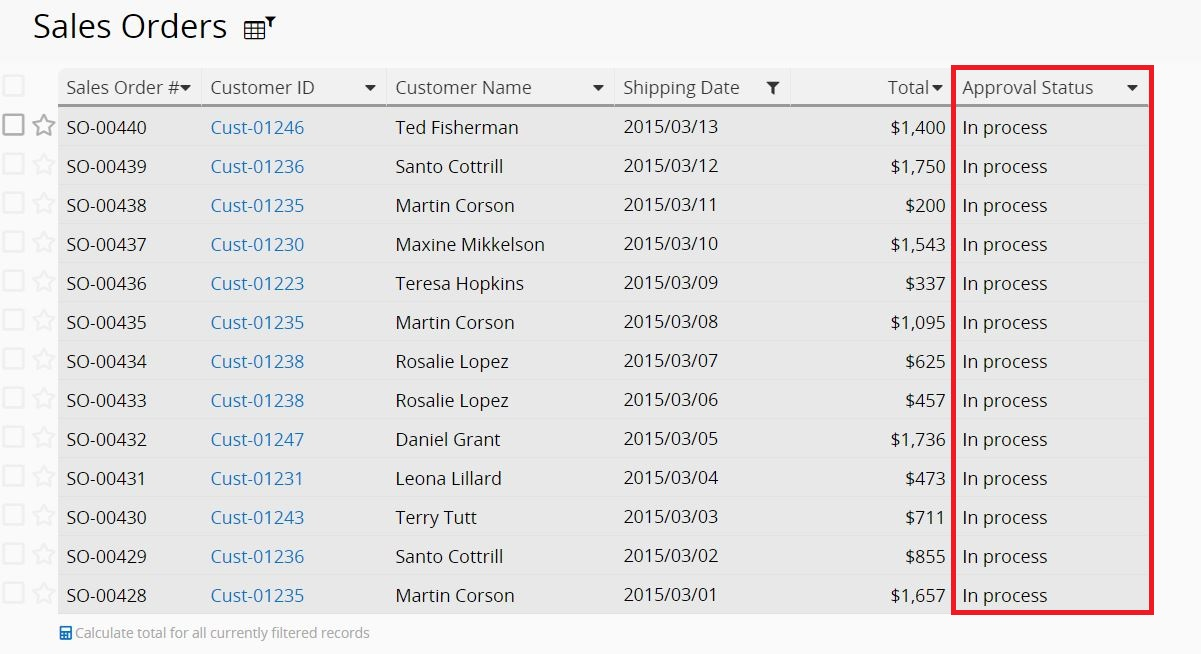
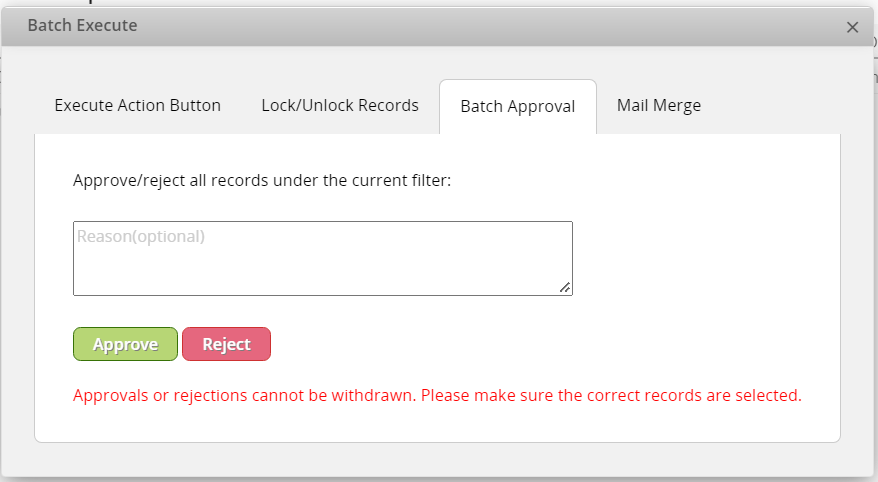
You can batch start filtered records' approval through this feature.
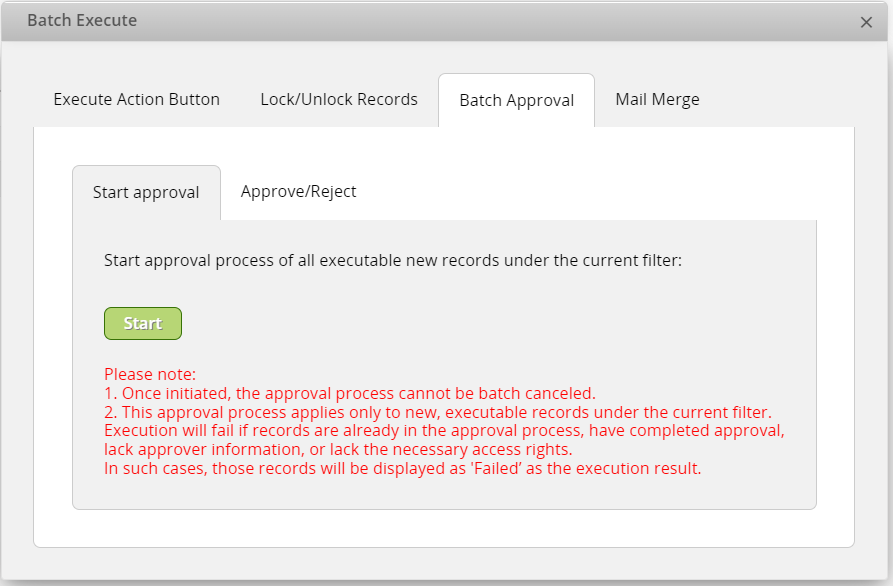
Please note:
1. Once initiated, the approval process cannot be batch canceled.
2. This approval process applies only to new, executable records under the current filter.
3. Execution will fail if records are already in the approval process, have completed approval, lack approver information(when the approver needs to manually select), or lack the necessary access rights. In such cases, those records will be displayed as 'Failed’ as the execution result.
You can batch approve or reject filtered records "in the approval process" through this feature.
Select Batch Approval.
After confirming, your mass update will start. The update will run in the background so you may proceed to use the database.
Note: If there is batch approval failed message, it might result from the user who executed batch approval has no right to approve the record or the record hasn't start approval.
You can also batch execute mail merge.
Note: Please keep in mind that the detailed history of the data modification done by this feature won't be recorded into entry information.
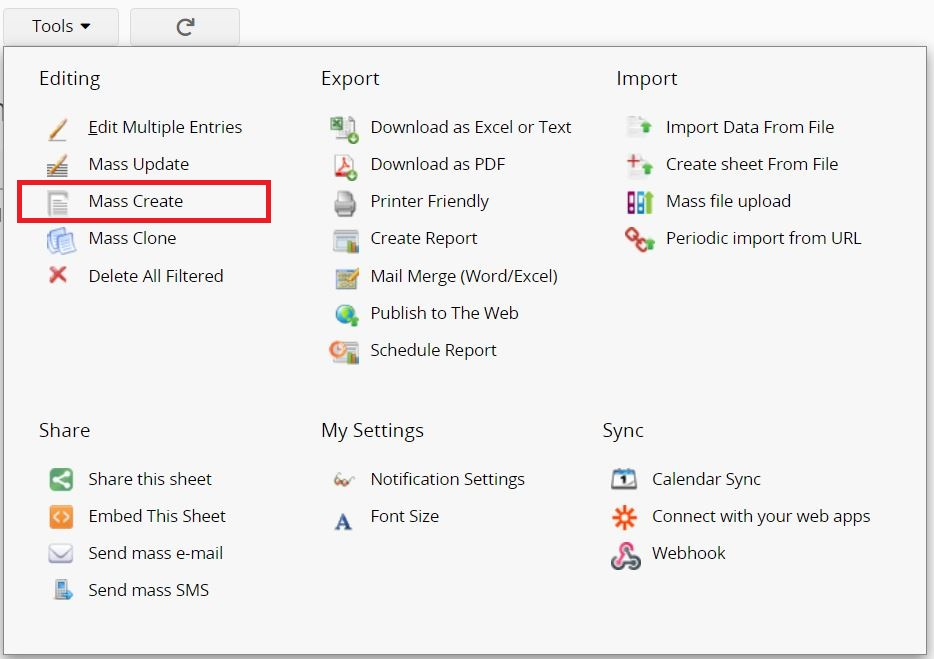
You can create a record for every number, day, week, month, year, user, option, or based on other sheet's field. In the next step, assigning the field you would like to fill with certain value.
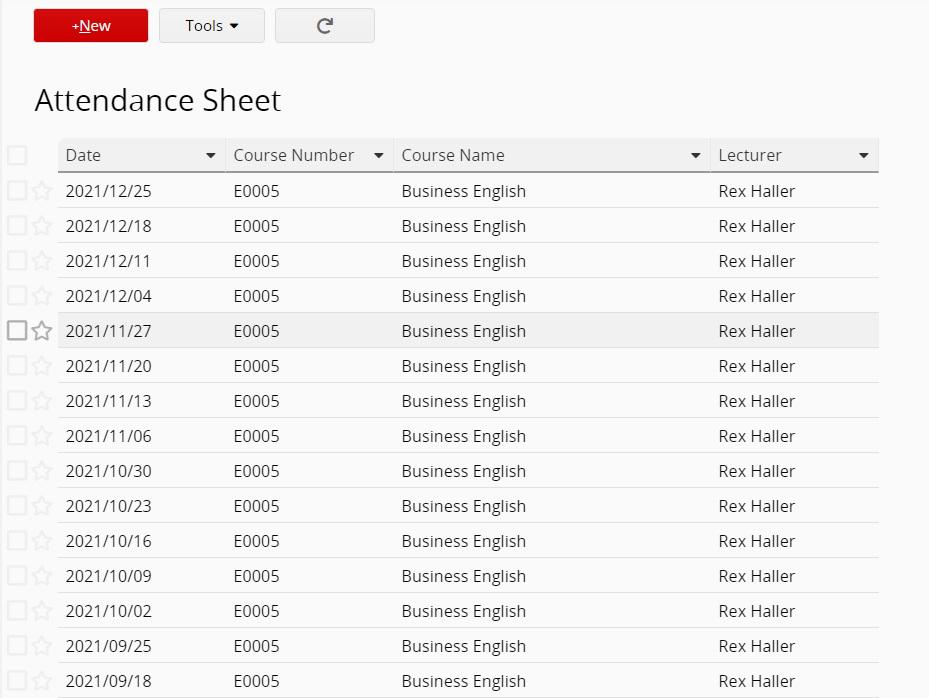
For example, you may have a "Business English" course every Saturday for one whole year. We use this feature to generate Attendance Sheet records for the whole year at once and also assign values to "Course Number", "Course Name", and "Lecturer" fields.
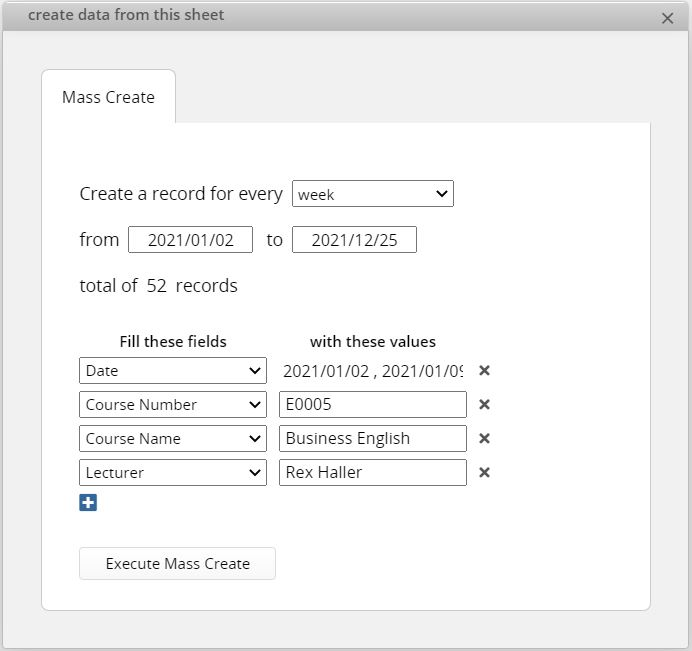
After completing the settings and executing mass create, you will easily create lots of records without manually entering them one by one or importing data from Excel.
You can create records based on the field values on the other sheet.
For instance, you would like to create records for each account in "Sales Order". And the accounts' information are in the other sheet "Accounts". Besides, you may apply filter if there are saved filters in the other sheet.

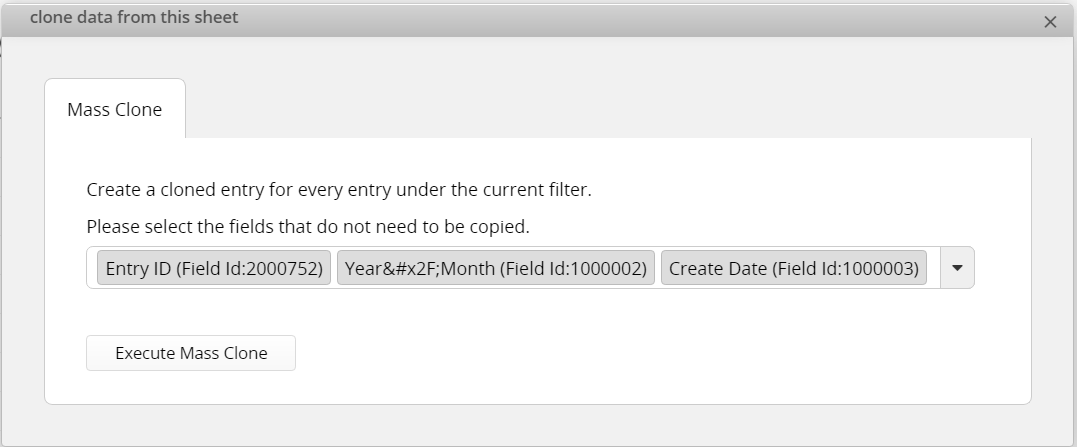
You can select the fields that do not need to be copied. In addition, you may use this tool along with other features such as formulas, default values, and link&load. This will be very convenient for you to create new batches of employee payrolls.
Navigate to the form page of the entry you would like to delete, by clicking on the entry in the listing page.
Click on the Tools button in the form page, and select Delete Entry.

You can use filters on the left sidebar search tool, the top search bar, or through field headers to view all the entries you would like to delete.
Click on the Tools button and select Delete All Filtered to delete all filtered entries.

To delete all of the entries under your listing page, you can select Delete All Filtered without creating a filter.
If SYSAdmin allows Fast Delete Mode, you can decide whether to use it when deleting entries.
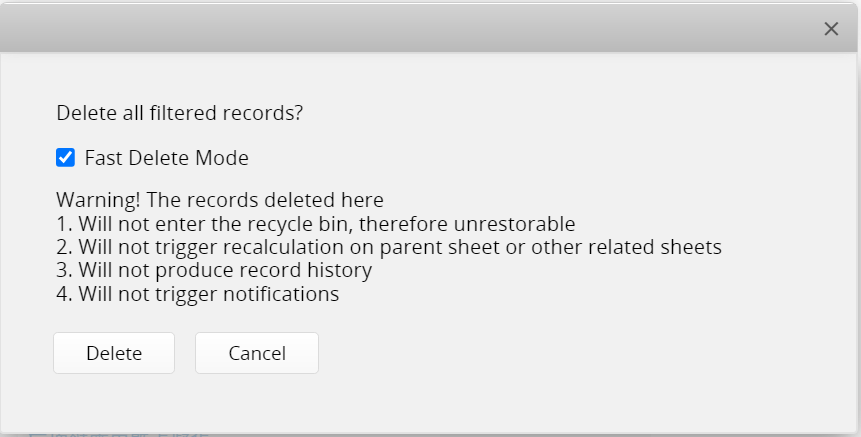
The records deleted here
1. Will not enter the recycle bin, therefore unrestorable
2. Will not trigger recalculation on parent sheet or other related sheets
3. Will not produce record history
4. Will not trigger notifications
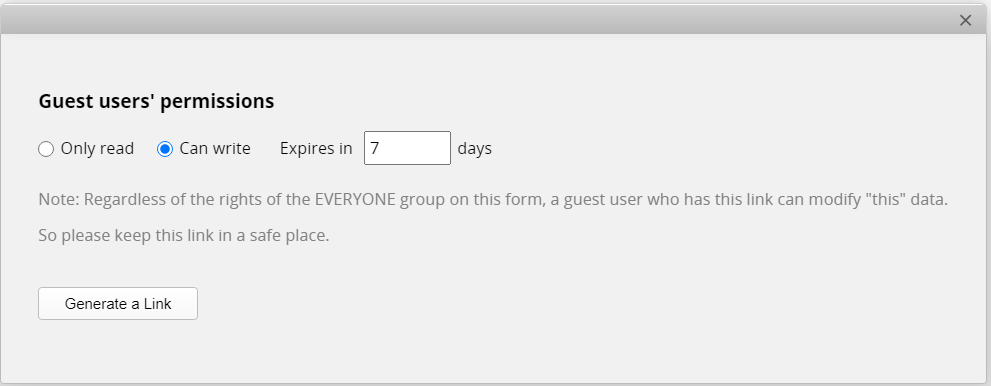
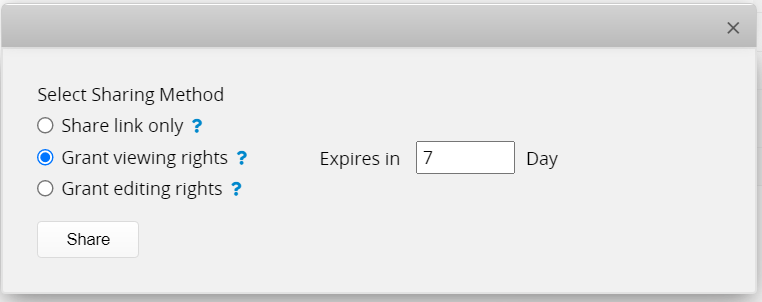
You have two options: Only read and Can write.
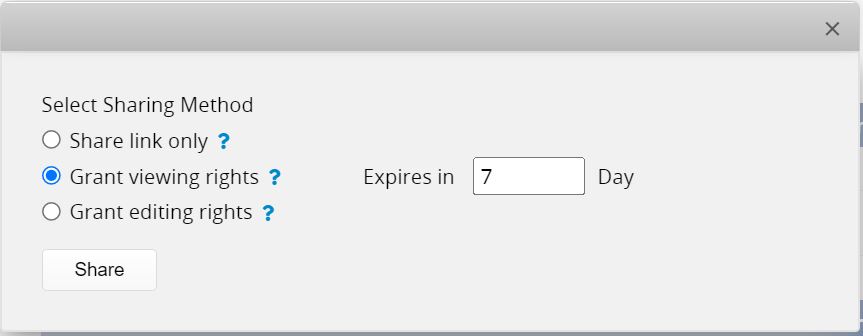
Users will only be able to view that entry if you choose Only read. If you choose Can write, they will be able to modify that entry. Besides, you can set the expiration time for the link.
Other than sharing this entry directly, you can also attach the temporary access links (read-only or editable, expire in 7 days) of this entry when you email this entry.
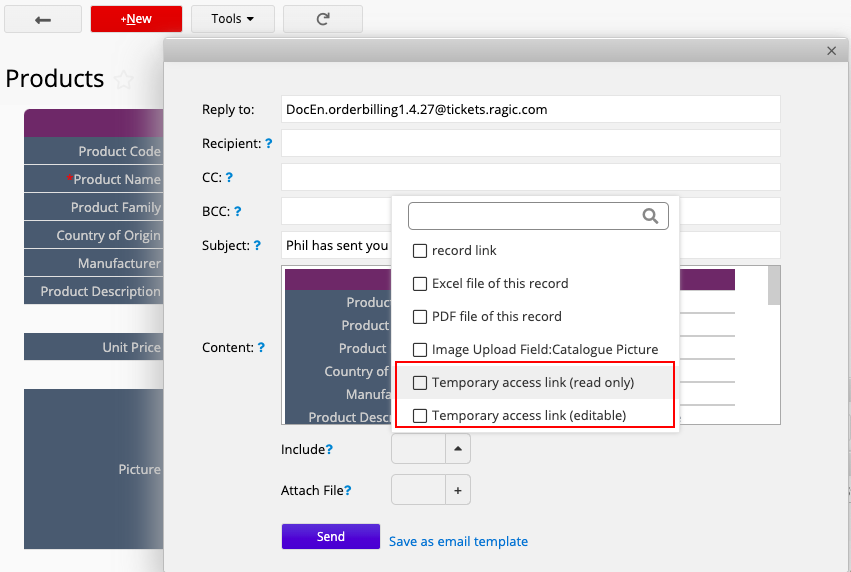
Please note that users won't be able to see other features or other entries after opening the link so you won't need to worry about your data security and privacy. Another thing is that the link will be valid for only one week.

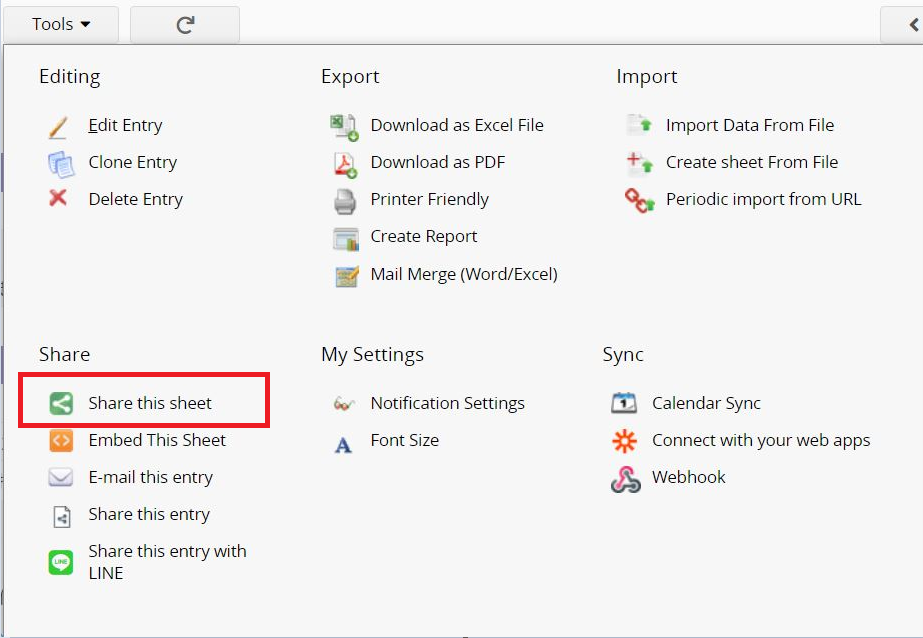
There are two ways to share, the first one is Raw sheet URL, the other one is Data collection URL. You quickly have the sharing URL and QR Code at the same time.
There are 3 sharing methods: Share link only (Receiver must have access right to this entry and must log into Ragic to access the entry), Grant viewing rights or Grant editing rights.
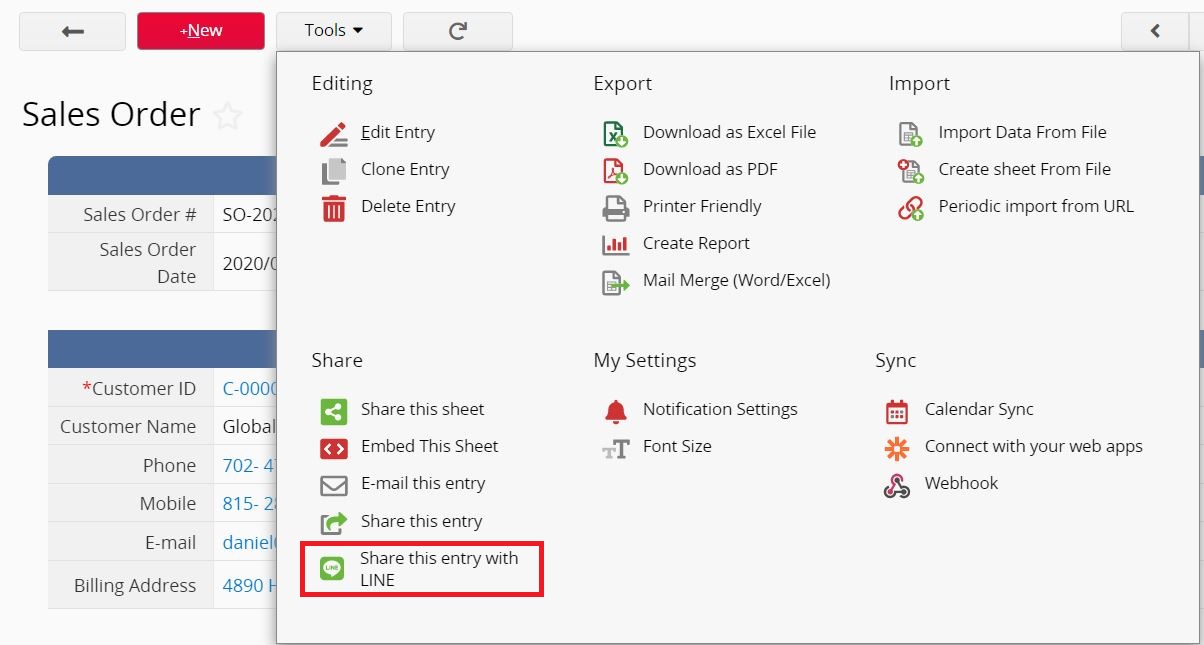
Click on Share. This will take you to the login page of LINE. After logging into your LINE account, you can add a personal message to the receiver here.
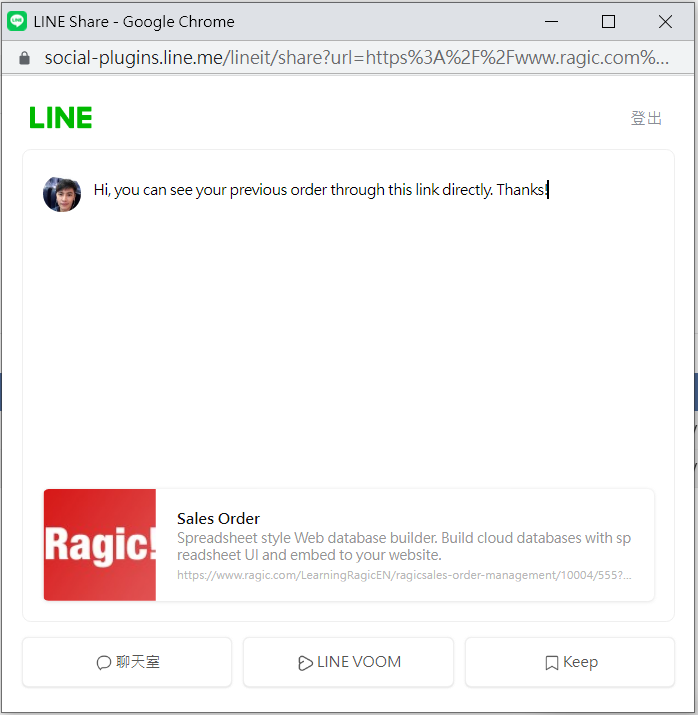
Select the receiver from your LINE contact.
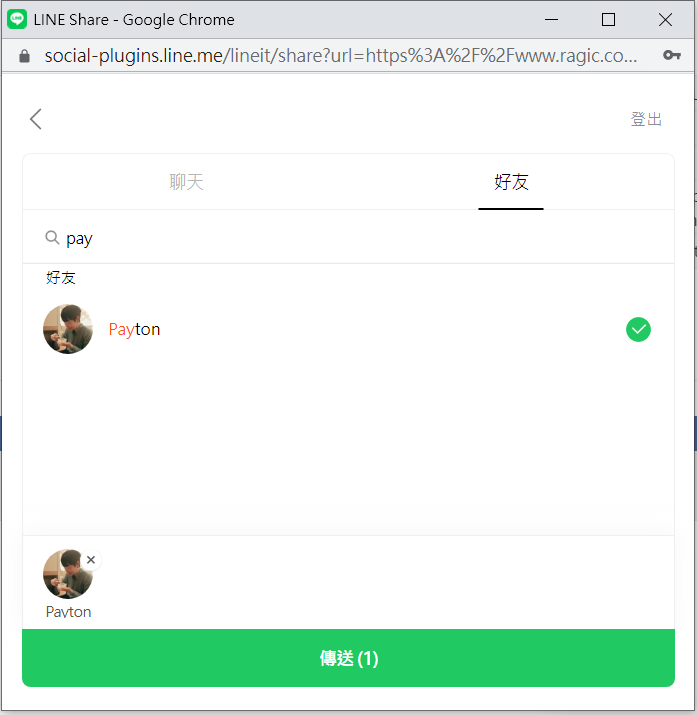
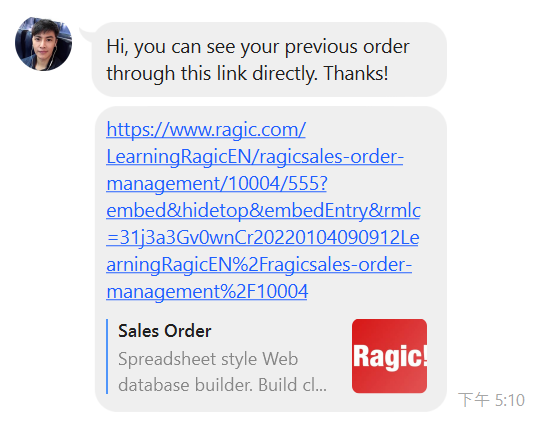
She will receive a link to the entry following your personal message.
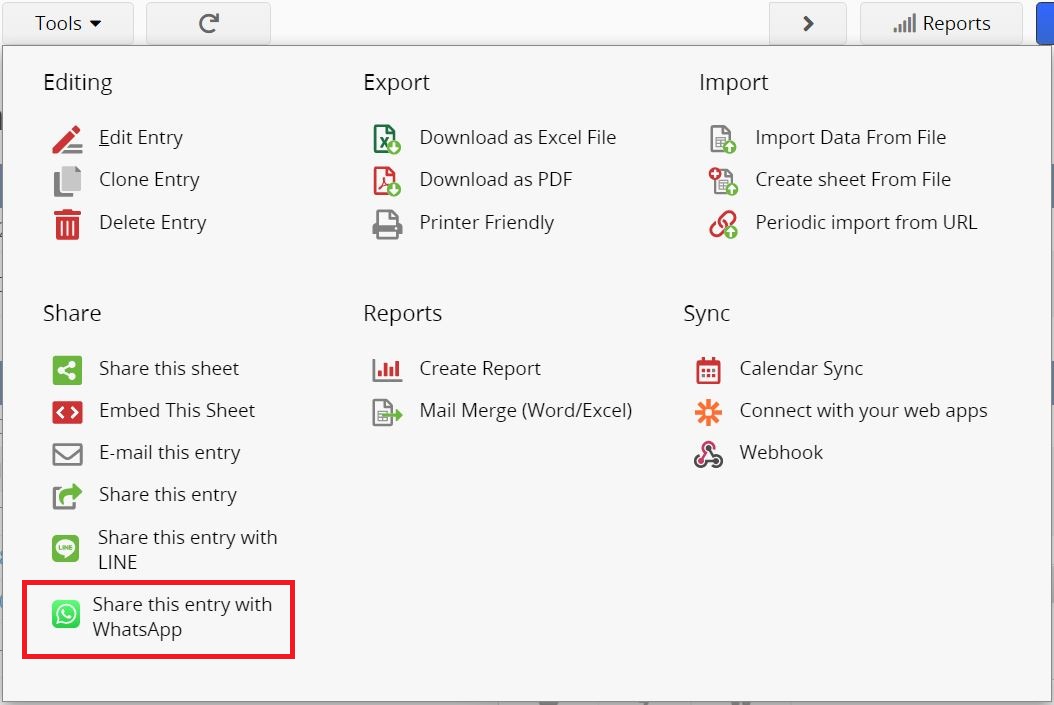
There are 3 sharing methods: Share link only (Receiver must have access right to this entry and must log into Ragic to access the entry), Grant viewing rights or Grant editing rights.
Select the receiver from your contact.
He/She will receive a link to the entry following your personal message.

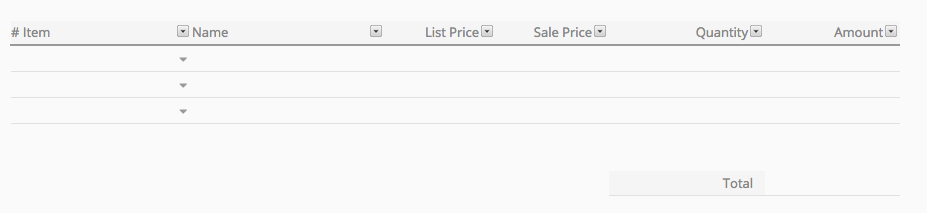
Subtables are extremely useful for handling one-to-many relationships in your form. For example, you might have a customer account with multiple contacts and multiple contact history that you would like to record. Or you might need to record multiple items in a purchase order or quotation. Subtables are everywhere in business applications, and Ragic provides the easiest way for you to create forms to manage them.

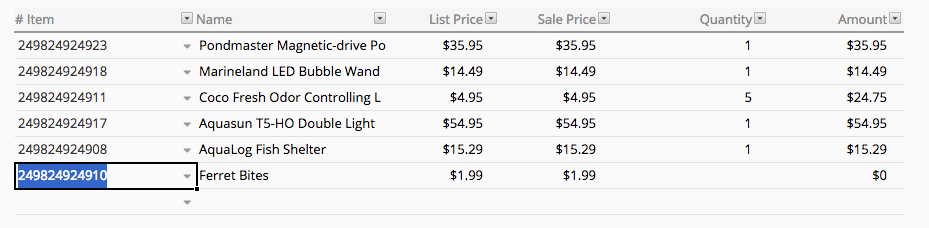
In the subtable, you can enter many sub-entries that belongs to the main form entry. The subtable will initially have three empty rows shown to the user, and as they are filling more entries in the empty rows, more rows will appear.
If there is a Select from other sheet field (linked field) in the subtable, applying Multiple subtable rows at once configuration will allow you to select entries and populate multiple subtable rows at once.
You will need to close the window manually after the data entry. (If the Multiple subtable rows at once configuration is not checked, the window will close after you select one entry).
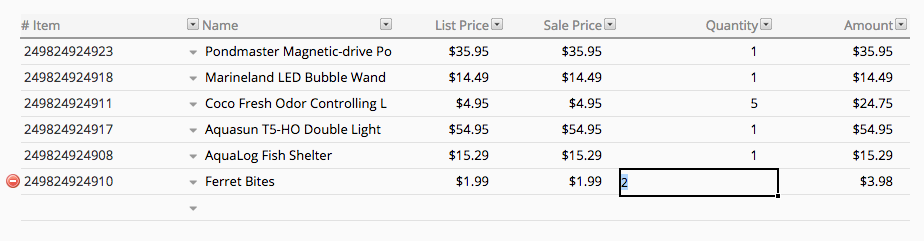
You can delete a field's value by clicking on it, and pressing backspace or delete on your keyboard.
If you would like to delete a whole subtable row, you can click on the delete icon in the form, on the left side of the subtable row which you are editing.
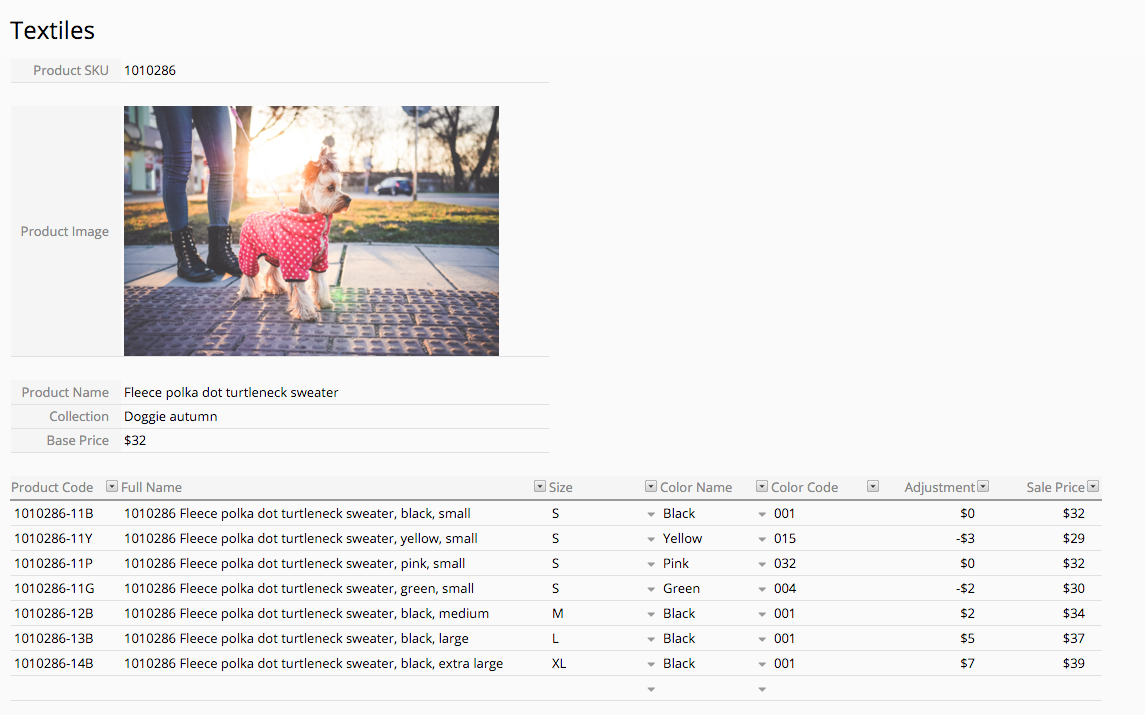
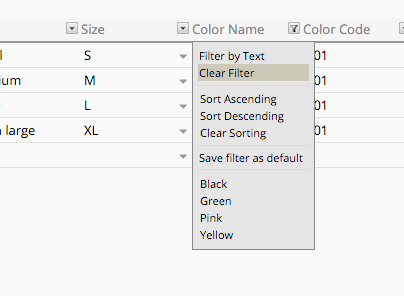
In some cases, you might want to filter or sort records in your subtables. This can be done by clicking on the arrow next to the field headers of your subtable to filter or sort the results displayed.
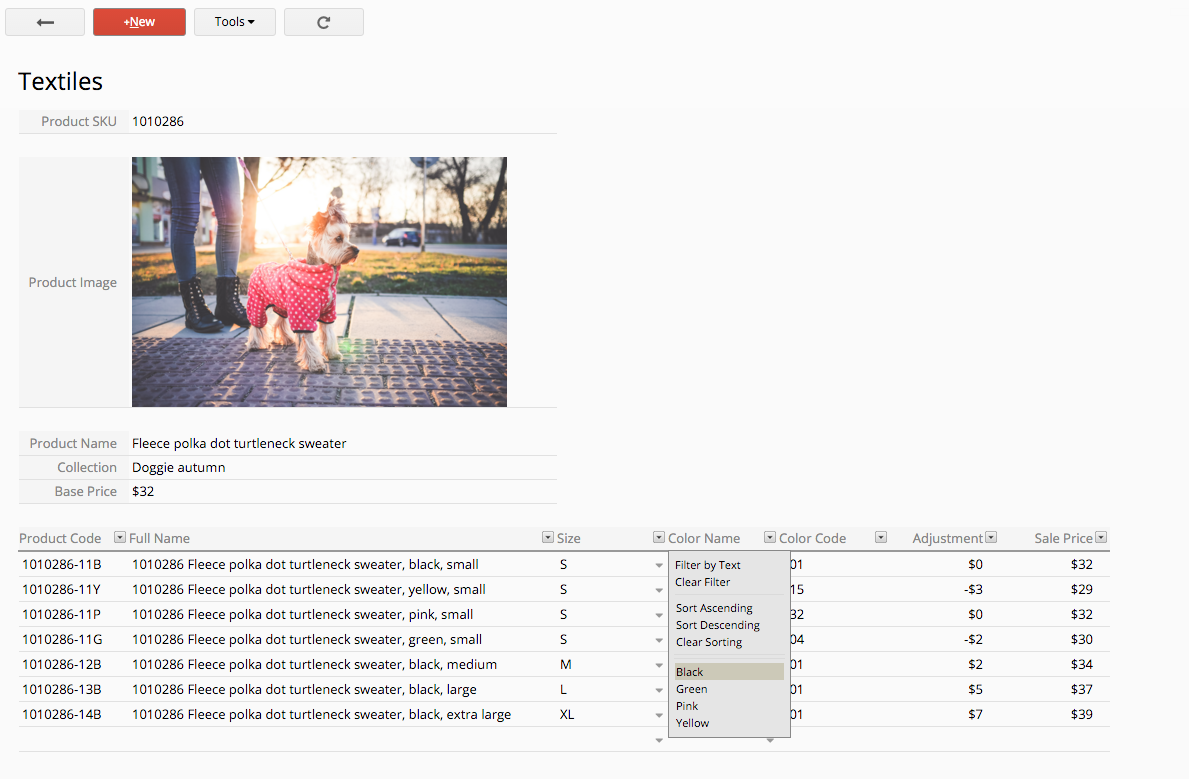
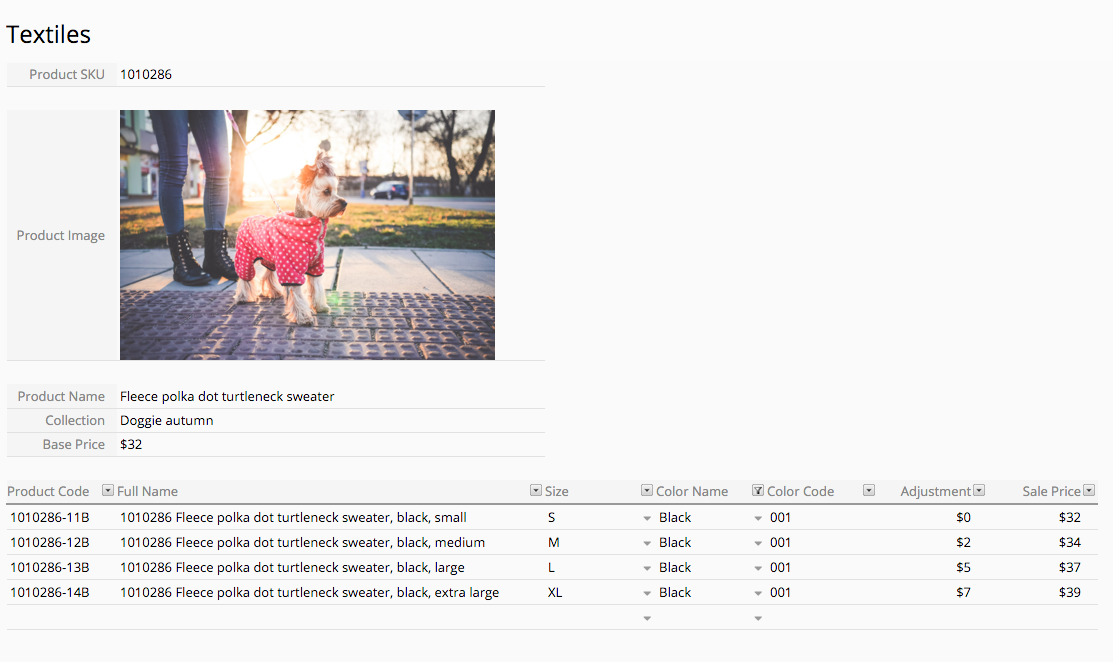
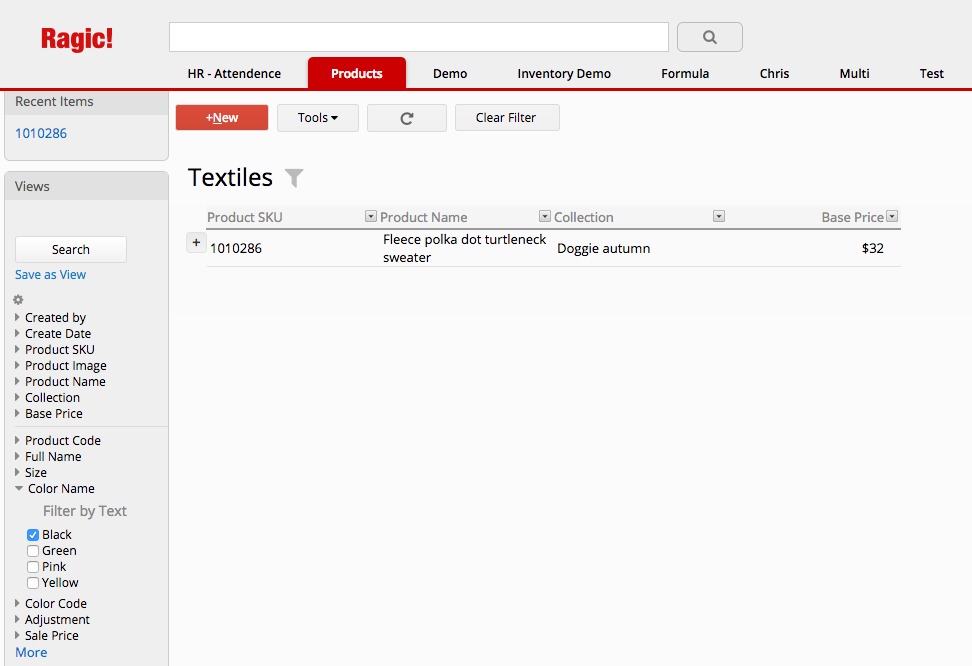
You can use the "Filter by text" option to filter your subtable. If the field is a selection field or a multiple selection field, you can also choose one of the selection options to filter results.
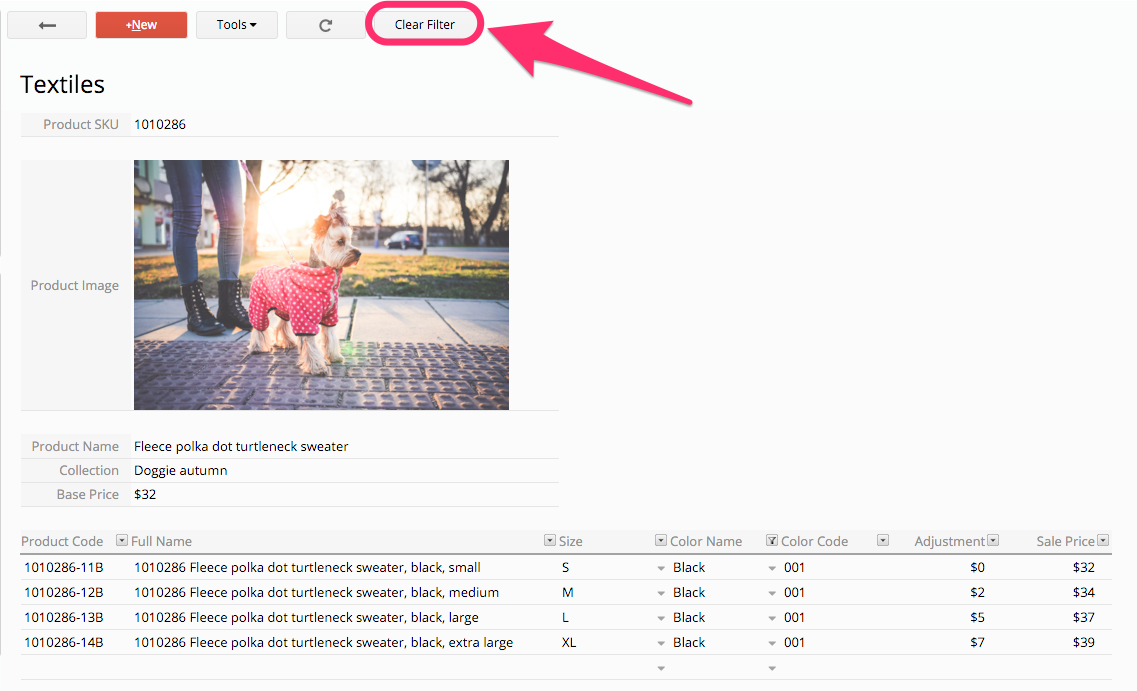
The filters applied can be cleared with the "Clear Filters" button on the top of your page, or the "Clear Filter" option through the arrows next to the field headers.
Or you might also be able to filter subtable records through left sidebar if the SYSAdmin of the database has configured these fields to appear in the left sidebar search too.
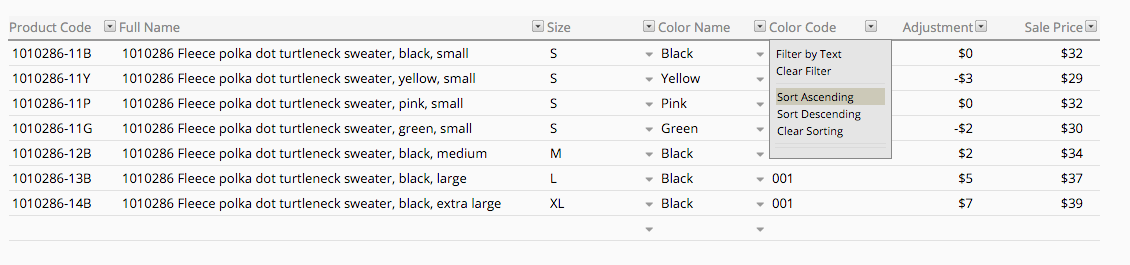
Options include sorting ascending or descending.

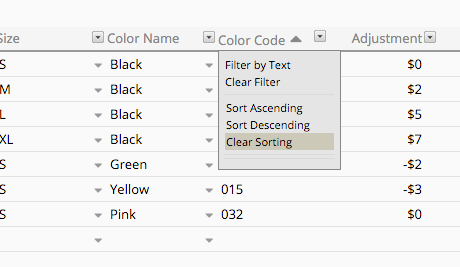
Sorting applied to the subtable can be cleared via the "Clear sorting" option through the arrow next to the field header you're applying the sorting from.
You can also sort multiple fields in the subtables. For example, sorting Status first and then sorting Account Owner.
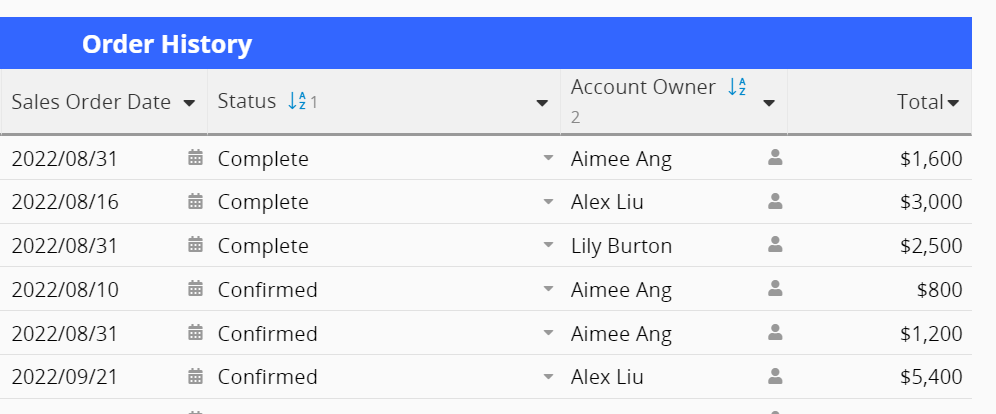
Notice: Applying multiple sorting will be meaningful only when the previous sorted field has duplicate values.
Exporting or importing would require creating a new sheet from the subtable by using our linking tool, which would need to be done by your SYSAdmin. All subtable records from the original sheet will turn into independent records on the new sheet, so you will be able to import or export subtable records from the new sheet instead.
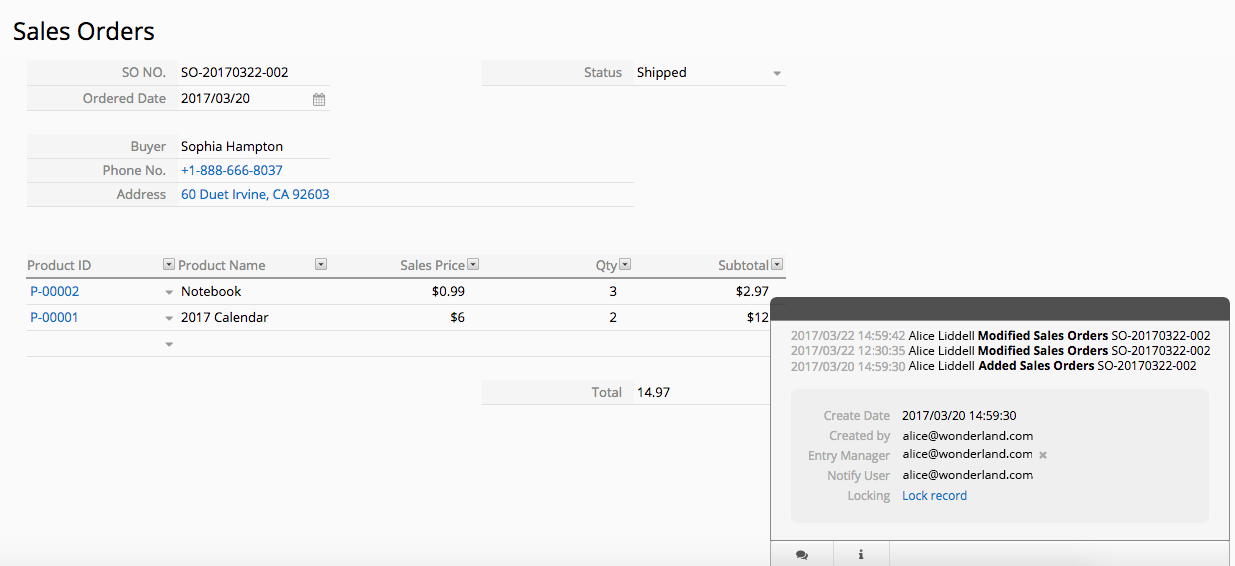
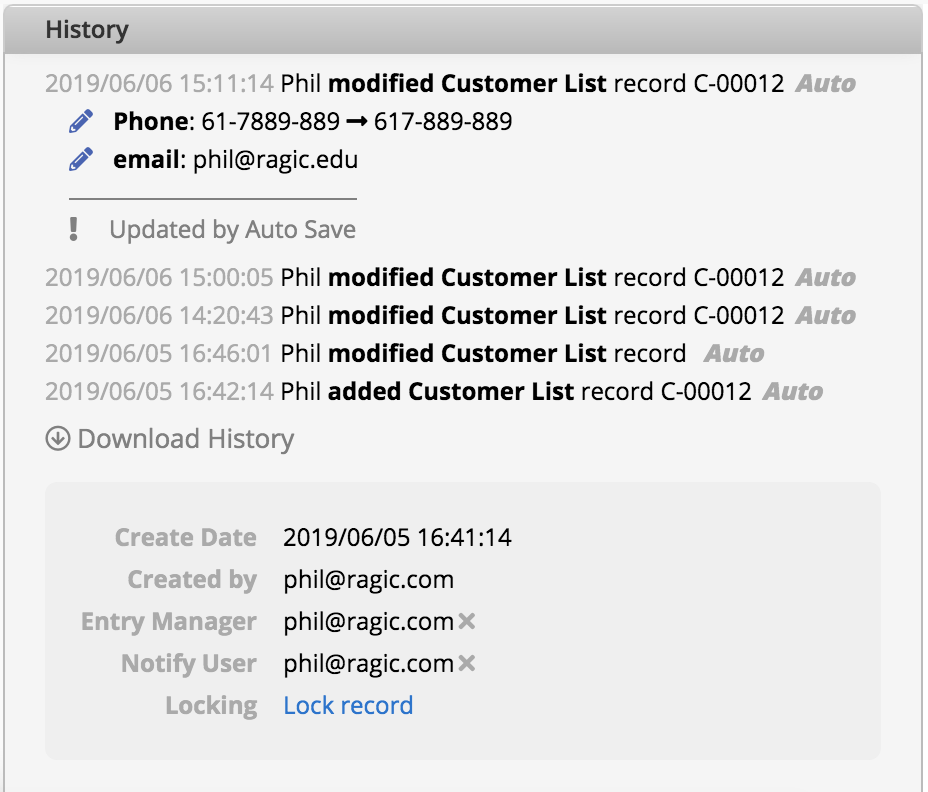
Clicking the i icon at the lower-right corner of the form page while browsing your entry will display the history details, such as the create date, user the entry was created by, entry manager, users that are notified, and locking status.
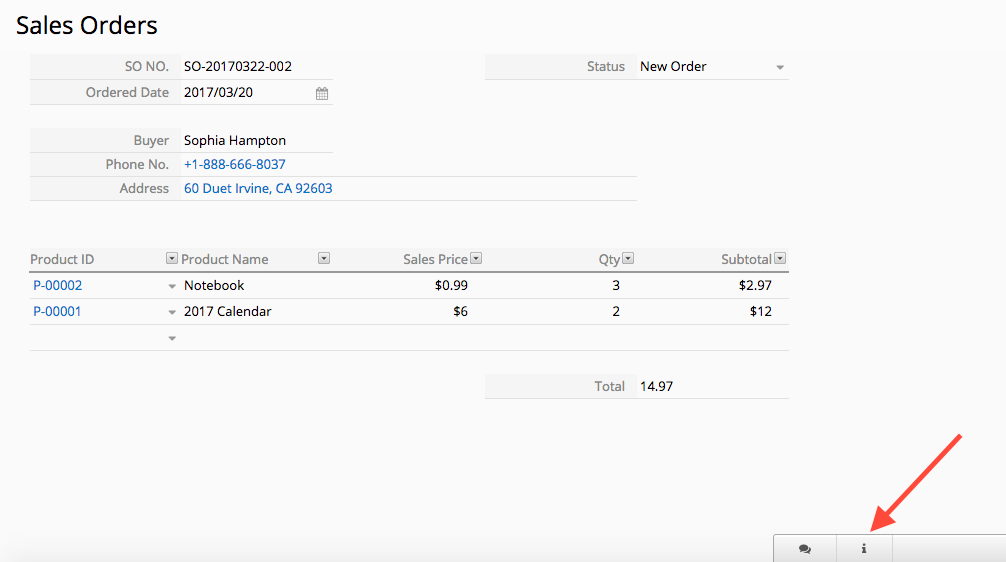
If you have access rights higher than survey user (such as viewer, bulletin user, or admin), you will be able to view the history details of records.
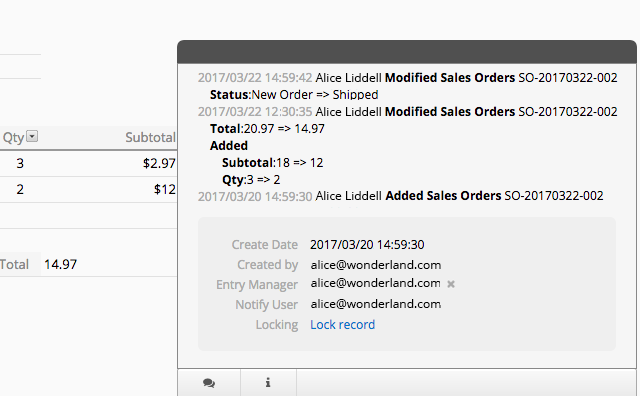
You can click on the added/modified records, to view details on additions and modifications.
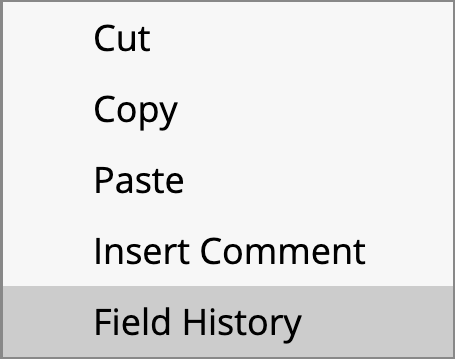
If you are the admin of a sheet, you can view changes made on a certain field. You would need to right click on a field and select field history. After that, a window will display with the related information.

You can use some of the BBCode tags that you would normally use in forums or bulletin boards when you are filling out your form in Ragic. Using BBCode tags is extremely useful when you are filling free text fields or comments for internal communication.
These are the supported tags and how they will be displayed:
Enter "/" in the field or comment, and the BBCodes menu will automatically pop up. You can then directly choose the desired tag from it!
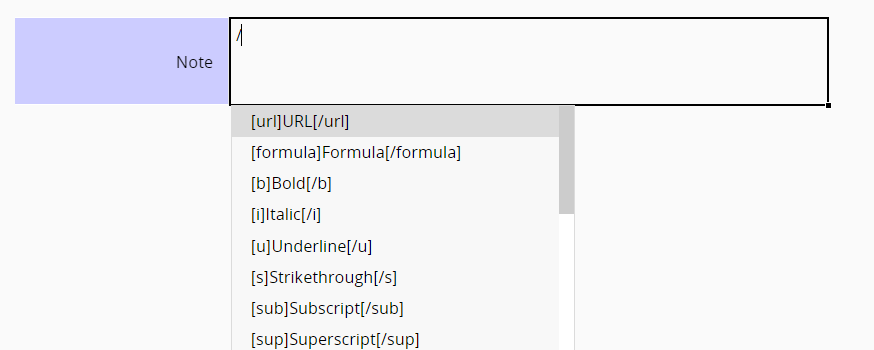
Make a text into a URL by adding the [url] BBCode.
[url=https://www.ragic.com]Run your business smarter[/url]
Tag a text with two square brackets so that it can be searchable in your database. This works great in comments if you know a related entry's ID, and would like to tag these entries.
[[search query term]]
![]()
You can use formulas in Ragic to display values from other fields with the [formula] BBCode.
[formula]A3[/formula]
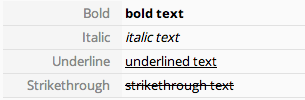
Change the text formatting to bold, italic, underlined, strikethrough, subscript, or superscript with the following BBCodes.
[b]bold text[/b]
[i]italic text[/i]
[u]underlined text[/u]
[s]strikethrough text[/s]
[sub]subscript[/sub]
[sup]superscript[/sup]
Change the color of a text with the [color] BBCode.
[color=red]Red color text[/color]
![]()
Below you can see some examples:
| BBCode | Display |
|---|---|
| [color=blue]blue text[/color] | blue text |
| [color=yellow]yellow text[/color] | yellow text |
| [color=green]green text[/color] | green text |
| [color=pink]pink text[/color] | pink text |
| [color=gray]gray text[/color] | gray text |
| [color=orange]orange text[/color] | orange text |
| [color=purple]purple text[/color] | purple text |
| [color=brown]brown text[/color] | brown text |
| [color=cyan]cyan text[/color] | cyan text |
This would also work with a hexadecimal color value.
[color=#cc0000]Red color text[/color]
![]()
Insert an image, using the [img] BBCode.
[img]https://www.ragic.com/sims/img/logoRed_150x56.png[/img]

You can also add "width x height" as a parameter in the BBCode to resize your image if needed:
[img=100x20]image_url[/img]
You can use the [fa=type] BBCode to insert Font Awesome Icons. There are four types of Font Awesome icons: fas=Solid, far=Regular, fal=Light, fab=Brands.
[fa=fas]fa-star[/fa]
[fa=far]fa-star[/fa]
[fa=fal]fa-star[/fa]
[fa=fab]fa-apple[/fa]
Please note that not all Font Awesome icons can be supported at this time by our [fa] BBCode due to the icon version on Font Awesome.
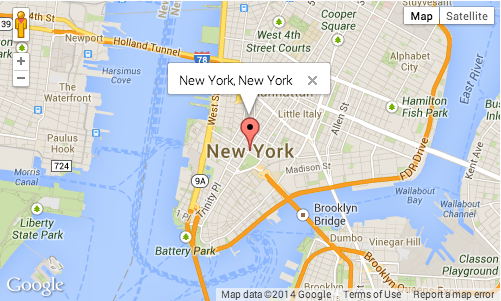
Embed a map by entering an address in the [addr] BBCode.
[addr]New York, New York[/addr]
Embed a video using the [embed] BBCode.
[embed]https://www.youtube.com/v/rEUYC4kh2k0[/embed]

You can also add "width x height" as a parameter in the BBCode to resize your video if needed:
[embed=800x600]video_url[/embed]
You can send an e-mail to a specific address with the [mailto] BBCode.
[mailto]support@ragic.com[/mailto]
[mailto=support@ragic.com]contact Ragic support[/mailto]
You can call a specific phone number with the [tel] BBCode.
[tel]0277288692[/tel]
[tel=0277288692]call Ragic[/tel]
You can send an SMS to a specific phone number with the [SMS] BBCode.
[sms]0912345678[/sms]
[sms=0912345678]send SMS to 0912345678[/sms]
Using the [iframe] BBCode to embed external content such as company website pages, custom-developed reports, Google Calendar, or YouTube videos.
[iframe=width x height]URL[/iframe]
Tips: If the iframe content embedded in Ragic is blocked, please go to Company Settings → Account Settings and adjust the value of the "iframe sources" field.
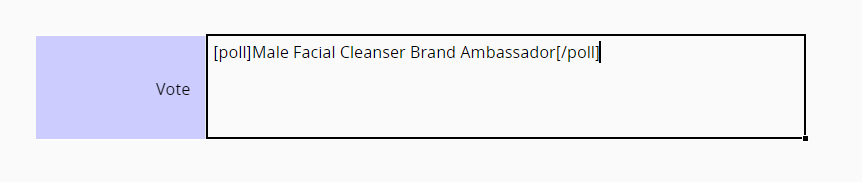
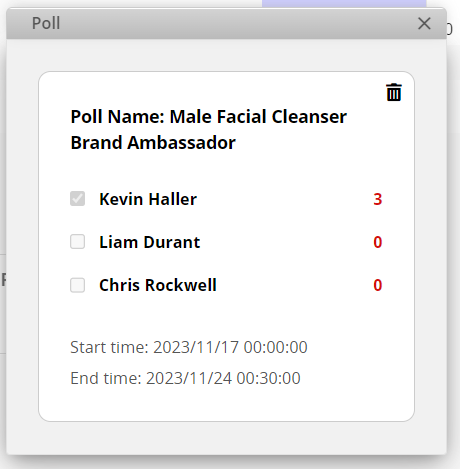
Using the [poll] BBCode to create a poll. Let users vote together for the best solution.
[poll]Poll Name[/poll]. Note that the duplicate "Poll Name" in the database will trigger the same voting event. If you want to create a new poll, please use a different poll name. If the original poll has been deleted, you can use the previous name.
Input [poll]Poll Name[/poll] in the field.
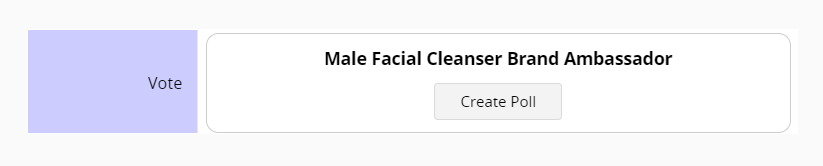
After saving, the poll interface will be displayed. Click Create Poll to open the configuration window.
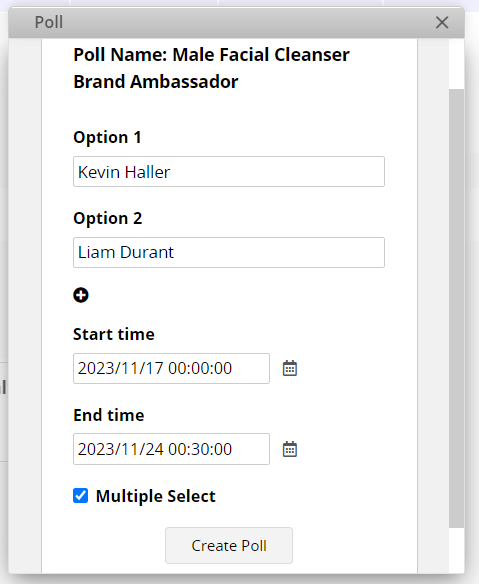
In this section, you can add options, set the duration, and check whether multiple selections are allowed.
Next, vote in the window; click on Vote Count to see the list of voters; click End Poll to close this poll directly.
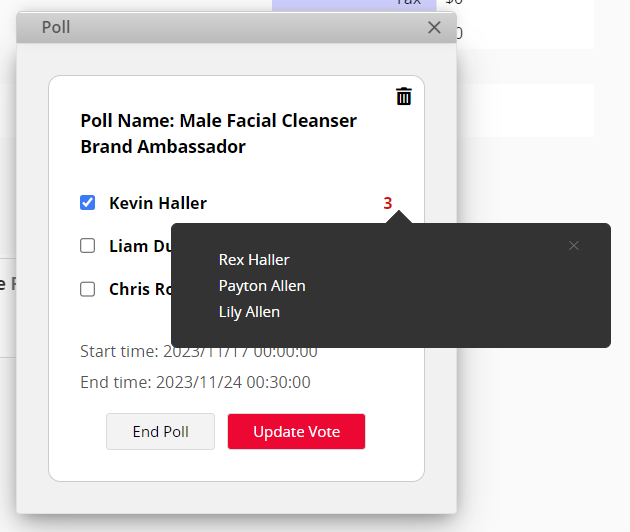
After ending, you can view the results. In the window, there is a trash bin icon in the upper right corner to remove this poll.
Using the [pagebreak] BBCode to force page breaks between field values when downloading as a PDF or printer-friendly. Insert [pagebreak][/pagebreak] between the field values where you want the page breaks to occur.
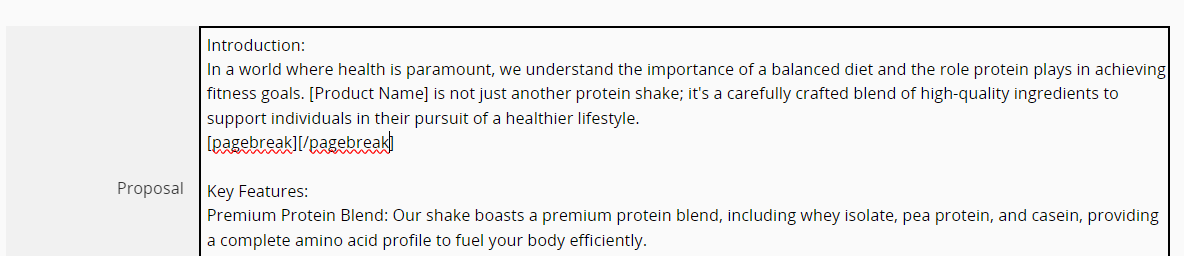
Page breaks will occur automatically during printing.
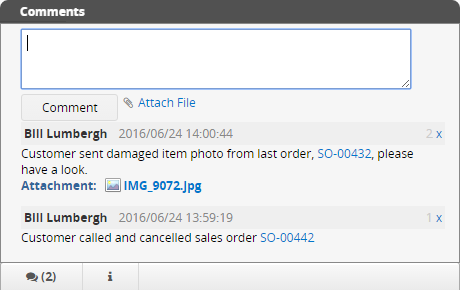
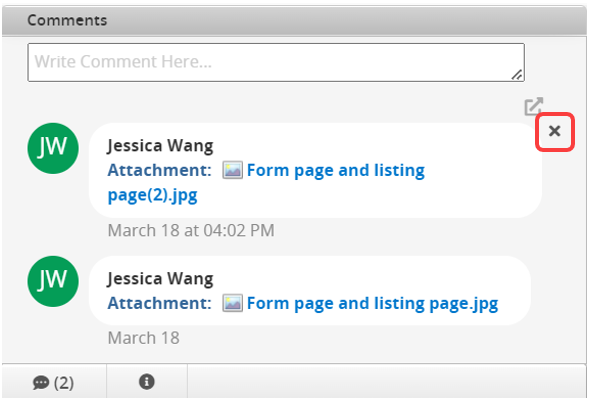
You can use the commenting tool in Ragic, available for each records' form page on the lower-right corner to write comments to your colleagues and attach files related to the record.
The comments are located when you click the chat bubble icon in the lower-right corner of any record. This icon also displays the number of comments.
You can attach any type of file within the comments, and also use the BBCodes that are available in Ragic within the comment boxes.
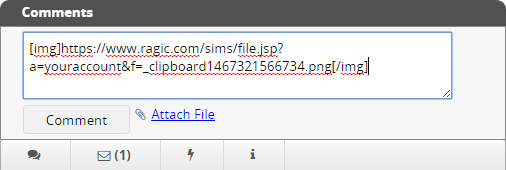
If your clipboard contains an image, Ragic can paste that image into the comment box for you. This would be uploaded after you add your comment for others to be able to view later.
To delete a comment, hover over it and click the "X" icon in the top right corner. Currently, only the SYSAdmin and the user who commented can delete it.
While you're browsing in the form page, you can right-click on any of the fields where the value is, and select the Insert Comment option to leave a comment for other team members to see.

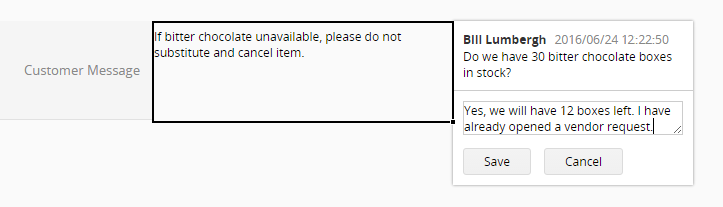
After saving, other team members will be able to see that you left a comment - Ragic will display a red triangle in the upper-right corner of the cell.
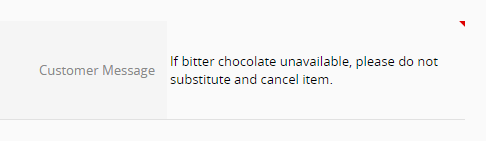
Hovering on this cell will display all comments. New comments will be added to the same thread.
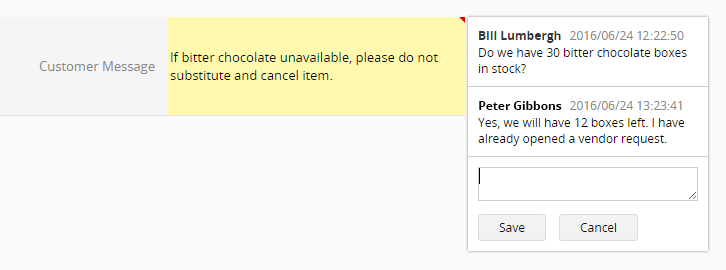
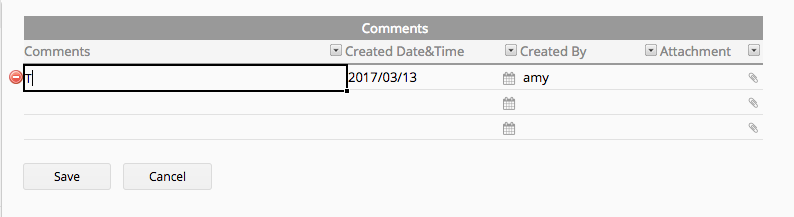
If there is a subtable for commenting purpose in the sheet design, it is also extremely useful when taking notes, especially if you want to record details such as the user entering the data, and the date & time.
You can opt-in to receive notifications in order to be notified when another user creates or modifies an entry related to you.
| Hotkey | Listing Page | Form Page |
|---|---|---|
| ↑ | to previous entry | to previous field |
| ↓ | to next entry | to next field |
| → | go to form page of entry | |
| ← | back to listing page of entry | |
| Page Up | to previous page | to previous entry |
| Page Down | to next page | to next entry |
| E | edit multiple entries | edit entry |
| Hotkey | Function |
|---|---|
| N | Create a new entry |
| E | Edit entry/entries |
| F2 | Edit entry |
| Alt+↓ | Show selection drop-down |
| Tab | Switch between cells (clockwise) |
| Shift+Tab | Switch between cells (counter-clockwise) |
| Alt+Enter | Add a line break |
| Ctrl+S | Save entry |
| Esc | Go back to browsing mode |
Users with Admin access right to the sheet, or users who are the "entry managers" (the entry creator or users who have been assigned to the entry) with Bulletin User or Survey User access right to the sheet will able to start approval flow.
External users have no right to start an approval flow but can be set as approvers. Non-users cannot start an approval flow nor be an approver. However, if you would like to include non-users in an approval flow, please refer to this method.
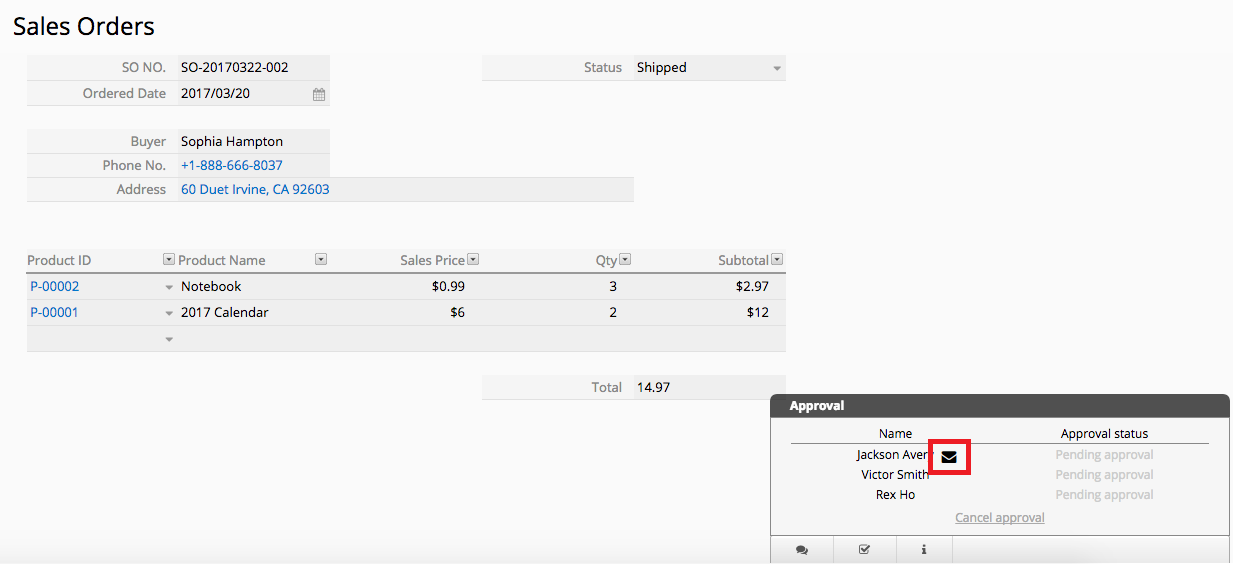
You may send approval requests through the lower right corner on the form page of a data entry if there's an approval flow configured in the sheet.
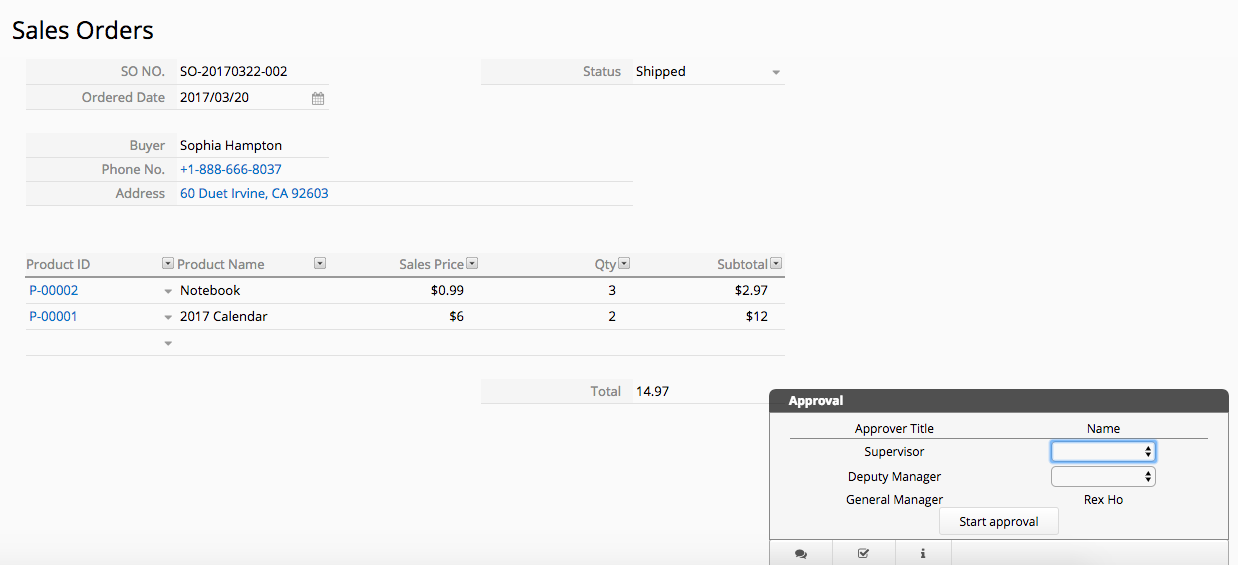
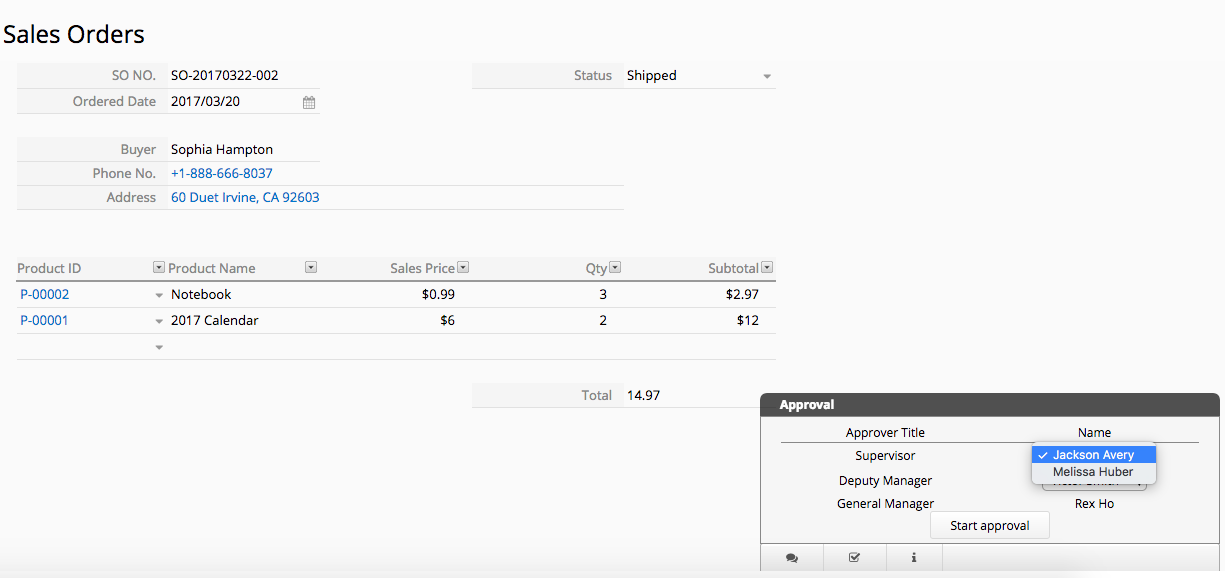
If you see a drop-down menu under Name, select the approver's username.
Click on the "Start Approval" button to start the process. You will notice "Approval status" switches to "Pending approval". To notify the approver again, you may click the "email" icon beside the approver's name.
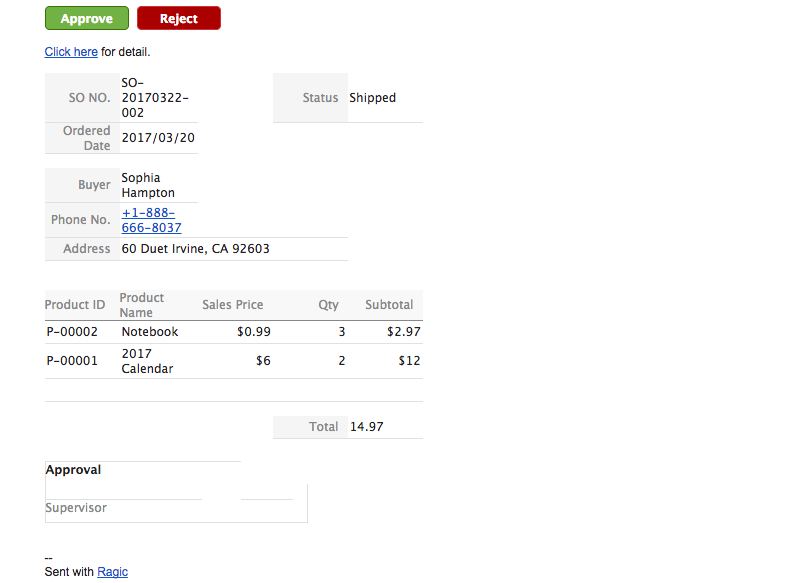
Approval requests will be sent to the next approver in the approval flow. Approvers can approve (or reject) this request through the notification email they receive.
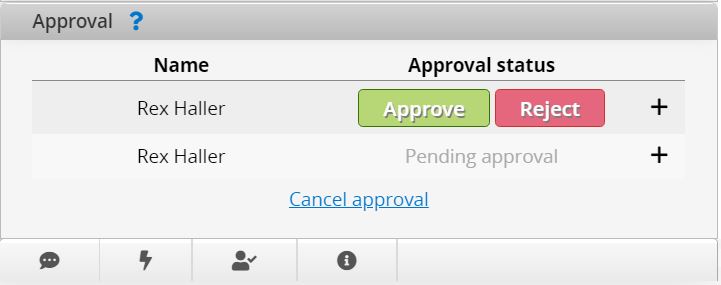
Approvers can also approve (or reject) directly through the form page of this entry.
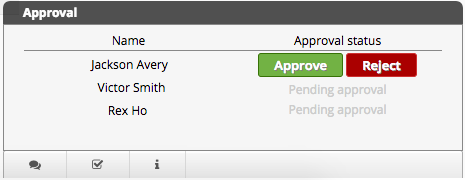
("Reject" option is available if it is added during approval flow configuration.)
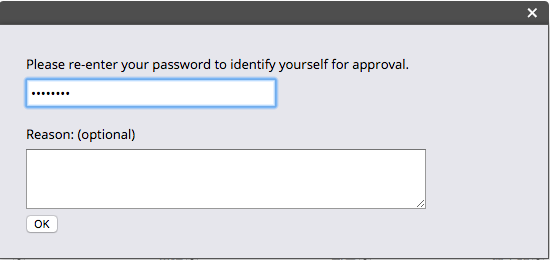
You will have to re-enter your password to verify your identity if the approval flow is configured with strict identity verification.
The approval flow goes from top to bottom. An approval step can only be executed once the previous step is completed. Each time an approval step is completed, "Approval status" will be updated and notifications will be sent to relevant users.
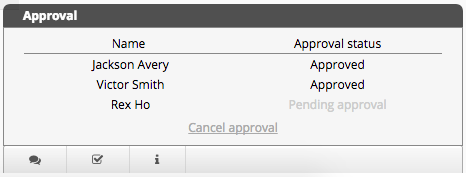
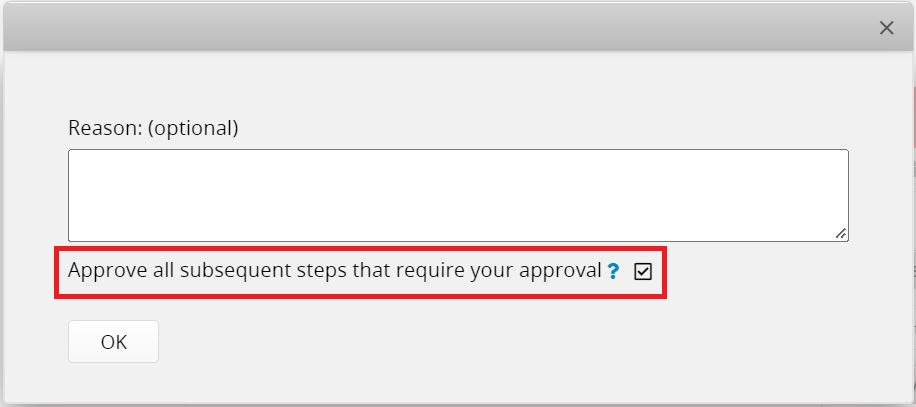
If the subsequent steps have the same approver, the system is set to approve all subsequent steps that require one's approval by default. You can uncheck this setting if needed.
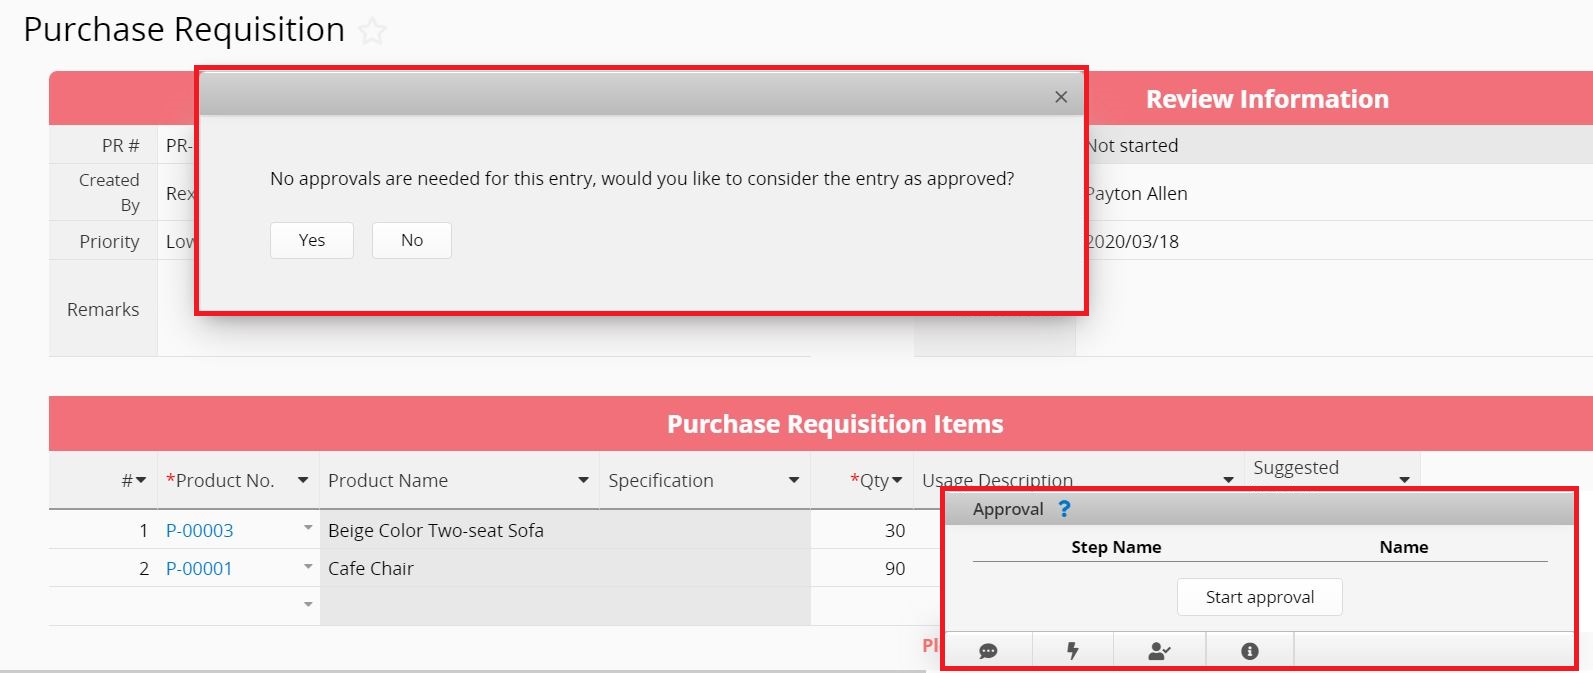
When the record's approval steps are all skipped due to approval rules, you can still start approval and finish it. It will be helpful if there are action buttons that can only be executed when the entry is approved.
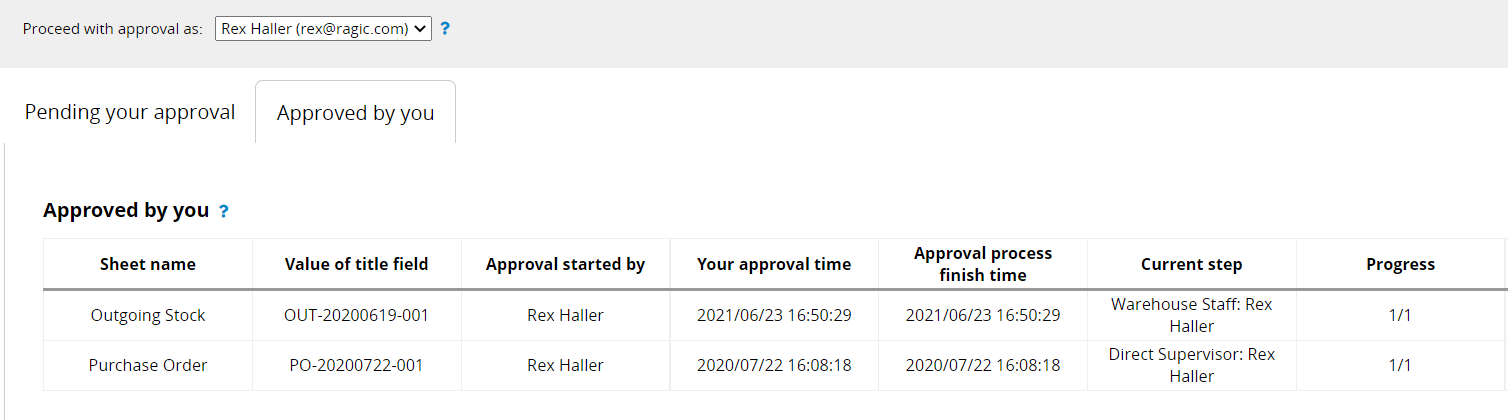
You can approve or reject multiple records' "in process" approvals through Batch Approval.
After an approval flow is started, only the user who started it and SYSAdmin can cancel it. If an approval flow is finished, then only SYSAdmin can cancel it.
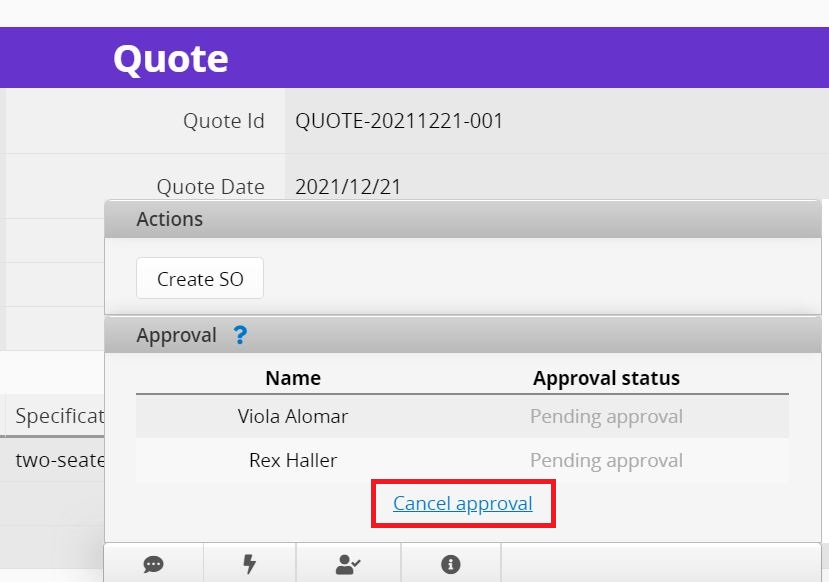
If you want to allow other users to cancel approval, please contact your SYSAdmin to modify Feature Access Settings.
Note: If action buttons are configured to be executed following the completion of an approval flow, then the approval flow cannot be canceled after it is finished.
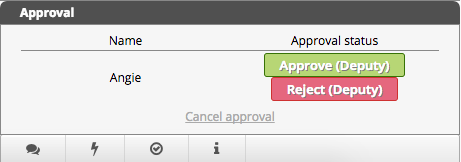
If deputy information is saved in your User sheet, the deputy user can approve/reject approval requests on your behalf.
Deputy users will see (Deputy) next to the approve/reject action buttons on the form page of the entry that requires approval.
In the notification e-mail, there will also be an indication of deputy approval.

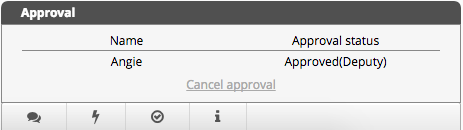
"Approval status" will indicate if approval/rejection is made by a deputy user.
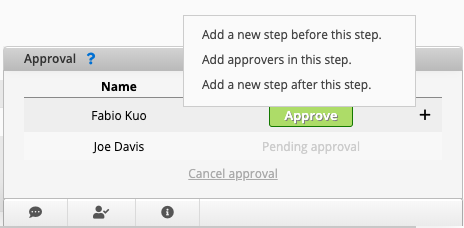
To add approvers/approval steps to the flow, click on the "+" icon next to the approve/reject buttons. You can:
Add a new step before this step - your approval step will be paused until the additional approval step(s) is completed
Add approvers in this step
Add a new step after this step
If your System Administrator turned on the auto save, you can see the latest record update time next to the reload button when you are entering data. Record modification history will be updated regularly.
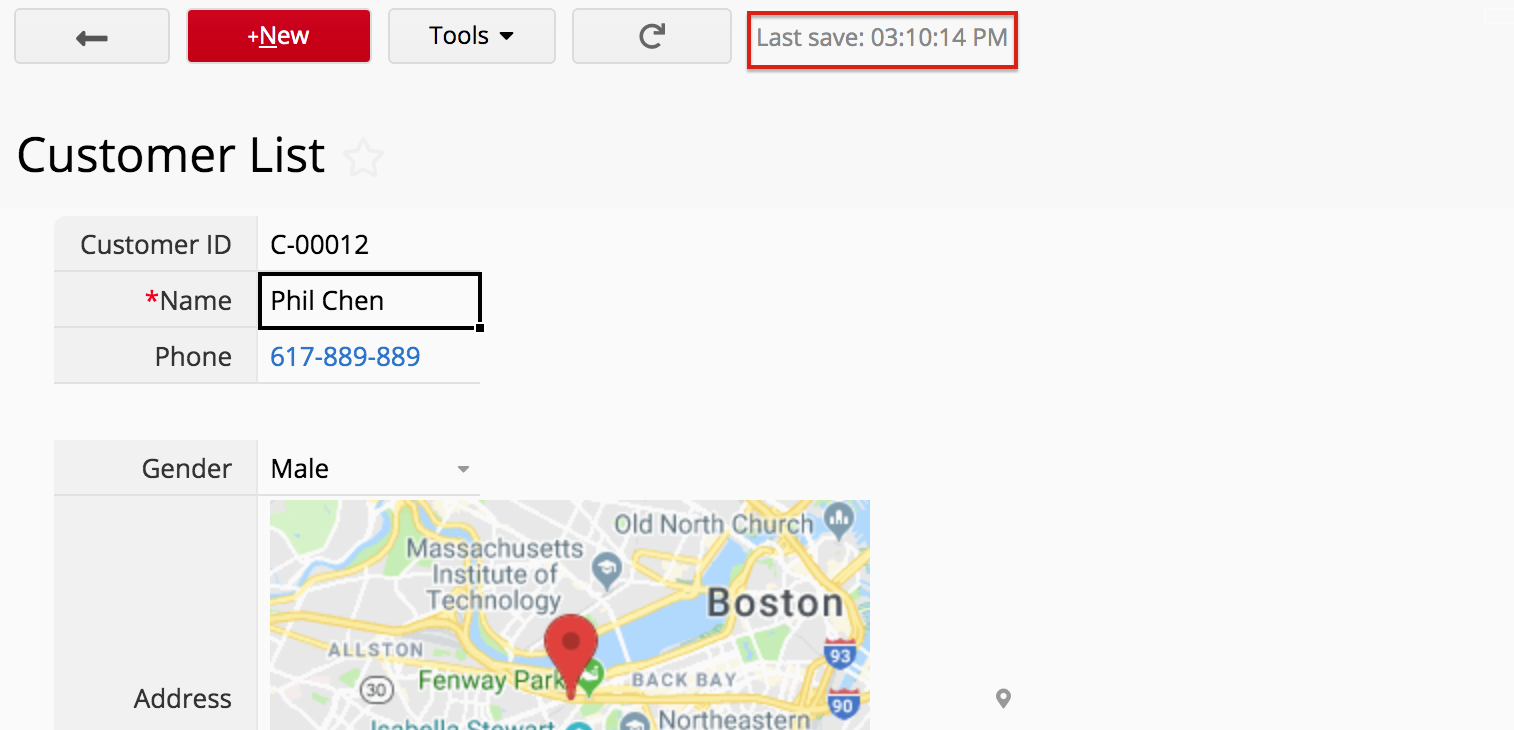
If the data entered do not meet the setting requirements, such as not empty, validation, unique...etc, changes will not be saved. You can click on Why? at the upper right side of the page to see why the data isn't saved.

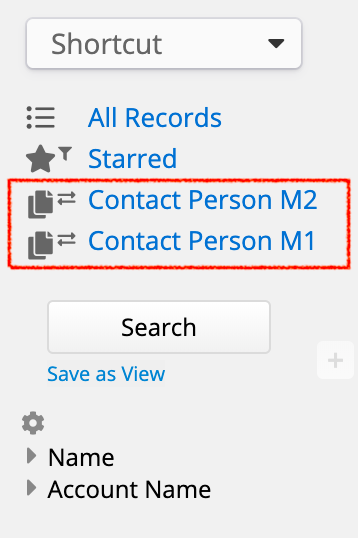
Multiple versions are different sheets that use the same data source, meaning that when you update data on a field in one sheet, the same field on another sheet will also be updated automatically.
If you see this icon ![]() on the left sidebar, it symbolizes other multiple versions sheets that use the same data source with the sheet you are at right now. You can simply click on it to go to that sheet immediately.
on the left sidebar, it symbolizes other multiple versions sheets that use the same data source with the sheet you are at right now. You can simply click on it to go to that sheet immediately.
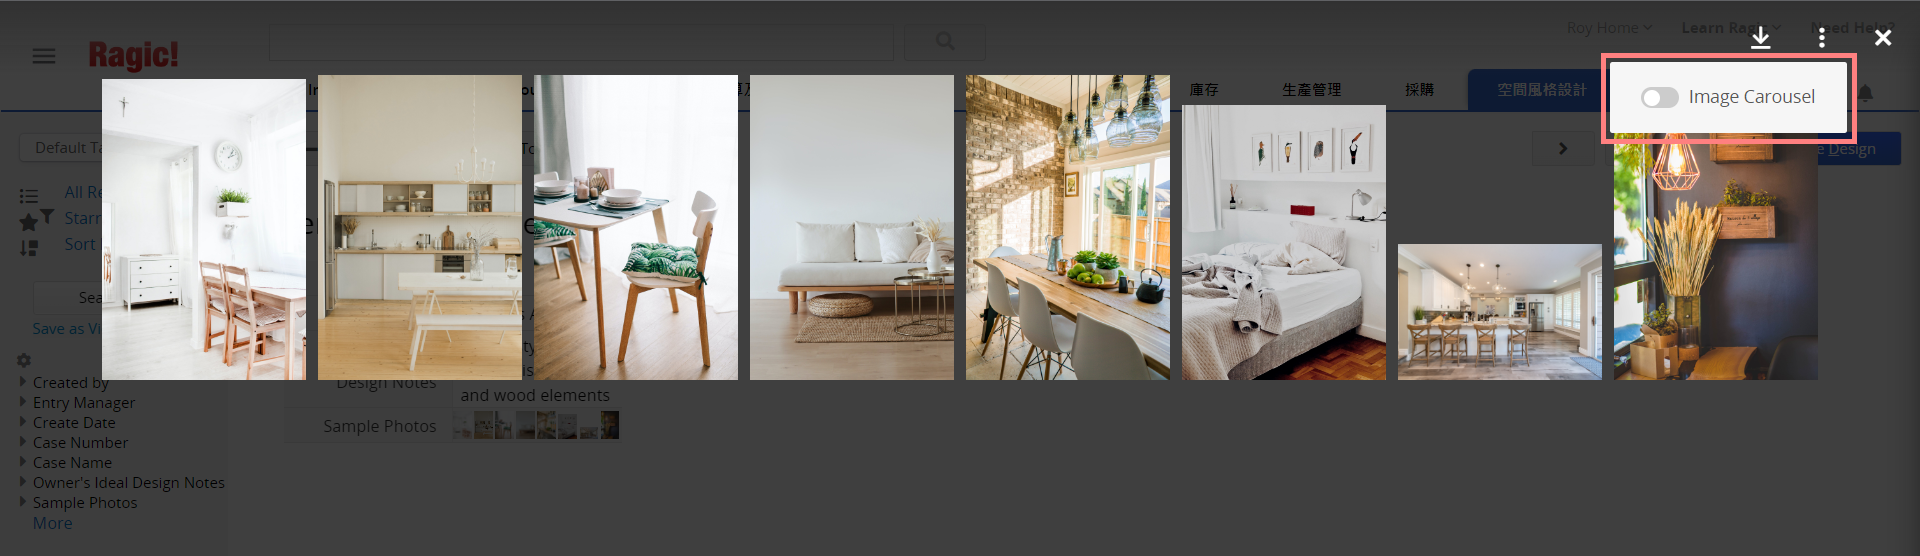
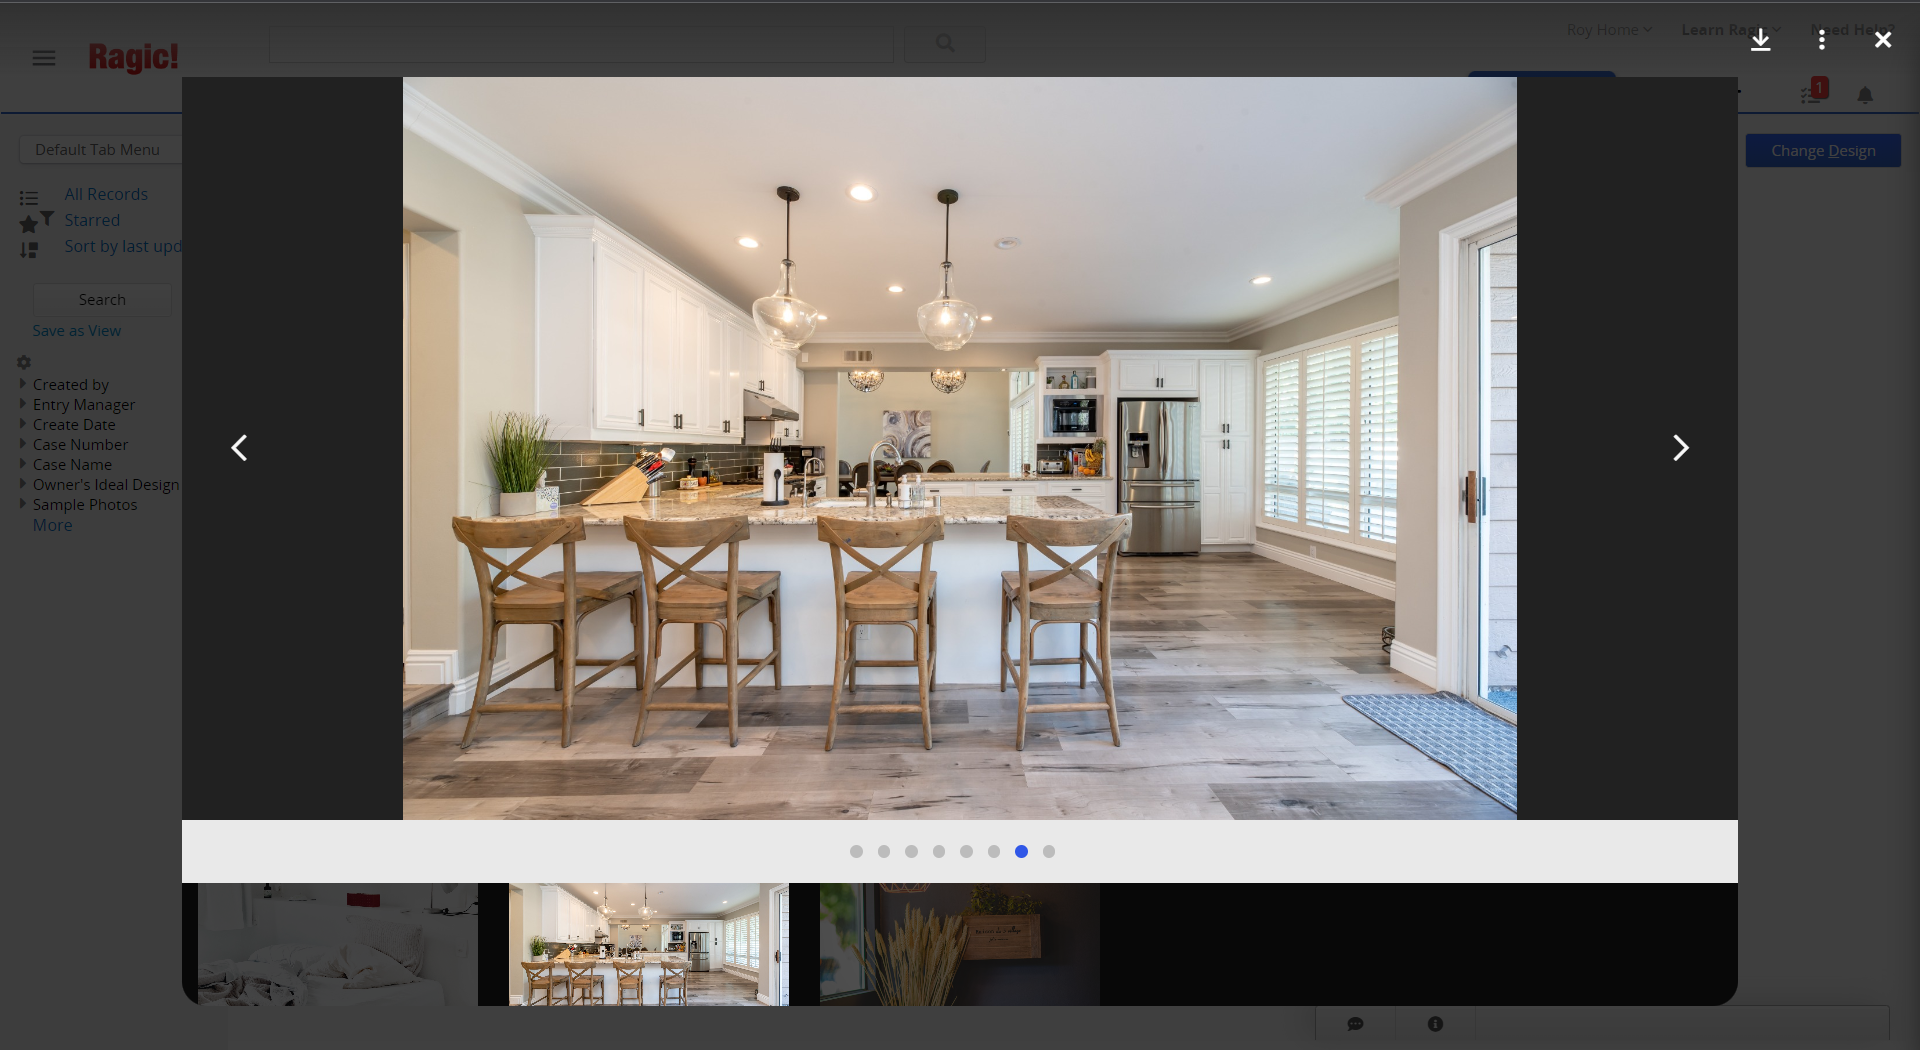
Once the Image Carousel is toggled on, photos will be displayed in large sizes. The carousel navigation bar in the middle shows the total number of images in this field, and the order of these images. The thumbnail navigation bar at the bottom displays thumbnails of the images.
It is worth noting that you have to tick the “multiple-images upload” option and upload more than one photo to toggle on the Image Carousel mode. In addition, if you want to switch to the Image Carousel mode in different sheets, you will have to toggle it on in every sheet. The image display mode is individual to every sheet.
Ragic mobile app also offers Image Carousel mode and does not require any settings. Once you open a sheet on the app, you can swipe on thumbnails in the Image Upload field. When you click on the field, it automatically switches to the Image Carousel mode and displays larger-size photos. You can zoom in or out on the photos if you need to check the details.

It should be noted that currently Image Carousel does not work on mobile browsers. If you often browse or display photos in the sheets on your mobile, using the Ragic mobile app (iOS, Android) will ensure you a better experience.
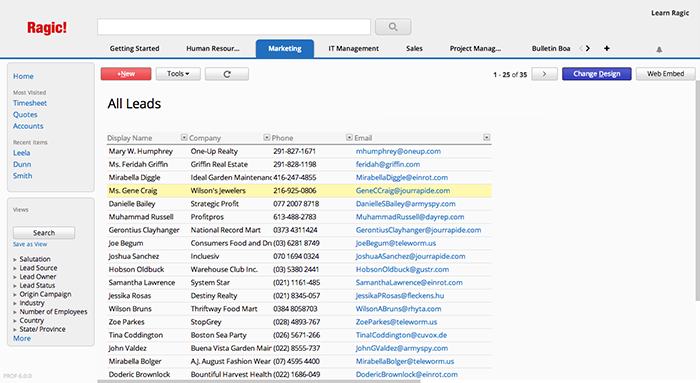
To search through your sheets for full values and view offered suggestions, you can use the top search bar. You can also write some syntax and boolean operators here if needed.
If you'd like to filter your entries with a certain criteria, you can use the left sidebar, and save your commonly used searches as personal views with this method too.
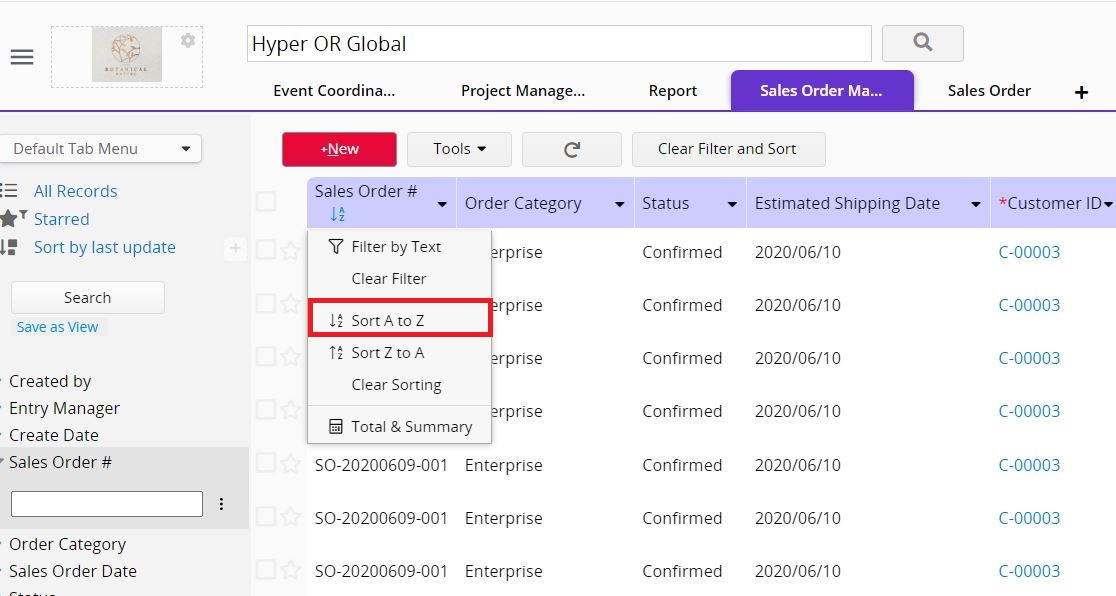
You can sort a certain field ascending or descending through a field header from your listing page , or if you would like to filter one field, you can use filters through field headers as well.
For subtables, you can also filter and sort through subtable field headers.
If you fill in the field value with Tagging BBCode tags as the search query term, users can quickly get the full text search result by clicking on the search query term.
If you'd like to filter your entries with a certain criteria, you can use the left sidebar, and save your commonly used searches as personal views with this method too.
If would like to filter one field, check the using filters through field headers section below.
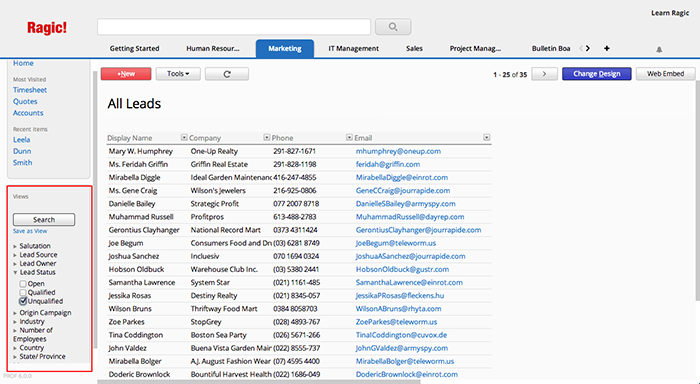
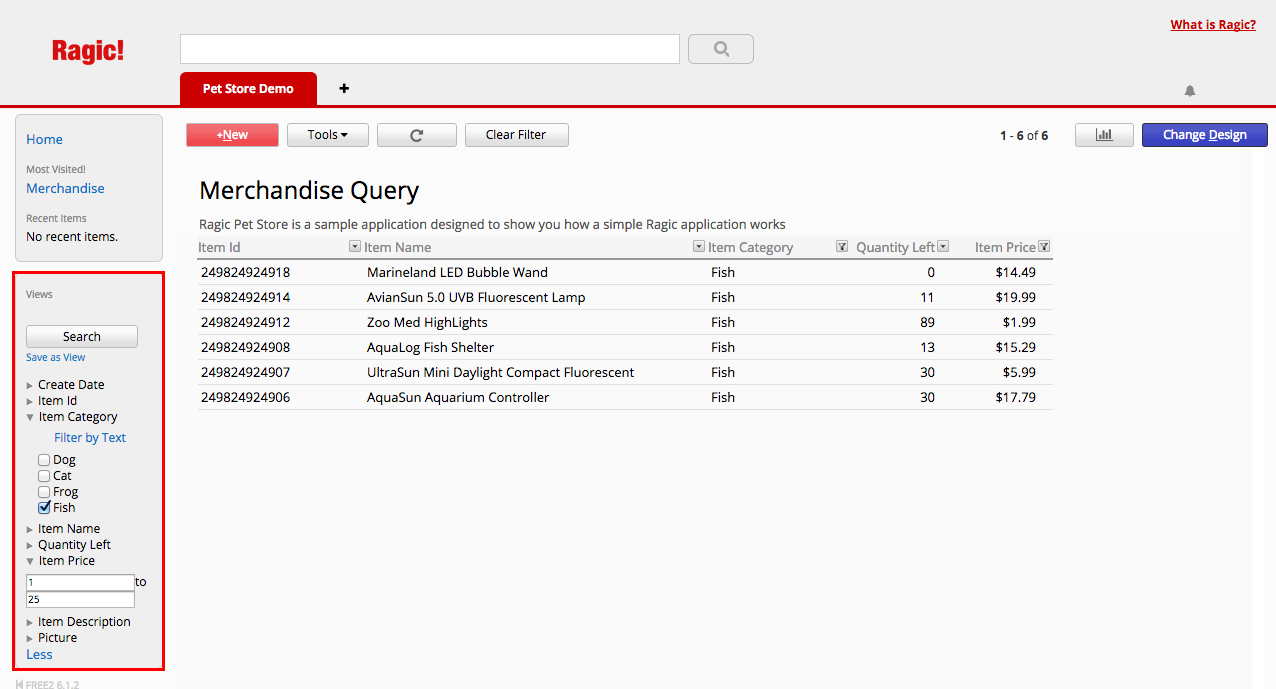
The left sidebar search tool allows multi conditional queries. You can select one or more fields to filter data so as to narrow down your search results. These filters are defined according to the corresponding value types of every field in the form; therefore, different query methods are offered for different field types.
For example, if the field type is a Selection field, all the options within the selection field will be listed as a multiple selection, you can click on the multiple options that you need to filter.
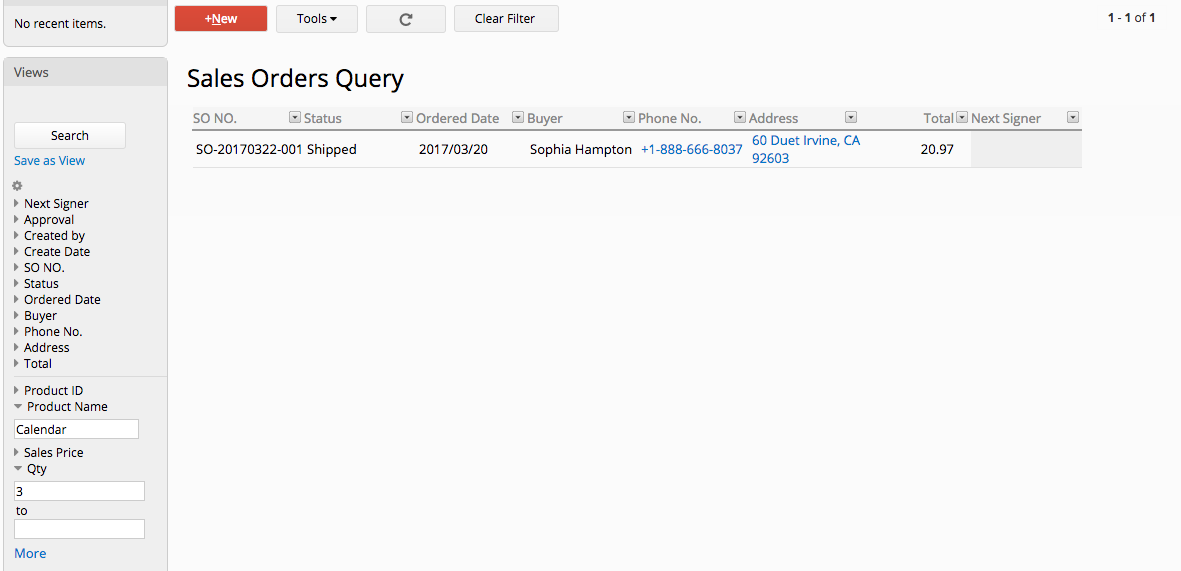
If the field type is a Numeric or a Date field, you can search within a range.
After setting all of the filters you need in the left sidebar search tool, click on the Search button above the filter categories for the results.
To clear the applied filter, click on button "Clear Filter" on the top.
You might also be able to filter subtable records through the left sidebar search tool if your SYSAdmin has configured these fields to appear in the left sidebar search tool.
If you need to apply multiple criteria in one field, you may click on ![]() icon to open the advanced settings:
icon to open the advanced settings:
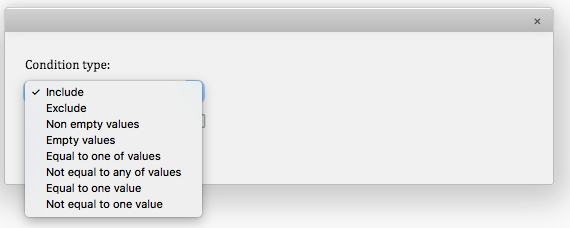
You can select a condition type of you prefer, enter the criteria, and click 'save' to apply. Below are the examples on how different condition types affect the query results:
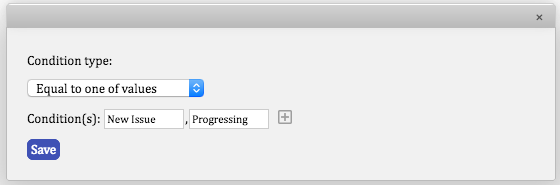
1. If you'd like to search for fields with values equal to either of the two conditions you set, choose Equal to one of values condition type. In this example, "New issue" and "Progressing" are set as the conditions:
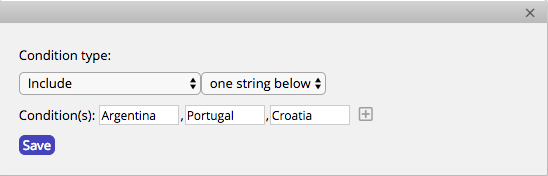
2. If you'd like to search for records that include at least one of the strings you set as the conditions, set the condition type to include one string below. In this example, your query will result in records that include either "Argentina", "Portugal", or "Croatia".
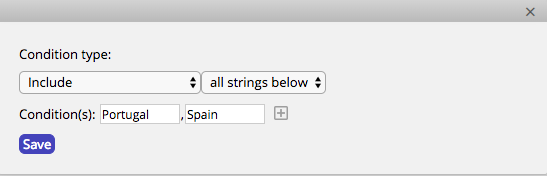
3. Set the query condition type to include all strings below if you want to search for records that include all the string conditions you enter. In this example, your search results will show records that include both "Portugal" and "Spain".
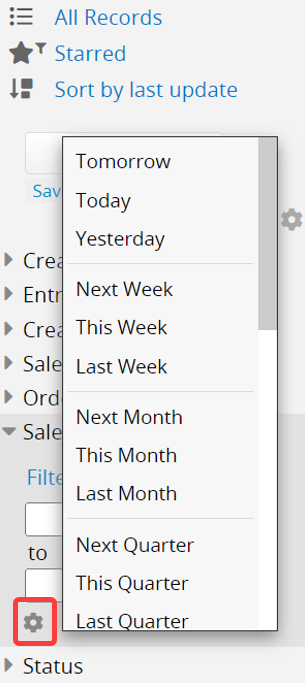
With advanced filtering for date fields, you can quickly find data within a specific date range. For instance, if you want to filter all the records for which the 'order date' is today, you can click on the gear icon to open the menu, find the filtering condition, and then apply it directly.
You can click on the arrows that correspond to the right side of your field headers in your listing page to filter the results displayed.
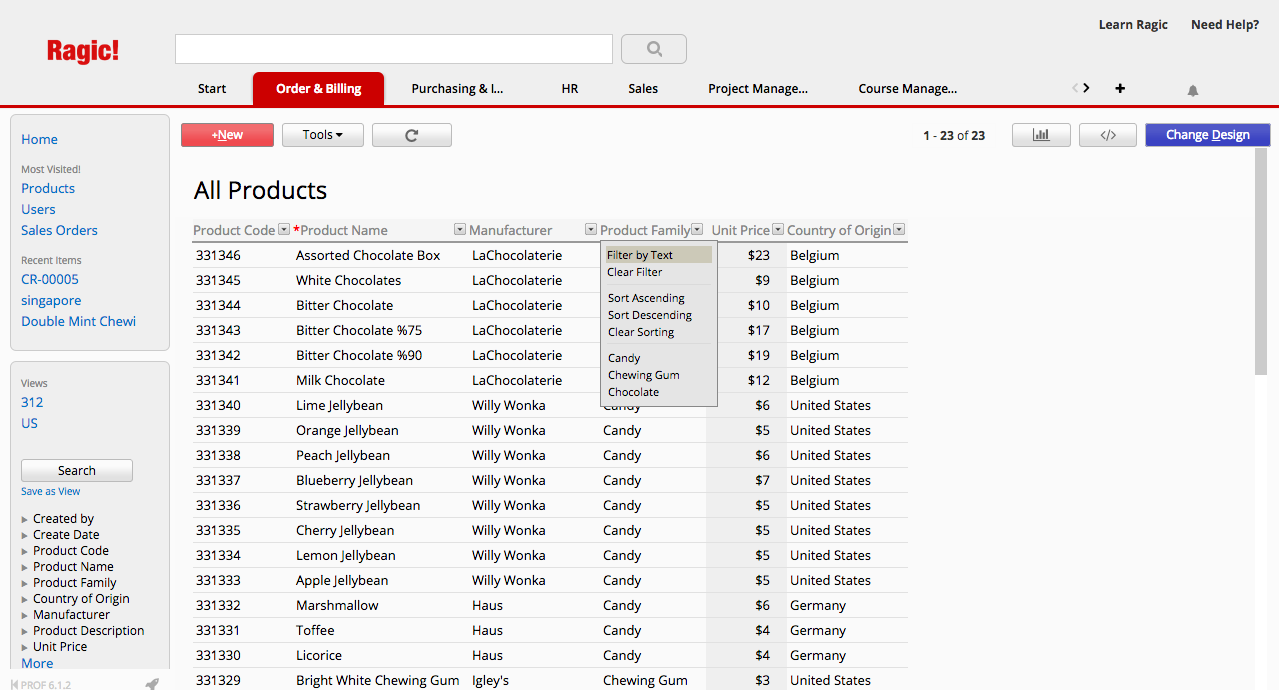
Options include filtering by text, or the selection options if the field is a selection field.
This kind of filtering can also be applied in subtable headers.
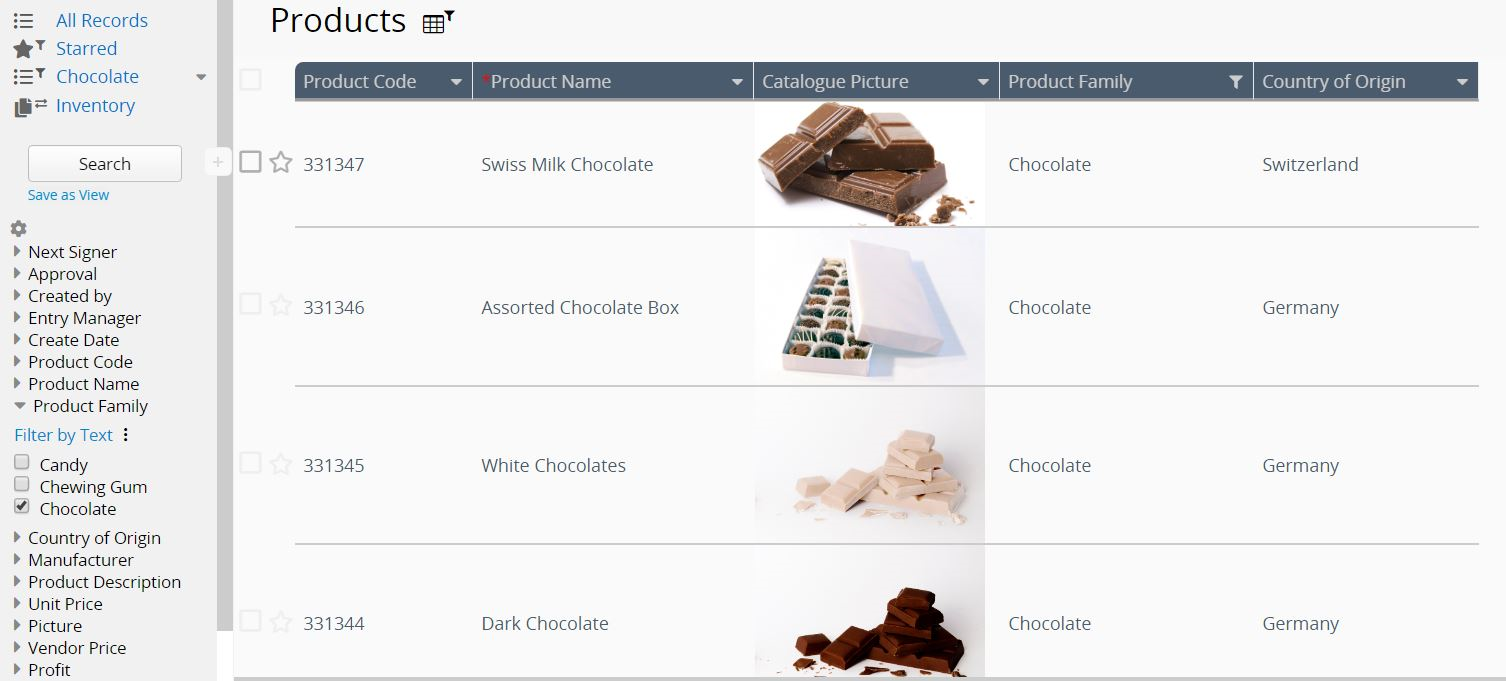
If you want to filter your entries by a specific field value, you can directly right-click the value and select it as the filter condition.
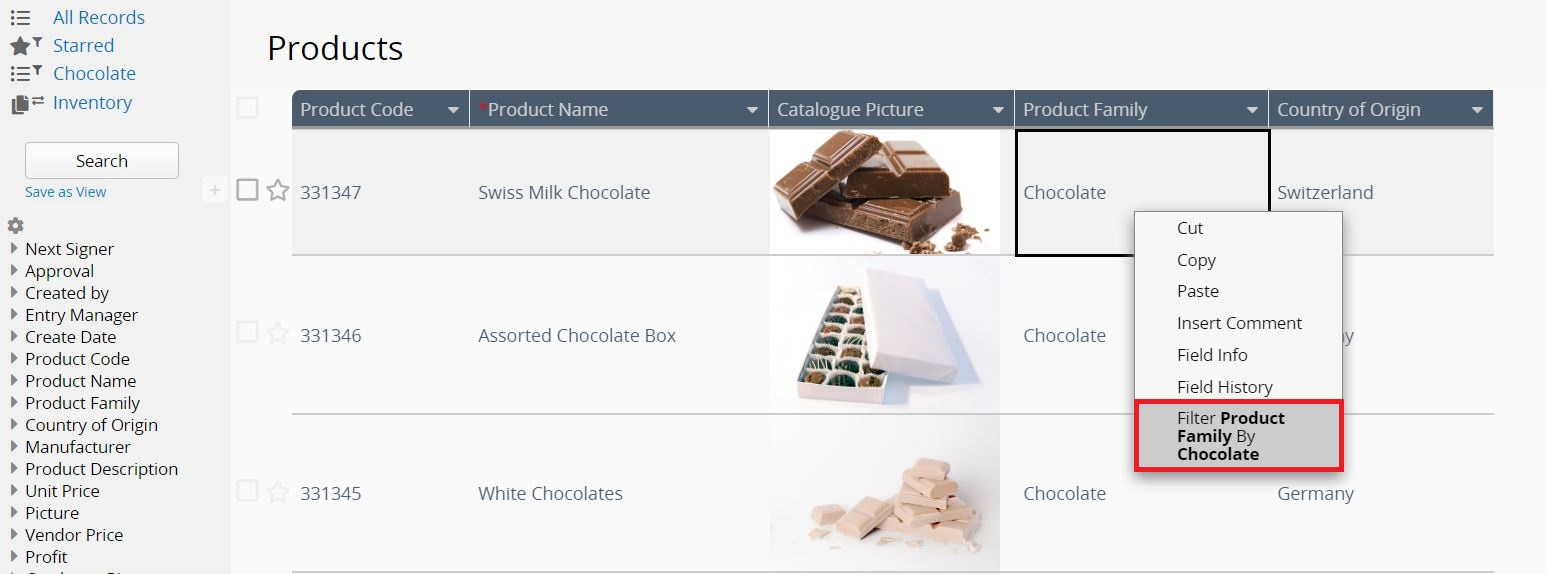
For example, filter Product Family by Chocolate.
You might need to search selection if there are lots of selections in selection field, multiple select field, checkbox field, select from other sheet field, select user field and select group field. By clicking the field headers of those field types on listing page, you will see the search bar and be able to search the selection you are looking for rapidly.
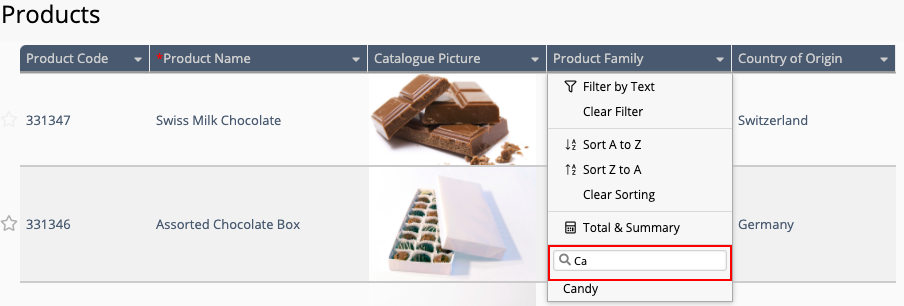
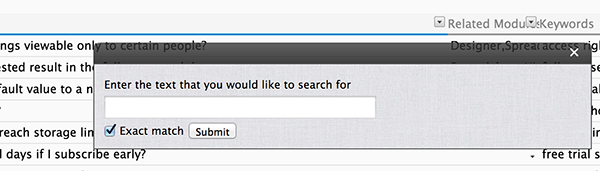
You can click on the arrows that correspond to the right side of your field headers in your listing page, and use the "Filter by Text" option. Check the Exact match checkbox, and click Submit for Ragic to return entries that have the filtered field empty.
You can also use the left sidebar search tool to query for empty values.

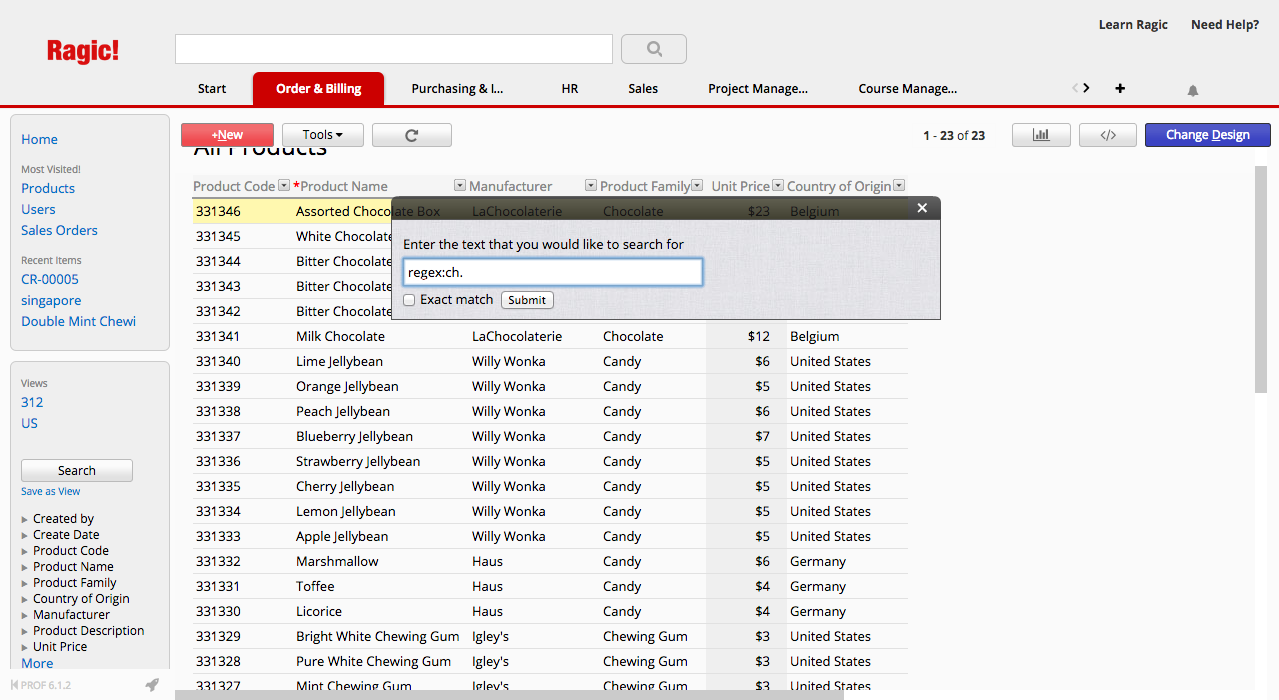
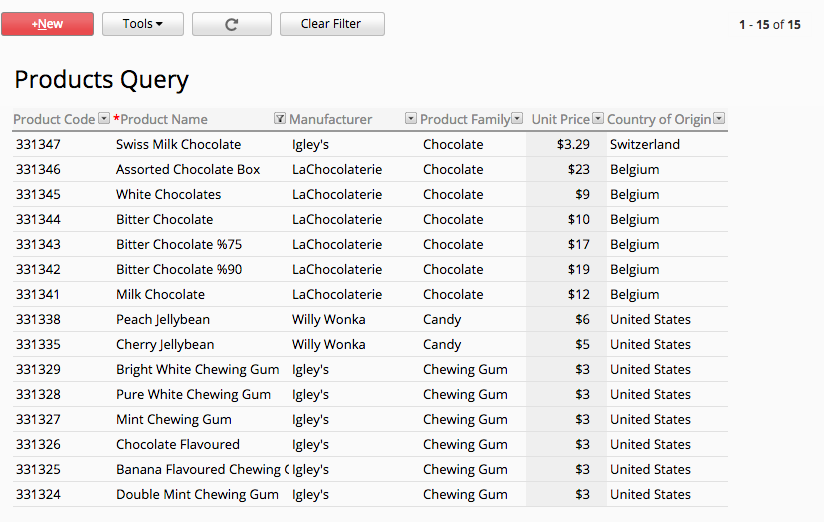
In case that pre-built filtering tool in left sidebar cannot query your data properly, you can just write regex: in the beginning of your search and write your regular expression next to it.
As an example, the product names below are filtered with regex:ch.. This means that if the name contains a word that includes "ch" they will be included in this filter.
Here are some useful regular expressions that you can try out:
| Search query | Result |
|---|---|
| regex:^[a-c].* | Returns entries that start with the letters a to c for this field |
| regex:^123 | Returns entries that starts with the string sequence 123 for this field |
| regex:.?.?.?.?/03/.?.? | Returns the month March in date fields |
| regex:.+ | Returns entries that have a value in this field |
| regex:^((?!foobar).)*$ | Returns entries that don't contain a specific word (e.g. foobar) |
| regex:(apple|orange) | Returns entries that contain apple or orange in this field |
Please note that if there is formatting applied to your value from Design Mode, you will still need to use the default formatting in Ragic while conducting a search with regular expressions.
For example, even though your formatting might display MM-dd-yyyy, the data is still stored in your Ragic database as yyyy/MM/dd. Therefore, searching for regex:.?.?-03-.?.?.?.? will not provide any results, and you will need to use regex:.?.?.?.?/03/.?.? instead.
If you don't know how to write regular expressions for a specific query that you need, please e-mail our friendly support team.
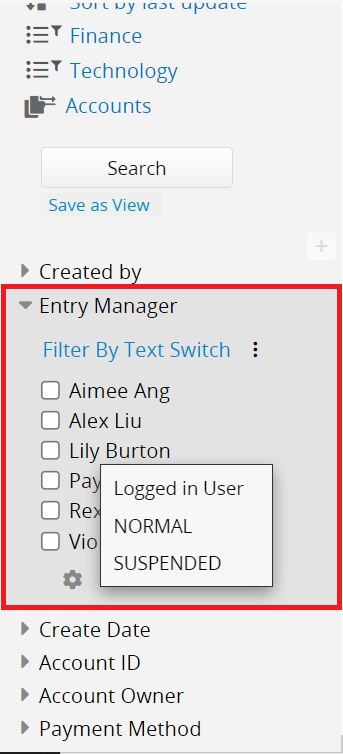
If there are select user fields in the form, you can click on the gear icon in the left-side panel to filter by "Logged In User," "Normal," or "Suspended."
You can click on the arrow next to the field headers on your listing page to sort the results to be displayed in ascending or descending order according to that field values.
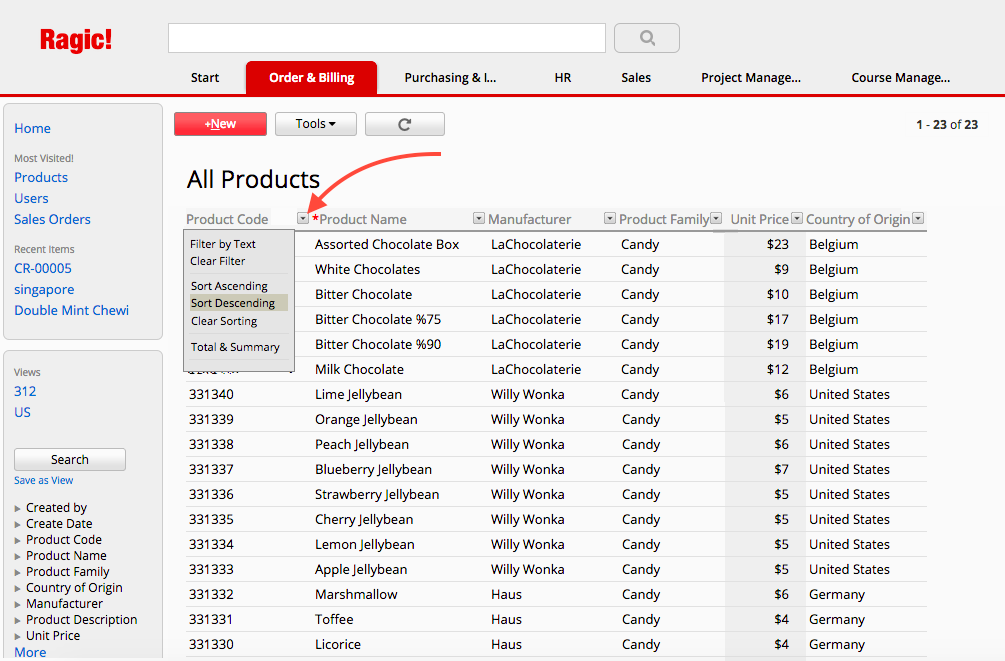
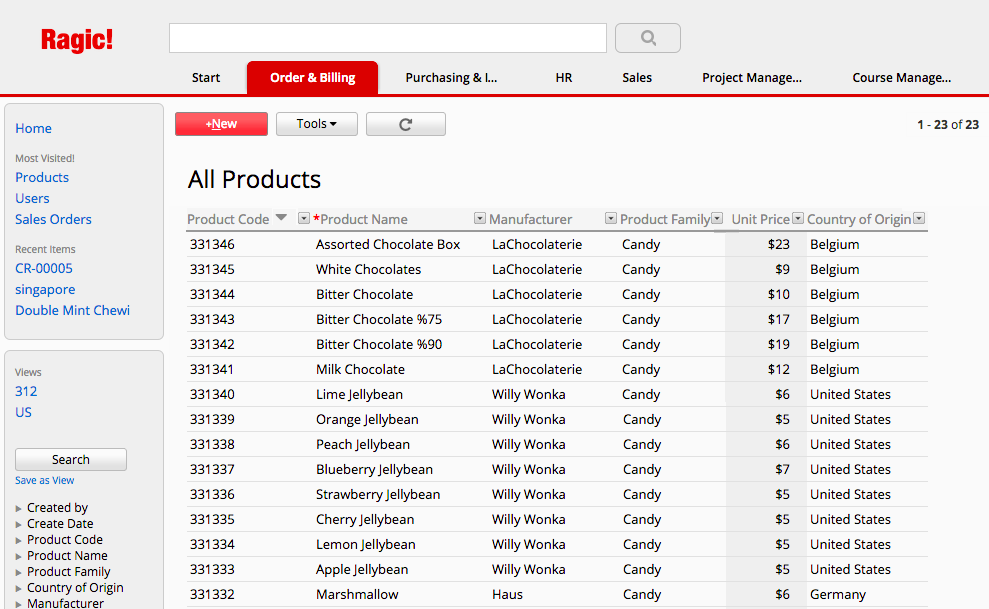
You will see a triangle icon next to the field header if you apply a sort to this field, which will point upwards when sorted ascending, and downwards when sorted descending.
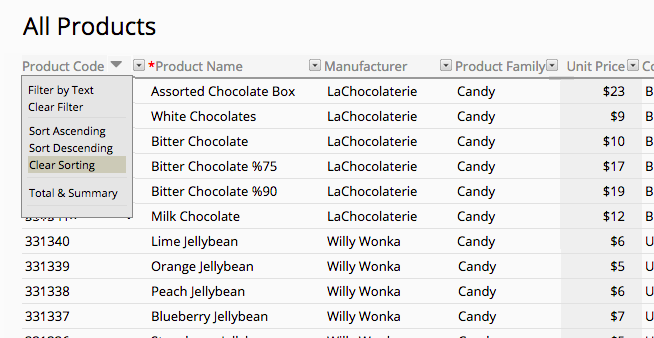
Sorting applied to the field header can be cleared via the "Clear sorting" option through the arrow next to the field header you're applying the sorting from.
If you search the data by full text search, the sorting will be according to the correlation to the keyword instead.
And the sorting can be applied in subtable headers as well.
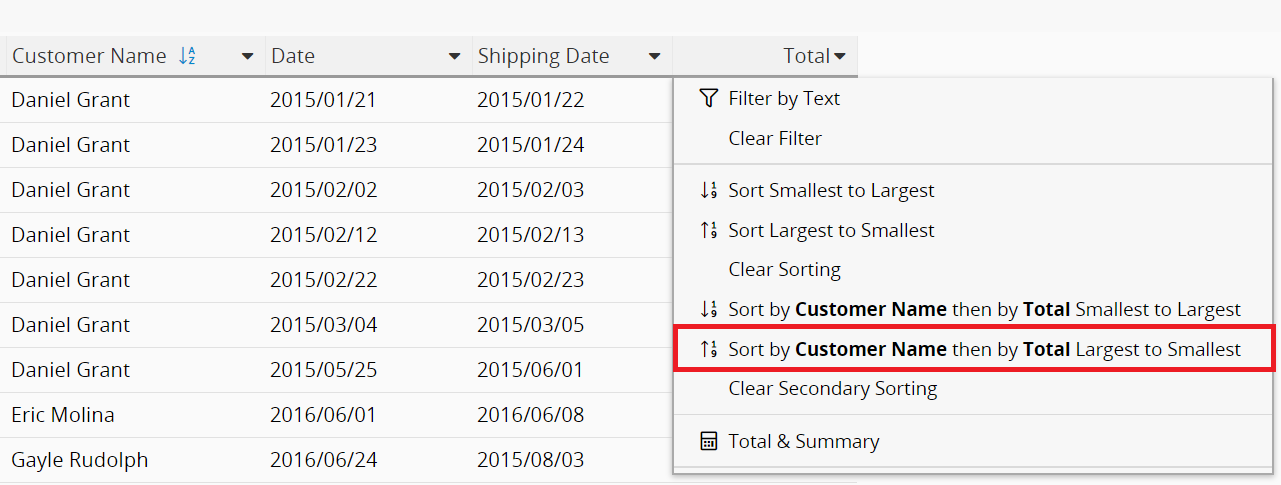
You can also sort multiple fields in the Listing Page.
For example: sorting Customer Name first (as shown below),
then the total price from the largest to the smallest by clicking on the "Total" field header > Sort by Customer Name then by Total Largest to Smallest.
The sorting order number will be indicated next to the field header title.
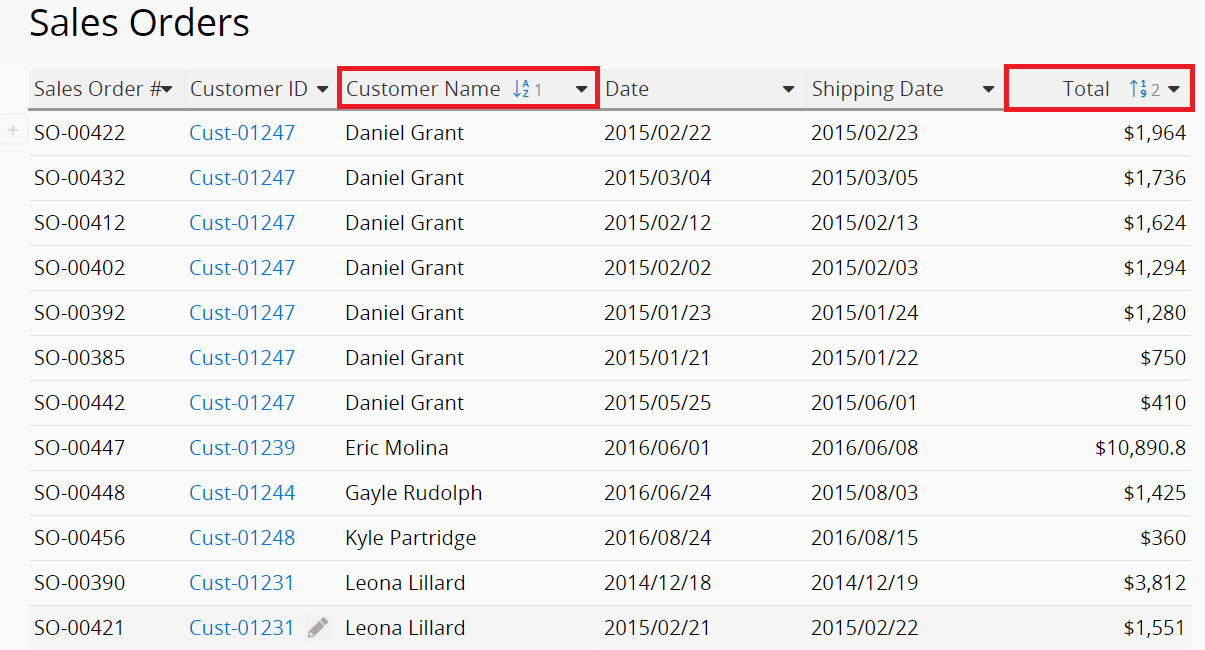
Notice: Applying multiple sorting will be meaningful only when the previous sorted field has duplicate values. In the example, we firstly sort by Customer Name and then sort by Total, the result will sort the records which its total belongs to the first customer and then the records which its total belongs to the second customer. If the previous sorted field doesn't have duplicate values, it will be invalid to apply second sorting.
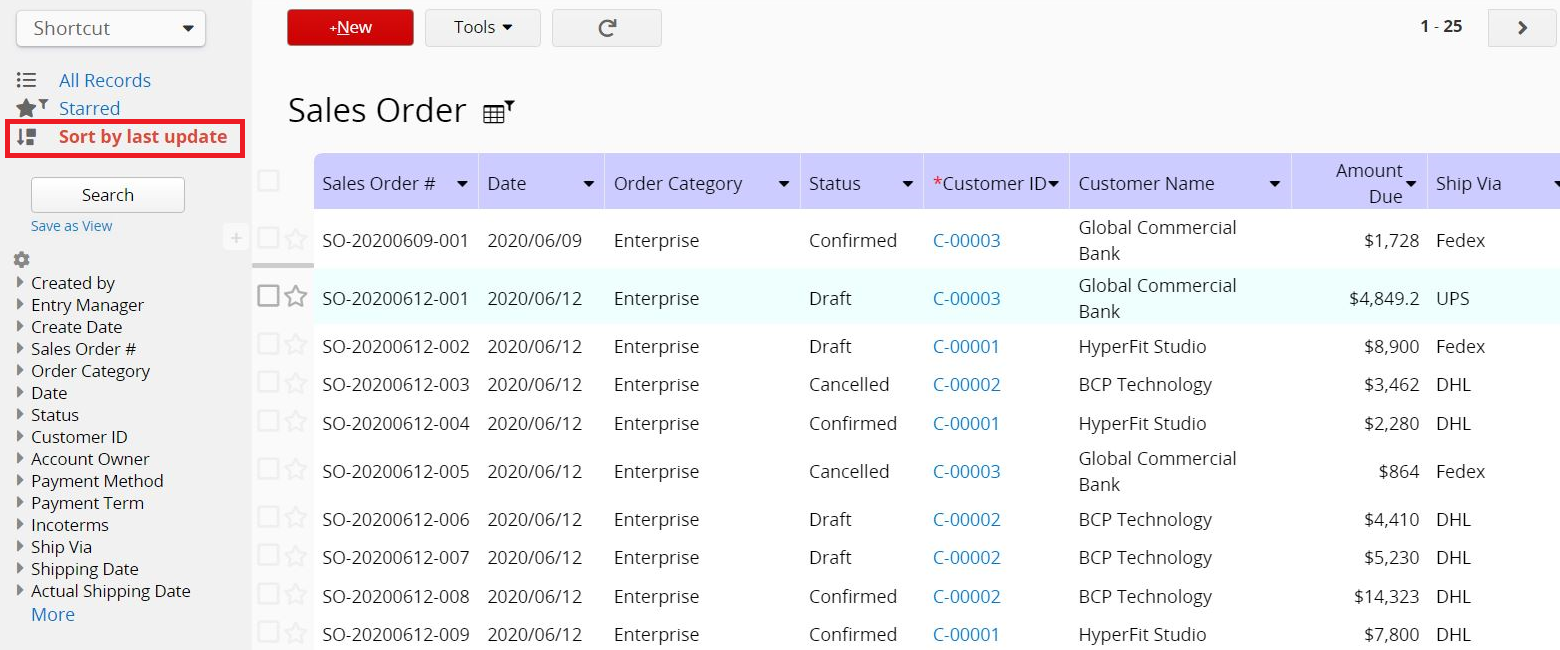
In the left side panel, you can click the system default option Sort by last update to sort your entries from the newest to the oldest.
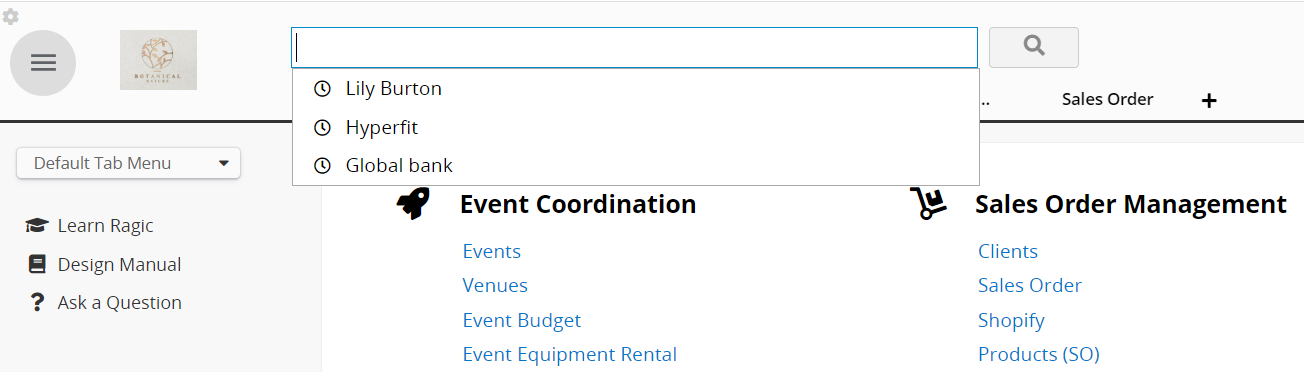
You can do full text search by using the top search bar. Other than clicking on it, you can also execute this function by using the hotkey fn+F3. If you search on the Home page, the full text search results will apply to all the sheets that you have access right to. If you search on a specific sheet, the full text search results will only apply to that sheet.
The top search bar works like a search engine, which can help you to find full values, while also offering you search suggestions when you begin to type. This is a very useful tool when you are looking for a specific entry where you know at least one of the values.
You can further apply field sorting if needed.
The homepage full text search will display the most recent three search history.
The top search bar cannot be used to search partial data, unless you use regular expressions, which means that you cannot directly search for the last three digits "001" if you have a value such as "1234567001". For this kind of query, you can use the left sidebar search tool or filter through field headers instead.
When querying in Ragic, you can write some syntax in the top search bar to combine multiple terms, and use boolean operators to form a more complex query to find specific entries, similar to the google syntax.

You can also modify query terms to provide a wide range of searching options.
While doing this, you can search any field by typing the field name followed by a colon ":" and then the term you are looking for.
Boolean operators allow terms to be combined through logic operators. Ragic supports AND, "+", OR, NOT and "-" as Boolean operators. Please note that the boolean operators are case-sensitive.
The OR operator is the default conjunction operator. This means that if there is no Boolean operator between two terms, the OR operator is used. The OR operator links two terms and finds a matching entry if either of the terms exist in an entry. The symbol || can be used in place of the word OR.
To search for documents that contain either "customer service", or just "customer" use the query:
"customer service" customer
or
"customer service" OR customer
The AND operator matches documents where both terms exist anywhere in the text of a single entry. The symbol && can be used in place of the word AND.
To search for documents that contain "customer service" and "Service Issues" use the query:
"customer service" AND "Service Issues"
The "+" or required operator requires that the term after the "+" symbol exist somewhere in a the field of a single entry.
To search for entries that must contain "customer" and may contain "service" use the query:
+customer service
The NOT operator excludes entries that contain the term after NOT. The symbol ! can be used in place of the word NOT.
To search for entries that contain "customer service" but not "Service Issues" use the query:
"customer service" NOT "Service Issues"
Note: The NOT operator cannot be used with just one term. For example, the following search will return no results:
NOT "customer service"
The "-" or prohibit operator excludes entries that contain the term after the "-" symbol.
To search for entries that contain "customer service" but not "Service Issues" use the query:
"customer service" -"Service Issues"
You can place single and multiple character wildcard searches within single terms (not within phrase queries).
To perform a single character wildcard search, use the "?" symbol.
To perform a multiple character wildcard search, use the "*" symbol.
The single character wildcard search looks for terms that match that with the single character replaced.
For example, to search for "text" or "test" you can use the search
te?t.
Multiple character wildcard searches looks for 0 or more characters. For example, to search for test, tests or tester, you can use the search
test*.
You can also use the wildcard searches in the middle of a term, such as
te*t
Note: You cannot use a * or ? symbol as the first character of a search.
To do a fuzzy search (finding strings that match a pattern approximately, rather than exactly) use the tilde, "~" symbol at the end of a single word term. For example, to search for a term similar in spelling to "roam" use the fuzzy search
roam~. This search will find terms like foam and roams.
An additional (optional) parameter can specify the required similarity. The value is between 0 and 1, with a value closer to 1 only terms with a higher similarity will be matched. For example:
roam~0.8
The default that is used if the parameter is not given is 0.5.
You can find words that are within a specific distance away. To do a proximity search use the tilde, "~", symbol at the end of a phrase. For example, to search for a "customer" and "breakfast" within 10 words of each other in an entry, use the search:
"customer breakfast"~10
Usually, the left sidebar search tool would have options to do a range search for specific field types, such as date fields, but range searches are also supported in Ragic.
Range queries allow one to match entries whose field values are between the lower and upper bound, specified by the range query. Range queries can be inclusive or exclusive of the upper and lower bounds. Sorting is done lexicographically.
Date:[20020101 TO 20030101]
This will find entries whose "Date" field has values between 20020101 and 20030101. These dates would be inclusive to the search. Note that range queries are not only reserved for date fields. You could also use range queries with other fields:
title:{Aida TO Carmen}
This will find all entries whose titles are alphabetically between Aida and Carmen, but not including Aida and Carmen.
Note: Inclusive range queries are denoted by square brackets. Exclusive range queries are denoted by curly brackets.
You can boost the relevance level of matching entries, based on the terms found. To boost a term use the caret "^" symbol with a boost factor (a number) at the end of the term you are searching. The higher the boost factor, the more relevant the term will be.
Boosting allows you to control the relevance of an entry by boosting its term. For example, if you are searching for customer service,
and you want the term "customer" to be more relevant, you can boost it using the ^ symbol along with the boost factor next to the term. You can type:
customer^4 service
This will make documents with the term customer appear more relevant. You can also boost Phrase Terms as in the example:
"customer service"^4 "Customer Service"
By default, the boost factor is 1. Although the boost factor must be positive, it can be less than 1 (e.g. 0.2)
You can use parentheses to group clauses to form sub queries. This can be very useful if you want to control the boolean logic for a query.
For example, to search for either "customer" or "service" and "address" use the query:
(customer OR service) AND address
This eliminates any confusion, and makes sure that address must exist, and either term customer or service may exist in the resulting entries.
You can use parentheses to group multiple clauses to a single field.
To search for a title that contains both the word "return" and the phrase "pink panther", use the query:
title:(+return +"pink panther")
As you query more and more often, you'll notice that you might have a set of queries that you regularly execute. You can save these types of frequent searches on any combination of fields in your form from the left sidebar search tool as a Personal View.
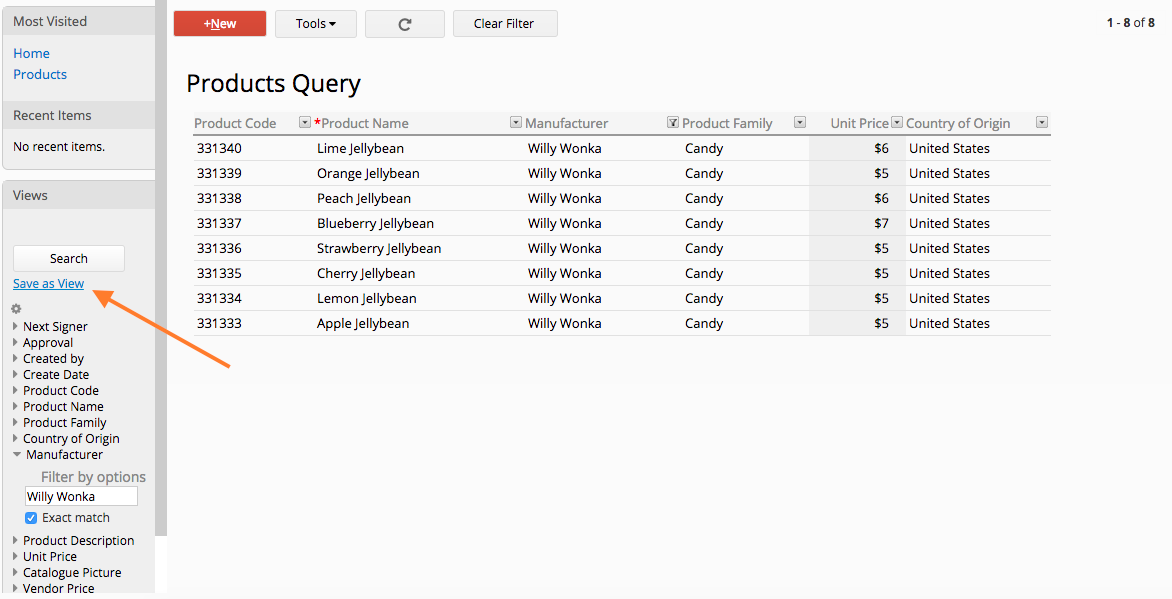
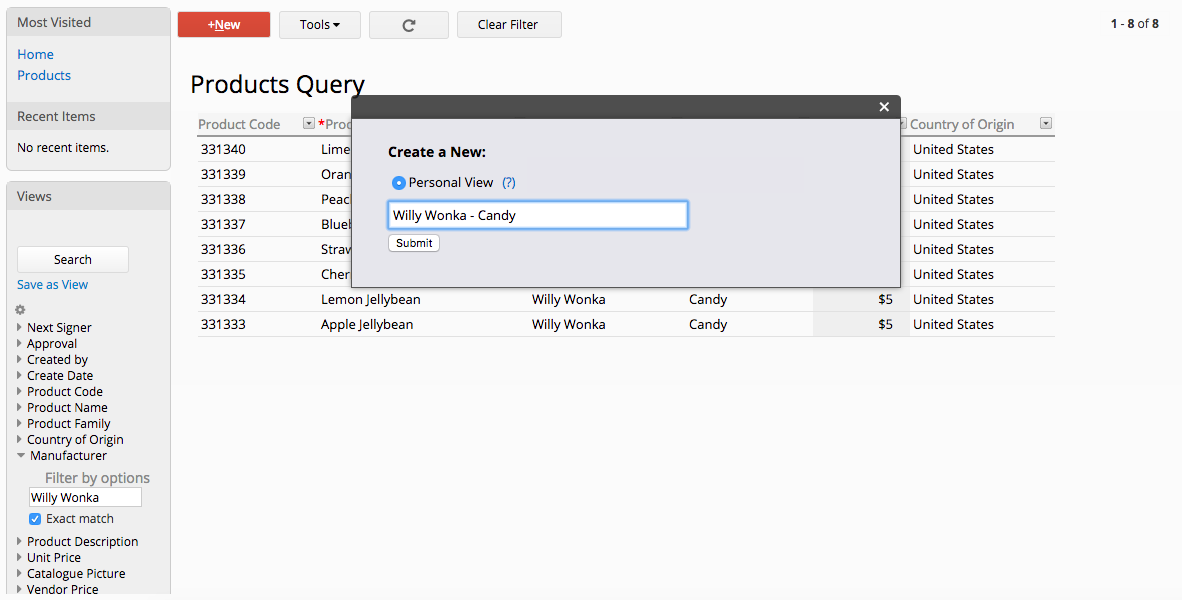
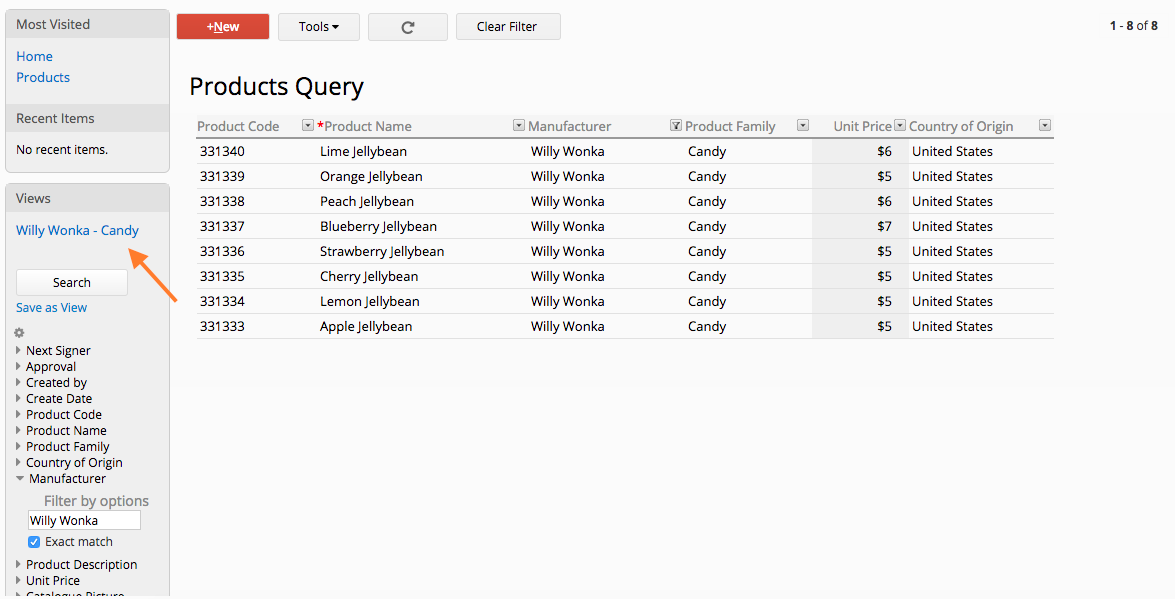
Your saved Personal Views are listed on the left side, above the Search button.
Please note that other users in your account won't be able to see this even if they have access to the same sheet.
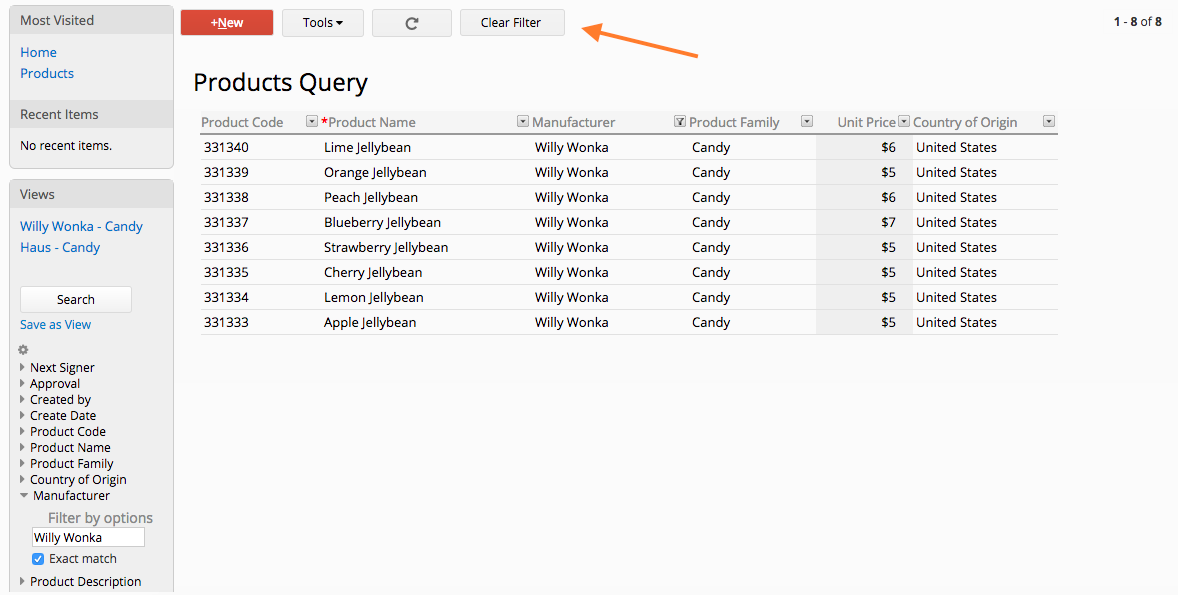
You can always click on the Clear Filters button which will lead you back to the full database.
If you would like to have a view that can be shared with everyone, you may ask your SYSAdmin / the designer of the sheet to create a shared view.
In some circumstances, you may want to share data with a specific view to other users. For example, as a sales manager, you'd like to share a list of only the unshipped order data with the logistics company.
To do this, you can right-click on the shared view and choose the "Share View URL" option. This will generate the three URLs you can use to share the data.
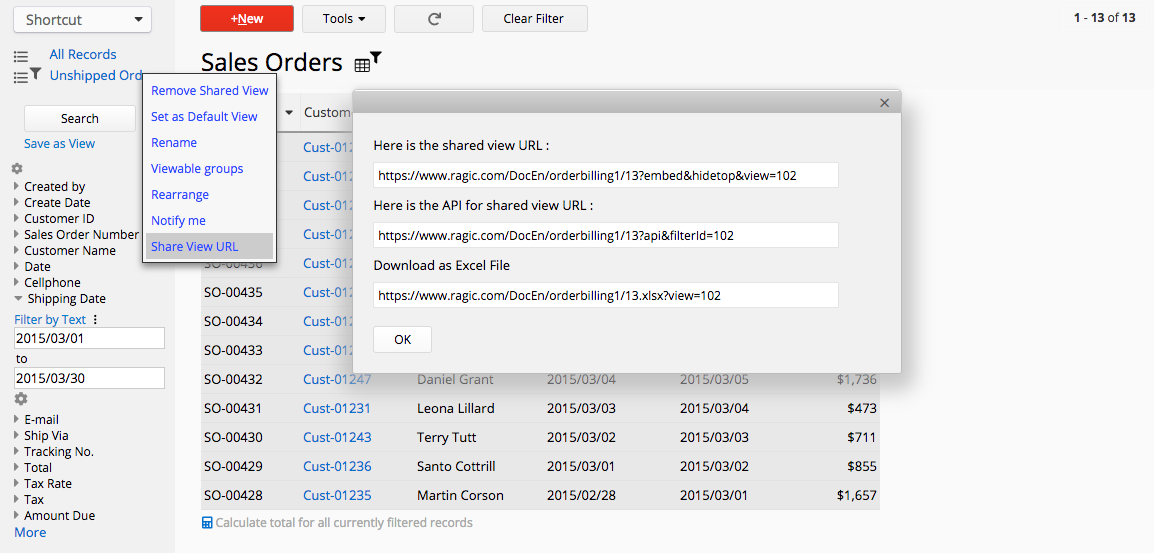
The link under "Here is the shared view URL" will directly take users to the the page with the view you've applied.
The link under "Here is the API for shared view URL" is the API link of the page with the view you've applied.
The link under "Here is the download as excel File URL" is the download link of the page with the view you've applied.
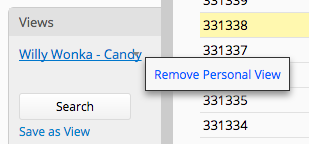
To remove the saved views, click on the arrow next to the saved view's name, and select "Remove Personal View".
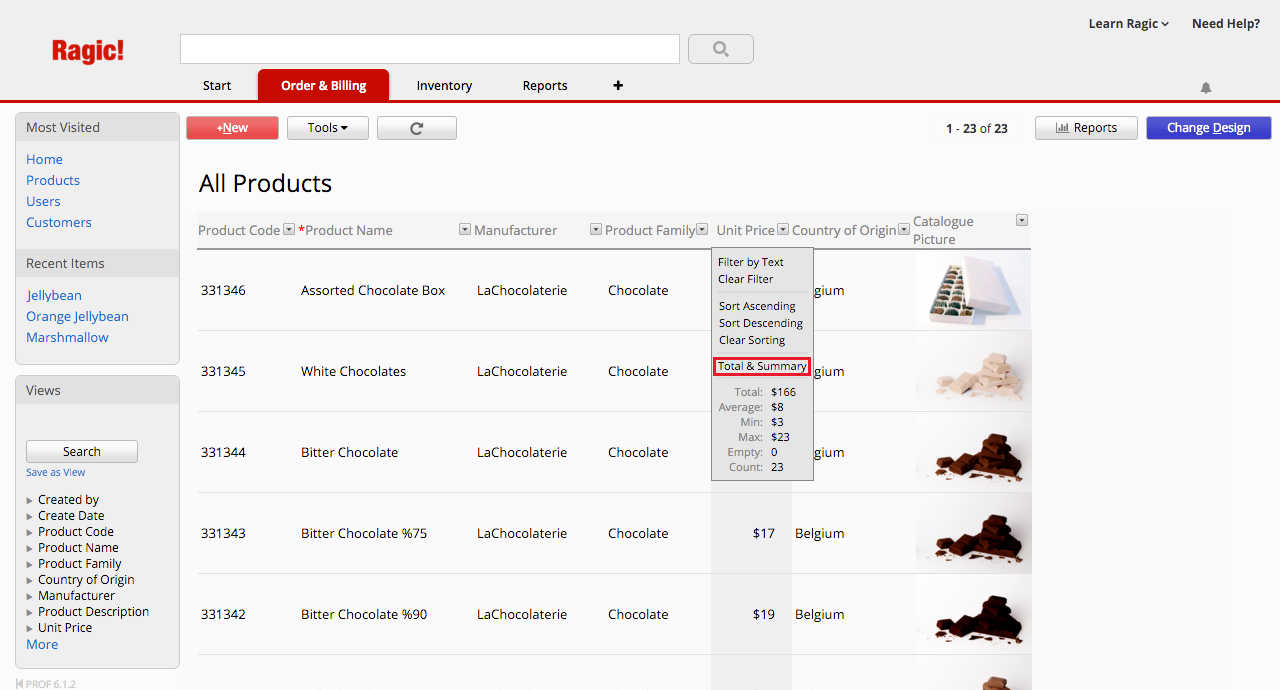
While using Ragic in some cases you will need to quickly view a summary of your data according to the values in your database. For single fields, Ragic can display a quick count, averages, the number empty values, and other various data that might change according to the field type. You can use filters to refine the values being displayed.
To view this short summary, click on the arrow next to your field header in the Listing Page, and click on Total & Summary.
Clicking on Total & Summary will display a list of values according to your field type.
This includes numeric fields, and numeric fields that have a format applied, such as money fields.
| Summary Name | Description |
|---|---|
| Total | Calculates the total of the values in this field for filtered records |
| Average | Calculates the average of the values in this field for filtered records |
| Min | Displays the minimum value in this field for filtered records |
| Max | Displays the maximum value in this field for filtered records |
| Empty | Displays the number of empty values this field has for filtered records |
| Count | Displays the number of records for the applied filter |
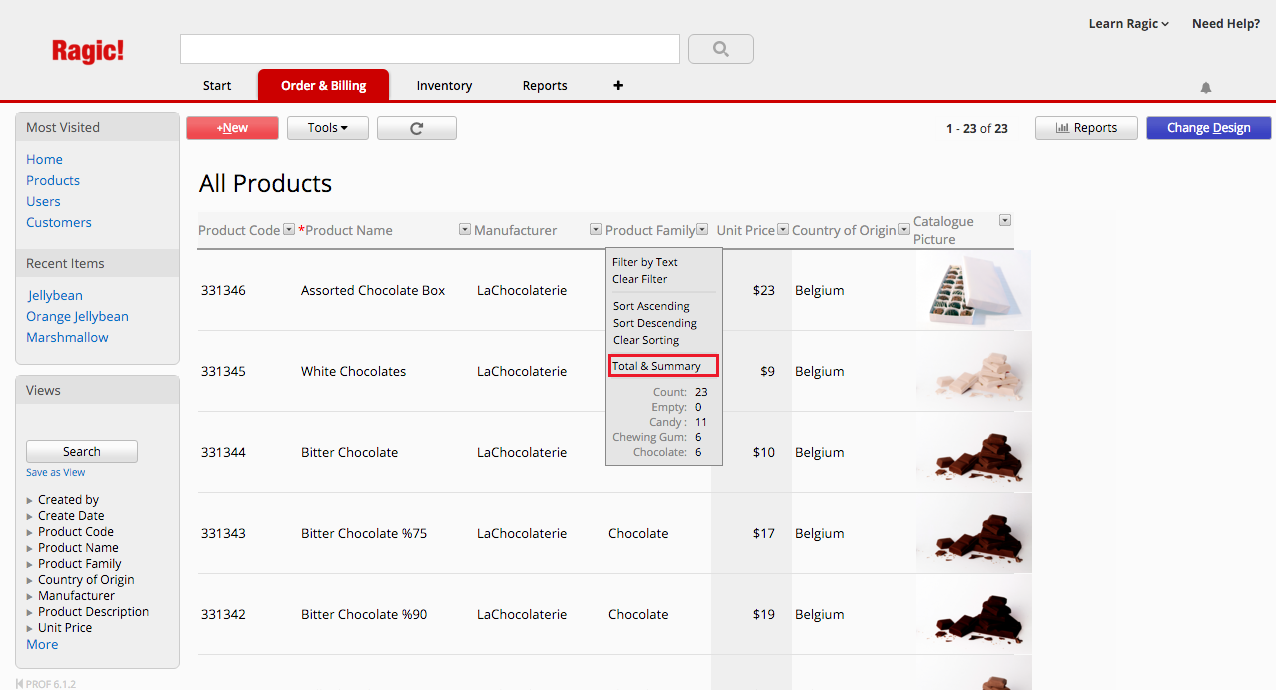
Includes selection fields and multiple selection fields.
| Summary Name | Description |
|---|---|
| Count | Displays the number of records for the applied filter |
| Empty | Displays the number of empty values this field has for filtered records |
| [Option Name] | Displays the option name, and the number of values this field has under this option for filtered records |
| Summary Name | Description |
|---|---|
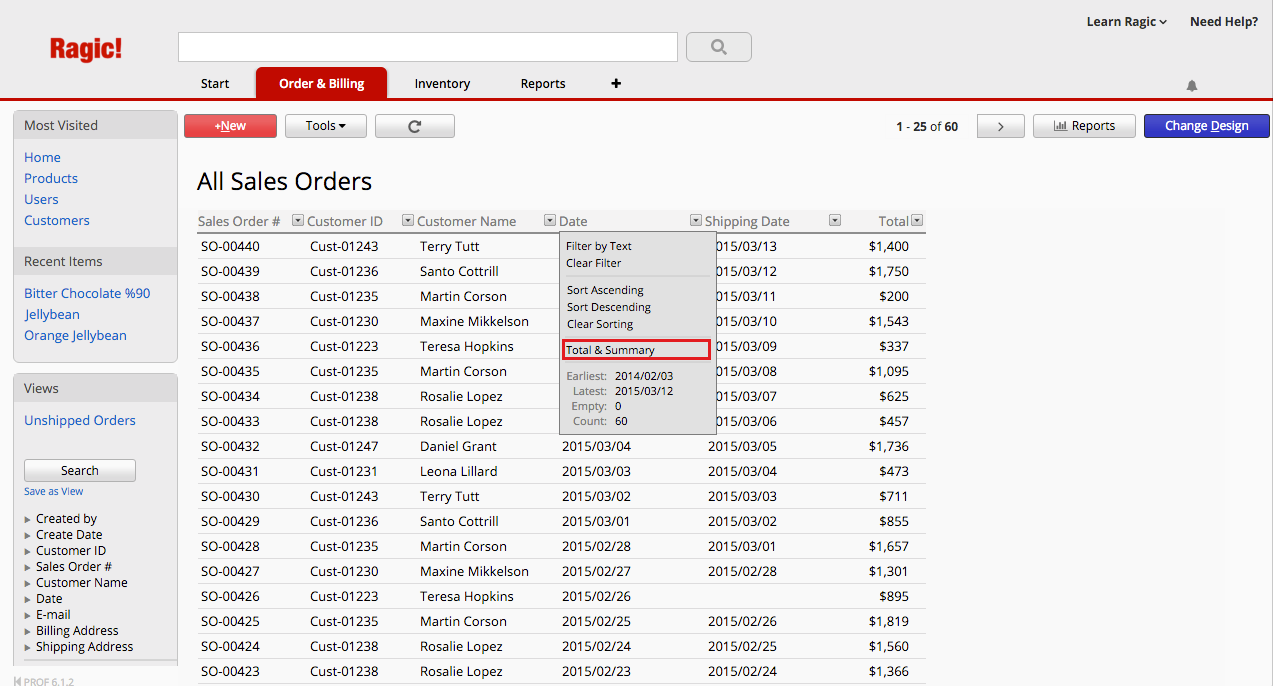
| Earliest | Displays the earliest date value within this field for filtered records |
| Latest | Displays the latest date value within this field for filtered records |
| Empty | Displays the number of empty values this field has for filtered records |
| Count | Displays the number of records for the applied filter |
The Total & Summary feature is meant to be used for a summary at a glance. If you need to view and save a summary that is more advanced, you can use the report types available in Ragic. (Only the SYSAdmin can save generated reports.)
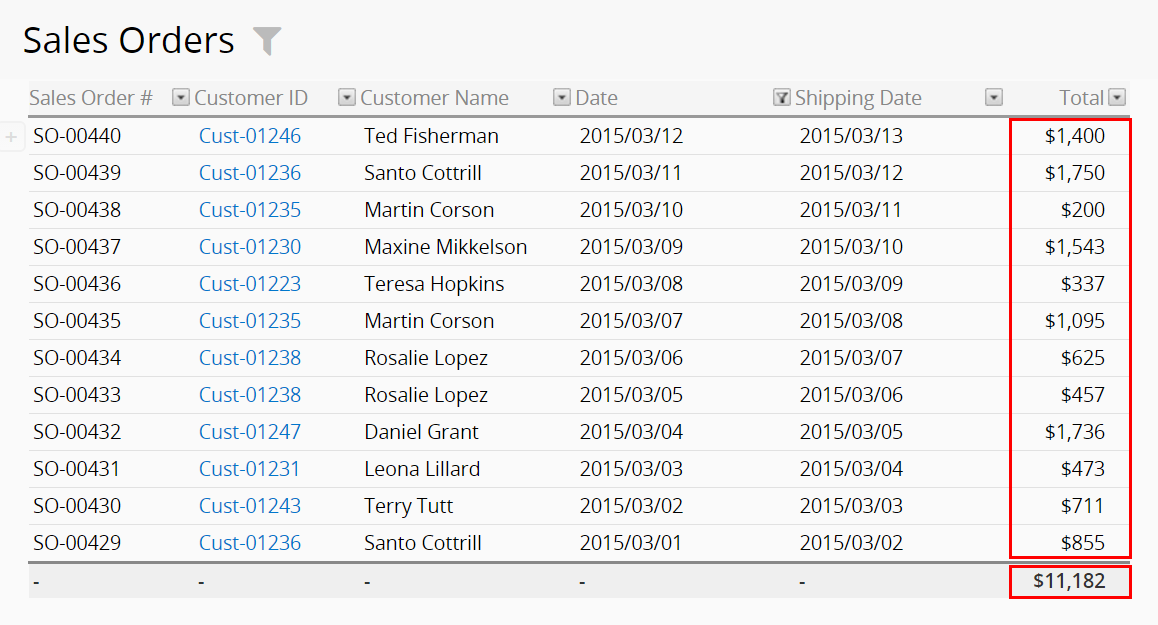
While using Ragic, in some cases you will need to quickly calculate the total of values of your data that were entered in separate records. For numeric fields, Ragic can quickly calculate a total from the listing page through the "Calculate total" function in the bottom of the page. You can use filters to refine the values being displayed. If a filter is not applied, all values in numerical fields will be summed.
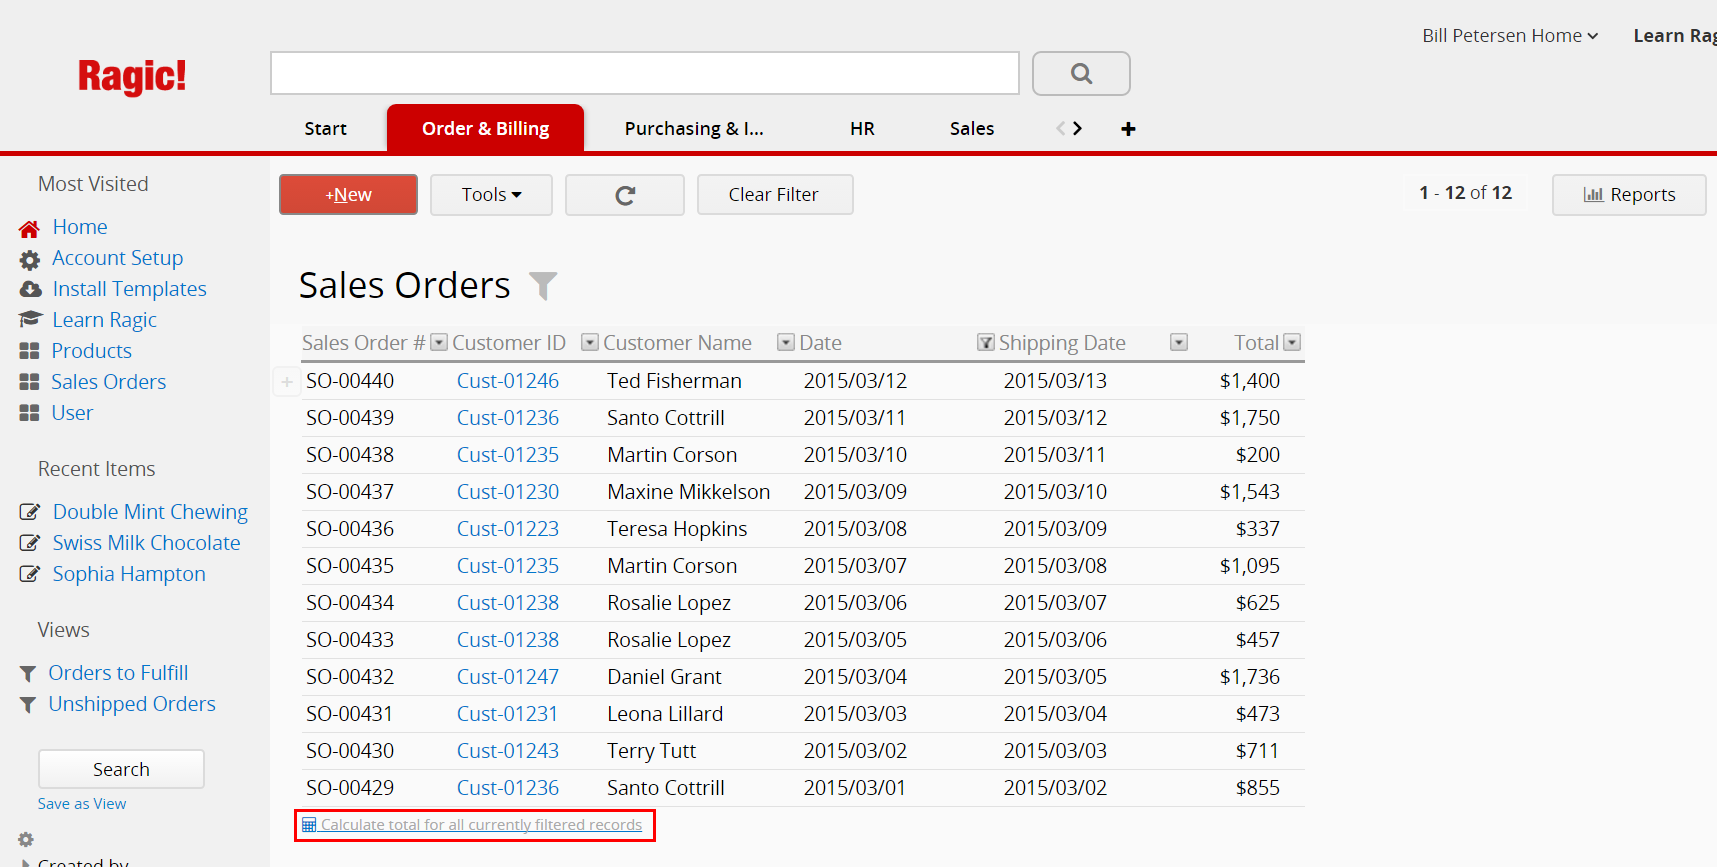
The Calculate Totals feature is meant to be used for a quick sum at a glance. If you need to view and save a summary that is more advanced, you can use the report types available in Ragic. (Only the SYSAdmin can save generated reports.)
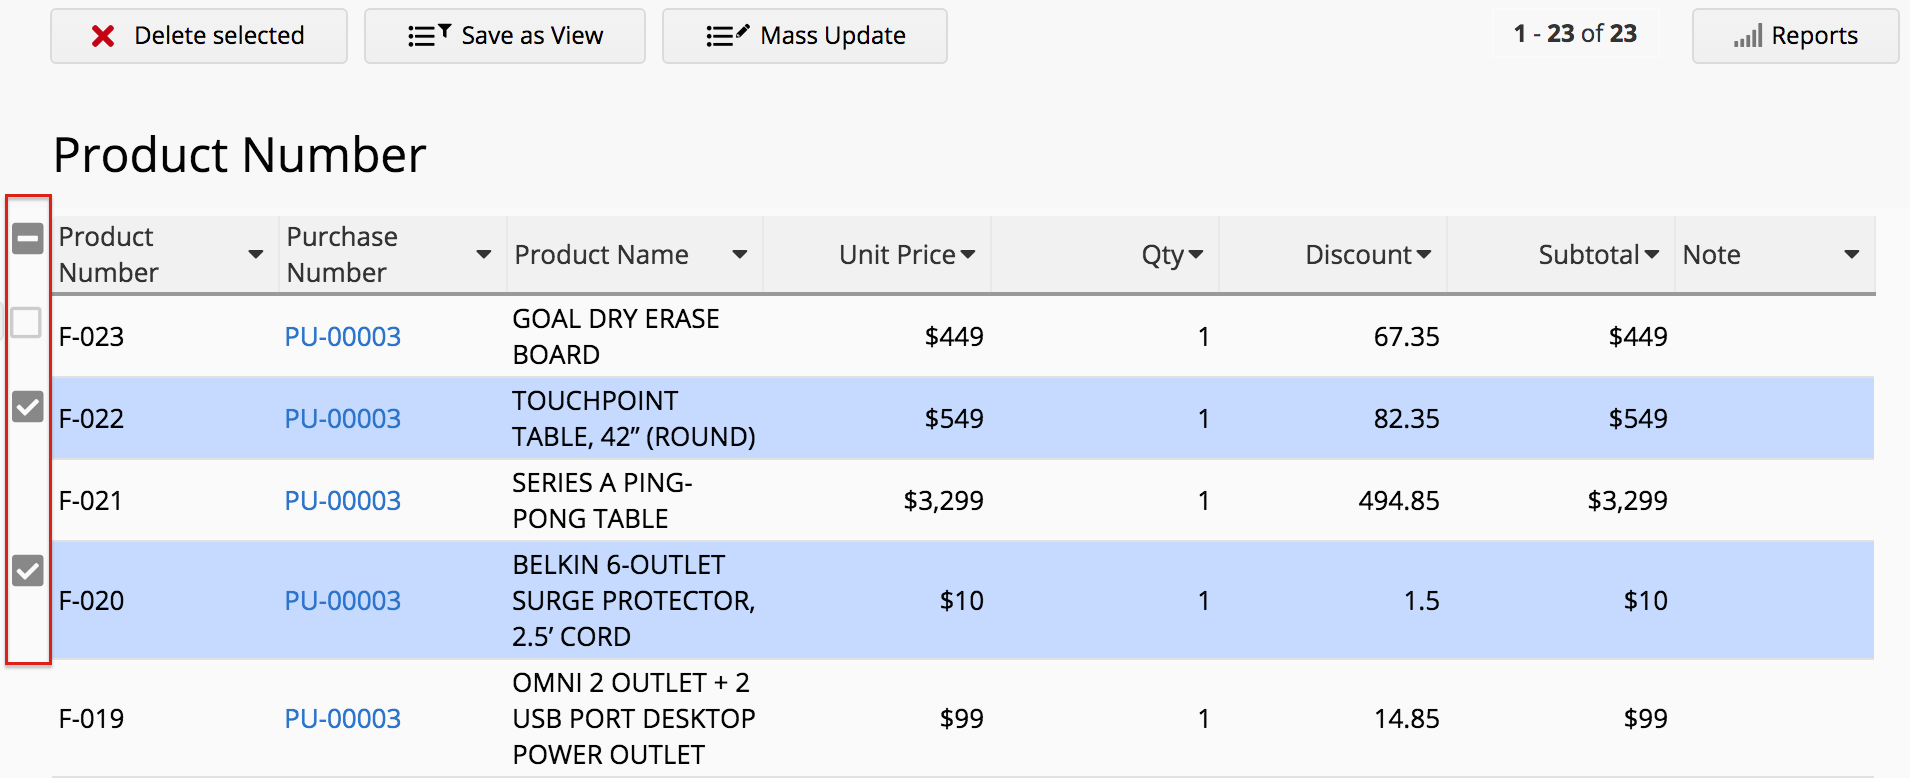
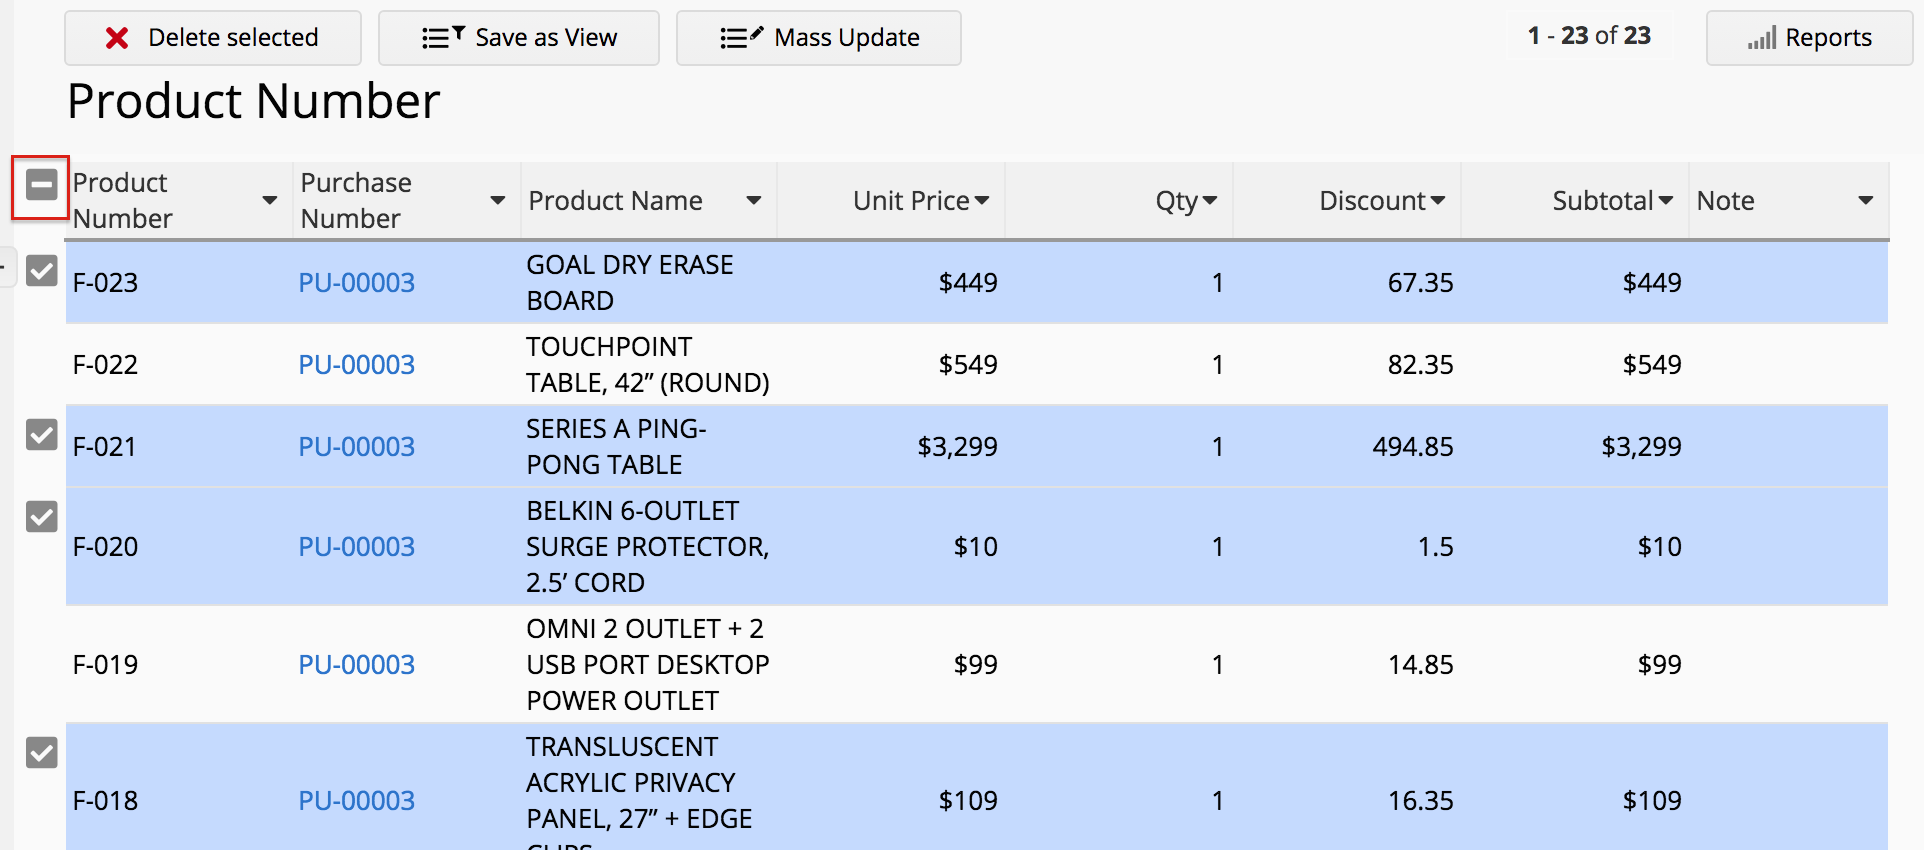
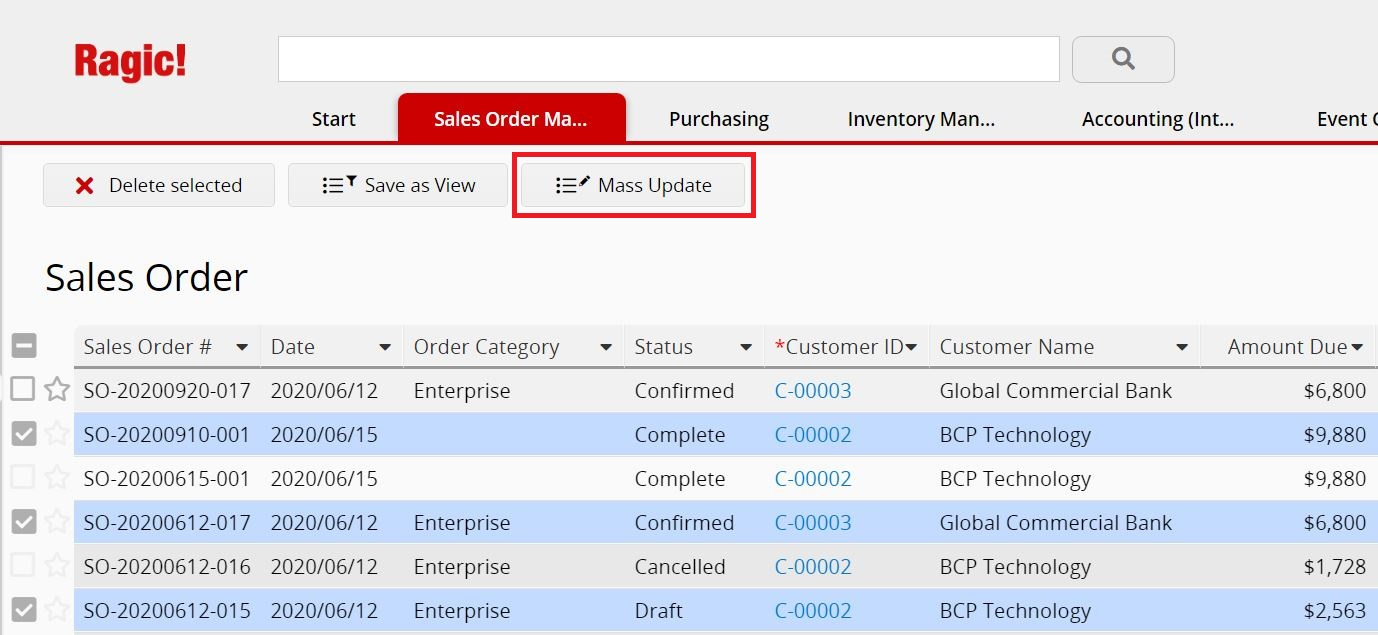
To select data manually, go to the sheet listing page. Select the entries you want by ticking the checkbox on the left side of each entry's first column.
You can tick the box on the upper left side of the table to select all the entries on that listing page if you don't select any entry previously.
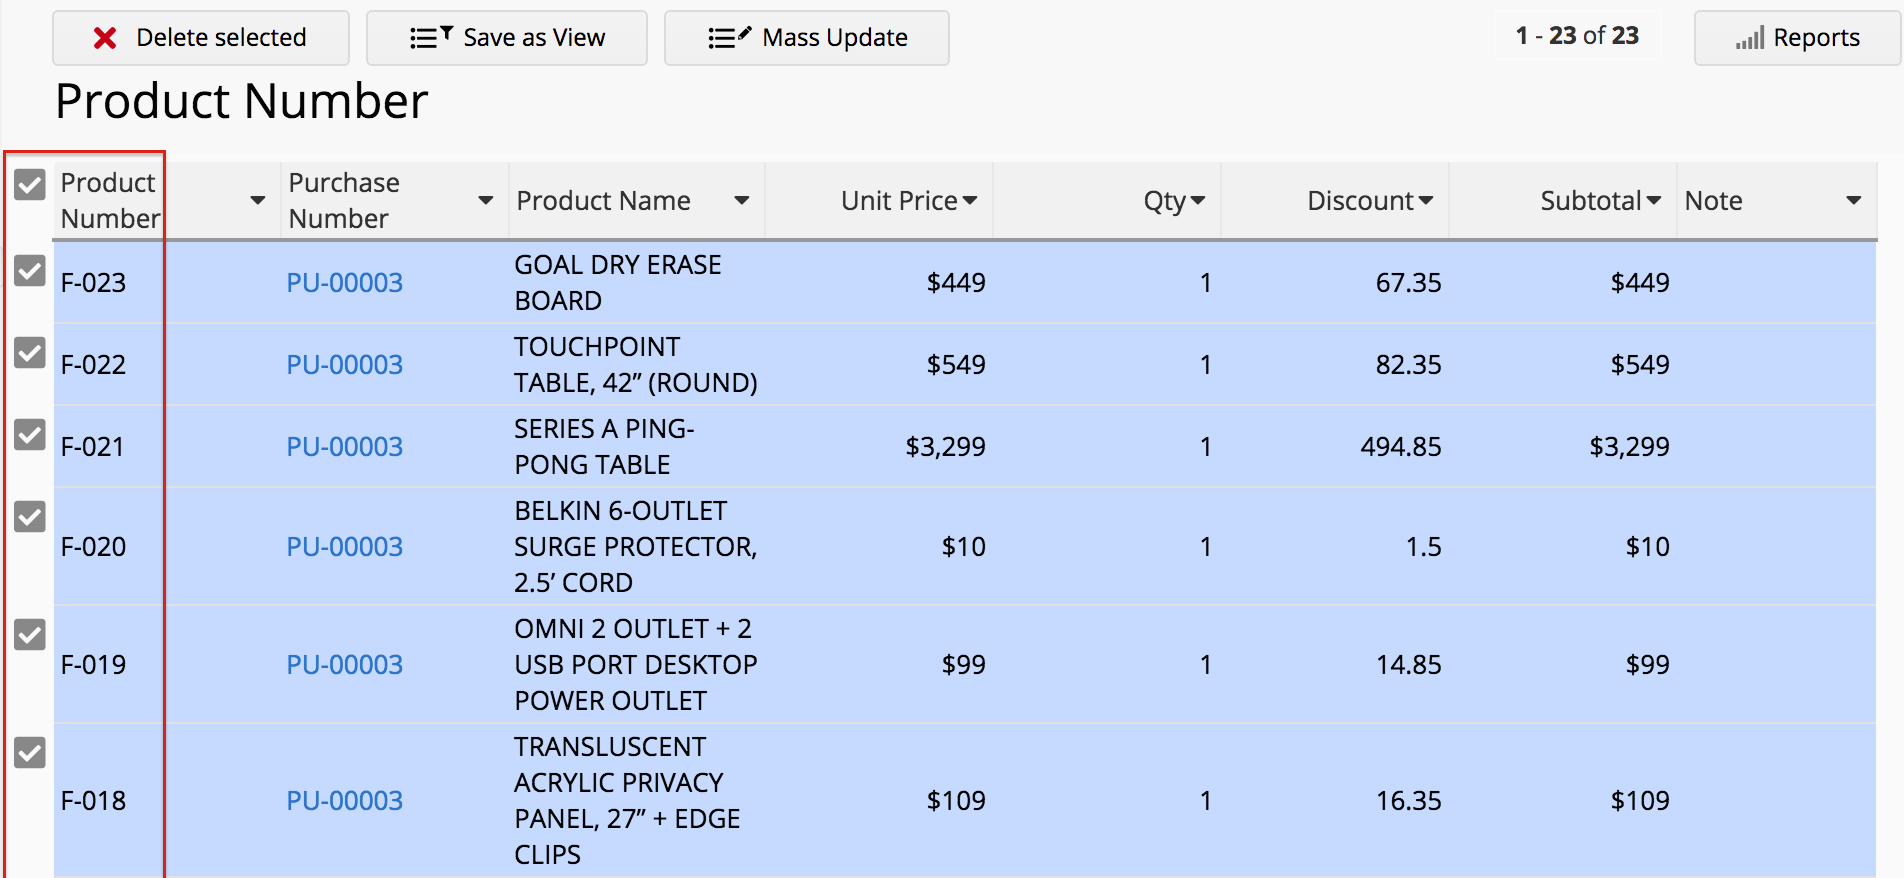
To cancel selecting the entries, click the "-" on the upper left side of the table.
There are three things you can do after selecting the entries:
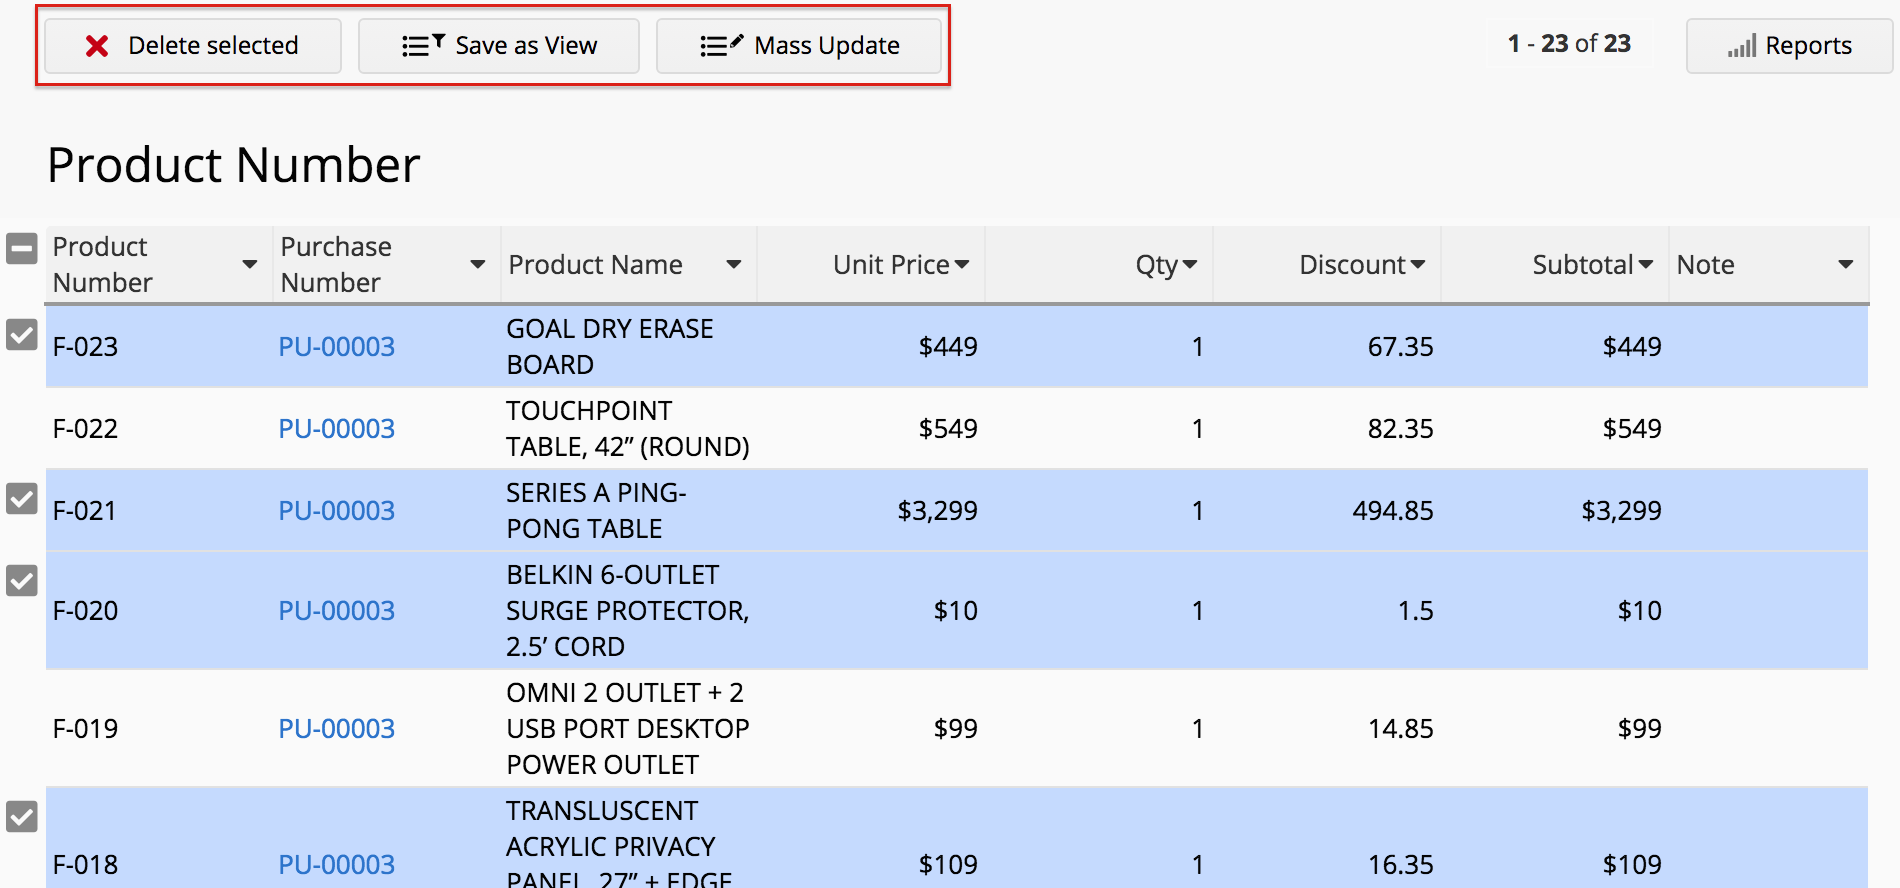
Selected entries will be deleted.
Please refer to this article for more details.
Please refer to this article for more details.
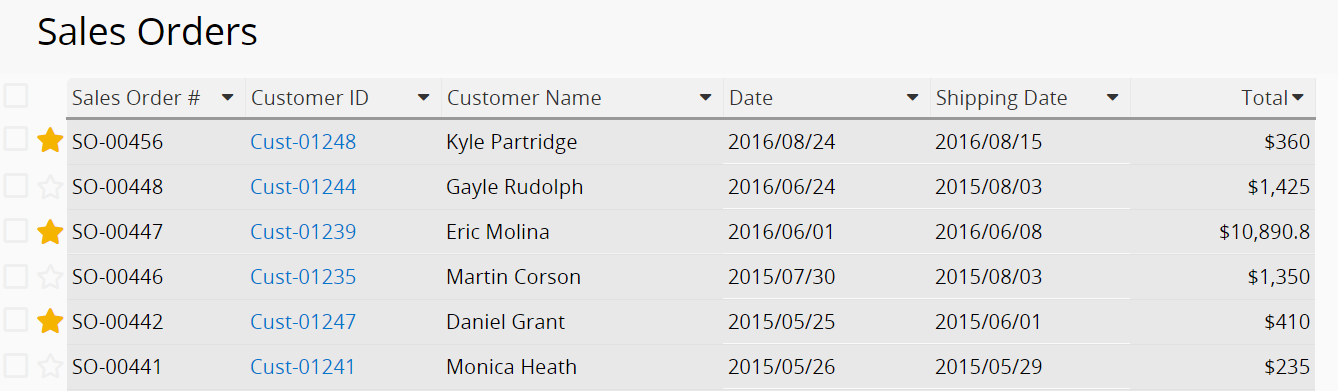
To remove the star of an entry, simply click on the star icon again.
To filter the starred entries, you can click the Starred option on the left search panel.
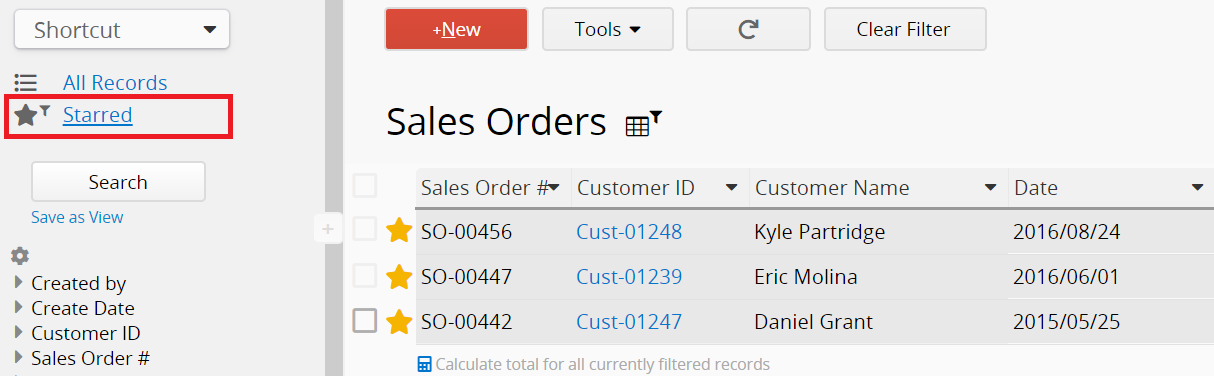
You can also star or unstar an entry from its Form Page.
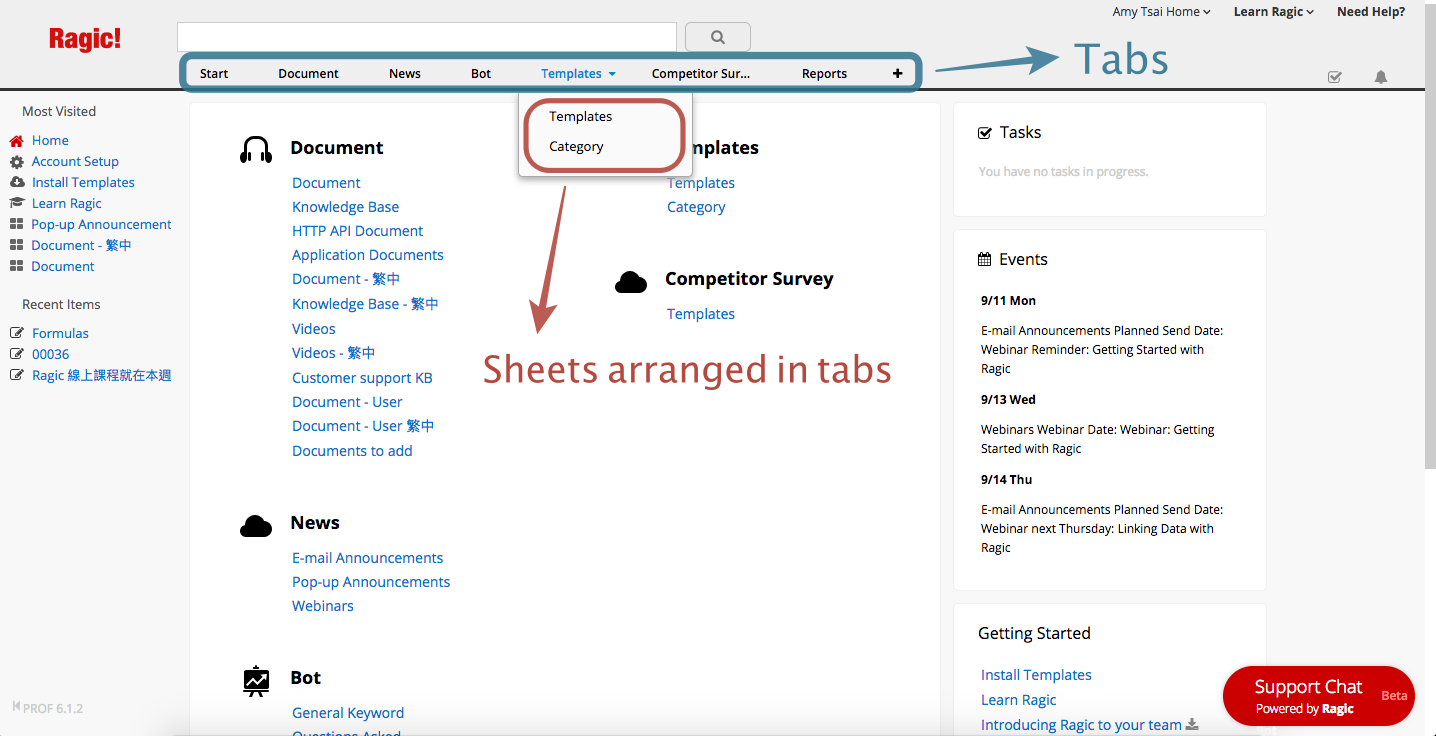
When you enter your Ragic database, you'll see a list of all available sheets under each tab that you have access rights to on the user Homepage. You can either scroll down to find the sheet that you want to access, or navigate from the Tab on the top.
In Ragic, a sheet is made up of a Listing Page and a Form page.
To understand the concept of a sheet in Ragic, you can refer to the definition of listing page and form pages.
To navigate to the Home page, you can click either the logo on the upper-left corner or your_name Home on the upper-right corner.
There are many Account-wide features you might be interested in:
You can collapse / expand the left side tool bar by dragging on the edge of the line (the area shown below.)
1. Why can't I find a certain sheet in the database?
In most cases, this might result from the configuration of access rights, which is set by the system administrator (SYSadmin) of the database. You may contact your SYSadmin user(s) for further support.
Setting up your personal profile information for your database account and preferences can be done through your Personal Settings panel.
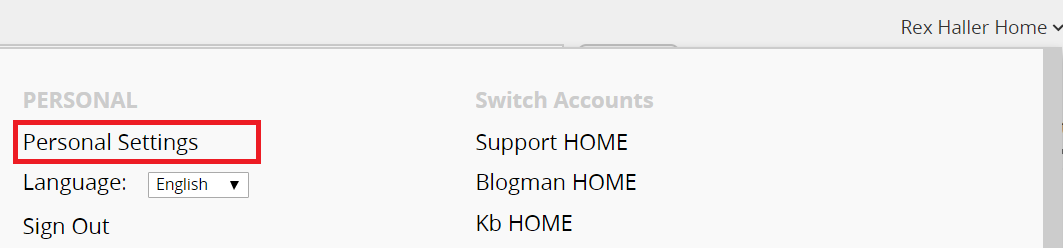
To access the Personal Settings panel, hover on your name (if you don't have a name registered, your e-mail address will be shown) on the upper-right side of your screen. Under Personal, click Personal Settings.
Your Profile page allows you to set your display name, change your password, and set your phone, picture, and signature. This information will only be visible to system administrators in your Ragic account through the internal user information panel, and anywhere this information is linked to within your database for users with access rights to view this information.
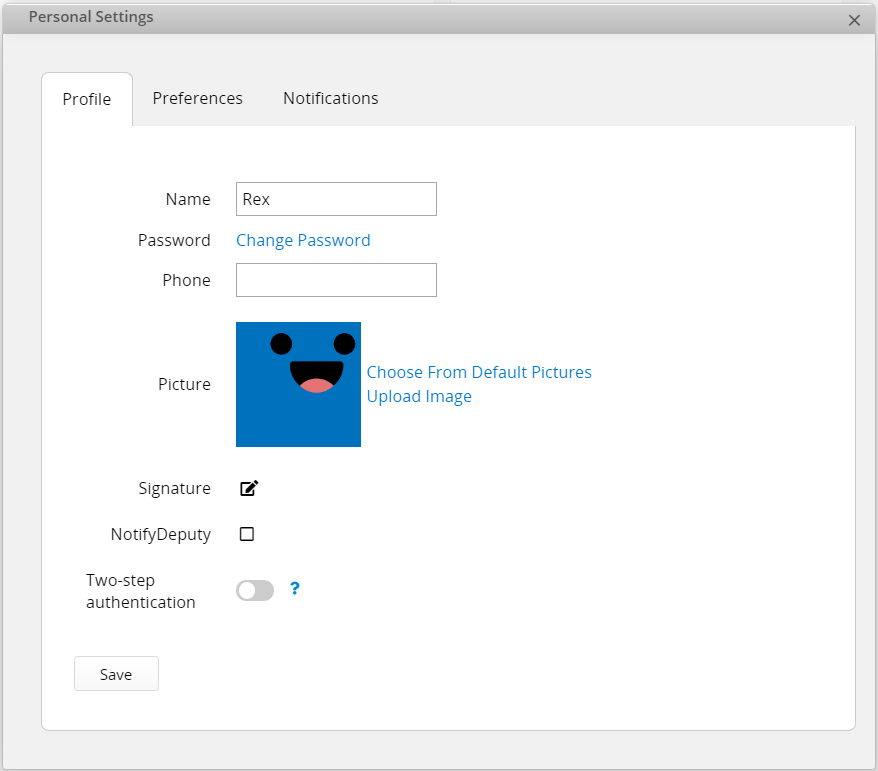
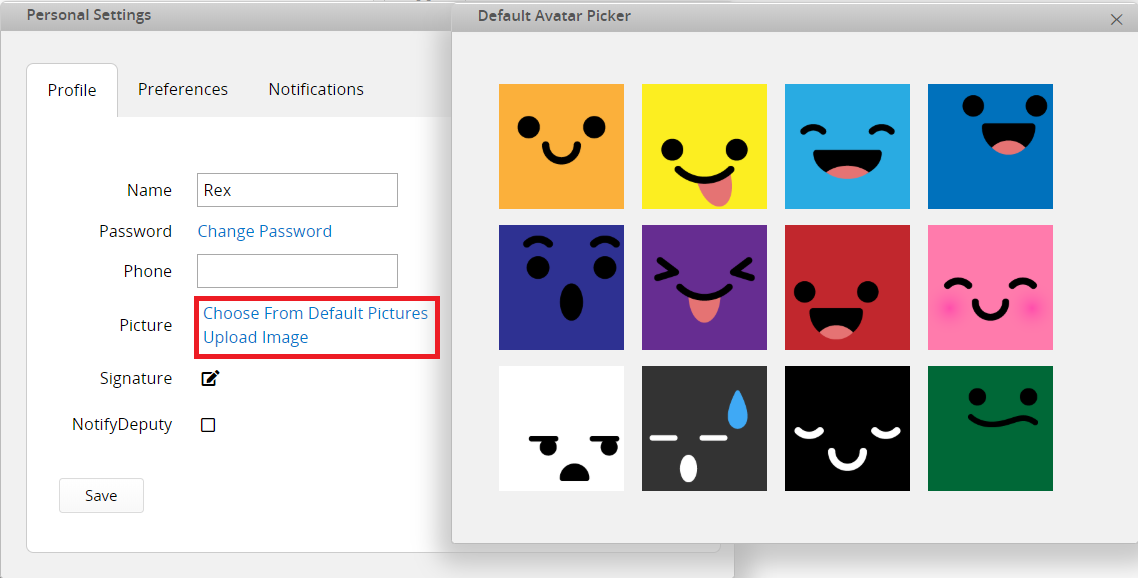
The picture you upload to your Profile will be your avatar in Ragic. You can also choose a picture from default pictures as an alternative to uploading your own.
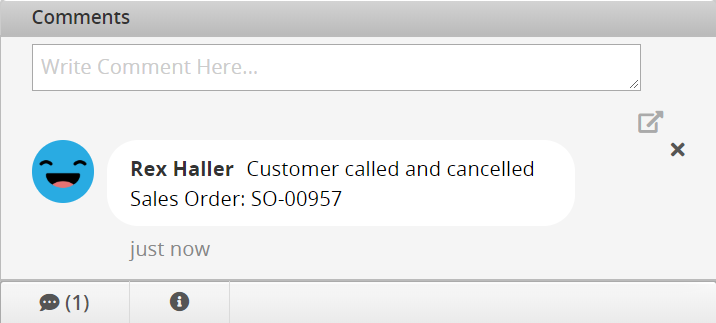
The uploaded picture will be displayed in Comments、Tasks、Notifications and Select User Fields.
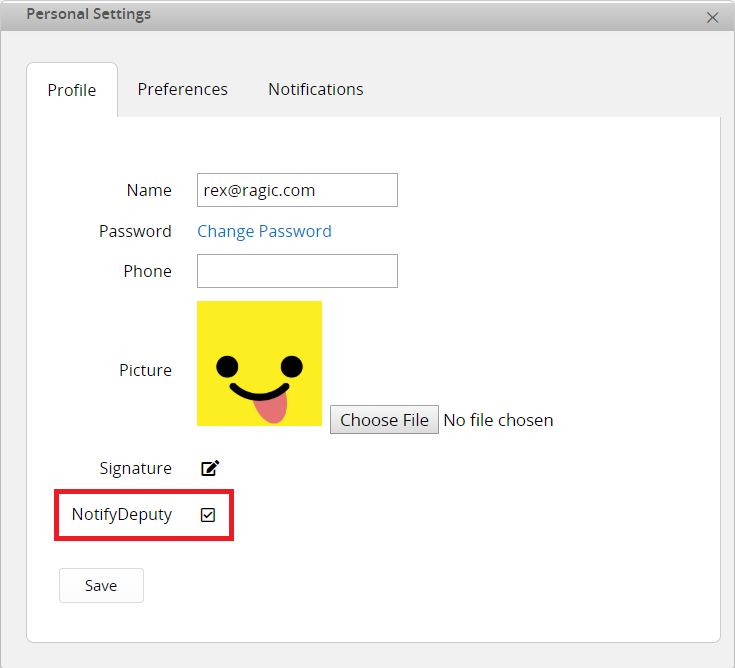
If you turn on the Notify Deputy option, the Ragic system will automatically send approval requests to your deputy when an approval flow related to you starts. Using this option would be very helpful when you are on leave.
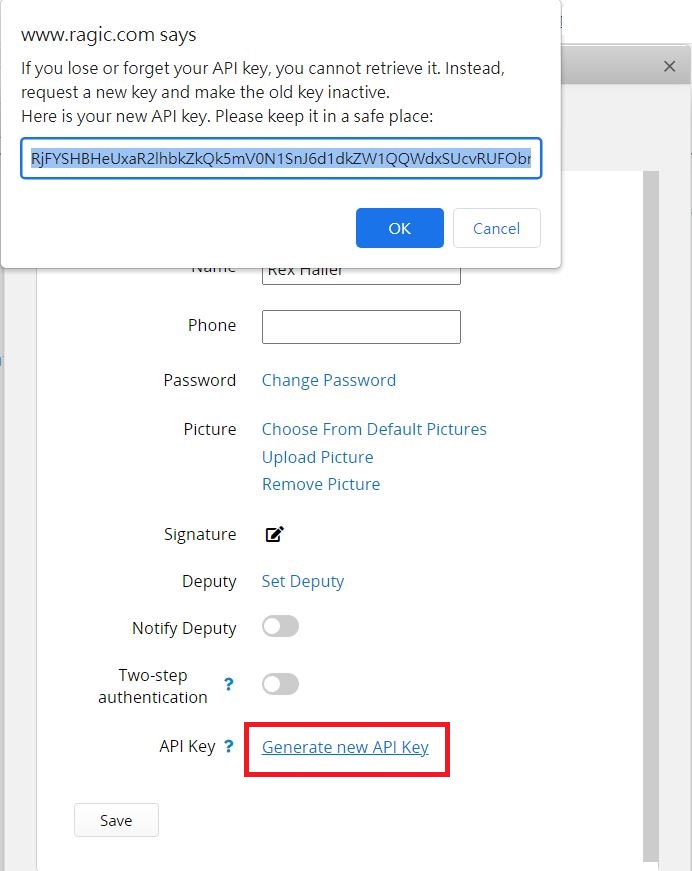
You can generate your API key in Personal Settings. Click this button will reset your API key as well.
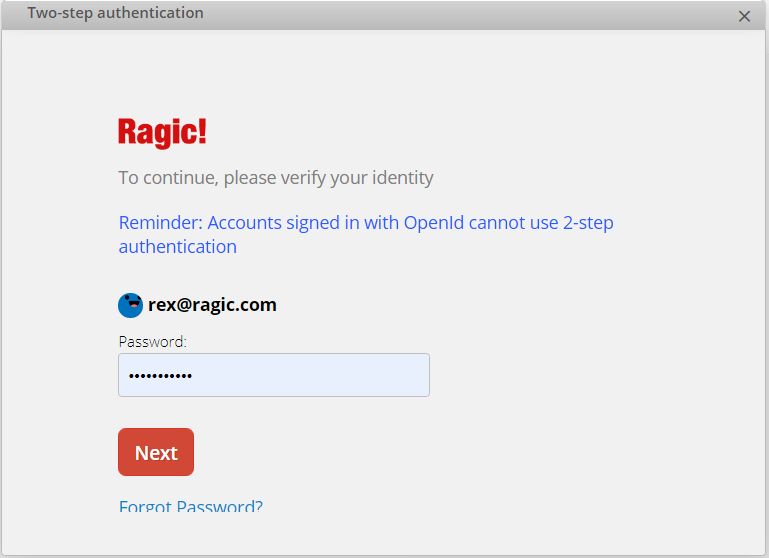
You can activate Two-step authentication to protect your account with both your password and your phone. First, you will need to enter your password.
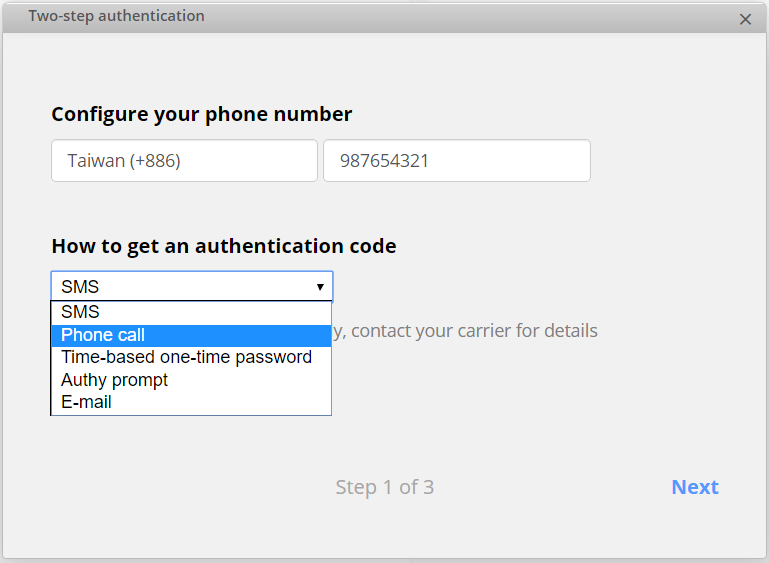
In the next step, it requires your phone number and selection of how to get the authentication code. If you choose Time-based one-time password or Authy prompt, you will need to download a third party app - Authy. This app will be used for authentication purposes.
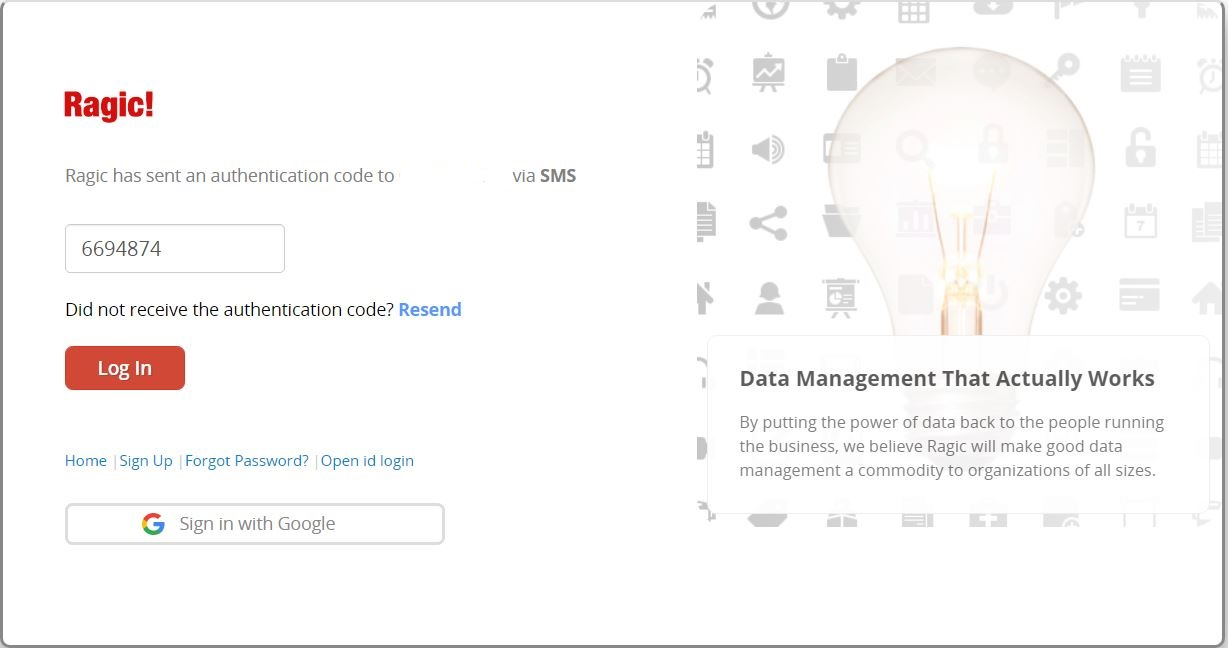
Enter the code you received.
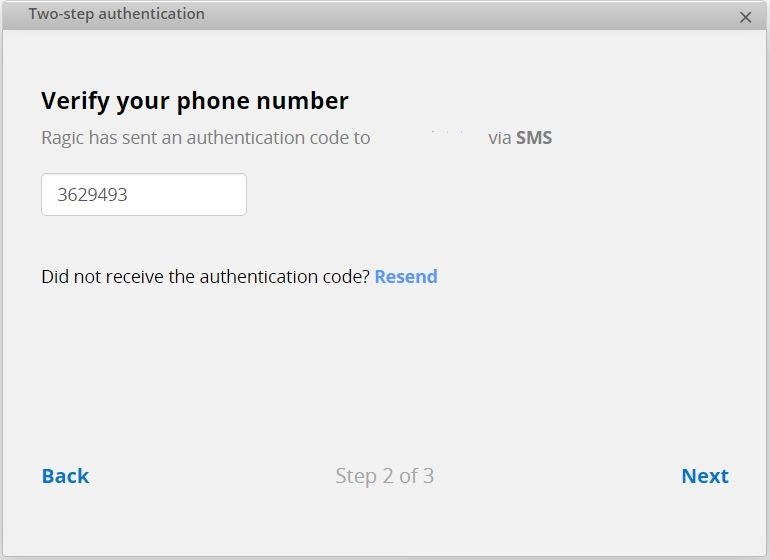
Click Enable to apply this setting.
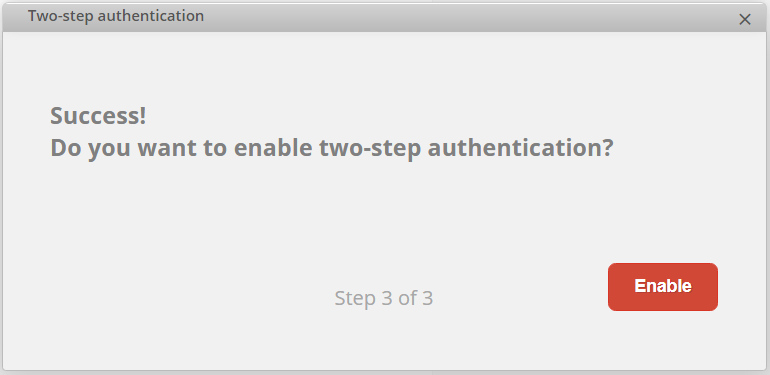
After enabling two-step authentication, you will need to enter the authentication code to log in.
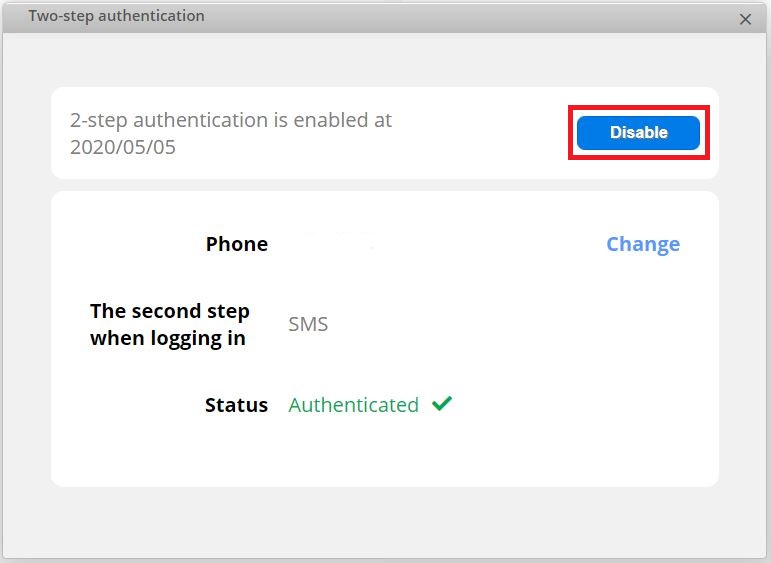
If you would like to disable two-step authentication, you can adjust it in your Profile.
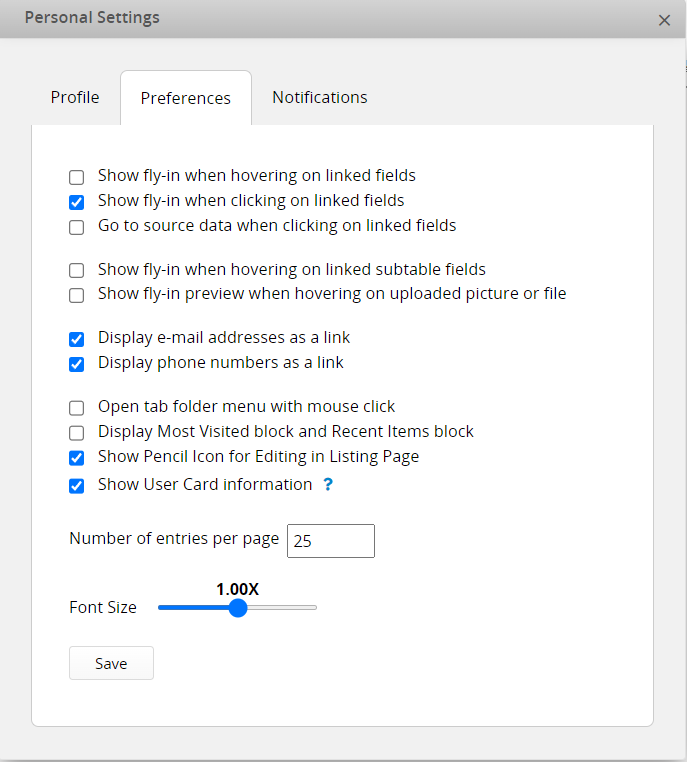
Your Preferences panel is a global display setting that affects how you interact with your Ragic database sheets. The default values and what these preference options mean are explained below:
| Preference | Default Value | Description |
|---|---|---|
| Show fly-in when hovering on linked fields | On | Displays the right panel fly-in when hovered on linked fields. |
| Show fly-in when clicking on linked fields | On | Displays the right panel fly-in when clicking on linked fields. |
| Go to source data when clicking on linked fields | Off | Opens the source data in a new tab when clicking on linked fields. You can only turn on either Show fly-in when clicking on linked fields or Go to source data when clicking on linked fields at the same time. |
| Show fly-in when hovering on linked subtable fields | On | Displays the right panel fly-in when hovered on linked fields in subtables. |
| Show fly-in preview when hovering on uploaded picture or file | On | Displays an image or file preview for image upload fields or file upload fields when hovered on an existing uploaded image or file. |
| Display e-mail addresses as a link | On | Displays E-mail fields as links, and behaves according to how the user has configured their browser setting for e-mail addresses. |
| Display phone numbers as a link | On | Displays Phone fields as links, and behaves according to how the user has configured their browser setting for phone links. |
| Open tab folder menu with mouse click | Off | Toggles setting for tab menus to display sheet names when hovered or clicked. |
| Display Most Visited block and Recent Items block | Off | Displays recently used sheets and records in the left side panel. |
| Show Pencil Icon for Editing in Listing Page | On | Displays Pencil Icon in Listing Page for quick access to Edit Multiple Entries. |
| Show User Card information | On | Displays the User Card when viewing user data. Since the User Card is accessible only for Internal Users. External Users cannot view this information, regardless of the setting. |
| Number of entries per page | 25 | Global setting for the number of entries displayed on listing pages. This can be configured for individual sheets with this method. |
| Font Size | 1.00X | Setting the font size of the data in the form. |
You can also turn off all of the fly-in by clicking gear icon in right panel. For detailed information please refer to this article.
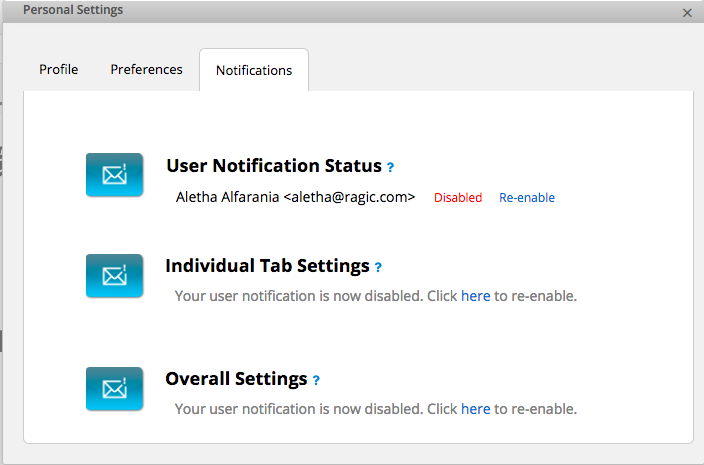
You may access Notification settings from Personal Settings to determine whether or not you wish to receive notifications, when and how you would like to be notified.

There are 3 sections in the notification settings:
This section determines whether or not you would like to receive any notifications (from all features like reminders, entry reviews and approval, etc).
Users who disable User Notification Status (with status "Disabled") will not receive notifications, and therefore cannot, and have no need to, set up the following two sections.
If your notification status is enabled, this section determines under which conditions notifications will be received when users create or modify entries in the sheet.
Clicking on any of your application tab on the menu will take you to the list of all the sheets under that tab where you can configure the notifications you would like to receive.
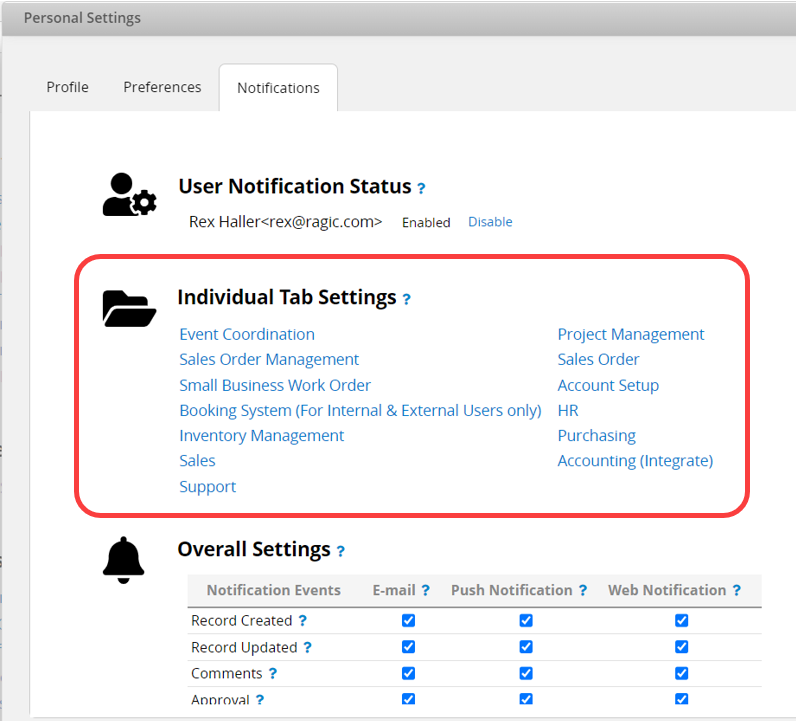
There are four conditions of receiving notifications you can choose for each sheet:
Notify me when a record related to me is updated. (default setting)
Notify me when a new record is created.
Notify me when a record is updated.
Notify me when a record is commented.
Note: A record is considered "related to me" if they are created by me, assigned to me, or commented on by me.

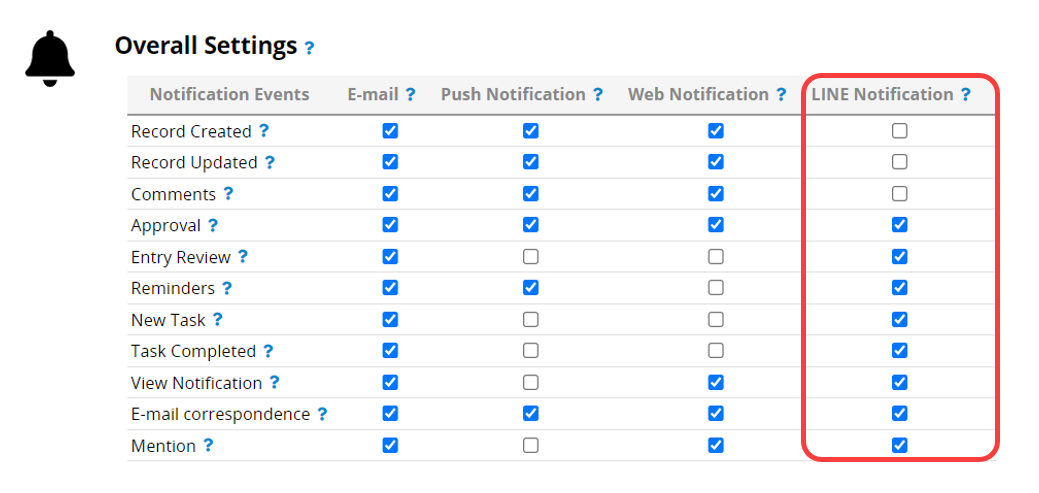
Tick the options to decide the type of notifications you prefer and when you wish to receive them.
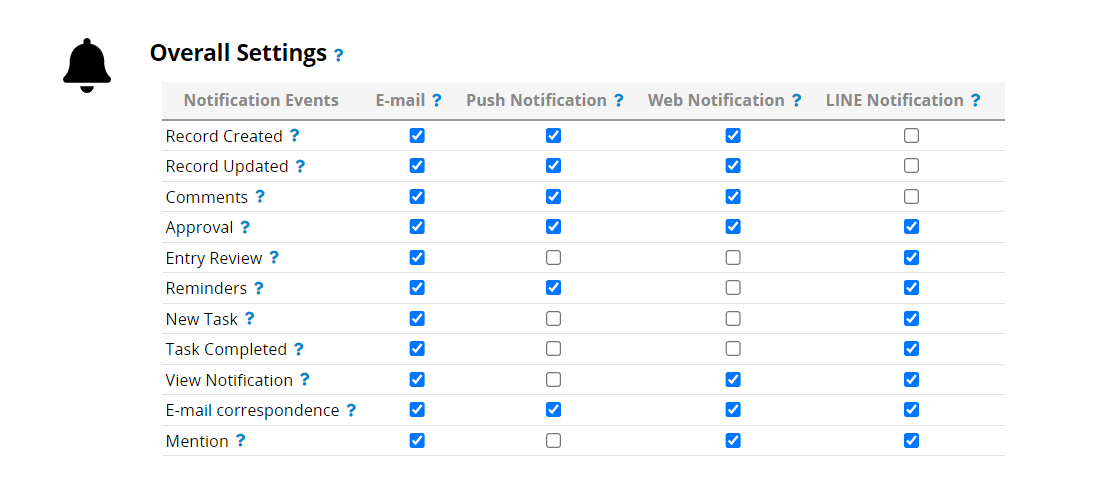
If you want Ragic to send you E-mails as notifications, tick the "E-mail" option from Overall Settings.
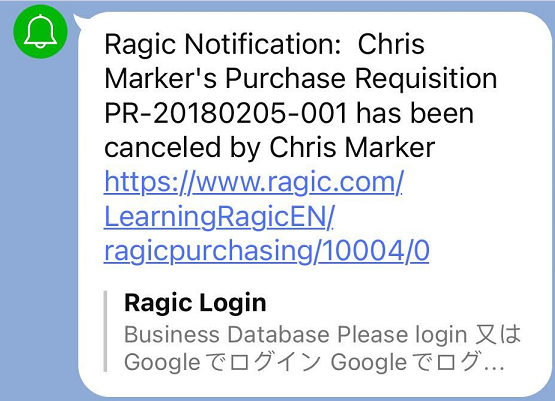
If you want Ragic to send push notifications to your mobile devices (in a condition that you have already installed Ragic Android or iOS app and turned on its notification), choose "Push Notification".
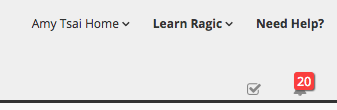
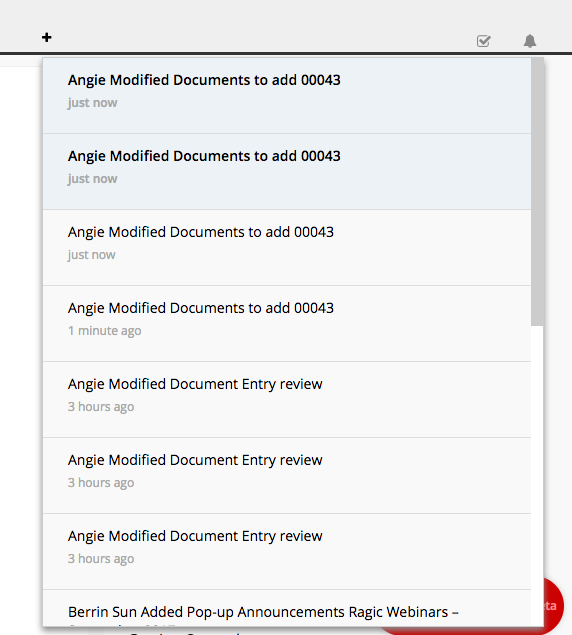
For "Web Notification" option, notifications will be shown on the notification badge icon (the bell icon) at the upper right corner of your screen when you open Ragic home page. Click the icon to view the notifications, and click again on one of them to view the full entry.
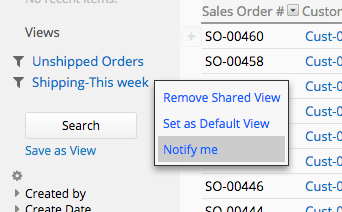
In addition to setting up notification for each sheet, you can also set up notifications based on a Shared View if you would like to receive notifications only from the filtered records in the sheet.
Please note that the Shared View can only be created by the SYSAdmins in your database account.
Click on the arrow next to the name of the shared view, and click the Notify me option.
Below are the two conditions in which the system will send you notifications if you set the Notify me setting for a shared view:
1. New records that match the queries. (either by creating a new entry or modifying an existing entry)
2. Records that formerly matched the queries but do not any longer.
Note: You won't be notified if the records are updated by Mass Update or an Import.

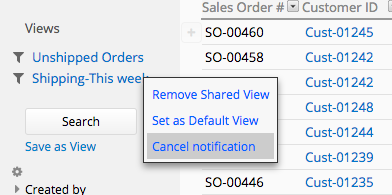
To cancel the notifications, click on the arrow next to the name of the shared view, and choose Cancel notification.
Through this feature, you can send notifications, such as adding, editing, commenting, and @mentioning within Ragic, simultaneously to LINE.
Please refer to the following steps for configuration.
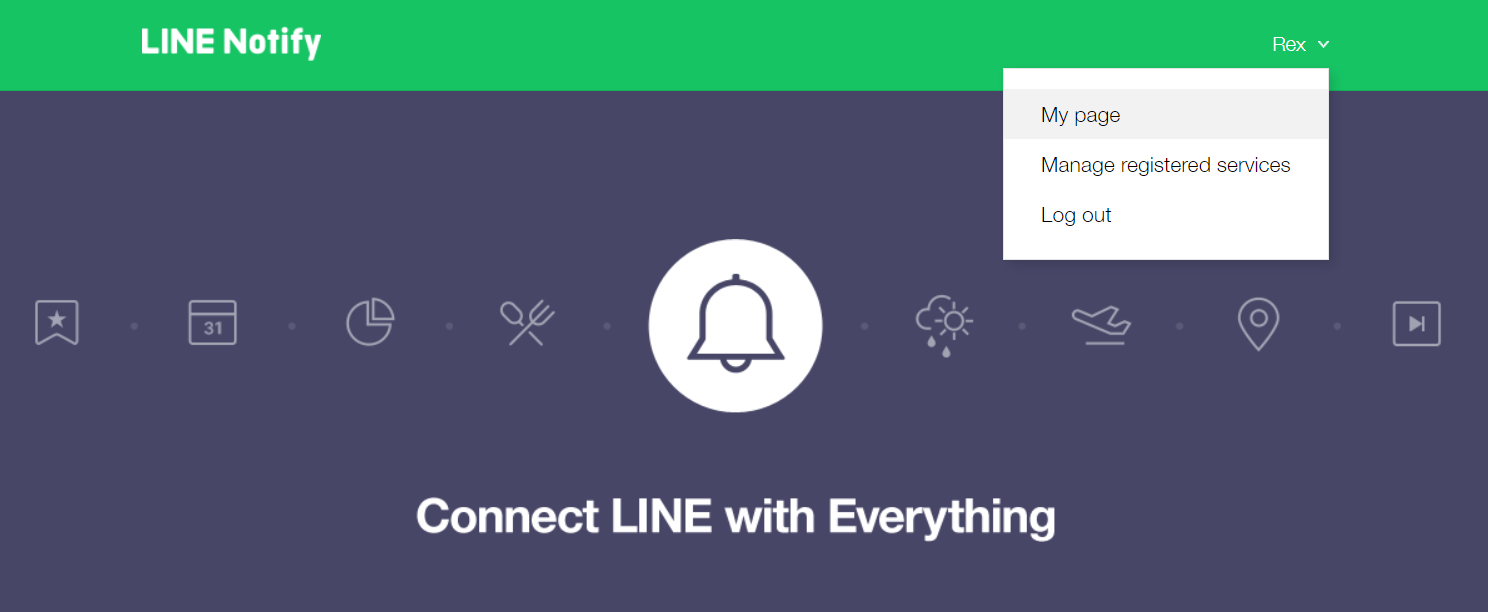
First, go to LINE Notify, log in with your account, and then click on the My page.
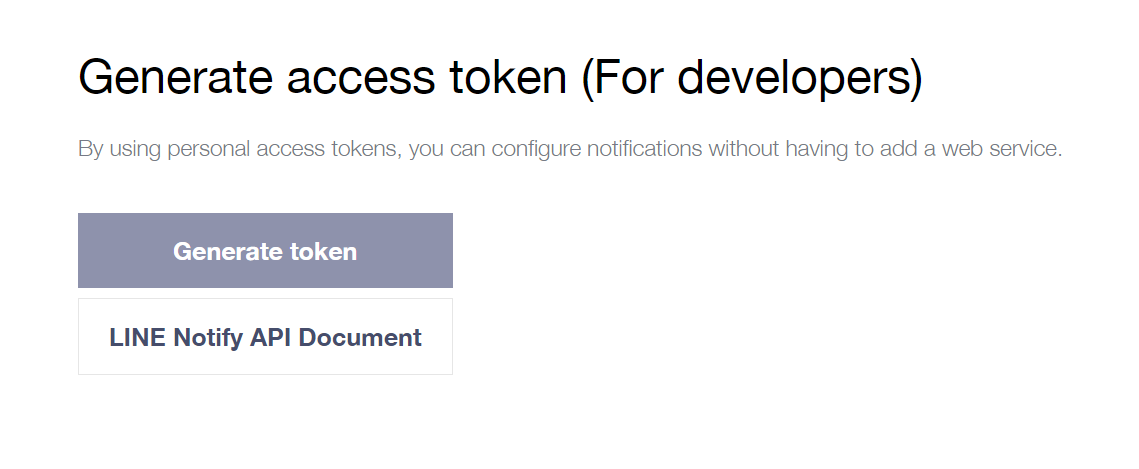
Click on Generate token.
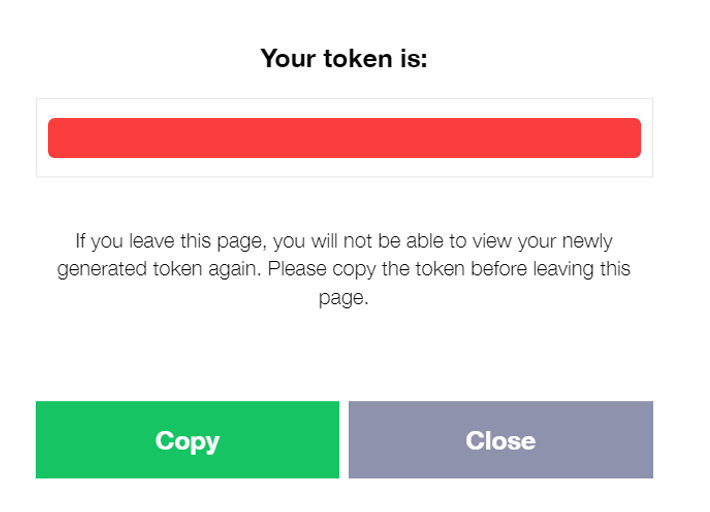
Choose the chat room to receive notifications; receive LINE Notify notifications in a one-on-one chat.

Copy the token. If you lose the token, you'll need to reconnect to obtain a new one.
Set up the LINE token in Personal Settings and save the configuration.
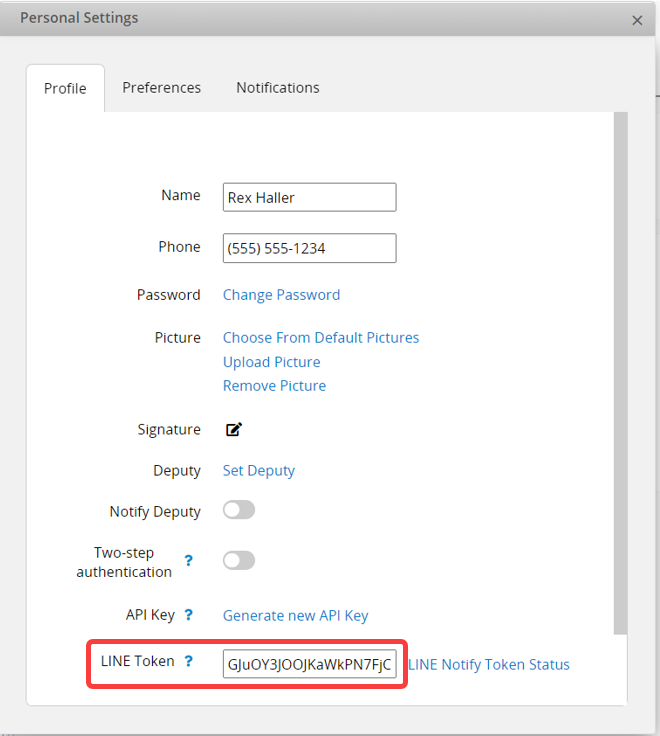
Navigate to Personal Settings and check the notification settings. Once you have selected the events for LINE notifications, you are all set!
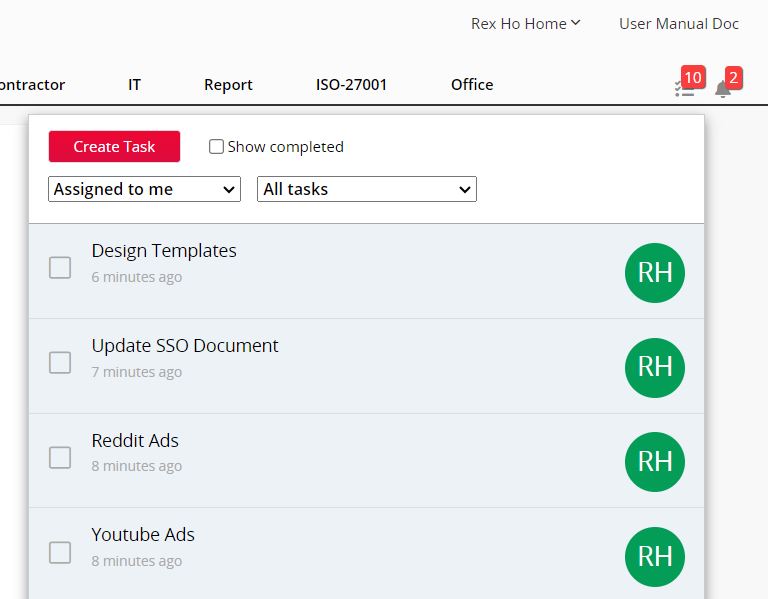
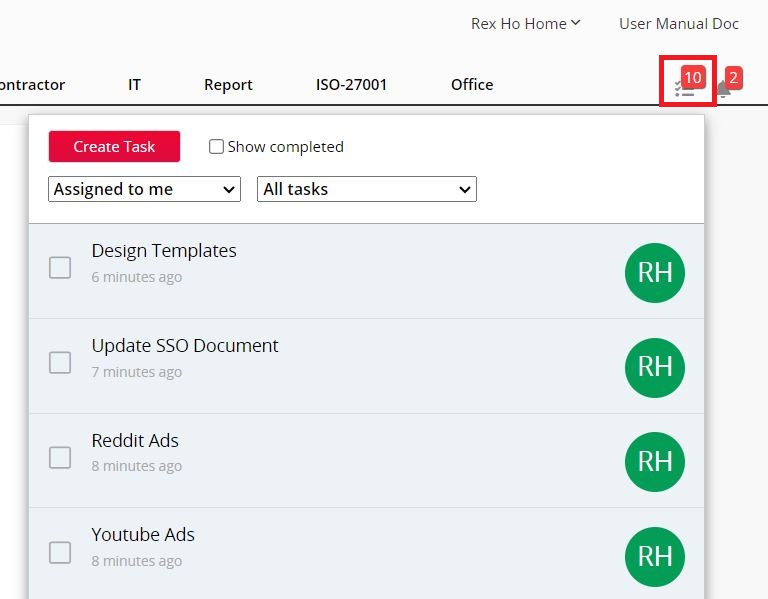
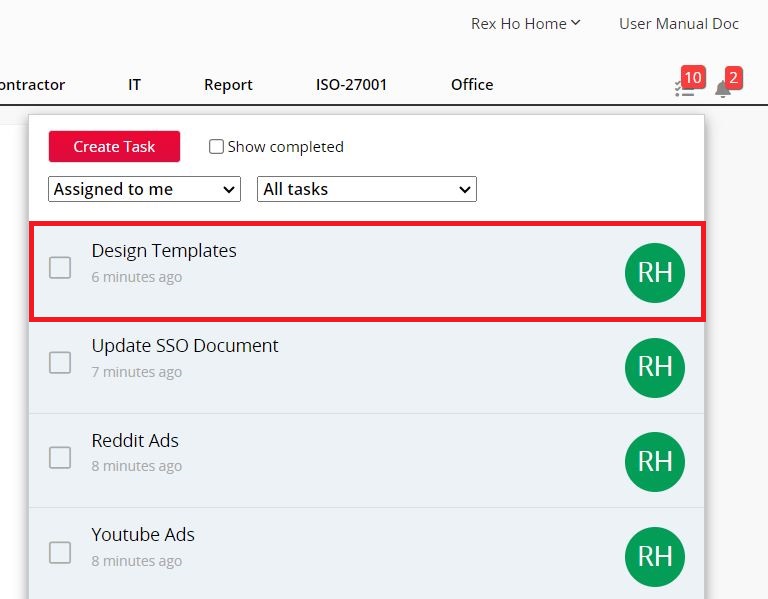
Clicking the task icon at the upper-right corner of your Ragic account page will list out the tasks users need to do in a descending order. Tasks can be generated from the system or manually assigned. Task items will gray out and will no longer show in the task list once the user ticks the "complete" checkbox.
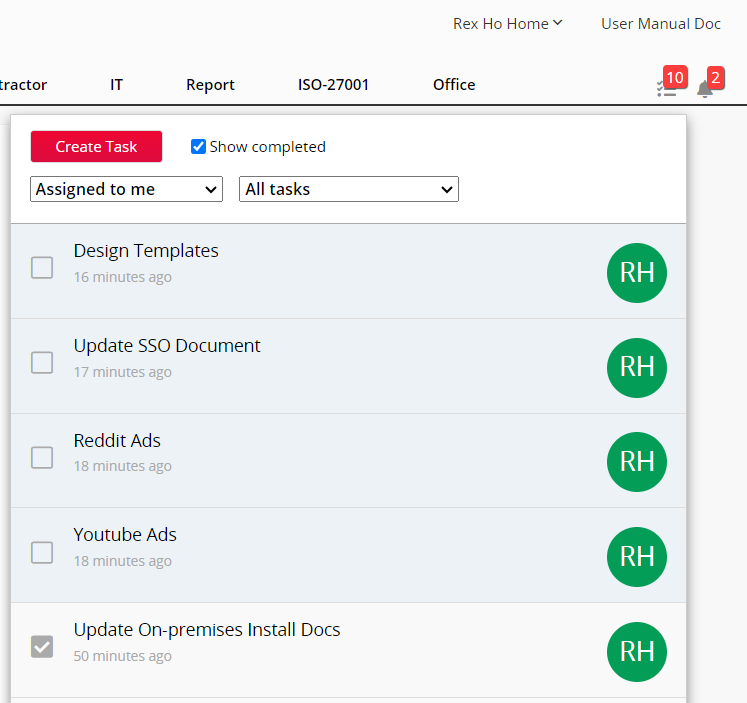
You can view all the completed tasks by ticking the "Show completed" checkbox on the upper right side of the task window, which will prompt you back to the default (uncompleted task) list. From there, you can also uncheck completed tasks.
Task list has four kinds of views:
| View | Content |
|---|---|
| Assigned to me | Tasks assigned to the user |
| Assigned by me | Tasks assigned by the user |
| Assigned to my team | On non-supervisor users' account page, the list will show all the tasks assigned to other users under the same supervisor. On the supervisor's account page, the task list will show all the tasks assigned to his/ her subordinates |
| Subordinate's tasks | Switch to the subordinate's task list |
You can also modify other users' task status in the task list. When the status is changed, system will send notification to whom the task is addressed.
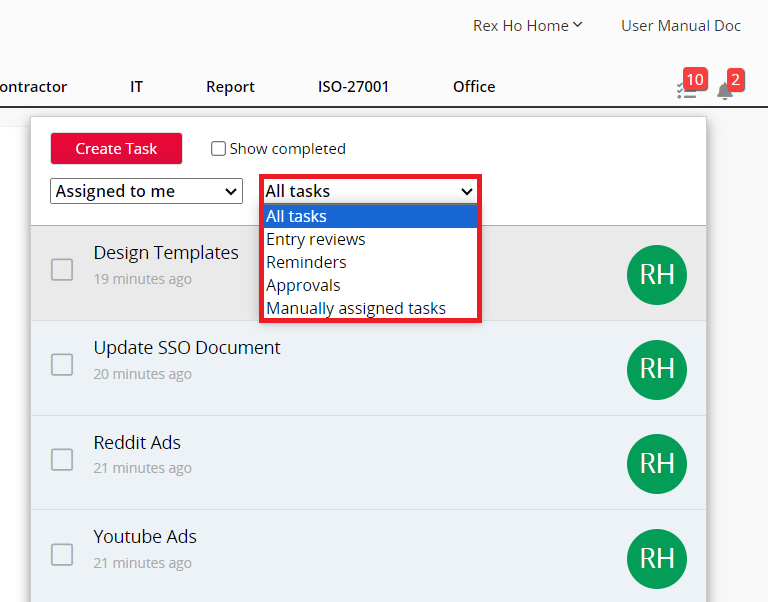
When reviewing the task items, you can filter the categories to be displayed.
1. Approval
When other users start an approval flow which requires your approval, you will receive both an e-mail request and a task icon badge notification. Once you approve it via the email request or through the form page, the system will automatically mark it as "completed".
2. Review
When you're requested to review a certain entry, you will receive both an e-mail request and a task badge notification. Once you open the email request or view the form page of the entry, the system will automatically mark the task as "completed".
3. Reminder
When you're configured as the recipient of reminders, you will receive both an e-mail request and a task badge notifications. Once you open the email request or view the form page of the entry, the system will automatically mark the task as "completed".
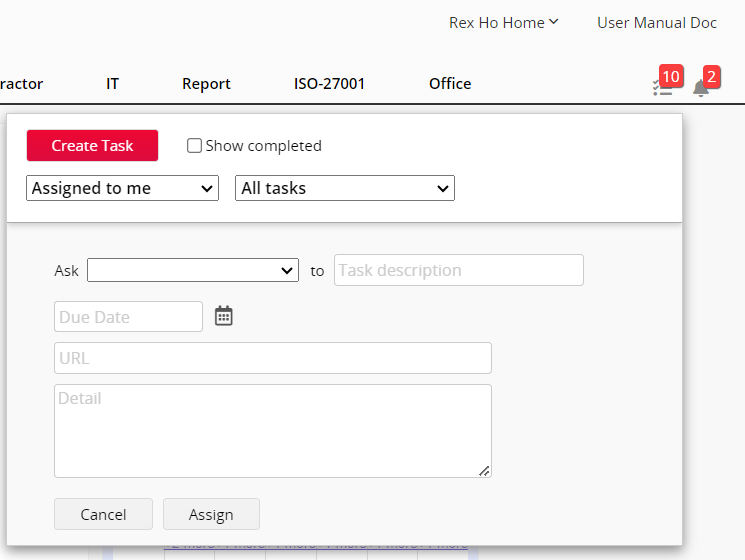
You can manually create tasks and assign them to other internal users. On the task icon of your home page, click Create task. In the pop-up configuration window, select a user you'd like to assign the task to, type in the task details, and click Assign.
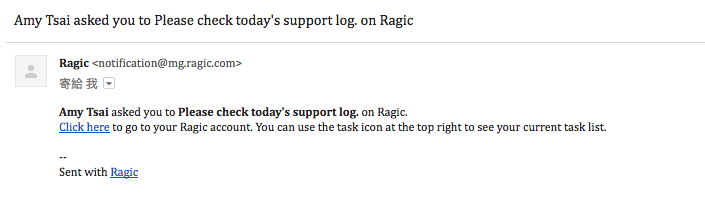
Once the task is created, the assigned user will receive an e-mail and a task badge notification on his/ her Ragic page.
E-mail notification:
Badge Icon:
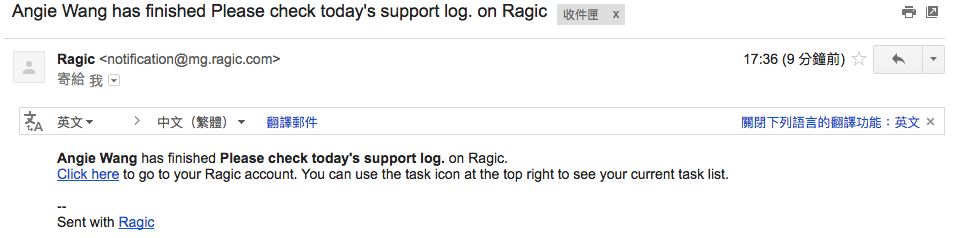
Once the assigned user completes the task and ticks the "complete" checkbox, the task creator will receive a task completion email notification.
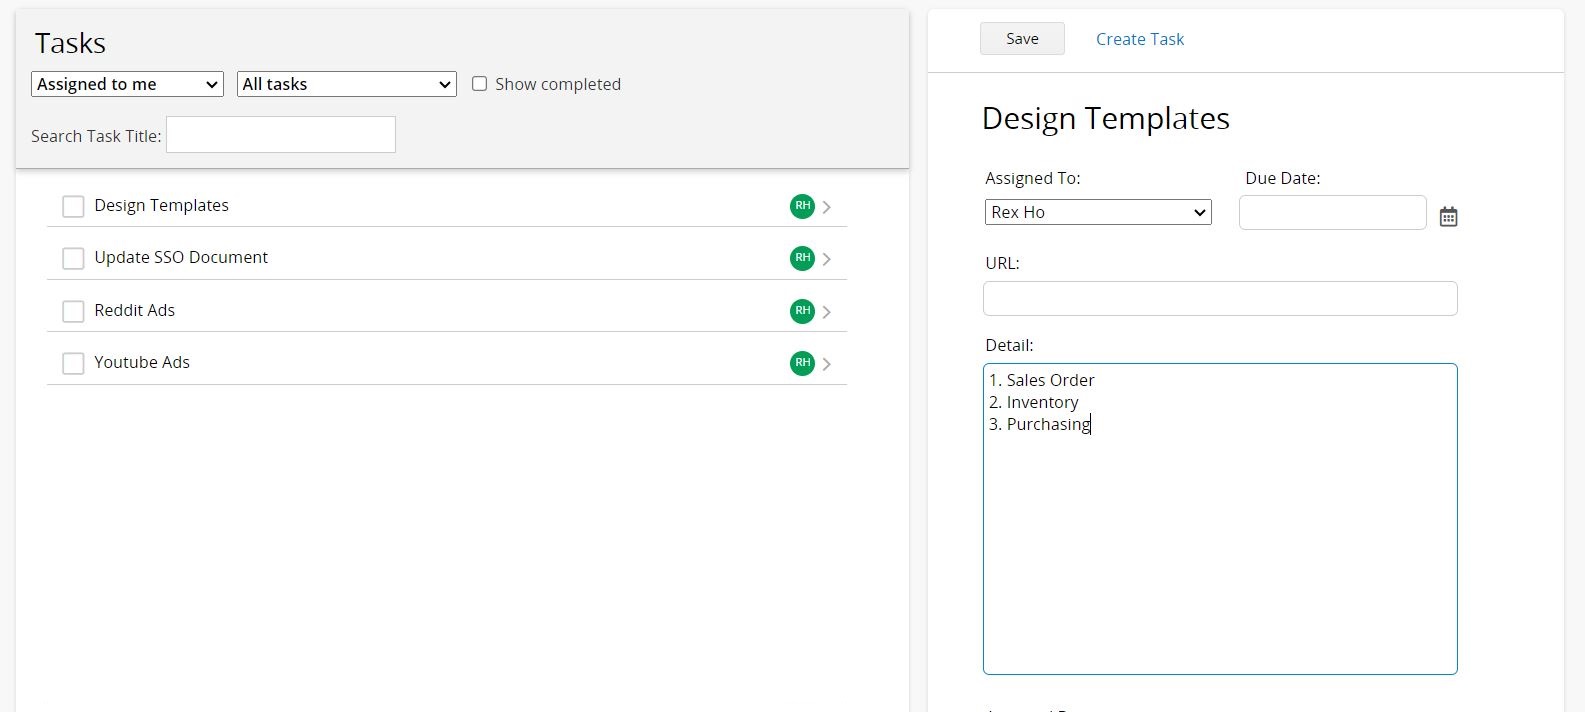
Clicking on one of the task items or the See Detail option on the bottom of the task window will prompt you to a new page where you can manage all the tasks.
In the task detail page, you can see who assigned the task and edit the task's due date, URL, details and comments.
If there are date fields on your sheet, the Event Calendar on your user homepage lists up to 10 upcoming entries that are entered with date information as events.
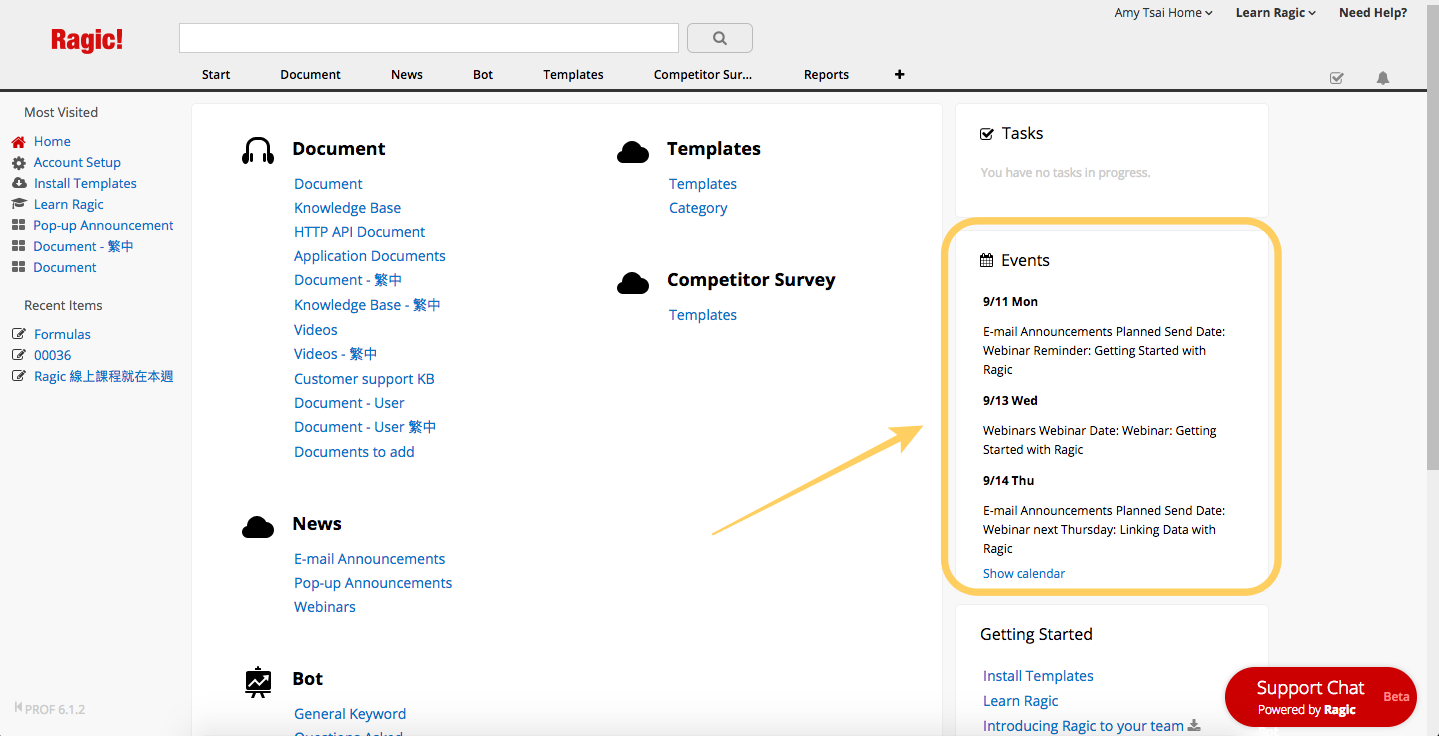
Clicking the name of the event will take you to the form page of the related entry.
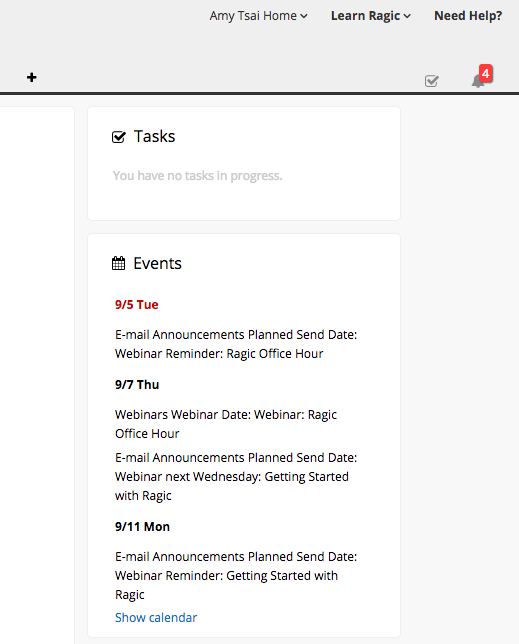
Clicking the Show calendar button will open a calendar listed with these events.
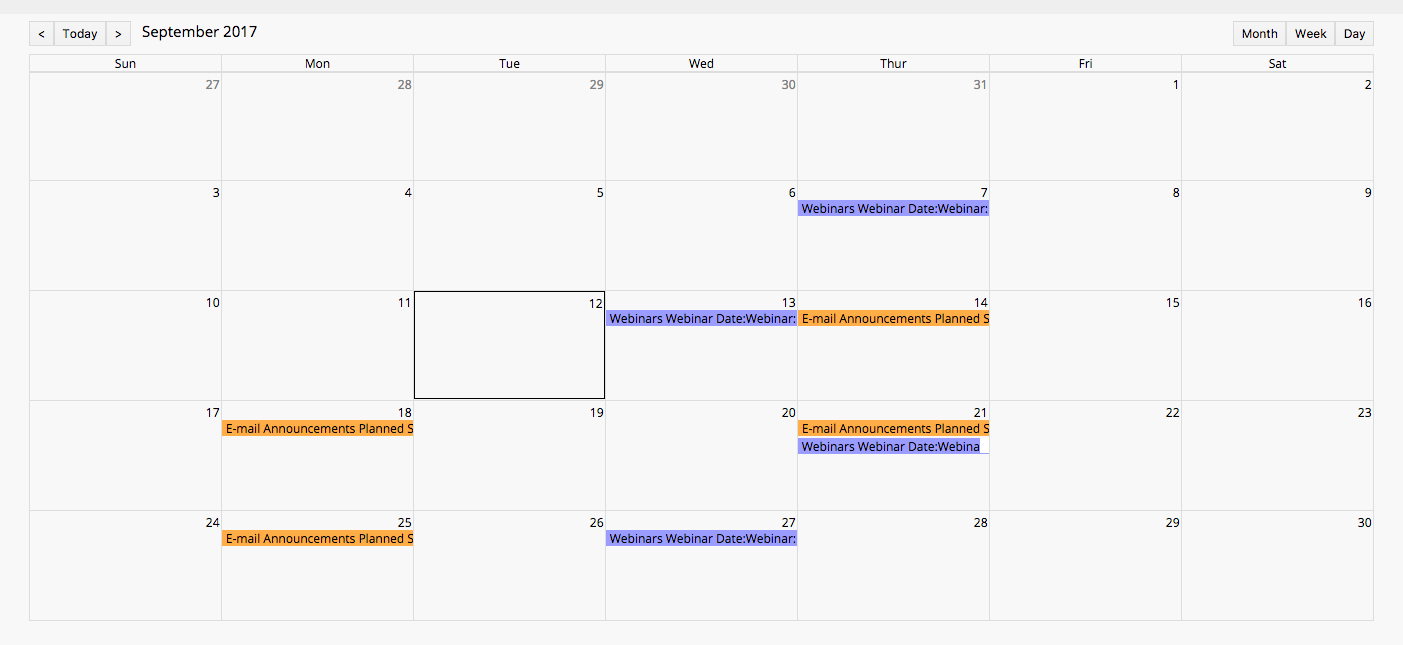
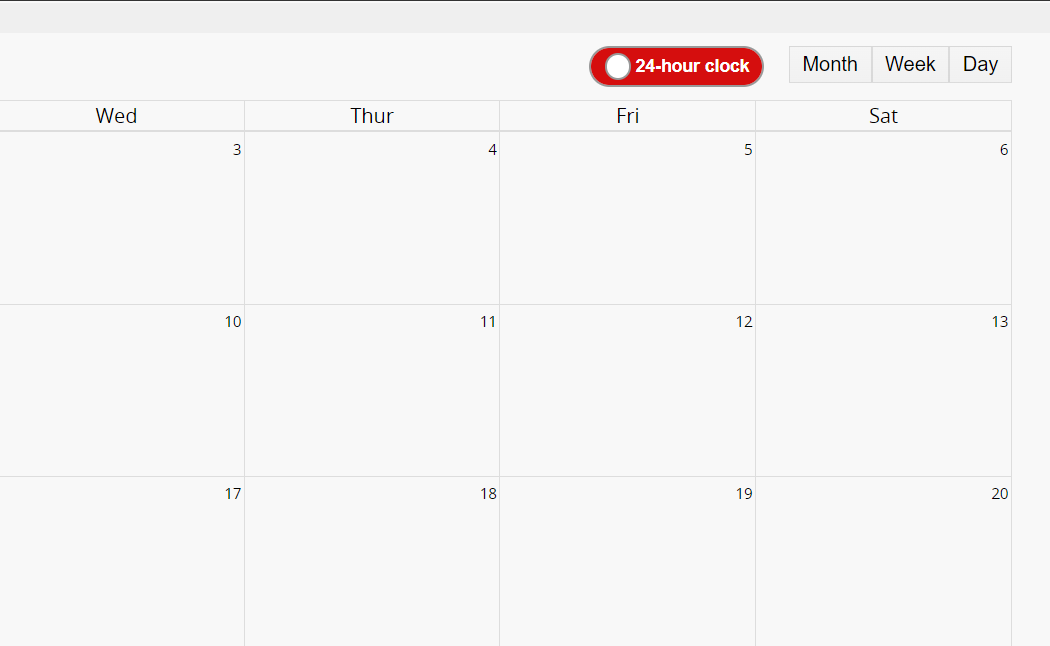
The calendar defaults to displaying in a 12-hour format, and you can switch to a 24-hour format in the top right corner.
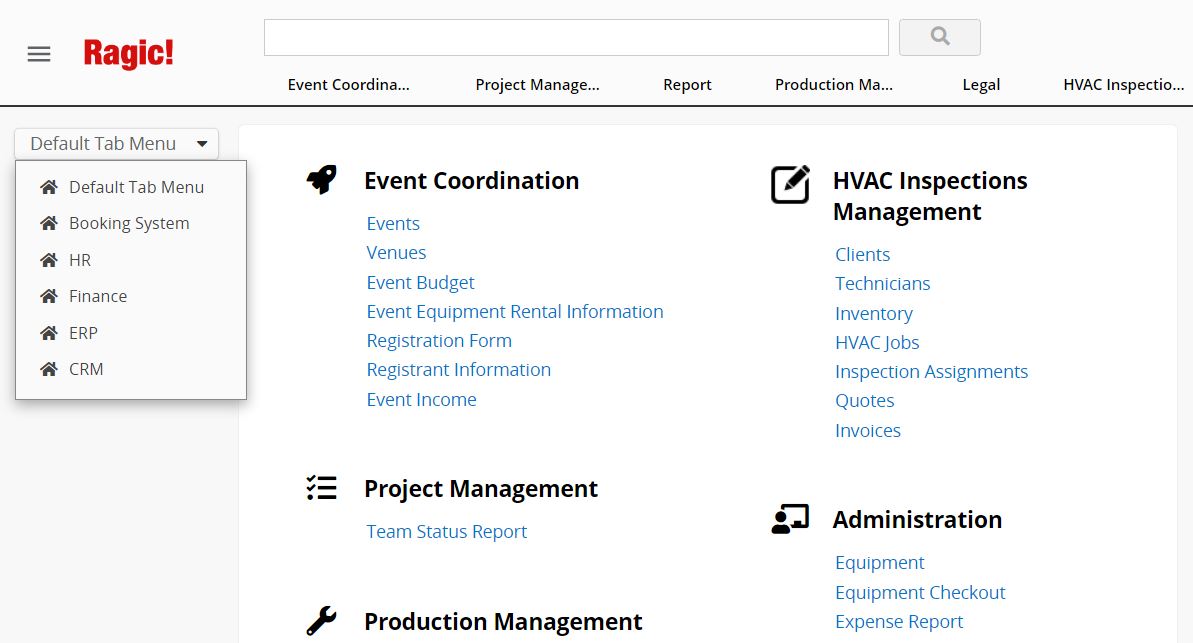
Users can switch between tab menus using the scroll-down menu on the upper-left of the page.
Note:
1. Tabs added to other tab menus will no longer be displayed in Default Tab Menu.
2. Reports will move along with their source sheets.


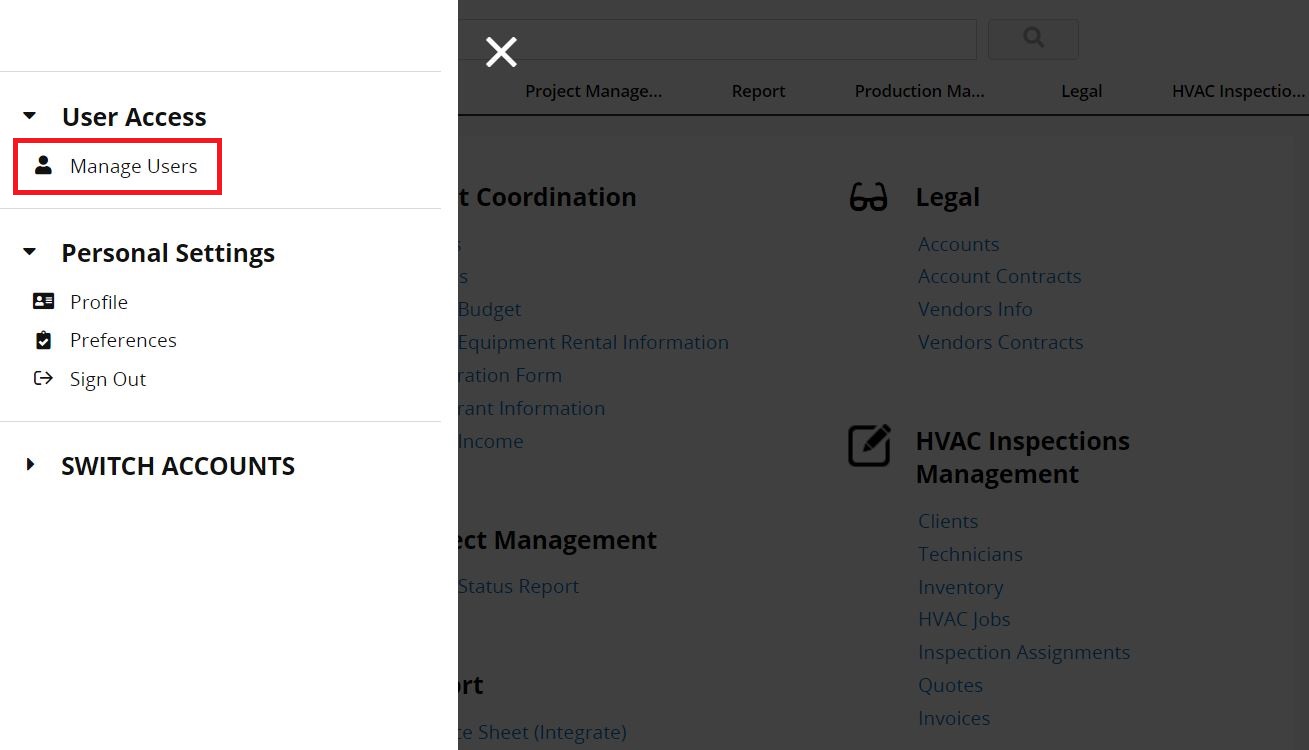
Group administrator will see the Manage Users sheet by clicking the hamburger icon on the upper-left of the page.
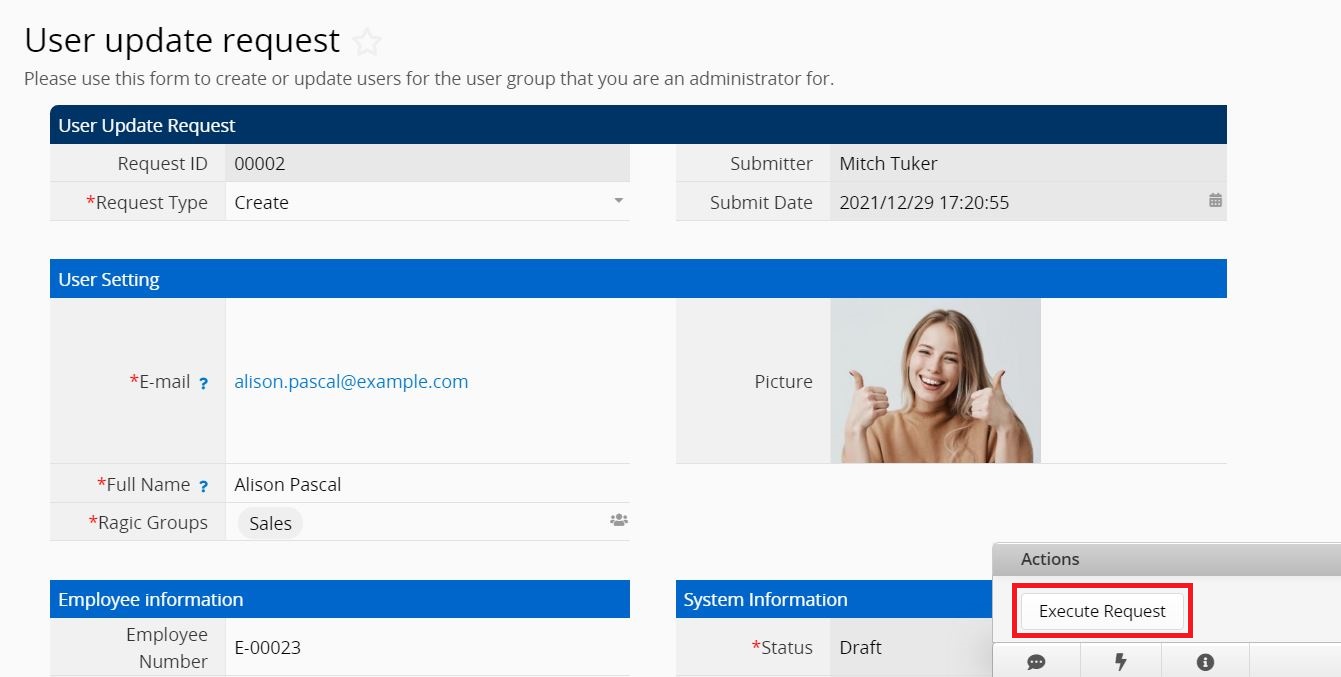
In this sheet, you can create, update, or suspend users who belong to your groups.
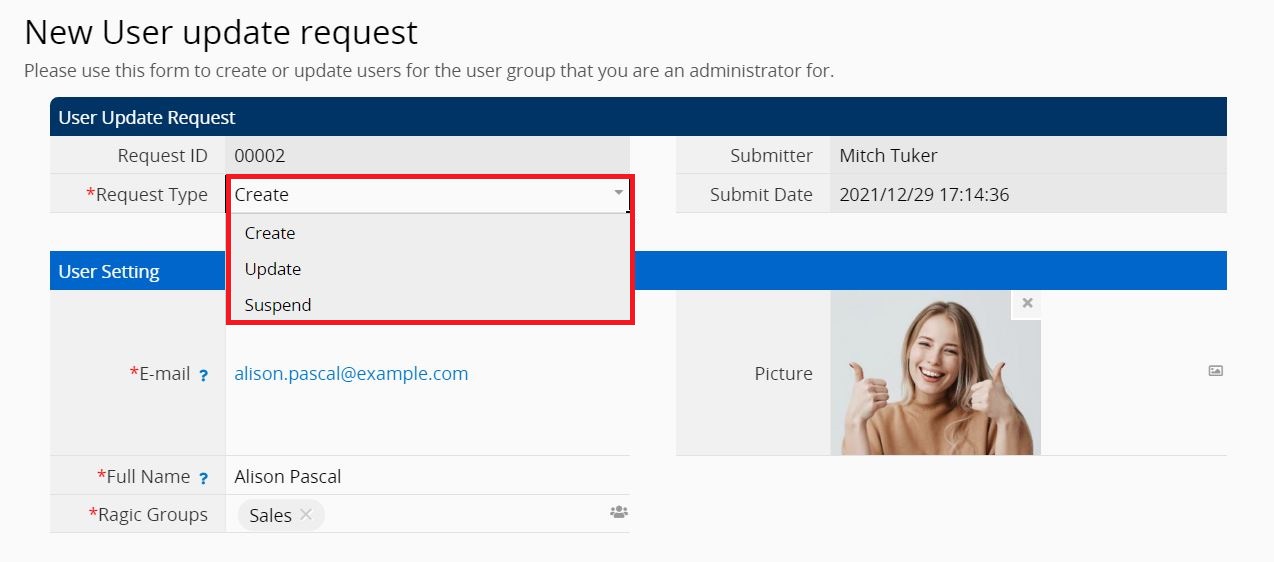
After you edit the sheet, click the action button to execute.
Note:
1. You can only add users to a group when you are the Group Administrator.
2. You can only update or suspend the users in a group when you are the Group Administrator.
3. If you would like to change user's group to the group which you are not manager, please contact SYSAdmin.
You can import data from your Excel or .csv files into your Ragic database, or export data from your Ragic database as Excel and .csv files.
If you don't see any of the options in the following instructions on your sheets, this may be related to the access rights you are granted. If you have any questions about the features that are available to you, please contact your SYSAdmin of your database account to check if you are configured with proper access rights.
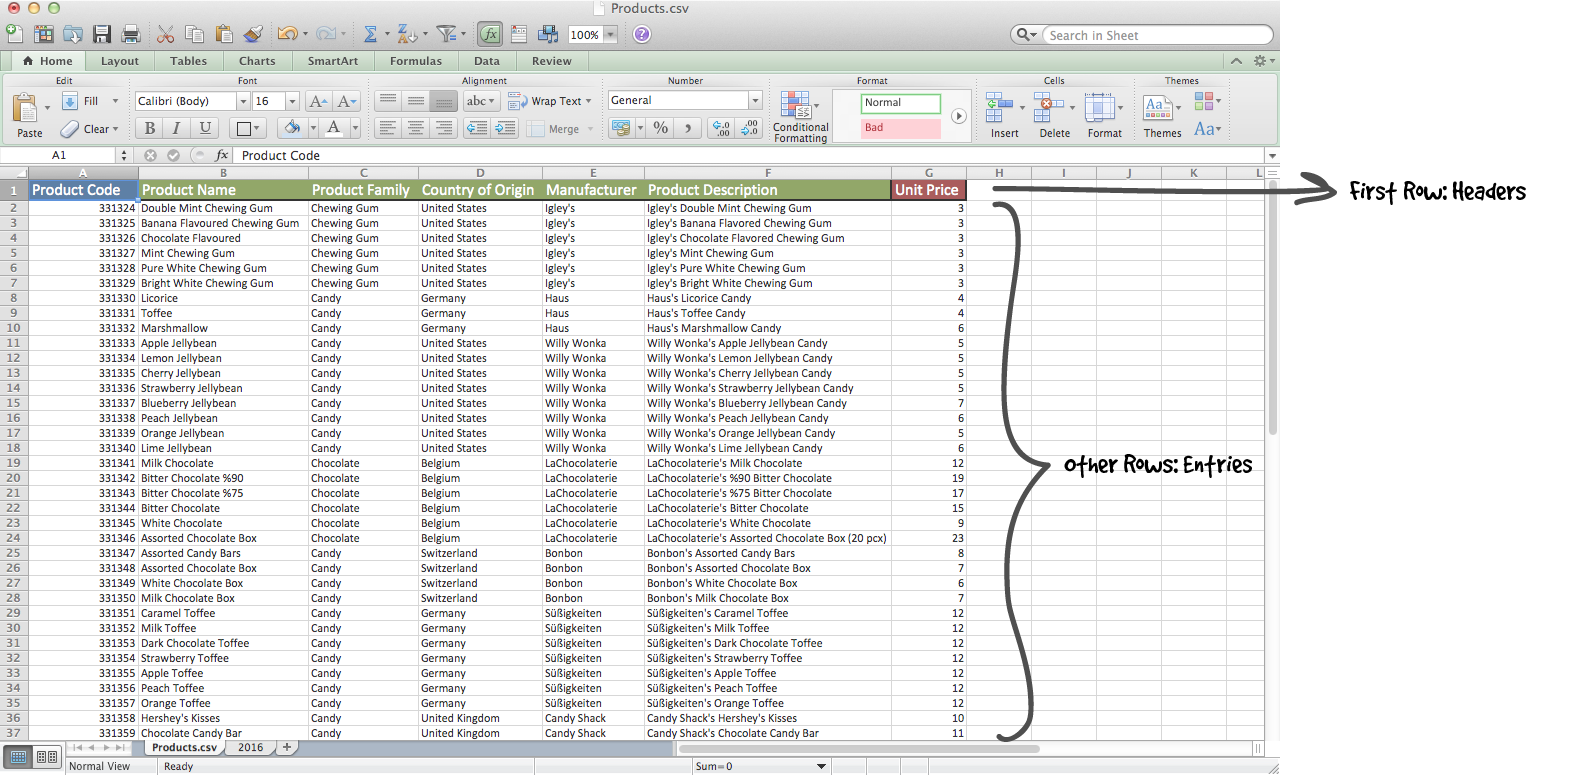
In order to have Ragic map your information correctly to your entries, you will need to have a unique identification for each entry that we call the key field, such as "Product ID" for products, or "Customer No." for your customers. To make your database easier to use, let the first column of your import data be this type of key field.
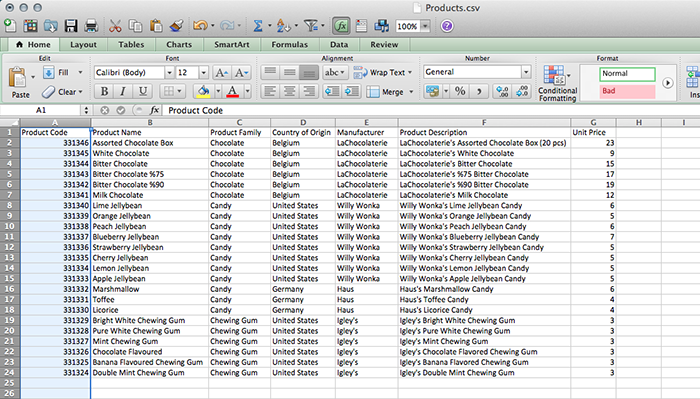
Your file should have the first row as the headers of the fields. If you have other types of formatting such as logos or informational text on your first few rows, for your specific import file, you can remove these and save a version with field headers on the first row.
Ragic supports .xls .xlsx and .csv files. We recommend that you save your file with the .csv format for the best performance.
To import multiple values for your multiple selection fields, you can format your fields in the file you are importing with a vertical bar character (|) or a comma character (,) to separate your values. (If the value itself contains a comma character, you should use a vertical bar character to separate them).
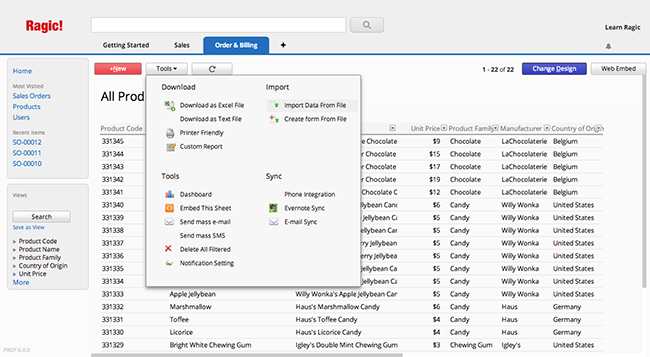
Ragic has a convenient import wizard for users to import from their existing data from Excel or CSV files. To import from your files to Ragic, you can go to the listing page that you would like to import your data to, and choose Import Data From File under Tools. There will be a step-by-step wizard to guide you through the field mapping process as well as other configurations for the data to import correctly.
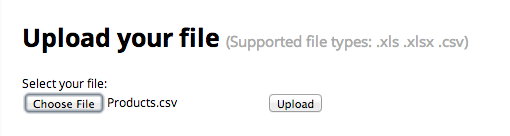
Upload your file.
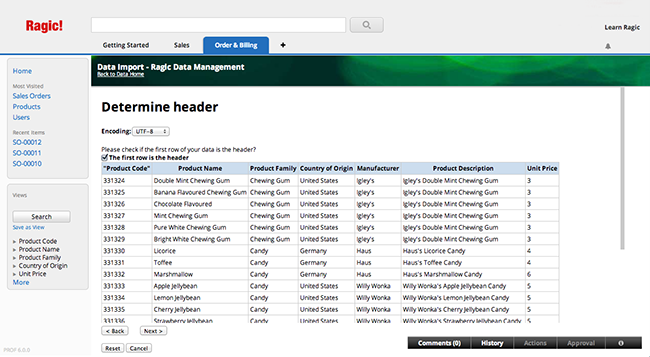
Determine if your first row is the header. If so, Ragic will automatically determine how the data in this row will be mapped to your fields for the next step.
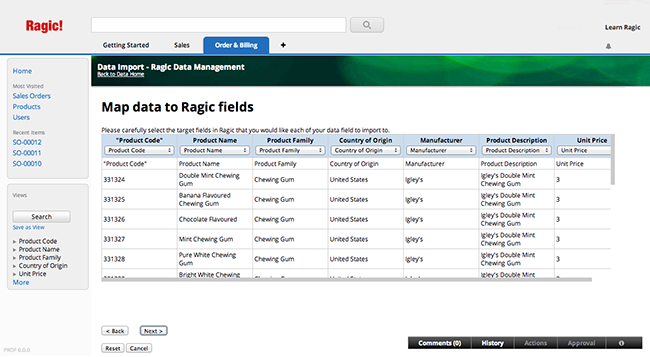
Check to see if all the target fields are correct. This is especially important if you have similar names for two seperate fields. You can also choose to ignore columns of data that you do not want to import. Note that the target field values should also be in the correct formatting, such as the date format. If you're importing into a "select user" field, you will need to have the user's e-mail that's used in Ragic instead of the username that you see to uniquely identify the person.
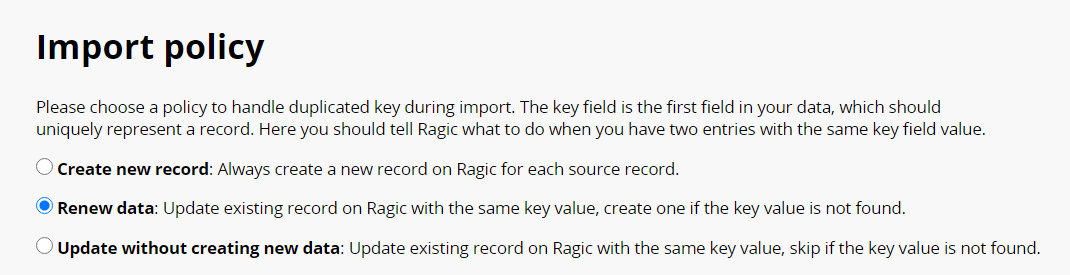
Choose the import policy to handle duplicated keys during your import. Ragic will match to the entries in your sheet according to the key value in the first column in the imported file.
If you choose Create new entry, new entries will be created containing data with the same key values.
If you choose Renew data, your existing data will be updated if you have entries with the same key value, and new entries will be created for the key values that aren't in your database.
If you choose Update without creating new data, your existing data will be updated if you have entries with the same key value, and entries with key values which aren't in your database will not be imported.
This type of import policy is especially useful when you are doing mass editing.
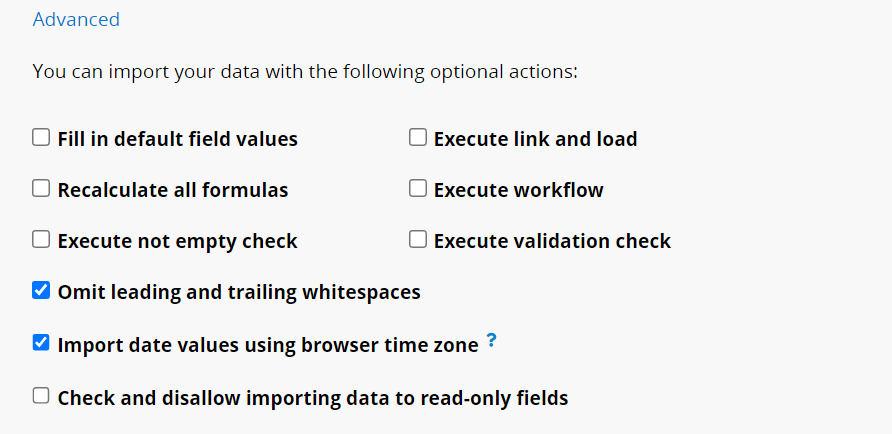
You can configure Advance Settings in Import Policy as well if necessary.
| Advanced Setting | Description |
|---|---|
| Fill in default field values | If you have a configured default value in your sheet, please check this box so that the field value will be updated or populated with the import. |
| Execute link and load | If there are sets of link and load configured on your sheet, please check this box to have the loaded fields auto-populated. Otherwise, the loaded fields will be left empty if the field values aren't included in your import file. |
| Recalculate all formulas | Recalculate all formulas during the import. |
| Execute work-flow | Execute work-flow, if any, in your sheet. |
| Execute not empty check | Check if there are field values configured with the "Not Empty" feature. If there is no field value, Ragic will skip that row during the import. |
| Execute validation check | Check if the field value meets the configured validation . If it doesn't, Ragic will skip that row during the import. |
| Import date values using browser time zone | When enabling "Import date values using browser time zone", the date values in your import file will refer to your browser's time zone. If this option is not selected, the date values would be considered in the UTC+0 time zone. |
| Check and disallow importing data to read-only fields | If the imported file contains read-only field values, those values will not be written into the database. |
Ragic has many useful export options, that are accessible from the Tools Menu. Please note that if you're exporting many entries from the listing page with any method, the filter that is applied from searches will have effect on the records that are exported.
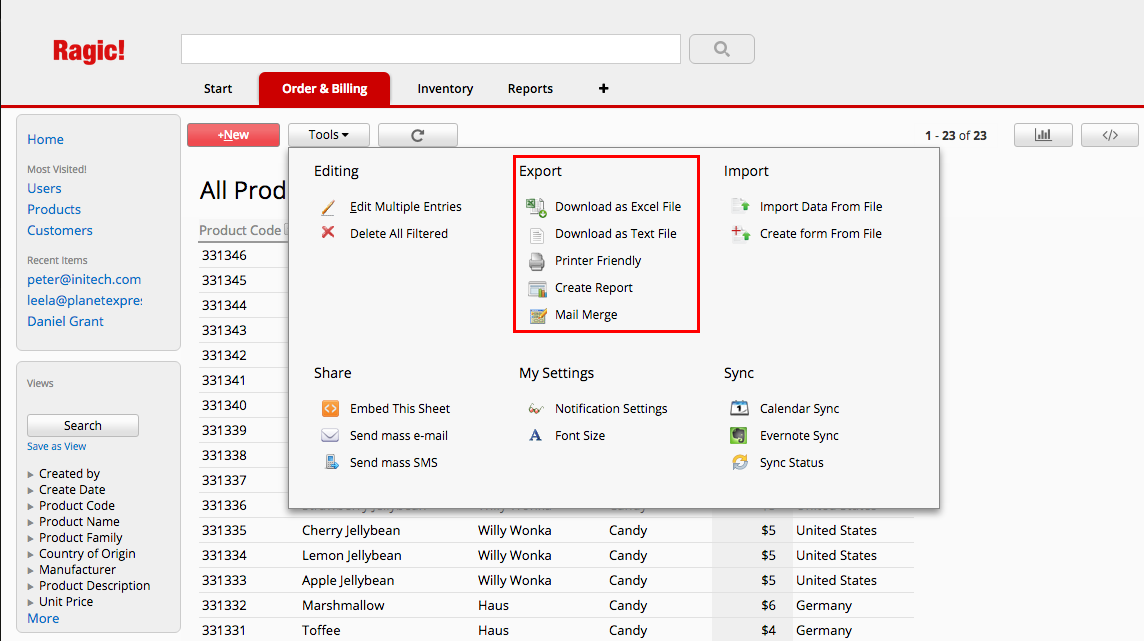
You can use the Download as Excel File or Download as Text File feature that could be accessed in the listing page of a form from Tools to export multiple entries.
You can choose if you want to export all fields, or only the fields that are displayed on the listing page from the download configuration, as well as the number of entries you would like to export.
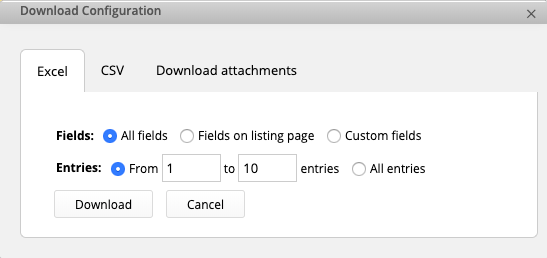
For image upload field: If the number of records you'd like to download is within 100 and they contain image upload fields, the downloaded Excel file will automatically embed the images. However, if the number of records you'd like to download exceeds 100 and you don't set an exact number of records to export, the images will not be embedded in the Excel file.
For file upload field: Due to Excel's limitation of allowing only one hyperlink per cell, when there is only one file in the field, exporting to Excel will present it as a hyperlink with the file name and its URL. However, if there are multiple files in the field, due to the limitation, the file names and file URLs will be presented in a text format.
To export one entry, navigate to Tools under the form page instead.
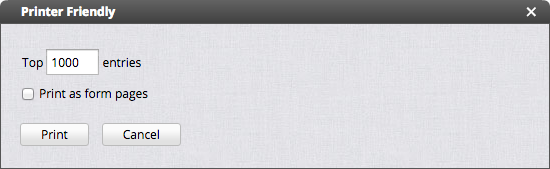
The Printer Friendly option will display your data in a clear, ready to print format. In the printer friendly configuration, you can choose to print your data as it is displayed on your listing page, or download individual entries as they look like on the form page.
You can switch to the record's other versions in the gear icon.
Learn more about the types of reports you can generate in Ragic here.
Our mail merge tool allows you to export your data in a specific excel template that you can upload into Ragic.
You can download reports of individual entries in a customized Excel or Word format in Ragic with the mail merge tool.
If you don't see this feature on the sheets, it may be related to the access right you are granted. If you have any questions not having this feature, please contact your SYSAdmin of the database to check if you are configured with proper access right.
Click Mail Merge under Tools in your listing page.

You can download the template created by Ragic according to your form page design, by clicking the Download button next to Sample Template.

Feel free to make modifications to customize your template in any way you want. You can choose to omit fields if you want, and repeating field values are also possible. Just make sure that you are writing:
<>
where you want to add the field values.
If the field values are in subtables, they can be written as
#Field Name#
in a row.
Note. If you have duplicated field names, and you want to mail merge the data from all these fields (those with the same name), you will need to change them with different names, to let the system map the fields correctly while downloading your data by mail merge.
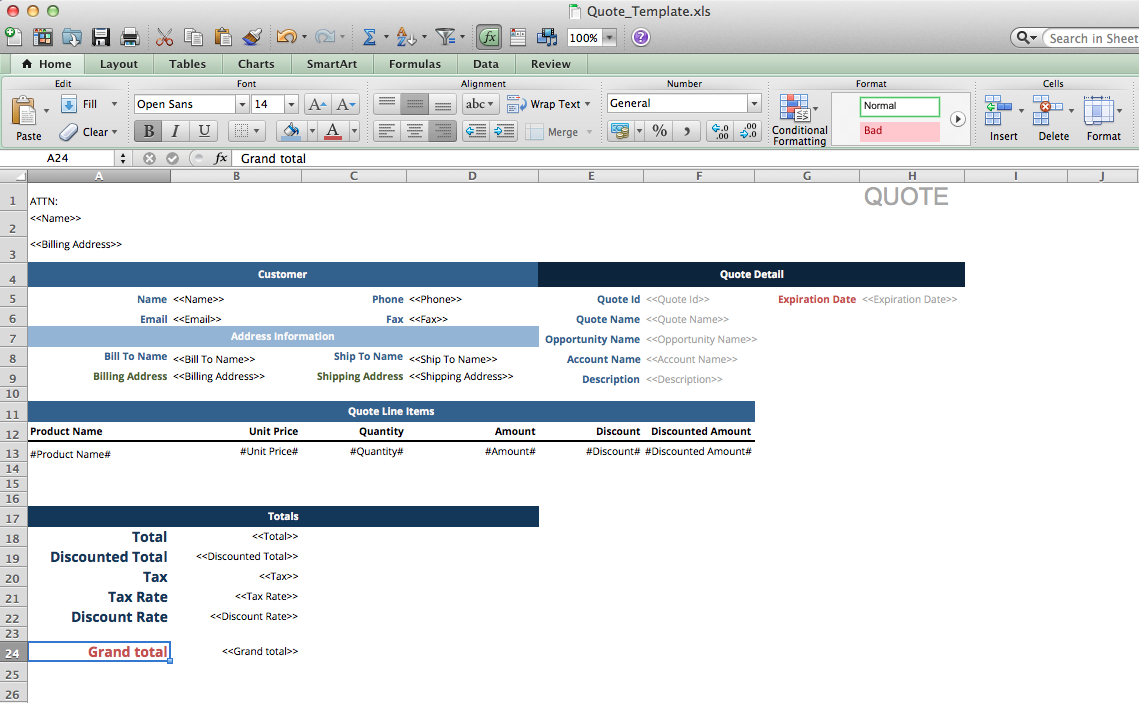
In the example above, Microsoft Excel is used to edit the template, but basically, any type of spreadsheet application would work as long as you can save your spreadsheet with .xlsx format.
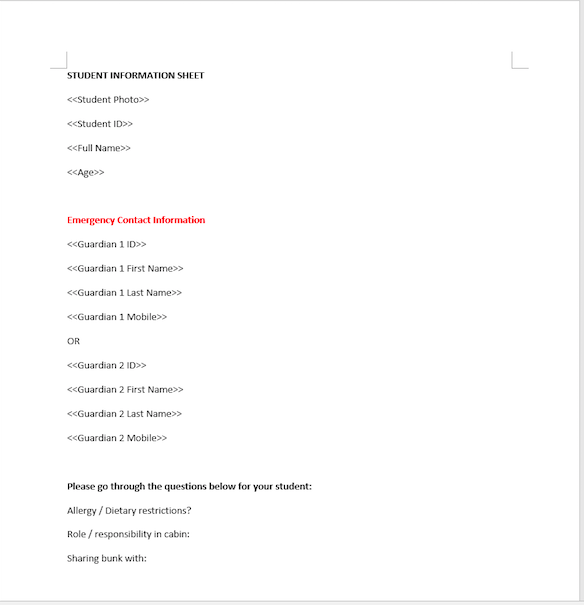
If you need a text document instead, you can create a template directly in a text editor application such as Microsoft Word. The field values would be formatted like the above. Save the text document with the .docx format. Please note that some elements like text boxes are not supported for variables yet.
If you need to mail merge the subtable records, it's currently only supported with Excel.
After you're done with designing your template, upload this report template to your sheet by clicking on Create a template on the mail merge configuration.

You can name and save your uploaded template here (don't forget to click Upload to save).
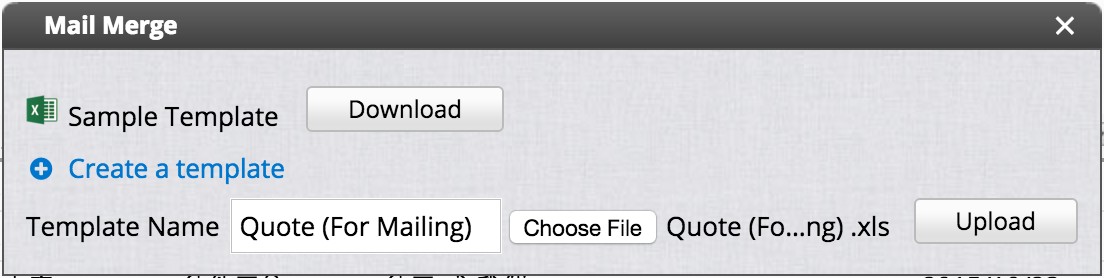
You can upload as many report templates as you want.
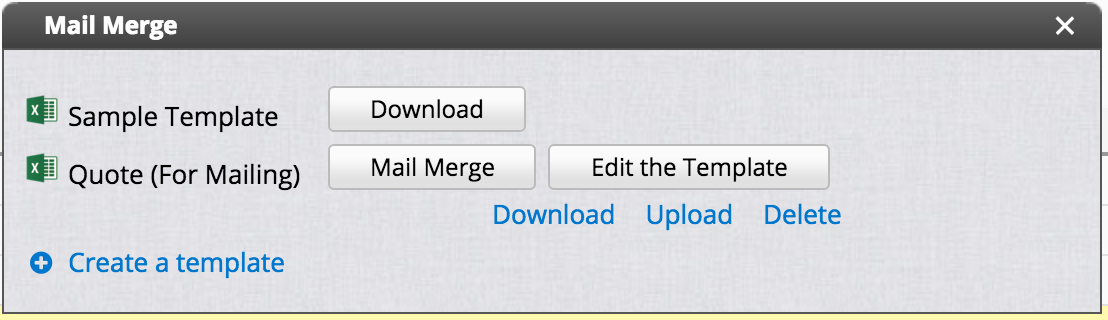
Clicking the Mail Merge button next to your report name when you would like to generate reports from the data in your database will take you to an option that displays the number of entries you would like to download with the mail merge template applied.
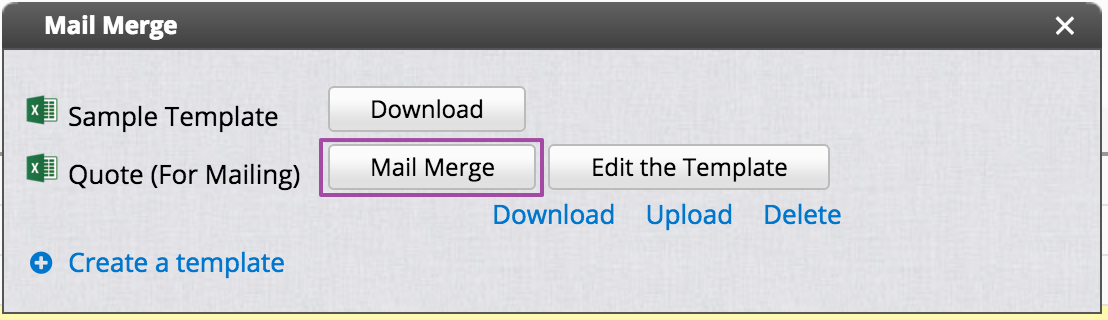
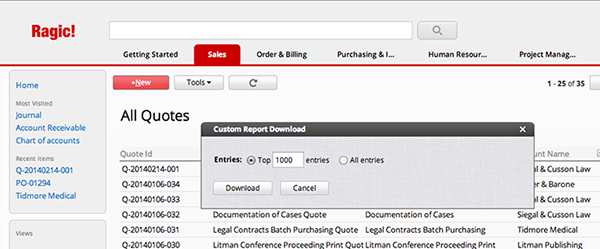
The reports will then be downloaded to your computer in a .zip file. If a filter is applied to your listing page, only the filtered records will be mail merged.
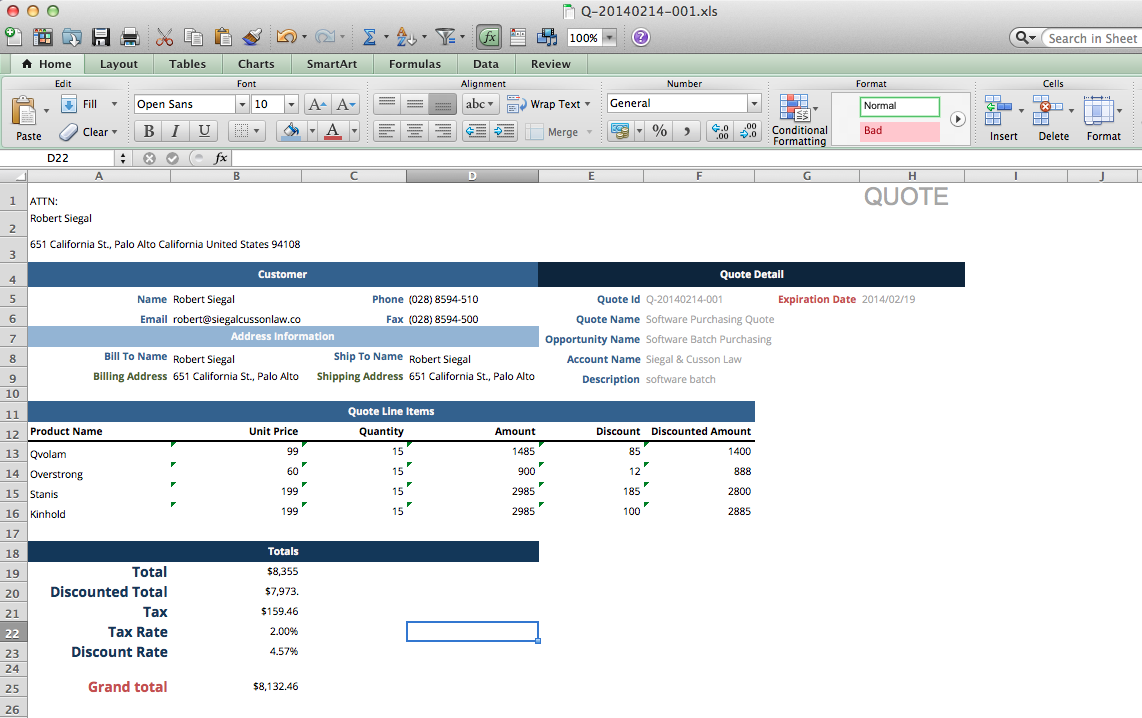
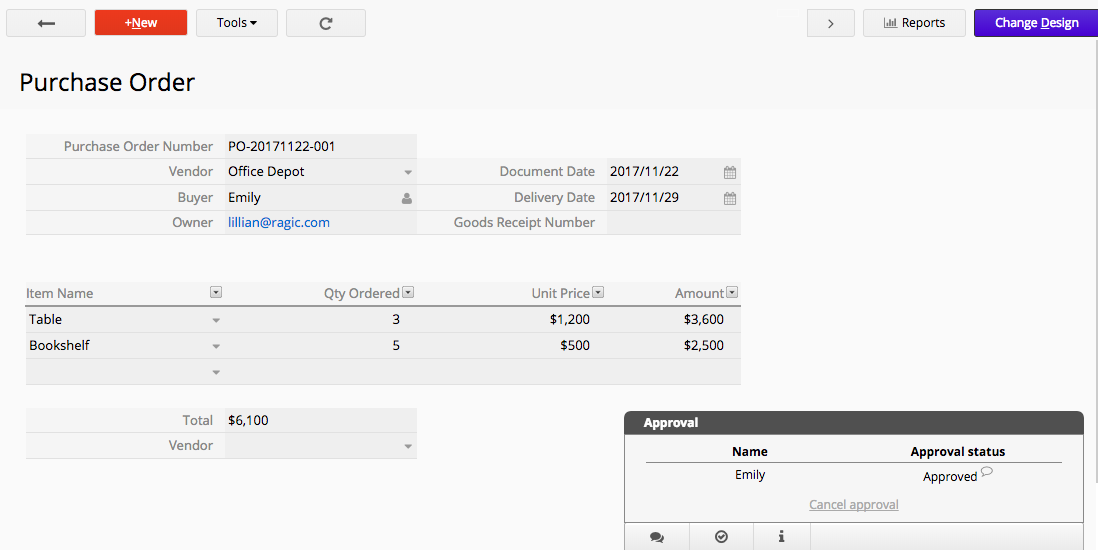
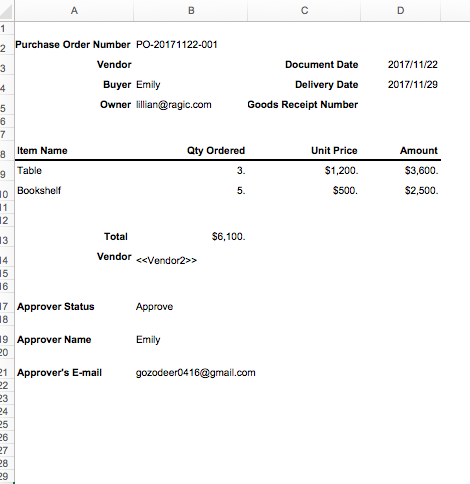
This would be how a single report looks with the uploaded template example above:
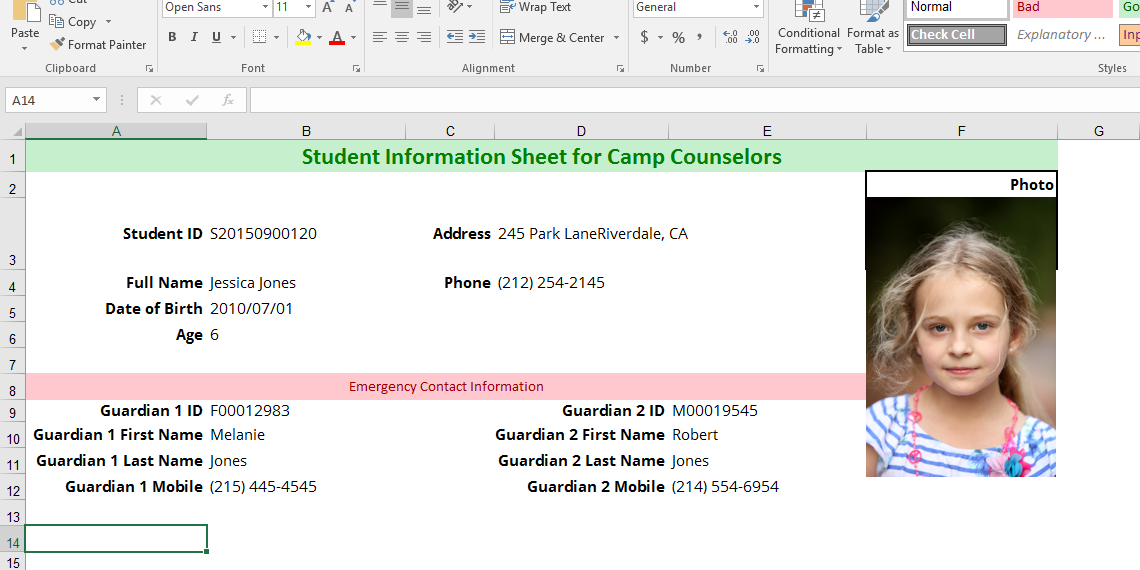
Here are other examples, with an image field included:
The original format of the sample template document that you download from Ragic mainly contains the fields of the sheet and its subtable(s). If this sheet is configured with an approval process, the approval process records that are shown on the bottom right side of your sheet within Ragic would not automatically appear in the sample template document. If you want to add the approval process records into your mail merge, you can manually add some instructions when you modify the template document. After that, you can upload your customized template document to download reports formatted with your template that contain your approval process records.
| Parameter | Output | Note |
|---|---|---|
| #{{APPROVAL_STATUS}}# | Approval Status | If an assigned deputy helps approve or reject approval requests, (Deputy) wil be shown next to the approval status |
| #{{APPROVAL_APPROVER_TITLE}}# | Step Name | — |
| #{{APPROVAL_DATE}}# | Approval Date | Only shown when the approval step was approved |
| #{{APPROVAL_APPROVER_NAME}}# | Approver’s Name | — |
| #{{APPROVAL_APPROVER_SIG}}# | Approver's Signature in Personal Settings | — |
| #{{APPROVAL_APPROVER_EMAIL}}# | Approver’s E-mail | — |
In this example, we will show you how to create a mail merge template that will display approval process records on a mail merge.
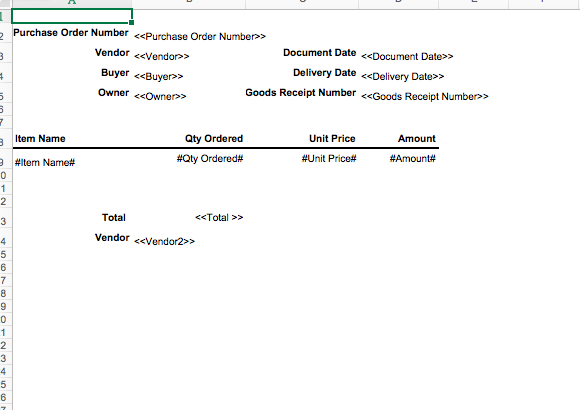
First, we download the template document from the mail merge menu. It looks like the screenshot below and does not contain approval process records. The fields and subtable fields are shown as below:
We manually add the fields with the necessary parameters for the approval process on this spreadsheet document. We add the Approval Status, the Approver’s Name, and the Approver’s E-mail address in this case. After uploading this document, we're done with configuring this as a new template.
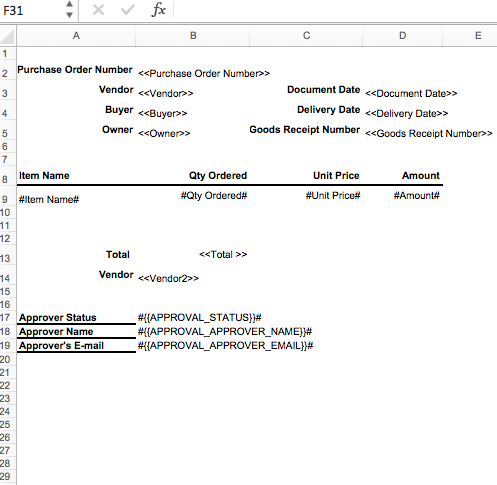
With this new template, we can now have records of the approval process when we export our data through mail merge.
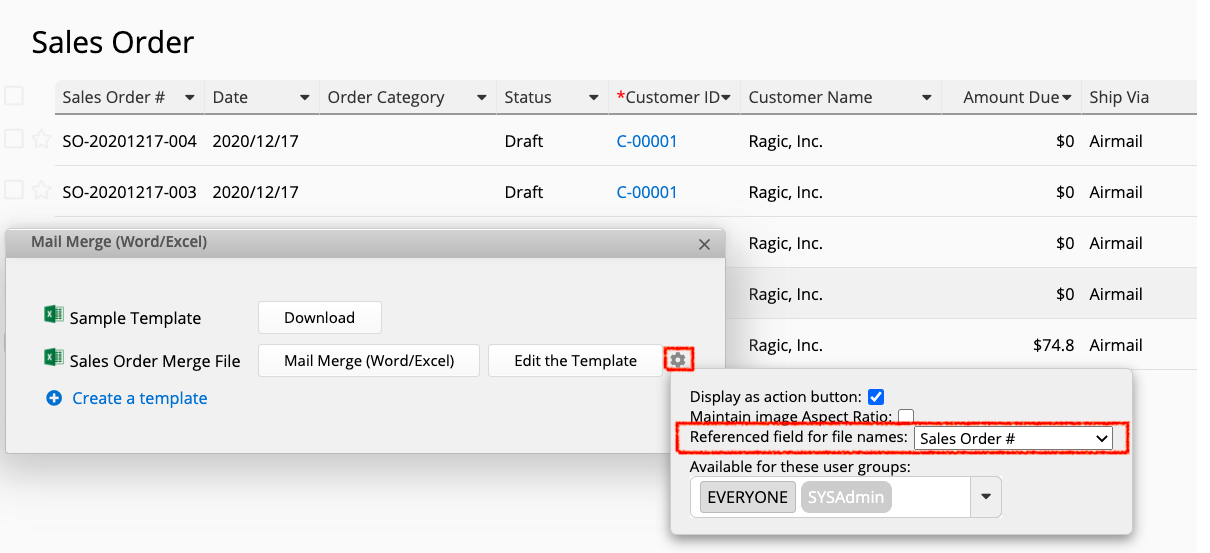
You can select to reference a certain field while naming your mail merge file. The settings can be found by clicking on the gear icon next to the mail merge template you would like to use.
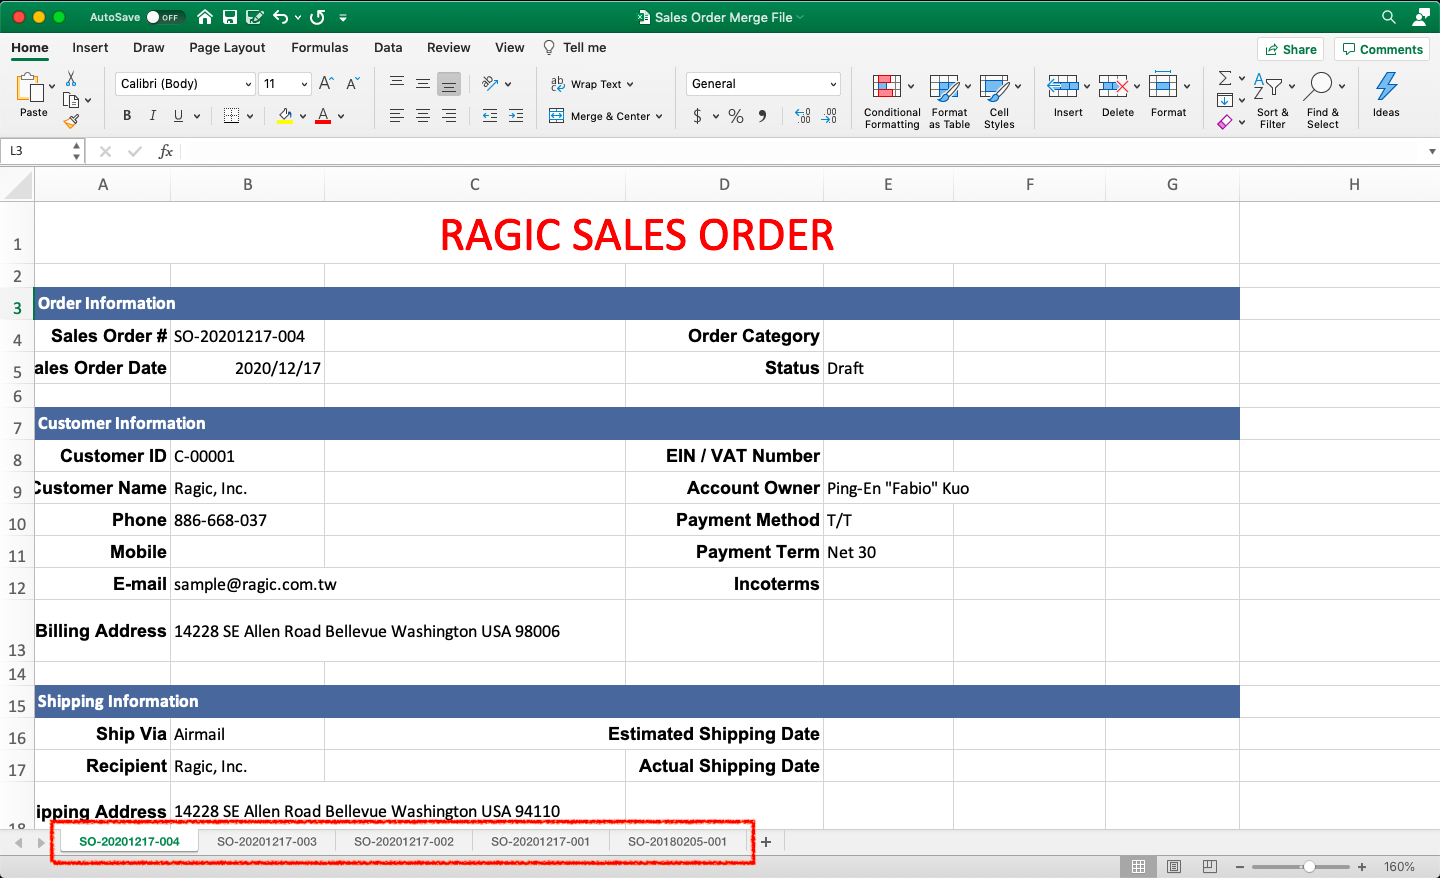
While executing mail merge, if you select to save multiple records as a single file separated by tabs, the selected referenced field will apply its values on the tabs in the Excel file.
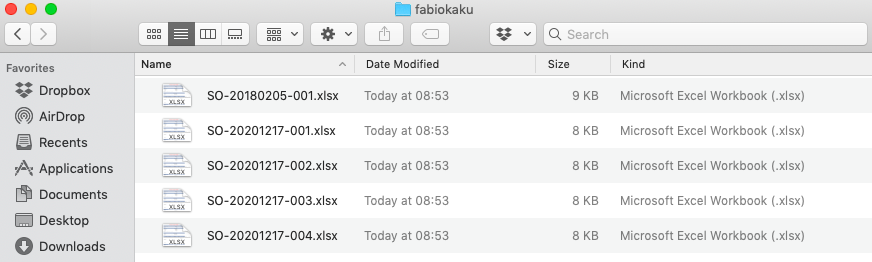
On the other hand, if you select to save multiple records as separated files (compressed into a zip file), the selected referenced field will apply its field values to the respective files’ name.
Note: This function does not support mail merge for the listing page.
| Parameter | Output |
|---|---|
| < |
The value of a field. Case sensitive. If there is more than one field with the same field name, use < |
| < |
The value of a field |
| #Field Name# | The value of a subtable field |
| #{{APPROVAL_APPROVER_NAME}}# | Approver’s name |
| #{{APPROVAL_APPROVER_SIG}}# | Approver's Signature in Personal Settings |
| #{{APPROVAL_APPROVER_EMAIL}}# | Approver’s E-mail |
| #{{APPROVAL_STATUS}}# | Approval status |
| #{{APPROVAL_DATE}}# | Date of approval |
| <<RECORD_LINK>> | The URL of the record |
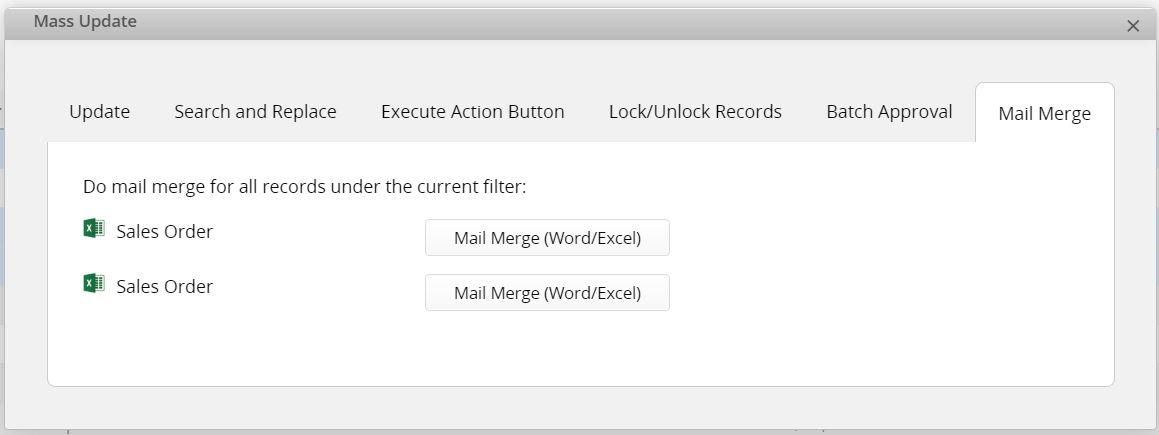
You can use the mail merge function to only export selected entries. To do so, please select the entries you would like to export by ticking the checkbox next to the entries and then click Mass Update.
Next, choose the format you would like to export under Mail Merge tab.
Please view the video below for a step-by-step tutorial:
To upload multiple files into your existing records in a sheet for a certain file upload field, you can navigate to the listing page while browsing your database and click Tools > Import > Mass file upload.
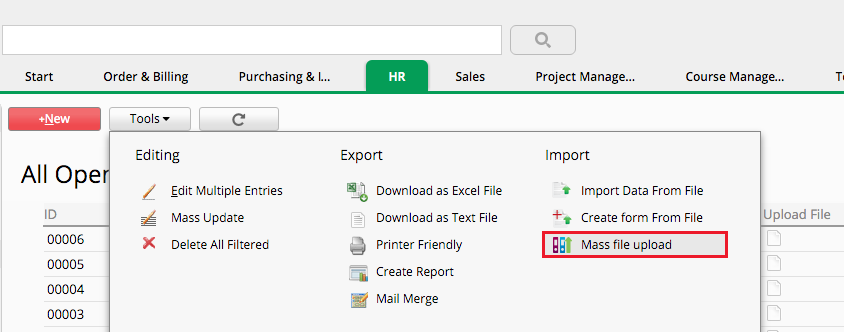
This will take you to a Data Import Menu that will help you with mapping and uploading your files into your Ragic sheet.
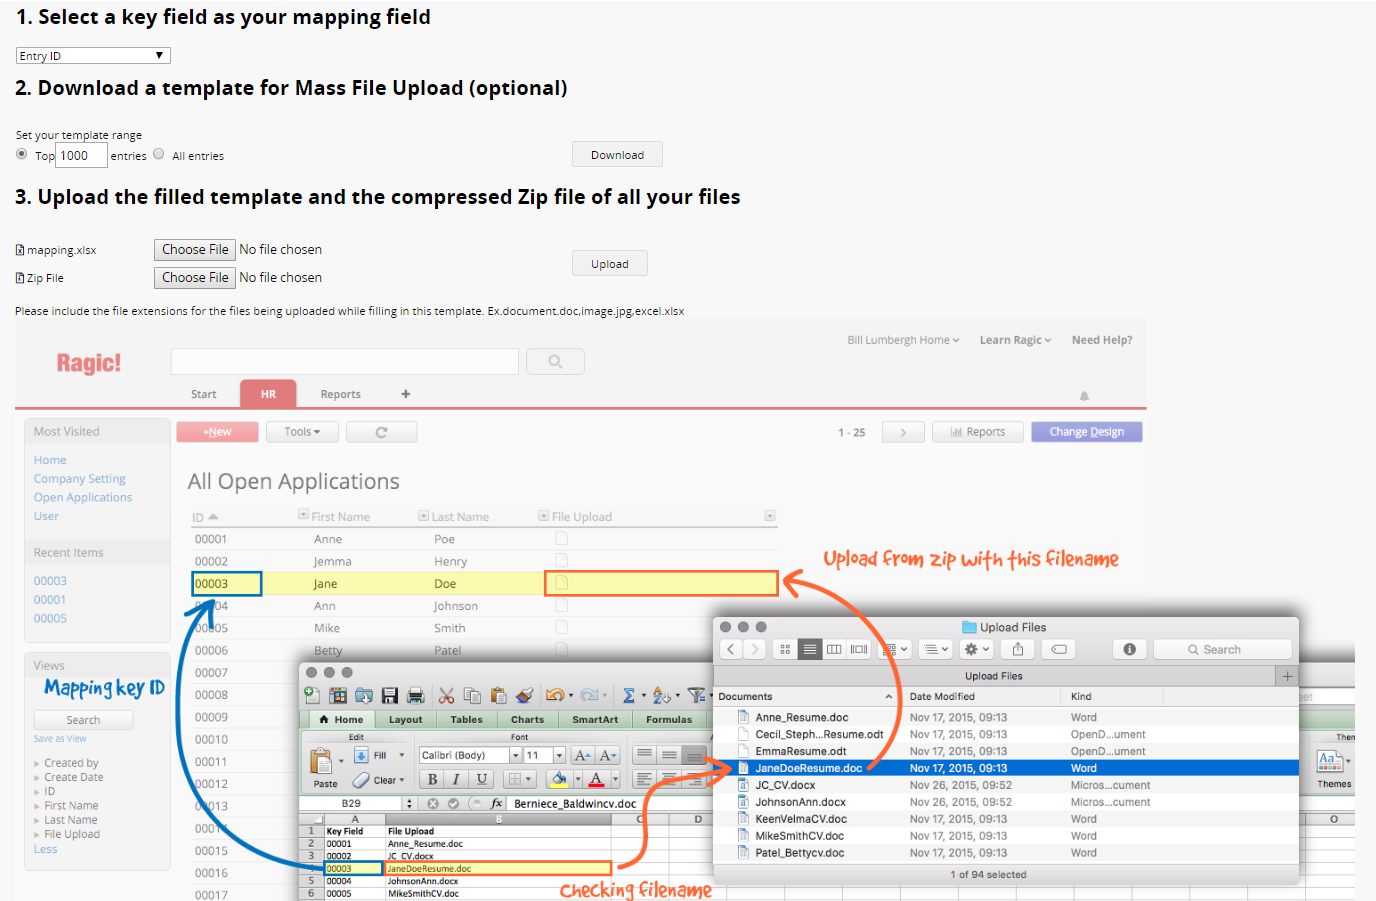
First of all, you'll need to set your template's key field to determine which field is the key to mapping your files to the correct records. In our example above, we're using the "ID" field, which will map certain applicants' resume and CV files to their records in Ragic.
After determining the key field, you can download a template for mass file upload. This downloads an empty spreadsheet in .xlsx format that contains the key field you had determined in the first step, and space to write the file names.
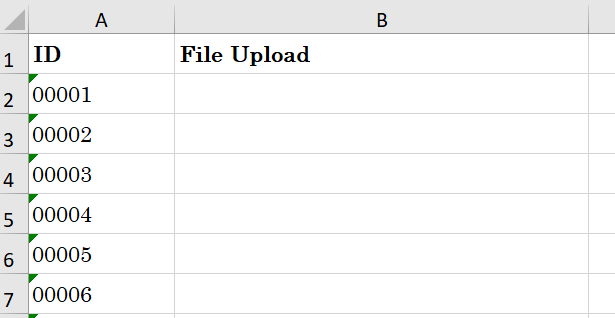
Fill in your template with the filenames and extensions of the files that you’re going to upload under the appropriate column named after your file upload field.

After you’re done, please save the modified template.
Note: Please do not use commas "," as it is used to determine the different file names when uploading multiple files.
To zip your files/images that you are going to upload, please do it by selecting all of your files/images > right click > Compressed (Zipped) folder instead of zipping a folder that includes the needed files/images.
After you saved your template and zipped all the files/images that needed to be uploaded in one .zip file, you can upload your filled template and .zip file with mass file upload.
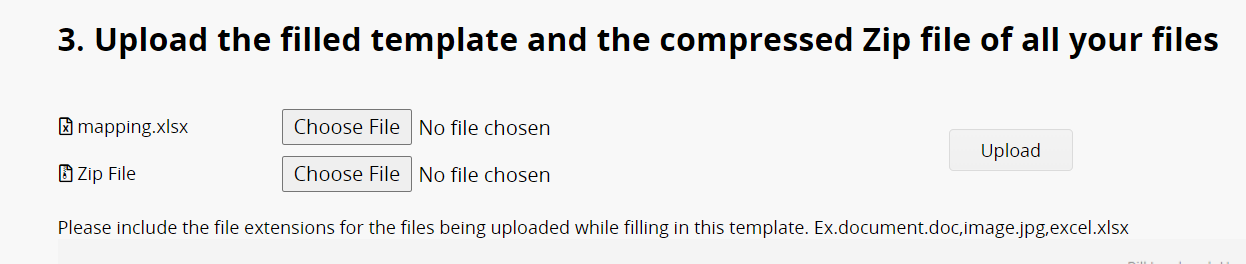
Ragic will check the mapping key ID, and map the corresponding files according to the template you have filled and upload the files to the corresponding records.
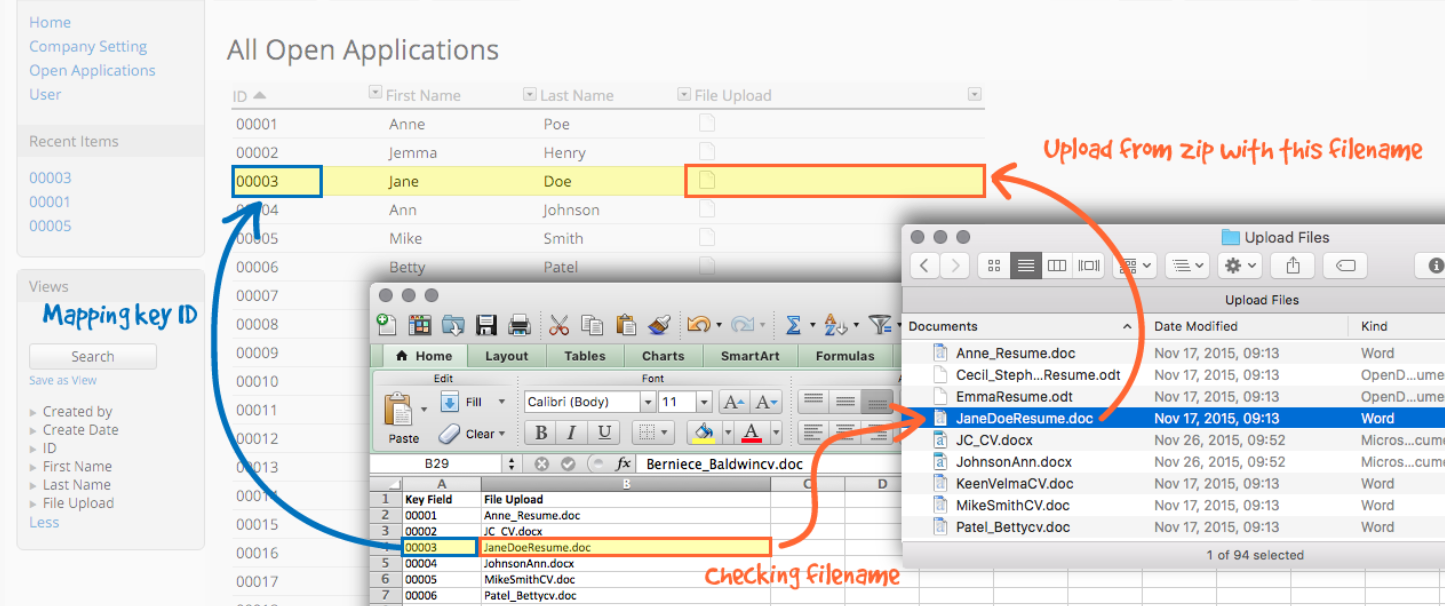
If you have enabled to allow uploading multiple files in the file upload field and would like to use mass file upload to upload multiple files, you'll need to use commas "," to separate your filenames in the respective cells on your template.

Choosing the field you want to download, for example, you would like to download all the files in the Document Review Request. This will generate a .zip file that contains all the files from the field you selected.
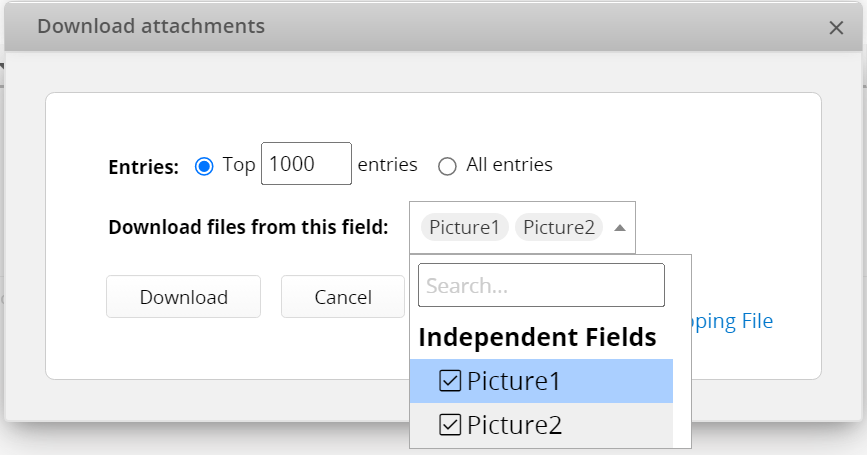
You can also download mapping file as a .zip file by clicking Add Mapping File and selecting the corresponding key field.
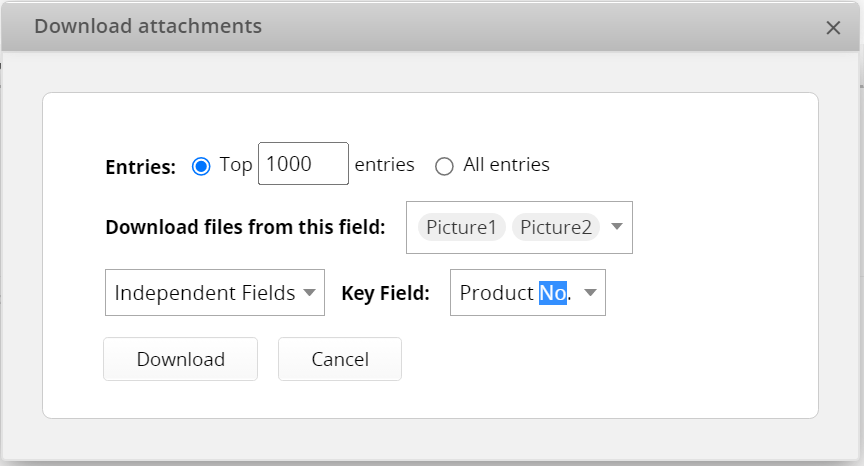
If you cannot see the options featured below on your database sheets, it may be related to the access rights you are granted. If you have any questions about your access rights, or you're not able to send mass e-mail, please contact the SYSAdmin of your database to grant you proper access rights configurations.
The mass e-mail feature sends out e-mails that you compose, to records that have at least one e-mail field. You can either select an e-mail field or a select group field to use for the recipients. This is extremely useful for sending follow-up e-mails, promotional campaigns, or newsletters to certain groups of people.
To send out mass e-mails, you can first filter your records if necessary, and use the Send Mass E-mail function under the Tools menu.
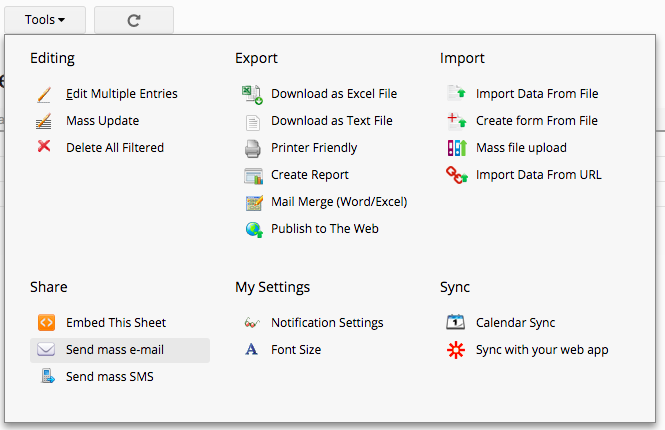
Not filtering records would mean that the mass e-mail will be sent to all contacts in your database sheet.
Select the e-mail field that you would like to send e-mails to, and enter the subject and content of the e-mail.
You will be able to refer to field values within the record that you're using to send out this e-mail with variable syntax. Check all supported variables here.
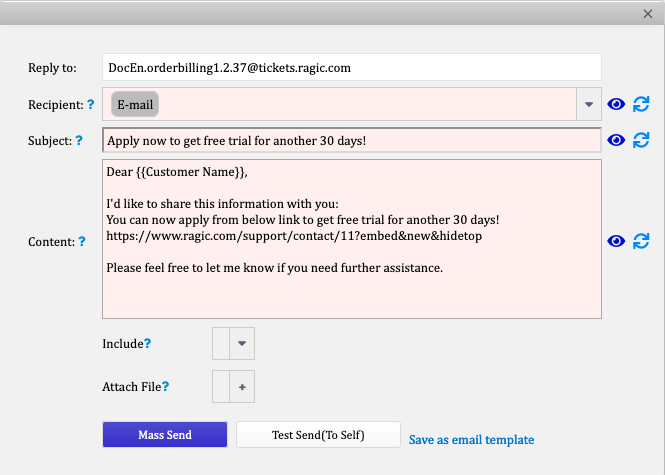
You can click on ![]() which will show you a demo on how the custom e-mail looks like. If you decide to use our standard template instead, click on
which will show you a demo on how the custom e-mail looks like. If you decide to use our standard template instead, click on ![]() will discard all the changes you've made.
will discard all the changes you've made.
Furthermore, you may also attach the URL, Excel file, PDF document, temporary access links (read-only or editable), and the mail merge file of the record as well as other attachments. When you attach the URL of the record, please make sure you have grant the access right of the sheet to the recipients. Otherwise, they'll have a blank page when they access the database through the entry URL.
Clicking on the "Test Send" will send the mail to your e-mail address. In addition, you will be able to view the sent e-mails' status after clicking the "Mass Send" button.
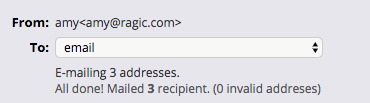
Below is a received e-mail sent with the mass e-mail feature that includes variables:
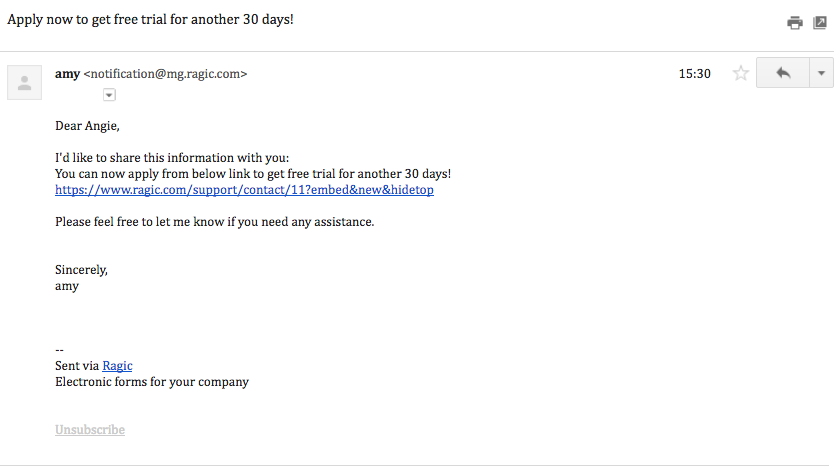
The sent e-mail will be stored with your entry in the database, which can be found on the entry's form page, accessible through the e-mail icon on the lower-right corner.
Similar to our E-mail Support Ticket System Template, you can reply to the sent e-mails.
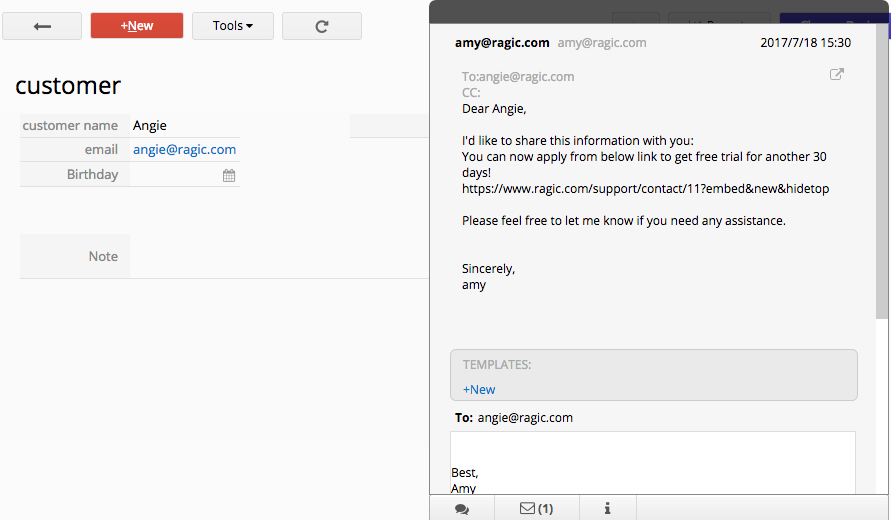
Professional Plan: 1000 x Internal Users in your database
Lite Plan: 250 x Internal Users in your database
Free Plan: 100
You can click here for more details on pricing.
Note: The email recipients must agree to receive the emails you send from Ragic. If the emails are bounced or reported as scam, you may be suspended from using this function on Ragic.
If you don't see any options featured below on your database sheets, it may be related to the access rights you are granted. If you have any questions about your access rights or not being able to send mass e-mail, please contact your SYSAdmin of the database to check for the proper access rights configurations.
To e-mail an entry, you can click on the Tools menu on the top of the form page, and select E-mail this entry.
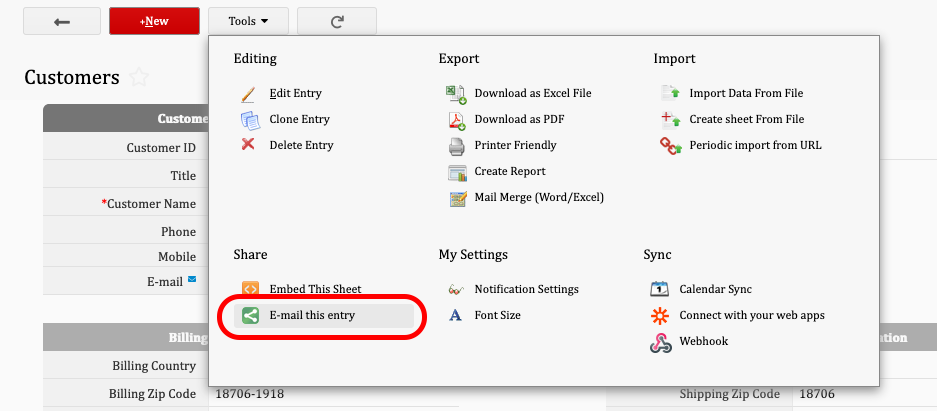
In the pop-up window, you can customize the e-mail settings.
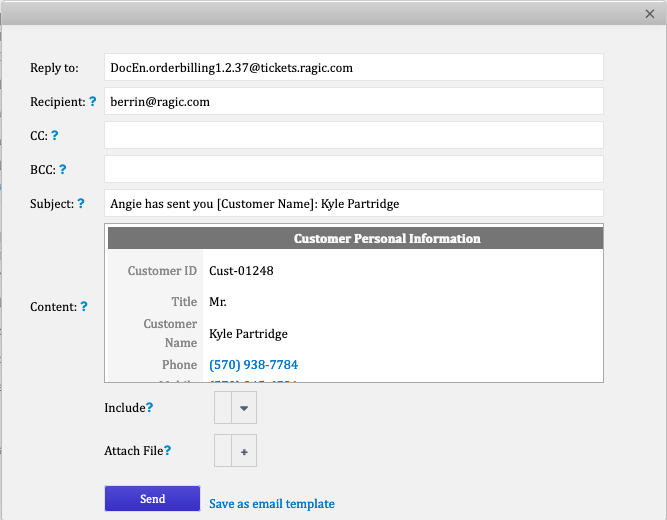
The default reply to is the e-mail address of this entry. You may input other e-mail address or select an e-mail field.
Ragic will map the first e-mail field in the form page as the recipient by default. If you would like to change the recipient to another e-mail address, you can either input the recipient manually in the text box or use parameters. Clicking on the ![]() icon will let you preview the result of your setting.
icon will let you preview the result of your setting.
The CC field is blank by default. Similar to the recipient field, you can type in the carbon copy recipient(s) or use parameters. Clicking on ![]() icon will let you preview the result of your setting.
icon will let you preview the result of your setting.
By default, Ragic will show the record summary in the content. If you want to apply customized content, you may also use the variables. Check all supported variables here. Clicking on ![]() will let you preview the result of your setting.
will let you preview the result of your setting.
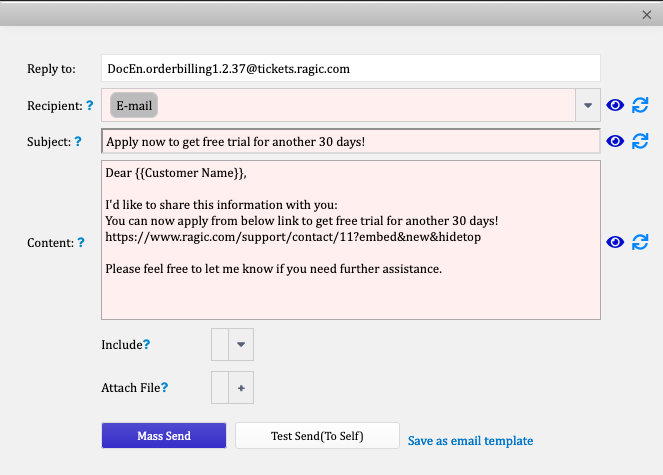
If you decide to use our standard template instead, click on ![]() will discard all the changes you've made. Furthermore, you may also attach the URL, Excel file, PDF document, temporary access links (read-only or editable, expire in 7 days), and the mail merge file of the record as well as other attachments. When you attach the URL of the record, please make sure you have grant the access right of the sheet to the recipients. Otherwise, they'll have a blank page when they access the database through the entry URL.
will discard all the changes you've made. Furthermore, you may also attach the URL, Excel file, PDF document, temporary access links (read-only or editable, expire in 7 days), and the mail merge file of the record as well as other attachments. When you attach the URL of the record, please make sure you have grant the access right of the sheet to the recipients. Otherwise, they'll have a blank page when they access the database through the entry URL.
If you need to send the e-mail in this format regularly, you can save it as e-mail template. You can only create one template in each sheet and this template will be shared between users.
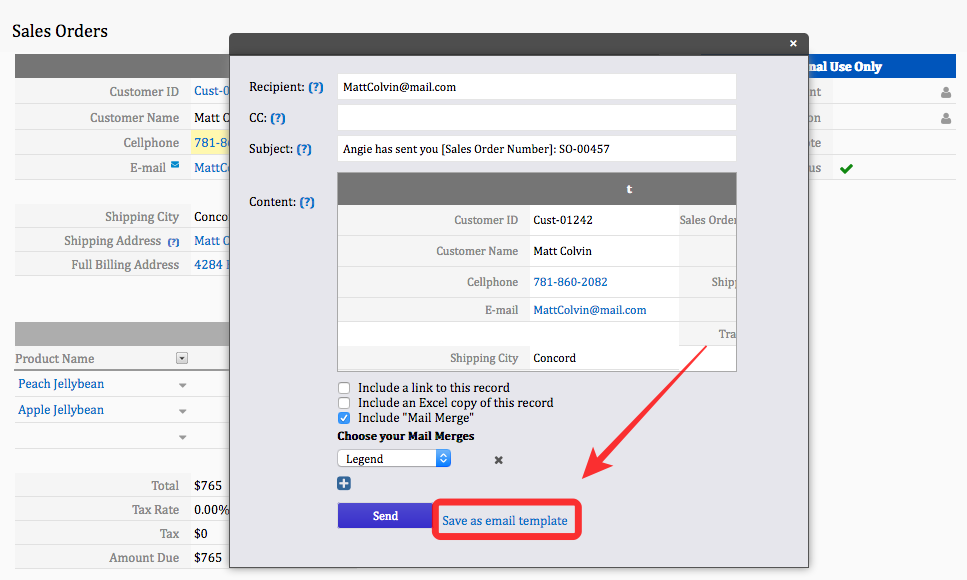
Once the e-mail is sent, it will be displayed in your e-mail history within Ragic. You can access previously sent e-mails through these mailing records.
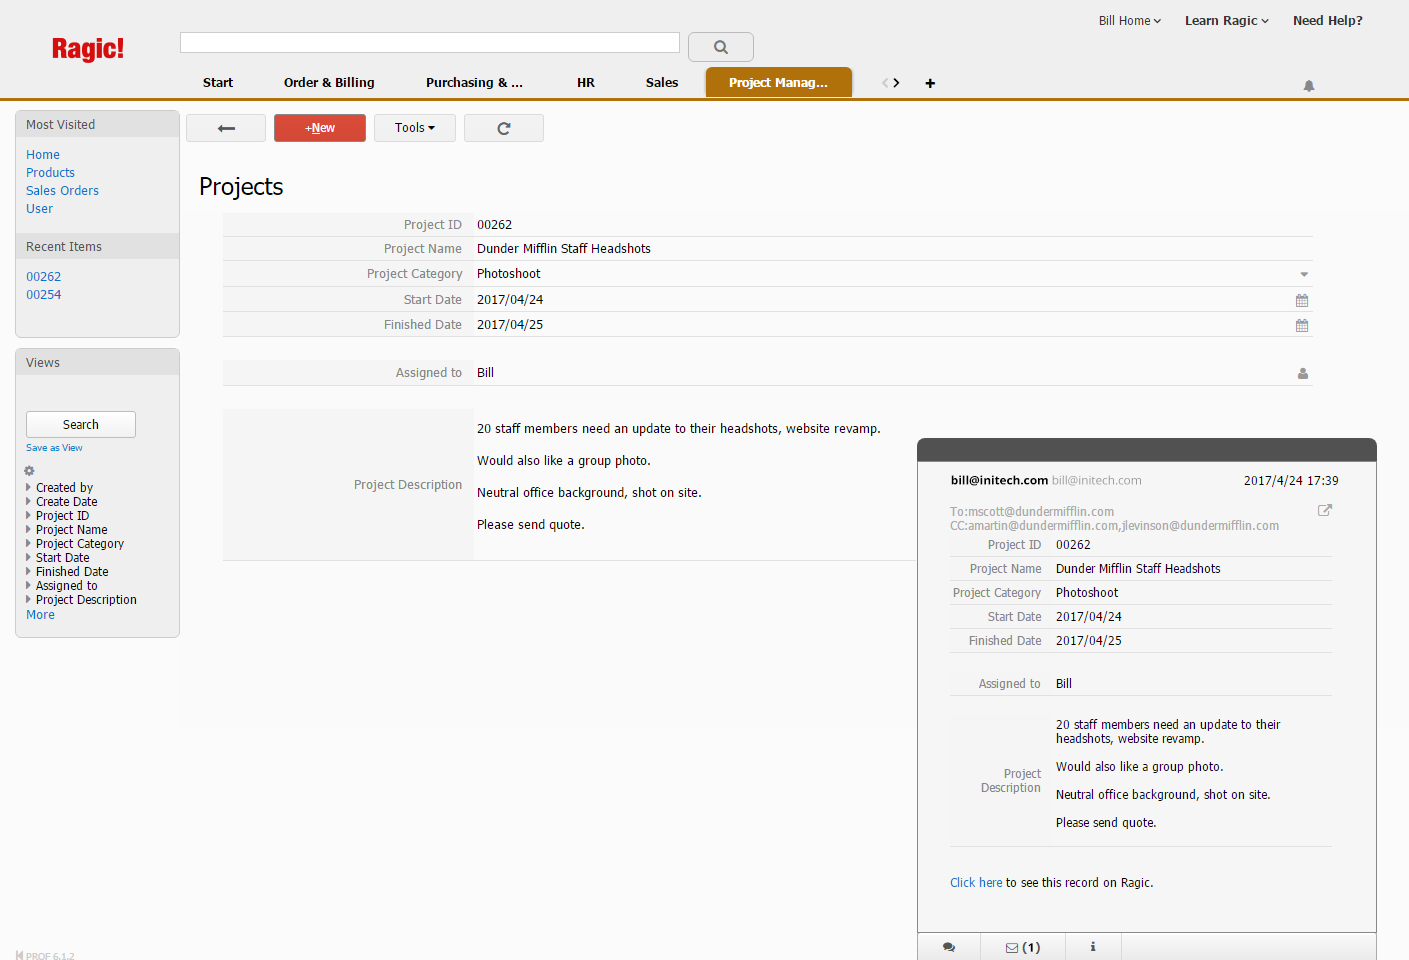
Users will also be able to reply to this e-mail through this record by following this article.
If you want to hide the mailing record, you may refer to this tutorial.
You can recognize this field type by the blue E-mail icon next to the field name.
![]()
As the record is saved with the E-mail address filled up in this field, Ragic will automatically send an e-mail to this e-mail address. This e-mail will contain a verification link that can authenticate that the guest user is the owner of this e-mail, which they can use to log in to Ragic. This is extremely useful when users create the records without logging in but would like to edit the records in the future.
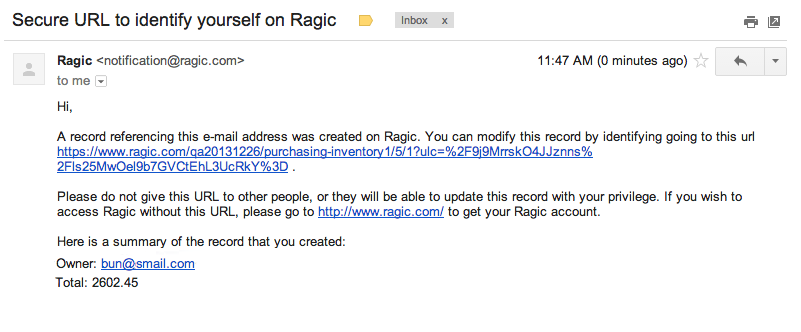
Ragic would now determine which records the guest user has permissions to view and edit. This type of temporary login is usually used so that the guest user can see and edit changes in the entries they have created or created for them.
Ragic will also send a verification e-mail when the record is updated.
To manually resend the verification without updating a record, you can click on the blue "E-mail" icon next to the field name.
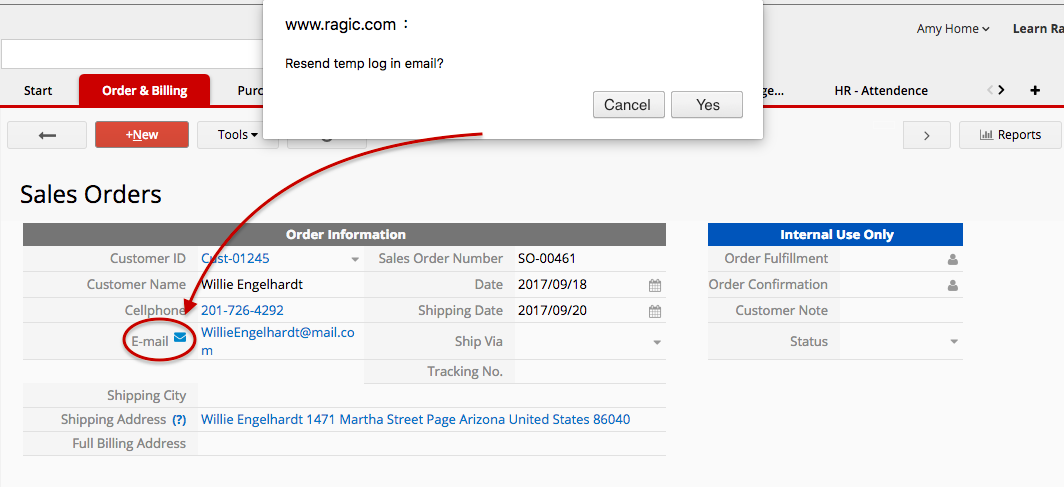

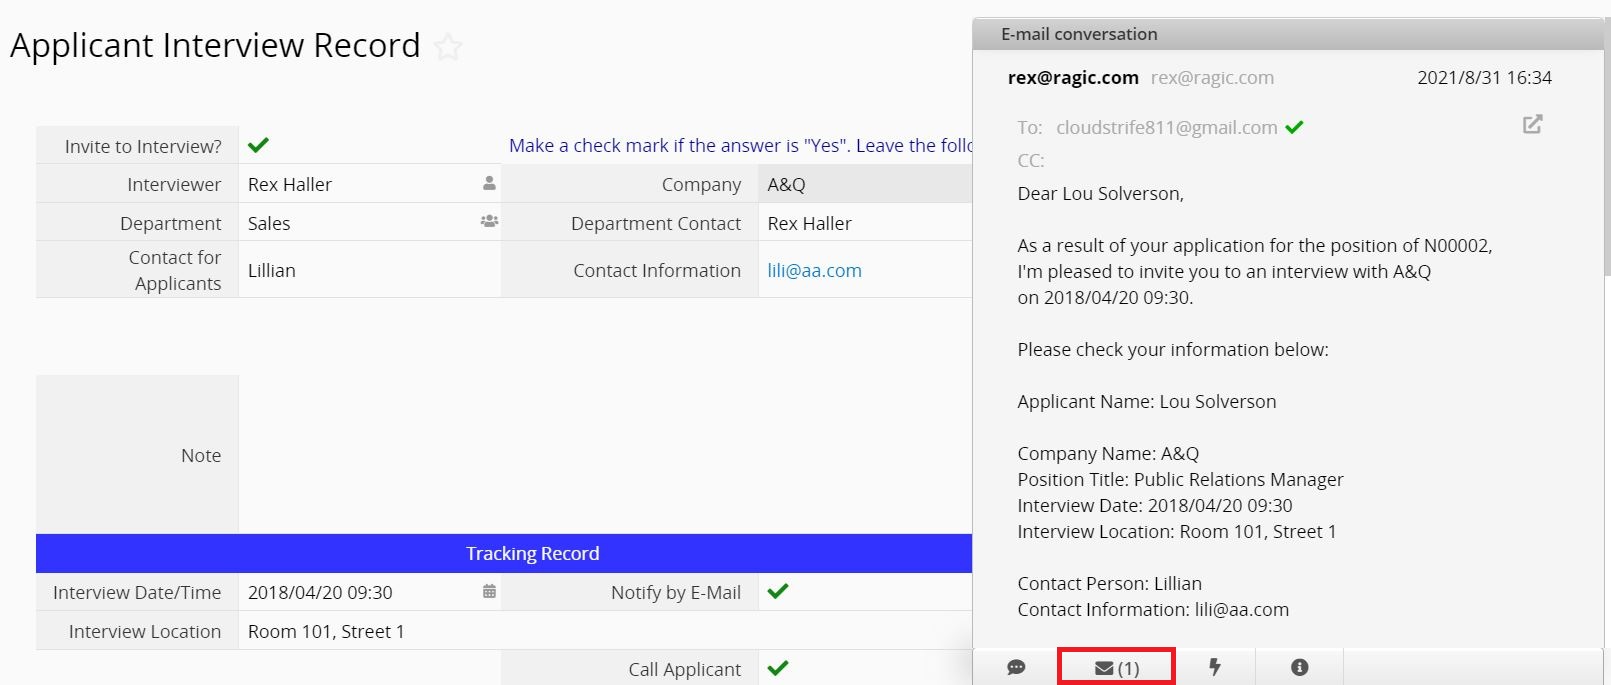
If someone sends an email to the email address of the entry , it will also show up in the email history of the record.
You can hover to the receiver's email address to view the notified time and read time.
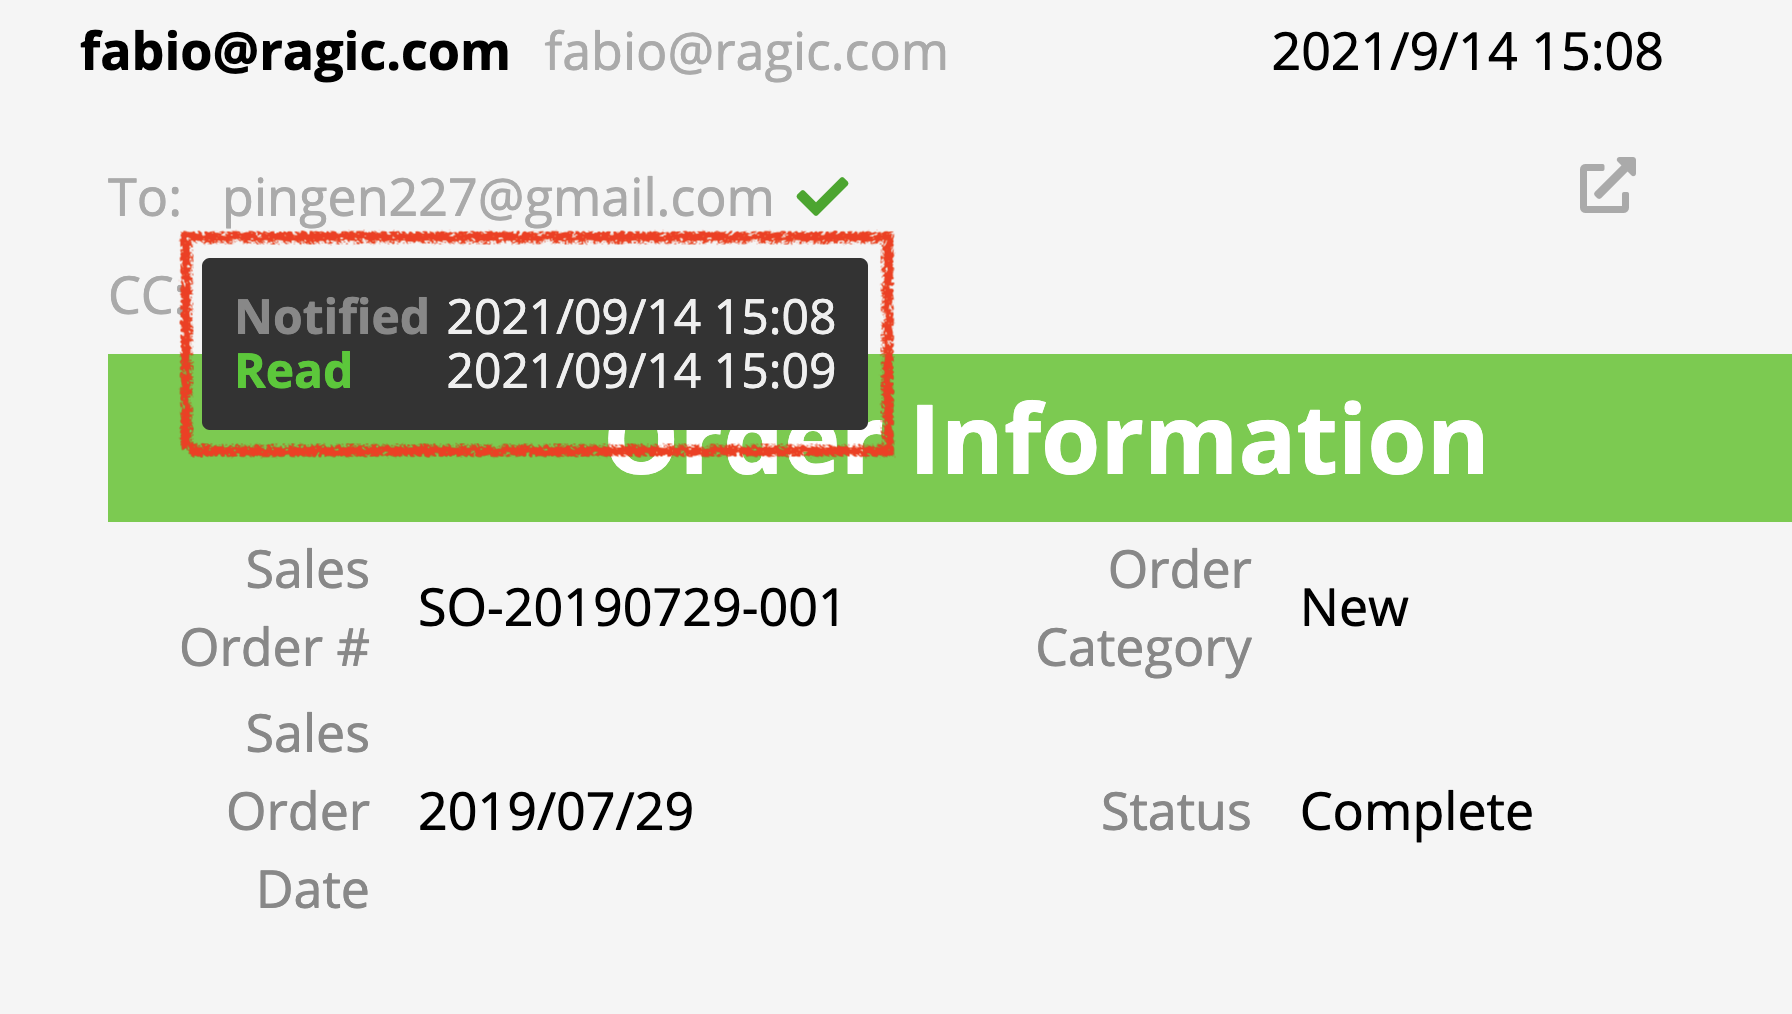
The Send mass SMS feature is available if you subscribe with our Professional plan or above. If you don't see this feature, please contact your SYSAdmin.
The mass SMS feature uses the data from the form as a phone book to send SMS messages to the "Phone" field of all (or filtered) data, such as promotional offers or announcements. (This service requires the purchase of additional credits, please refer to the SMS Fee Charged for detailed information.)
To use this feature, the form needs to have a Phone Field and the field values should adhere to a specific phone number format.
In the List Page > Tools > Share > Send SMS, a pop-up window will appear where you can purchase credits. Then, select the phone number field as the "Recipient" and enter the content you wish to send. The system will send SMS messages to all the numbers in that field.
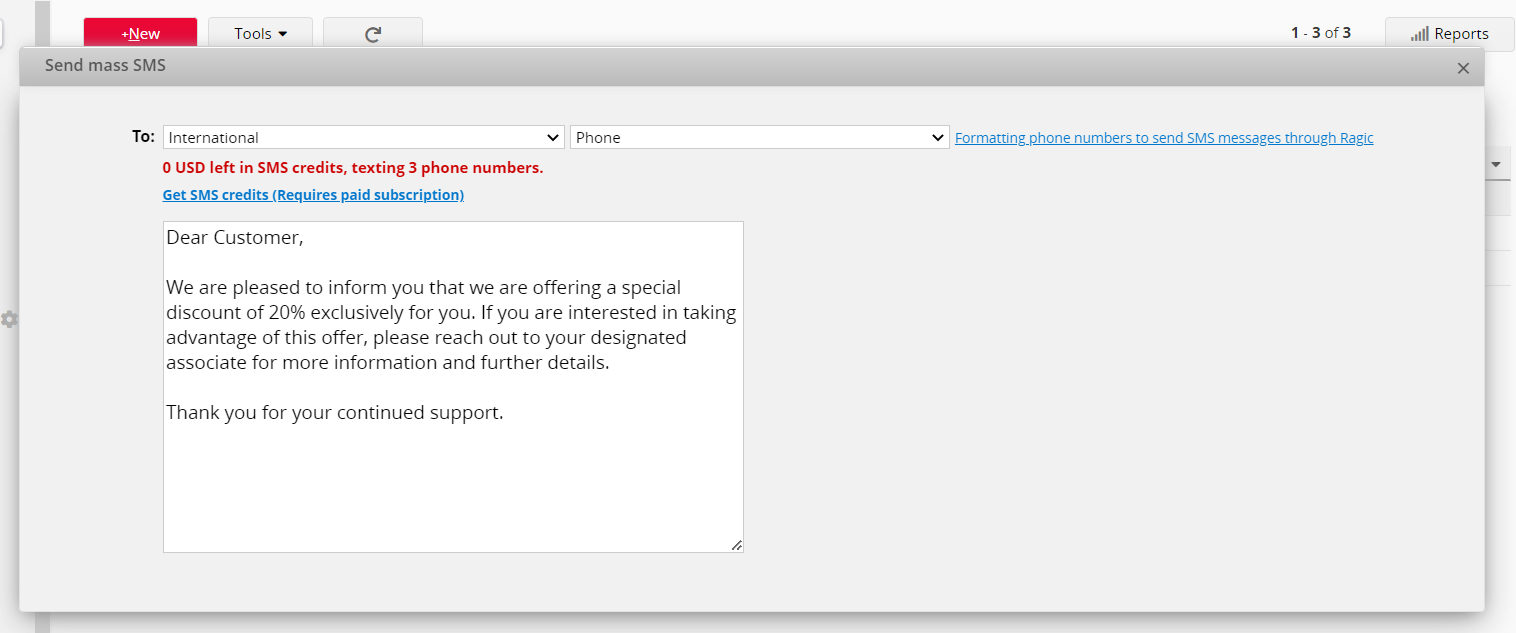
If you want the subject and content of the SMS to be customized based on the field values of each record, such as displaying the customer's name in the SMS, you can use variables. For example:
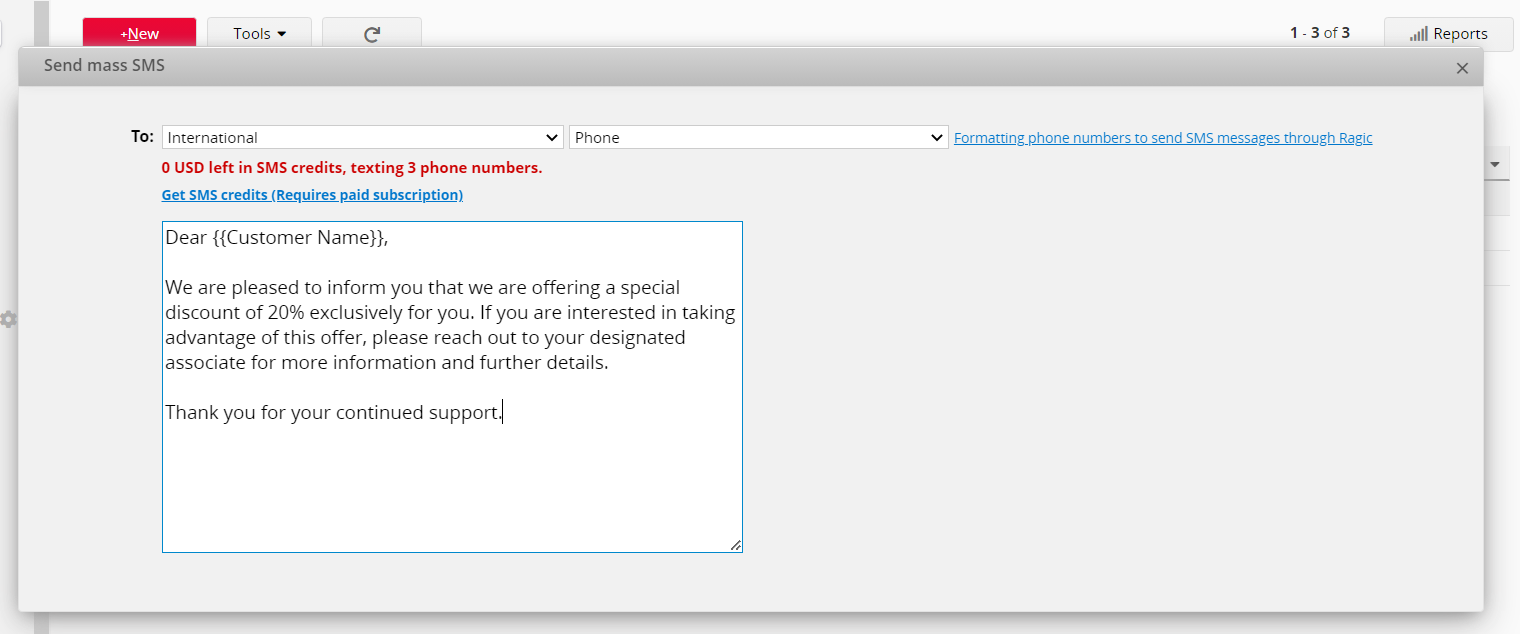
Below is the list of variables you can use in the SMS content::
| Variable | Description |
|---|---|
| {{AP_NAME}} | Your Ragic account name |
| {{USER_NAME}} | Name of sender |
| {{RECORD_LINK}} | Record URL |
| {Field ID}} | Value of the field |
| {{Field Name}} | Value of the field |
If there are duplicated field names on the sheet, please use {{FIELD ID}} to retrieve the field value instead.
Ragic uses Twilio's service to send mass SMS. To use this feature, you must purchase SMS credits in Ragic so that the actual cost of each SMS sent (the fee charged by Twilio) will be deducted from your total purchased credits.
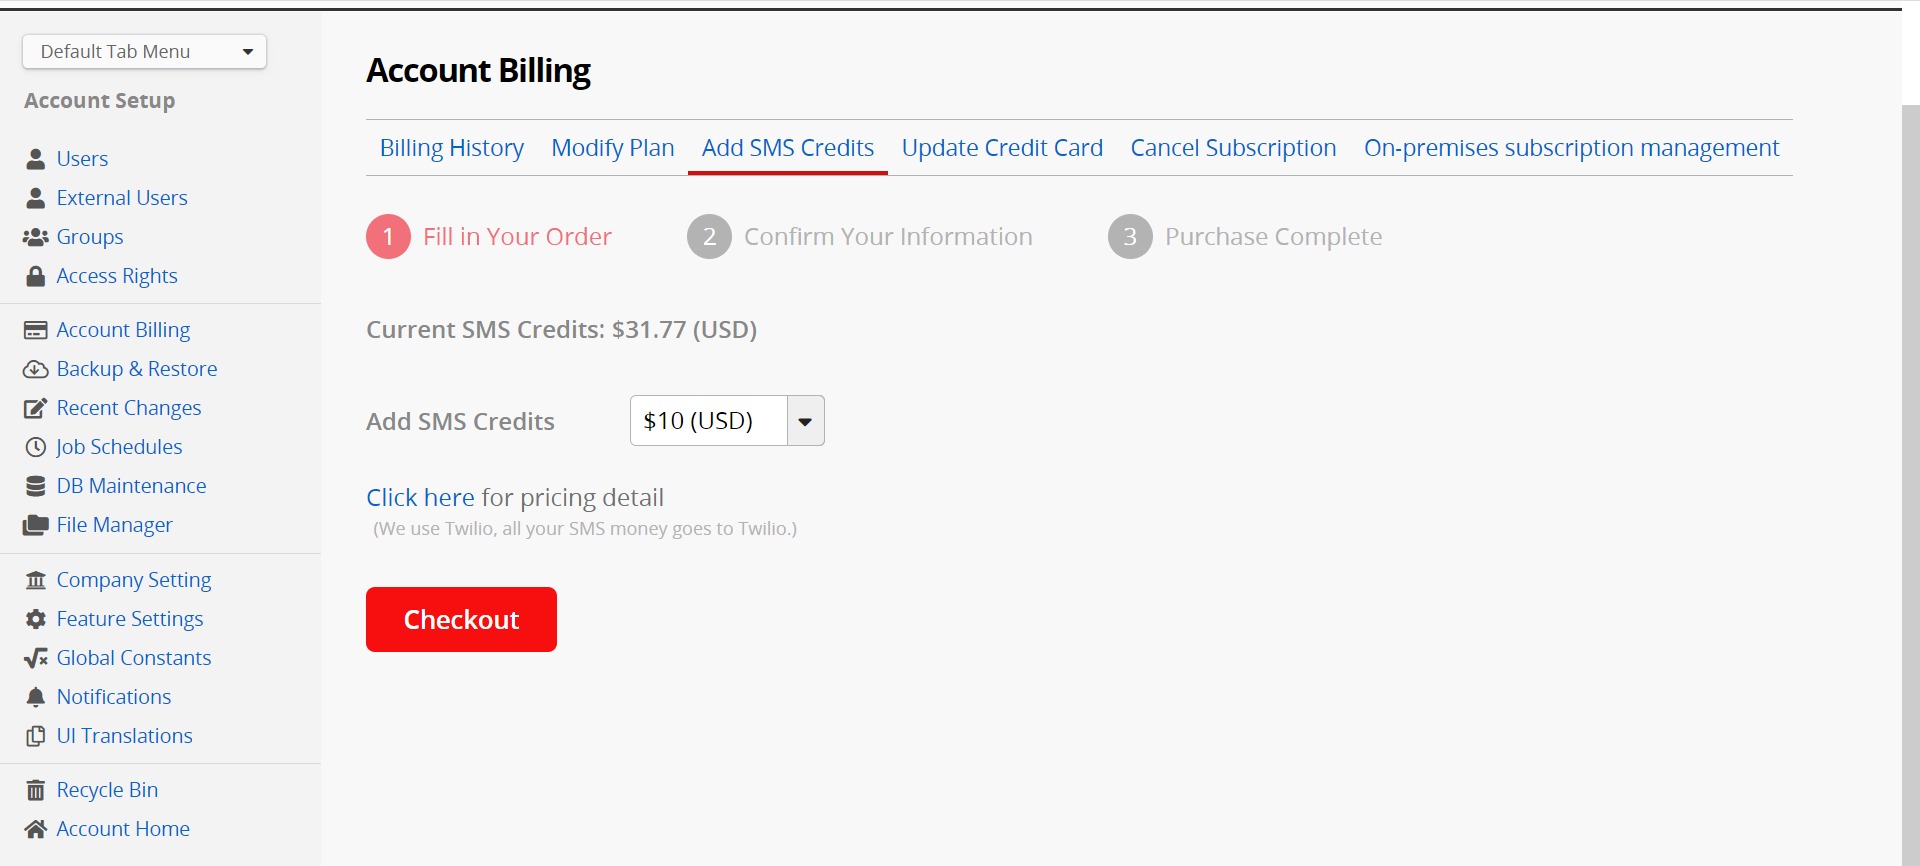
For information on the fees charged for each SMS in Twilio, please visit Twilio's official website: https://www.twilio.com/sms/pricing/us
Below is the screenshot from Twilio's official website showing the cost of each message sent to German domestic telecommunications (in US$).
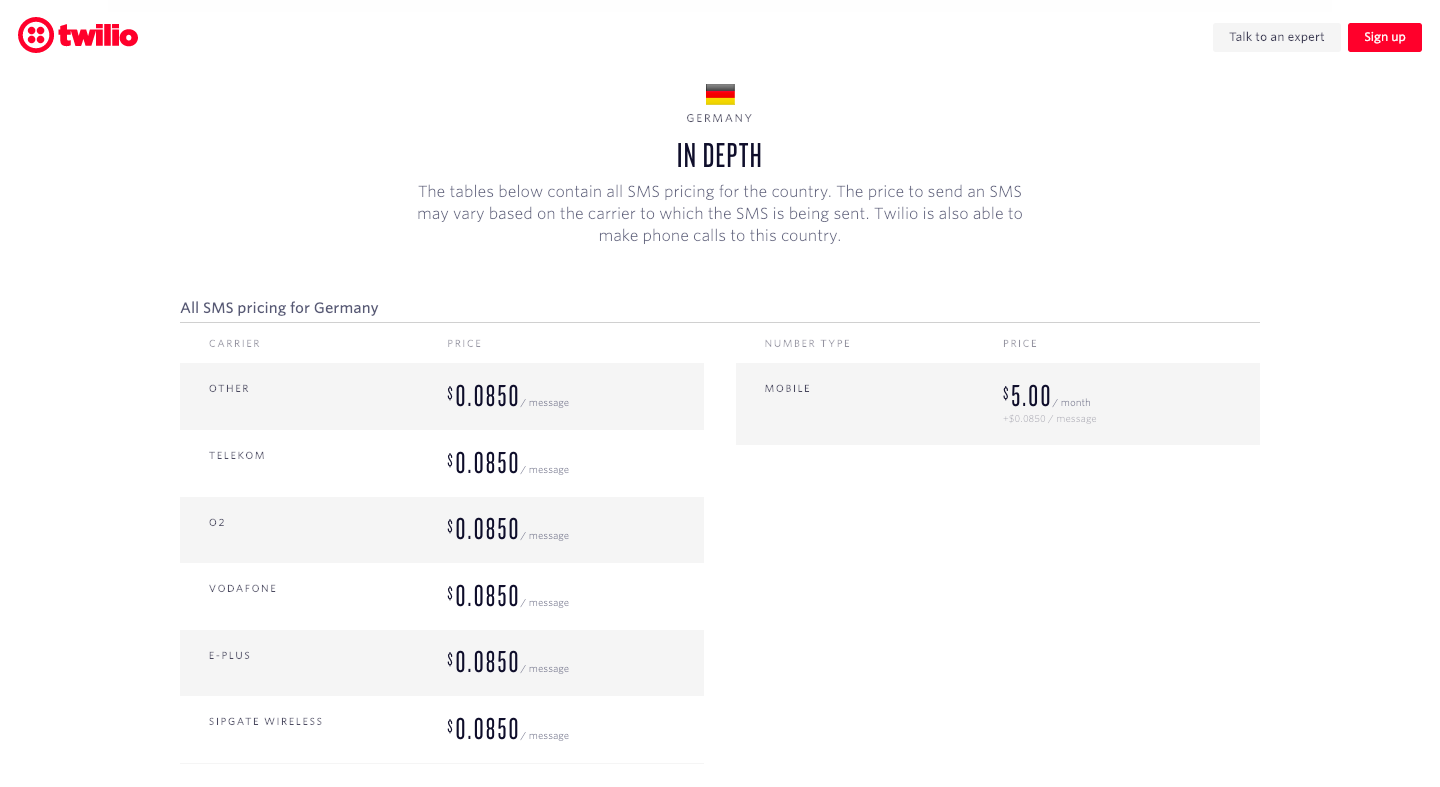
The character limit for a single SMS message is 160 characters, however, most modern phones and networks support concatenation and segment and rebuild messages up to 1600 characters. Messages not using GSM-7 encoding are limited to 67 characters.
We recommend you check any mass messages in this tool before you send them out. It will flag any UCS-2 characters to avoid you being double charged for messages.
When you send a SMS message over 160 characters the message will be split. Large messages are segmented into 153 character segments and sent individually then rebuilt by the recipients' device. For example, a 161-character message will be sent as two messages, one with 153 characters and the second with 8 characters.
If you include non-GSM characters like eastern characters in SMS messages, those messages have to be sent via UCS-2 encoding. Messages containing any UCS-2 characters are limited to 67 characters and will be concatenated into 67-character message segments, even if the messages contain less than 160 characters.
If the recipients' phone numbers are all from a single country, you can use the local standard representation for the field values, such as the US format (555) 555-1234. When selecting the recipient, choose "United States", and the system will automatically convert the numbers to the international format and send the SMS. However, if the field values contain phone numbers from multiple countries, you will need to select "International" as the recipient. In this case, all numbers must be in international format for the SMS to be successfully sent. For example, a French number 05 12 34 56 78 would need to be written as +33512345678.
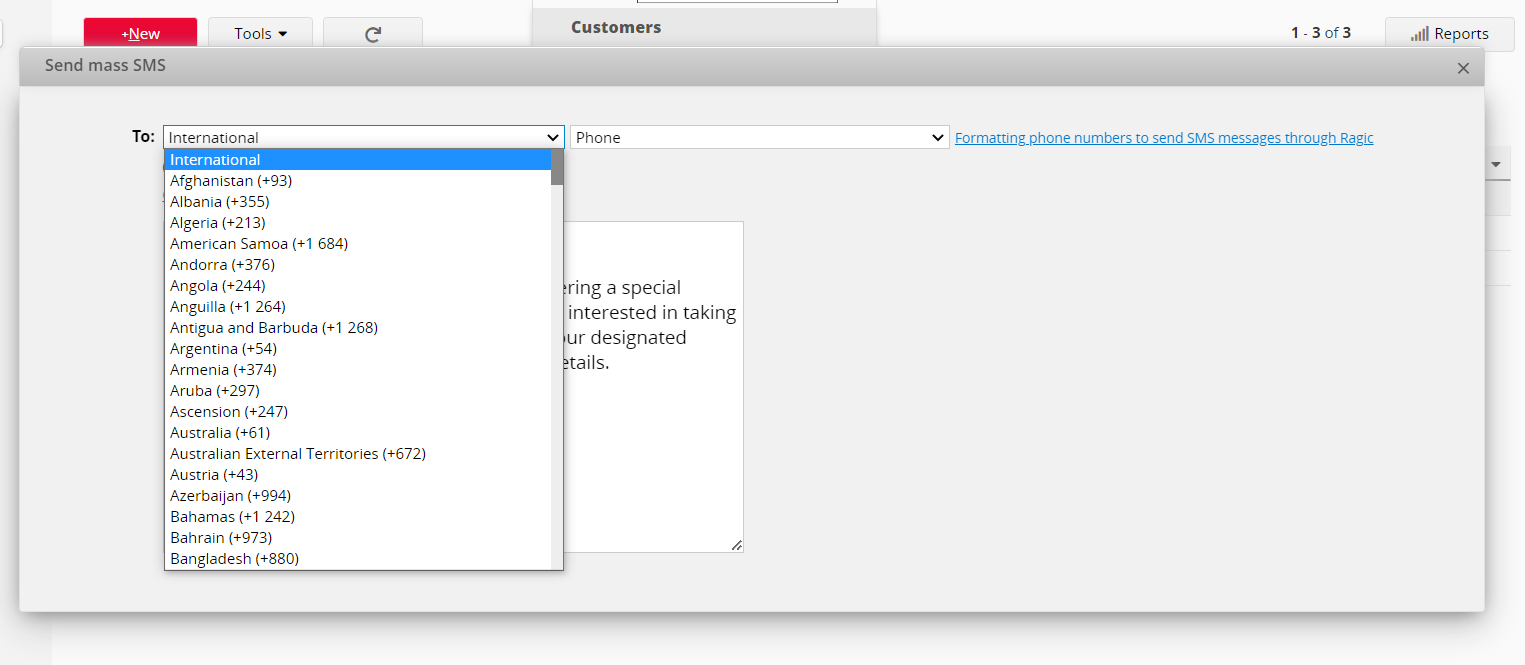
If you have a "Phone" field already, you may use string formulas to retrieve international format.
For example, the "Phone" field locates in A2 with format 310-123-4567, you can create an SMS free text field with formulas: "+1"+LEFT(A2,3)+MID(A2,4,3)+RIGHT(A2,4)
If you don't see any options featured below on your database sheets, it may be related to the access rights you are granted. If you have any questions about your access rights or not being able to view or generate reports, please contact your SYSAdmin of the database to check for the proper access rights configurations.
Ragic has a few types of reports that you can generate from the data you have in your Ragic sheets.
To generate a report from your data, you may first filter out the entries if necessary. Click on the Report button at the upper-right corner on the listing page.
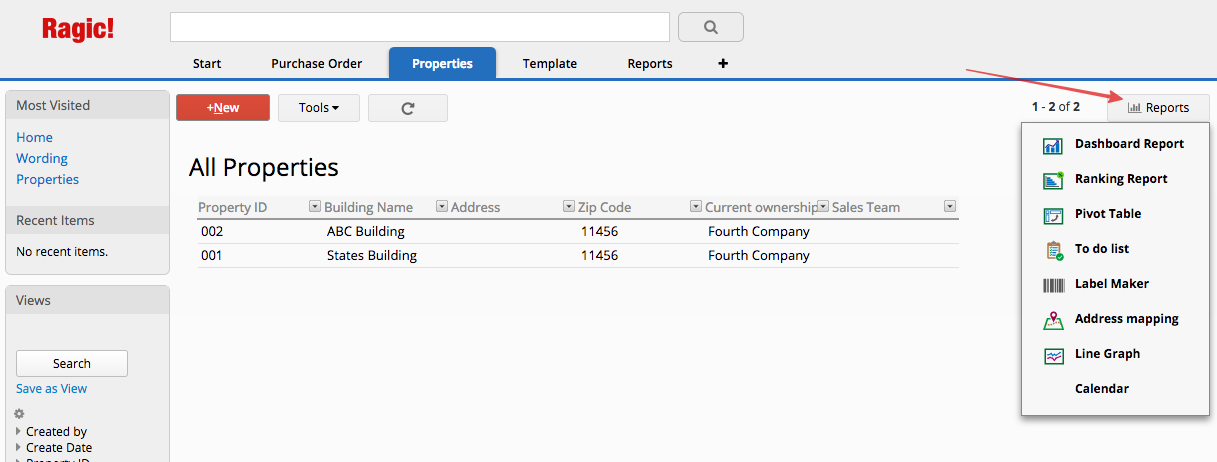
You may also find saved reports under the Reports tab for easy access. (This is only visible when your SYSAdmin saves reports with the source data that you have access rights to.)
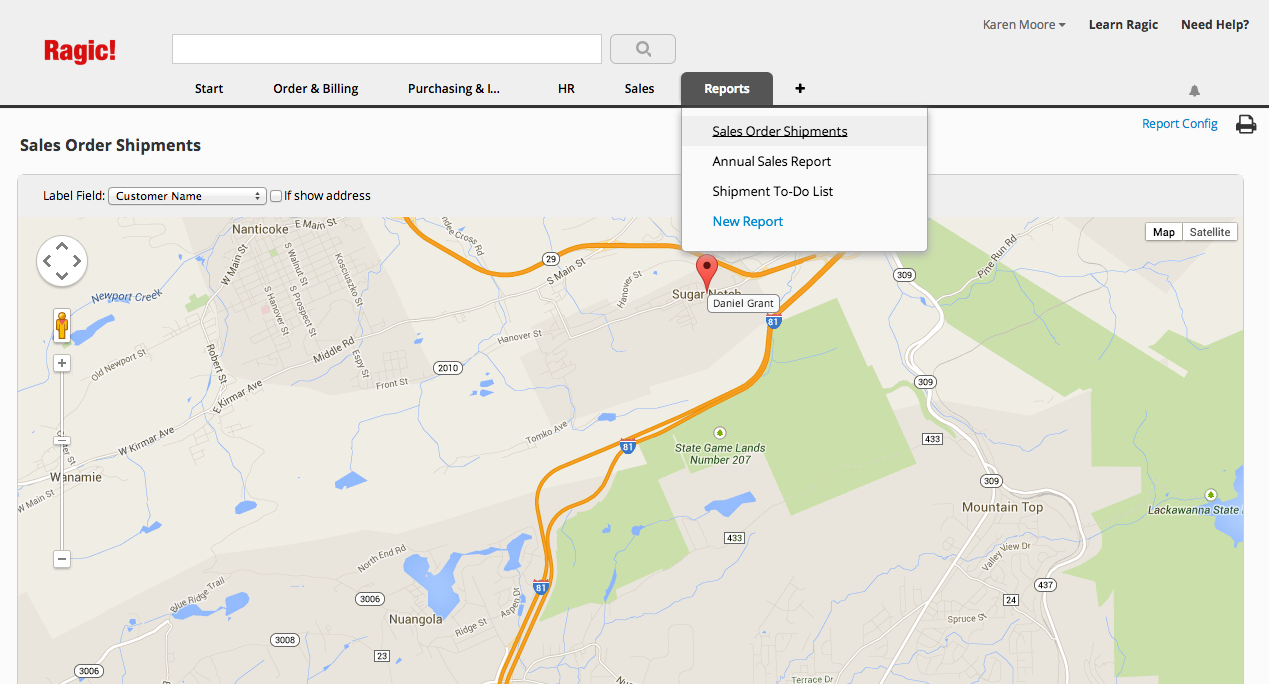
Here is an introduction to the types of reports that Ragic offers:
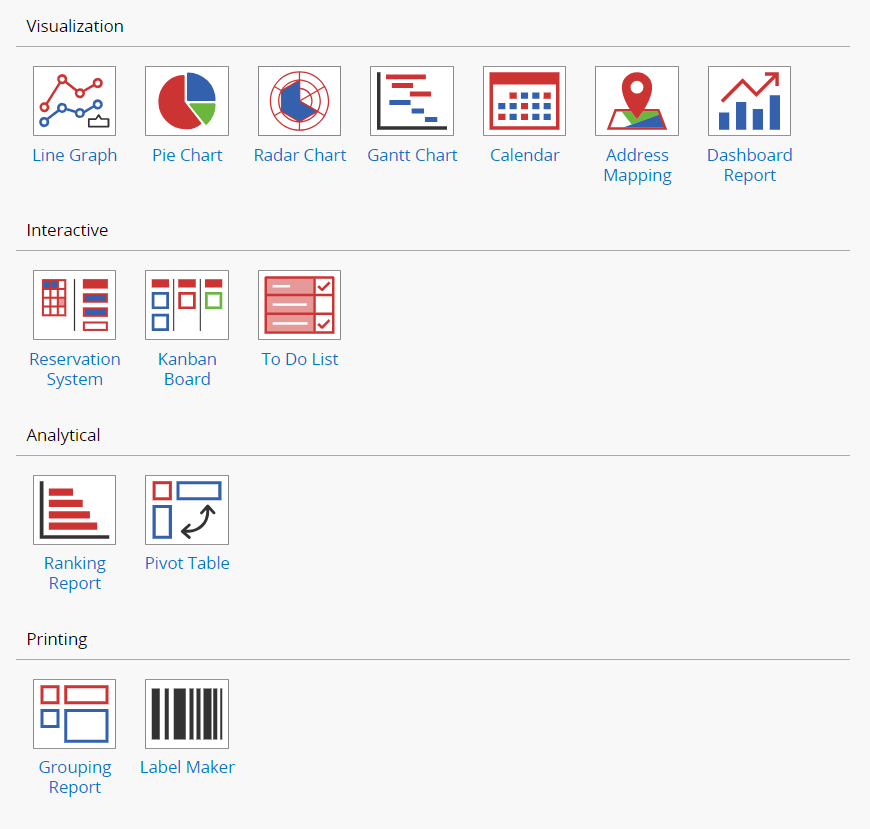
Your report will be generated according to the filter you have applied, but you can also generate reports for a certain shared view to display results within a different filtered criteria. You can change the applied view within the report, from the top-right side.
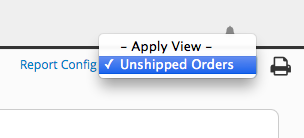
If a fixed filter view is applied to your sheet, the report will display results accordingly.
You can configure style settings in any report. By clicking the "more" icon at the top right corner, you can see style settings in the first option.
There are three things that you can configure in style settings.: Basic, Font, and Boundary.

You can refer to the image below to know what you can configure in Basic.
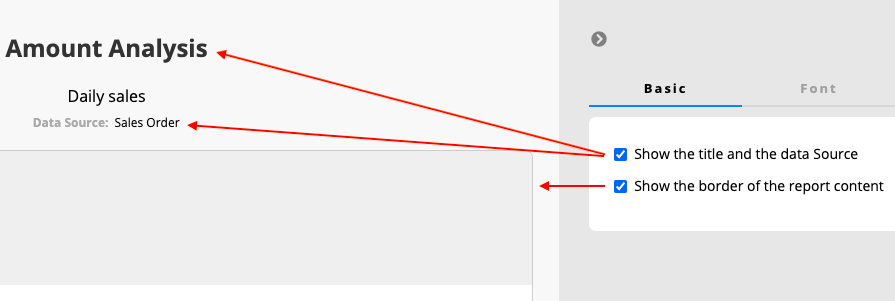
You can adjust the Font, Font Size and Alignment here.

You may modify a report's inner boundary and outer boundary.
Inner boundary means the distance between the border and the report content.
Outer boundary means the distance between the border and the browser border.
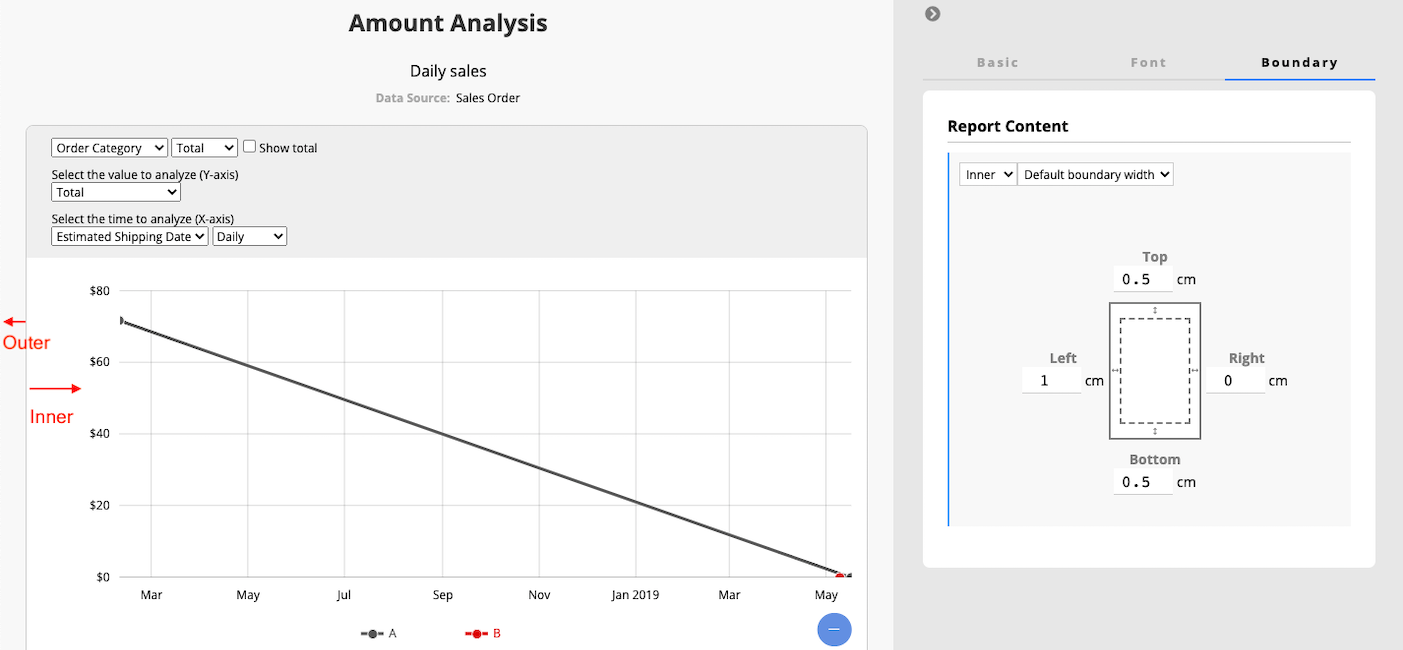
If you don't see any options featured below on your database sheets, it may be related to the access rights you are granted. If you have any questions about your access rights or not being able to view or generate reports, please contact your SYSAdmin of the database to check for the proper access rights configurations.
In addition to the saved report created by your SYSadmin, you can also generate and view reports. Clicking on the Report button at the upper-right corner on the listing page, select the report type that you would like to generate.
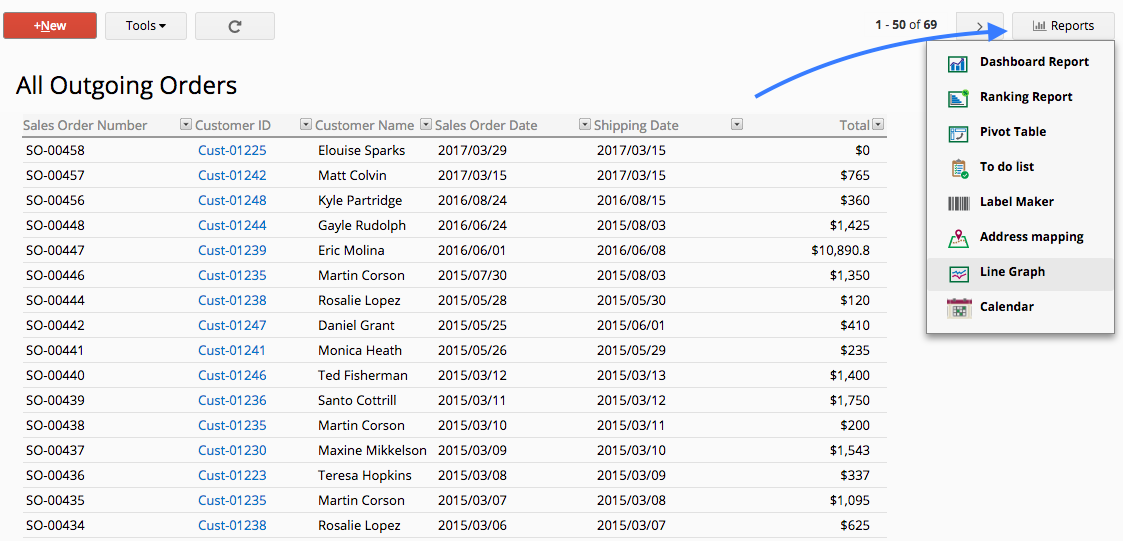
Ragic can analyze your data to generate a line graph.
You have the option to pick a certain field to graph out, choose criteria, and also choose a date field or a date criteria that Ragic can record, as well as the timeframe in which your line graph will be drawn. You can change these anytime while viewing your report.

The legends that are determined with the field you are sorting by can be turned off and on below the graph.
Below is a chart of the configurations you can make on your line graph.
| Option | Description | Optional? |
|---|---|---|
| Breakdown Field | Pick a field that has options (a selection field) to analyze as a source field. If not picked, Ragic will analyze the number of records by time on your sheet. Ex: in the screenshot above, the breakdown is made according to the status of entries. | Mandatory |
| Value field | Pick a criteria so that Ragic can analyze your data, if not picked Ragic will use the # of Records. | Optional |
| Date field | Choose a date field as an axis field to analyze your data with, if not picked, Ragic will use the creation date of your records. | Optional |
| Timeframe duration | Choose a timeframe (day, week, or month) to view your graph. | Optional |
You can also save as a pdf file or print your report by clicking the print icon on the right side.

You can find the saved report that are created by your SYSadmin under the Reports tab for easy access.
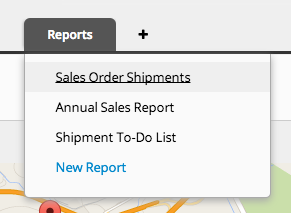
Your report will be generated according to the filter you have applied, but you can also generate reports for a certain shared view to display results within a different filtered criteria.
If a fixed filter view is applied to your sheet, the report will display results accordingly.
If you would like to reset your report, you can click on the return arrow icon to reset it.
If you don't see any options featured below on your database sheets, it may be related to the access rights you are granted. If you have any questions about your access rights or not being able to view or generate reports, please contact your SYSAdmin of the database to check for the proper access rights configurations.
In addition to the saved report created by your SYSadmin, you can also generate and view reports. Clicking on the Report button at the upper-right corner on the listing page, select the report type that you would like to generate.
You can find Reports on the right side of your listing page or create report from the tab.
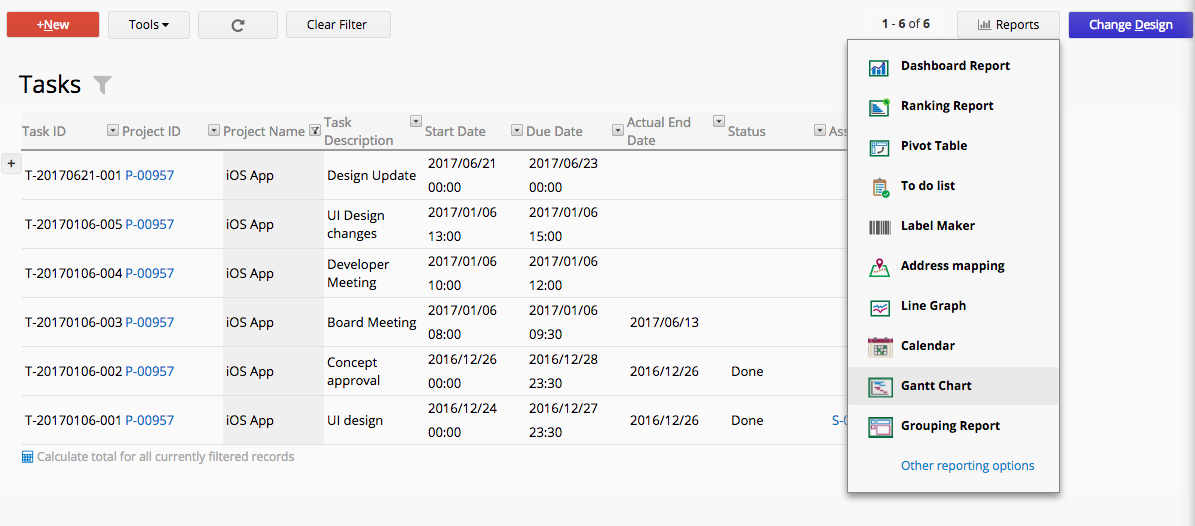
Ragic can analyze your data to generate a gantt chart.
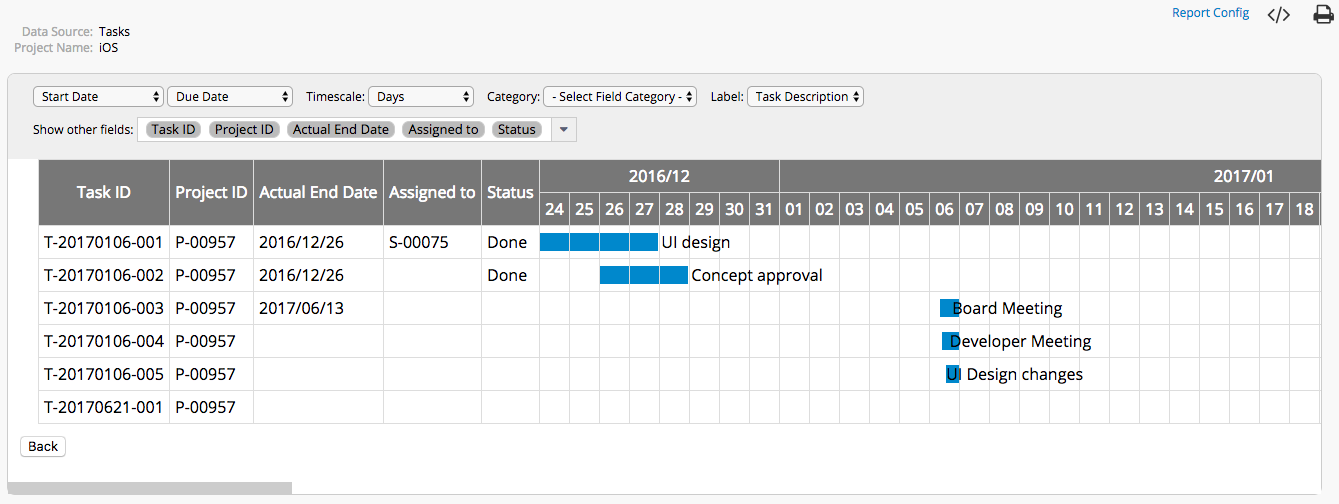
The report is generated based on the selected Start Date field and End Date field.
You can configure the Labels to be shown with the data.
You can also configure the Timescale to determine if your data will be shown by Days, Hours, or Quarter Hours.
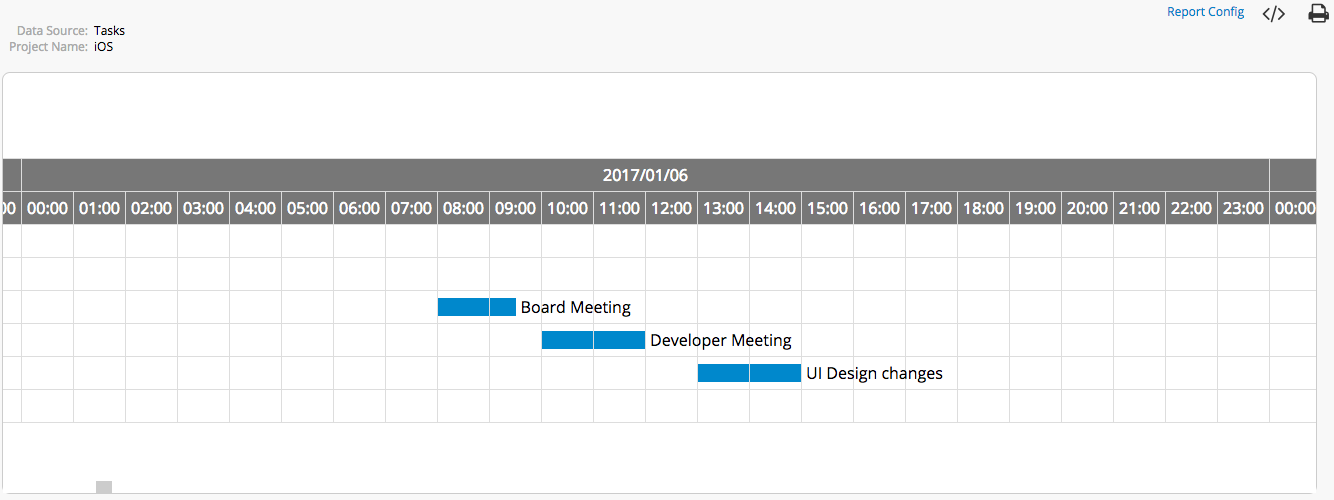
To show the data by each category according to a field, you can select a field as a Category.
To include more information on the Gantt Chart, you can configure Show other fields.
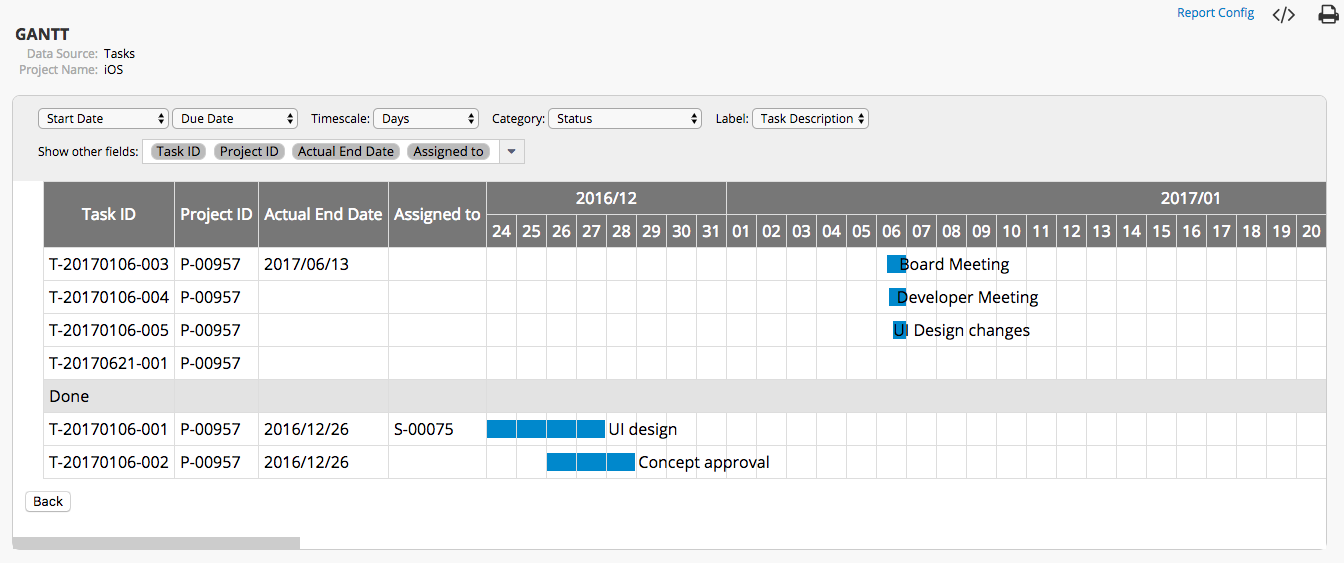
You can also save as a pdf file or print your report by clicking the print icon on the right side.
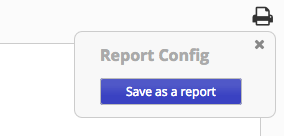
You can find your saved reports under the Reports tab for easy access.
Your report will be generated according to the filter you have applied, but you can also generate reports for a certain shared view to display results within a different filtered criteria.
If a fixed filter view is applied to your sheet, the report will display results accordingly.
If you would like to reset your report, you can click on the return arrow icon to reset it.
If you don't see any options featured below on your database sheets, it may be related to the access rights you are granted. If you have any questions about your access rights or not being able to view or generate reports, please contact your SYSAdmin of the database to check for the proper access rights configurations.
In addition to the saved report created by your SYSadmin, you can also generate and view reports. Clicking on the Report button at the upper-right corner on the listing page, select the report type that you would like to generate.
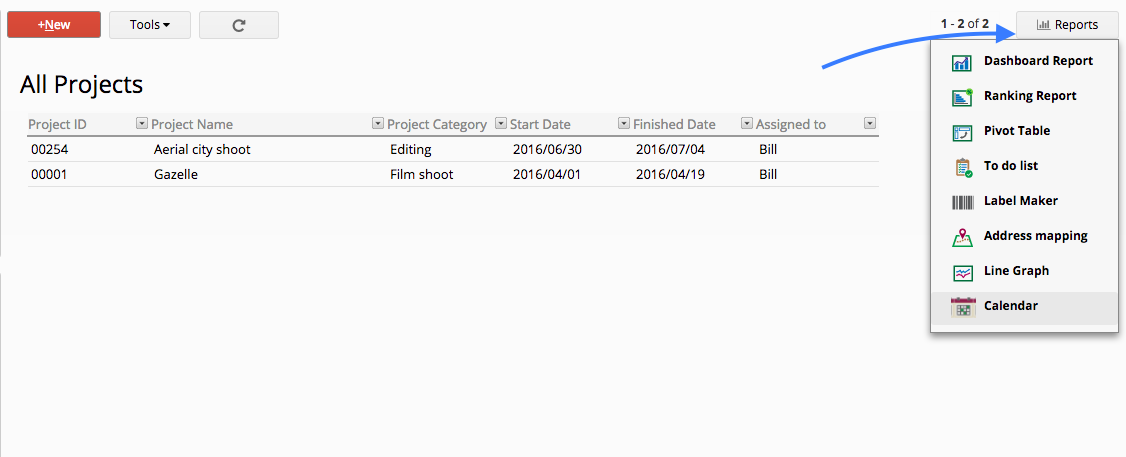
Ragic can analyze your data in a form that has two date fields, to generate a Calendar Report according to the criteria you choose. Configuring a start and end date for certain events or tasks, and determining which field should be used as a title for the label is required.
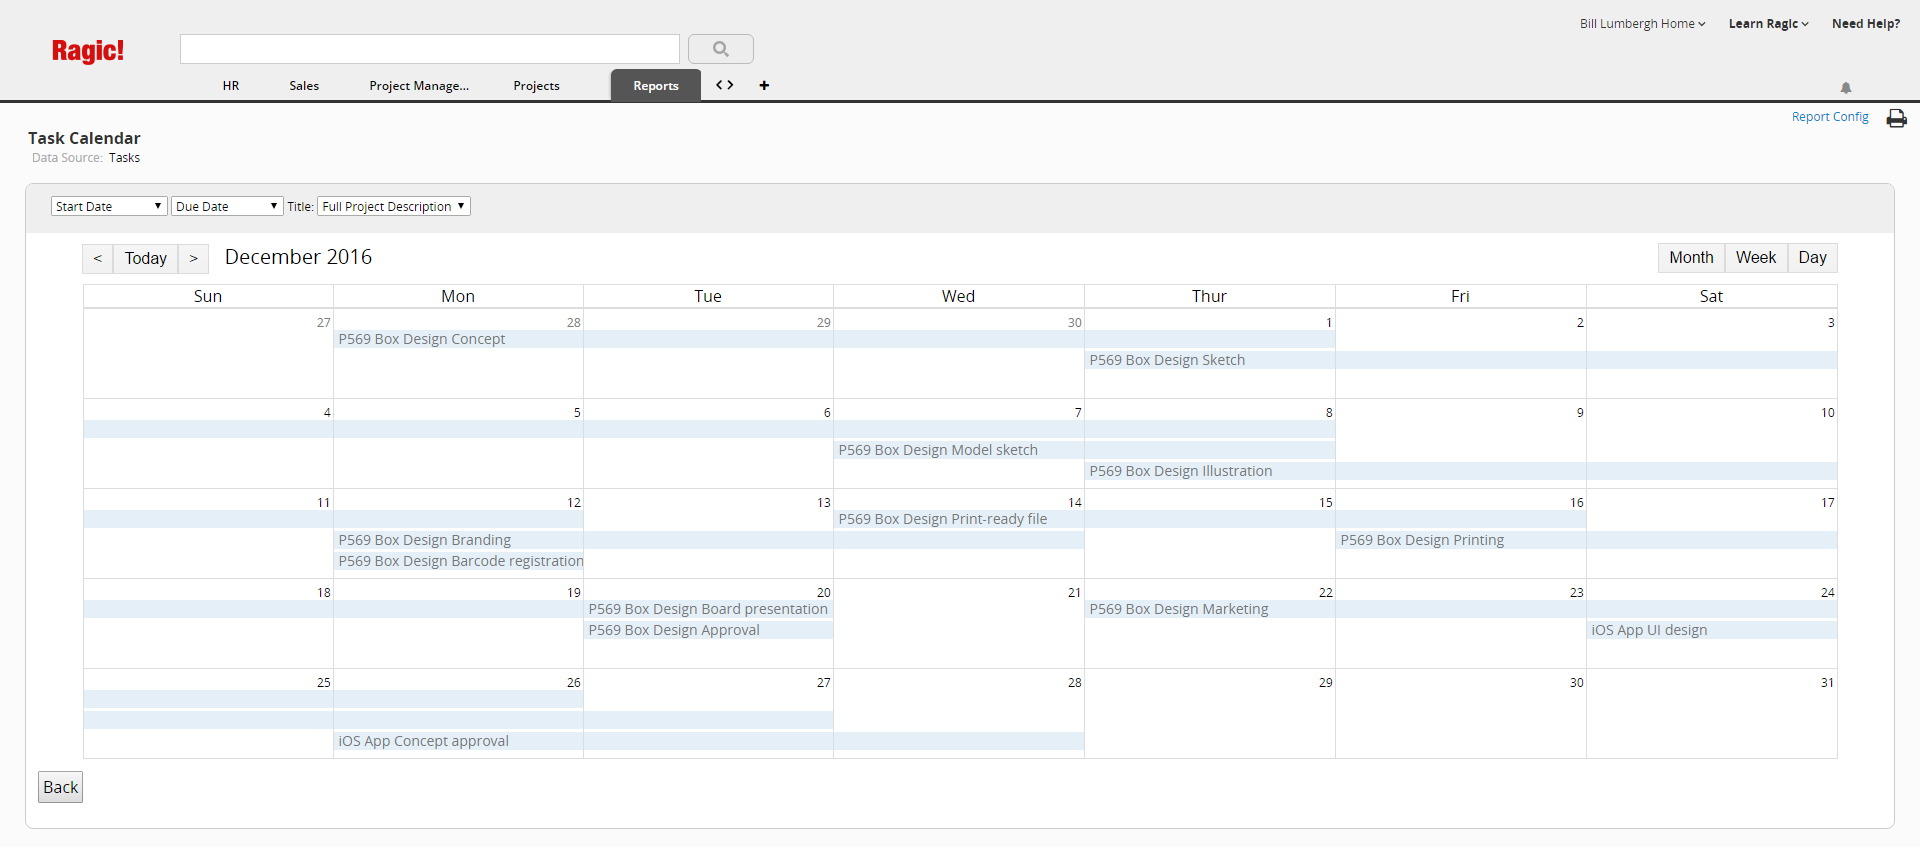
You can view your calendar in a Monthly, Weekly, or Daily view.
It's recommended to use a date format that includes hours for the weekly and daily views.
The monthly view is ideal for tasks that may span a few days.
The weekly view is ideal to view weekly tasks or shifts, taking advantage of the date formatting with hours.
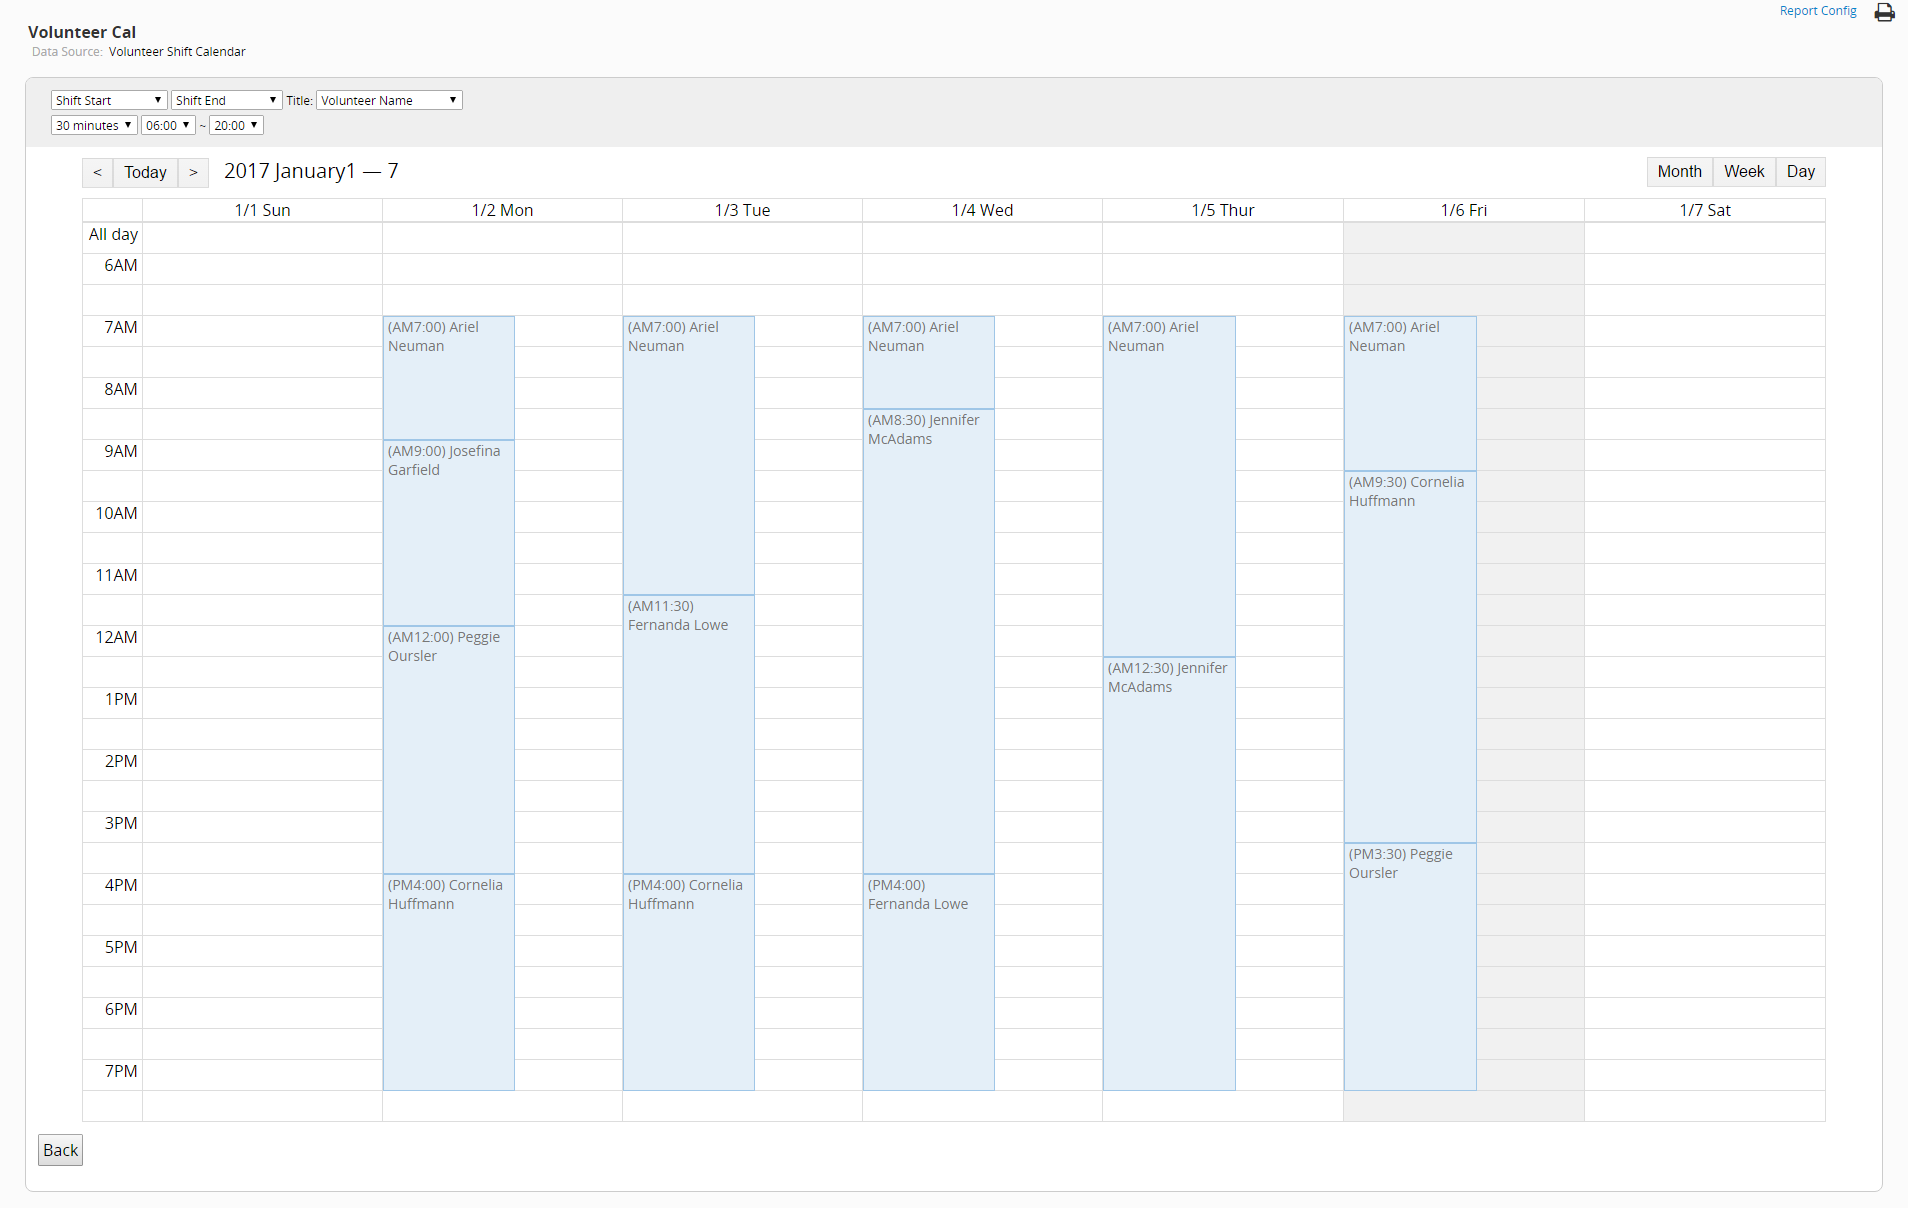
The daily view is ideal to view a quick overview of the days' tasks.
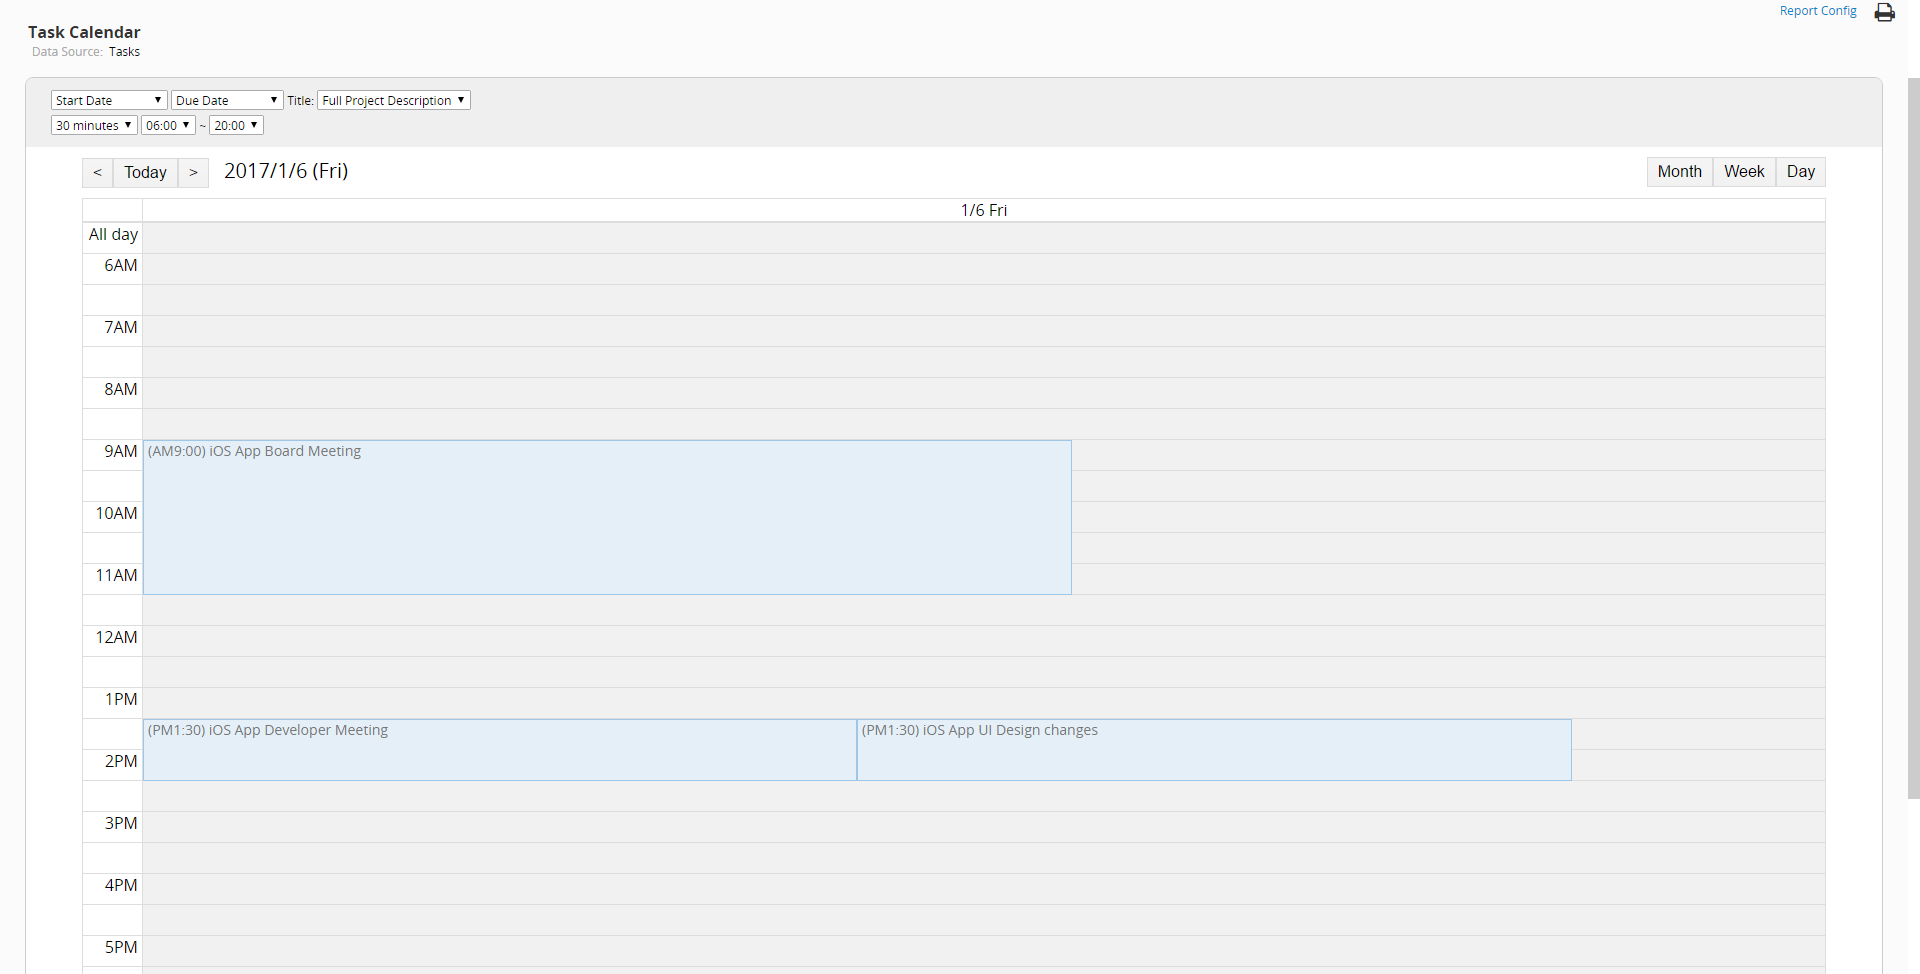
You can also save as a pdf file or print your report by clicking the print icon on the right side.
You can find saved reports that were created by your SYSadmin under the Reports tab for easy access.
Your report will be generated according to the filter you have applied. You can also generate reports for a certain shared view to display results within a different filtered criteria.
If a fixed filter view is applied to your sheet, the report will display results accordingly.
If you would like to reset your report, you can click on the return arrow icon to reset it.
If you don't see any options featured below on your database sheets, it may be related to the access rights you are granted. If you have any questions about your access rights or not being able to view or generate reports, please contact your SYSAdmin of the database to check for the proper access rights configurations.
In addition to the saved report created by your SYSadmin, you can also generate and view reports. Clicking on the Report button at the upper-right corner on the listing page, select the report type that you would like to generate.
If you have an address field in your database sheet, you can generate a report with Ragic to show all records on a map. Just pick a label field and the map will show you where these addresses are.
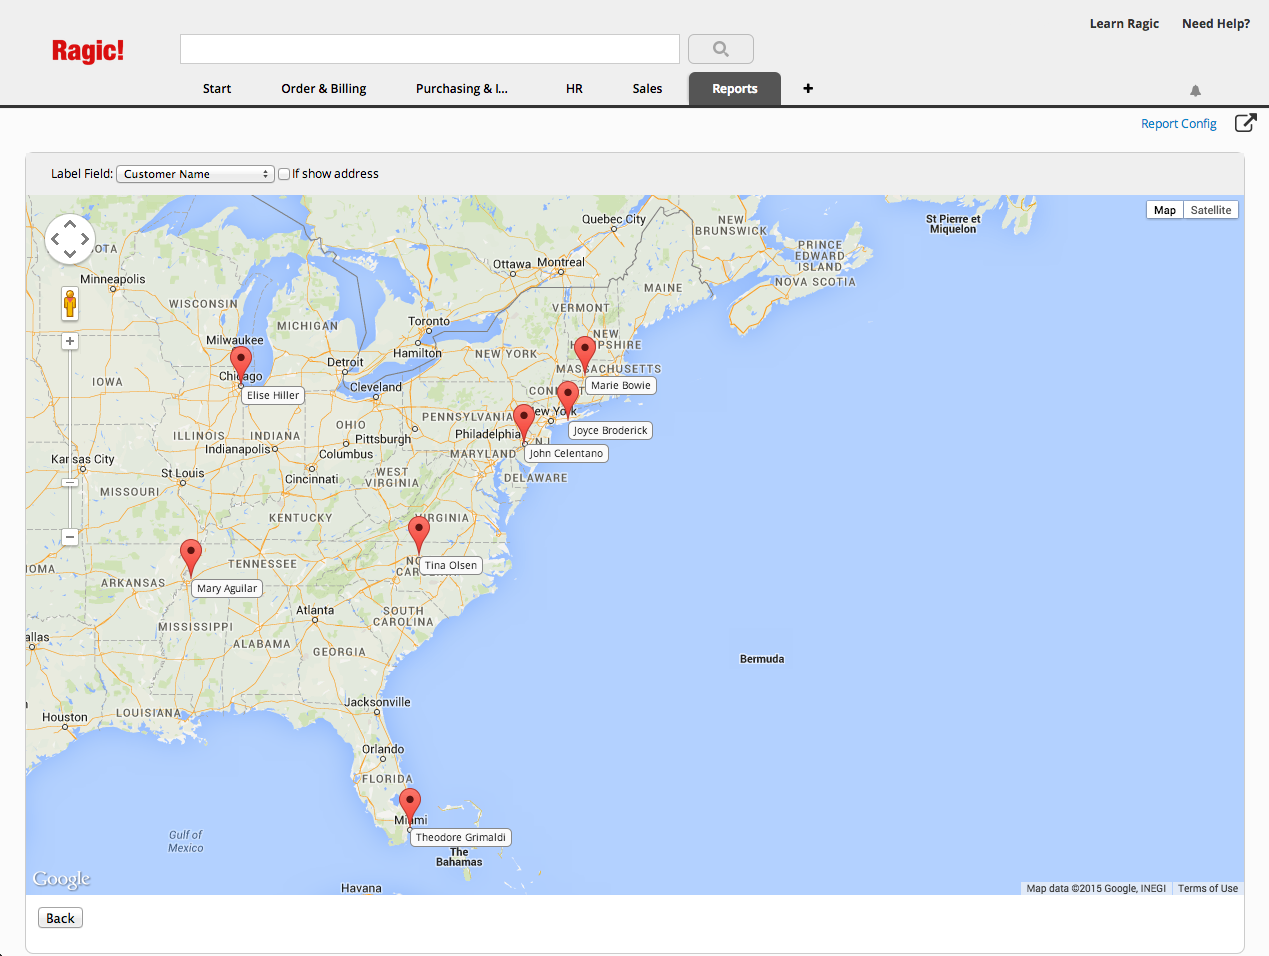
To display the addresses next to the label field, check the box If show address.
You can also save as a pdf file or print your report by clicking the print icon on the right side.
You can find saved reports that were created by your SYSadmin under the Reports tab for easy access.
Your report will be generated according to the filter you have applied. You can also generate reports for a certain shared view to display results within a different filtered criteria.
If a fixed filter view is applied to your sheet, the report will display results accordingly.
If you would like to reset your report, you can click on the return arrow icon to reset it.
If you don't see any options featured below on your database sheets, it may be related to the access rights you are granted. If you have any questions about your access rights or not being able to view or generate reports, please contact your SYSAdmin of the database to check for the proper access rights configurations.
In addition to the saved report created by your SYSadmin, you can also generate and view reports. Clicking on the Report button at the upper-right corner on the listing page, select the report type that you would like to generate.
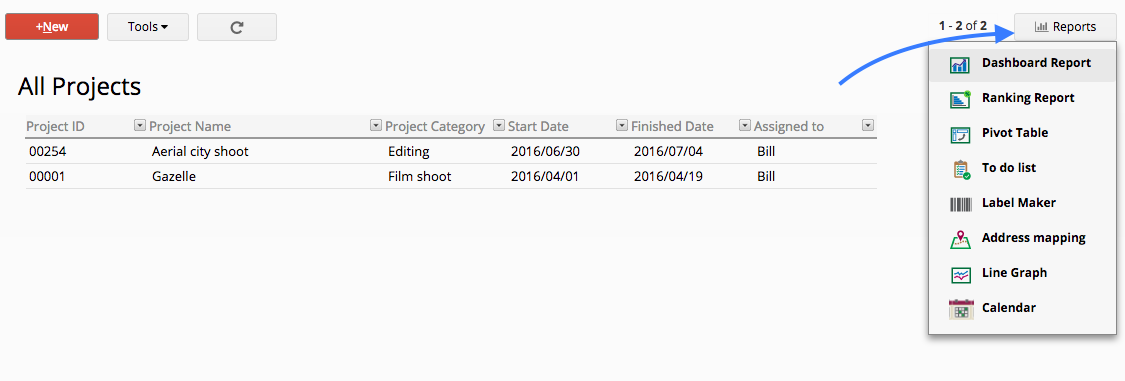
Ragic can analyze your data to generate a quick dashboard.
The Dashboard Report will show you the total and average values for fields containing numbers, as well as a number of comparison charts below.
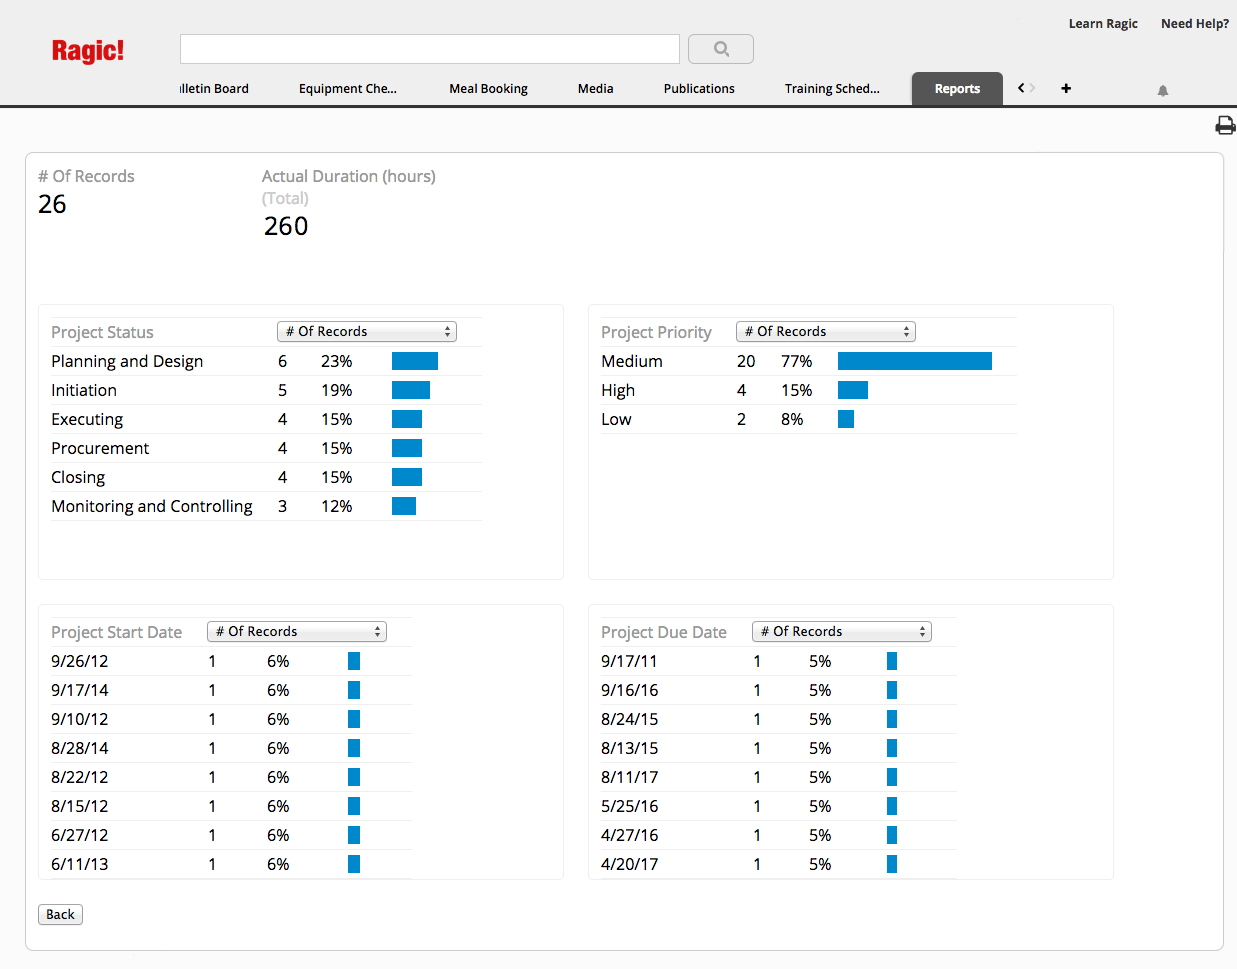
You can change which criteria the bar charts are displayed in (total vs. average) when applicable, by clicking on the drop-down menu displayed next to the headers, which are generated according to your field names.
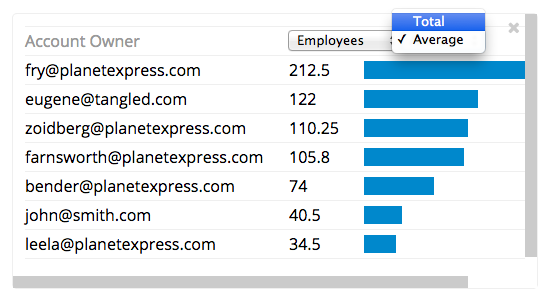
You can also save as a pdf file or print your report by clicking the print icon on the right side.
You can find saved reports that were created by your SYSadmin under the Reports tab for easy access.
Your report will be generated according to the filter you have applied. You can also generate reports for a certain shared view to display results within a different filtered criteria.
If a fixed filter view is applied to your sheet, the report will display results accordingly.
If you would like to reset your report, you can click on the return arrow icon to reset it.

After selecting your reservation time, a window will appear on the right to show your reservation details. In this window, you can type your remarks and click Make a reservation to confirm your reservation.
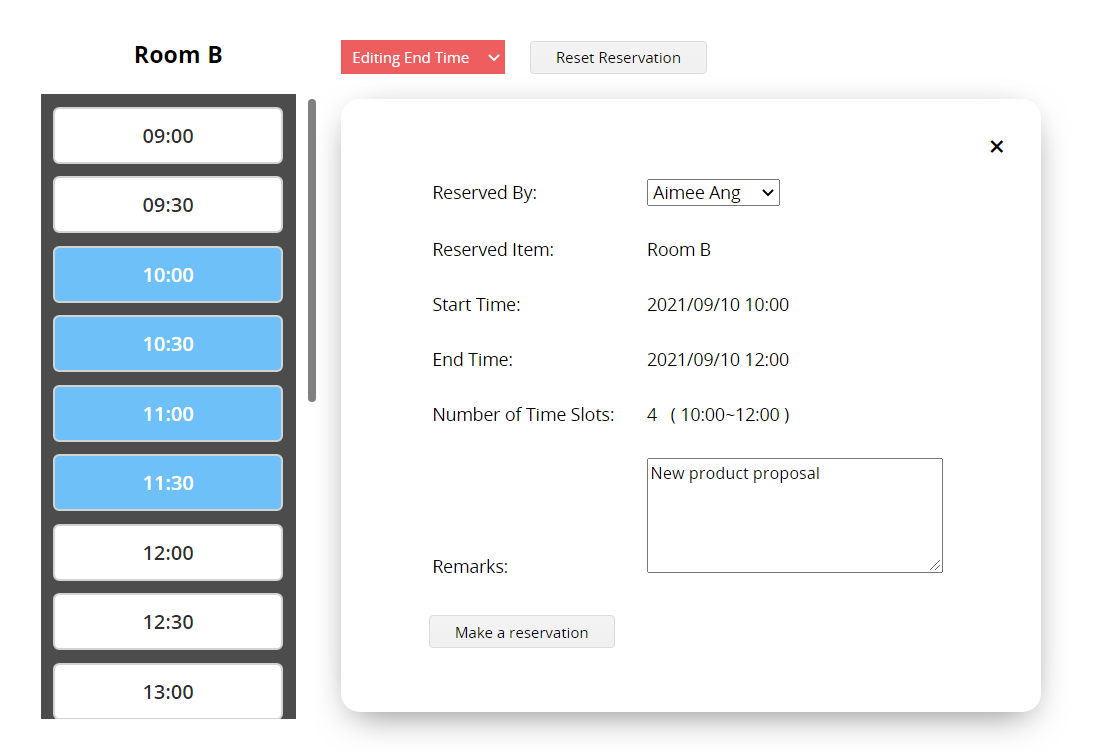
You can come back to the system to edit your saved reservations.
If you don't see any options featured below on your database sheets, it may be related to the access rights you are granted. If you have any questions about your access rights or not being able to view or generate reports, please contact your SYSAdmin of the database to check for the proper access rights configurations.
In addition to the saved report created by your SYSadmin, you can also generate and view reports. Clicking on the Report button at the upper-right corner on the listing page, select the report type that you would like to generate.
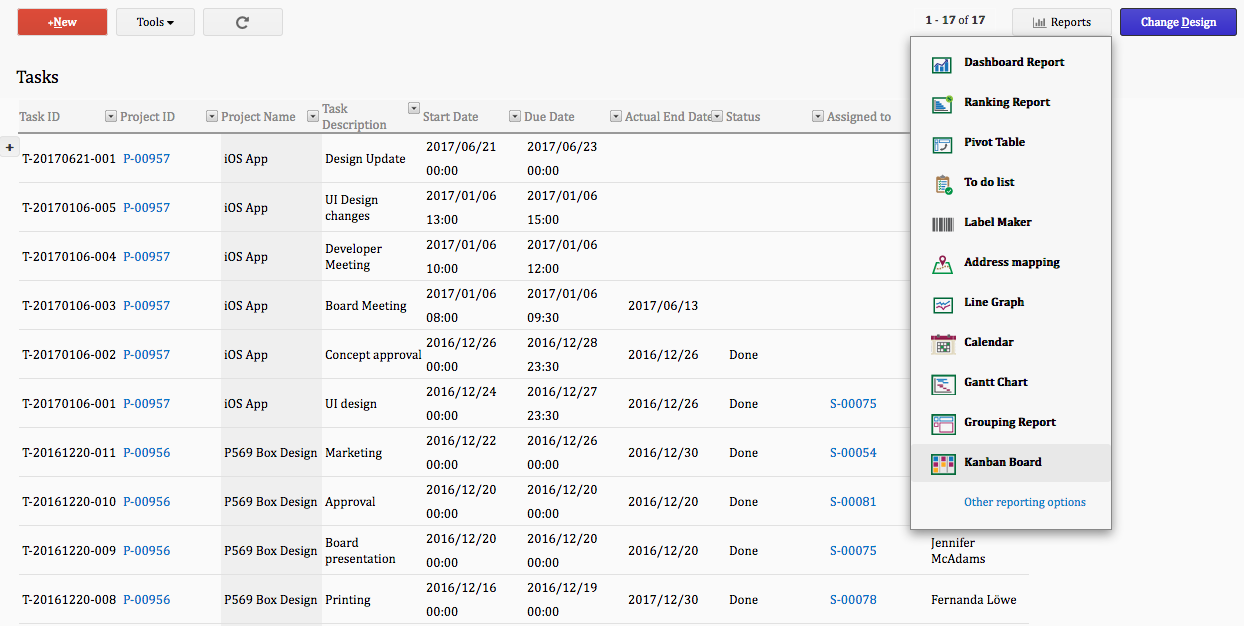
Ragic can analyze your data to generate a Kanban Board.
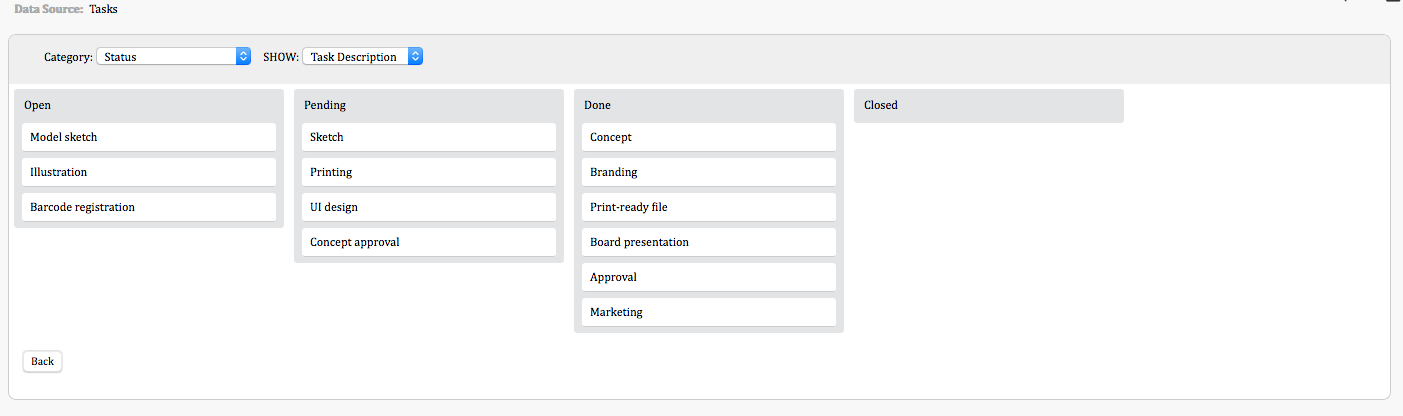
The report will be generated based on the selected Category fields. The selected fields through the SHOW fields option will be displayed in your Kanban Board.
You can also save as a pdf file or print your report by clicking the print icon on the right side.
Within the Kanban Board, you can drag to change the status of entries.
Moving cards to a different category will simultaneously update the field value of the Category fields, which you can later check in the history panel.
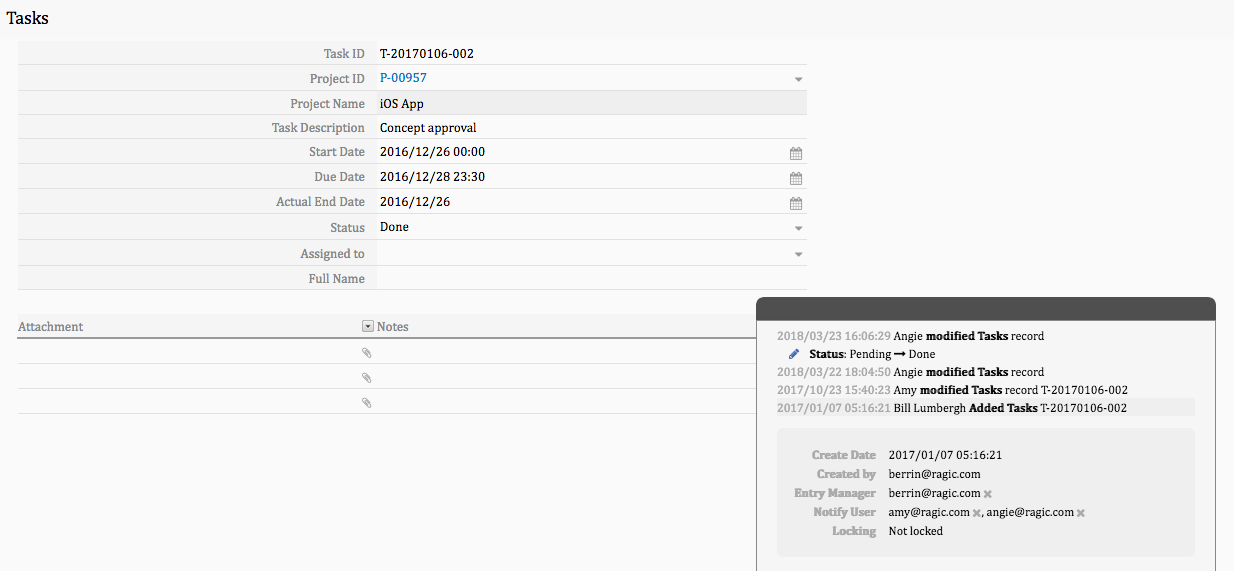
You can find the saved report that are created by your SYSadmin under the Reports tab for easy access.
Your report will be generated according to the filter you have applied, but you can also generate reports for a certain shared view to display results within a different filtered criteria.
If a fixed filter view is applied to your sheet, the report will display results accordingly.
If you would like to reset your report, you can click on the return arrow icon to reset it.
If you don't see any options featured below on your database sheets, it may be related to the access rights you are granted. If you have any questions about your access rights or not being able to view or generate reports, please contact your SYSAdmin of the database to check for the proper access rights configurations.
In addition to the saved report created by your SYSadmin, you can also generate and view reports. Clicking on the Report button at the upper-right corner on the listing page, select the report type that you would like to generate.
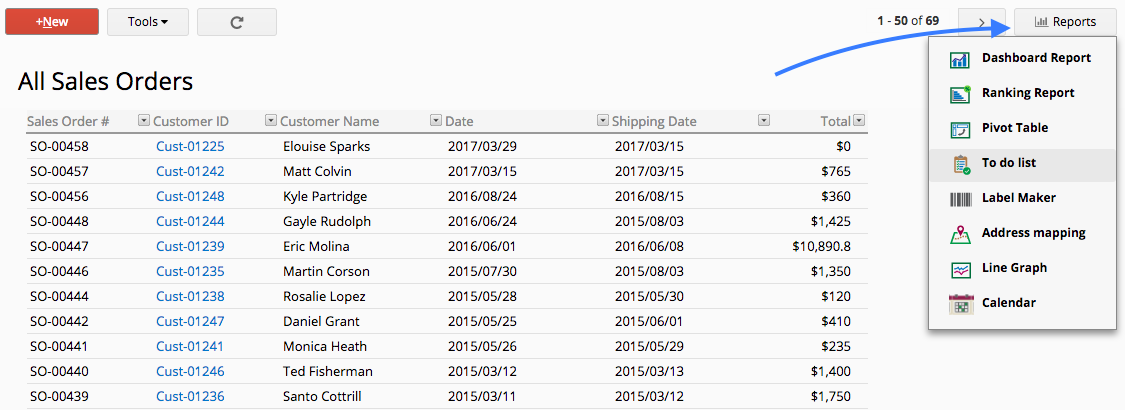
You can create a to-do list with your records in Ragic.
You'll need to have at least one empty date field, in order to record a finished date of a task in your to-do list.
You can check fields off with the checkbox as you complete tasks, the current date will be automatically saved in your empty date field in your database when you do so.
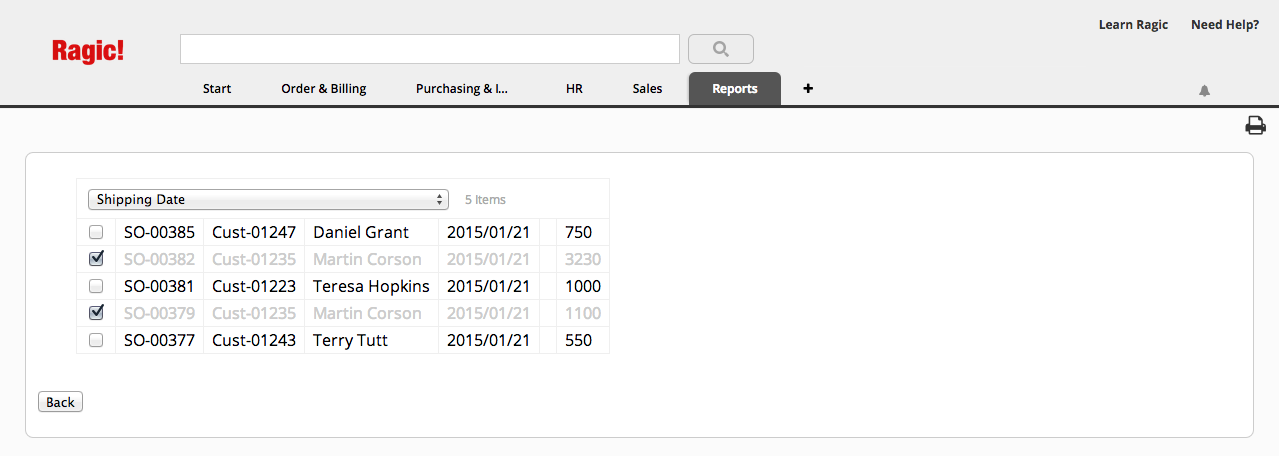
The next time you're in your to-do list, your checked off tasks will not appear.
You can also save as a pdf file or print your report by clicking the print icon on the right side.
You can find saved reports that were created by your SYSadmin under the Reports tab for easy access.
Your report will be generated according to the filter you have applied. You can also generate reports for a certain shared view to display results within a different filtered criteria.
If a fixed filter view is applied to your sheet, the report will display results accordingly.
If you would like to reset your report, you can click on the return arrow icon to reset it.
If you don't see any options featured below on your database sheets, it may be related to the access rights you are granted. If you have any questions about your access rights or not being able to view or generate reports, please contact your SYSAdmin of the database to check for the proper access rights configurations.
In addition to the saved report created by your SYSadmin, you can also generate and view reports. Clicking on the Report button at the upper-right corner on the listing page, select the report type that you would like to generate.
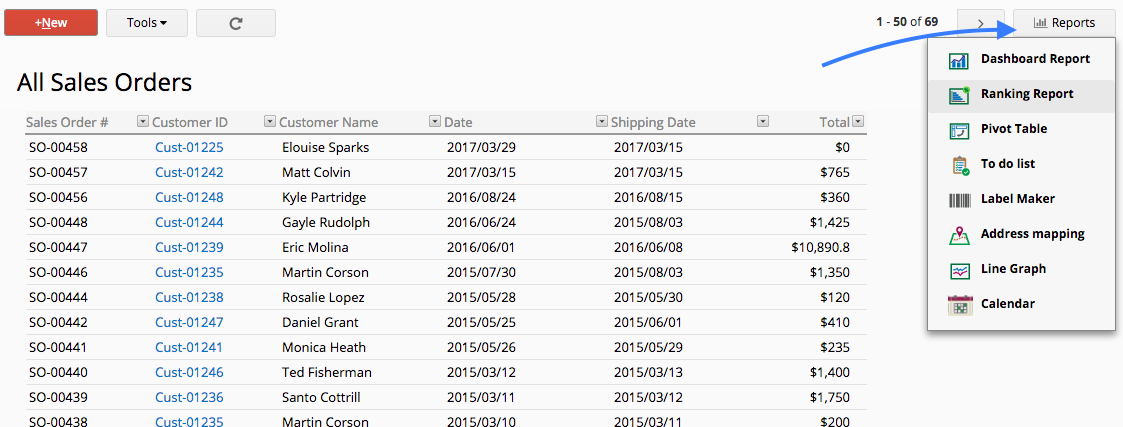
Ragic can analyze your data to generate a ranking report with the numerical fields in your database. Just determine the field and values to sort, and Ragic will automatically calculate the differences in total, and the differences by timeframe, as well as the percentage.
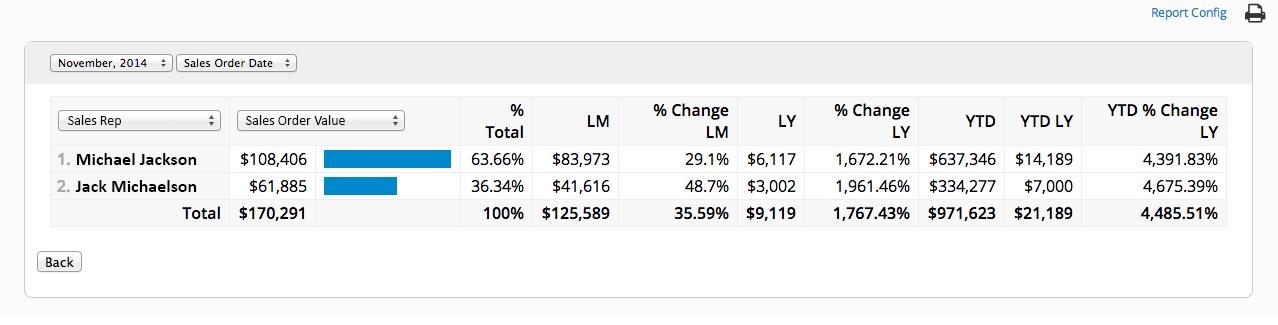
You can click the numeric value or pie chart on the ranking report to see the records used for analyzing the value.
Below is a chart of the configurations you can make on your ranking report.
| Option | Description | Optional? |
|---|---|---|
| Date Range | Pick a month as a date range. You also have the option to choose "All time". | Optional |
| Date Field | Choose a date field in your sheet for Ragic to analyze. | Mandatory |
| Rank Field | Pick a field that Ragic should rank according to values. | Mandatory |
| Value Field | Pick a number field that should be analyzed aggregated by the record's value in the Rank Field. Ragic will show you the total and changes compared with the past time period. | Mandatory |
You can also save as a pdf file or print your report by clicking the print icon on the right side.
You can find saved reports that were created by your SYSadmin under the Reports tab for easy access.
Your report will be generated according to the filter you have applied. You can also generate reports for a certain shared view to display results within a different filtered criteria.
If a fixed filter view is applied to your sheet, the report will display results accordingly.
If you would like to reset your report, you can click on the return arrow icon to reset it.
If you don't see any options featured below on your database sheets, it may be related to the access rights you are granted. If you have any questions about your access rights or not being able to view or generate reports, please contact your SYSAdmin of the database to check for the proper access rights configurations.
In addition to the saved report created by your SYSadmin, you can also generate and view reports. Clicking on the Report button at the upper-right corner on the listing page, select the report type that you would like to generate.
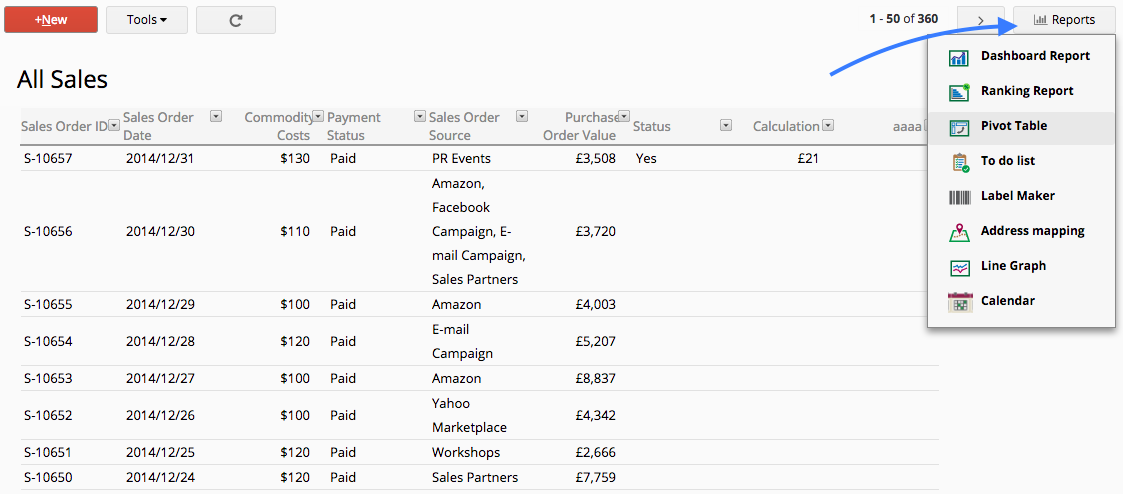
Ragic can analyze your data to generate a pivot table with the numeric fields in your database according to the criteria you choose. You can change the column field and row field to create the report you need, and Ragic will automatically calculate the total values according to your settings.
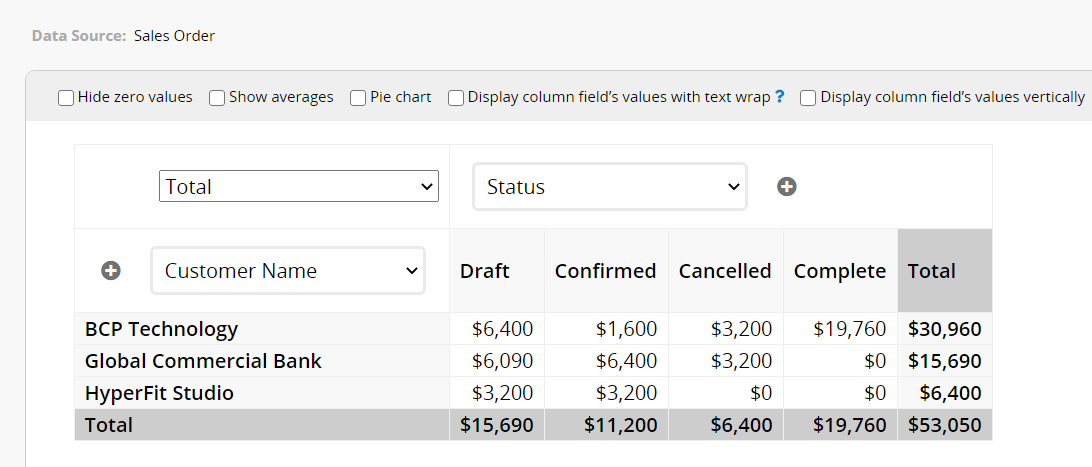
You can click the numeric value on the pivot table to see the records used for analyzing the value.
You can also analyze multiple row or column fields.

Below is a chart of the configurations you can make on your pivot table report.
| Option | Description | Optional? |
|---|---|---|
| Value Field | Pick a numeric field that Ragic should analyze according to the column and row labels. | Mandatory |
| Row Labels | Pick a field that Ragic should display numeric values for. | Mandatory |
| Column Labels | Pick a field that Ragic should display numeric values for. | Mandatory |
You can also save as a pdf file or print your report by clicking the print icon on the right side.
You can find saved reports that were created by your SYSadmin under the Reports tab for easy access.
Your report will be generated according to the filter you have applied. You can also generate reports for a certain shared view to display results within a different filtered criteria.
If a fixed filter view is applied to your sheet, the report will display results accordingly.
If you would like to reset your report, you can click on the return arrow icon to reset it.
If you don't see any options featured below on your database sheets, it may be related to the access rights you are granted. If you have any questions about your access rights or not being able to view or generate reports, please contact your SYSAdmin of the database to check for the proper access rights configurations.
In addition to the saved report created by your SYSadmin, you can also generate and view reports. Clicking on the Report button at the upper-right corner on the listing page, select the report type that you would like to generate.
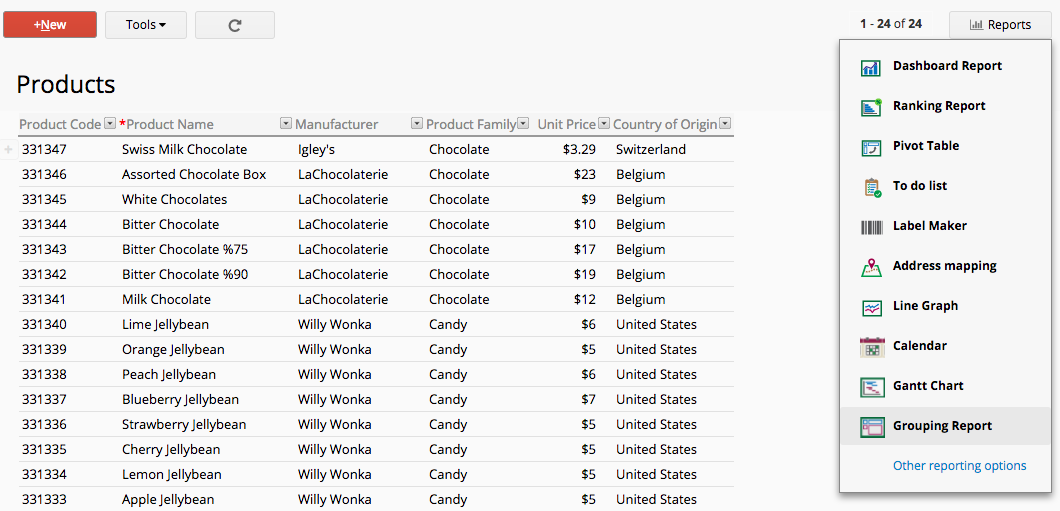
Ragic can analyze your data to generate a grouping report.
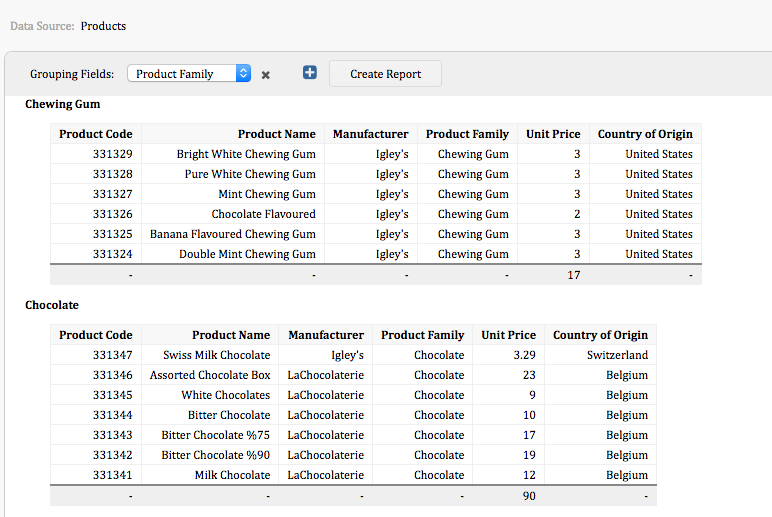
The report will be generated based on the selected Grouping fields. You can click on the plus icon to add more than one field. Note that the sequence of your grouping fields will effect the grouping result.
You can also save as a pdf file or print your report by clicking the print icon on the right side.
You can find the saved report that are created by your SYSadmin under the Reports tab for easy access.
Your report will be generated according to the filter you have applied, but you can also generate reports for a certain shared view to display results within a different filtered criteria.
If a fixed filter view is applied to your sheet, the report will display results accordingly.
If you would like to reset your report, you can click on the return arrow icon to reset it.
If you don't see any options featured below on your database sheets, it may be related to the access rights you are granted. If you have any questions about your access rights or not being able to view or generate reports, please contact your SYSAdmin of the database to check for the proper access rights configurations.
In addition to the saved report created by your SYSadmin, you can also generate and view reports. Clicking on the Report button at the upper-right corner on the listing page, select the report type that you would like to generate.
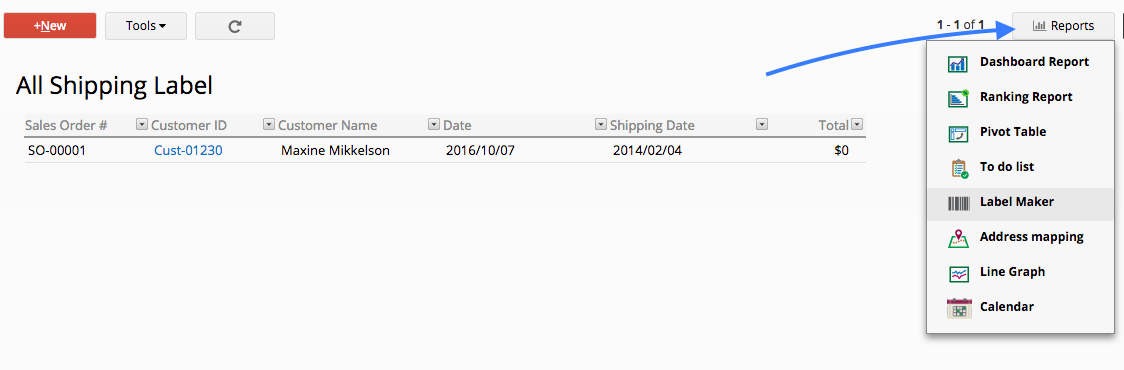
You can generate simple labels for the specified fields in all entries in your sheet with the label maker.
You can change the label style such as the font size, label width, height and whether or not you'd like to display the field name.
Note: If you find that the value is not displayed completely, please check if you have set the correct height or width.
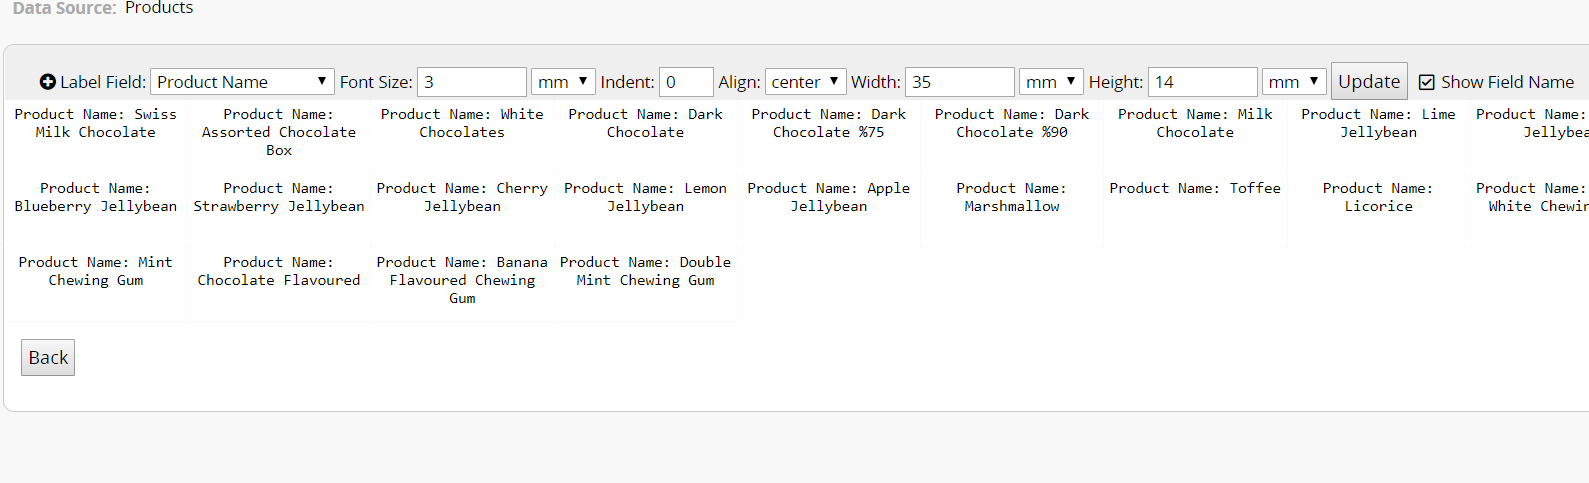
You may design your label to include data from more than one field. Click on the + button to add more fields. The example below includes information from both the "Product Name" and "Barcode" fields.
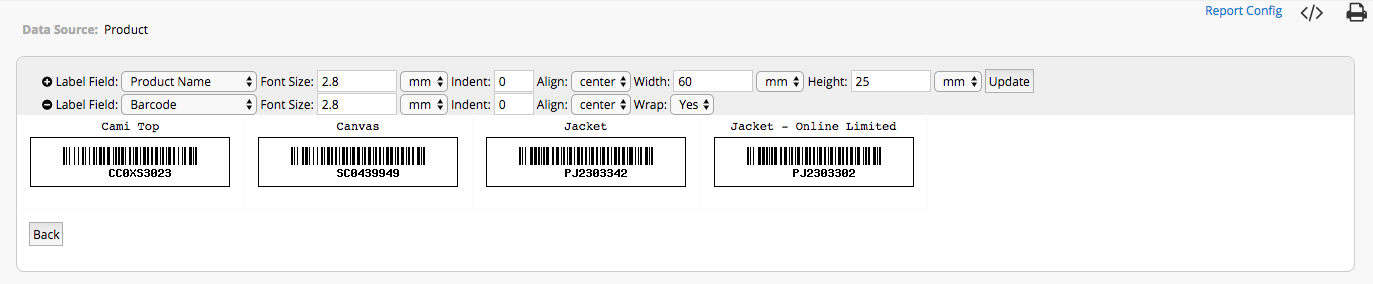
These labels can easily be printed through the printer icon on the top-right corner.
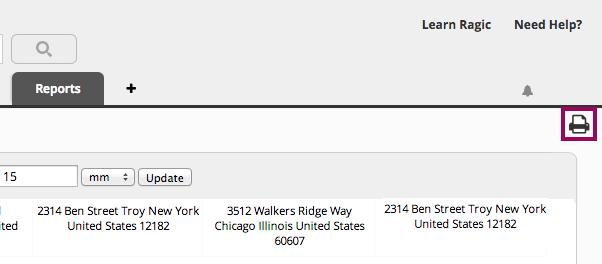
Below is a chart of the configurations you can make on your label maker report.
| Option | Description | Optional? |
|---|---|---|
| Label Field | Pick a field on your Ragic sheet so that Ragic can display the values in this field as a label. | Mandatory |
| Font Size | Enter the desired font size for your label content. | Optional |
| Indent | Enter the desired label indent. | Optional |
| Align | Enter the desired label alignment. | Optional |
| Width | Enter the desired label width. | Optional |
| Height | Enter the desired label height. | Optional |
| Wrap | Choose to wrap text or not for a selection of multiple fields. | Optional |
You can also save as a pdf file or print your report by clicking the print icon on the right side.
You can find saved reports that were created by your SYSadmin under the Reports tab for easy access.
Your report will be generated according to the filter you have applied. You can also generate reports for a certain shared view to display results within a different filtered criteria.
If a fixed filter view is applied to your sheet, the report will display results accordingly.
If you would like to reset your report, you can click on the return arrow icon to reset it.
In the report, users will be able to manage entries that need his or her approval, and also entries that have approvals related to him or her.
In the Proceed with approval as: located in the upper area, you can select which user account he or she would like to proceed with the approval with. The default identity will be your user’s account, but you can also select other accounts that you are deputy to proceed with the approval.
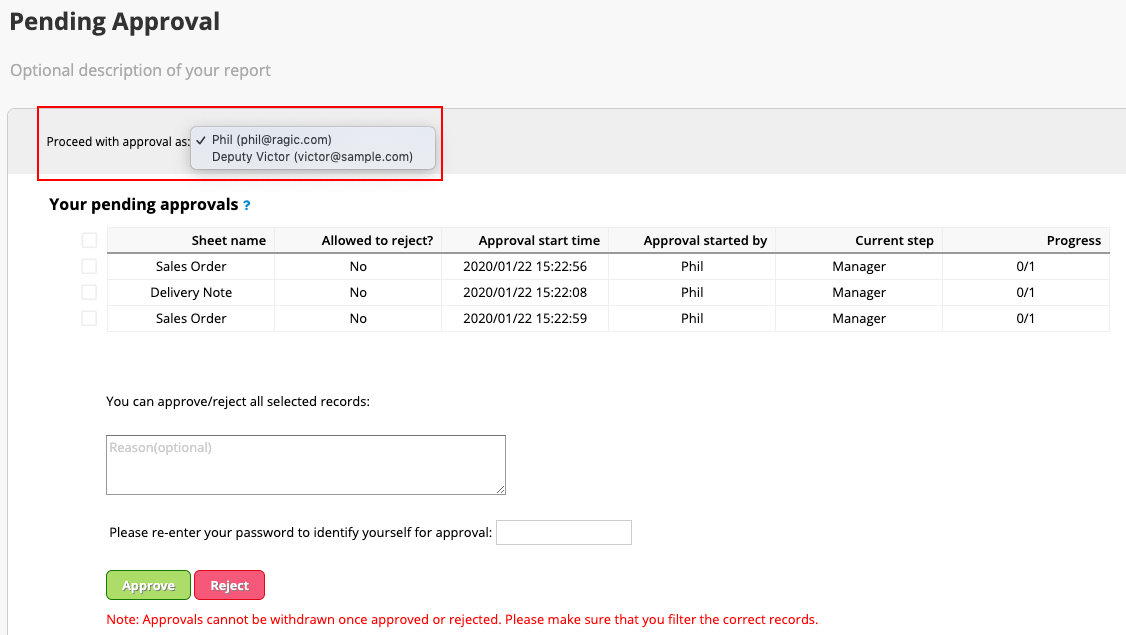
Notice: The report will only display latest 90 days and up to 100 records to achieve the best system performance.
You will see all the entries that need to be approved, and you can select entries that you want to approve using the checkboxes. Before approving, you can click an entry to see its details with the fly-in.
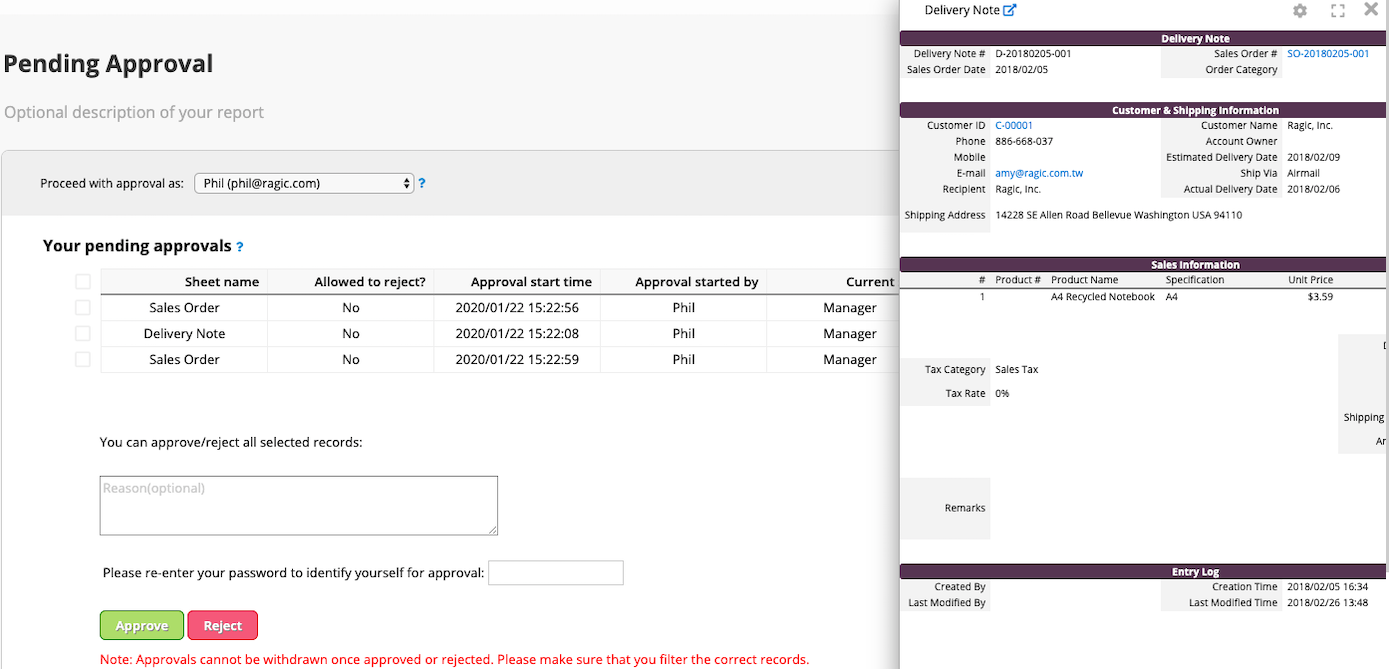
Please note that the value on the "Current Step" field is the approver's title or the name of that approval step. And in the "Progress" field, it will also show many people have approved on the right side and how many people in total should approve an entry. Below the entries, users need to re-submit the password before they proceed and also have the option to fill in the reason. Entries will no longer show in this report after being approved.
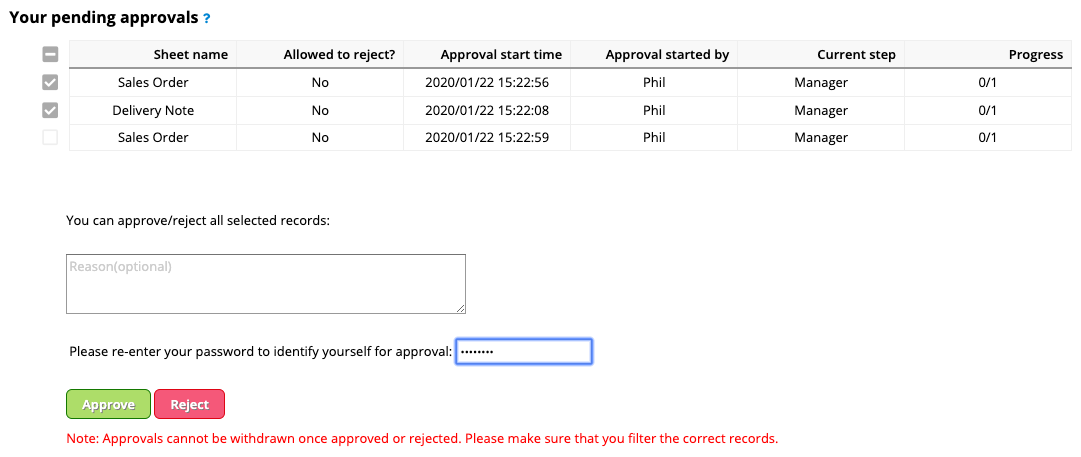
You will see two kinds of entries in this section:
1. Entries with approvals that are started by you.
2. Entries that will need your approval, but is currently at previous steps.
If the approval flow has stopped for a while, you can find out which step it is currently at in the “Current Step” field and remind the approver(s) of that step.

You also will be able to click on an entry to see its details in the fly-in tab from the right side here.
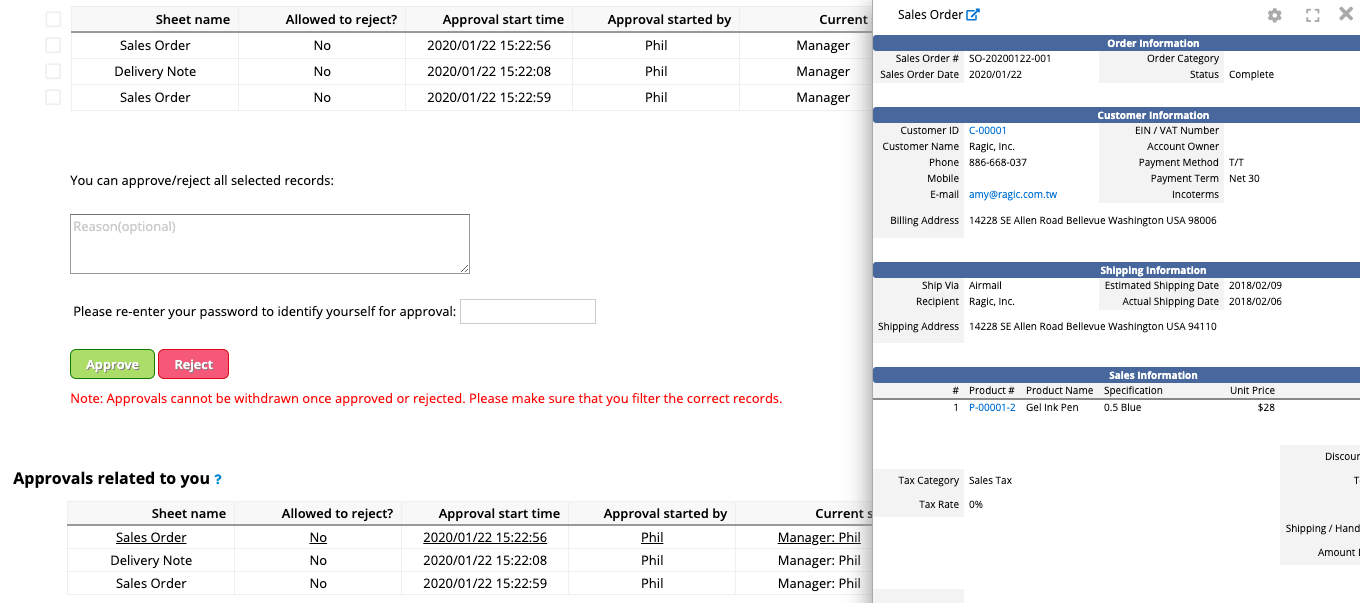
You can check all approved records in this tab.